Chapter 6
Getting Even More Out of Meetings & Chat
IN THIS CHAPTER
![]() Creating IM groups
Creating IM groups
![]() Creating and using Zoom channels
Creating and using Zoom channels
![]() Refining your Zoom notifications
Refining your Zoom notifications
![]() Running reports in Zoom
Running reports in Zoom
Whoa! I didn’t know that you could do that.
Has someone ever uttered that sentence to you after you performed a task on your phone, in a software application, or with a programming language? If not, then have you ever said the same thing to someone under those circumstances?
Plenty of people are downright oblivious of many technologies’ useful and time-saving features — sometimes for years. Don’t take my word for it, though.
Presenting his research at a tech conference in 2002, Jim Johnson — the founder and chairman of The Standish Group — confirmed what many industry types have long suspected: In a typical software program or system, the majority of users ignore nearly two-thirds of its available features. Put differently, most folks usually know just enough to get by. When we spoke in May 2020, Johnson relayed that his firm’s subsequent studies have confirmed that not much has changed since then.
Generally speaking, power users understand that using the basics of any application gets them only so far — and that same adage certainly applies to Meetings & Chat. If you use it only to make video calls, then you’re missing out on oodles of its useful and timesaving features.
Are you willing to open your mind? If so, then you’ll find that you can do so much more, especially if your organization subscribes to a premium Zoom plan. Along these lines, this chapter describes some of the valuable but lesser used features in Meetings & Chat: IM groups, channels, snippets, reporting, and more.
Managing Users via IM Groups
As I cover in Chapter 3, account owners and admins can enable or disable certain settings — ones that affect all users in an organization’s Zoom account. That is, they can make global decisions that regular Zoom members cannot override. People in administrative roles can also perform tasks that their non-administrative brethren cannot.
In that chapter, I cover creating user accounts, roles, user groups, and more. To be sure, customers on Meetings & Chat premium accounts get quite a bit of mileage out of these features. Far too often, however, they fail to take advantage of one particularly useful piece of Zoom functionality.
Understanding the need for IM groups
Lucy manages Marillion, a five-member progressive rock band based in England. She uses Meetings & Chat to coordinate events, conduct band meetings, and generally stay in touch with all of its members. In this simple scenario, it’s unlikely that her directory will become unwieldly.
Now, assume that you work for a global conglomerate that consists of 6,000 employees distributed across the globe. Employees can use Meetings & Chat to manage their internal communications, but it’s not hard to imagine logistical difficulties associated with such a large workforce.
To this end, IM groups fulfill a key need. (IM here stands for Instant Message.) This administrative tool allows owners and admins to corral users into specific buckets. (That is, a regular Zoom member cannot create IM groups for herself.)
Think of IM groups as different subdirectories. They allow individual members to easily find and connect with specific peers in their organization and discuss relevant topics. Even better, you can place the same member in your Zoom account into multiple IM groups. For example, a company hires Grace as its new head of northeastern sales. Its Zoom admin places her into two IM groups: one for new hires and one for sales.
 Like user groups, Zoom restricts IM groups to customers on premium plans.
 If you create IM groups, then you should encourage employees to use them.
Examples of IM groups run the gamut. A large retailer decides to create IM groups for its sales, accounting, and HR departments. A restaurant chain uses separate IM groups for its store and district managers. School districts create them for different types of teachers across districts — as well as a massive IM group for all teachers in all districts.
Zoom gives account owners and admins the ability to create three types of IM groups:
- Shared: All Zoom members can search for the group and view it.
- Private: Only existing IM group members can view the IM group. Members who don’t belong to this group can search for users who are in the group. (In its online help text, Zoom sometimes refers to private groups as normal groups.)
- Restricted: Only group members can view the group and find the members in it.
Depending on the type of IM group(s) that you create, Zoom users in your organization may or may not be able to view all of them.
Note that IM groups are different than user groups, discussed in Chapter 3.
Adding a new IM group
To add a new IM group, just follow these steps:
- In the Zoom web portal, under the Admin header, click on Account Management.
- Click on IM Management.
- Click on the blue + Add IM Group button on the right-hand side of the screen.
-
Under Group Name, enter a name for the new IM group.
In this case, I am calling it Internal.
- Select whether it’s a shared, private, or restricted group.
- Click on the blue Save button.
Adding users to IM groups
Of course, adding an IM group makes little sense unless you populate it with Zoom members. To place existing Zoom users into an existing IM group, follow these steps:
- In the Zoom web portal, under the Admin header, click on Account Management.
- Click on IM Management.
-
Under Group Name, select the name of the existing IM group to which you want to add members.
For this example, I selected Internal.
- Click on the blue + Add Members button on the right-hand side of the screen.
-
Enter at least three letters of an individual’s email address.
Note that a person’s email address may not contain any of the same letters as his name.
-
After Zoom recognizes your text string, select that person’s name from the drop-down list.
Repeat this step as often as you like for new members.
- Click on the blue Add button.
Figure 6-1 displays my new IM group Internal, along with its two members.
IM groups appear in the Contacts section of users’ Zoom desktop clients.

FIGURE 6-1: New Zoom IM group with members.
Exploring Additional Options and Features in Meetings & Chat
You may not like how owners and admins have locked down certain Zoom features or required others. Feel free to disagree with them or, if you’re feeling particularly bold, politely discuss your bone of contention.
Make no mistake, though: Regular Zoom members can still do plenty to customize their experience.
Understanding Zoom Channels
Say that your local high school employs 200 teachers. Some teach math, while others cover history, English, science, and physical education. The math teachers would like to discuss math-related issues with their colleagues. They frequently share numbers-oriented techniques and exercises with each other — plus the occasional horror story about helicopter parents and students who can’t do simple addition. In this scenario, the district’s nonmath teachers don’t care too much about algebra and trigonometry.
All teachers do, however, need to know about district-wide announcements, faculty meetings, and safety issues. Sure, the school superintendent could blast out all-employee emails, but that one-size-fits-all solution isn’t terribly elegant. What’s more, hitting the Reply All button is bound to cause chaos. At a minimum, users will receive plenty of irrelevant emails and subsequent responses.
What if there were a way to create specialized containers of conversations? And what if teachers could join only the ones that interest them? While I’m at it, what if newly hired teachers could search for — and view —prior conversations and digest them at their own pace?
If you followed my logic, then you now understand the general idea behind channels. They allow users connected in Zoom to discuss specific subjects with one another — whether they are in the same organization or not. Channels let people engage in targeted group discussions and send files and images. Channel-mates can also start instant group meetings with or without video.
In short, channels are incredibly useful. If you’re not using them, then you are missing out.
Zoom offers users the ability to create their own channels, functionality that tools such as Slack and Microsoft Teams have also embraced.
As of this writing, Zoom users can start two types of channels:
- Public: Anyone in the organization can join these channels.
- Private: To join this type of channel, an existing member needs to invite you.
Private channels for customers on premium plans can consist of a maximum of 5,000 members. On its Basic plan, Zoom restricts private channels to 500 members. Zoom public channels can accommodate up to a downright bawdy 10,000 members.
On their surface, channels resemble IM groups, discussed in the section “Managing Users via IM Groups” earlier in this chapter. There’s a subtle but important difference between the two features, though: Regular Zoom members can create channels on their own. That is, they don’t need to solicit prior owner or admin approval. As such, channels tend to be smaller and more topic-specific than broad IM groups.
Why channels tend to beat group chats
Astute readers may be furrowing their brows at this point. Don’t Zoom channels overlap to some extent with group chats? (Chapter 5 discusses the latter topic.) The answer is yes. For several reasons, though, channels generally represent a better way of holding group discussions.
First, Meetings & Chat users can freely discover public channels on their own. Put differently, public channels are more open and democratic than private group chats. By default, Zoom lets members discover and join public channels for themselves. That is, they don’t need to receive formal invitations. (For obvious reasons, private channels are a different story.)
Second and just as important, channels are more permanent than group chats. For example, say that Arthur, Michael, and Barry are all attorneys at the New York law firm Kenner, Back and Ledeen. (Yes, these characters are from the excellent flick Michael Clayton.) The three lawyers discuss a complicated legal matter in a Zoom group chat. Six months later, all leave the firm. Their discussions technically still exist, but Zoom’s privacy settings will prevent others from accessing them. (Chapter 9 goes much deeper into this subject.) Had they created and used a public channel, then others could easily join it and view their previous conversations.
Channels also overlap to some extent with IM groups, discussed in the “Managing Users via IM Groups” section earlier in this chapter. There’s one key difference, though: IM groups are administrative or top-down tools. For their part, Zoom users drive channels. As such, they are bottom-up tools.
Creating a new channel
To create a Zoom channel, abide by these steps:
- Launch the Zoom desktop client.
- At the top of the screen, click on Contacts.
- In the sidebar, click on Channels.
- Click on the plus icon to the immediate right of the word Channels.
-
From the menu that appears, choose Create a Channel.
Zoom displays the Create a Channel window.
- Enter the name of your new channel in the Channel Name text box.
- (Optional) Invite members to your new channel by entering parts of their names.
- (Optional) Restrict the channel to just members on your organization’s Zoom plan.
- Select whether you want to create a private or public channel by clicking on the checkbox to the left of each option.
-
Click on the blue Create Channel button.
Your channel is created.
After you create a public channel, Zoom places the word Public in parentheses to its immediate right in the sidebar. Meetings & Chat makes no such annotation for private channels.
Zoom places a people icon to the left of the channel in the sidebar.
Browsing and joining existing public channels
If you’re new to an organization, you’re going to want to stay informed. To this end, it’s best to explore public channels and join those that interest you.
To join an existing public channel, follow these steps:
- Launch the Zoom desktop client.
- At the top of the screen, click on the Contacts icon.
- In the sidebar, click on Channels.
- Click on the plus icon to the immediate right of the word Channels.
-
From the menu that appears, click on Join a Channel.
Zoom displays the Join a Channel window, allowing you to view all public channels.
- (Optional) In the search bar, type a few letters of the name of the public channel that you want to join and press the Enter key.
- Underneath the search bar, identify the name of the public channel that you want to join and click on it.
-
Click on the blue Join button to the right of the name of the public channel.
Zoom takes you back to the desktop app’s Chat window.
Viewing information about specific channels
For each channel, Zoom makes it easy to get a lay of the land. That is, with a few clicks, you can view important information about each channel, what members have already shared in it, and more.
Just follow these directions:
- Launch the Zoom desktop client.
- At the top of the screen, click on Chat.
-
In the sidebar, click on a channel to which you already belong.
Zoom highlights it in blue.
-
Underneath your profile picture in the upper right-hand corner, click on the circled i icon.
Zoom displays Figure 6-2 — a new pane with a number of items, each of which displays a right-arrow to its right.

FIGURE 6-2: Zoom information on
#Announcementschannel. - Click on the menu items to perform the action you’d like:
- Channel Info: Add a description to the channel.
- Members: View the channel’s current members.
- Images: View the images (if any) that members of the channel have shared.
- Files: View the files (if any) that members of the channel have shared.
- Starred Messages: View the messages in the channel (if any) that members of the channel have starred.
- Notifications: Customize your channel notifications. (See the section “Setting keyword-specific notifications,” later in this chapter, for more information on this topic.)
- More Options: Perform additional channel actions, all of which I cover in this chapter.
Starring a channel
Say that you spend a great deal of time in the #TechTips channel and want it to appear at the top of your channel list in the sidebar. To indicate that a particular channel is a favorite, follow these steps:
- Launch the Zoom desktop client.
- At the top of the screen, click on Chat.
-
In the sidebar, click on the channel.
Zoom highlights it in blue and displays a drop-down arrow.
-
Click on the drop-down arrow to the right of the HR channel and choose Star this Channel from the pop-up menu that appears.
Zoom moves the channel up to the top of your sidebar within the starred section.
Deleting channels
Say that you create a public channel and give it a chic name, such as #ZoomBeasts. Six months later, no one uses it. Alternatively, no one has used it for months because users have flocked to a different channel.
As long as you are the channel admin, you can delete a channel as follows:
- Launch the Zoom desktop client.
- At the top of the screen, click on Chat.
-
In the sidebar, click on the channel that you want to delete.
Zoom highlights it in blue.
-
Click on the drop-down arrow next to the channel and choose Delete Channel from the menu that appears.
Zoom prompts you to confirm that you want to delete the channel.
- Click on the red Delete Channel button.
Say that you're only a channel member, not an admin. In this case, Zoom forbids you from deleting that channel. You won’t even see it as an option.
Channel deletions are permanent. Say adios to all of the correspondence that previously took place and the files that people shared in it.
Leaving channels
If you join a channel by mistake or lose interest, you don’t have to remain in it. You can leave it whenever you like by following these steps:
- Launch the Zoom desktop client.
- At the top of the screen, click on Chat.
-
In the sidebar, click on the channel that you want to leave.
Zoom highlights it in blue.
-
Click on the drop-down arrow next to the channel and choose Leave Channel from the menu that appears.
Zoom prompts you to confirm that you want to leave the channel.
- Click on the blue Leave Channel button.
If you leave a public channel, then you can always rejoin it. For private channels, though, a current member will need to re-invite you.
Converting channel types
Beanie runs Speaker City, a 50-employee outfit in the Midwest. He uses Zoom to create an #HR channel. He figures that it represents the best way to make general announcements about employee pay and benefits policies. Unfortunately, the types of conversations that take place in the channel are more sensitive in nature. For example, employees ask about specific disciplinary issues and volunteer information about their private lives that just aren’t appropriate for public consumption.
What should Beanie do?
He certainly can delete the channel. That move, however, poses a problem: All of the information in #HR goes poof. A better alternative is to convert the public channel to a private one:
- Launch the Zoom desktop client.
- At the top of the screen, click on Chat.
-
In the sidebar, click on the HR channel.
Zoom highlights it in blue.
-
Click on the drop-down arrow next to the channel and choose Edit Channel from the menu that appears.
Zoom prompts you to edit the channel.
- Under Group Type, select the Private (Invited members only) checkbox.
-
Click on the blue Save Changes button.
Zoom removes the text (Public) to the right of the channel name in the sidebar.
Zoom lets you easily reverse this process as well. If you want to make a private channel public, follow the preceding steps and select Public in Step 5. Just because you can, though, doesn't mean that you should. Employees may have posted certain messages and files in a private channel with the understanding that others would not be able to view them. Making that channel public violates that compact.
 Tread lightly when converting private channels to public ones. Carelessly making this decision is bound to cause strife with its members.
Inviting other members to an existing private channel
You are discussing a potential acquisition with your four colleagues. It’s very much under the radar. To this end, the five of you are using a private channel. A few of them recommend bringing your company’s VP of Finance into the discussion.
Follow these steps to invite a new user into your existing private channel:
- Launch the Zoom desktop client.
- At the top of the screen, click on Contacts.
- In the sidebar, click on Channels.
- Click on the name of the private channel to which you want to add members.
- Click on the ellipsis icon and click on Invite Others from the menu that appears.
-
From the new window, select the people whom you want to invite.
Either type a few letters of their names in the search bar or select their names from the list.
- Click on the blue Invite button.
Referencing channels in messages
While not a requirement, it’s wise to reference public channels in your messages when appropriate. Referencing extraneous channels for the sake of doing so is bound to confuse people.
This practice offers a number of benefits. First, when others click on the channel in your message, Zoom takes them directly to that channel. Beyond that, it encourages others to join those public channels — something that they may have missed when they joined your organization.
Follow these steps to reference a public channel in an individual or group message:
- Launch the Zoom desktop client.
- Create a new message for an individual, a group, or another channel.
- Before you enter the name of the public channel, enter the # symbol.
- Press the Enter key.
For example, I reference the marketing message in my message to Hans Gruber, as Figure 6-3 displays.

FIGURE 6-3: Zoom message referencing the public #Marketing channel.
Zoom does not let members reference private channels in this manner.
Starting quick channel meetings
Say that you’re bandying ideas back and forth with some channel members via chat. At some point, Walter suggests actually discussing the matter and moving away from text-based chatting. In no time, Zoom lets you change the medium from text to a real-time audio or video call.
Follow these steps to start a quick video meeting with all channel members:
- Launch the Zoom desktop client.
- At the top of the screen, click on Chat.
- Click on the name of the channel with which you want to hold an audio or video meeting.
-
Click on the video camera icon in the main screen, as Figure 6-4 shows.
Zoom prompts you with a new window asking whether you want to invite all members to join.

FIGURE 6-4: Video camera icon to hold a quick channel meeting.
-
Click on the white Yes button.
Zoom attempts to notify all channel members of the impending call.
Members who accept the invitation will join the channel video chat.
I’m hard-pressed to imagine a simpler way to elevate the discussion to a better medium.
Don’t be afraid to move from text to a real-time meeting. If you haven’t put your face on, just opt not to enable the video on Zoom calls.
Turning group chats into proper channels
By default, Zoom isn’t terribly creative when it names a group chat. It just lumps the participants’ names together.
Of course, assigning a more descriptive topic to a group chat is prudent. While you’re at it, why not turn the informal group chat into a more formal channel? To do so, follow these steps:
- Launch the Zoom desktop client.
- At the top of the screen, click on the Chat icon.
-
In the sidebar, click on the existing group chat.
Zoom highlights it in blue.
-
Click on the drop-down arrow next to the group chat and choose Edit Chat from the menu that appears.
Zoom prompts you to enter a new topic.
- (Optional) Select the checkbox if you want new members to be able to see the group’s message history.
- Click on the blue Save Changes button.
Posting messages in channels
The process for posting messages in channels is the same as sending messages to individuals and groups. The only difference is the audience for your messages. For more on this subject, see Chapter 5.
Searching specific channels
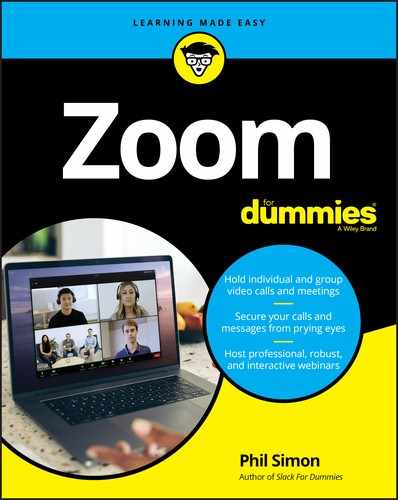
Say that I’m looking for the word feedback, but I’d like to search only a specific channel for that keyword. Follow these directions:
- Launch the Zoom desktop client.
- Click on the search bar in the upper right-hand corner of the screen.
-
Type your keyword.
In this case, I type the word feedback.
Zoom then displays a prompt underneath the search bar asking whether you want to restrict your search to messages or files.
If you have previously highlighted a channel, the search defaults to that channel. -
If you want to search everything in Zoom, then ignore the prompt that appears and press the Enter key.
Zoom displays the results of your query.
- (Optional) If you want to restrict your results to a specific channel, select its name from the Search in: drop-down menu, as Figure 6-5 displays.
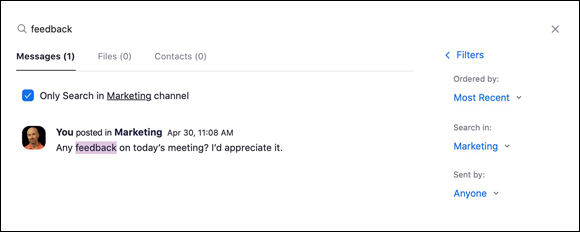
FIGURE 6-5: Zoom channel-specific search for the word feedback.
Comparing channels to similar Zoom features
Table 6-1 compares and contrasts some of the related Zoom features in this book.
TABLE 6-1 Feature Comparison
|
Feature |
Type |
Type of Plan |
Description and General Uses |
|
User groups |
Administrative |
Premium |
Provide the ability to manage users and their settings en masse. Admins can save time by concurrently changing or locking the settings for multiple users. |
|
IM groups |
Administrative |
Premium |
Assign users under the organization's Zoom account to groups that automatically display within their directories. |
|
Channels |
Non-administrative |
All |
Start more formal and permanent conversations about particular topics. |
|
Group chats |
Non-administrative |
All |
Start informal, temporary, and possibly disposable conversations about particular topics. |
If you are new to Meetings & Chat, then bookmark or highlight Table 6-1.
Refining your Zoom notifications
Basic Zoom notifications are indeed useful. (For more on this subject, see the section “Staying current with Zoom notifications” in Chapter 5.) In a way, though, they are a bit limited because of their global nature. That is, when users set them, Zoom applies their choices to all messages and/or mentions.
Many Zoom users don’t realize that Meetings & Chat provides two additional ways to customize their alerts. These options allow you to stay informed without feeling overwhelmed.
Setting specific notifications for channels and group chats
As you use channels and group chats, you’ll invariably find that some of them are busier, noisier, and more relevant than others. In this respect, they are just like people. For example, some channels may thrive with interesting activity and relevant content to your job or industry. You’ll want to pay close attention to them. Others, though, may annoy you, although you don’t want to leave them altogether.
Luckily, Meetings & Chat allows users to customize their notifications for individual channels and group chats. Doing so lets them strike a balance between staying informed and losing their sanity. Zoom accommodates that legitimate need. For example, what if you’d like to receive certain #Announcements notifications but different ones for #HappyHour?
Follow these steps to customize your notifications for a particular channel or group chat:
- Launch the Zoom desktop client.
- At the top of the screen, click on Chat.
-
In the sidebar, click on the channel or group chat whose notifications you want to modify.
Zoom highlights it in blue.
- Click on the drop-down arrow next to the channel and choose Notifications from the menu that appears.
-
From the menu that appears, choose the notification options you want to enable.
Figure 6-6 displays your options.

FIGURE 6-6: Customizing your notifications for a specific channel.
- Enabling the Show unread message count option under the Unread Message Count header means that Zoom displays in red the number of new messages in the channel or group chat.
- The Push Notifications header contains three options:
- All messages: Zoom alerts you to all messages posted in the channel or group chat.
- Mention me or all members: Zoom notifies you when someone tags you with the
@symbol or uses@all. (See Chapter 5 for more on this subject.) - Nothing: Clicking here means that you're muting the channel or group chat.
Quickly setting your notifications for all channels and group chats
If you belong to — and participate in — multiple channels, then individually tweaking their notification settings can become a bit time-consuming. Fortunately, Meetings & Chat provides users with a single place to change all channel and group-chat settings. Follow these directions:
- Launch the Zoom desktop client.
- At the top of the screen, click on your profile image and choose Settings from the menu that appears.
- On the left-hand side of the screen, click on Chat.
-
(Optional) Under Push Notifications, select the With exception for checkbox and click on the Channels button.
Meetings & Chat displays a new window allowing you to customize your alerts from your essential channels and group chats. See Figure 6-7.
Note that Zoom intelligently places starred channels and group chats at the top of the screen. The rest appear in alphabetical order.
-
Customize each channel’s and group chat’s notifications by selecting the appropriate checkboxes.
You have three options:
- All messages: Zoom notifies you of all new messages, whether they mention you directly or not. (This option is the most inclusive.)
- Only private messages or mentions: Think of this option as a middle ground. If someone references you in a message, then Zoom notifies you.
- Nothing: This option represents the equivalent of muting the channel or group chat.
- Click on the blue Save button.
- Close the Settings by clicking on the red circle in the upper left-hand corner of the screen.
FIGURE 6-7: Customizing all notifications for all channels and group chats in a single screen.
Say that you want to restore your notification settings to their default values. Just click on the white Reset in the bottom left-hand corner of Figure 6-7.
Setting keyword-specific notifications
Setting channel-specific notifications can keep you informed of key activity that takes place within them. Still, as the following example illustrates, plenty of scenarios exist in which they may not be optimal or even practical.
Benicio is the head of marketing at Kobayashi Porcelain. As such, he belongs to several public channels. Kobayashi has released some new mugs, but rumor has it that they are not terribly durable. Benicio is particularly concerned about a blowback on social media sites, such as Facebook and Twitter. He doesn’t want to constantly check all of his public channels for the word “fail.” In other words, he’d like Zoom to notify him when a colleague mentions that word in any of the public channels to which he belongs. Meetings & Chat lets him do just that.
To enable keyword-specific notifications, follow these steps.
- Launch the Zoom desktop client.
- At the top of the screen, click on your profile image and choose Settings from the menu that appears.
- On the left-hand side of the screen, click on Chat.
- (Optional) Under Receive notifications for, click on the Keywords button.
-
Enter the keyword(s) for which you want Zoom to send you alerts.
Select more than one keyword by separating them with commas.
-
Click on the Done button.
Now, when someone uses one of your keywords in a public channel, Zoom displays a numeric red badge to its immediate right.
Keyword-specific alerts work only for public channels and private channels to which you already belong. That is, say that members in your organization use a private channel of which you are not a part. When they use your predefined keywords, Meetings & Chat doesn’t notify you.
Mess around with channel- and chat-specific notifications until you find a system that works for you. Meetings & Chat is very flexible in this regard.
Sharing code snippets
Software engineers are fond of snippets, a term that connotes a relatively small region of reusable code. As such, it should be not a surprise that Zoom allows you to create and share them with others individually, in group chats, and even in channels.
You don’t need be a proper programmer, though, to benefit from snippets. Web designers, business analysts, and other folks who occasionally dabble in code also tend to find them useful. An example will help illustrate my point.
Amy is the head of marketing at Hudsucker Industries. She sometimes wants to make small changes to her company’s website. In the past, she has followed this process:
- She generates some simple Hypertext Markup Language (HTML).
- She copies and pastes it into a Word document.
- She emails it as an attachment to her web developer, Norville.
- He receives the email, downloads the attachment, copies the new code, and then inserts the updated code into the website.
Amy and Norville can certainly continue to follow this process. A more efficient way, however, involves using snippets.
Enabling snippets
Before you can create a snippet, you have to enable it in the Meetings & Chat user interface or UI. Follow these instructions to perform this one-time task:
- Launch the Zoom desktop client and click on the Home icon at the top of the screen.
-
Click on the Settings icon underneath your profile picture.
Zoom launches its Settings screen.
- On the left-hand side of the screen, click on Chat.
- Under Chat Settings, select the Show Code Snippet button checkbox.
-
Close the screen and return to your meeting by clicking on the red circle in the top left-hand corner of the screen.
Zoom displays a new
</> Codeicon in the message pane, as Figure 6-8 displays.

FIGURE 6-8: Zoom new snippet icon.
You need to follow this process only once. After completing it, you can add snippets as often as you like, whenever and wherever you like.
Creating a snippet
I’m a fan of the programming language Python, although I’m hardly an expert at it. Sometimes I write code for fun and to keep my axe sharp. (If you haven’t figured it out by now, I’m a bit of a geek.) If I find myself stuck on a Python script, I can create a snippet and share it with my Zoom contacts who know the programming language better than I do. To create a snippet, follow these steps:
- Launch the Zoom desktop client.
- At the top of the screen, click on Chat.
- Click on the name of the contact with whom you want to share a snippet.
-
In the message pane, click on the </> Code icon above the area in which you’d normally enter text for a message.
Zoom launches the Create Code Snippet window.
- (Optional) In the Title box just underneath Create Code Snippet, give your snippet a descriptive name.
-
(Optional) To the right of the Title box, choose the specific programming language from the drop-down list.
You can also just leave the default language of Text, if you like.
- Type or paste your software code into the main box, as Figure 6-9 displays.

FIGURE 6-9: Creating a Zoom snippet.
- (Optional) Select the Wrap checkbox if you’d like to — wait for it — wrap your text.
-
Click on the blue Create snippet button.
Zoom posts the snippet where you decided, as Figure 6-10 shows.

FIGURE 6-10: Completed Zoom snippet sent to contact.
Running Reports in Zoom
Say that you are an inquisitive, data-driven person. As such, you may be scratching your head at this point. After all, Meetings & Chat can store a tremendous amount of valuable data. You may want to ask insightful and analytical questions. Specific queries may include
- Which employees at our company are using Meetings & Chat the most?
- What about Zoom Phone and Video Webinars?
- How does Meetings & Chat usage vary by department?
- What are the most popular days and times of the week for meetings?
- On which devices do employees most frequently use Meetings & Chat?
- Which employees aren’t using Zoom much or even at all?
As it turns out, customers on premium plans can answer these questions in spades — and many more. Zoom provides a robust set of reports, graphs, and easily exportable data for additional analysis. Trust me: I could expand this chapter into a separate 200-page book.
Suffice it to say that Zoom offers users a bevy of different reports. That’s not to say, however, that you’ll be able to view absolutely everything that takes place in Zoom from all users in perpetuity. At a general level, users’ reporting capabilities hinge upon the following restrictions:
- The individual’s formal Zoom role. (See Chapter 3 for more on this subject.)
- The Zoom plan and add-ons to which the organization subscribes.
- The number of users in her organization’s Zoom account.
- The specific reports and features that her account owners and administrators have locked down.
- Her organization’s data-retention policies.
Reviewing Zoom’s role-based reporting
At a high level, Zoom grants account owners and admins greater reporting access than it does to regular members. No shocker here.
Account owners
Zoom account owners tend to look at things through an organization-wide perspective. That is, they’re not just concerned about what Zoom-related actions they, as individuals, are performing. Along these lines, by default account owners and admins can access two different report buckets:
- Usage reports: These reports display data on the Zoom services that account members have used.
- User-activity reports: These logs typically provide audit trails in the event that the organization needs to investigate a security event.
To view these buckets, account owners should do as follows:
- In the Zoom web portal, under the Admin header, click on Account Management.
-
Click on Reports.
Zoom takes account owners and admins to the main reporting page. Figure 6-11 displays a partial view of this screen.

FIGURE 6-11: Partial view of Zoom admin and account report main screen.
Table 6-2 explains the first bucket of reports.
TABLE 6-2 Bucket 1: Usage Reports
|
Sub-category |
Description |
|
Daily |
Displays daily number of new users, meetings, participants, and total meeting minutes per month. |
|
Active Hosts |
Displays meetings, participants, and meeting minutes within a user-defined time range. |
|
Inactive Hosts |
Displays inactive users during a specific period. |
|
Upcoming Events |
Displays information on upcoming meetings and webinars. |
|
Meeting |
Displays registration and poll reports for meetings. |
|
Cloud Recording |
Displays detailed information about calls that users have recorded to the cloud. |
|
Phone System |
Displays users’ activity on Zoom Phone for specific time periods. Note that you can view this option only if your organization subscribes to Zoom Phone, covered in Chapter 11. |
|
Remote Support |
Displays users’ in-meeting support sessions during certain time periods. |
Note that Table 6-2 excludes the option for running webinar reports. Expect to see it, though, if your organization subscribes to Zoom Video Webinars.
Table 6-3 shows the types of user activity reports that account owners can run.
TABLE 6-3 Bucket 2: User-Activity Reports
|
Sub-category |
Description |
|
Operation Logs |
View account activity, including adding and deleting different types of groups, adding new users, changing passwords, and much more. |
|
Sign In/Sign Out |
Determine when different users logged in and out of Zoom, along with their Internet Protocol (IP) addresses. |
|
Phone System Operation Logs |
View data about the phone-related actions that admins have taken. (Chapter 11 goes much deeper into Zoom Phone.) |
Zoom owners can access these report buckets by following these steps:
- In the Zoom web portal, under the Admin header, click on Account Management.
-
Click on Reports.
Zoom displays two tabs: Usage Reports and User-Activity Reports.
Refer to Tables 6-1 and 6-2 for more information on your specific report choices here.
-
To view the specific reports available to you, click on one of the selections.
For example, I selected the Active Hosts report under the Usage Reports heading. By default, Zoom displays activity only during the past two days, as Figure 6-12 shows.

FIGURE 6-12: Zoom daily usage report.
For how to run a report, see the section “Running a simple report,” later in this chapter.
Admins for Zoom customers on Business and Education plans can access a separate reporting dashboard. Visit bit.ly/zfd-dash to learn more about this topic.
Note that certain Zoom reports contain graphs and/or charts to go along with the raw data. For example, as Figure 6-13 shows, the Daily Usage Report provides these simple bar charts at the bottom.

FIGURE 6-13: Zoom participants-usage reports for April 2020.
Members
Zoom restricts the types of reports that members can run. Still, they can access limited information on their activity, as Table 6-4 shows.
TABLE 6-4 Types of Member Reports
|
Name |
Description |
|
Usage |
Members can view a list of meetings, participants, and meeting minutes for meetings that they have hosted. |
|
Meeting |
Members can create meeting-specific registration reports and poll reports. |
|
Webinar |
Members can run reports based upon webinar registration, attendees, performance, Q&A, and polls. (Chapter 8 covers Zoom Video Webinars in depth.) |
Account admins
To be sure, Zoom grants account admins greater reporting access than regular members. At the same time, though, admins’ reporting powers fall short of those of full account owners. While understandable, this restriction can be problematic.
Say that your job requires you to analyze data on how members in your organization communicate. Unfortunately, your current admin role makes this impossible. You find yourself constantly asking Mark — the Zoom account owner — to run reports for you and send you the results. Importantly, Mark doesn’t want to promote you to the role of owner.
What to do?
Fortunately, Zoom allows account owners to create new roles and assign them. In this case, a Reporting Analyst role would enhance your default your reporting capability to include ones that you currently cannot access. For more information on this subject, see Chapter 3.
To watch a quick video of how I did this very thing, visit bit.ly/zfd-newrole.
Running a simple report
To run a simple report, follow these steps:
- In the Zoom web portal, under the Admin header, click on Account Management.
- Click on Reports.
-
Click on the type of report that you want to run.
Again, Zoom’s default categories are Usage and Meetings.
-
Click on either one.
Note that only account owners can view User Activity Reports.
Depending on the report that you select in the previous step, Zoom may display a blue Search button that allows you to restrict your results to a specified date range, specific users, and more.
I return to this subject in the section “Selecting a date range,” later in this chapter.
Figure 6-14 displays the results of this simple usage report.

FIGURE 6-14: Zoom simple member-usage report.
Much like Zoom search (covered in Chapter 5), your report may fail to show data for any number of reasons. Examples here run the gamut. Perhaps your criteria are too restrictive or have no data for Zoom to display. Alternatively, your Upcoming Events report comes up blank because no one has scheduled any meetings or webinars. (Chapter 8 covers webinars.)
Users cannot access reports in the Zoom desktop client. They have to use the Zoom web portal.
Customizing your reports
Regardless of your role, Zoom provides a few useful ways to customize your reports.
Selecting a date range
In the abstract, reports are certainly useful. Those that provide too little or too much information, however, often cause more problems than they solve. It’s usually helpful to restrict reports to a certain period of time. Doing so allows you to answer questions such as
- What were users doing last January?
- After our company’s TV commercial ran, how many calls did our call-center reps receive?
- And how long was the average call?
To tweak your report’s date range, follow these steps:
-
Log in to the Zoom web portal and run a Zoom report.
If you’re unsure how to run a report, see the section “Running a simple report,” earlier in this chapter.
Note that Zoom’s different reports provide different options. That is, there’s no one-size-fits all approach to running reports. Visit bit.ly/zfd-rptsto watch a quick video of me running a few reports. -
(Optional) At the top of the report, select your desired date range.
Depending on the specific report that you’re trying to run, you may be able to filter dates by
- A specific month
- A specific date range
-
(Optional) Click on the blue Search button.
Zoom displays the results — if any — that meet your new date criteria.
Some Zoom reports default to the current month’s activity. To state the obvious, if you want to go back in time, just select a new month from the drop-down menu.
Zoom currently restricts date ranges for some reports to 30 days. In these cases, say that you want 60 days’ worth of data. You will have to run the report twice — once for each 30-day period. You’ll then have to stitch them together. (For more on this subject, see the section “Exporting raw report data,” later in this chapter.)
Toggling columns
By default, many Zoom reports include a host of different fields, some of which might not matter to you. For example, employees in your organization may not include their department in their profile, so why display it in the report? Alternatively, you may not use Zoom Rooms, the subject of Chapter 10.
To hide fields from your report, follow these directions:
-
Log in to the Zoom web portal and run a Zoom report.
If you’re unsure how to run a report, see the section “Running a simple report,” earlier in this chapter.
- To the right of the report, click on the Toggle columns link.
-
In the menu that appears, uncheck the box to the left of the field that you want to hide.
Zoom immediately removes those fields from your report.
Exporting raw report data
Some folks may find Zoom’s standard reports a bit wanting. Sure, they present information in a simple way, but what if you want to do more with that data? Like me, you may prefer to analyze your data in Tableau (my personal favorite), Microsoft PowerBI, Microsoft Excel or Access, Google Sheets, or another data-analysis tool. Those applications let users slice and dice their data and, even better, create interactive visualizations.
To export report data to a comma-separated value or CSV file, follow these steps:
-
Log in to the Zoom web portal and run a report.
For a refresher on how to run a report, see the section “Running a simple report,” earlier in this chapter.
-
Click on Export as CSV File link.
Zoom alerts you that the download will start automatically when ready. Depending on the size of your dataset, Zoom may need a few minutes to generate the report and the download file.
- From the prompt, decide where on your computer you want to save the file and click on the Save button.
- (Optional) Open the file in another program and go nuts.
All mainstream reporting and analysis programs allow you to easily import data from CSVs for additional analysis.
Chapter 8 covers this topic in the context of webinars.