Chapter 8
Connecting with the Masses through Webinars
IN THIS CHAPTER
![]() Understanding Zoom’s webinar-specific roles
Understanding Zoom’s webinar-specific roles
![]() Scheduling a webinar
Scheduling a webinar
![]() Promoting and recording your webinar
Promoting and recording your webinar
![]() Handling attendees’ questions
Handling attendees’ questions
Anyone with a lick of business sense knows the following: It’s wise to stay in touch with your constituents on a regular basis. I’m talking about your colleagues, employees, vendors, and partners.
In the inimitable words of The Simpsons’ C. Montgomery Burns, “Duh!”
Circumstances permitting and absent global pandemics, odds are that most recurring meetings at your organization have historically taken place in person. Some people stick to the meeting agenda, while others routinely ignore it. Is the conversation equally distributed? Maybe not. A few folks may routinely tend to dominate these meetings and drive you crazy in the process. Still, you expect a decent amount of back and forth during these many-to-many conversations.
But what about information sessions and product demonstrations? In these one-to-many presentations, hosts generally don’t want others interrupting them. If people have any questions, then they should wait until the end of the meeting. What’s more, participants don’t expect to regularly attend these types of presentations. They’re essentially one-offs. Normal Zoom meetings just don’t make sense here.
Welcome to Zoom Video Webinars, a special type of Zoom meeting that lets organizations disseminate knowledge, acquire leads, answer group questions in an organized forum, and more. For their part, webinar attendees can learn new things and receive timely information.
This chapter provides a boatload of information about Zoom webinars: how to set one up, collect registrant data, administer them, answer attendees’ questions, record them, run reports on them, and share them for others to view in the future.
Taking Your First Steps
Before going too far down the rabbit hole, a few disclaimers are in order.
First, video webinars are old hat. People of a certain age remember when they rose to prominence in the mid-1990s. In this vein and in the interest of transparency, Zoom hasn’t exactly reinvented the wheel. In keeping with this analogy, however, Zoom has created a better, smoother ride, and its customers rarely have to deal with flat tires.
Second, Zoom webinars largely rely upon the same technology required to its run video meetings — a topic I cover in Chapter 4. Yes, there are a few differences between the two, particularly with regard to roles. Still, if you understand the basic idea behind Zoom meetings, then you’ll pick up webinars in no time.
Next, webinars represent an add-on to Zoom’s core Meetings & Chat plan. (See Chapter 2 for more information here.) That is, Zoom doesn’t include webinars in its Free or even Pro plans. If your organization wants to host webinars, then it will have to pony up. Trust me, though: The juice is well worth the squeeze.
Finally, this chapter does not cover every feature or option in Zoom Video Webinars. I could have easily written a separate 180-page book on this meaty subject. For lots more information on this subject, visit bit.ly/zfd-webz.
 To host your own webinar, Zoom requires more than just subscribing to a premium Meetings & Chat plan. Participating in other hosts’ and organizations’ webinars, however, costs attendees nothing.
Creating your first Zoom webinar
As long as your organization’s current Zoom plan includes webinars, scheduling them is remarkably easy:
- In the Zoom web portal, under the Personal header, click on Webinars.
-
Click on the blue Schedule a Webinar button.
Zoom displays the Schedule a Webinar window, shown in Figure 8-1.
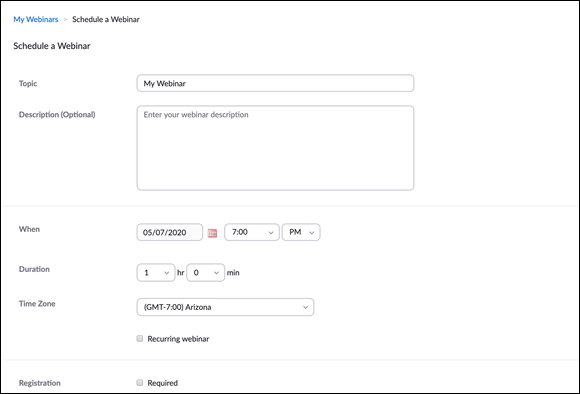
FIGURE 8-1: Scheduling a new Zoom webinar.
-
In the Topic text box, enter the name of your webinar.
You can always change it later.
-
(Optional) Enter a description.
Don’t skip this step. You’ll want to provide prospective attendees with more information about what they can expect to learn if they attend.
- Enter a date and time.
-
Enter a duration.
Zoom defaults to one hour. This duration is for scheduling purposes only. That is, Zoom doesn’t cut you off once the host reaches the end time.
-
Override the time zone, if you like.
Zoom defaults to the time zone associated with your account, but you can override it.
- (Optional) Enter whether the webinar is recurring.
-
Indicate whether your webinar requires users to enter a password to join; if so, then enter the password.
 Only provide this password to webinar registrants unless you want it to be useless.
 - Under the Video header, select whether the hosts and/or panelists can show their faces.
-
Indicate your audio preference.
Zoom defaults to Telephone and Computer Audio, but you can override that option.
- Under webinar options, indicate whether you want to allow the following options by selecting the appropriate checkboxes:
- Q&A
- Enable Practice Session
- Only authenticated users can join (See Chapter 9 for details.)
- Make the webinar on-demand
- Record the webinar automatically
-
(Optional) Enter the email addresses of any alterative hosts.
I cover this option in the section “Reviewing Zoom’s webinar-specific roles,” later in this chapter.
Say that you’ve enabled a practice session for your webinar. When you start the webinar, Zoom displays the following orange text at the top of the window: Practice Mode Only: Attendees cannot join until you broadcast.
None of these webinar options is set in stone. That is, you can edit all of them later — up until the point that you begin your webinar.
Setting your registration options
By default, Zoom doesn’t require people to register for webinars. As such, as long as they know the URL, they can just show up without providing any of their contact information. This option is certainly viable. For many reasons, though, you may want to require registration and collect their basic data in advance.
To tweak your webinar-registration options, follow these steps:
- In the Zoom web portal, under the Personal header, click on Webinars.
-
Click on the title of one of your upcoming webinars.
They appear under the Topic tab in the middle of the page.
-
In the Invitations tab, click on the blue Edit link to the far right of the word Approval.
Zoom displays the window in Figure 8-2 with three tabs:
- Registration: Make decisions about webinar registration and approval. For example, when you require registration via a unique URL, Zoom sends one to each registrant. Also, you can disable attendees’ ability to join from multiple devices so that they can’t share their unique URLs with other people and circumvent the registration process.
- Questions: Select the checkboxes here if you want to require attendees to include additional information to register for the webinar. Examples include their phone number, employer, industry, job title, and more.
- Custom Questions: Create your own multiple-choice or short-answer questions.
By asking a few targeted registration questions, you may be able to determine which topic(s) attendees would value most ahead of time. - Make whatever changes you want and click on the blue Save button.

FIGURE 8-2: Zoom registration options and questions.
Tread lightly with webinar registration. You don’t want to required too many questions. Try to strike a balance. If you come across as too nosy, then you run the risk of minimizing the number of webinar registrants and attendees. On the other hand, your goal should not necessarily be to maximize these numbers.
Consider two scenarios:
- Option A: Twenty people attend your webinar, each of whom is legitimately interested in your company’s product or service. Attendees ask penetrating and insightful questions.
- Option B: Fifty, mostly aloof, people attend your webinar. Attendees constantly fidget with their devices as you present. They ignore your polls and other chances to interact. When it’s time for questions at the end of the webinar, you hear crickets.
Option A beats B any day of the week and twice on Sunday.
Visit bit.ly/zfd-webreg for ways on how you can customize your webinar-registration options.
Preparing for your webinar
As the famous philosophical query goes, “If a tree falls in a forest, and no one is around to hear it, does it make a sound?”
By the same token, if you hold a webinar without any attendees, does anyone gain any knowledge from it? For now, forget whether they view a recording of it a few weeks or months later. (I cover that subject later in this chapter in the section “Accessing your recorded webinar and sharing it with the world.”)
I never advocate spamming people. Still, if you’re hosting a public webinar, then you should promote it and encourage people to register for it. Doing so allows you to get a sense of your audience in advance — specifically, their interests, job titles, locations, and more. As a result, you can customize your webinar’s content to provide the most valuable experience for as many attendees as possible.
Inviting others to your webinar
To share your webinar link with others, follow these directions:
- In the Zoom web portal, under the Personal header, click on Webinars.
- Click on the title of one of your upcoming webinars.
-
In the Invitations tab, to the right of the Webinar attended limit, click on Copy the invitation.
Zoom displays the full invitation, including detailed directions on how to join and links, as Figure 8-3 shows.
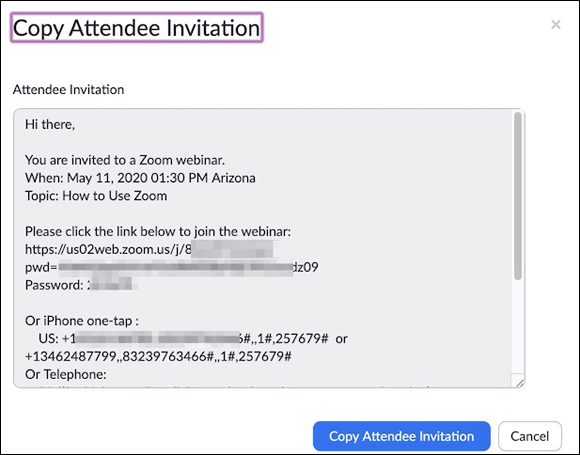
FIGURE 8-3: Zoom webinar invitation.
-
Click on the blue Copy Attendee Invitation.
You can email an invitation to yourself by selecting Email me the invitation. After clicking on a blue button, Zoom emails you the details.Zoom lets you know that it has copied the text to the clipboard.
- Paste your text into an email or as a post on one of your social networks.
Play around with Zoom’s different options for creating tracking links. This feature allows you to see which marketing channels yield the most registrations. The data will inform you how to promote your webinars in the future.
Sharing a link to your webinar with others
Blasting emails is certainly one way to encourage others to sign up for your webinar. For example, you can send the invitation to members of your organization’s mailing list.
But what if you don’t want to limit your potential audience to people with whom you’ve already connected? After all, the whole point of many webinars is to connect with new people — individuals whose email addresses you just don’t know yet.
To this end, you may want to share your webinar link on Facebook, Twitter, LinkedIn, and other high-traffic sites. What’s more, it’s wise to create a simple page that links to the webinar on your company’s website. (I do the same thing myself when I host webinars for my clients.)
To find the registration link for your webinar, follow these steps:
- In the Zoom web portal, under the Personal header, click on Webinars.
- Click on the title of one of your upcoming webinars.
- In the Invitations tab, to the right of Invitee Attendees underneath Registration Link, copy the full link.
-
Share that link however you want.
When other people click on it, they’ll see something like Figure 8-4.

FIGURE 8-4: Unbranded Zoom webinar registration page.
By filling out the form, attendees can register for your webinar. Once they do, Zoom displays a confirmation, such as the one in Figure 8-5.
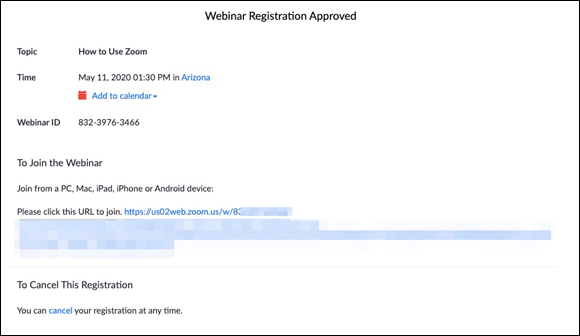
FIGURE 8-5: Zoom attendee webinar registration confirmation.
If you want to add a banner or logo to your webinar URL, click on the Branding tab on the same page and go nuts.
Viewing and removing webinar registrants
Ideally, loads of people will sign up for your webinar. Great news, right? Perhaps, but maybe a few of them participated in previous webinars and acted like knuckleheads. To view which people have already registered and block a few knuckleheads from participating, follow these steps:
- In the Zoom web portal, under the Personal header, click on Webinars.
- Click on the title of one of your upcoming webinars.
- Click on the Invitations tab.
-
To the far right of Manage Attendees, click on the blue View link.
Zoom displays a screen similar to Figure 8-6.
- (Optional) To remove a registered attendee from your list, select the checkbox to the immediate left of that person’s name.
-
(Optional) Click on the white Cancel Registration button.
Zoom adds the user to the Denied/Blocked list.

FIGURE 8-6: Viewing list of registered attendees for webinar.
Disabling attendee questions
Zoom enables attendee Q&A by default. (See the section “Creating your first Zoom webinar,” earlier in this chapter.) If you want to change this option at any point prior to starting the webinar, then follow these steps.
- In the Zoom web portal, under the Personal header, click on Webinars.
- Click on the title of one of your upcoming webinars.
- Click on the white Edit this Webinar button.
- Uncheck the checkbox to the left of Q&A.
You can also enable anonymous attendee questions if privacy is a concern.
Setting up polls
Real-life and virtual meetings tend to involve multiple people talking to each other. By contrast, webinars tend to consist of one or two people doing the vast majority of the talking.
That’s not to say, however, that you can’t add a little interactivity to your webinars beyond enabling Q&A. Polls let you do just that. What’s more, they allow the webinar host to collect valuable data on any number of subjects.
Before the webinar begins, follow these steps to create a poll that you can invoke after you kick it off:
- In the Zoom web portal, under the Personal header, click on Webinars.
- Click on the title of one of your upcoming webinars.
- Click on the Polls tab and click on Polls.
-
To the immediate right, click on the white Add button.
Zoom displays a new window.
- Enter the title of your question.
- (Optional) Select the Anonymous if you want to hide attendees’ responses checkbox.
- Type the name of your question.
- Indicate whether the question is single or multiple choice by clicking in the related radio box.
- Enter the possible responses in the text boxes.
- (Optional) Click on + Add a Question to repeat this process and proceed with Steps 5 through 9 again.
-
When you finish, click on the blue Save button.
Zoom takes you back to the main webinar page and displays a brief message that lets you know that you were successful.
Repeat these steps as necessary. You can invoke up to 25 polls per webinar.
I prefer to set up polls ahead of time because it leaves fewer things to chance. Still, as the next section describes, creating polls on the fly is simple as long as your permissions are sufficient. This ad hoc approach allows you to respond to new issues and questions that attendees have raised during the webinar.
Reviewing Zoom’s webinar-specific roles
Like just about all popular webinar tools, Zoom understands that one size does not fit all. Zoom users can perform different actions during a webinar.
Note that the roles in the following section pertain only to Zoom webinars. That is, they differ from the proper user roles discussed in Chapter 3. Also, they overlap a bit with the roles in Zoom Meetings & Chat (see Chapter 4).
Host
Think of the webinar host as an omnipotent king or queen — one whose permissions include the following actions:
- Stop and start the webinar
- Promote panelists to co-hosts
- Mute panelists and stop their ability to project video
- Create and edit polls
- Remove disruptive attendees
Say that Geddy creates a new webinar. Zoom defaults his role to host. Of course, it’s wise for him to share his hosting duties with someone — and Zoom makes that task easy to accomplish.
Alternative host
Say that 1,000 people have registered for your upcoming webinar. Much like a wedding, it’s foolish to expect all registrants to actually attend. Make no mistake, though: The larger the number of webinar registrants, the more attendees you can expect.
You may get only one bite at the apple with webinar attendees. What’s more, emergencies happen. You don’t want all of them waiting for a tardy host to arrive or get her Internet connection working.
To this end, Zoom lets hosts assign as many alternative hosts to their webinars as they like. (For how to do so, see the “Creating your first Zoom webinar” section, earlier in this chapter.) Alternative hosts can do almost everything that hosts can. Most important here is that they can start the webinar in the event that the primary host is MIA. (For more on roles, see bit.ly/zfd-alth.)
Alternative webinar hosts can’t ride for free. That is, an individual must be a licensed user under your organization’s Zoom Meetings & Chat plan to serve as an alternative webinar host.
Panelist
Panelists are full webinar participants, but their powers lie somewhere between hosts and attendees. They can perform the following actions:
- Participate in webinar practice sessions
- Raise their hands
- Locally record the webinar
- View the list of attendees
To assign panelists to an existing webinar, following these steps:
- In the Zoom web portal, under the Personal header, click on Webinars.
- Click on the name of the upcoming webinar to which you want to add panelists.
- Click on the white Edit this Webinar button.
- To the right of Panelists, select the Panelists radio button.
- Click on the blue Save button.
- Under Invitations, click on Edit next to Invite Panelists.
- From the prompt, enter the panelists’ names and email addresses.
-
When you finish, click on the blue Save button.
Zoom rattles off emails to those people that include links that let them enter that webinar as panelists by default. That is, no one will have to promote them.
Panelists cannot anoint themselves; primary and alternative webinar hosts must designate them — either ahead of time or after they join as regular attendees.
Co-host
At a high level, co-hosts can perform most of the same actions that hosts can. In this way, think of the co-host as the host’s right-hand man or woman during the webinar. (If you’re a fan of the seminal HBO series The Larry Sanders Show, then the co-host conjures up images of “Hey Now” Hank Kingsley.)
More specifically, co-hosts can perform the following actions during webinars:
- Manage attendees
- Start and stop the recording
- Remove disruptive attendees
- Open polls
Co-hosts cannot start webinars independently — a key difference compared to Zoom’s alternative host role.
The co-host is an essential role. As such, it’s wise to assign at least one to each webinar that your organization hosts. In my earlier example, say that Hank is feeling ill and cannot serve as the webinar co-host. Larry should designate a different webinar co-host as soon as possible.
If you’re still on the fence about using a co-host, here’s the final nail in the no-co-host coffin:
- Scenario A: You fly solo on the webinar and opt not to appoint a co-host.
- Scenario B: You appoint a co-host.
During the webinar, your Internet connection suddenly dies. Under Scenario A, Zoom terminates the webinar for everyone. Under Scenario B, Zoom automatically transfers hosting responsibilities to the co-host and keeps the webinar running.
Zoom doesn’t require hosts to assign co-hosts to webinars, but it’s certainly a best practice — particularly for large webinars.
To enable webinar co-hosts at the account level, account owners and admins should follow these directions:
- In the Zoom web portal, under the Personal header, click on Settings.
-
Slide the Co-host toggle button to the right.
Zoom turns the toggle blue and confirms your new settings.
Note that Zoom remembers this selection for all webinars held under your organization’s account. That is, you need not perform this step for every webinar that you and others under your account host.
Oddly, at present, Zoom does not grant webinar hosts the power to pre-assign co-hosts. To receive their promotions to co-hosts, panelists have to wait until a host starts the webinar. At that point, the host can promote panelists to co-host status by following these directions:
- Launch the webinar.
- From the icons at the bottom of the screen, click on Manage Participants.
- Click on the Participants tab.
- Identify the person whom you want to make your co-host.
- Mouse over that person and choose Make Co-Host from the menu that appears, as Figure 8-7 displays.
- Select Make Co-host.
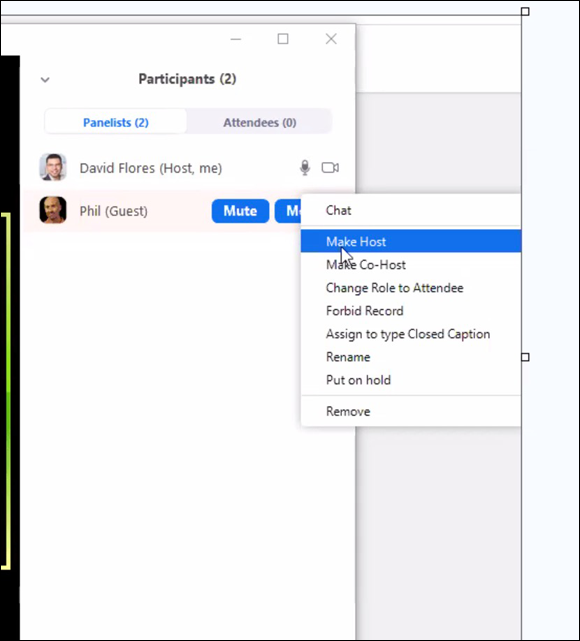
FIGURE 8-7: Zoom panelist options.
As the sidebar illustrates, an experienced webinar co-host is worth her weight in gold.
Ask a colleague whether he would be interested in being a webinar panelist or co-host. Don’t spring these responsibilities on folks at the last minute.
Zoom provides a host of other options here for adding and managing co-hosts. (Pretty good pun, eh?) Visit bit.ly/zfd-web-h to learn more about this topic.
If you’re the host, then you cannot remove a co-host from the webinar in one fell swoop. You have to demote him first and then kick him out of the webinar.
Attendee
Compared to the other roles, attendees can’t do all that much. They certainly can view the webinar and participate in it, but they remain fairly passive observers — and that’s very much the point. Specifically and if hosts enable these features, attendees can perform the following actions during webinars:
- Participate in polls: When a host or co-host launches a poll, they can choose to respond.
- Raise their hands: Attendees can indicate that they need something from webinar panelists.
- Ask the webinar host questions: Attendees can indirectly submit questions to the host, subject to panelist or co-host moderation.
- Chat with others: By clicking on this icon, they can send messages to the group or to individuals privately. They can also ask questions.
To be sure, attendees can certainly troll webinars via chat. Panelists and co-hosts can remove these disruptive individuals.
To ensure a successful webinar, think carefully about who should be able to do what. Granting people too much or too little power is bound to cause problems.
Visit bit.ly/zm-web-role to view a comprehensive list of the actions that people in each role can perform during Zoom webinars.
Taking Zoom webinars up a notch with third-party apps and integrations
Chapter 7 covers third-party apps that extend the native power of Zoom Meetings & Chat. If you would like to do the same thing with Zoom Video Webinars, you’re in luck.
Generally speaking, Zoom’s webinar-specific apps and integrations fall into the following three buckets:
- CRM and Marketing Automation: Many organizations use customer-relationship management (CRM) and marketing automation tools. Popular choices include Salesforce, Marketo, Pardot, and HubSpot. By installing these apps for Zoom Video Webinars, users can automatically capture registrants as leads in these systems. Say goodbye to dual-data entry.
- Content Distribution: Zoom’s Kaltura and Panopto integrations allow users to easily share their videos with large audiences.
- Monetization: While many or most companies provide their webinars for free, some charge a nominal fee. With a few clicks of your mouse, you can directly connect Video Webinars with PayPal. Say that you use Eventbrite, CVent, or another event management site and want to charge for your webinar. If so, then you can use the popular and multifaceted automation tool Zapier to stitch those tools together.
 Laypeople don’t need to worry about the technical differences between Zoom apps and integrations. At a high level, they effectively do the same types of things — namely, automate manual tasks and make your life easier.
For more on how to use these apps and integrations, check out Zoom’s informative 12-page ebook Running Engaging Online Events at bit.ly/zfd-onlineev.
Canceling your webinar
John is an accomplished guitarist who works at a Guitar Center in Long Island, New York. He decides to hold a webinar called “How to Play a 12-String” and show his considerable chops. For whatever reason, though, attendance is sparse. Despite his best efforts to promote it, only two people have registered. After mulling it over, he pulls the plug on the webinar.
To cancel your webinar before it starts, follow these directions:
- In the Zoom web portal, under the Personal header, click on Webinars.
-
To the right of the webinar that you want to cancel, click on the white Delete button.
Zoom displays a window allowing you to easily notify registrants that you are canceling the webinar, as Figure 8-8 shows.
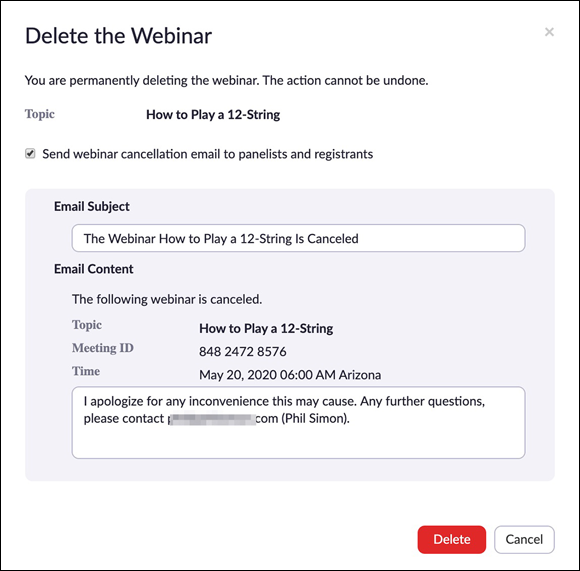
FIGURE 8-8: Zoom screen allowing host to notify registrants of webinar cancelation.
-
(Optional) Uncheck the Topic checkbox and click on the red Delete button if you want to cancel the webinar without alerting registrants.
 If you cancel the webinar, leave the checkbox selected here to alert registrants. It’s bad form to cancel a webinar without notifying them.
 - Customize your cancelation email as desired.
-
Click on the red Delete button.
Zoom sends all registrants the email that you specified.
Whether you alert registrants or not, Zoom sends the webinar host a separate email confirming the cancelation.
Running Your Webinar
Say that you have already scheduled your webinar, promoted it, reviewed the registrant list, assigned webinar roles, created a few polls, and did a walkthrough. To quote Saul Goodman on AMC’s Better Call Saul, “It’s showtime.” That is, it’s time to launch your webinar and demonstrate to the world how much you know about your topic.
Launching your webinar
Follow these directions to kick off your webinar:
- In the Zoom web portal, under the Personal header, click on Webinars.
- Click on the title of one of your upcoming webinars.
-
Click on the white Start button.
Zoom launches the desktop client, and displays a screen similar to Figure 8-9.
You can and should begin your webinar at least 20 minutes early. Doing so allows you to assign webinar co-hosts, test your computer’s audio and microphone again, and generally relax before it’s time to rock and roll. Starting your webinar early does not mean that registrants will be able to participate ahead of time.
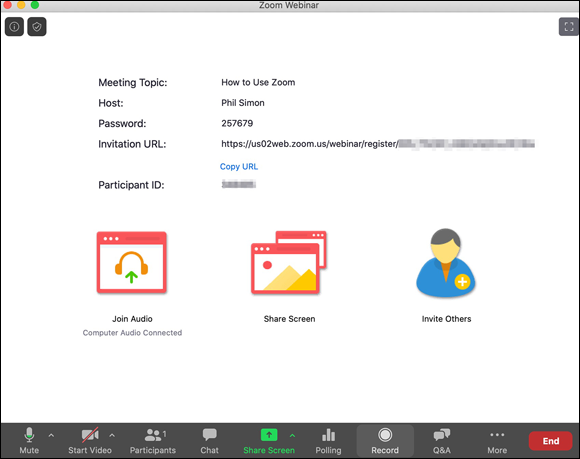
FIGURE 8-9: Zoom webinar launch screen.
Table 8-1 displays the controls that Zoom offers hosts once they kick off their webinars. They largely overlap with the controls for Zoom meetings, discussed in Chapter 4.
TABLE 8-1 Zoom In-Webinar Controls for Webinar Hosts
|
Name |
Description |
|
|
Mutes and unmutes your microphone. Click on the down-pointing arrow to the right of this button to invoke a number of other sound-related options, including testing your speaker and microphone. |
|
|
Enables and disables your video. Click on the down-pointing arrow to the right of this button to invoke a number of other video-related options, including choosing a virtual background. |
|
|
Displays a new panel on the right-hand side of the screen showing the panelists and attendees for your webinar. From here, you can allow them to talk, rename them, lower their raised hands, promote them to panelists, or boot them from the webinar altogether. |
|
|
Displays a window in which you can send messages to other panelists and attendees. |
|
|
Prompts you to share a screen with webinar attendees. After sharing your screen, Zoom provides a separate menu with powerful annotation options. (Table 8-3 covers these options.) |
|
|
Launches one of the polls you created specifically for this webinar. (See the section “Setting up polls,” earlier in this chapter.) |
|
|
Records your webinar either locally or to the cloud. |
|
|
Displays the questions that attendees have asked. Zoom displays three tabs: Open, Answered, and Dismissed. When an attendee raises his hand, Zoom displays a red badge to indicate that he requires attention. |
|
|
Discontinues the webinar for good. |


Always record your webinar — even if you’re not sure that you’ll need it for future use. To paraphrase the German writer Franz Kafka, it’s better to have and not need than to need and not have.
Of course, Table 8-1 displays the options available to webinar hosts. To state the obvious, Zoom does not grant everyone on the webinar the same power. In fact, Zoom limits the tasks that attendees can perform to the ones listed in Table 8-2.
TABLE 8-2 Zoom Options for Webinar Attendees
|
Name |
Description |
|
|
Invokes the audio settings for the Zoom desktop client. Click on the upward arrow to the right of this button to invoke a number of other sound-related options, including testing your speaker and microphone. |
|
|
Sends a message to other webinar attendees, a panelist, or everyone on the call. |
|
|
Indicates that you require attention. This action notifies the panelist host or co-host. If you change your mind, then click on Lower Hand. |
|
|
Asks the host a question. Zoom displays two tabs: Open and Answered. |
|
|
Exit stage left and remove yourself from the webinar. |


Sharing and annotating your screen
Say that your webinar is going swimmingly well. For example, attendees are enthusiastically asking you pointed questions about what your software product can do and how to do it. As the host, you want to demonstrate a specific feature as clearly as possible.
Zoom’s screen-sharing and annotation functionality mirrors that of its Meetings & Chat service, discussed in Chapter 4.
Follow these directions to annotate your screen for all webinar attendees:
- After you launch the meeting, choose Share Screen from the menu.
-
Select the specific screen on your computer that you want to share with webinar attendees.
Zoom displays that screen with everyone on the webinar.
-
Mouse over the black menu and click on the Annotate icon.
Zoom displays a separate annotation menu.
Table 8-3 lists the webinar-annotation options that Zoom provides for hosts:
TABLE 8-3 Zoom Webinar Host-Annotation Options
|
Name |
Description |
|
|
Click here to revert to using your mouse. That is, you’ll temporarily disable all of the other formatting options in the menu. |
|
|
Click and drag here to create a box that engulfs your other annotations, allowing you to easily move them as a group. |
|
|
Enter text over any part of your screen. |
|
|
Draw whatever you like with your mouse or touchpad. Zoom also lets you insert a number of basic shapes. |
|
|
Place any number of stamps. Examples include an arrow, checkmark, X, star, heart, and question mark. |
|
|
Click here to make your computer’s cursor more visible. You can turn it into a red circle or a rightward arrow. |
|
|
As its name states, click on this button to erase prior annotations or parts of them. |
|
|
Click here to change the color, line width, and font of your annotation. |
|
|
Reverse your previous annotation. |
|
|
Repeat your previous annotation. |
|
|
Click here to invoke three options: Clearing All Drawings, Clearing My Drawings (the ones that you have created), and Clearing Viewers’ Drawings (the ones — if any — that they have created). |
|
|
Click here to save entire screen markup as a local file on your computer. |

These icons largely overlap with the ones for Zoom meetings covered in Chapter 4. This fact shouldn’t surprise you. Webinars are special types of Zoom meetings.
Figure 8-10 shows how I marked up the Zoom For Dummies manuscript during a practice webinar.
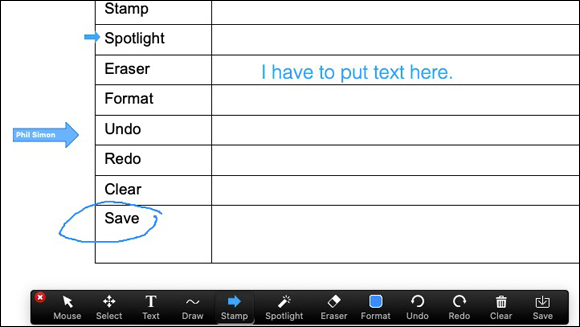
FIGURE 8-10: Annotating your screen during a webinar.
Interacting with webinar attendees
More than 10 million people purchased and presumably read Stephen Covey’s 1990 book The 7 Habits of Highly Effective People (Free Press). The text didn’t impress me all that much when I read it 25 years ago, but one of his recommendations always stuck with me: Begin with the end in mind.
Think about that oft-quoted adage in the context of holding a successful webinar. More specifically, it’s critical to consider the following questions well before starting your webinar:
- What should attendees be allowed to do during the webinar?
- In both positive and negative ways, how could attendees’ actions affect the webinar?
- How many strikes do offending attendees get?
- Do you want to limit how attendees ask questions and interact with others?
- Based on the answers to the previous questions, which permissions will allow co-hosts and panelists to manage the webinar most effectively?
By thinking through these issues ahead of time, you maximize the chance of a smooth webinar.
There’s no one right recipe for holding a successful webinar. Much hinges upon the size and demographics of your audience, their level of inquisitiveness, and even the topic itself.
Bounce ideas off of more experienced colleagues, especially if you’re new to hosting webinars.
Disabling attendee annotation
Webinar attendees run the gamut. In my experience, most act in a professional way. Never confuse most with all, though. It takes only one troll to disrupt a webinar and ruin it for everyone.
One simple way to thwart potential trolls is to disable attendees’ ability to annotate the screen. Just follow these steps:
- After starting the webinar, share your screen.
-
From the black menu bar, click on the More icon on the right-hand side.
Zoom displays the webinar-specific menu in Figure 8-11.
- From the drop-down menu, choose Disable Attendee Annotation.

FIGURE 8-11: Disabling attendee annotation.
Of course, you may want to keep this option enabled if you trust your attendees and there’s a legitimate need for them to annotate the host’s screen.
Dismissing attendees’ questions
Panelists and co-hosts typically want to save interesting attendee queries for the host to answer at the end of the webinar. Sometimes, however, attendees ask redundant, previously answered, or downright silly questions. In such cases, the webinar co-host can easily dismiss them as follows:
- During the webinar, click on the Q&A icon in the menu.
- Click on the Open tab and mouse over an attendee’s question.
-
Click on the gray X Dismiss text that appears over the question.
Zoom moves the question to the Dismissed tab in the Q&A panel, as Figure 8-12 displays.
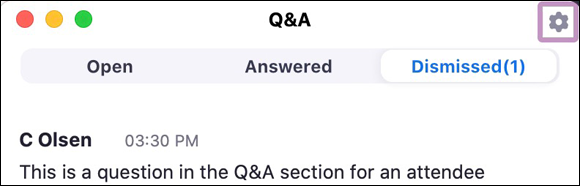
FIGURE 8-12: Zoom attendee questions dismissed by webinar panelist or co-host.
Answering attendees’ questions
Sometimes the host has already answered an attendee’s question. As such, why should a panelist or co-host leave it open for the host to address again?
To mark an attendee’s question as answered, follow these steps:
- During the webinar, click on the Q&A icon in the menu.
- Click on the Open tab and mouse over the attendee’s open question.
- Click on the Type answer button and enter your response.
-
(Optional) Select the Send privately checkbox.
If you leave this box unchecked, then all webinar attendees can view your answer.
-
Click on the blue Send button.
Zoom moves the question to the Answered tab and updates the number to its right. For example, if you answer eight questions, you see Answered (8).
Reopening dismissed attendee questions
Perhaps a panelist or co-host dismissed an attendee’s question too early. To reopen a dismissed question, follow these steps:
- During the webinar, click on the Q&A icon in the menu.
- Click on the Dismissed tab and go to the dismissed question.
-
Underneath the question, click on the Reopen button.
Zoom moves the question back under the Open tab. From here, you can respond to the attendee’s query.
Allowing attendees to upvote others’ questions
Attendees sometimes pepper the host with questions. The co-host or panelist may not know or want to decide which ones are most important to the audience. To this end, the host can enable question upvoting. (Reddit users are intimately familiar with this feature.)
-
During the webinar, click on the Q&A icon in the menu.
Zoom launches a new window.
-
In the upper right-hand corner of the Q&A window, click on the Settings icon.
Zoom displays additional options, as Figure 8-13 shows.
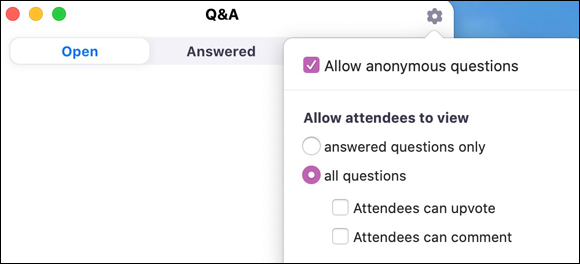
FIGURE 8-13: Zoom Q&A options.
-
Select the All questions checkbox and then select the Attendees can upvote checkbox.
Now attendees can mouse over others participants’ questions and click on the thumbs-up icon. Zoom tracks the number of likes and places the ones with the most votes at the top of the list.
Attendees can respond to others’ questions by following these directions:
-
During the webinar, click on the Q&A icon in the menu.
Zoom launches a new window.
-
Click on the Open tab.
Zoom displays attendees’ open questions.
- Click on a specific question.
- (Optional) Click on the thumb-ups icon to upvote the question.
- (Optional) Type a comment and click on the white Comment button.
As of this writing, many popular webinar tools pale in comparison to Zoom’s attendee functionality. For example, WebEx, GoToWebinar, ON24, and Brightalk currently do not allow webinar attendees to upvote or comment on questions.
Responding when webinar attendees raise their hands
When attendees raise their hands, panelists and co-hosts can view new activity by clicking on the Participants tab during the webinar. Zoom displays Figure 8-14.

FIGURE 8-14: Zoom notification of participant activity.
Performing other attendee-related actions
Zoom allows co-hosts and panelists to do a number of other things with individual participants:
- During the webinar, click on the Participants tab.
- Click on the name of the attendee in question.
-
From the menu that appears, select the action(s) that you want to perform.
Figure 8-15 displays the following attendee-related options:
- Allow the attendee to talk to fellow attendees and disable that ability if already enabled.
- Send them direct chat messages.
- Promote to panelist.
- Rename.
- Remove the attendee from the webinar.

FIGURE 8-15: Zoom attendee options.
For more information on managing attendees’ questions, visit bit.ly/zfd-manq.
Options for managing attendees’ specific questions remain after they leave the webinar. That is, they don’t need to be present for co-hosts and panelists to answer or dismiss them.
As the nearby sidebar illustrates, an experienced webinar co-host is worth her weight in gold.
Practice for your webinars. Unprofessional or underprepared hosts usually get only one bite at the apple. Attendees can always leave with a few mouse clicks.
Concluding Your Webinar
To state the obvious, by recording your webinar, Zoom provides you with more options than if you had not. For example, after you conclude your webinar, you can do each of the following things:
- Follow up with registrants and attendees.
- Access and/or edit the webinar recording.
- Share it on your website, YouTube, or wherever you like.
- Run reports and analyze data from your webinar.
Accessing your recorded webinar and sharing it with the world
All your preparation paid off. The webinar killed, and you’re glad that you recorded it. You want to access it and share it with people who couldn’t attend the live event via Facebook, Twitter, LinkedIn, and more.
Zoom makes performing these actions very easy.
- In the Zoom web portal, under the Personal header, click on Recordings.
- In the main area of the screen, locate the recorded webinar and click on the Share button.
-
In the window that appears, indicate what you’d like to do by sliding the appropriate toggles.
Figure 8-16 displays your related webinar-sharing options, including whether you want to:
- Enable a password for the webinar.
- Allow people to view the webinar on-demand without registration.
- Let the link to the webinar expire on a certain date.

FIGURE 8-16: Zoom webinar-sharing options.
- Make whatever changes you like from the options in the previous step.
-
Copy the sharing information to your computer’s clipboard.
Pay special attention to the webinar’s unique URL.
- Click on the white Done button.
You can share the link however you want, with whomever you want, and as often as you want.
Downloading your recorded webinar
Another popular distribution channel is YouTube. After uploading the webinar there, it takes all of about eight seconds to embed the webinar on your company’s website. By doing this, you keep users on your site and hopefully encourage them to interact even more.
- In the Zoom web portal, under the Personal header, click on Recordings.
- On the right-hand side of the screen, locate the recorded webinar and click on the More button.
- From the drop-down menu, choose Download (2 files).
-
Select where on your computer you want to save the video file.
Zoom’s default video-file format is .mp4.
- Click on the Save button.
-
(Optional) Select where on your computer you want to save the audio file.
Zoom’s default audio-file format is .m4a.
-
(Optional) Click on the Save button.
Figure 8-17 displays both the audio and video files.
Just like with meetings (covered in Chapter 4), Zoom provides transcriptions when you record your webinar to the cloud, but not locally.
FIGURE 8-17: Zoom downloaded webinar files.
-
(Optional) Edit the audio and video files with whatever program you like.
Visit bit.ly/zfd-editto read an informative post about some of Zoom’s file-editing options. - Upload the audio and video files to whatever service you like.
Soundcloud is a popular audio destination. Along with YouTube, Facebook and Vimeo are obvious choices for videos.
Running webinar-related reports
Who exactly who attended your webinar? How did attendees respond to your poll questions?
As long as your formal Zoom role permits you (and not your webinar-specific role), you can answer these types of questions by running reports:
- In the Zoom web portal, under the Admin header, click on Account Management.
-
Under Usage Reports, click on Webinar.
Account admins and regular members will see the word Reports instead of Usage Reports.
-
Select a reporting option.
Underneath the Step 1 heading, Zoom provides the following five reporting options:
- Registration Report: Displays a list of webinar registrants and related information.
- Attendee Report: Presents information on webinar attendees. (Remember that this data stems directly from the questions that you required them to answer upon registering for the webinar.)
- Performance Report: Provides information on attendee registration, attendance, and feedback.
- Q&A Report: Displays attendee questions and answers during the webinar.
- Poll Report: If you conducted polls during the webinar, displays attendee responses.
- In the top part of the screen, select the checkbox to the left of the report that you want to run.
-
(Optional) Underneath the Step 2 heading, restrict your available reports by date range and/or by webinar-ID filters.
For example, I selected the attendee report option. From here and as Figure 8-18 shows, Zoom displays the reports that I can run.
-
Select the radio box to the left of the specific report that you want to run.
For example, I am running a report from May 9, 2020 at 9:04 a.m.

FIGURE 8-18: Available reports on webinar attendees.
-
Under the Step 3 heading, select your report options.
Note that report options hinge upon the specific one that you want to run.
If you prefer simple, structured data, you probably want to leave these options blank. -
Click on the blue Generate CSV Report button.
CSV here stands for comma-separated values.
- Download the file to wherever you like on your computer.
-
Open the file in whatever data-analysis program you like.
I chose Microsoft Excel, as Figure 8-19 displays.
Note that I hid a few of the report fields and formatted the header record in Figure 8-19 to improve its visibility for the book.

FIGURE 8-19: Zoom webinar attendee report.
Chapter 6 goes much deeper into the subject of Zoom reports.
For more information on Zoom’s webinar-specific reports, visit bit.ly/zfd-webrep.
Deleting your recorded webinars
After a while, you may decide that you no longer need to store a copy of the webinar in your account, especially if you’ve already taken the steps in the previous section.
Delete your webinar by following these instructions:
- In the Zoom web portal, under the Personal header, click on Recordings.
- On the right-hand side of the screen, locate the recorded webinar and click on the More button.
-
From the drop-down menu, choose Delete.
Zoom displays a prompt confirming that you want to delete your files.
- Click on the blue Yes button.
If you change your mind, you can recover your deleted webinar as follows:
- In the Zoom web portal, under the Personal header, click on Recordings.
- On the right-hand side of the screen, click on the word Trash.
-
To the right of the deleted webinar, click on Recover.
Zoom displays a prompt confirming that you want to recover the deleted webinar.
-
Click on the blue Yes button.
Zoom briefly displays a green message acknowledging its successful recovery at the top of the screen.
Just like with meetings (discussed in Chapter 4), you can store your webinars as long as you like with one caveat: You need to stay within your plan’s data storage limit. As Chapter 2 describes, Zoom provides 1GB of free storage per account user on its Pro and Business plans.
Zoom emails the account owner when a user reaches 80 percent of his storage capacity. If a host reaches his storage limit during the webinar, Zoom graciously continues the recording until it finishes.