
Chapter 3
Setting Up Zoom
IN THIS CHAPTER
![]() Creating a new Zoom account
Creating a new Zoom account
![]() Downloading and installing the Zoom desktop client
Downloading and installing the Zoom desktop client
![]() Reviewing the benefits of user groups
Reviewing the benefits of user groups
![]() Understanding Zoom’s different roles
Understanding Zoom’s different roles
Zoom allows people to easily hold high-quality videoconferences with their colleagues, partners, customers, families, friends, or students. You may be jumping at the bit to start one.
I understand your excitement, but hold the phone. It’s essential to first cover a few foundational topics. Case in point: Before you can host a meeting, you need to take care of a few things.
This chapter explains the necessary housekeeping that you’ll have to perform in order to start using Zoom in earnest. Don’t worry. You’ll be up and running with Meetings & Chat shortly.
Taking Your First Steps
The world is data-driven. Rare is the company today that doesn’t want to collect basic information about its users and customers. To this end, in order for you to host a Zoom meeting, you’ll have to first create an account.
 Zoom labels all audio and video calls with others as meetings. This term may seem a bit formal to you. Still, I use it consistently throughout the book to avoid confusion with Zoom’s other offerings.
Creating a new Zoom account
Like many apps and web-based services today, Zoom requires users to establish accounts online if they want to host meetings.
Someone in your organization may have already created a Zoom account for you. That is, management may have already subscribed to one of Zoom’s premium plans and registered you. In this case, you don’t need to create a new account; you’ll just log in with your existing email address and password. If you’re not sure, just check with your employer’s IT department.
To create a new Zoom account, follow these steps:
- Go to the Zoom web portal at
https://www.zoom.us. -
In the upper right-hand corner of the website, click on the orange Sign up, it’s free button.
From here, Zoom provides you with three sign-up options via
- An email address
If you select the second or third option, then Zoom makes you authenticate your new account through that service. At a high level, you are granting Zoom permission to access some of the data that you have provided to Facebook or Google.
Admittedly, this practice is quite common. For example, for years Spotify has allowed people sign up for new accounts with Facebook. When they do, new users don’t need to provide Spotify with their names, dates of birth, email addresses, and the like. Facebook already stores this information about its users — and plenty more, depending on how much they share on the social network.
Say that that thought terrifies you or you don’t use those popular services. Simply select the first option and continue.
The following instructions assume that you’re signing up for Zoom with your email address, and not via Facebook or Google.
-
Enter your email address and click on the Sign-Up button.
Zoom informs you that an email confirmation is on its way (see Figure 3-1).

FIGURE 3-1: Zoom browser message.
 To minimize spam and the impact of bad actors, Zoom blocks certain domains from registering new accounts. For example, Zoom rejected
 [email protected]because people often use that domain to create disposable email addresses. (Chapter 9 dives much deeper into security and privacy.) -
Check your inbox and open the Zoom-authentication email.
The message resembles Figure 3-2.
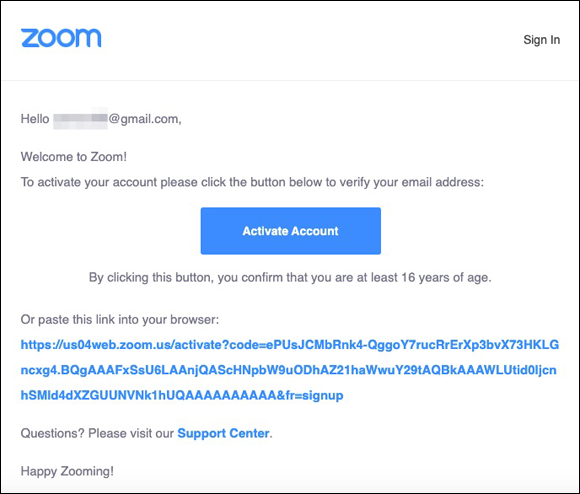
FIGURE 3-2: Zoom email requesting account authentication.
-
Open the email and click on the blue Activate Account button.
Zoom takes you to a new window or tab in your default web browser, as Figure 3-3 displays.

FIGURE 3-3: Completing your Zoom account.
-
Complete your Zoom account by entering the required information.
Zoom requires you to enter your first and last name. What’s more, you’ll need to create and confirm your password. When you click on the password field, Zoom prompts you with guidelines about what it can and cannot contain. For example, setting your password as starwars won’t fly. Try again, young Skywalker.
-
Click on the orange Continue button.
The Don't Zoom Alone screen appears.
-
(Optional) Invite your friends, family, and/or colleagues by typing in their email addresses.
Skip this step if you like by clicking on the button in the lower left-hand corner of the page. Zoom ultimately directs you to a page that lists your personal Zoom web page or URL, such as the one that Figure 3-4 displays.
 URL stands for Uniform Resource Locator. Many people equate this term to web address, although technically speaking that’s incorrect.
 -
Check your inbox again.
Zoom has sent you an email confirming your account and listing the features of your current plan, as Figure 3-5 displays. (Chapter 2 explains more about Zoom’s different plans.)
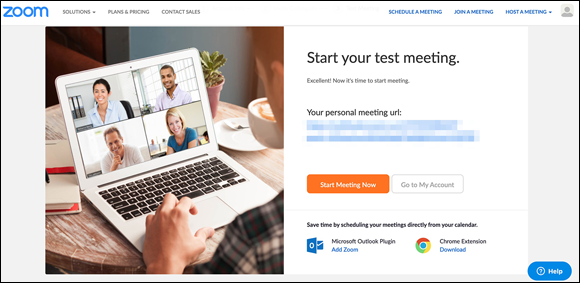
FIGURE 3-4: Zoom page with personal meeting URL.

FIGURE 3-5: Zoom email confirming new account.
Congratulations. Your Zoom account is now active.
You’re now halfway home. To take advantage of the powerful features in Meetings & Chat, however, you’ll want to install its desktop client. (For instructions, see the section “Downloading and installing the Zoom desktop client,” later in this chapter.)
Just like with many services today, you can create Zoom different accounts with different email addresses. In fact, you may want to create a personal Zoom account independent of your work account to separate church and state.
Modifying your Zoom plan
At some point, your business may expand, contract, or change. For example, maybe the sales folks begin to offer webinars and other customer-information sessions. Fortunately, Zoom allows its customers to easily upgrade, downgrade, cancel, and add on to their plans.
Your current Zoom role may prevent you from upgrading yourself or your organization to a more robust plan. (For more on roles, see the section “Creating new user roles,” later in this chapter.)
Upgrading from the Basic to the Pro plan
Say that you kicked the tires on Zoom’s Basic Meetings & Chat plan. You’re impressed and want to take it to the next level. Follow these directions to upgrade to the Pro plan:
- In the Zoom web portal, under the Personal header, click on Profile.
-
Scroll down until you see the User Type section.
Zoom displays your current plan. In this example, it’s the Basic one.
- Click on the Upgrade link to display a new page.
-
Click on the orange Upgrade Account button.
A table that describes Zoom’s different plans and features appears.
-
Click on the button of the plan to which you want to upgrade.
In this case, it’s the Pro plan.
-
Select the number of meeting hosts that you want to purchase.
Zoom’s default is one. More hosts results in a larger bill.
-
Select the length of your subscription.
Zoom defaults to annual (with a discount), but you can easily select monthly, if that’s your preference.
-
(Optional) Select your desired add-ons.
For more information on these options, see Chapter 2.
- Click on the Continue button at the bottom the page.
- On the page that appears, enter your contact information and payment method.
- Confirm that you’re not a robot and agree to the Privacy Policy and Terms of Services by selecting the appropriate checkboxes.
-
Click on the blue Upgrade Now button.
Zoom displays an order summary.
-
Look over the summary to ensure that you’re subscribing to your desired plan and for the desired time period; if you’re happy with what you see in the summary, then click on the orange Confirm button.
Zoom displays a message confirming that you’ve upgraded your plan, as shown in Figure 3-6.

FIGURE 3-6: Zoom message confirming upgrade from Basic to Pro plan.
Note that your specific upgrade steps may vary slightly based upon
- Your organization’s existing plan
- The length of its current subscription
- Whether or not it had already upgraded
Canceling and making other changes to your existing plan
If you decide to cancel, change, or add on to your existing Meetings & Chat plan, follow these directions:
- In the Zoom web portal, under the Admin header, click on Account Management.
-
Click on Billing to display your current plans and add-ons.
Zoom displays your current plans and add-ons. Figure 3-7 displays my Zoom account dashboard.
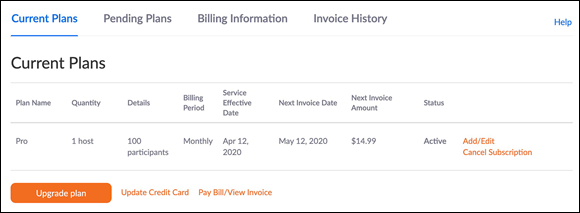
FIGURE 3-7: Zoom account dashboard.
-
Make your desired changes.
From the Zoom dashboard, you can
- Downgrade your Zoom plan.
- Cancel your Zoom Meetings & Chat subscription.
- Update your credit card.
- Pay your bill.
- View your invoices.
- Add new features to your existing Zoom Meetings & Chat subscription.
Downloading and installing the Zoom desktop client
To be sure, Zoom users and customers can participate in meetings no matter where they are as long as they can connect to the Internet. Again, Meetings & Chat runs on anything: smartphone, tablet, laptop, and desktop.
Still, to take advantage of all of Zoom’s robust functionality, you’ll want to install the Zoom desktop client. Fortunately, if your computer runs MacOS, Windows, or even Ubuntu/Linux, Zoom has you covered.
A desktop client is an application running on a desktop computer. Although purists will probably furrow their brows, I use the terms desktop client and computer app interchangeably. By the way, you can run that desktop client on your laptop.
To install the Zoom desktop client on your computer, follow these steps:
-
In the Zoom web portal, hover over the word Resources in the top right-hand corner.
A drop-down list appears.
-
Select Download Zoom Client from the drop-down list.
Zoom takes you to its Download Center, shown in Figure 3-8.
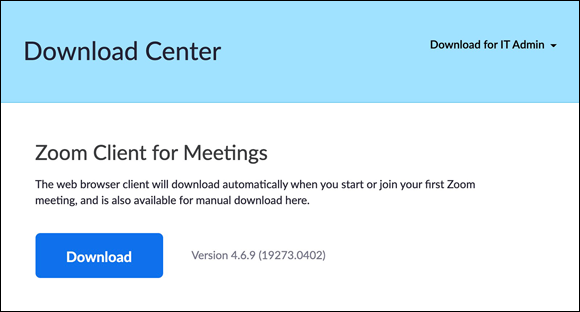
FIGURE 3-8: Zoom Download Center.
-
Click on the Download button.
Depending on your browser and how you’ve configured its settings, you may receive a warning that you’re about to download a file. If you do, then proceed.
-
Save this file to your computer.
The specific location is generally a matter of personal preference, but it’s wise to follow these common conventions:
- For PC/Windows users: C:Program Files
- For Mac users: Hard-drive nameApplications
Remember where you save this file.
-
Once the download completes, locate the file.
The specific type of file hinges upon your computer’s operating system. As of this writing, here are the filenames and extensions:
- For PC/Windows users: An executable file or with an .exe extension called Zoominstaller.exe.
- For Mac users: An installer package archive file with a .pkg extension named zoomusInstaller.pkg.
Remember where you saved this file. You’re going to need it for the next step.
-
Double-click on the file to launch Zoom’s installation wizard.
The exact steps that you follow depend upon your computer’s operating system. If you’ve ever installed a new program on your computer before, then you’ll recognize the steps required.
-
Complete the steps in the wizard.
Once you do, then the Zoom desktop client is installed. You can easily host audio and videoconferencing calls with people on any device across the globe.
 If you want to access Zoom directly via your web browser of choice, you’re in luck. Just visit
 bit.ly/zoom-brows and install the extension for Chrome, Firefox, or another browser. Note, however, that using Zoom via a browser means that you won’t be able to do everything that you can on the desktop client.
Signing in to the Zoom desktop client
After you sign up for a Zoom account and download and install the desktop client on your computer (see preceding section), you can sign in to the Zoom desktop client:
-
Launch the Zoom desktop client.
Zoom displays the window shown in Figure 3-9.
Note two things here: Zoom remembers who you are after you successfully log in. Second, Figure 3-9 displays an option that I have not mentioned yet: single sign-on or SSO. If you’d like to know more about it, then read the nearby sidebar “Making life simple with SSO.” For the purposes of the simple directions, however, you can ignore it.
- Enter your email address and password.
-
Click on the blue Sign In button.
Zoom takes you to the main screen.

FIGURE 3-9: Logging in to the Zoom desktop client.
Completing your Zoom profile
At a bare minimum, you’ll want to add a profile picture so that your colleagues and/or friends will recognize you.
To set your profile photo, follow these steps:
- In the Zoom web portal, under the Personal header, click on Profile.
-
Click on Change, which is below the person icon next to your name.
The Change Picture window appears.
-
Click on the Upload button in the lower left-hand corner.
Zoom warns you that the maximum file size is 2MB.
- Choose the photo that you want to upload from your computer.
- (Optional) Crop the photo.
- Click on the blue Save button.
From time to time, you may want to modify your Zoom profile. For example, perhaps you changed jobs or locations within your company. Zoom lets you make plenty of additional, self-explanatory edits in this part of its web portal. Note, however, that your role may limit the changes that you can make to your profile and account. (See the section “Discussing the Importance of Zoom Roles,” later in this chapter, for more information.)
Getting to know the Zoom UI
After you create your account and install the Zoom desktop client, you can explore Zoom’s user interface (UI). Figure 3-10 displays the screen that appears when you log in to Zoom. Keep in mind that Figure 3-10 displays the UI for Zoom Meetings & Chat, not for its other offerings.
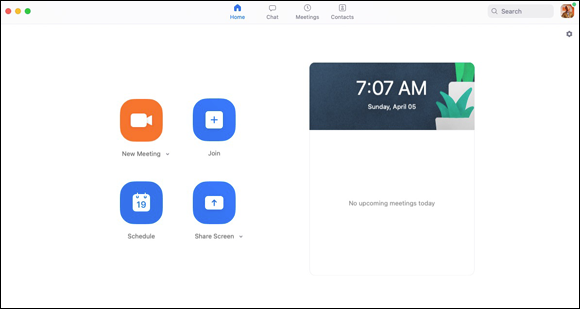
FIGURE 3-10: Zoom Meetings & Chat user interface.
Think of the UI as a dashboard from which you can launch meetings, join existing meetings, tweak your settings, and do much more. After installing the Zoom app, the following icons and elements (from left to right) appear at the top of the screen:
- Home: Clicking on Home always takes you back to this main screen. Think of Home as the equivalent of the home page in your favorite web browser.
- Chat: In Chat, you can start new text-based individual and group chats. You can also access your previous ones.
- Meetings: In Meetings, you can find information on your previous and future meetings and view recording meetings, among other things.
- Contacts: You can access your directory of Zoom contacts and create channels, or containers for group-based text messages and file exchanges.
- Search bar: You can search for messages, files, and contacts that exist within Zoom.
- Your Zoom Meetings & Chat profile: You can set your status, edit your profile, check for app upgrades, and more.
- Settings icon: You can control settings, such as video, audio, chat, and screen-sharing for Zoom meetings.
The following four icons adorn the left-hand side of the screen:
- New Meeting: Start and host a new Zoom meeting.
- Join: Join an existing Zoom meeting — that is, one that another host has initiated.
- Schedule: Set up a future meeting and configure its settings.
- Share Screen: Share your screen with other meeting participants.
I unpack these features and settings in Chapters 4 and 5. For now, suffice it to say that you’ll frequently return to the home screen of Zoom’s desktop client. In other words, you won’t just set it and forget it.
Reviewing Zoom Account Management
Think about your colleagues for a moment. How many of them are relatively new to your group or organization? How many have been there for a decade or more?
Zoom understands that organizations are living, breathing things. Things change. Maybe the president hires a new VP of finance and five programmers. Conversely, Travis’s bad behavior finally caught up with him, and management has shown him the door. Your cross-town rival poaches a few of your rock stars.
Fortunately, Zoom makes account management a breeze.
You must belong to a premium plan to add users to your Zoom account. (For more information on Zoom’s different plans, see Chapter 2.)
If you’re on the Zoom’s Basic plan, then the rest of this chapter covers functionality unavailable to you. Still, I’d encourage you to carefully read the rest of this chapter. At some point, you or your organization may upgrade from the Basic plan to one of Zoom’s premium offerings. To this end, failure to understand the features on these Zoom plans can result in excess charges, lost data, security issues, and a bevy of other troubles.
Adding new users to your Zoom account
It’s a cinch in Zoom to create new user accounts for your employees, partners, vendors, and customers. In fact, you can add new Zoom users to your account for anyone in the world, even if those folks don’t work for your organization, by follow these steps:
- In the Zoom web portal, under the Admin header, click on User Management.
- Click on Users to see a list of your organization’s current Zoom users.
-
On the right-hand side of the page, click on the Add Users button.
The Add Users window appears, as shown in Figure 3-11.
- Enter the email addresses for any users you want to add, using commas to separate their email addresses.
-
Select the type of user(s) that you’re adding.
Your choices are
- Basic: Zoom lets these users ride for free, but they aren’t able to access any of your plan’s premium features.
- Licensed: Zoom’s default option results in account charges, the extent to which hinge upon your organization’s plan.
- On-Prem: These users can host meetings with unlimited minutes only if they use a Zoom Meeting Connector. (Chapter 11 discusses Zoom Phone in much more depth.)

FIGURE 3-11: Zoom prompt to add new users.
Pay attention here. Some people have neglected to check this option only to find unexpected charges at the end of their billing cycles. -
Select the features that you want to assign to the user(s).
Note that Zoom restricts you based upon your existing plan. For example, if you’re currently not paying for webinars, then Zoom forbids you from adding a user with the ability to host them. In this case, you have to subscribe to webinars as an add-on first.
- (Optional) Enter the new user’s department, job title, and/or location.
-
Click on the blue Add button at the bottom of the screen.
Zoom displays a temporary message at the top of the screen that lets you know the user(s) have been added.
Deactivating existing accounts
Say that John has stepped on a bunch of shattered glass and has to take a two-month medical leave. (He wasn’t wearing shoes. It’s a long story.) Here’s how you can deactivate his Zoom account.
- In the Zoom web portal, under the Admin header, click on User Management.
- Click on Users to see a list of your organization’s current Zoom users.
- On the left-hand side of the page, select the checkbox to the left of the name of the person whom you want to deactivate.
-
On the right-hand side of the page, click on the three horizontal dots that correspond to his name.
Zoom displays three options:
- Deactivate
- Delete
- Unlink
-
Choose Deactivate from the menu that appears.
Zoom asks you to confirm the deactivation. The user will no longer be able to access any Zoom service.
- Click on the blue Deactivate button.
A few months later, John has healed and wants to return to work. Reactivate him by following the same steps with one exception: You’ll choose Activate in Step 5.
Deleting existing users from your Zoom account
Sometimes deactivating an employee’s user account is insufficient. Perhaps an employee did something unconscionable, such as stole company secrets. Maybe an employee passed away.
In either case, you want to permanently eliminate the person’s Zoom account. Follow these steps:
- Follow Steps 1 through 4 in the “Deactivating existing accounts” section, earlier in this chapter.
-
Choose Delete.
Zoom displays a window asking whether you want to transfer the data associated with the current user’s account. This step is optional, but your choices are
- All upcoming meetings
- All upcoming webinars
- All cloud recording files
-
Select your desired data transfer options by selecting the appropriate checkboxes, entering an email address when prompted.
Zoom assigns all of the current user’s data to the account associated with the email address that you enter here.
-
If you selected data transfer options in the preceding step, then click on the Transfer Data, Then Delete button; otherwise, click on the Delete Now Without Data Transfer button.
Either way, you need to click on a red button to proceed with the account deletion. Zoom displays a message at the top of the screen indicating that it has processed the account deletion. That account no longer appears in the list of users.
This step is permanent. There is no CTRL+Z.
Unlinking users from your Zoom account
Zoom offers one final option for managing accounts, one slightly less draconian than deletion. By unlinking an account from the mother organization, the account continues to exist — just under a different, unaffiliated email address. Think of it as a divorce.
Follow these steps to remove a user account from your organization in Zoom:
- Follow Steps 1 through 4 in the “Deactivating existing accounts” section, earlier in this chapter.
-
Choose Unlink.
Zoom displays a window asking whether you want to transfer the data associated with the current user’s account. This step is optional, but your choices are
- All upcoming meetings
- All upcoming webinars
- All cloud recording files
-
Select your desired data transfer options by selecting the appropriate checkboxes, entering an email address when prompted.
Zoom assigns all of the current user’s data to the account associated with the email address that you enter here.
-
If you selected data transfer options in the preceding step, then click on the Transfer Data, Then Unlink button; otherwise, click on the Unlink Now Without Data Transfer button.
Either way, you need to click on a red button to proceed to unlink the account.
Note that the email address must correspond to an active and existing Zoom account in your organization.Zoom displays a message at the top of the screen indicating that it has unlinked the account. That user account no longer appears in your Zoom web portal.
You can do even more with Zoom’s robust account management functionality. See bit.ly/zm-acct-x for loads of additional information on this topic.
Unlocking the power of Zoom user groups
Zoom offers customers on premium plans a particularly valuable and timesaving feature: user groups. At a high level, user groups grant admins and owners the ability to manage user settings at the group level. In other words, they can concurrently change or lock the settings for multiple users. If that seems a bit abstract, then consider one of the many potential applications of user groups.
The fictitious Octavarium University has subscribed to Zoom’s Education plan for years. To build camaraderie and minimize misunderstandings, the school encourages its employees to enable their video when holding remote meetings. (See Chapter 4 for more information on this subject.)
At the same time, its administrators are justifiably concerned about student privacy, especially during the pandemic. They want to ensure that students don’t join their professors’ Zoom meetings with their video automatically enabled. In other words, undergraduates can activate their webcams if they want, but the choice should ultimately be theirs to make.
Jordan is Octavarium’s Zoom admin. To make this change for all university professors, he follows this three-step process:
- Create a new user group.
- Populate the user group.
- Apply the relevant Zoom account setting for that user group.
You can also restrict apps to specific user groups. Chapter 7 covers Zoom’s third-party apps in more detail.
Creating a new user group
You first create a specific Zoom user group for professors by following these directions:
- In the Zoom web portal, under the Admin header, click on User Management.
- Click on Group Management.
- On the right-hand side of the page, click on the white Add Group button.
-
From the prompt, enter the name of the user group.
In this case, he calls it Professors.
- (Optional) Enter a description of the group.
-
Click on the blue Add button.
Zoom displays a brief message in green at the top of the screen that the group is created.
Populating a user group
Jordan has created a new user group, but by itself it is useless. In order to customize users’ settings, he needs to place existing Zoom members into these groups — specifically, all of Octavarium’s college professors.
You can populate a user group by following these directions:
- In the Zoom web portal, under the Admin header, click on User Management.
- Click on Group Management.
-
On the right-hand side of the page, click on the name of the group to which you want to add members.
In this case, it’s the Professors user group.
- On the right-hand side of the page, click on the white Add Members button.
- From the prompt, select as many users as you want by entering part of their email addresses into the text box.
-
Click on the blue Add button.
Zoom confirms that you successfully added the group members.
Now that Jordan has both created the user group and added professors to it, he can now apply a specific change to all Octavarium professors in one fell swoop. At a high level, Zoom’s options fall into three buckets:
- Meeting: Chapter 4 delves into Zoom’s robust meeting options.
- Recording: Chapter 4 delves into this subject as well.
- Telephone: Zoom Phone is the subject of Chapter 11.
Changing a user group
Jordan is almost finished. He wants to allow group members to join meetings without enabling video:
- In the Zoom web portal, under the Admin header, click on User Management.
- Click on Group Management.
- On the right-hand side of the page, click on the name of the group whose settings you want to change.
-
Find the setting that you’d like to tweak for this group.
In this example, Jordan wants to ensure that students can join meetings without enabling their video.
- Click on the Meeting tab on the right-hand side of the page to enable members to join meetings without enabling videos.
-
Next to Participants video, slide the blue toggle button left.
It turns gray, indicating that it’s now off.
Zoom displays a brief message in green at the top of the screen that confirms that the settings have been updated.
-
As an added safety measure, click on the gray lock icon to the right of the toggle button so that no one can override this setting.
Zoom displays the same confirmation message at the top of the screen. Voilà! Now Octavarium students can join Zoom meetings with their professors via audio only if they desire.
I have just scratched the surface on what user groups can do. Chapter 9 covers this meaty topic in the context of Zoom’s privacy and security settings, many of which owners and admins can easily apply via user groups.
For much more information on user groups, see bit.ly/zfd-groups.
Discussing the Importance of Zoom Roles
Zoom relies heavily upon user roles. In this way, Zoom resembles most powerful systems and applications. The basic premise behind roles is straightforward: In any organizations, users’ needs and responsibilities will differ. As such, they require the ability to perform certain actions. Just as important, certain users should not be able to do specific things. It’s not hard to imagine the chaos that would result if everyone in Zoom could perform every task.
Like users (the topic of the previous section), Zoom roles apply only to its premium plans: Pro, Business, Enterprise, Enterprise Pro, and Education. If your organization is currently a member of Zoom’s Basic plan, then it will have to upgrade to take advantage of the considerable flexibility and functionality that roles provide.
Reviewing Zoom’s default roles
Zoom ships with three default user roles:
- Owner: This role grants full privileges to access and manage the organization’s Zoom account. No one outranks the owner. For example, an owner can invite others to the Zoom account and downgrade, upgrade, or cancel a Zoom subscription altogether.
- Admin: While an admin technically sits underneath an owner, their privileges run the gamut. They can perform a number of essential tasks, both for themselves and others. For example, an admin can add, remove, and edit users.
- Member: Members operate largely within the boundaries that owners and admins have set for them. Many times, they can change their individual settings, but they generally cannot alter Zoom settings that affect others in the organization.
Creating new user roles
If the roles of owner, admin, and member seem a skosh confining to you, then you’re in luck. Say that you want to create a new role specifically for Roger, the head of marketing. Roger frequently hosts webinars for prospective customers. As a result, he needs to be able to do a few things that regular members can’t. At the same time, though, you don’t want to give him the keys to the kingdom.
Zoom lets admins and owners create new roles as needed. Just follow these steps:
- In the Zoom web portal, under the Admin header, click on User Management.
-
Click on Role Management to see the current roles in your organization.
By default, they are owner, admin, and member.
- On the right-hand side of the page, click on the Add Role button.
- Enter a name for the role.
- (Optional) Enter a description for that role.
-
Click on the blue Add button.
Zoom displays a boatload of options.
-
Select the specific options that you want to grant to the new role.
At a high level, Zoom lets you determine what the people in the role will be able to do. Options include
- View the setting or output
- Edit the setting
- Do both
- Do neither (the default)
-
When you finish, click on the blue Save Changes button at the bottom of the screen.
Zoom displays a temporary message in green at the top of the screen that confirms that your settings have been updated.
Your custom role is created, but it’s not assigned to anyone in your organization.
Tread lightly when creating new roles. Zoom grants users assigned to these new roles the power that you grant them. For example, in the preceding example, if you mistakenly allow Roger to delete users’ accounts, then he will be able to do just that.
Changing an existing user’s role
Employees and companies part ways. New hires come aboard. People transfer from one part of the company to another. Don’t worry, though. Zoom recognizes that things change.
To assign someone in your organization a new Zoom role, follow these steps:
- In the Zoom web portal, under the Admin header, click on User Management.
- Click on Users to see a list of users in your organization.
-
Click on the Edit button next to the name of the person whose role you want to change.
Zoom displays a new window that allows you to edit the user’s information.
- Next to User Role, choose the user’s new role from the drop-down menu.
-
Click on the blue Save button.
Zoom displays a temporary message in green at the top of the screen to confirm that you successfully changed the user’s role.
Common courtesy dictates that you alert people when you’ve changed their roles.
For much more about Zoom roles, see bit.ly/zmroles.