Chapter 14. The web: web views and internet protocols
Internet connectivity is an essential feature of modern life, and the iPhone and iPad are so useful because iOS allows for easy internet access. In this chapter, we’ll cover the major ways to access the internet from the SDK. You can use a variety of approaches, and we’ll outline their hierarchy in the first section. Later in the chapter, we’ll look at low-level networking, working with URLs, using the UIWebView, parsing XML, using POST, and accessing the social web using various protocols.
14.1. The hierarchy of the internet
Internet programming involves a hierarchy of protocols. At the lowest level are the sockets you use to connect one computer to another. Above them are a variety of more sophisticated technologies, such as FTP, Bonjour, and HTTP. HTTP is a critical protocol, represented on the iPhone and iPad by both low-level access and the high-level UIWebView. Recently, an increasing number of protocols have been built on top of HTTP, forming what we call the social web.
This hierarchy of internet protocols is shown in figure 14.1, along with iOS classes of note.
Figure 14.1. Internet protocols are arranged in a hierarchy.

In this chapter, we’ll cover all these protocols, starting with the lowest level. But our real focus will be on the higher-level internet and social web protocols, because they’re the protocols that are best supported by iOS, and they’re the ones you’re most likely to want to interact with.
14.2. Low-level networking
We’ve opted not to pay much attention to BSD sockets and the lower-level networking classes, because we expect they’ll be of little interest to most application programmers. If you need to work with BSD sockets, you should look at Apple’s “Introduction to CFNetwork Programming Guide.”
If you need to work with the lower-level protocols, CFNetwork provides a variety of classes that you’ll find useful. You can find more information about them in the “Networking & Internet” topic in the Apple docs. In particular, the “CFNetwork Framework Reference” will give you an overview of the various classes. Among the classes are CFFTPStream, which lets you communicate with FTP servers; and CFNetServices, which gives you access to Bonjour—Apple’s service discovery protocol. There are also two low-level HTTP-related classes, CFHTTPMessage and CFHTTPStream. We’ll leave these classes alone, because our HTML work will be related to the higher-level NSURL, NSURLRequest, UIWebView, NSMutableURLRequest, and NSURLConnection classes.
Rather than skipping over these low-level and unabstracted protocols entirely, we’ll look at one of them: CFHost. It’s the easiest to work with and perhaps the most immediately useful.
CFHost allows your program to request information about an internet host, such as its name, its address, and whether it’s reachable. The following listing shows a sample of how to determine whether a hostname exists.
Listing 14.1. A simple hostname lookup
-(IBAction)reportStatus:(id)sender {
    CFStreamError errorTest;
    if (myInput.text) {
        CFHostRef myHost = CFHostCreateWithName(kCFAllocatorDefault,
            (CFStringRef)myInput.text);
        if (myHost) {
            if (CFHostStartInfoResolution(myHost, kCFHostAddresses,
                &errorTest)) {
                myOutput.text = [myInput.text stringByAppendingString:
                    @" COULD be resolved."];
            } else {
                myOutput.text = [myInput.text stringByAppendingFormat:
                    @" could NOT be resolved (Error: %i).",
                        errorTest.error];
            }
        }
        CFRelease(myHost);
    }
}
The sample method, reportStatus:, is activated by a button push. It reads a hostname from a UITextField called myInput and reports out to a UITextView called myOutput.
All uses of the CFHost commands follow the same pattern. First you create a CFHostRef object with CFHostCreateCopy, CFHostCreateWithAddress, or CFHostCreateWithName. Then, you use CFHostStartInfoResolution to request a certain type of information, which can be kCFHostAddresses, kCFHostNames, or kCFHostReach-ability. This example omits a final step in which you retrieve the information with CFHostGetAddressing, CFHostGetNames, or CFHostReachability—something that isn’t necessary here because the point is to see if the request for an address resolves correctly.
You can find more information about these functions, and about how to use a callback function to make the host resolution asynchronous, in the CFHost reference.
We consider this look at low-level networking—and CFHost—an aside, meant only to hint at what’s possible if you must do lower-level networking work. Now, we’ll move on to higher-level HTML-related network work that’s more likely to be the focus of your network programming. The first thing you’ll need to know is how to use iOS’s URL objects.
14.3. Working with URLs
With HTTP being the basis of most internet programming, it shouldn’t be a surprise that URLs are a foundational technique for internet-based programming. You’ll use them whether you’re calling up UIImageViews, accessing content by hand, or parsing XML. As a result, we’ll spend some time on the two fundamental URL classes: NSURL and NSURLRequest. We’ll also look at how to manipulate HTML data by hand.
14.3.1. Creating an NSURL
An NSURL is an object that contains a URL. It can reference a website or a local file, as any URL can. You’ve used it in the past to access Apple’s stock page and to load local media files for play.
As noted in the NSURL class reference, you can use numerous methods to create an NSURL. The most important ones are listed in table 14.1.
Table 14.1. A variety of NSURL creation methods
|
Method |
Summary |
|---|---|
| fileURLWithPath: | Creates a URL from a local file path |
| URLWithString: | Creates a URL from a string; equivalent to initWithString: |
| URLWithString:relativeToURL: | Adds a string to a base URL; equivalent to initWithString:relativeToURL: |
When you have an NSURL in hand, you can do any number of things with it:
- You can pass it on to functions that require a bare NSURL.
- You can query its properties to easily break down the URL into its parts. As usual, you can find a complete list of properties in the Apple reference, but properties like baseURL, fragment, host, path, port, and query may be particularly useful.
- You can use the NSURL to load a UIWebView.
The first two possibilities require only the use of an NSURL; but when you’re working with a UIWebView, you must first create an NSURL and then turn it into an NSURLRequest.
NSURL is a toll-free bridge to CFURL, making an NSURL * and a CFURLRef equivalent. We take advantage of this in chapter 12 when dealing with the MPMoviePlayer-Controller and with sounds. Whenever you need to create a CFURLRef, you can do so using the standard methods for NSURL creation that are described in this chapter.
14.3.2. Building an NSURLRequest
The NSURLRequest class contains two parts: a URL and a specific policy for dealing with cached responses. As noted in table 14.2, there are four ways to create an NSURLRequest, although we expect you’ll usually fall back on the simple factory method, requestWithURL:.
Table 14.2. The related NSURLRequest init methods
|
Method |
Summary |
|---|---|
| requestWithURL: | Creates a default request from the URL; equivalent to initWithURL: |
| requestWithURL:cachePolicy:timeoutInterval: | Creates a request with specific caching choices; equivalent to initWithURL:cachePolicy:timeoutInterval: |
By default, an NSURLRequest is built with a caching policy that’s dependent on the protocol and a timeout value of 60 seconds, which should be sufficient for most of your programming needs. If you need to get more specific about how things are loaded, you can call requestWithURL:cachePolicy:timeoutInterval:, giving it an NSURLRequestCachePolicy for the policy and an NSTimeInterval for the timeout.
You can also create a more interactive NSURLRequest by using the NSMutableURL-Request class, which allows you to more carefully form and modify the request that you’re sending. We’ll talk about this in section 14.6, when we examine how to send POST requests.
The NSURLRequest will get you through most web page work. As with the NSURL, you can do a few different things with an NSURLRequest. You can hand it off to a UIImageView, or you can use it to read in the contents of a web page, to later manipulate it by hand.
14.3.3. Manipulating HTML data by hand
To read the contents of a web page manually, you need to access an NSURLRequest’s properties. Table 14.3 lists some of the most important ones, although, as usual, you can find more information in the class reference.
Table 14.3. NSURLRequest can give access to a page’s content.
|
Property |
Summary |
|---|---|
| allHTTPHeaderFields | Returns an NSDictionary of the header |
| HTTPBody | Returns an NSData with the body |
| valueforHTTPHeaderField: | Returns an NSString with the header |
If you’re not reading data that meets the HTTP protocol, you can’t use NSURLRequest’s properties to access the data. Instead, you must fall back on other functions that let you read in data from an NSURL.
You’ve already met functions that read data that follows other protocol specifications, such as the MPMoviePlayerController and the sound players from chapter 12. Similarly, in this chapter we’ll talk about an XML parser. All of these classes can read directly from a URL.
If you need to capture raw data that isn’t set in HTML, the best way to do so is with an init or factory method that reads from a URL, such as NSData’s dataWithContentsOfURL:. We’ll look at an example of that in the last section of this chapter.
The catch with these properties is that you can work only with well-defined HTML pages. Most notably, the NSURLRequest properties can’t read fragments, such as would be generated by Ajax or JSON, nor can they parse other sorts of content, such as XML or RSS.
You may also discover that you need a more interactive way to deal with HTML data. In this case, you’ll probably use an NSURLConnection object; but as with the NSMutableURLRequest, we’ll save that for later, because you’ll typically need to use it only when you’re POSTing information to a web page rather than just retrieving it.
For the moment, we’ll put all these complexities aside and look at how to display straight HTML data using the SDK’s UIWebView.
14.4. Using UIWebView
One of the easiest ways to connect to the internet is to use the UIWebView class, which gives you full access to web pages of any sort. In some ways, this class is of limited utility, because it largely duplicates Safari, and Apple isn’t interested in approving applications that duplicate their existing technology. But there are clearly situations where you’ll want a program to be able to refer to some specific web pages, and that’s what UIWebView is for.
The class is easy to use—we included it in simple examples way back in chapters 3 and 4. The only real complexity is in building an NSURL or NSURLRequest object to get your web view started, but that process follows the methods you’ve already seen.
14.4.1. Calling up the web view
The two main ways to fill a web view once you’ve created it are listed in table 14.4. Most frequently, you’ll start with an NSURLRequest, which you must create using the two-step process we described in the previous section; but you can also load a web view with an NSURL and an NSString. A few other init methods can be found in the class reference.
Table 14.4. Methods for loading UIWebView
|
Method |
Summary |
|---|---|
| loadHTMLString:baseURL: | Loads a page from a URL and a string |
| loadRequest: | Loads a page from an NSURLRequest |
Assuming you use the more common NSURLRequest method, you can put together all the lessons you’ve learned so far, which is just what you did back in chapter 3 when you created your first UIWebView:
[myWebView loadRequest:
    [NSURLRequest requestWithURL:
        [NSURL URLWithString:url]]];
When you have a UIWebView, you can start working with it. The five UIWebView methods and properties of particular note are summarized in table 14.5.
Table 14.5. Some sterling UIWebView options
|
Method/Property |
Type |
Summary |
|---|---|---|
| goBack | Method | Moves back a page; check canGoBack property first |
| goForward | Method | Moves forward a page; check canGoForward property first |
| reload | Method | Reloads the current page |
| scalesPageToFit | Property | Boolean that determines whether the page is zoomed into a viewport and whether user zooming is allowed |
We think the most exciting options are the goBack, goForward, and reload methods, which give you some control over how the UIWebView moves among pages. Similarly, the loadRequest: method can be continually rerun if you want to move a user through multiple pages, treating the UIWebView more like a web slideshow than a browser.
Warning
In our opinion, the scalesPageToFit property doesn’t work correctly at the current time. It always scales the page as if the UIWebView were full screen, and it leaves a less than optimal view if you create a small UIWeb-View, as you’ll do in the next example. As of iOS 4.0, this has yet to be resolved.
You must always load NSURLs using the loadRequest: method of NSURLRequest that we’ve laid out here to load pages into your web views.
14.4.2. Managing the web view delegate
One critical element we haven’t discussed previously is that you can set a delegate to manage a few common responses. You must follow the UIWebViewDelegate protocol, which lists four methods, described in table 14.6.
Table 14.6. Managing UIWebViews with delegate methods
|
Method |
Summary |
|---|---|
| webView:shouldStartLoadWithRequest:navigationType: | Called prior to content loading |
| webViewDidStartLoad: | Called after content begins loading |
| webViewDidFinishLoad: | Called after content finishes loading |
| webView:didFailLoadWithError: | Called after content fails to load |
Together with the UIWebView methods, these delegate methods give you considerable power. You can use them to load alternative web pages if the preferred ones don’t load. Or, continuing the slideshow analogy, you can use them to continuously load new pages when old ones finish. All those possibilities highlight the ways you may be able to use the UIWebView as more than a Safari clone.
14.4.3. Thumbnails: a web view example
As we’ve previously stated, UIWebViews are easy to set up, and we’re not going to spend a lot of time on a coding sample. Listing 14.2 presents a simple example that creates a set of web page thumbnails, similar to the startup page of the Google Chrome browser. It uses delegates first to get rid of UIWebViews that don’t load and later to zoom in on the one the user selects.
You should initially create it visually by laying out four UIWebViews on your interface. Make sure they’re set to scale, and set their delegates to be the view controller.
Listing 14.2. A thumbnail web viewer
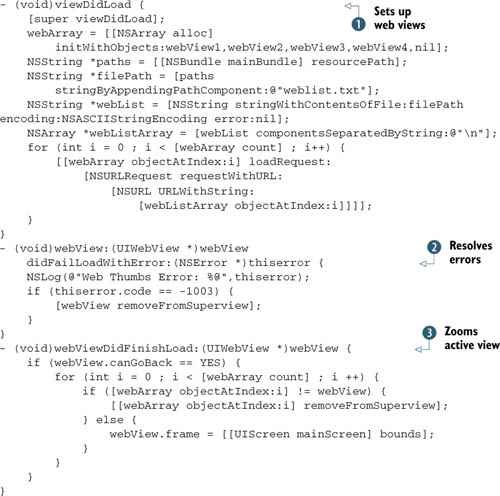
To start with, you read a set of (exactly) four URLs from a file and use the NSString method componentsSeparatedByString: to turn them into an NSArray that you use to seed your web views ![]() . After that, it’s a question of responding to delegation messages.
. After that, it’s a question of responding to delegation messages.
The webView:didFailLoadWithError: method ![]() shows off some valuable techniques for both debugging and error management. You should use NSLog when you want to do a printf-style reporting of runtime variables. It outputs to /var/log/system.log when you run it in the Simulator.
shows off some valuable techniques for both debugging and error management. You should use NSLog when you want to do a printf-style reporting of runtime variables. It outputs to /var/log/system.log when you run it in the Simulator.
In a UIWebView, two error codes come up with some frequency: -1003 is “Can’t find host,” and -999 is “Operation could not be completed.” This example ignores -999 (which usually means the user clicked a link before the page finished loading); but in the case of a -1003 failure, you dismiss the web view.
We haven’t talked much about debugging your SDK program in this book, primarily for reasons of space. Here’s a short overview of our favorite techniques:
Xcode itself provides the best debugging. Pay careful attention to autocompletion of words and note when an expected autocompletion doesn’t occur, because that usually means you didn’t set a variable correctly.
Always carefully consider the warnings and errors that appear on compilation.
Finally, after you’ve finished with your program, you should run it through Instruments to check for memory leaks.
For more information, see “Xcode Debugging Guide,” “Debugging with GDB,” and “Instruments User Guide,” Apple articles that contain comprehensive explanations of those subjects.
Finally, the webViewDidFinishLoad: method ![]() zooms in on an individual web view (dismissing the rest) after a user clicks a link and the page loads. Realistically, this
should occur whenever the user touches the web view; but we wanted to show the UIWebView delegate methods, so we chose this slightly more circuitous route.
zooms in on an individual web view (dismissing the rest) after a user clicks a link and the page loads. Realistically, this
should occur whenever the user touches the web view; but we wanted to show the UIWebView delegate methods, so we chose this slightly more circuitous route.
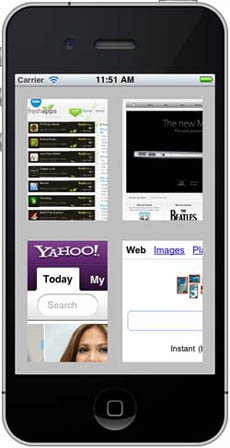
And that’s it—a simple web thumbnail program, as shown in figure 14.2. It could be improved by giving the user the ability to manage the selected URLs and by polishing the way the user selects an individual page (including an option to return to the thumbnail page afterward). For our purposes, though, it does a great job of demonstrating some of the intricacies of the UIWebView.
Figure 14.2. As shown on an iPhone, the thumbnail web views load on the screen.
Before we finish with web views, we’ll look at one more example. In chapter 10, we talked about how Core Location would be better served when we got into the world of the internet. In section 14.5.4, we’ll look at the first of two Core Location internet examples.
14.5. Parsing XML
Extensible Markup Language (XML) is a generalized markup language whose main purpose is to deliver data in a well-formed and organized way. It has some similarities to HTML, and an XML version of HTML has been released, called XHTML.
Because of XML’s popularity on the internet, the iOS SDK includes its own XML parser, the NSXMLParser class. This is an event-driven API, which means it reports start and end tags as it moves through the document, and you must take appropriate action as it does.
Running the NSXMLParser involves setting it up, starting it running, and then reacting to the results. We’ll cover that process in the rest of this section. For more information about any of these topics, we suggest reading Apple’s “Event-Driven XML
When using NSXMLParser, you’ll probably immediately think about reading data taken from the internet, but it’s equally easy to read XML from your local files. You create a path to the file and then use NSURL’s fileURLWithPath: method, as you’ve seen elsewhere in this book.
An XML file can be a nice intermediary step between saving data in plain text files and saving it in databases, which were two of the options you saw in chapter 9. Although you’re still using files, you can do so in a well-organized manner. You’ll see an example of this in section 14.5.3.
Programming Guide for Cocoa,” but we’ll provide a tutorial on the basics and build an RSS reader. We’ll start with the parser class.
14.5.1. Starting up NSXMLParser
In order to get started with the NSXMLParser, you need to create it, set various properties, and then start it running. The most important methods for doing so are listed in table 14.7.
Table 14.7. Methods to get your NSXMLParser going
|
Method |
Summary |
|---|---|
| initWithContentsOfURL: | Creates a parser from an NSURL |
| initWithData: | Creates a parser from an NSData |
| setDelegate: | Defines a delegate for the parser |
| parse | Starts the parser going |
Not listed are a few additional setters that allow the parser to process namespaces, report namespace prefixes, and resolve external entities. By default, these properties are all set to NO; you shouldn’t need them for simple XML parsing.
14.5.2. Acting as a delegate
There are approximately 14 delegate methods for NSXMLParser. They’re all optional: you need to write delegates only for things you’re watching for.
In this chapter, we’ll look at the five most critical methods you’ll need to use whenever you’re parsing XML. These methods report the start and end of elements, the contents inside, when the XML parsing has ended (unrecoverably!) with an error, and when the XML parsing has ended because it’s finished. These are listed in table 14.8.
Generally, when you’re parsing XML, you should take the following steps as you move through elements:
- When you receive the didStartElement: method, look at the NSString to see what element is being reported, and then prepare a permanent variable to save its content, to prepare your program to receive the information, or both. Optionally, look at the NSDictionary passed by the attributes: handle and modify things accordingly.
- When you receive the foundCharacters: method, save the contents of the element into a temporary variable. You may have to do this several times, appending the results to your temporary variable each time, because there’s no guarantee that all the characters will appear in one lot.
- When you receive the didEndElement: method, copy your temporary variable into your permanent variable, take an action based on having received the complete element, or both.
- Optionally, when you receive parserDidEndDocument:, do any final cleanup.
Table 14.8. The five important NSXMLParser delegate methods
|
Method |
Summary |
|---|---|
| parser:didStartElement:namespaceURI:qualifiedName:attributes: | Reports the start of an element and its attributes |
| parser:foundCharacters: | Reports some or all of the content of an element |
| parser:didEndElement:namespaceURI:qualifiedName: | Reports the end tag of an element |
| parserDidEndDocument: | Reports the end of parsing |
| parser:parseErrorOccurred: | Reports an unrecoverable parsing error |
Beyond that, the parser:parseErrorOccurred: method should call up an NSAlert or otherwise alert the user to the problem. As we noted, this is only for an unrecoverable problem: the user can’t do anything about it without modifying the original XML.
To show how you can use the NSXMLParser, the next example involves writing a simple RSS reader. Building an RSS reader on your own will allow you to walk through the basic functionality of NSXMLParser using an XML type that’s widely available on the internet for testing.
14.5.3. Building a sample RSS reader
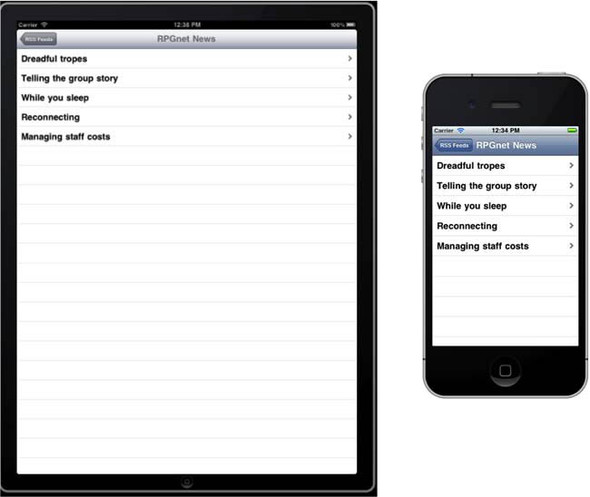
Now that you understand the basics of XML, you’re ready to put together a sample program that uses NSXMLParser in two ways: first to read a text file, and then to read an RSS feed. The results will be output to a hierarchy of tables. The first level of the hierarchy will show all the possible feeds, and the second level will show the contents of individual feeds. An example of the latter sort of page is shown in figure 14.3.
Figure 14.3. RSS feeds can easily be placed in table views.
The Top-Level Table
To start this project, you’ll need to create a Navigation-Based Application, which will provide the navigator and initial table setup needed to get this project started. In a more advanced program, you’d give users the opportunity to create a settings file for whichever RSS feeds they want to read. But for the purposes of this example, create an XML settings file called rssfeeds.xml by hand, using the following format:
<rdf:RDF xmlns:rdf="http://www.w3.org/1999/02/22-rdf-syntax-ns#"
    xmlns="http://purl.org/rss/1.0/"
    xmlns:dc="http://purl.org/dc/elements/1.1/">
  <feed title="RPGnet News" url="http://www.rpg.net/index.xml" />
  <feed title="RPGnet Columns" url="http://www.rpg.net/columns/index.xml"
      />
</rdf:RDF>
For each entry, create a singular <feed> element and include title and url attributes.
After you’ve added rssfeeds.xml to your project, you’re ready to write the code for the top-level table, which will parse your local XML file and give your user the option to select one of the RSS feeds. The following listing displays this code, which appears in the main view controller.
Listing 14.3. Reading an XML text file
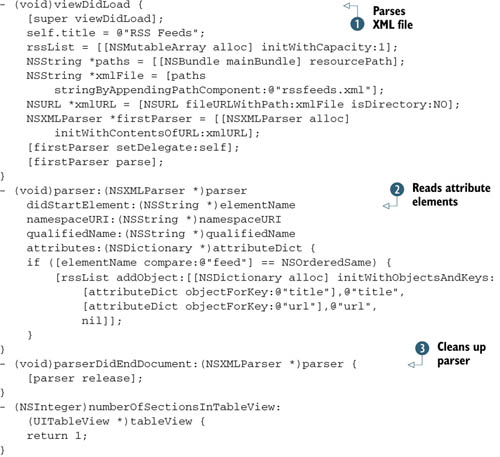
This example begins by reading in XML from a file ![]() . The result is a lot more pleasing than trying to read raw text, as in the thumbnail example earlier in this chapter, so
we suggest encoding simple preference files as XML in the future.
. The result is a lot more pleasing than trying to read raw text, as in the thumbnail example earlier in this chapter, so
we suggest encoding simple preference files as XML in the future.
Because we designed a simple XML format, where the information is encoded as attributes, you have to watch only one delegate
method, didStartElement: ![]() . Here you add the information to rssList, an NSMutableArray, for use later. The only other thing you have to do with your XML parser is clean it up when you’ve finished
. Here you add the information to rssList, an NSMutableArray, for use later. The only other thing you have to do with your XML parser is clean it up when you’ve finished ![]() .
.
The next few functions are standard table view work, because you define the sections, rows, and cells using the rssList array you created. Finally, you define what happens when the user selects a row ![]() , and that’s to call up a brand-new type of object, the rssViewController.
, and that’s to call up a brand-new type of object, the rssViewController.
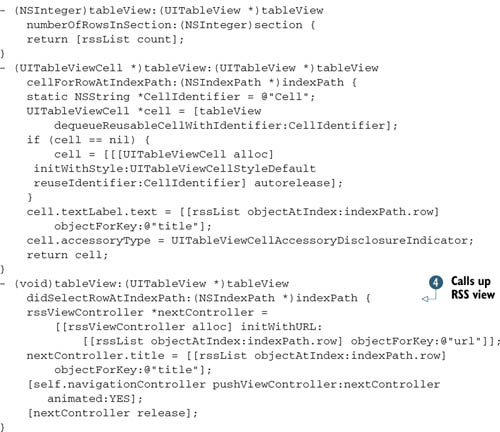
The RSS Table
The rssViewController is a subclass of the UITableViewController that displays an RSS feed if initialized with a URL. Listing 14.4 shows the complete contents, much of which are similar to listing 14.3. The biggest differences are in the XML parsing, because an RSS feed is a much more complicated XML format, even when you’re using only minimal information from it, as is the case here.
Listing 14.4. Creating a table from an RSS feed

The difference in this new table view starts with the fact that you have a custom init function that allows you to start an
XML parser running on an RSS feed ![]() . In a more polished application, you’d check for the feed’s existence, but for this example you can dive right in.
. In a more polished application, you’d check for the feed’s existence, but for this example you can dive right in.
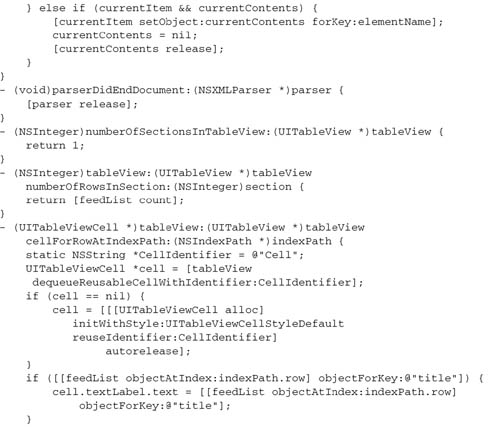
Because this XML file is more complex than the previous one, you can’t do all your work in didStartElement:. Instead, you use this method as part of a systemic examination of the XML content, by preparing variables, creating a dictionary to hold the contents of a complete RSS item, and initializing a string to hold each individual element.
In parser: foundCharacters: ![]() , you have to keep appending data to the current element’s string, as we promised. The XML parser will break the data from an individual element into multiple strings, so you have to be careful about this.
, you have to keep appending data to the current element’s string, as we promised. The XML parser will break the data from an individual element into multiple strings, so you have to be careful about this.
When you’ve finished ![]() , you can add your string to the element’s dictionary; and when the element is done, you can add the dictionary to the array
of RSS contents that you’re maintaining.
, you can add your string to the element’s dictionary; and when the element is done, you can add the dictionary to the array
of RSS contents that you’re maintaining.
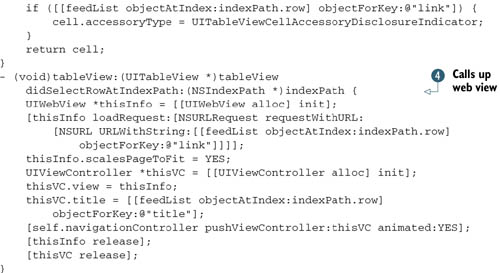
From here on, most of the table work is similar to the previous example. You read back through your master array to fill in
the contents of the table. The only thing of note comes in the last method ![]() , when a user clicks a table row. At this point, you call up a UIWebView so the user can hop straight to the RSS feed item they’re interested in.
, when a user clicks a table row. At this point, you call up a UIWebView so the user can hop straight to the RSS feed item they’re interested in.
Before we finish with XML entirely, we want to look at one more Core Location example, using GeoNames to read in altitude.
14.5.4. Altitude redux: a Core Location example
GeoNames, which you can find at www.geonames.org, offers a variety of web services related to location. It can give you information about postal codes, countries, addresses, and more. A complete listing of its web services is available at www.geonames.org/export/ws-overview.html.
Most of GeoNames’s information is returned in either XML or JSON format, as you prefer. We’ll look at the XML interface here. Table 14.9 shows off some of the XML-based GeoNames information that you may find particularly useful.
Table 14.9. GeoNames searches allowable with coordinate information
|
Information |
Summary |
|---|---|
| findNearestIntersection | Returns nearest street intersection in the U.S. |
| gtopo30 | Returns altitude of location or -9999 for sea |
| srtm3 | Returns altitude of location or -32768 for sea |
| timezone | Returns not only the time zone info but also the current time |
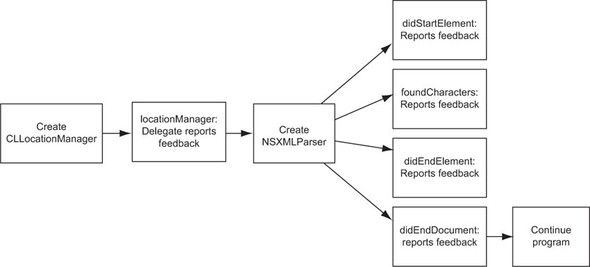
We’ll use gtopo30 to follow through on our promise from chapter 10 to look up the altitude from GeoNames based on the location manager’s results. This project requires a somewhat complex chaining together of multiple delegate-driving classes, as shown in figure 14.4.
Figure 14.4. Complex SDK programs can chain multiple classes.
The bare skeleton of the code needed to make this work is shown in the following listing.
Listing 14.5. Deriving altitude from GeoNames

In general, this is a simple application of lessons you’ve already learned. It’s also an interesting application of the internet to Core Location.
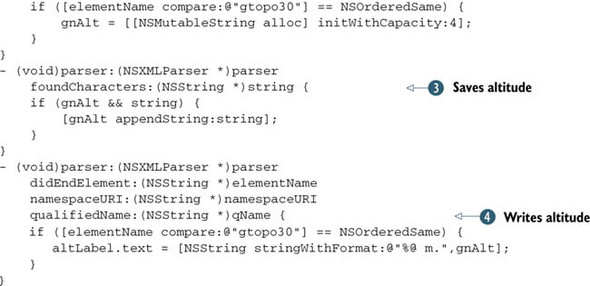
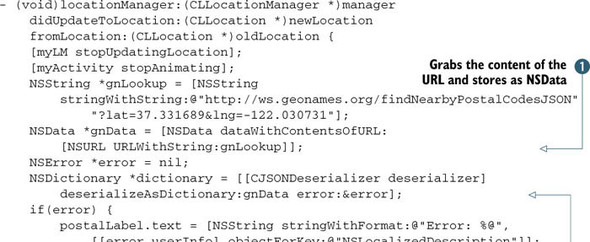
The only thing particularly innovative comes in the Core Location delegate ![]() , where you create a GeoNames URL using the format documented at the GeoNames site. Then you watch the start tags
, where you create a GeoNames URL using the format documented at the GeoNames site. Then you watch the start tags ![]() , content
, content ![]() , and end tags
, and end tags ![]() and use those to derive altitude the same way that you pulled out XML information when you were reading RSS feeds.
and use those to derive altitude the same way that you pulled out XML information when you were reading RSS feeds.
As we mentioned in chapter 10, the result should be an altitude that’s much more reliable than what the iPhone and iPad can currently provide, unless you’re in a tall building, in an airplane, or hang gliding.
To date, all the examples of web parsing have involved simple GET connections, where you can encode arguments as part of a URL. That won’t always be the case on the web; so before we leave web pages behind, we’ll return to some basics of URL requests and look at how to POST information to a web page when it becomes necessary.
14.6. POSTing to the web
Many web pages allow you to GET or POST information interchangeably. But in some situations, that’s not the case, and you’re instead forced to POST (and then to read back the response manually). In this section, we’ll look at both how to program a simple POST and how to do something more complex, like a form.
14.6.1. POSTing by hand
When you need to POST to the web, you have to fall back on some HTTP-related low-level commands that we haven’t yet discussed in depth, including NSMutableURL-Request (which allows you to build a piecemeal request) and NSURLConnection (which allows you to extract information from the web).
In general, you’ll follow this process:
- Create an NSURL pointing to the site you’ll POST to.
- Create and encode the data you plan to POST, as appropriate.
- Create an NSMutableURLRequest using your NSURL.
- Use the NSMutableURLRequest’s addValue:forHTTPHeaderField: method to set a content type.
- Set the NSMutableURLRequest’s HTTPMethod to POST.
- Add your data to the NSMutableURLRequest as the HTTPBody.
- Create an NSURLConnection using your NSMutableURLRequest.
- Either immediately capture the return using a synchronous response, or set up a delegate to receive the data as it comes, as defined in the NSURLConnection class reference.
- Parse the NSData you receive as you see fit.
For a simple synchronous response, the next listing shows how to put these elements together.
Listing 14.6. A simple POSTing example
NSURL *myURL = [NSURL URLWithString:@"http://www.example.com"];
NSMutableURLRequest *myRequest = [NSMutableURLRequest
    requestWithURL:myURL];
[myRequest setValue:@"text/xml" forHTTPHeaderField:@"Content-type"];
[myRequest setHTTPMethod:@"POST"];
NSData *myData = [@"someText" dataUsingEncoding:NSASCIIStringEncoding];
[myRequest setHTTPBody:myData];
NSURLResponse *response;
NSError *error;
NSData *myReturn = [NSURLConnection sendSynchronousRequest:myRequest
    returningResponse:&response error:&error];
A large number of steps are required to move from the URL through to the data acquisition, just as there were when creating a URL for a simple UIWebView; but when you have them down, the process is easy. The hardest part, as it turns out, often is getting the data ready to POST.
This code works fine for posting plain data to a web page. For example, you could use it with the Google Spell API found at www.google.com/tbproxy/spell to send XML data and then read the results with NSXMLParser.
Things can get tricky if you’re doing more intricate work than that, such as POST-ing form data.
14.6.2. Submitting forms
Sending form data to a web page follows the same process as any other POSTed data, and reading the results works the same way. The only tricky element is packaging the form data so it’s ready to use.
The easiest way to work with form data is to create it using an NSDictionary or NSMutableDictionary of keys and values, because that matches the underlying structure of HTML forms. When you’re ready to process the data, you pass the dictionary to a method that turns it into NSData, which can be sent as an NSMutableURLRequest body. After you’ve written this method the first time, you can use it again and again.
The next listing shows how to turn a dictionary of NSStrings into NSData.
Listing 14.7. Creating form data
- (NSData*)createFormData:(NSDictionary*)myDictionary
     withBoundary:(NSString *)myBounds {
    NSMutableData *myReturn = [[NSMutableData alloc] initWithCapacity:10];
     NSArray *formKeys = [dict allKeys];
    for (int i = 0; i < [formKeys count]; i++) {
         [myReturn appendData:
            [[NSString stringWithFormat:@"--%@
",myBounds]
                dataUsingEncoding:NSASCIIStringEncoding]];
         [myReturn appendData:

            [[NSString stringWithFormat:
                @"Content-Disposition: form-data; name="%@"

%@
",
                    [formKeys objectAtIndex:i],
                    [myDictionary valueForKey:[formKeys objectAtIndex: i]]]
                 dataUsingEncoding:NSASCIIStringEncoding]];
    }
    [myReturn appendData:
         [[NSString stringWithFormat:@"--%@--
", myBounds]
            dataUsingEncoding:NSASCIIStringEncoding]];
    return myReturn;
}
There’s nothing particularly notable here. If you have a sufficiently good understanding of the HTML protocol, you can easily dump the dictionary elements into an NSData object. The middle appendData: method is the most important, because it adds both the key (saved in an NSArray) and the value (available in the original NSDictionary) to the HTML body.
Back outside the method, you can add the data to your NSMutableURLRequest just as in listing 14.6, except the content type looks a little different:
NSMutableURLRequest *myRequest = [NSMutableURLRequest
    requestWithURL:myURL];
NSString *myContent = [NSString stringWithFormat:
   @"multipart/form-data; boundary=%@",myBounds];
[myRequest setValue:myContent forHTTPHeaderField:@"Content-type"];
[myRequest setHTTPMethod:@"POST"];
[myRequest setHTTPBody:myReturn];
Some other types of data processing, such as file uploads, require somewhat different setups, and you’d do well to look at HTML documentation for the specifics; but the general methods used to POST data remain the same.
With POSTing out of the way, we’ve now covered all of the SDK’s most important functions related to the internet. But we want to touch on one other topic before we close this chapter—a variety of internet protocols that you can access through third-party libraries.
14.7. Accessing the social web
Since the advent of Web 2.0, a new sort of internet presence has appeared. We call it the social web. This is an interconnected network of web servers that exchange information based on various well-known protocols. If you’re building internet-driven programs, you may wish to connect to this web so that your users can become a part of it.
14.7.1. Using web protocols
To participate in the social web, clients need to speak a number of protocols, most of them built on top of HTML. These include Ajax, JSON, RSS, SOAP, and XML. Here’s how to use each of them from your iPhone and iPad:
- Ajax—Ajax is something that, as it turns out, you can largely ignore. It’s usually used as part of a client/server setup, with HTML on the front side, but iOS uses an entirely different paradigm. You can dynamically load material into labels or text views, and you can dynamically call up websites using the XML or HTML classes we’ve discussed. There’s no need for Ajax-type content as long as you have good control over what a server will output. You just need to remember some of the lessons that Ajax teaches, such as downloading small bits of information rather than a whole page.
- JSON—JSON is perhaps the most troublesome protocol to integrate. It’s important as a part of the social web, because it’s one of the standardized ways to download information from a website. It also depends on your iPhone or iPad being able to understand JavaScript, which it doesn’t (unless you do some fancy work with DOM and the WebKit, which are beyond the scope of this section). Fortunately, two JSON toolkits are already available: JSON Framework and TouchJSON. We’ll look at an example of the latter shortly.
- RSS—At the time of this writing, we’re not aware of any RSS libraries for the iPhone and iPad. But as we’ve already demonstrated in this chapter, it’s easy to parse RSS using an XML parser.
- SOAP—SOAP isn’t as popular in the social web as most of the other protocols listed here, but if you must use it, you’ll want a library. One SOAP library written for Objective-C (though not necessarily for the iPhone and iPad), is SOAP Client.
- XML—XML is, as you’ve seen, fully supported by iOS. But if you don’t like how the default parser works and want an alternative, you should look at TouchXML.
These libraries should all be easy to find with simple searches on the internet, but table 14.10 lists their current locations as of this writing.
Table 14.10. Download sites for social protocol libraries
|
Library |
Location |
|---|---|
| JSON Framework | http://code.google.com/p/json-framework/ |
| TouchJSON | https://github.com/TouchCode/TouchJSON |
| SOAP Client | http://code.google.com/p/mac-soapclient/ |
| TouchXML | https://github.com/TouchCode/TouchXML |
Because of its importance to the social web, we’ll pay some additional attention to JSON, using the TouchJSON library.
14.7.2. Using TouchJSON
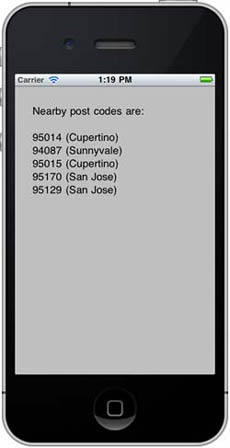
For this final example, we’ll return to Core Location one more time, because GeoNames offers a lot of JSON information. You’re going to use GeoNames to display the postal codes near a user’s current location. Figure 14.5 shows our intended result by highlighting the postal codes near Apple headquarters, the location reported by the Simulator.
Figure 14.5. It’s easy to extract data using TouchJSON.
In order to get to this point, you must first install this third-party library and make use of it.
Installing TouchJSON
To integrate TouchJSON into your project, you must download the package from Google and move the source code into your project. The easiest way to do this is to open the TouchJSON download inside Xcode and copy the Source folder to your own project. Tell Xcode to copy all the files into your project as well. Afterward, you’ll probably want to rename the copied folder from Source to TouchJSON.
Then you need to include the header CJSONDeserializer.h wherever you want to use TouchJSON.
Using TouchJSON
In order to use TouchJSON, you pass the CJSONDeserializer class an NSData object containing the JSON code. Listing 14.8 shows how to do so. In this example, this work occurs inside a location manager delegate. It’s part of a program similar to our earlier GeoNames example, but this time we’re looking up postal codes with a JSON return rather than altitudes with an XML return.
Listing 14.8. Using TouchJSON
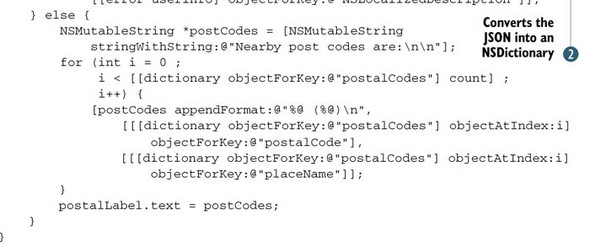
To access the JSON results, you first retrieve the data from a URL using the dataWithContentsOfURL: method ![]() , which was one of the ways we suggested for retrieving raw data earlier in the chapter. Then you plug that NSData object into the CJSONDeserializer
, which was one of the ways we suggested for retrieving raw data earlier in the chapter. Then you plug that NSData object into the CJSONDeserializer ![]() to generate an NSDictionary containing the JSON output.
to generate an NSDictionary containing the JSON output.
The TouchJSON classes are much easier to use than the XML parser we met earlier in this chapter. All you need to do is read through the arrays and dictionaries that are output. The downside is that the resulting dictionary may take up a lot of memory (which is why the XML parser didn’t do things this way), so be aware of that if you’re retrieving particularly large JSON results.
Absent that concern, you should be on your way to using JSON and creating yet another link between your users and the whole World Wide Web.
14.8. Summary
“There’s more than one way to do it.”
That was the slogan of Perl, one of the first languages used to create dynamic web pages, and today you could use that slogan equally well to describe the iPhone and iPad, two of the popular mobile devices.
We opened this book by talking about the two different ways that you could write apps: using web technologies and using the SDK. We also highlighted two different ways that you could interact with the internet: either as an equal participant—a web-based member of the internet’s various peer-to-peer and client/server protocols—or as a pure client that runs its own programs and connects to the internet via its own means.
We’ve said before that each programming method has its own advantages, and we continue to think that web development is often a better choice when you’re interacting with the internet already. But when you need to use other SDK features, the SDK offers some great ways to connect to the web.
As you’ve seen in this chapter, you have easy and intuitive access to the social web—that conglomeration of machines that’s connected via various public protocols. You should have no trouble creating projects that use the HTML and XML protocols, and even further flung protocols like JSON and SOAP are usable thanks to third-party libraries. That’ll cover most programmers’ needs, but for those of you who need to dig deeper, the SDK has you covered there too, thanks to Core Foundation classes.
In the next chapter, we’ll take networking one step further and introduce the Game Kit framework. There, we’ll show you how to use Apple’s built-in network layers to create a fully functional two-player video game.