
8
INTERPROCESS COMMUNICATION
Interprocess communication (IPC) on iOS is, depending on your perspective, refreshingly simple or horribly limiting. I mostly consider it to be the former. While Android has flexible IPC mechanisms such as Intents, Content Providers, and Binder, iOS has a simple system based on two components: message passing via URLs and application extensions. The message passing helps other applications and web pages invoke your application with externally supplied parameters. Application extensions are intended to extend the functionality of the base system, providing services such as sharing, storage, and the ability to alter the functionality of the Today screen or keyboard.
In this chapter, you’ll learn about the various ways you can implement IPC on iOS, how people commonly get IPC wrong, and how to work around some of the limitations imposed by this system without compromising user security.
URL Schemes and the openURL Method
The official IPC mechanism available to iOS application developers is via URL schemes, which are similar to protocol handlers such as mailto: on a desktop system.
On iOS, developers can define a URL scheme that they want their application to respond to, and other applications (or web pages, importantly) can invoke the application by passing in arguments as URL parameters.
Defining URL Schemes
Custom URL schemes are described in a project’s Info.plist file. To add a new scheme, you can use Xcode’s plist editor, shown in Figure 8-1.
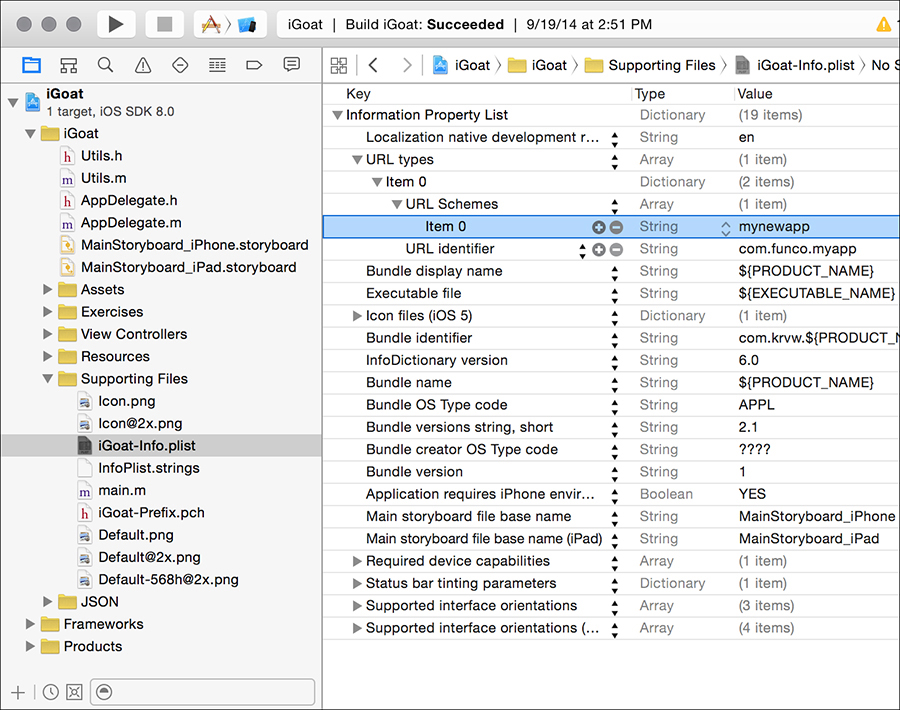
Figure 8-1: Defining a URL scheme within the Xcode plist editor
First, you add the URL types key, which will create a subkey, called Item 0. A subkey will automatically be created for the URL identifier, which should be populated with a reverse DNS notated string such as com.mycompany.myapp. Then, you create a new subkey of Item 0, which is the URL Schemes key. Under Item 0, which was created under URL Schemes, enter the scheme you want other applications to call your application by. For example, entering mynewapp here makes it so that your application will respond to mynewapp:// URLs.
You can also define these URL schemes manually within the plist file using an external editor, as shown in Listing 8-1.
<?xml version="1.0" encoding="UTF-8"?>
<!DOCTYPE plist PUBLIC "-//Apple//DTD PLIST 1.0//EN" "http://www.apple.com/DTDs/
PropertyList-1.0.dtd">
<plist version="1.0">
<dict>
<key>CFBundleDevelopmentRegion</key>
<string>en</string>
<key>CFBundleURLTypes</key>
<array>
<dict>
<key>CFBundleURLSchemes</key>
<array>
<string>com.funco.myapp</string>
</dict>
</array>
<key>CFBundleDisplayName</key>
<string>${PRODUCT_NAME}</string>
<key>CFBundleExecutable</key>
<string>${EXECUTABLE_NAME}</string>
Listing 8-1: URL schemes as shown in the plist
The bold lines indicate the additions to the original plist after the creation of the URL scheme in Figure 8-1. Learn what’s in this file so that you can quickly grep for the information you need when examining a new and foreign codebase. When you’re hunting for a custom URL scheme, you should look for the CFBundleURLSchemes key.
Once you’ve defined a URL scheme or discovered a URL scheme you want to interact with, you’ll need to implement code to make or receive IPC calls. Thankfully, this is fairly simple, but there are a few pitfalls to watch out for. You’ll take a look at them now.
Sending and Receiving URL/IPC Requests
To send a message via a URL scheme, you simply create an NSURL object containing an NSString representing the URL you want to call and then invoke the openURL: method [UIApplication sharedApplication]. Here’s an example:
NSURL *myURL = [NSURL URLWithString:@"someotherapp://somestuff?someparameter=avalue
&otherparameter=anothervalue"];
[[UIApplication sharedApplication] openURL:myURL];
Keys and values for the receiving application are passed in as they would be in an HTTP URL, using ? to indicate parameters and & to separate key-value pairs. The only exception is that there doesn’t need to be any text before the ? because you’re not talking to a remote site.
The receiving application can then extract any component of the URL with the standard NSURL object properties,1 such as host (somestuff in my example), or the query (your key-value pairs).
Validating URLs and Authenticating the Sender
When the receiving application is invoked with its custom URL scheme, it has the option to verify that it wants to open the URL to begin with, using the application:didFinishLaunchingWithOptions: method or application:will-FinishLaunchingWithOptions: method. Applications typically use the former, as in Listing 8-2.
- (BOOL)application:(UIApplication *)application didFinishLaunchingWithOptions:(NS
Dictionary *)launchOptions {
if ([launchOptions objectForKey:UIApplicationLaunchOptionsURLKey] != nil) {
NSURL *url = (NSURL *)[launchOptions valueForKey:UI
ApplicationLaunchOptionsURLKey];
if ([url query] != nil) {
NSString *theQuery = [[url query]
stringByReplacingPercentEscapesUsingEncoding:NSUTF8StringEncoding];
if (![self isValidQuery:theQuery]) {
return NO;
}
return YES;
}
}
}
Listing 8-2: Validating URLs within didFinishLaunchingWithOptions
If YES is returned, the openURL method will be called with the supplied URL. In the openURL method, the data passed (if any) is parsed and openURL makes decisions as to how the app will behave in response. The method is also where you can make decisions based on the application that called your app. Listing 8-3 shows what an openURL method might look like.
- (BOOL)application:(UIApplication *)application openURL:(NSURL *)url
sourceApplication:(NSString *)sourceApplication annotation:
(id)annotation {
➊ if ([sourceApplication isEqualToString:@"com.apple.mobilesafari"]) {
NSLog(@"Loading app from Safari");
return NO; // We don't want to be called by web pages
}
else {
➋ NSString *theQuery = [[url query]
stringByReplacingPercentEscapesUsingEncoding:NSUTF8StringEncoding];
➌ NSArray *chunks = [theQuery componentsSeparatedByString:@"&"];
for (NSString* chunk in chunks) {
➍ NSArray *keyval = [chunk componentsSeparatedByString:@"="];
➎ NSString *key = [keyval objectAtIndex:0];
NSString *value = [keyval objectAtIndex:1];
➏ // Do something with your key and value
--snip--
return YES;
}
}
}
Listing 8-3: Parsing the data received by openURL
At ➊, the method examines the source application to see whether it comes from the bundle ID that identifies Mobile Safari; since this application is meant to take input only from other applications, it returns NO. If your app is meant to be opened only by a specific application, you could restrict it to one valid bundle ID.
At ➋, the input is unescaped, in case there are URL-encoded characters in it (such as %20 for a space). At ➌ and ➍, individual key-value pairs are separated out and broken down further into key-value pairs. The first key-value pair is grabbed at ➎, and it is parsed to inform whatever logic might be written at ➏.
The parsing and validation of the actual query string will depend on what type of data you’re receiving. If you’re expecting a numeric value, you can also use a regular expression to ensure that the string contains only numbers. Here’s an example of a check you might add to your openURL method:
NSCharacterSet* notNumeric = [[NSCharacterSet decimalDigitCharacterSet] invertedSet
];
if ([value rangeOfCharacterFromSet:notDigits].location != NSNotFound) {
return NO; // We didn't get a numeric value
}
Just validate any parameters received via URL-based IPC to ensure that they contain only the type of data you expect. If you use these parameters to form database queries or change the content of the HTML, make extra sure you’re sanitizing the data and integrating the content properly. I’ll talk more about this in Chapter 12.
Watch for Deprecated Validation Code
Note that you may sometimes see the deprecated (yet more sensibly named) handleOpenURL method used in some codebases; see Listing 8-4 for an example.
- (BOOL)application:(UIApplication *)application handleOpenURL:(NSURL *)url
Listing 8-4: Deprecated method for handling received URLs
Using handleOpenURL is undesirable in many cases because the method blindly opens any URL given to it, and it gives you no way to identify where the URL came from. Of course, verifying the source application provides only limited guarantees.
How Safe Is Sender Validation?
Given what I’ve discussed in this section, you may well wonder whether you can trust the value of the sourceApplication parameter at all. Good question! While the sender check is merely a string comparison and is not directly cryptographic, Apple does ensure that all app IDs submitted to the App Store are unique: first come, first served. On a jailbroken device, however, you can’t guarantee this uniqueness, so be wary of blindly trusting a URL just because it claims to come from a particular application.
URL Scheme Hijacking
The relatively simple system of URL scheme definition that I described has a potential problem. What if another application tries to register your URL scheme? In the case of Apple’s built-in applications, other applications won’t be able to successfully register a duplicate scheme. For everyone else, though, the resultant behavior is ... undefined. Just ask Apple:
If more than one third-party app registers to handle the same URL scheme, there is currently no process for determining which app will be given that scheme.2
In other words, you face two unpleasant possibilities. First, a malicious application installed before your application could register your URL scheme and retain it after your application is installed. Or, a malicious application installed after your application could successfully register your URL scheme, effectively hijacking it from your application. Either situation can result in data intended for your application going to a malicious third-party app. What can you do? I’ll let you know once I figure that out.
In recent versions of iOS, however, alternative mechanisms for passing data between applications have been made available, each appropriate for different circumstances. These may be a better fit for your app than openURL. Let’s look at a few of these newer methods now.
Universal Links
URL scheme hijacking is one of the reasons that Apple introduced Universal Links in iOS 9. Universal Links are a way to effectively provide deep linking in an iOS application and integration between websites and mobile applications. For example, imagine you’ve published an instant messaging application called HoopChat. If a user visits a website that has a “Message me in HoopChat!” button, this could link to a URL like https://www.hoopchat.com/im/send/?id=356372. If the user clicks this link and has your application installed, the link would open directly in your application, where the app could create a new message to the person with the user ID of 356372. If the user doesn’t have the application installed, the same URL would be viewed in Mobile Safari, which would take you to a web-based UI to send a message.
Behind the scenes, the way this works is that the application has an entitlement that specifies how it handles links to particular domains, as shown in Figure 8-2.

Figure 8-2: Enabling Universal Links under Associated Domains in Xcode
When one of these domains is visited in Mobile Safari, a file called apple -app-site-association is downloaded from the web server. This takes the form of a signed blob of JSON, as in Listing 8-5.
{
"applinks": {
"apps": [],
"details": {
➊ "FAFBQM3A4N.com.hoopchat.messenger": {
➋ "paths": [ "*" ]
}
}
}
}
Listing 8-5: Format of the apple-app-site-association file
This file specifies the developer team ID, the bundle identifier (shown at ➊), and the URL paths that should be handled by the app (as opposed to the main website). In this case, all URLs should be handled by the app if it’s installed, so the file gives a value of * at ➋.
As mentioned, this blob needs to be signed; the signing key is actually the private key to your production SSL certificate. If you have the private and public keys to your website, your JSON file can be signed from the command line, as shown in Listing 8-6.
openssl smime
-sign
-nodetach
➊ -in "unsigned.json"
➋ -out "apple-app-site-association"
-outform DER
➌ -inkey "private-key.pem"
➍ -signer "certificate.pem"
Listing 8-6: Signing the apple-app-site-association file
This example uses the openssl utility, providing it with the unsigned JSON file at ➊ and the output filename at ➋. At ➌ and ➍, a key pair is provided. If your key is protected by a passphrase, you’d enter that when prompted, and you’d receive a valid apple-app-site-association file as the output. This file would then be uploaded to the web root of your website, where iOS would fetch it over HTTPS to determine whether to pass the URL to your app. Within the application, logic as to what action your app will take upon receiving a universal link will depend on what you implement in the application:continueUserActivity:restorationHandler: method of your application delegate.
This universal linking approach is preferable to custom URL handling schemes for a few reasons. First, Universal Links isn’t subject to URL scheme hijacking; only your website, authenticated over HTTPS, can specify what URLs will be opened in your application, and those calls can’t be sent to a separate bundle ID. Second, the links should work regardless of whether an app is installed. In earlier versions of iOS, you’d just get an error saying that the scheme isn’t recognized. With Universal Links, if the app isn’t installed, you’ll be sent to the equivalent on the website. Finally, Universal Links provide some privacy protections by preventing applications from enumerating what applications are present on a device. (Apps could previously use the canOpenURL method to enumerate installed applications; with Universal Links, no such mechanism exists.)
Now that you’ve seen how you can control interactions with your own application, let’s take a look at some ways to more deeply integrate your application with popular apps and services using UIActivity.
Sharing Data with UIActivity
In iOS 6, Apple started allowing third-party applications to share information through a set of predefined methods, such as sending data via an email or posting to Facebook. This limited form of IPC allows developers to implement the most basic sharing functionality. You can get an idea of the types of data this is useful for by examining the following UIActivity types:
• UIActivityTypePostToFacebook
• UIActivityTypePostToTwitter
• UIActivityTypePostToWeibo
• UIActivityTypePostToTencentWeibo
• UIActivityTypePostToFlickr
• UIActivityTypePostToVimeo
• UIActivityTypeMessage
• UIActivityTypeMail
• UIActivityTypePrint
• UIActivityTypeCopyToPasteboard
• UIActivityTypeAssignToContact
• UIActivityTypeSaveToCameraRoll
• UIActivityTypeAddToReadingList
• UIActivityTypeAirDrop
To share via UIActivity, just create a UIActivityViewController and pass it data such as text, a URL, an image, and so forth, as shown in Listing 8-7.
NSString *text = @"Check out this highly adequate iOS security resource";
NSURL *url = [NSURL URLWithString:@"http://nostarch.com/iossecurity/"];
UIActivityViewController *controller = [[UIActivityViewController alloc]
initWithActivityItems:@[text, url]
applicationActivities:nil];
[navigationController presentViewController:controller animated:YES completion:nil
];
Listing 8-7: Instantiating a UIActivityViewController
Here, a UIActivityViewController called controller is passed some text and a URL. If certain modes of sharing aren’t appropriate for the data, you can exclude them. For example, if you want to ensure that users can only mail or print your content but not post to social networking sites, you can tell UIActivityViewController to exclude all other known types of sharing, as in Listing 8-8.
[controller setExcludedActivityTypes:@[UIActivityTypePostToFacebook,
UIActivityTypePostToTwitter
UIActivityTypePostToWeibo
UIActivityTypePostToTencentWeibo
UIActivityTypePostToFlickr
UIActivityTypePostToVimeo
UIActivityTypeMessage
UIActivityTypeCopyToPasteboard
UIActivityTypeAssignToContact
UIActivityTypeSaveToCameraRoll
UIActivityTypeAddToReadingList
UIActivityTypeAirDrop];
Listing 8-8: Excluding certain types of sharing activities
This exclusion approach is, unfortunately, not convenient or thorough, and any sharing types added in future versions of iOS will be included by default. If it’s important to disable parts of the sharing UI, be sure that you test with the most recent versions of iOS before they reach the general public.
In addition to URL schemes and UIActivity methods, there’s one more way to handle IPC in iOS: through extensions.
Application Extensions
In iOS 8 and later, developers can write various extensions, which behave like specialized forms of IPC. The extensions allow you to present data to other applications, have applications share data through your app, or alter system behavior. Table 8-1 shows the various kinds of extension points you can code for. An extension point defines what component of the OS the extension will have access to and how it will need to be coded.
Type |
Function |
Today |
Manipulates widgets in the Today view of the Notification Center |
Share |
Allows data to be sent to your app via Share buttons |
Action |
Reads or manipulates data to be returned to the host app |
Photo |
Provides methods to manipulate photos within the Photos app |
Document Provider |
Allows access to a library of files |
Keyboard |
Provides a custom keyboard |
While app extensions aren’t applications, they are required to come bundled with an application, referred to as the containing app. Third-party applications that use an extension (called host apps) can communicate with the extension bundled in the containing app, but the containing app itself does not directly talk to the extension. Apple also specifically excludes some functions from being accessible via extensions, such as using the HealthKit API, receiving AirDrop data, or accessing the camera or microphone.
Extensions can be implemented in many ways, and they can be treated as applications in and of themselves. As shown in Figure 8-3, extensions are created as their own applications within Xcode.

Figure 8-3: Adding a new extension target to a project
For this book, however, let’s home in on the most important aspects to check from a security perspective.
Checking Whether an App Implements Extensions
First, you can easily determine whether the app you’re examining implements an extension by searching for the NSExtensionPointIdentifier inside property lists. To search for that property, you can execute the following command in the project’s root directory:
$ find . -name "*.plist" |xargs grep NSExtensionPointIdentifier
This greps all .plist files in the directory for NSExtensionPointIdentifier. You can also search for the property by checking the .plist file within Xcode, as in Figure 8-4.

Figure 8-4: The Info.plist of a newly created extension, viewed in Xcode
An extension’s Info.plist file will contain the type of extension being used, as well as optional definitions of the types of data that the extension is designed to handle. If you find the NSExtensionPointIdentifier property defined, you should dig in to the project and find the view controller for the defined extension.
Restricting and Validating Shareable Data
For share and action extensions, you can define an NSExtensionActivationRule, which contains a dictionary of data types that your application is restricted to handling (see Figure 8-5).

Figure 8-5: Activation rules in an extension’s .plist file, viewed in Xcode
This dictionary will be evaluated to determine what data types your extension allows and the maximum number of these items you’ll accept. But apps aren’t limited to accepting predefined types of data; they can also implement custom NSPredicates to define their own rules for what they’ll accept. If this is the case, you’ll see the NSExtensionActivationRule represented as a string rather than a numeric value.
If you know you’re dealing with predefined data types, however, keep the following predefined activation rules in mind:
• NSExtensionActivationSupportsAttachmentsWithMaxCount
• NSExtensionActivationSupportsAttachmentsWithMinCount
• NSExtensionActivationSupportsFileWithMaxCount
• NSExtensionActivationSupportsImageWithMaxCount
• NSExtensionActivationSupportsMovieWithMaxCount
• NSExtensionActivationSupportsText
• NSExtensionActivationSupportsWebURLWithMaxCount
• NSExtensionActivationSupportsWebPageWithMaxCount
Because extensions can often receive unknown and arbitrary kinds of data, it’s important to ensure that your extension performs correct validation in the isContentValid method of its view controller, particularly in share or action extensions. Examine the logic in your app’s implementation of this method and determine whether the app is performing the necessary validation required.
Typically, an extension will examine the NSExtensionContext (which is passed in by the host app when it calls beginRequestWithExtensionContext), as in Listing 8-9.
NSExtensionContext *context = [self extensionContext];
NSArray *items = [context inputItems];
Listing 8-9: Creating an array of NSExtensionItems from the NSExtensionContext
This will give an array of NSExtensionItem objects, and each object will contain a different type of data passed in by the host app, such as images, URLs, text, and so on. Each of these items should be examined and validated before you use them to perform actions or allow the user to post the data.
Preventing Apps from Interacting with Extensions
Keyboard extensions have the unique characteristic that they read every keystroke that a user enters into them. Different third-party keyboards may have various degrees of keystroke logging to help with things such as auto-completion or sending data to a remote web service for processing. It’s also possible that an actively malicious keyboard could be distributed, working as a pure keylogger. If your application accepts security-sensitive data via the keyboard, you may want to prevent the use of third-party keyboards with your application. You can do this with the shouldAllowExtensionPointIdentifier delegate method, as shown in Listing 8-10.
- (BOOL)application:(UIApplication *)application
shouldAllowExtensionPointIdentifier:(NSString *)extensionPointIdentifier {
if ([extensionPointIdentifier isEqualToString:UI
ApplicationKeyboardExtensionPointIdentifier]) {
return NO;
}
return YES;
}
Listing 8-10: The shouldAllowExtensionPointIdentifier delegate method
This code simply examines the value of extensionPointIdentifier and returns NO if it matches the constant UIApplicationKeyboardExtensionPointIdentifier. Note that currently third-party keyboards are the only extensions that can be disabled in this fashion.
You’ve seen the best ways to implement IPC, so to close the chapter, I’ll walk you through one approach to IPC that you may see in the wild that doesn’t work out so well.
A Failed IPC Hack: The Pasteboard
There have been occasional reports of people abusing the UIPasteboard mechanism as a kind of IPC channel. For example, some try using it to transfer a user’s data from a free version of an application to a “pro” version, since there’s no way the newly installed application can read the old application’s data. Don’t do that!
An OAuth library designed to work with Twitter3 uses the general paste-board as a mechanism to shuffle authentication information from a web view to the main part of the app, as in this example:
- (void) pasteboardChanged: (NSNotification *) note {
➊ UIPasteboard *pb = [UIPasteboard generalPasteboard];
if ([note.userInfo objectForKey:UIPasteboardChangedTypesAddedKey] == nil)
return;
NSString *copied = pb.string;
if (copied.length != 7 || !copied.oauthtwitter_isNumeric) return;
➋ [self gotPin:copied];
}
After reading data from the general pasteboard at ➊, this library validates the data and sends it to the gotPin method at ➋.
But the general pasteboard is shared among all applications and can be read by any process on the device. This makes the pasteboard a particularly bad place to store anything even resembling private data. I’ll go into more detail on the pasteboard in Chapter 10, but for now, ensure that the app you’re examining isn’t putting anything on the pasteboard that you wouldn’t want every other app to know about.
Closing Thoughts
While IPC in iOS appears limited at first, there are ample opportunities for developers to fail to parse externally supplied input, create new data leaks, and even potentially send data to the wrong app. Ensure that sharing is appropriately limited, received data is validated, sending applications are verified, and unencrypted data isn’t passed by simply trusting that the receiving URL handler is the one you would expect.