6
BLACK-BOX TESTING
While white-box testing is almost always the best way to security test an application, sometimes you simply have to do your testing without source code or insight into a program’s design. In these cases, you’ll need to dig a little deeper into the guts of iOS, especially into the realm of Objective-C and the Mach-O binary format.
Black-box testing on iOS is a rapidly moving target—it relies on the continuous development of jailbreaks, as well as robust third-party tools and debugging implements. I’ve tried to make the techniques and tools described in this chapter as future-proof as possible to give you a solid foundation to build on.
To effectively black-box test an iOS application, you’ll first need to get a jailbroken device so that you can sideload applications and install your testing tool chain. The details of jailbreaking change too rapidly for me to document here, but you can usually find current information from the iPhone Dev Team1 or iClarified.2
Once you’ve jailbroken your device, launch Cydia, choose Developer mode, and then update your package list (under Changes).
Now you can load your device with some testing tools, primarily from the Cydia app store. These are the must-haves:
odcctools This includes otool, lipo, and other development goodies.
OpenSSH You’ll need this to actually access the device. Be sure to change the passwords of your root and mobile accounts immediately using the passwd(1) command.
MobileTerminal This will allow you to navigate the command line on the device itself, when necessary.
cURL You’ll want this for downloading remote files over HTTP or FTP.
Erica Utilities This includes a smattering of useful utilities from Erica Sadun. See a detailed list at http://ericasadun.com/ftp/EricaUtilities/.
vbindiff This is a binary diff program to help verify changes to binaries.
netcat This is your general, all-purpose network listener.
rsync You can install this for syncing whole directory trees to and from the device.
tcpdump You can install this for capturing network traffic dumps for analysis.
IPA Installer Console This will allow you to directly install .ipa files copied to the device.
Cydia Substrate This tool is used for hooking and modifying the behavior of applications.
Now, let’s look at how you can get these testing tools onto your device.
Installing Third-Party Apps
Depending on how you’ve come to possess your application files, there are a couple of ways to sideload them onto your device.
Using a .app Directory
If you’ve acquired a .app directory, you can do the following:
First, archive your .app bundle with tar, and use scp to copy the archive over to your test device, as follows:
$ tar -cvzf archive.tar.gz mybundle.app}
$ scp archive.tar.gz [email protected]:
Then ssh to your device and untar the bundle into the /Applications directory:
$ cd /Applications
$ tar -xvzf ~/archive.tar.gz
This should put the application right next to the official Apple-supplied applications. To get it to show up on the home screen, you’ll need to either restart the SpringBoard or reboot the device. To restart SpringBoard, you can use the killall command, like this:
$ killall -HUP SpringBoard
If you find yourself needing to “respring” a lot, you can use a tool like CCRespring from Cydia, as shown in Figure 6-1.

Figure 6-1: A simple respring button added to the Control Center by CCRespring
Tools like CCRespring add a button that you can press to restart the SpringBoard so you don’t have to go to the command line every time.
NOTE
Some have reported that simply respringing the device does not cause the application to appear on the SpringBoard. In this case, you can either reboot or run the uicache command as the mobile user.
Using a .ipa Package File
If you’ve been given (or have otherwise obtained) a .ipa package file, you can copy it to your device with scp and install it using the installipa command, as follows:
$ installipa ./Wikipedia-iOS.ipa
Analyzing Wikipedia-iOS.ipa...
Installing Wikipedia (v3.3)...
Installed Wikipedia (v3.3) successfully.
$ ls Applications/CC189021-7AD0-498F-ACB6-356C9E521962
Documents Library Wikipedia-iOS.app tmp
Decrypting Binaries
Before you can inspect the contents of binaries, you’ll need to decrypt them. There are a couple of ways to do so. The simplest way is to use a prepackaged tool, such as Stefan Esser’s dumpdecrypted.3 This is a shared library that is dynamically loaded when executing your application. You can use it as follows:
$ git clone https://github.com/stefanesser/dumpdecrypted
$ cd dumpdecrypted
$ make
$ scp dumpdecrypted.dylib [email protected]:
$ ssh [email protected]
$ DYLD_INSERT_LIBRARIES=dumpdecrypted.dylib /var/mobile/Applications/(APP_ID)/
YourApp.app/YourApp
This will output a decrypted version of the binary within the tmp directory of the application’s .app bundle.
Because there have been many automated tools for dumping decrypted binaries, most of which have become unusable, it’s best to have a backup method. For a more robust and (ideally) future-proof way to decrypt binaries and to help you understand some of the inner workings of application encryption and decryption, you can use command line tools and lldb.4
To create a decrypted binary, you’ll follow these basic steps:
Analyze the binary to determine the location of its encrypted portion.
Run the application under lldb.
Copy the original binary for use as a donor file.
Remove the donor binary’s cryptid flag.
Transplant the unencrypted segment into the donor binary.
Let’s discuss this decryption process in more detail.
Launching the debugserver on the Device
Before you can get a memory dump, you need to get Apple’s debugserver onto the device. The debugserver is in DeveloperDiskImage.dmg, buried inside Xcode. From the command line, you can attach the disk image and extract the debugserver to a local directory, as shown in Listing 6-1.
$ hdiutil attach /Applications/Xcode.app/Contents/Developer/Platforms/iPhoneOS.
platform/DeviceSupport/7.1 (11D167)/DeveloperDiskImage.dmg
Checksumming whole disk (Apple_HFS : 0)
..................................................................
disk (Apple_HFS : 0): verified CRC32 $D1221D77
verified CRC32 $B5681BED
/dev/disk6 /Volumes/DeveloperDiskImage
$ cp /Volumes/DeveloperDiskImage/usr/bin/debugserver .
Listing 6-1: Extracting the debugserver from the Developer Disk Image
Once you’ve copied over the debugserver, you’ll need to edit the entitlements of the binary. Normally, when Xcode itself uses the debugserver, it launches applications directly; you want to change its permissions to allow it to attach to arbitrary running programs on the device. First, generate a plist using the current entitlements of the binary, as follows:
$ codesign --display --entitlements entitlements.plist debugserver
This should result in an XML-formatted plist file with the following contents:
<?xml version="1.0" encoding="UTF-8"?>
<!DOCTYPE plist PUBLIC "-//Apple//DTD PLIST 1.0//EN" "http://www.apple.com/DTDs/
PropertyList-1.0.dtd">
<plist version="1.0">
<dict>
<key>com.apple.backboardd.debugapplications</key>
<true/>
<key>com.apple.backboardd.launchapplications</key>
<true/>
<key>com.apple.springboard.debugapplications</key>
<true/>
<key>run-unsigned-code</key>
<true/>
<key>seatbelt-profiles</key>
<array>
<string>debugserver</string>
</array>
</dict>
</plist>
This file needs to be updated to include the get-task-allow and task_for_pid-allow entitlements and remove the seatbelt-profiles entitlement. Those updates will result in a plist like the following:
<!DOCTYPE plist PUBLIC "-//Apple//DTD PLIST 1.0//EN" "http://www.apple.com/DTDs/
PropertyList-1.0.dtd">
<plist version="1.0">
<dict>
<key>com.apple.springboard.debugapplications</key>
<true/>
<key>run-unsigned-code</key>
<true/>
<key>get-task-allow</key>
<true/>
<key>task_for_pid-allow</key>
<true/>
</dict>
</plist>
After updating the entitlements.plist file, you’d use it to sign the application (thus overwriting the existing entitlements of the binary) and copy the debugserver to the device, as shown here:
$ codesign -s - --entitlements entitlements.plist -f debugserver
debugserver: replacing existing signature
$ scp debugserver [email protected]:
Now you can finally debug the application. Ensure that the program you want to debug is currently running on the device and then launch the debugserver to attach to it, like this:
$ ssh [email protected]
$ ./debugserver *:666 --attach=Snapchat
debugserver-310.2 for arm64.
Attaching to process Snapchat...
Listening to port 666 for a connection from *...
This example debugserver is now listening for a network connection from another machine running lldb. Next, on your local machine, you’d connect to the device as follows:
$ lldb
(lldb) platform select remote-ios
Platform: remote-ios
Connected: no
SDK Path: "/Users/lx/Library/Developer/Xcode/iOS DeviceSupport/8.0 (12A4265u)"
SDK Roots: [ 0] "/Applications/Xcode.app/Contents/Developer/Platforms/iPhoneOS.
platform/DeviceSupport/4.2"
SDK Roots: [ 1] "/Applications/Xcode.app/Contents/Developer/Platforms/iPhoneOS.
platform/DeviceSupport/4.3"
SDK Roots: [ 2] "/Applications/Xcode.app/Contents/Developer/Platforms/iPhoneOS.
platform/DeviceSupport/5.0"
SDK Roots: [ 3] "/Applications/Xcode.app/Contents/Developer/Platforms/iPhoneOS.
platform/DeviceSupport/5.1"
SDK Roots: [ 4] "/Applications/Xcode.app/Contents/Developer/Platforms/iPhoneOS.
platform/DeviceSupport/6.0"
SDK Roots: [ 5] "/Applications/Xcode.app/Contents/Developer/Platforms/iPhoneOS.
platform/DeviceSupport/6.1"
SDK Roots: [ 6] "/Applications/Xcode.app/Contents/Developer/Platforms/iPhoneOS.
platform/DeviceSupport/7.0"
SDK Roots: [ 7] "/Applications/Xcode.app/Contents/Developer/Platforms/iPhoneOS.
platform/DeviceSupport/7.1 (11D167)"
SDK Roots: [ 8] "/Users/lx/Library/Developer/Xcode/iOS DeviceSupport/5.0.1
(9A405)"
SDK Roots: [ 9] "/Users/lx/Library/Developer/Xcode/iOS DeviceSupport/6.0.1
(10A523)"
SDK Roots: [10] "/Users/lx/Library/Developer/Xcode/iOS DeviceSupport/7.0.4
(11B554a)"
SDK Roots: [11] "/Users/lx/Library/Developer/Xcode/iOS DeviceSupport/8.0
(12A4265u)"
SDK Roots: [12] "/Users/lx/Library/Developer/Xcode/iOS DeviceSupport/8.0
(12A4297e)"
(lldb) process connect connect://de.vi.ce.ip:666
Process 2801 stopped
* thread #1: tid = 0x18b64b, 0x0000000192905cc0 libsystem_kernel.dylib`
mach_msg_trap + 8, stop reason = signal SIGSTOP
frame #0: 0x0000000192905cc0 libsystem_kernel.dylib`mach_msg_trap + 8
libsystem_kernel.dylib`mach_msg_trap + 8:
-> 0x192905cc0: b 0x19290580c
libsystem_kernel.dylib`mach_msg_overwrite_trap:
0x192905cc4: .long 0x0000093a ; unknown opcode
0x192905cc8: ldr w16, 0x192905cd0 ; semaphore_signal_trap
0x192905ccc: b 0x19290580c
In this example, the running program is now interrupted, and at this point, you’d be free to manipulate it with lldb on your local machine. To extract the decrypted program data, you’d next need to determine which part of the binary the encrypted segment resides in.
Note that you may find that a network connection is too unstable to complete the memory dump successfully. If this is the case, you can use the iproxy command included with usbmuxd to act as a proxy between your USB port and a TCP port, as follows:
$ brew install usbmuxd
$ iproxy 1234 1234 &
$ lldb
(lldb) process connect connect://127.0.0.1:1234
These commands connect to a network socket with lldb but actually go over the USB port.
Locating the Encrypted Segment
To locate the encrypted segment, you’ll require odcctools and lldb. First, run otool -l myBinary and view the output in your favorite pager. You can do this either on the device or on your local machine. The copy included with OS X has a more modern version of otool that will provide cleaner output. Here’s an example:
$ otool -fh Snapchat
Fat headers
fat_magic 0xcafebabe
nfat_arch 2
architecture 0
cputype 12
cpusubtype 9
capabilities 0x0
offset 16384
size 9136464
align 2^14 (16384)
architecture 1
cputype 12
cpusubtype 11
capabilities 0x0
offset 9158656
size 9169312
align 2^14 (16384)
Snapchat (architecture armv7:
Mach header
magic cputype cpusubtype caps filetype ncmds sizeofcmds flags
0xfeedface 12 9 0x00 2 47 5316 0x00218085
Snapchat (architecture armv7s):
Mach header
magic cputype cpusubtype caps filetype ncmds sizeofcmds flags
0xfeedface 12 11 0x00 2 47 5316 0x00218085
The Mach-O binary format allows for what are called fat files, which can contain the program compiled for multiple architectures at once (this is how OS X universal binaries work). To make reverse engineering easier, you need to work with the part of the binary that will be running on your target device; in my case, I have an iPhone 5s as a test device, so I want the armv7s architecture.
After determining the architecture, you have a couple of options. You could thin the binary to include only one architecture using the lipo(1) command (the thin flag specifies which architecture you’re interested in), like this:
$ lipo -thin armv7 myBinary -output myBinary-thin
But for the purposes of this chapter, I’ll show you how to work with a fat binary. First, you’d use otool to determine what the base address of the text segment of the binary is—this is where the actual executable instructions will be loaded into memory—as in Listing 6-2.
$ otool -arch armv7s -l Snapchat
Snapchat:
Load command 0
cmd LC_SEGMENT
cmdsize 56
segname __PAGEZERO
vmaddr 0x00000000
vmsize 0x00004000
fileoff 0
filesize 0
maxprot 0x00000000
initprot 0x00000000
nsects 0
flags 0x0
Load command 1
cmd LC_SEGMENT
cmdsize 736
segname __TEXT
vmaddr 0x00004000
vmsize 0x007a4000
fileoff 0
filesize 8011776
maxprot 0x00000005
initprot 0x00000005
nsects 10
flags 0x0
Listing 6-2: Finding the base address of the text segment
You can see here that the text segment starts at 0x00004000. Record this address because you’ll need it in a bit. The next step is to determine the beginning and end of the encrypted part of the binary. You can do this with otool—note that you’ll want to specify the -arch armv7s command (or whatever architecture you’re using) to ensure that you’re looking at the right section. The output should look like Listing 6-3.
$ otool -arch armv7s -l Snapchat
--snip--
Load command 9
cmd LC_VERSION_MIN_IPHONEOS
cmdsize 16
version 5.0
sdk 7.1
Load command 10
cmd LC_UNIXTHREAD
cmdsize 84
flavor ARM_THREAD_STATE
count ARM_THREAD_STATE_COUNT
r0 0x00000000 r1 0x00000000 r2 0x00000000 r3 0x00000000
r4 0x00000000 r5 0x00000000 r6 0x00000000 r7 0x00000000
r8 0x00000000 r9 0x00000000 r10 0x00000000 r11 0x00000000
r12 0x00000000 sp 0x00000000 lr 0x00000000 pc 0x0000a300
cpsr 0x00000000
Load command 11
cmd LC_ENCRYPTION_INFO
cmdsize 20
cryptoff 16384
cryptsize 7995392
cryptid 1
Listing 6-3: otool displaying a binary’s load commands
The values of interest here are cryptoff and cryptsize (cryptid simply indicates this is an encrypted binary).5 These indicate the address where the encrypted segment of the application begins and the size of the segment, respectively. The range between those two numbers will help you when dumping memory. These values are in hexadecimal, though—a quick way to obtain the hex values is to execute the following in the Terminal:
$ printf '%x
' 16384
4000
$ printf '%x
' 7995392
7a0000
In this case, the numbers are 0x00004000 and 0x007a0000. Write these down, too. Now, back in Listing 6-2, it was determined that the text segment in the binary starts at 0x00004000. However, the text segment probably won’t end up there when the program is actually run because ASLR moves portions of memory around at random.6 So check to see where the text segment actually got loaded using lldb’s image list command, as follows:
(lldb) image list
[ 0] E3BB2396-1EF8-3EA7-BC1D-98F736A0370F 0x000b2000 /var/mobile/Applications/
CCAC51DD-48DB-4798-9D1B-94C5C700191F/Snapchat.app/Snapchat
(0x00000000000b2000)
[ 1] F49F2879-0AA0-36C0-8E55-73071A7E2870 0x2db90000 /Users/lx/Library/Developer/
Xcode/iOS DeviceSupport/7.0.4 (11B554a)/Symbols/System/Library/Frameworks/
AudioToolbox.framework/AudioToolbox
[ 2] 763DDFFB-38AF-3444-B745-01DDE37A5949 0x388ac000 /Users/lx/Library/Developer/
Xcode/iOS DeviceSupport/7.0.4 (11B554a)/Symbols/usr/lib/libresolv.9.dylib
[ 3] 18B3A243-F792-3C39-951C-97AB416ED3E6 0x37fb0000 /Users/lx/Library/Developer/
Xcode/iOS DeviceSupport/7.0.4 (11B554a)/Symbols/usr/lib/libc++.1.dylib
[ 4] BC1A8B9C-9F5D-3B9D-B79E-345D4C3A361A 0x2e7a2000 /Users/lx/Library/Developer/
Xcode/iOS DeviceSupport/7.0.4 (11B554a)/Symbols/System/Library/Frameworks/
CoreLocation.framework/CoreLocation
[ 5] CC733C2C-249E-3161-A9AF-19A44AEB1577 0x2d8c2000 /Users/lx/Library/Developer/
Xcode/iOS DeviceSupport/7.0.4 (11B554a)/Symbols/System/Library/Frameworks/
AddressBook.framework/AddressBook
You can see that the text segment landed at 0x000b2000. With that address in hand, you’re finally ready to extract the executable part of the binary.
Dumping Application Memory
Let’s look at a bit of math to figure out the final offsets. The first step is to add the base address to the value of cryptoff; in this case, both were 0x00004000, so the starting number would be 0x00008000. The ending number would be the starting number plus the value of cryptsize, which is at 0x007a0000 in this example. These particular numbers are pretty easy to add in your head, but if you get offsets you can’t figure out easily, you can just use Python to calculate it for you, as shown in Listing 6-4.
$ python
Python 2.7.10 (default, Dec 14 2015, 19:46:27)
[GCC 4.2.1 Compatible Apple LLVM 6.0 (clang-600.0.39)] on darwin
Type "help", "copyright", "credits" or "license" for more information.
>>>
>>> hex(0x00008000 + 0x007a0000)
'0x7a8000'
Listing 6-4: Adding the starting number and the hexadecimal value of cryptsize
Now this example is seriously almost done, I promise. From here, you’d just plug your numbers in to the following lldb command:
(lldb) memory read --force --outfile /tmp/mem.bin --binary 0x00008000 0x007a8000
8011776 bytes written to '/private/tmp/mem.bin'
This won’t give you a full, working binary, of course—just a memory dump. The image lacks the Mach-O header metadata. To fix this, you’d need to transplant the memory dump into a valid binary, and to that end, you’d first make a copy of the original binary and use scp to copy it to your development machine.
Then, you’d copy the contents of the unencrypted memory dump into the donor binary, replacing the encrypted segment. You can use dd for this, specifying the seek parameter where it should start writing your data. The seek parameter should be the value of vmaddr added to cryptoff, which is 0x8000 in this case. Here’s how this example’s dd command would look:
$ dd bs=1 seek=0x8000 conv=notrunc if=/tmp/mem.bin of=Snapchat-decrypted
Next, you’d have to change the donor binary’s cryptid value to 0, indicating an unencrypted binary. There are several ways to do this. You can use MachOView7 (see Figure 6-2), which provides an easy interface for examining and changing Mach-O binaries, or you can use a hex editor of your choice. If you’re using a hex editor, I find it easiest to first find the LC_ENCRYPTION_INFO command by searching for 2100 0000 1400 0000.8 The next 16 numbers will be the offset and size, followed by 0100 0000. That byte is the cryptid; change it to 0000 0000.
Once you’ve disabled the cryptid flag, you’d need to copy the modified binary back to the device. With the modified binary in place, you can verify the change using vbindiff, which is available in Homebrew. Output from vbindiff should appear as shown in Listing 6-5.

Figure 6-2: The encrypted flag with MachOView

Listing 6-5: Verifying the changed cryptid value with vbindiff
The lines at ➊ and ➋ show the cryptid bit (in bold) enabled and disabled, respectively. Now, if all has gone well, you’d be ready to start dissecting the binary in earnest.
Reverse Engineering from Decrypted Binaries
Because of the rather transparent structure of the Mach-O binary format, basic reverse engineering on iOS is a fairly trivial task—at least once you’ve managed to obtain a decrypted binary. Several tools can help you understand class definitions, examine assembly instructions, and give details on how the binary was built. The most useful and easily obtainable ones are otool and class-dump. You’ll also take a look at Cycript and Hopper as tools for reversing particularly stubborn applications.
Inspecting Binaries with otool
otool has long been part of the base OS X toolkit for inspecting Mach-O binaries. Its current incarnation supports both ARM and amd64 architectures and can optionally use llvm to disassemble binaries. To get a basic look at a program’s internals, you can use otool -oV to view the data segment, as shown in Listing 6-6.
$ otool -oV MobileMail
MobileMail:
Contents of (__DATA,__objc_classlist) section
000c2870 0xd7be8
isa 0xd7bd4
superclass 0x0
cache 0x0
vtable 0x0
data 0xc303c (struct class_ro_t *)
flags 0x0
instanceStart 80
instanceSize 232
ivarLayout 0x0
name 0xb48ac MailAppController
baseMethods 0xc3064 (struct method_list_t *)
entsize 12
count 122
name 0xa048e toolbarFixedSpaceItem
types 0xb5bb0 @8@0:4
imp 0x40c69
name 0xa04a4 sidebarQuasiSelectTintColor
types 0xb5bb0 @8@0:4
imp 0x40ccd
name 0xa04c0 sidebarMultiselectTintColor
types 0xb5bb0 @8@0:4
imp 0x40d75
name 0xa04dc sidebarTintColor
types 0xb5bb0 @8@0:4
imp 0x130f5
name 0xa04ed updateStyleOfToolbarActivityIndicatorView:
inView:
types 0xb5c34 v16@0:4@8@12
imp 0x18d69
Listing 6-6: otool displaying the contents of the __OBJC segment
This gives you a view of class and method names, as well as information about ivars, provided these are implemented in Objective-C rather than straight C++. To view the text segment of a program, you can use otool -tVq. The -q indicates that you want to use llvm as the disassembler rather than otool’s built-in disassembler, which is noted by -Q. The differences in output are few, but llvm seems best suited for the task, given that it likely assembled the binary in the first place. It also provides slightly more readable output. Listing 6-7 shows some example output of otool -tVq.
MobileMail:
(__TEXT,__text) section
00003584 0000 movs r0, r0
00003586 e59d b 0x30c4
00003588 1004 asrs r4, r0, #32
--snip--
000035ca 447a add r2, pc
000035cc 6801 ldr r1, [r0]
000035ce 6810 ldr r0, [r2]
000035d0 f0beecf0 blx 0xc1fb4 @ symbol stub for: _objc_msgSend
000035d4 f2417128 movw r1, #5928
000035d8 f2c0010d movt r1, #13
000035dc 4479 add r1, pc
000035de 6809 ldr r1, [r1]
000035e0 f0beece8 blx 0xc1fb4 @ symbol stub for: _objc_msgSend
000035e4 4606 mov r6, r0
Listing 6-7: otool’s disassembly output
Here, you see the actual disassembly of methods, as well as some basic symbol information. To get a dump of all the symbols, use otool -IV, as shown in Listing 6-8.
$ otool -IV MobileMail
MobileMail:
Indirect symbols for (__TEXT,__symbolstub1) 241 entries
address index name
0x000c1c30 3 _ABAddressBookFindPersonMatchingEmailAddress
0x000c1c34 4 _ABAddressBookRevert
0x000c1c38 5 _ABPersonCopyImageDataAndCropRect
0x000c1c3c 7 _CFAbsoluteTimeGetCurrent
0x000c1c40 8 _CFAbsoluteTimeGetGregorianDate
0x000c1c44 9 _CFArrayAppendValue
0x000c1c48 10 _CFArrayCreateMutable
0x000c1c4c 11 _CFArrayGetCount
0x000c1c50 12 _CFArrayGetFirstIndexOfValue
0x000c1c54 13 _CFArrayGetValueAtIndex
0x000c1c58 14 _CFArrayRemoveValueAtIndex
0x000c1c5c 15 _CFArraySortValues
0x000c1c60 16 _CFDateFormatterCopyProperty
0x000c1c64 17 _CFDateFormatterCreate
Listing 6-8: Inspecting symbols with otool
Obtaining Class Information with class-dump
The class-dump9 tool is used to extract class information from Objective-C 2.0 binaries. The resulting output is essentially the equivalent of the header files of a given binary. This can give excellent insight into the design and structure of a program, making class-dump an invaluable tool for reverse engineering. The original class-dump by Steve Nygard runs only on OS X but recognizes the armv7 architecture, so you can copy files over to your desktop for analysis. There is also a modified version, class-dump-z,10 that can run on Linux and iOS. As of this writing, class-dump appears to be more up-to-date and functional, so I recommend sticking with it.
You can test class-dump against any unencrypted iOS binary. The quickest way to get a feel for it is to copy over one of the built-in Apple apps in /Applications and run class-dump on the binary, as shown in Listing 6-9.
$ class-dump MobileMail
--snip--
@interface MessageHeaderHeader : _AAAccountConfigChangedNotification <
MessageHeaderAddressBookClient, UIActionSheetDelegate>
{
MailMessage *_lastMessage;
id <MessageHeaderDelegate> _delegate;
UIWebBrowserView *_subjectWebView;
DOMHTMLElement *_subjectTextElement;
UILabel *_dateLabel;
unsigned int _markedAsUnread:1;
unsigned int _markedAsFlagged:1;
unsigned int _isOutgoing:1;
UIImageView *_unreadIndicator;
UIImageView *_flaggedIndicator;
WorkingPushButton *_markButton;
id _markUnreadTarget;
SEL _markUnreadAction;
ABPersonIconImageView *_personIconImageView;
SeparatorLayer *_bottomSeparator;
SeparatorLayer *_topSeparator;
float _horizontalInset;
unsigned int _allowUnreadStateToBeShown:1;
}
- (id)initWithFrame:(struct CGRect)fp8;
- (void)dealloc;
Listing 6-9: class-dump Showing the Interface Details of MobileMail
Delightful, no? Once you have a decrypted binary, most Objective-C applications become transparent pretty quickly.
Extracting Data from Running Programs with Cycript
If you don’t want to go through the hassle of decrypting a binary to get information about its internals, you can use Cycript11 to extract some of this information from a running executable. There are many tricks to interact with running applications using Cycript, but you’ll probably be most interested in using weak_classdump.cy12 to approximate the functionality of class-dump. With the Contacts application running, you can extract class-dump information thusly:
$ curl -OL https://raw.github.com/limneos/weak_classdump/master/
weak_classdump.cy
$ cycript -p Contacts weak_classdump.cy
'Added weak_classdump to "Contacts" (3229)'
$ cycript -p Contacts
cy# weak_classdump_bundle([NSBundle mainBundle],"/tmp/contactsbundle")
"Dumping bundle... Check syslog. Will play lock sound when done."
This will write out header files for each class into the /tmp/contactsbundle directory.
Note that in order to securely fetch things with cURL, you’ll need to install a CA certificate bundle on the device. If you use MacPorts and have cURL installed locally, do this:
$ scp /opt/local/share/curl/curl-ca-bundle.crt
[email protected]:/etc/ssl/certificates/ca-certificates.crt
Or if you use Homebrew and have the OpenSSL formula installed, you can use this command:
$ scp /usr/local/etc/openssl/cert.pem
[email protected]:/etc/ssl/certificates/ca-certificates.crt}
Disassembly with Hopper
There will likely be some situations where you need to get a closer view of a program’s actual logic, in the absence of source code. While IDA Pro13 is useful for this, it’s rather expensive. I usually use Hopper14 for disassembling, decompiling, and making flow graphs during black-box testing. While assembly language and decompiling are somewhat outside the scope of this book, let’s take a quick look at what Hopper can show you about a program’s logic. Looking at a basic password manager in Hopper (Figure 6-3), you will find a method called storeSavedKeyFor:, which looks promising.

Figure 6-3: The disassembly of the storeSavedKeyFor: function
If you call the decompiler (the if(b) button) on this particular section of code, Hopper will generate pseudocode to give you an idea of actual program flow, as shown in Figure 6-4.

Figure 6-4: Code generated by the decompiler
Notice that the PearlLogger class is being instantiated, and there’s a reference to the username for which the current item is being stored. var_64 shows that this username is getting passed to the logging function, probably to the NSLog facility—this is bad, for reasons I’ll explain further in Chapter 10. However, you can also see that the item is being stored in the Keychain with a restrictive protection attribute (kSecAttrAccessibleWhenUnlockedThisDeviceOnly, further detailed in Chapter 13), which is a point in the program’s favor.
Assembly language and decompilation are broad areas, but Hopper gives you a great way to get started with reverse engineering via assembly for a fairly low price. If you’d like to get started developing your skills reading ARM assembly, check out Ray Wenderlich’s tutorial: http://www.raywenderlich.com/37181/ios-assembly-tutorial/.
Defeating Certificate Pinning
Certificate pinning aims to prevent a rogue CA from signing a fake (but valid-looking) certificate for your site, with the purpose of intercepting communications between your network endpoint and the application. This is quite a good idea (and I’ll discuss how to implement it in Chapter 7), but it does of course make black-box testing slightly more difficult.
My colleagues and I ran into this problem frequently enough that we wrote a tool to help us with it: the iOS SSL Killswitch.15 The Killswitch tool hooks requests going through the URL loading system to prevent the validation of any SSL certificates, ensuring that you can run any black-box application through your proxy regardless of whether it uses certificate pinning.
To install the Killswitch tool, copy the precompiled .deb file to your device and install it with the dpkg tool.
# scp ios-ssl-kill-switch.deb [email protected]
# ssh [email protected]
(and then, on the test device)
# dpkg -i ios-ssl-kill-switch.deb
# killall -HUP SpringBoard
You should then find iOS SSL Killswitch in your Settings application (see Figure 6-5), where you can toggle it on and off.

Figure 6-5: Enabling the SSL Killswitch tool from within the Settings application
Hooking with Cydia Substrate
On jailbroken devices (which you’ll be performing your black-box testing on), you can use Cydia Substrate16 (formerly known as Mobile Substrate) to modify the behavior of the base system to give you additional information on your application’s activity or change application behavior. Your goals may be to disable certain security or validation mechanisms (like the iOS SSL Killswitch does) or to simply notify you when certain APIs are used, along with the arguments passed to them. Cydia Substrate hooks are referred to as tweaks.
The most user-friendly way to get started with developing Cydia Substrate tweaks is to use the Theos toolkit.17 To create a new tweak, use the nic.pl script included with Theos. Note that Theos is by default oriented toward tweaking the behavior of the SpringBoard application in order to customize user interface elements. For the purposes described in this book, though, you’ll want to affect all applications, so you’d specify a Bundle filter of com.apple.UIKit. This filter will configure Mobile/Cydia Substrate to load your tweak in any application that links to the UIKit framework (that is, applications displaying a user interface) but not other programs like system daemons or command line tools.
First, you need to acquire the Link Identity Editor, ldid,18 which Theos uses to generate the signature and entitlements for a tweak. Here’s how to get ldid:
$ git clone git://git.saurik.com/ldid.git
$ cd ldid
$ git submodule update --init
$ ./make.sh
$ sudo cp ./ldid /usr/local/bin
You can then clone the Theos repo and proceed to generate a tweak template, as follows:
$ git clone git://github.com/DHowett/theos.git ~/git/theos
$ cd /tmp && ~/git/theos/bin/nic.pl
NIC 2.0 - New Instance Creator
------------------------------
[1.] iphone/application
[2.] iphone/library
[3.] iphone/preference_bundle
[4.] iphone/tool
[5.] iphone/tweak
Choose a Template (required): 5
Project Name (required): MyTweak
Package Name [com.yourcompany.mytweak]:
Author/Maintainer Name [dthiel]:
[iphone/tweak] MobileSubstrate Bundle filter [com.apple.springboard]: com.apple.
UIKit
Instantiating iphone/tweak in mytweak/...
Done.
This will create a Tweak.xm file, with all of its contents commented out by default. Stubs are included for hooking either class methods or instance methods, with or without arguments.
The simplest type of hook you can write is one that just logs method calls and arguments; here’s an example that hooks two class methods of UIPasteboard:
%hook UIPasteboard
+ (UIPasteboard *)pasteboardWithName:(NSString *)pasteboardName create:(BOOL)create
{
%log;
return %orig;
}
+ (UIPasteboard *)generalPasteboard
{
%log;
return %orig;
}
%end
This code snippet uses Logos19 directives such as %hook and %log. Logos is a component of Theos designed to allow method-hooking code to be written easily. However, it is possible to write a tweak with the same functionality using only C instead.
You’ll want to provide the full method signature as well, which you can obtain either from API documentation or from framework header files. Once you’ve customized your tweak to your satisfaction, you can build it using the Makefile provided by nic.pl.
To build a Debian package suitable for installation onto a jailbroken device, you’ll also need to install the dpkg tool. You can do this either with the MacPorts20 port command or with Homebrew’s21 brew command. This example uses port:
$ sudo port install dpkg
--snip--
$ make
Bootstrapping CydiaSubstrate...
Compiling iPhoneOS CydiaSubstrate stub... default target?
Compiling native CydiaSubstrate stub...
Generating substrate.h header...
Making all for tweak MyTweak...
Preprocessing Tweak.xm...
Compiling Tweak.xm...
Linking tweak MyTweak...
Stripping MyTweak...
Signing MyTweak...
$ make package
Making all for tweak MyTweak...
make[2]: Nothing to be done for `internal-library-compile'.
Making stage for tweak MyTweak...
dpkg-deb: building package `com.yourcompany.mytweak' in `./com.yourcompany.
mytweak_0.0.1-1_iphoneos-arm.deb'.
Running these commands should result in a package that can be installed on your iOS device. First, you’d use the scp command to copy the file over to the device and load it manually. After that, you could simply use dpkg -i from the command line (as shown in the following code) or set up your own Cydia repository.22
$ dpkg -i com.yourcompany.mytweak_0.0.1-1_iphoneos-arm.deb
Selecting previously deselected package com.yourcompany.mytweak.
(Reading database ... 3551 files and directories currently installed.)
Unpacking com.yourcompany.mytweak (from com.yourcompany.mytweak_0.0.1-1_iphoneos-
arm.deb) ...
Setting up com.yourcompany.mytweak (0.0.1-1) ..
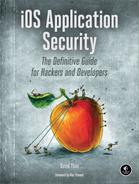
When this finishes, you can either manage the package further with the dpkg command (removing it with dpkg -P) or manage it via Cydia, as shown in Figure 6-6.
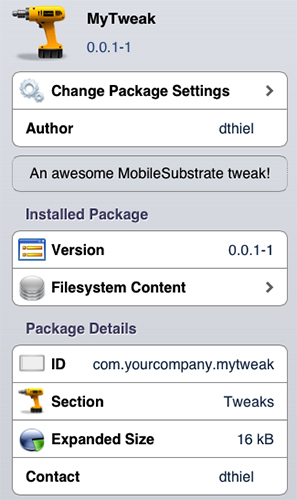
Figure 6-6: Your very own tweak in the Cydia management interface
After a tweak is installed, if you examine the system log, you’ll see the Cydia Substrate dynamic library being loaded upon launch of all applications. You’ll also see the hooked method calls being logged by the tweak. Here’s an example log:
May 2 14:22:08 my-iPad Maps~ipad[249]: MS:Notice: Loading: /Library/
MobileSubstrate/DynamicLibraries/MyTweak.dylib
May 2 14:22:38 lxs-iPad Maps~ipad[249]: +[<UIPasteboard: 0x3ef05408>
generalPasteboard]
There are, of course, many other things you can do with tweaks besides logging; see the Tweak.xm file of the iOS SSL Killswitch tool for an example of modifying method behavior, along with your own preference toggle.23
Automating Hooking with Introspy
While tweaks are useful for one-off hooking scenarios, my colleagues Alban Diquet and Tom Daniels have used the Cydia Substrate framework to make a tool called Intropsy24 that can help automate the hooking process for black-box testing without having to dig too deep in to the guts of iOS or Cydia Substratey. Introspy uses the Cydia Substrate framework directly (rather than via Theos) to hook security-sensitive method calls, logging their arguments and return values in a format that can subsequently be used to generate reports. To install Introspy, download the latest precompiled .deb package from https://github.com/iSECPartners/Introspy-iOS/releases/, copy it to your device, and enter the command dpkg -i filename on the device to add the package.
Once installed, respring the device using the following:
$ killall -HUP SpringBoard
Do the same for any application that you want to test, if it’s already running. You can now tell Introspy what applications you want to hook, along with which API calls you’d like to record (see Figure 6-7). Once your testing is complete, a SQLite database file will be deposited in /var/mobile if you’re testing Apple built-in or Cydia applications, or in /User/Applications/<AppID> if you’re testing an application that came from the App Store.
Figure 6-7: The Introspy settings screen. You can select which applications are profiled on the Apps tab.
To analyze this database, you’ll want to use the Introspy Analyzer,25 which will generate HTML reports of Introspy’s findings (see Figure 6-8).

Figure 6-8: The Introspy HTML report output, showing a list of findings that match the specified signatures
If you copy this database onto your test machine, you can create a report on the called APIs using introspy.py, as follows:
$ python ./introspy.py --outdir report mydatabase.db
Newer versions of Introspy also allow automatic copying and parsing of the database, by specifying the IP address of the device.
$ python ./introspy.py -p ios -o outputdir -f device.ip.address
Running Introspy will evaluate the calls against a signature database of potentially problematic APIs, helping you track down potential areas of interest. To cut down on noise, you can filter out specific API categories or signature types with the --group and --sub-group flags. With Introspy installed, enter introspy.py --help at the command line for details.
Closing Thoughts
While black-box testing poses some challenges, the development community has gone a long way to making it feasible, and some elements of black-box testing will help you regardless of whether you have source code. You will now turn your primary attention back to white-box testing; in Chapter 7, I’ll guide you through some of the most security-sensitive APIs in iOS, including IPC mechanisms, cryptographic facilities, and the myriad ways in which data can leak from applications unintentionally.