
13
ENCRYPTION AND AUTHENTICATION
While Apple’s cryptographic APIs are fairly robust, many developers don’t know how to use them effectively. There are two major built-in encryption components that you have control over: the Keychain and the Data Protection API. These components share some of the same encryption keys and have similar protection attributes, and I’ll cover them in this chapter. I’ll also provide a look at lower-level crypto primitives and the (limited) circumstances in which you would want to use them.
Using the Keychain
The Keychain is meant to be used when you have small snippets of sensitive data to store, including passwords, personal data, and so on. The Keychain itself is encrypted using the Device Key, combined with a user passcode if available. The Keychain’s API consists of four main operations: SecItemAdd, SecItemUpdate, SecItemCopyMatching, and SecItemDelete. These operations add items to the Keychain, update existing items, retrieve items, and delete them from the Keychain, respectively.
That said, I really wish I’d never see the GenericKeychain1 sample code again. Everyone seems to base their Keychain code on it (which is reasonable), but this code predates any of the modern Keychain protections that actually prevent secret data from being stolen off your device by a physical attacker. In this section, you’ll learn about those protections and how to take advantage of them.
The Keychain in User Backups
When users perform full backups of their devices, they have two security-related options: Unencrypted and Encrypted. Unencrypted backups can be restored only to the same device they were received from. Encrypted backups let the user select a passphrase to encrypt their backup data with. This allows the backup to be restored to any device (except for items marked with ThisDeviceOnly) and backs up the full contents of the Keychain as well. If you don’t want your Keychain item to be stored in backups, you can use the Keychain’s data protection attributes.
Keychain Protection Attributes
Keychain protection attributes specify when Keychain data is allowed to be stored in memory and requested by the OS or an application. When adding items such as passwords or personal data to the Keychain, it’s important to specify a protection attribute because this explicitly states when the data should be available. Not specifying a protection attribute should be considered a bug.
Specify attributes when first storing an item in the Keychain by using the SecItemAdd method. You’ll need to pass in one of a predefined set of values (see Table 13-1) for kSecAttrAccessible.
Three main types of access can be specified via this attribute:
Always accessible The key is always available, regardless of whether the phone is locked.
Accessible when unlocked The key is accessible when the device is unlocked; otherwise, attempts to access it will fail.
Accessible after first unlocked The key is accessible after the device has booted and been unlocked for the first time.
For each of the three main types of Keychain protection, there is an additional counterpart suffixed with ThisDeviceOnly. This means that the Key-chain item will not be backed up to iCloud, will be backed up to iTunes only if using encrypted backups, and cannot be restored onto another device.
Table 13-1: Keychain Protection Attributes and Their Associated Meanings
Keychain protection attribute |
Meaning |
kSecAttrAccessibleAfterFirstUnlock |
The key is inaccessible after boot, until the user enters a passcode for the first time. |
kSecAttrAccessibleAlways |
The key is always accessible, as long as the device is booted. Note that this is deprecated in iOS 9 because it has no real advantage over kSecAttrAccessibleAfterFirstUnlock. |
kSecAttrAccessibleAlwaysThisDeviceOnly |
The key is always accessible, but it cannot be ported to other iOS devices. |
kSecAttrAccessibleAfterFirstUnlockThisDeviceOnly |
This is the same as the previous key, but this key remains on only this device. |
kSecAttrAccessibleWhenUnlocked |
Whenever the device is unlocked (that is, after the user has entered a passcode), the key is accessible. |
kSecAttrAccessibleWhenUnlockedThisDeviceOnly |
This is the same as the previous key, but this key remains only on this device (except for full, encrypted backups). |
kSecAttrAccessibleWhenPasscodeSetThisDeviceOnly |
This is the same as the previous key, but this key will be available only to users who have a passcode set and will be removed from the device if that passcode is unset. It will not be included in any backups. |
When Keychain protections were first introduced, the default value was kSecAttrAccessibleAlways, creating an obvious security problem. Accessible in this case should be taken to mean “available to a physical attacker”: if someone steals your device, they’ll be able to read the contents of the Keychain. Generally, this is done by performing a temporary jailbreak and extracting the keys; using kSecAttrAccessibleAfterFirstUnlock instead will usually prevent this since a reboot is often required to perform the jailbreak. However, a code execution attack (such as someone exploiting a bug in a Wi-Fi driver) would give access to a device while it’s still running. In this case, kSecAttrAccessibleWhenUnlocked would be needed to prevent compromise of the keys, meaning that the attacker would need to determine the user’s passcode to extract secrets.
Unfortunately, brute-forcing a four-digit PIN on iOS is ridiculously fast. Not only can this be done with a temporary jailbreak,2 but my colleagues have successfully built cute robots to physically brute-force PINs in less than a day.3
Currently, the default attribute is kSecAttrAccessibleWhenUnlocked, which is a reasonably restrictive default. However, Apple’s public documentation disagrees about what the default attribute is supposed to be, so just in case, you should set this attribute explicitly on all Keychain items. For your own code, consider using kSecAttrAccessibleWhenUnlockedThisDeviceOnly if appropriate; when examining third-party source code, ensure that restrictive protection attributes are used.
In iOS 8, the kSecAttrAccessibleWhenPasscodeSetThisDeviceOnly protection attribute was added. Developers have long requested an API that requires a user to have a passcode set. This new attribute doesn’t directly accomplish that, but developers can use it to make decisions based on whether a passcode is set. When you attempt to add an item to the Keychain specifying the kSecAttrAccessibleWhenPasscodeSetThisDeviceOnly attribute, it will fail if the user does not have a passcode set. You can use this failure as a point at which to make a decision about whether to fall back to another Keychain protection attribute, alert the user, or just store less sensitive data locally.
If the user does have a passcode set, the addition will be successful; however, if the user ever decides to disable the passcode, the Class Keys used to decrypt the item will be discarded, preventing the item from being decrypted by the application.
Basic Keychain Usage
There are several classes of Keychain items, as listed in Table 13-2. Unless you’re dealing with certificates, kSecClassGenericPassword can generally be used for most sensitive data, so let’s look at some useful methods on that class.
Table 13-2: Keychain Item Classes
Item class |
Meaning |
kSecClassGenericPassword |
A plain-old password |
kSecClassInternetPassword |
A password specifically used for an Internet service |
kSecClassCertificate |
A cryptographic certificate |
kSecClassKey |
A cryptographic key |
kSecClassIdentity |
A key pair, comprising a public certificate and private key |
Listing 13-1 shows an example of how to use the Keychain to add a basic password item, using SecItemAdd. It sets up a dictionary to hold a Keychain query, which contains the appropriate key-value pairs to identify the password, sets a password policy, and specifies the password itself.
NSMutableDictionary *dict = [NSMutableDictionary dictionary];
NSData *passwordData = [@"mypassword" dataUsingEncoding:NSUTF8StringEncoding];
[dict setObject:(__bridge id)kSecClassGenericPassword forKey:(__bridge id)
kSecClass];
[dict setObject:@"Conglomco login" forKey:(__bridge id)kSecAttrLabel];
[dict setObject:@"This is your password for the Conglomco service." forKey:
(__bridge id)kSecAttrDescription];
[dict setObject:@"dthiel" forKey:(__bridge id)kSecAttrAccount];
[dict setObject:@"com.isecpartners.SampleKeychain" forKey:(__bridge id)
kSecAttrService];
[dict setObject:passwordData forKey:(__bridge id)kSecValueData];
[dict setObject:(__bridge id)kSecAttrAccessibleWhenUnlocked forKey:(__bridge id)
kSecAttrAccessible];
OSStatus error = SecItemAdd((__bridge CFDictionaryRef)dict, NULL);
if (error == errSecSuccess) {
NSLog(@"Yay");
}
Listing 13-1: Adding an item to the Keychain
Here, the kSecClassGenericPassword class is set for the Keychain item, along with a user-readable label, a long description, the account (username), and an identifier for the service (to prevent duplicates). The code also sets the password and an accessibility attribute.
SecItemUpdate works similarly. Listing 13-2 shows SecItemUpdate in action with an example that updates the user’s password, which is stored in kSecValueData.
NSString *newPassword = @"";
NSMutableDictionary *dict = [NSMutableDictionary dictionary];
[dict setObject:(__bridge id)kSecClassGenericPassword forKey:(__bridge id)
kSecClass];
[dict setObject:@"dthiel" forKey:(__bridge id)kSecAttrAccount];
[dict setObject:@"com.isecpartners.SampleKeychain" forKey:(__bridge id)
kSecAttrService];
NSDictionary *updatedAttribute = [NSDictionary dictionaryWithObject:[newPassword
dataUsingEncoding:NSUTF8StringEncoding] forKey:(__bridge id)kSecValueData];
OSStatus error = SecItemUpdate((__bridge CFDictionaryRef)dict, (__bridge
CFDictionaryRef)updatedAttribute);
Listing 13-2: Updating a Keychain item with SecItemUpdate
When updating a Keychain item with SecItemUpdate, you have to set two dictionaries. One should specify the basic Keychain identification information (at least the class, account, and service information), and the other should contain the attribute to update.
SecItemCopyMatching can be used to query the Keychain to find one or more entries matching a given set of criteria. Typically, you’d construct a search dictionary using the class, account, and service attributes you use when creating or updating a Keychain item. Then, you’d instantiate an NSDictionary that will hold the search results and perform the actual SecItemCopyMatching call, passing in the search dictionary and a reference to the result dictionary. An example can be found in Listing 13-3.
[dict setObject:(__bridge id)kSecClassGenericPassword forKey:(__bridge id)
kSecClass];
[dict setObject:@"dthiel" forKey:(__bridge id)kSecAttrAccount];
[dict setObject:@"com.isecpartners.SampleKeychain" forKey:(__bridge id)
kSecAttrService];
[dict setObject:(id)kCFBooleanTrue forKey:(__bridge id)kSecReturnAttributes];
NSDictionary *result = nil;
OSStatus error = SecItemCopyMatching((__bridge CFDictionaryRef)dict, (void *)&
result);
NSLog(@"Yay %@", result);
Listing 13-3: Querying the Keychain using SecItemCopyMatching
With the Keychain data in the result dictionary, you can then use this information to perform your security-sensitive tasks such as authenticating to a remote service or decrypting data. Note that if you construct a query based on attributes that don’t include the account and service (which uniquely identify Keychain items), you may get a return dictionary that contains more than one Keychain item. This dictionary can be limited with kSecMatchLimit (that is, by setting it to a value of 1), but this could lead to unpredictable behavior if you’re trying to search for a single piece of data like a password.
You can probably guess at this point what a SecItemDelete call will look like—see the example in Listing 13-4 for the actual code.
NSMutableDictionary *searchDictionary = [NSMutableDictionary dictionary];
[searchDictionary setObject:(__bridge id)kSecClassGenericPassword forKey:
(__bridge id)kSecClass];
[searchDictionary setObject:@"dthiel" forKey:(__bridge id)kSecAttrAccount];
[searchDictionary setObject:@"com.isecpartners.SampleKeychain" forKey:(__bridge id)
kSecAttrService];
OSStatus error = SecItemDelete((__bridge CFDictionaryRef)searchDictionary);
Listing 13-4: Deleting a Keychain item using SecItemDelete
Note that if you don’t uniquely identify your Keychain item, all matching items that your application has access to will be deleted.
Keychain Wrappers
When working with the Keychain, you’ll probably end up writing a number of wrapper functions to make it more convenient since most applications use only a subset of the Keychain API’s functionality. There are actually a number of prewritten Keychain wrappers available from third parties; I tend to prefer Lockbox4 for its simplicity and functionality. Lockbox provides a set of class methods for storing strings, dates, arrays, and sets. You can see the procedure for storing a secret string in Listing 13-5.
#import "Lockbox.h"
NSString *keyname = @"KeyForMyApp";
NSString *secret = @"secretstring";
[Lockbox setString:secret
forKey:keyname
accessibility:kSecAttrAccessibleWhenUnlocked];
Listing 13-5: Setting a Keychain item with Lockbox
The key name will be prefixed with your application’s bundle ID automatically, and this value will be used as for both the account and service keys. Retrieving data from the Keychain works as shown in Listing 13-6.
NSString *result = [Lockbox stringForKey:secret];
Listing 13-6: Retrieving a string from the Keychain using Lockbox
Whichever wrapper you choose or write, ensure that it has the ability to set kSecAttrAccessible attributes because much available sample code neglects this feature.
Shared Keychains
iOS has the capability to share Keychain data among multiple applications from the same developer by using Keychain access groups. For example, if you have a “buyer” app and a “seller” app for an online marketplace, you can let your users share the same username and password between the two applications. Unfortunately, this mechanism is widely misunderstood, which has led people to do horrifying things such as using named pasteboards to share items that should be specific to the Keychain.
NOTE
To use Keychain access groups, your applications must share the same bundle seed ID. This can be specified only upon creation of a new App ID.5
For your application to take advantage of access groups, you’ll need to create an Entitlements property list (see Figure 13-1) containing an array called keychain-access-groups, with a String entry for each shared Key-chain item.
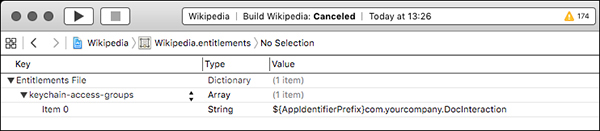
Figure 13-1: Define a Keychain access group consisting of your bundle seed ID and your company prefix, followed by a common name for the Keychain item.
The Keychain item will consist of the bundle seed ID, followed by your reverse-DNS notation developer identifier and a symbolic name that both applications can refer to the entitlement with (see Listing 13-7).
[dict setObject:@"DTHIELISEC.securitySuite" forKey:(id)kSecAttrAccessGroup];
Listing 13-7: Setting the access group of a Keychain item
Here, DTHIELISEC is the bundle seed ID. Your bundle ID will also be a 10-character alphanumeric string. You’ll need to pass in the value of your new entitlement as the value of the kSecAttrAccessGroup key when creating a Keychain item via the SecItemAdd function. Note that you can have only one Keychain access group on a Keychain item.
NOTE
Technically, if you create a Keychain access group and don’t specify it when creating a Keychain item, the first string in the keychain-access-groups array will be used as the default entitlement. So if you’re using only one access group, you don’t have to specify the group when doing a SecItemAdd—but you should anyway.
iCloud Synchronization
iOS 7 introduced a mechanism to allow Keychain items to be synchronized with iCloud, letting users share Keychain items across multiple devices. By default, this is not enabled on application-created Keychain items, but it can be enabled by setting kSecAttrSynchronizable to true.
[query setObject:(id)kCFBooleanTrue forKey:(id)kSecAttrSynchronizable];
Because this item is now potentially synchronized between multiple Keychains, updates to the item (including deletion) will propagate to all other locations as well. Ensure that your application can handle having Keychain items removed or changed by the system. Also note that you can’t specify an incompatible kSecAttrAccessible attribute when using this option. For instance, specifying kSecAttrAccessibleWhenUnlockedThisDeviceOnly doesn’t work because ThisDeviceOnly specifies that the item should never be backed up, either to iCloud, to a laptop or desktop, or to any other synchronization provider.
The Data Protection API
As an extra layer of protection, Apple introduced the Data Protection API (not to be confused with Microsoft’s Data Protection API), which allows developers to specify when file decryption keys are available. This lets you control access to the file itself, similar to the kSecAttrAccessible attribute of Keychain items. The Data Protection API uses the user’s passcode in conjunction with a Class Key to encrypt keys specific to each protected file and discards the Class Key in memory when those files should not be accessible (that is, when the device is locked). When a PIN is enabled, the passcode settings screen will indicate that Data Protection is enabled, as in Figure 13-2.

Figure 13-2: Passcode settings with Data Protection enabled
Protection Levels
There are several levels of protection that a developer can request with the Data Protection API, which are roughly analogous to the kSecAttrAccessible attributes one sets on Keychain items. Let’s explore those now.
The CompleteUntilFirstUserAuthentication Protection Level
CompleteUntilFirstUserAuthentication is the default file protection attribute for iOS 5 and later. It will be applied to all applicable files unless another attribute has been explicitly specified. It’s functionally similar to FileProtectionComplete, except the file is always available after the user first unlocks the device after a reboot. This doesn’t offer a ton of protection if someone gains remote code execution on your running device or if there’s a Sandbox bypass, but it does protect you from some attacks that require a reboot.
The Complete Protection Level
Complete is the safest file protection class available, if you can get away with using it. Complete protection ensures that after a short delay, locking the device discards the Class Key from memory and renders file contents unreadable.
This protection level is expressed with the NSFileProtectionComplete attribute of NSFileManager and the NSDataWritingFileProtectionComplete flag for NSData objects. For NSData objects, you can start by setting the NSDataWritingFileProtectionComplete flag, as shown in Listing 13-8.
NSData *data = [request responseData];
if (data) {
NSError *error = nil;
NSString *downloadFilePath = [NSString stringWithFormat:@"%@mydoc.pdf", NS
TemporaryDirectory()];
[data writeToFile:downloadFilePath options:NSDataWritingFileProtectionComplete
error:&error];
Listing 13-8: Setting the NSDataWritingFileProtectionComplete flag on an NSData object
Once you’ve set NSDataWritingFileProtectionComplete on your NSData object, you can use NNSFileManager to set the NSFileProtectionComplete flag.
NSArray *searchPaths = NSSearchPathForDirectoriesInDomains(NSDocumentDirectory, NS
UserDomainMask, YES);
NSString *applicationDocumentsDirectory = [searchPaths lastObject];
NSString *filePath = [applicationDocumentsDirectory stringByAppendingPathComponent:
@"mySensitivedata.txt"];
NSError *error = nil;
NSDictionary *attr =
[NSDictionary dictionaryWithObject:NSFileProtectionComplete
forKey:NSFileProtectionKey];
[[NSFileManager defaultManager] setAttributes:attr
ofItemAtPath:filePath
error:&error];
Listing 13-9: Setting the NSFileProtectionComplete flag using NSFileManager
You can also add file protection attributes on SQLite databases that you create, using the weirdly long SQLITE_OPEN_READWRITE_SQLITE_OPEN_FILEPROTECTION_COMPLETEUNLESSOPEN argument, as shown in Listing 13-10.
NSString *databasePath = [documentsDirectory stringByAppendingPathComponent:@"
MyNewDB.sqlite"];
sqlite3_open_v2([databasePath UTF8String], &handle, SQLITE_OPEN_CREATE|
SQLITE_OPEN_READWRITE_SQLITE_OPEN_FILEPROTECTION_COMPLETEUNLESSOPEN,NULL);
Listing 13-10: Setting protection attributes on SQLite databases
Think about how your app works before trying to use complete protection. If you have a process that will need continuous read/write access to a file, this protection mode will not be appropriate.
The CompleteUnlessOpen Protection Level
The CompleteUnlessOpen protection level is slightly more complicated. You’ll set it with the NSFileProtectionCompleteUnlessOpen flag when using NSFileManager and set it with NSDataWritingFileProtectionCompleteUnlessOpen when manipulating NSData stores. It is not, as its name might suggest, a mechanism that disables file protection if a file is currently held open by an application. CompleteUnlessOpen actually ensures that open files can still be written to after the device is locked and allows new files to be written to disk. Any existing files with this class cannot be opened when the device is locked unless they were already open beforehand.
The way this works is by generating a key pair and using it to calculate and derive a shared secret, which wraps the file key. Figure 13-3 illustrates this process.

Figure 13-3: Key generation and wrapping. Note that the file private key ➌ is transient and is discarded after the wrapped file key is stored in the file metadata.
Let’s walk through this file protection process step by step:
As with all files, a file key ➊ is generated to encrypt the file’s contents.
An additional key pair is generated6 to produce the file public key ➋ and the file private key ➌.
The file private key ➌ and the Protected Unless Open class public key ➍ are used to calculate a shared secret ➎.
An SHA-1 hash of this secret ➏ is used to encrypt the file key.
This encrypted file key ➐ is stored in the file’s metadata, along with the file public key.
The system throws away the file private key.
Upon closing the file, the unencrypted file key is erased from memory.
When the file needs to be opened again, the Protected Unless Open class private key and the file public key are used to calculate the shared secret.
The SHA-1 hash of this key is then used to decrypt the file key.
The upshot of this process is that you can still write data while the device is locked, without having to worry that an attacker will be able to read that data.
The DataProtectionClass Entitlement
If your application is not going to need to read or write any files while in the background or when the device is locked, you can add an entitlement to the project with a value of NSFileProtectionComplete. This will ensure that all protectable data files written to disk will be accessible only when the device is unlocked, which is the equivalent of setting kSecAttrAccessibleWhenUnlocked on every applicable file.
NOTE
While this will affect files managed with NSFileManager, NSData, SQLite, and Core Data files, other types of files (for example, plists, caches, and so on) will not be protected.
In Xcode 5 and later, the Data Protection entitlement is enabled by default on new projects; however, old projects will not be automatically migrated. Enabling entitlement itself is fairly simple—just flip the switch as shown in Figure 13-4.
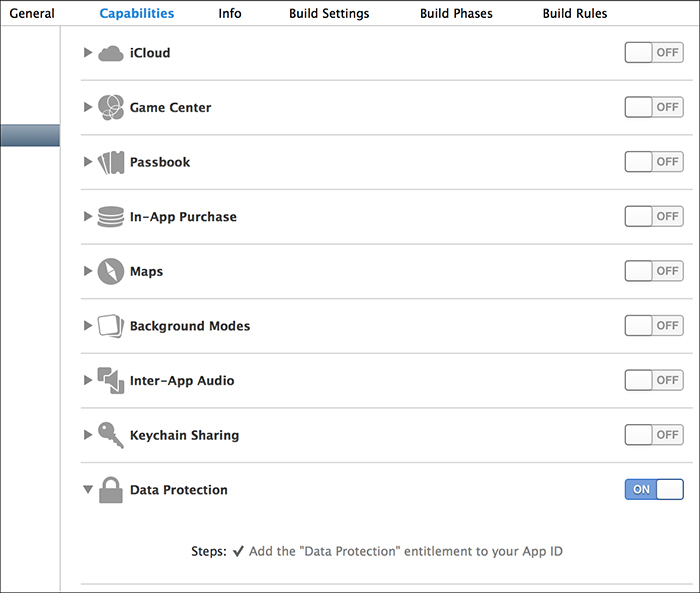
Figure 13-4: Enable the Data Protection entitlement in Xcode 5.
Note that applications that were installed before iOS 7 do not automatically have Data Protection enabled. They either need to be updated or must have specifically requested a Data Protection attribute in the past.
Checking for Protected Data Availability
For applications that do all their work in the foreground, Data Protection should work transparently. For applications that need to work in the background while the device is locked, your application will need to determine the availability of protected data before using it. This can be done via three different mechanisms.
Implementing Delegate Methods
To be notified and take particular actions when data’s availability changes, your application should implement the applicationProtectedDataWillBecomeUnavailable and applicationProtectedDataDidBecomeAvailable delegate methods, as in Listing 13-11.
- (void)applicationProtectedDataWillBecomeUnavailable:
(UIApplication *)application {
[self [theBodies hide]];
}
- (void)applicationProtectedDataDidBecomeAvailable:
(UIApplication *)application {
[self [theBodies exhume]];
}
Listing 13-11: Delegate methods for detecting Data Protection availability changes
Use these delegate methods to ensure that tasks requiring protected data files clean up gracefully and to notify you when the files will be active again.
Using the Notification Center
The NSNotificationCenter API essentially allows for an in-app broadcast mechanism, where one part of the app can listen for an event notification that can be called from other places in the code. To use the Notification Center to detect these state changes, you can register for the UIApplicationProtectedDataWillBecomeUnavailable and UIApplicationProtectedDataDidBecomeAvailable notifications, as shown in Listing 13-12.
- (BOOL)application:(UIApplication*)application didFinishLaunchingWithOptions:
(NSDictionary*)launchOptions {
➊ NSNotificationCenter *nc = [NSNotificationCenter defaultCenter];
➋ [nc addObserver:self
selector:@selector(dataGoingAway:)
name:UIApplicationProtectedDataWillBecomeUnavailable
object:nil];
}
➌ - (void)dataGoingAway {
[self [theBodies hide]];
}
Listing 13-12: Using the Notification Center to detect data availability changes
At ➊, an instance of the default Notification Center is instantiated and then an observer ➋ is added that specifies the selector to call when the event specified by name: occurs. Then you can simply implement that selector as part of the same class ➌ and put any logic that you want to perform upon receipt of the event there.
Detecting Data Protection Using UIApplication
You can also easily detect whether Data Protection is engaged at any given time, as shown in Listing 13-13.
if ([[UIApplication sharedApplication] isProtectedDataAvailable]) {
[self [theBodies hide]];
}
Listing 13-13: Using the protectedDataAvailable property
Just check the Boolean result of the isProtectedDataAvailable instance method of UIApplication.
Encryption with CommonCrypto
First things first: you are (probably) not a cryptographer.7 I’m not a cryptographer. It’s easy to think that you understand the subtleties of an encryption algorithm or to copy and paste crypto code from somewhere online, but you will generally mess up if you try to do crypto yourself.
That said, you should be aware of the CommonCrypto framework, if only so you can tell when other developers are trying to play cryptographer. There are some lower-level primitives for encryption and decryption operations, but the only one that you have any excuse for playing with is CCCrypt. Listing 13-14 shows one example of how you might use it.
CCCrypt(CCOperation op, CCAlgorithm alg, CCOptions options,
const void *key, size_t keyLength, const void *iv, const void *dataIn,
size_t dataInLength, void *dataOut, size_t dataOutAvailable,
size_t *dataOutMoved);
Listing 13-14: Method signature for CCCrypt
The CCCrypt method takes 11 arguments: control over the algorithm, key length, initialization vector, operation mode, and so on. Each one is a potential place to make a cryptographic mistake. In my experience, there are several common pitfalls that developers run into with CCCrypt, which I’ll describe here. Don’t make the same mistakes!
Broken Algorithms to Avoid
CCCrypt supports known bad encryption algorithms, such as DES, and if you use one, your app will almost certainly be susceptible to cryptographic attacks and brute-forcing. Even if you’re using the more modern AES, CCCrypt will let you switch from the default Cipher Block Chaining (CBC) mode to Electronic Code Book (ECB) using CCOptions, which is another bad idea. Using ECB mode causes identical blocks of plaintext to encrypt to identical blocks of ciphertext.8 This is a problem because if attackers know one piece of encrypted data, they can infer the contents of other blocks. This can typically be solved with a salt or initialization vector, but they can have problems as well.
Broken Initialization Vectors
The specification for AES’s CBC mode requires a nonsecret initialization vector (IV) to be supplied to the algorithm. The IV helps to randomize the encryption and produce distinct ciphertexts even if the same plaintext is encrypted multiple times. That way, you don’t need to generate a new key every time to prevent disclosure of identical blocks of data.
It’s important that you never reuse an IV under the same key, however, or two plaintext messages that begin with the same bytes will have ciphertext beginning with the same sequence of block values. This would reveal information about the encrypted messages to an attacker. As such, it’s important to use a random IV for each cryptographic operation.
You should also always make sure your call to AES CBC mode encryption functions don’t pass in a null initialization vector. If they do, then multiple sets of messages will be encrypted using the same key and IV, resulting in the situation I just described.
As you can see, using a static IV or a null IV has the same result: small blocks of ciphertext containing the same data will appear identical. An example of where this might be a problem would be a password manager, where encrypted keys are stored; if an attacker can read this data and determine that some of the ciphertexts are identical, they will know that the same password is used for multiple websites.
Broken Entropy
In the worst case, you may come across code that uses rand to attempt to obtain random bytes (rand being cryptographically insecure and not meant for use in cryptographic operations). The official Cocoa way to obtain entropy is via SecRandomCopyBytes.
uint8_t randomdata[16];
int result = SecRandomCopyBytes(kSecRandomDefault, 16, (uint8_t*)randomdata);
This code effectively acts as a wrapper of /dev/random, reading entropy from the kernel’s built-in entropy pool. Note that the kSecRandomDefault constant is not available on OS X, so if you’re writing code to be portable, simply specify NULL as the first argument. (Under iOS, this is equivalent to using kSecRandomDefault.)
Poor Quality Keys
People often mistakenly use a user-supplied password as an encryption key. Especially on mobile devices, this results in a fairly weak, low-entropy encryption key. Sometimes, it’s as bad as a four-digit PIN. When using user-supplied input to determine an encryption key, a key derivation algorithm such as PBKDF2 should be used. The CommonCrypto framework provides this with CCKeyDerivationPBKDF.
PBKDF2 is a key derivation function that uses a passphrase plus repeated iterations of a hashing algorithm to generate a suitable cryptographic key. The repeated iterations intentionally cause the routine to take longer to complete, making offline brute-force attacks against the passphrase far less feasible. CCKeyDerivationPBKDF supports the following algorithms for iterators:
• kCCPRFHmacAlgSHA1
• kCCPRFHmacAlgSHA224
• kCCPRFHmacAlgSHA256
• kCCPRFHmacAlgSHA384
• kCCPRFHmacAlgSHA512
If at all possible, you should be using at least SHA-256 or above. SHA-1 should be considered deprecated at this point because advances have been made to speed up cracking of SHA-1 hashes in recent years.
Performing Hashing Operations
In some circumstances, you may need to perform a hashing operation to determine whether two blobs of data match, without comparing the entire contents. This is frequently used to verify a file against a “known good” version or to verify sensitive information without storing the information itself. To perform a simple hashing operation on a string, you can use the CC_SHA family of methods as follows:
char secret[] = "swordfish";
size_t length = sizeof(secret);
unsigned char hash[CC_SHA256_DIGEST_LENGTH];
➊ CC_SHA256(data, length, hash);
This code simply defines a secret and its length and makes a char hash to contain the result of the hashing operation. At ➊, the call to CC_SHA_256 takes whatever has been put into data, calculates the hash, and stores the result in hash.
You may also be used to using OpenSSL for hashing functions. iOS does not include OpenSSL, but it does include some compatibility shims for using OpenSSL-dependent hashing code. These are defined in CommonDigest.h, shown in Listing 13-15.
#ifdef COMMON_DIGEST_FOR_OPENSSL
--snip--
#define SHA_DIGEST_LENGTH CC_SHA1_DIGEST_LENGTH
#define SHA_CTX CC_SHA1_CTX
#define SHA1_Init CC_SHA1_Init
#define SHA1_Update CC_SHA1_Update
#define SHA1_Final CC_SHA1_Final
Listing 13-15: OpenSSL compatibility hooks for CommonCrypto hashing functions
So as long as you define COMMON_DIGEST_FOR_OPENSSL, OpenSSL-style hashing operations should work transparently. You can see an example in Listing 13-16.
#define COMMON_DIGEST_FOR_OPENSSL
#include <CommonCrypto/CommonDigest.h>
SHA_CTX ctx;
unsigned char hash[SHA_DIGEST_LENGTH];
SHA1_Init(&ctx);
memset(hash, 0, sizeof(hash));
SHA1_Update(&ctx, "Secret chunk", 12);
SHA1_Update(&ctx, "Other secret chunk", 18);
SHA1_Final(hash, &ctx);
Listing 13-16: OpenSSL-style chunked SHA hashing
Listing 13-16 uses SHA1_Update and SHA1_Final, which is more appropriate for hashing a large file, where reading the file in chunks reduces overall memory usage.
Ensuring Message Authenticity with HMACs
It’s important to make sure that encrypted message data hasn’t been tampered with or corrupted and that it was produced by a party in possession of a secret key. You can use a keyed Hash Message Authentication Code (HMAC) as a mechanism to guarantee the authenticity and integrity of a message. In an iOS application, you could use this to verify the authenticity of messages sent between applications or to have a remote server verify that requests were produced by the correct application. (Just take care that the key is generated and stored in such a way that it is unique to the device and well-protected.)
To calculate an HMAC, you just need a key and some data to pass to the CCHmac function, as shown in Listing 13-17.
#include <CommonCrypto/CommonDigest.h>
#include <CommonCrypto/CommonHMAC.h>
➊ NSData *key = [@"key for the hash" dataUsingEncoding:NSUTF8StringEncoding];
➋ NSData *data = [@"data to be hashed" dataUsingEncoding:NSUTF8StringEncoding];
➌ NSMutableData *hash = [NSMutableData dataWithLength:CC_SHA256_DIGEST_LENGTH];
➍ CCHmac(kCCHmacAlgSHA256, [key bytes], [key length], [data bytes], [data length],
[hash mutableBytes]);
Listing 13-17: Calculating an HMAC
Note that Listing 13-17 is simplified to show the basic mechanism; embedding a static key in your source code is not a recommended practice. In most cases, this key should be dynamically generated and stored in the Keychain. The operation is fairly simple. At ➊, the key for the hash is passed in as a UTF-8 encoded string (this is the part that should be stored in the Keychain). At ➋, the data to be hashed is passed in, also as a UTF-8 string. Then an NSMutableData object is constructed ➌ to store the hash for later use and all three components are passed to the CCHmac function at ➍.
Wrapping CommonCrypto with RNCryptor
If you need to use the encryption functionality exposed by CommonCrypto, RNCryptor is a good framework.9 This wraps CommonCrypto and helps perform the most common function needed from it: encrypting data via AES with a user-supplied key. RNCryptor also helps you by providing sane defaults. The basic examples given in the instructions should be sufficient for most usage. See Listing 13-18 for basic usage.
NSData *data = [@"Data" dataUsingEncoding:NSUTF8StringEncoding];
NSError *error;
NSData *encryptedData = [RNEncryptor encryptData:data
withSettings:kRNCryptorAES256Settings
password:aPassword
error:&error];
Listing 13-18: Encryption with RNCryptor
Simply pass in your data to the encryptData method, along with a constant specifying the encryption settings you want to use, a key (pulled from the Keychain or from user input), and an NSError object to store the result.
Decrypting data (Listing 13-19) is more or less the inverse of encrypting, except that you do not need to provide the kRNCryptorAES256Settings constant because this is read from the header of the encrypted data.
NSData *decryptedData = [RNDecryptor decryptData:encryptedData
withPassword:aPassword
error:&error];
Listing 13-19: Decrypting RNCryptor-encrypted data
Encrypting streams or larger amounts of data while keeping memory usage sane is slightly more involved (see https://github.com/rnapier/RNCryptor for current examples), but the examples shown here cover the most common use case you’ll likely encounter.
NOTE
An older version of RNCryptor suffered from a vulnerability10 that could allow an attacker to manipulate a portion of the decrypted data by altering the ciphertext, so make sure that your code is using the most up-to-date version of RNCryptor.
Local Authentication: Using the TouchID
In iOS 8, Apple opened up the Local Authentication API so that third-party apps could use the fingerprint reader as an authenticator. The Local Authentication API is used by instantiating the LAContext class and passing it an authentication policy to evaluate; currently, only one policy is available, which is to identify the owner biometrically. Listing 13-20 shows this process in detail. Note that using this API doesn’t give developers access to the fingerprint—it just gives a success or failure from the reader hardware.
➊ LAContext *context = [[LAContext alloc] init];
➋ NSError *error = nil;
➌ NSString *reason = @"We use this to verify your identity";
➍ if ([context canEvaluatePolicy:LAPolicyDeviceOwnerAuthenticationWithBiometrics
error:&error]) {
➎ [context evaluatePolicy:LAPolicyDeviceOwnerAuthenticationWithBiometrics
localizedReason:reason
reply:^(BOOL success, NSError *error) {
if (success) {
➏ NSLog(@"Hooray, that's your finger!");
} else {
➐ NSLog(@"Couldn't read your fingerprint. Falling back to PIN or
something.");
}
}];
} else {
// Something went wrong. Maybe the policy can't be evaluated because the
// device doesn't have a fingerprint reader.
➑ NSLog(@"Error: %@ %@", error, [error userInfo]);
}
Listing 13-20: Authenticating the user via a fingerprint
First, this code creates an LAContext object ➊ and an NSError object ➋ to contain the results of the operation. There also needs to be a reason to present to the user when the UI asks for their fingerprint ➌. After creating these things, the code checks whether it can evaluate the LAPolicyDeviceOwnerAuthenticationWithBiometrics policy at ➍.
If evaluation is possible, then the policy is evaluated ➎; the reason and a block to handle the results of the evaluation are also passed to the evaluatePolicy method. If the fingerprint authenticates successfully, you can have the application allow whatever action it’s performing to continue ➏. If the fingerprint is invalid, then depending on how you choose to write your application, it can fall back to a different method of authentication or authentication can fail entirely ➐.
If the call to canEvaluatePolicy at ➍ fails, then the execution ends up at ➑. This is most likely to happen if the user’s device doesn’t support the finger-print reader, fingerprint functionality has been disabled, or no fingerprints have been enrolled.
How Safe Are Fingerprints?
As with most other forms of biometric authentication, fingerprint authentication is an imperfect approach. It’s convenient, but given that you leave your fingerprints all over the place, it’s not difficult to re-create a mold that would effectively simulate your finger. In the United States, law enforcement is legally allowed to use fingerprints to unlock devices, whereas they cannot compel someone to divulge their passcode.
There are a couple of things that developers can do to address these shortcomings. The most obvious is to provide the user with an option to use a PIN instead of using the TouchID, or perhaps in addition to the TouchID. Another thing that can help mitigate fingerprint cloning attacks is to implement a system similar to the one that Apple uses to handle the lock screen: after three unsuccessful attempts, revert to a PIN or require the user’s password. Because successfully getting a cloned fingerprint is an unreliable process, this may help prevent a successful fraudulent fingerprint authentication.
Closing Thoughts
Encryption and authentication features aren’t always the most straightforward to use, but given the importance of user data privacy, both from a legal and reputational standpoint, correct deployment of these features is crucial. This chapter should have given you a reasonable idea of the strategies you might encounter or need to deploy. Protecting user privacy is a broader topic than just encryption, though—you’ll be turning your attention to that in the next chapter.