
10
DATA LEAKAGE
Data theft is a serious concern in the mobile world, where devices containing critical personal and business data are lost or stolen frequently. The primary threat to consider here is forensic attackers, so use special care to ensure that such data is persisted in a format that can’t be easily extracted by physical attackers or by compromised devices. Unfortunately, there’s a lot of confusion over what APIs actually end up storing sensitive data, which is understandable since much of this behavior is undocumented.
In this chapter, I’ll examine the many ways in which data can leak from your application to dark corners of the device—and even accidentally be synced to remote services such as iCloud. You’ll learn how to search for leaked data on a device or within your own Simulator application directory structure, as well as how to prevent these kinds of leaks from happening.
The Truth About NSLog and the Apple System Log
For years developers have used printf to output basic debug information while writing programs. In iOS, NSLog appears to be the equivalent, and it’s frequently used as such. However, NSLog doesn’t merely write output to the Xcode console, as most people believe. Its purpose is to log an error message to the Apple System Log (ASL) facility. Here’s what Apple has to say:
Messages received by the server are saved in a data store (subject to input filtering constraints). This API permits clients to create queries and search the message data store for matching messages.1
So perhaps NSLog is best thought of as a hybrid between printf and syslog, which spits out messages in the Xcode console when debugging and sends messages to a global system log when on the device. It follows, then, that data logged by NSLog will be retrievable by anyone in physical possession of the device, similar to other cached application data.
No special tools are necessary to read the log. Just plug the iOS device in to a Mac, open Xcode, select Window → Devices, and click your device. The device’s system log may not be initially visible in the console. If it isn’t, click the tiny arrow in the lower left of the panel. Figure 10-1 shows an example of viewing the console log with the Devices window.
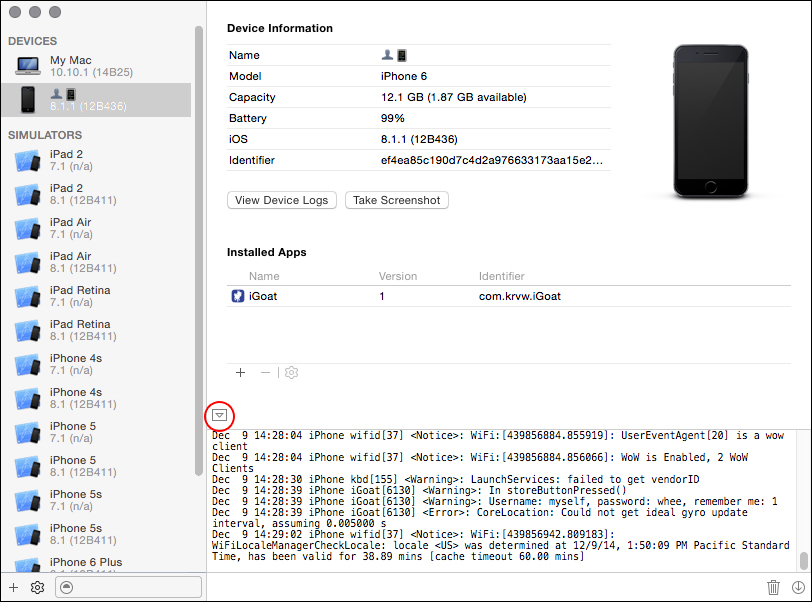
Figure 10-1: The Devices window in Xcode
The Apple System Log facility has one quirk that makes it different from the traditional UNIX syslog facility: you can create queries to search existing data in the ASL. In versions of iOS before iOS 7, this function works regardless of which application originally submitted the data, which means that any information an application logs can be read by any other application on the device. Any application can read the ASL programmatically, too, as Oliver Drobnik describes on the Cocoanetics blog.2 In fact, there are several applications that act as system log viewers using this API.
In iOS 7 and later, the impact of this flaw has lessened significantly because apps can access only their own logs. However, all application logs can still be read with physical access to a device, provided that the device has a trust relationship with another computer (or that the attacker jailbreaks the device).
Since log information can leak under certain circumstances, you need to be painstakingly careful to ensure that sensitive information doesn’t end up in the system log. For example, I’ve seen applications containing code like the horrible snippet in Listing 10-1.
NSLog(@"Sending username \%@ and password \%@", myName, myPass);
Listing 10-1: Please don’t do this.
If you’re sending usernames, passwords, and so on, to NSLog, you’re basically handing over users’ private information, and you should feel bad about that. To redeem yourself, stop abusing NSLog; take it out of the equation before releasing your app to users.
Disabling NSLog in Release Builds
The simplest way to get rid of NSLog output is to use a variadic macro (Listing 10-2) that makes NSLog a no-op unless the app is built in Debug mode within Xcode.
#ifdef DEBUG
# define NSLog(...) NSLog(__VA_ARGS__);
#else
# define NSLog(...)
#endif
Listing 10-2: Disabling NSLog in nondebug builds
As bad as NSLog seems, apps with NSLog do make it into the App Store. This may change at some point, but you can’t rely on Apple to detect that your application is logging information that you don’t intend, nor can you rely on Apple to prevent applications from reading that logged data.
Logging with Breakpoint Actions Instead
Another option is to use breakpoint actions to do logging, as I touched on in Chapter 5. In that case, you’re effectively logging with the debugger, rather than the program itself. This is more convenient in some circumstances and doesn’t result in data being written to the system log when deployed, reducing the risk of releasing code with logging enabled to zero. Knowing how to use these actions will also be useful to you in future debugging.
Breakpoint actions are stored within a project, rather than in the source itself. They’re also user specific, so you see only the breakpoints and logging actions that you care about, rather than having everyone on your team clutter up the codebase with their logging statements. But when needed, Xcode lets you share your breakpoints with other users, making them part of the main project (see Figure 10-2).
You can also easily enable or disable actions, as well as specify that they shouldn’t output until the breakpoint is hit a certain number of times. You can even specify complex breakpoint conditions, which define when the associated actions will execute.
If you want to disable all the breakpoints in a project, you can do this a couple of ways in Xcode. Either go the breakpoint navigator and right-click the workspace icon (Figure 10-2) or use the shortcut ![]() -Y.
-Y.

Figure 10-2: Sharing breakpoints with other users and disabling all breakpoints in Xcode
While NSLog leaks information to disk where it can be read by a physical attacker (and malicious apps in some versions of iOS), data can also leak between apps via more transient mechanisms, such as iOS pasteboards. Let’s take a look at them now.
How Sensitive Data Leaks Through Pasteboards
The iOS pasteboard is a flexible mechanism for sharing arbitrary data within or between applications. Via a pasteboard, you can share textual data or serialized objects between applications, with the option to persist these pasteboards on disk.
Restriction-Free System Pasteboards
There are two default system pasteboards: UIPasteboardNameGeneral and UIPasteboardNameFind. The former is the pasteboard that almost every application will read from and write to by default when using Cut, Copy, or Paste menu items from within the app, and it’s the pasteboard of choice when you want to share data between third-party applications. The latter is a special pasteboard that stores the contents of the last search string entered into a UISearchBar, so applications can automatically determine what users have searched for in other applications.
NOTE
Contrary to the official description of UIPasteboardNameFind, this pasteboard is never used in real life. This bug is acknowledged by Apple but hasn’t been fixed, nor has the documentation been updated. As a security consultant, I can only hope that it will be fixed so that I can complain about it being a security flaw.
It’s important to remember that the system pasteboards have no access controls or restrictions. If your application stores something on the pasteboard, any application has access to read, delete, or tamper with that data. This tampering can come from processes running in the background, polling pasteboard contents periodically to harvest sensitive data (see Osamu Noguchi’s UIPasteBoardSniffer3 for a demonstration of this technique). As such, you need to be extremely careful about what ends up on UIPasteboardNameGeneral in particular, as well as pasteboards in general.
The Risks of Custom-Named Pasteboards
Custom-named pasteboards are sometimes referred to as private pasteboards, which is an unfortunate misnomer. While applications can create their own pasteboards for internal use or to share among other specific applications, custom pasteboards are public in versions of iOS prior to 7, making them available for any program to use so long as their names are known.
Custom pasteboards are created with pasteboardWithName, and in iOS 7 and later, both pasteboardWithName and pasteboardWithUniqueName are specific to all applications within an application group. If other applications outside of this group attempt to create a pasteboard with a name already in use, they’ll be assigned a totally separate pasteboard. Note, however, that the two system pasteboards are still accessible by any application. Given that a number of devices can’t be upgraded to iOS 6, much less iOS 7, you should carefully examine how custom pasteboards are used in different versions of iOS.
One thing that you can do with a custom pasteboard is mark it as persistent across reboots by setting the persistent property to YES. This will cause pasteboard contents to be written to $SIMPATH/Devices/<device ID>/data/Library/Caches/com.apple.UIKit.pboard/pasteboardDB, along with other application pasteboards. Listing 10-3 shows some data you might see in the pasteboardDB file.
<?xml version="1.0" encoding="UTF-8"?>
<!DOCTYPE plist PUBLIC "-//Apple//DTD PLIST 1.0//EN" "http://www.apple.com/DTDs/
PropertyList-1.0.dtd">
<plist version="1.0">
<array>
<integer>1</integer>
<dict>
<key>bundle</key>
<string>com.apple.UIKit.pboard</string>
<key>items</key>
<array/>
<key>itemsunderlock</key>
<array/>
<key>name</key>
<string>com.apple.UIKit.pboard.find</string>
<key>persistent</key>
<true/>
</dict>
--snip--
<dict>
<key>bundle</key>
<string>com.apple.UIKit.pboard</string>
<key>items</key>
<array>
<dict>
<key>Apple Web Archive pasteboard type</key>
<data>
bigbase64encodedblob==
</data>
<key>public.text</key>
<data>
aHR0cDovL2J1cnAvY2VydA==
</data>
</dict>
</array>
<key>itemsunderlock</key>
<array/>
<key>name</key>
<string>com.apple.UIKit.pboard.general</string>
<key>persistent</key>
<true/>
</dict>
</array>
</plist>
Listing 10-3: Possible contents of the com.apple.UIKit.pboard/pasteboardDB file
The base64 blobs bigbase64encodedblob (too big to include in its entirety) and aHR0cDovL2J1cnAvY2VydA hold pasteboard contents, leaving those contents accessible to any application that can read pasteboardDB. Note, too, that pasteboards can be of different types: the Apple Web Archive pasteboard allows an entire web page to be stored, while the public.text pasteboard is the text content of the general pasteboard.4
Pasteboard Data Protection Strategies
To minimize the risk of information leakage, it’s a good idea to analyze exactly what behavior you’re trying to facilitate by using pasteboards. Here are some questions to ask yourself:
• Do I want users to copy information into other applications, or will they simply need to move data within my application?
• How long should clipboard data live?
• Is there any place in the application that data should never be copied from?
• Is there any part of the application that should never receive pasted data?
The answers to these questions will inform the way you should handle pasteboard data within your application. You can take a few different approaches to minimize data leakage.
Wiping the Pasteboard When You Switch Apps
If you want your users to copy and paste only within your own application, you can clear the pasteboard on the appropriate events to ensure that data doesn’t stay on the pasteboard when the user switches applications. To do this, clear the pasteboard by setting pasteBoard.items = nil on the applicationDidEnterBackground and applicationWillTerminate events. This won’t prevent applications running in the background from reading the pasteboard, but it will shorten the lifetime of the data on the pasteboard and will prevent users from pasting data into apps they’re not supposed to.
Keep in mind that clearing the pasteboard may interfere with data the end user or other applications are using for a different purpose. You may want to create a flag that indicates whether potentially sensitive data has been written to the pasteboard and clear it only conditionally.
Preventing Copy/Paste Selectively
Even when you do want to let the user copy and paste, sometimes there are specific places you want to disallow the option. For example, you might want to prevent a user from pasting in a PIN or answer to a security question (such data should never be on the pasteboard in the first place) yet allow the ability to paste in an email address from an email.
NOTE
That’s not to say you should use security questions, which tend to enable account hijacking by using publicly available information as an authenticator. You’ll take a look at this in “Keylogging and the Autocorrection Database” on page 175.
The official way to allow users to paste some information and prevent them from pasting others is with the canPerformAction:withSender responder method.5 Create a new class in Xcode, as in Figure 10-3.
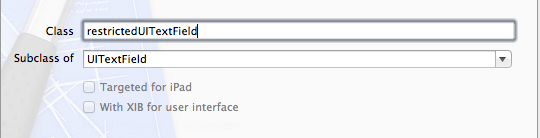
Figure 10-3: Creating the restrictedUITextField subclass
Then, edit restrictedUITextField.m and add the canPerformAction method.
#import "restrictedUITextField.h"
@implementation restrictedUITextField
- (id)initWithFrame:(CGRect)frame {
self = [super initWithFrame:frame];
if (self) {
// Initialization code
}
return self;
}
➊ -(BOOL)canPerformAction:(SEL)action withSender:(id)sender {
➋ if (action == @selector(cut:) || action == @selector(copy:))
return NO;
else
return YES;
}
@end
Listing 10-4: Adding canPerformAction to restrictedUITextField.m
The canPerformAction method at ➊ is passed an action selector, which can be inspected to see what type of action is being requested at ➋. You can use any method from those specified in the UIResponderStandardEditActions protocol. If you want to entirely disable the context menu, you can, of course, simply return NO in every circumstance.
Finding and Plugging HTTP Cache Leaks
You’ll also find cached data from the URL loading system stored, unencrypted, in the <app ID>/Library/Caches/com.mycompany.myapp/Cache.db* files, which are private to each application. HTTP caches can contain images, URLs, and text fetched over HTTP and can therefore expose sensitive data to a third party if examined. An easy way to get an idea of the type of data exposed by your application is to use File Juicer to carve the database into normal, readable individual files. You can download File Juicer at http://echoone.com/filejuicer/, and Figure 10-4 shows the type of output it provides.

Figure 10-4: Examining the contents of the cache databases, split into separate files and directories by File Juicer
File Juicer splits data into directories based on particular file types, so you can investigate stored images, plists, SQLite databases, or plaintext conversions of other binary file types.
Once you know what kind of data your application exposes through cached data, you can consider how best to manage it.
Cache Management
Cache management on iOS is somewhat complex. There are many configuration settings and a seemingly endless number of ways to affect cache policy. On top of that, the platform tries to aggressively cache and copy everything it can get its hands on to try to improve the user experience. Developers need to determine which of these methods allows for secure cache management, but it’s easy to lull yourself into a false sense of security. Pentesters have to know when clients who think they are doing the right things are in fact leaking potentially sensitive information onto disk. Let’s talk about all the wrong ways to manage caches.
As I mentioned in Chapter 5, the documented way to remove cached data, [NSURLCache removeAllCachedResponses], only removes cache entries from memory. This is essentially useless for security purposes because the same information is persisted to disk and is not removed. Perhaps there’s a better approach.
Ideally, you won’t ever need to delete the cache because removal implies that you were caching responses in the first place. If the response data is so sensitive, then why not just never cache it? Let’s give that a shot.
The first place to start limiting cached responses is in the NSURLCache configuration, as in Listing 10-5. This API lets you control the amount of memory and disk capacity that the platform dedicates to the cache.
NSURLCache *urlCache = [[NSURLCache alloc] init];
[urlCache setDiskCapacity:0];
[NSURLCache setSharedURLCache:urlCache];
Listing 10-5: Limiting disk cache storage to zero bytes
The problem with this strategy is that the capacity manipulation APIs are not intended to be security mechanisms. Rather, these configurations exist to provide the system with information to be used when memory or disk space runs low. The NSURLCache documentation6 specifies that both the on-disk and in-memory caches will be truncated to the configured sizes only if necessary.
So you can’t trust configuring the cache capacity. What about setting the cache policy to NSURLRequestReloadIgnoringLocalCacheData to force the URL loading system to ignore any cached responses and fetch the data anew? Here’s how that might work:
NSURLRequest* req = [NSURLRequest requestWithURL:aURL
cachePolicy:NSURLRequestReloadIgnoringLocalCacheData
timeoutInterval:666.0];
[myWebView loadRequest:req];
But this policy is not implicitly preventing responses from being cached; it’s preventing the URL loading system only from retrieving the cached responses on subsequent fetches. Any previously cached responses will persist on disk, which poses problems if your initial app implementations allowed caching. No dice.
As I’ve tried to demonstrate, if you rely on the system defaults for web view cache management, you might just implement a lot of precautions that don’t really protect users at all. If you want to reliably control the contents of your application caches, you need to do it yourself. Luckily, this isn’t actually that difficult.
The Cocoa Touch API gives developers the ability to manipulate responses on a per-request basis before they are cached using the [NSURLConnection connection:willCacheResponse:] method. If you don’t want to cache the data, you can implement the delegate method, as shown in Listing 10-6.
-(NSCachedURLResponse *)connection:(NSURLConnection *)connection
willCacheResponse:(NSCachedURLResponse *)cachedResponse {
NSCachedURLResponse *newCachedResponse = cachedResponse;
if ([[[[cachedResponse response] URL] scheme] isEqual:@"https"]) {
newCachedResponse=nil;
}
return newCachedResponse;
}
Listing 10-6: Preventing caching of responses served over secure connections
This implementation of the delegate just returns NULL instead of the NSCachedURLResponse representation of the response data.
Similarly, for data fetched using the NSURLSession class, you’d implement the [NSURLSessionDataDelegate URLSession:dataTask:willCacheResponse:completion-Handler:] delegate method. Beware of relying entirely on this method, however, because it is called only for data and upload tasks. Caching behavior for download tasks will still be determined by the cache policy only and should be resolved similarly to Listing 10-6.7
In summary, caching on iOS is unreliable. Be careful, and double-check your app after extended use to make sure it’s not leaving sensitive information around.
Solutions for Removing Cached Data
The documented way to remove locally cached data is to use the removeAllCachedResponses method of the shared URL cache, shown in Listing 10-7.
[[NSURLCache sharedURLCache] removeAllCachedResponses];
Listing 10-7: The documented API for removing cached data
A similar method, removeCachedResponseForRequest, exists to remove cached data for only specific sites. However, as you discovered in Chapter 4, this removes only cached data from memory and not from the disk cache that you’re actually concerned with. I would file a bug, if Apple’s bug tracking system were not an infinitely hot and dense dot from which no light or information could escape.8 Anyway, there are a few ways you can work around this—the caching issue, I mean; you’re on your own if you’re unfortunate enough to have to report a bug.
Just Don’t Cache
In most circumstances, it’s better to just prevent caching altogether, rather than clean up piecemeal afterward. You can proactively set the cache capacities for disk and memory to zero (Listing 10-8), or you can simply disable caching for the disk, if you’re comfortable with in-RAM caching.
- (void)applicationDidFinishLaunching:(UIApplication *)application {
[[NSURLCache sharedURLCache] setDiskCapacity:0];
[[NSURLCache sharedURLCache] setMemoryCapacity:0];
// other init code
}
Listing 10-8: Disallowing cache storage by limiting permitted storage space
Alternatively, you can implement a willCacheResponse delegate method of NSURLConnection, returning a value of nil, as in Listing 10-9.
-(NSCachedURLResponse *)connection:(NSURLConnection *)connection
willCacheResponse:(NSCachedURLResponse *)cachedResponse {
NSCachedURLResponse *newCachedResponse=cachedResponse;
➊ if ([cachedResponse response]) {
➋ newCachedResponse=nil;
}
return newCachedResponse;
}
Listing 10-9: Sample cache discarding code
This just checks whether a cached response has been sent at ➊ and, if it finds one, sets it to nil at ➋. You can also conditionally cache data by examining the properties of the response before returning the object to cache, as shown in Listing 10-10.
-(NSCachedURLResponse *)connection:(NSURLConnection *)connection
willCacheResponse:(NSCachedURLResponse *)cachedResponse {
NSCachedURLResponse *newCachedResponse=cachedResponse;
➊ if ([[[[cachedResponse response] URL] scheme] isEqual:@"https"]) {
newCachedResponse=nil;
}
return newCachedResponse;
}
Listing 10-10: Conditional cache discarding code
This is nearly the same as in Listing 10-9, but it additionally examines the response being cached at ➊ to determine whether it is being delivered over HTTPS and discards it if that’s the case.
If you’re using NSURLSession, you can also use ephemeral sessions, which will not store any data to disk; this includes caches, credentials, and so forth. Creating an ephemeral session is easy. Just instantiate a configuration object for your NSURLSessions, like so:
NSURLSessionConfiguration *config = [NSURLSessionConfiguration
ephemeralSessionConfiguration];
You can find more information and examples of how to use NSURLSession in Chapter 7.
Disable Caching via the Server
Presuming you control the server your application communicates with, you can instruct the client not to cache requests using the Cache-Control HTTP header. This allows you to either disable caching application-wide or apply it only to specific requests. The mechanism for implementing this on the server side is language-dependent, but the header you’ll want to return for requests you don’t want cached is as follows:
Cache-Control: no-cache, no-store, must-revalidate
Sadly, at least some versions of iOS (verified as of 6.1) don’t actually obey these headers. It’s a good idea to set them for sensitive resources regardless, but don’t rely on this method to solve the problem entirely.
Go Nuclear
The previous approaches will prevent data from being cached, but sometimes you may want to cache data and then clean it up later. This could be for performance reasons or perhaps because you’re correcting a caching problem in a newly released version of your application, which has already cached data locally on disk. Whatever your reason, clearing the cache in the documented manner doesn’t work, so you’re stuck removing the cached data forcibly, as in Listing 10-11.
NSString *cacheDir=[NSSearchPathForDirectoriesInDomains(NSCachesDirectory,
NSUserDomainMask, YES) objectAtIndex:0];
[[NSFileManager defaultManager] removeItemAtPath:cacheDir
error:nil];
Listing 10-11: Manually removing the cache database
There’s no guarantee that some other part of the system won’t freak out if you clear cached data manually. However, this method is the only reliable way I’ve found to remove cached data after it’s already been written to disk.
Data Leakage from HTTP Local Storage and Databases
The HTML 5 specification allows websites to store and retrieve large amounts of data (larger than what would fit in a cookie) on the client. These mechanisms are sometimes used to cache data locally so that primarily web-based applications can function in an offline mode. You can find these databases in a number of locations on the device or your simulator, including the following:
• /Library/Caches/*.localstorage
• /Library/Caches/Databases.db
• /Library/Caches/file__0/*.db
You can feed these locations to File Juicer the same way you do with HTTP caches to get access to the plaintext data. One obvious application for larger local storage and SQL databases is storing structured information about communications such as email so that those communications can be accessed when the user doesn’t have cell phone reception. This can leave traces around the storage databases, as shown in Figure 10-5.
This exposure is probably an acceptable risk for metadata, but storing it in an encrypted SQLite store might be better, especially when storing full message contents. I’ll talk more about how to do this in “Data Protection API” on page 219.

Figure 10-5: Email metadata left in a mail client
Keylogging and the Autocorrection Database
Everyone is familiar with iOS’s word autocompletion mechanism, the source of endless entertainment and amusing typos (and of frustration when trying to use expletives). One aspect of this system that’s gained some attention in the press is that the autocompletion mechanism acts as an accidental keylogger, recording portions of the text that a user types in what is basically a plaintext file to help with future completions. A forensic attacker could then retrieve that completion database.
This behavior is already disabled for password fields—that is, UITextField objects with setSecureTextEntry:YES set—but many other forms in an application may take sensitive data. As such, developers have to consider the all too common trade-off between user experience and security. For some applications, no amount of unencrypted data stored to disk is acceptable. Other applications handle sensitive data, but they involve so much text entry that disabling autocorrection would be extremely burdensome.
Fields that take smaller amounts of sensitive data, though, are a no-brainer. Consider answers to security questions, for example. For these fields, you’ll want to disable autocorrection behavior by setting the autocorrectionType property to UITextAutocorrectionTypeNo on UITextField and UITextView objects. This is also applicable (and a good idea) for UISearchBar objects because having search contents leak to disk is usually undesirable. Check out Listing 10-12 for an example of how you might try to disable this attribute.
UITextField *sensitiveTextField = [[UITextField alloc] initWithFrame:CGRectMake(0,
0, 25, 25)];
[sensitiveTextField setAutocorrectionType:UITextAutocorrectionTypeNo];
Listing 10-12: Disabling autocorrection on a UITextField
Of course, note that I say, “You’ll want to disable this behavior.” You’ll want to, but you can’t. Around iOS 5.1, a bug crept in that causes the on-disk word cache to be updated even if you disable autocorrection, autocapitalization, spellcheck, and so on. There are currently two ways around this, ranging from very silly to utterly ridiculous.
The silly approach (shown in Listing 10-13) is to use a UITextView (note View, rather than Field) and send it the message setSecureTextEntry:YES. The UITextView class doesn’t actually implement the UITextInputTraits protocol9 correctly, so text isn’t obscured by circles like it would be in a UITextField configured for password entry. It does, however, prevent text from getting written to the disk.
-(BOOL)twiddleTextView:(UITextView *)textView {
[textView setSecureTextEntry:YES];
}
Listing 10-13: Setting the SecureTextEntry attribute on a UITextView
The ridiculous method, which works on both UITextView and UITextField objects, is shown in Listing 10-14.
-(BOOL)twiddleTextField:(UITextField *)textField {
[textField setSecureTextEntry:YES];
[textField setSecureTextEntry:NO];
}
Listing 10-14: Twiddling setSecureTextEntry on a UITextField
Yes, seriously. Just switch keylogging on and then turn it off.
The classes are implemented such that they forget to turn keylogging back on if you simply wiggle it on and off again. Unfortunately, UISearchbar also doesn’t implement the protocol correctly, so you can’t pull this trick on one of the search bars. If preventing data leakage from your search bar is critical, you may want to replace the search bar with an appropriately styled text field instead.
Of course, that bug might be fixed in a future version of the OS, so just be prudent and ensure that the OS your app is running on is a version that you’ve tested the behavior on before you do this yes/no flipping trick. Listing 10-15 shows how to do this.
UITextField *sensitiveTextField = [[UITextField alloc] initWithFrame:CGRectMake(0,
0, 25, 25)];
[sensitiveTextField setAutocorrectionType: UITextAutocorrectionTypeNo];
if ([[[UIDevice currentDevice] systemVersion] isEqual: @"8.1.4"]) {
[sensitiveTextField setSecureTextEntry:YES];
[sensitiveTextField setSecureTextEntry:NO];
}
Listing 10-15: Checking iOS version
To help verify that your application isn’t leaking anything unexpected, you can also check <device ID>/data/Library/Keyboard/dynamic-text.dat on the simulator or on a jailbroken device. (Figure 10-6 shows an example dynamic-text.dat file.) This isn’t going to catch every corner case of what might be committed to the database, but the file should give you a reasonable idea. Note that the database may not actually get updated until you hit the Home button.

Figure 10-6: Contents of dynamic-text.dat after using the keyboard to enter message contents. Note that the order of words does not reflect the order in which they were entered.
In iOS 8 and later, additional information is stored in the Keyboard cache. This data is used to help with the QuickType word prediction system, but it also leaks more information about conversations and people who have communicated with the device owner. In the <device ID>/data/Library/Keyboard/en-dynamic.lm directory,10 you’ll find four additional data files: dynamic.dat, lexicon.dat, meta.dat, and tags.dat. Check all these files for data entered into your application. Because QuickType adapts based on the recipient, the tags.dat file also includes a list of past message recipients so the completion system can use the correct cache for the correct recipient.
Misusing User Preferences
As I briefly mentioned in Chapter 3, user preferences often contain sensitive information. But user defaults are actually intended to define, say, what URL an app’s API should be at or other nonsensitive preference information.
Preferences are manipulated through the NSUserDefaults API or, less commonly, the CFPreferences API, and many developers clearly must not know what happens to that data on the device. Restrictions on these files are fairly loose, and user preferences can easily be read and manipulated using commonly available tools, such as iExplorer.
Listing 10-16 shows an intentionally terrible usage of NSUserDefaults from the iGoat project.11
NSUserDefaults *credentials = [NSUserDefaults standardUserDefaults];
[credentials setObject:self.username.text forKey:@"username"];
[credentials setObject:self.password.text forKey:@"password"];
[credentials synchronize];
Listing 10-16: The worst possible way to use NSUserDefaults
This is essentially the worst-case scenario for data leakage: the credentials are stored in plaintext in a plist belonging to the app. Many applications in the wild store user credentials this way, and many have been called out for it.
One less common problem with NSUserDefaults is that developers may use it to store information that really shouldn’t be under a user’s control. For example, some apps hand over the reins for security controls that dictate whether users can download and store files locally or whether they’re required to enter a PIN before using the app. To protect users, let the server enforce such decisions as often as possible instead.
When auditing an application, check each use of the NSUserDefaults or CFPreferences APIs to ensure that the data being stored there is appropriate. There should be no secret information or information you don’t want a user to change.
Dealing with Sensitive Data in Snapshots
As I also discussed in Chapter 3, iOS snapshots an app’s current screen state before sending the app to the background so it can generate an animation when the app is opened again. This results in potentially sensitive information littering the disk, sometimes even if the user doesn’t intentionally background the app. For example, if someone happens to answer a call in the middle of entering sensitive information into an application, that screen state will be written to disk and remain there until overwritten with another snapshot. I’ve seen many applications willing to record people’s SSNs or credit card numbers in this fashion.
Once these snapshots are written to disk, a physical attacker can easily retrieve them with common forensics tools. You can even observe the file being written using the Simulator, as shown in Figure 10-7.

Figure 10-7: A snapshot of a user searching for embarrassing material on Wikipedia, saved to local storage
Just suspend your application and open UIApplicationAutomaticSnapshot Default-Portrait.png, which you’ll find under your app’s Library/Caches/Snapshots/com.mycompany.myapp directory. Unfortunately, applications can’t just go and remove snapshots manually. There are, however, a couple of other ways you can prevent this data from leaking.
Screen Sanitization Strategies
First, you can alter the screen state before the screenshot actually occurs. You’ll want to implement this in the applicationDidEnterBackground delegate method, which is the message that your program receives when the application is going to be suspended, giving you a few seconds to complete any tasks before this occurs.
This delegate is distinct from the applicationWillResignActive or applicationWillTerminate events. The former is invoked when the application temporarily loses focus (for example, when interrupted by an incoming phone call overlay) and the latter when the application is forcibly killed or has opted out of background operation.12 For an abbreviated example of the events received over the life cycle of an iOS application, see Figure 10-8.

Figure 10-8: The simplified iOS application life cycle. Code for handling these events can be defined in the application delegate.
After these tasks are complete, the snapshot should be taken, and the application should disappear with its little “whoosh” animation. But how can you sanitize your user’s screen?
The simplest and most reliable method of obscuring screen contents, and the one that I primarily recommend, is simply placing a splash screen with some logo art on top of all the current views. You can implement this as shown in Listing 10-17.
- (void)applicationDidEnterBackground:(UIApplication *)application {
application = [UIApplication sharedApplication];
self.splash = [[UIImageView alloc] initWithFrame:[[UIScreen mainScreen]
bounds]];
[self.splash setImage:[UIImage imageNamed:@"myimage.png"]];
[self.splash setUserInteractionEnabled:NO];
[[application keyWindow] addSubview:splash];
}
Listing 10-17: Applying a splash screen
With this code in place, on entering the background, your application should set whatever image you have stored in myimage.png as the splash screen. Alternatively, you could set the hidden attribute of the relevant container objects—for example, UITextFields, whose contents might be sensitive. You can use this same approach to hide the entire UIView. This is less visually appealing but easily does the job in a pinch.
A slightly fancier option is to perform some of your own animation,13 as in Listing 10-18. This just does a fade-out before removing the content from the view.
- (void)fadeMe {
[UIView animateWithDuration:0.2
animations:^{view.alpha = 0.0;}
completion:^(BOOL finished){[view removeFromSuperview];}
];
}
Listing 10-18: Animating a fade to transparency
I even saw one application that took its own screenshot of the current screen state and ran the screenshot through a blur algorithm. It looked pretty, but hitting all the corner cases is tricky, and you’d have to ensure that the blur is destructive enough that an attacker couldn’t reverse it.
Regardless of your obfuscation approach, you’ll also need to reverse your changes in either the applicationDidBecomeActive or applicationWillEnter Foreground delegate method. For example, to remove the splash image placed over the screen in Listing 10-17, you could add something like Listing 10-19 to the applicationWillEnterForeground method.
- (void)applicationWillEnterForeground:(UIApplication *)application {
[self.splash removeFromSuperview];
self.splash = nil;
}
Listing 10-19: Removing a splash screen
Before you’re done, ensure that your sanitization technique is effective by repeatedly suspending your app in different application states while monitoring your application’s Library/Caches/Snapshots/com.mycompany.myapp directory. Check that the PNG images saved there have all parts of the window obscured by the splash image.
NOTE
The com.mycompany.myapp directory is re-created on every suspension of the application. If you’re watching for the file to be created in that directory from the Terminal, you’ll have to reenter the directory using cd $PWD or similar for the file to appear.
Why Do Those Screen Sanitization Strategies Work?
People often misunderstand the fixes I just described because they don’t grasp how iOS lays out its views and windows, so I’ve created a flowchart (Figure 10-9) that shows everything you need to know.
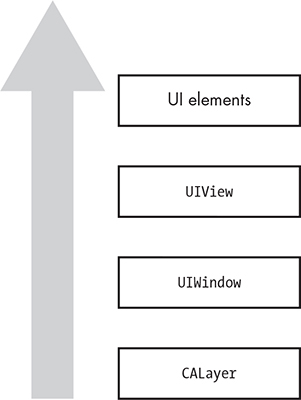
Figure 10-9: The hierarchy of iOS views
Every application that displays contents on the screen is backed by a layer, which is CALayer by default. On top of the layer is an instance of the UIWindow class, which manages one or more views, instances of the UIView class. UIViews are hierarchical, so a view can have multiple subviews along with buttons, text fields, and so forth.
iOS apps typically have only one UIWindow, but multiple windows are quite possible. By default, windows have a windowLevel property of 0.0, specifying that the window is at the UIWindowLevelNormal level. Other defined levels are UIWindowlevelAlert and UIWindowlevelStatusBar, both of which have level priority over UIWindowLevelNormal, meaning that they’ll appear on top of other windows. The most obvious scenario is that of an alert, and in that case, UIAlertView creates a new window on top of all others except the status bar by default.
The window currently receiving user events is referred to as the key window, and it can be referenced via the keyWindow method in UIApplication.
Common Sanitization Mistakes
Developers who don’t understand iOS windows and views frequently sanitize screens incorrectly. I’ve seen several applications that have taken a few development iterations to get it right. One flaw I’ve seen is to set only the key window’s rootViewController to hidden, like so:
UIApplication *application;
application = [UIApplication sharedApplication];
[[[[application] keyWindow] rootViewController] view] setHidden:YES];
This mistake is understandable because most developers are used to working with UIViews when programming GUIs. While the code will look like it works much of the time, it still leaves any subviews of the root visible. An improvement would be to hide the entire key window, like this:
UIApplication *application;
application = [UIApplication sharedApplication];
[[[application] keyWindow] setHidden:YES];
But hiding the key window isn’t a failsafe option either because any UIAlertView windows will appear above other content and become the key window; effectively, you’d end up hiding only the alert.
Because several methods of hiding content are error prone, I almost always recommend that developers use the splash screen approach. There is, however, an even easier, foolproof approach for some use cases: preventing suspension entirely.
Avoiding Snapshots by Preventing Suspension
If your application never really needs to be suspended and resumed (that is, if you want a fresh start with every app launch), then use the Xcode plist editor to add “Application does not run in background” to your plist and set the value to YES, as in Figure 10-10. You can also set UIApplicationExitsOnSuspend to YES in your Info.plist file from your favored text editor.
Adding that item will cause the application to jump to the applicationWillTerminate event rather than stopping at the applicationDidEnterBackground event, which normally immediately precedes the taking of the screenshot.

Figure 10-10: Adding the “Application does not run in background” item to the plist
Leaks Due to State Preservation
iOS 6 introduced the concept of state preservation, which provides a method for maintaining application state between invocations, even if the application is killed in the meantime. When state preservation is triggered, each preservable object’s encodeRestorableStateWithCoder delegate method, which contains instructions for how to serialize various UI elements to disk, is called. Then, the decodeRestorableStateWithCoder method is called on relaunch of the application. This system presents a possibility for sensitive information to leak from the user interface to storage on disk since the contents of text fields and other interface data will be put on local storage.
When you are examining a new codebase, you can quickly determine whether any state preservation is happening by grepping the codebase for restorationIdentifier, rather than clicking your way through all the Storyboard UI elements.
If preservation is in use, you should find results like this one in the *.storyboard files:
<viewController restorationIdentifier="viewController2" title="Second" id="3"
customClass="StatePreservatorSecondViewController" sceneMemberID=
"viewController">
<view key="view" contentMode="scaleToFill" id="17">
<rect key="frame" x="0.0" y="20" width="320" height="499"/>
<autoresizingMask key="autoresizingMask" widthSizable="YES" heightSizable=
"YES"/>
<subviews>
<textView clipsSubviews="YES" multipleTouchEnabled="YES" contentMode=
"scaleToFill" translatesAutoresizingMaskIntoConstraints="NO" id="Zl1-tO-jGB">
<textInputTraits key="textInputTraits" autocapitalizationType=
"sentences"/>
</textView>
Note that there is a view controller with a restorationIdentifier attribute, and this controller contains a subview with a textView object. If the application delegate implements the encodeRestorableStateWithCoder method, it can specify an encodeObject method that preserves the .text attribute of the UITextView for later restoration. This method can be used to ensure that text typed into the field isn’t lost if the application is terminated,14 as shown in Listing 10-20.
-(void)encodeRestorableStateWithCoder:(NSCoder *)coder {
[super encodeRestorableStateWithCoder:coder];
[coder encodeObject:_messageBox.text forKey:@"messageBoxContents"];
}
Listing 10-20: An example encodeRestorableStateWithCoder method
After performing functional testing, you can also examine the application’s Library/Saved Application State/com.company.appname.savedState directory, where you’ll find the descriptively named data.data file. This file contains the serialized state of the application for objects that have restorationIdentifiers assigned. Examine this file to determine whether any sensitive data from the user interface may have been encoded. You can also do this on the device, if you’re performing black-box testing.
Secure State Preservation
If a product needs the UX and convenience of state preservation but needs data to be stored securely while on disk, you can encrypt sensitive object contents before passing them to the encodeObject method. I discuss encryption in more detail in Chapter 13), but here’s how you’d encrypt this particular sort of data.
When the application is installed, generate an encryption key and store it in the Keychain with secItemAdd. Then, in your encodeRestorableStateWithCoder methods, read the key out of the Keychain and use it as the key for an encryption operation.15 Take the resulting data and serialize it with the NSCoder’s encodeObject method. Finally, in the decodeRestorableStateWithCoder method, perform the same operations in reverse to restore the application’s state.
You can use the SecureNSCoder project16 to help implement that functionality. SecureNSCoder can automatically generate a key for your application, store it in the Keychain, and use it to encode and decode your program state. For the rest of this section, I’ll walk you through a sample project that demonstrates how to use this tool in your own programs.
First, include the SecureArchiveDelegate and SimpleKeychainWrapper files in your project. Then, include SecureArchiverDelegate.h in your view controller’s .h file, as shown in Listing 10-21.
#import <UIKit/UIKit.h>
#import "SecureArchiverDelegate.h"
@interface ViewController : UIViewController
// Some simple properties, adding one for the delegate
@property (weak, nonatomic) IBOutlet UITextField *textField;
@property (weak, nonatomic) SecureArchiverDelegate *delegate;
@end
Listing 10-21: A basic ViewController.h
Next, implement the initWithCoder method, as in Listing 10-22.
- (id)initWithCoder:(NSKeyedUnarchiver *)coder {
if (self = [super initWithCoder:coder]) {
return self;
}
return nil;
}
Listing 10-22: initWithCoder in ViewController.m
Then implement the awakeFromNib method shown in Listing 10-23.
- (void)awakeFromNib {
self.restorationIdentifier = NSStringFromClass([self class]);
self.restorationClass = [UIViewController class];
}
Listing 10-23: awakeFromNib in ViewController.m
Finally, implement the two state preservation methods in Listing 10-24.
- (void)encodeRestorableStateWithCoder:(NSKeyedArchiver *)coder {
// preserve state
SecureArchiverDelegate *saDelegate = [[SecureArchiverDelegate alloc] init];
[self setDelegate:saDelegate];
[coder setDelegate:[self delegate]];
[coder encodeObject:[[self textField] text] forKey:@"textFieldText"];
[super encodeRestorableStateWithCoder:coder];
}
- (void)decodeRestorableStateWithCoder:(NSKeyedUnarchiver *)coder {
// restore the preserved state
SecureArchiverDelegate *saDelegate = [[SecureArchiverDelegate alloc] init];
[self setDelegate:saDelegate];
[coder setDelegate:[self delegate]];
[[self textField] setText:[coder decodeObjectForKey:@"textFieldText"]];
[super decodeRestorableStateWithCoder:coder];
}
Listing 10-24: Encode and decode methods in ViewController.m
You’ve seen how data can leak from applications on a device, but what about data that’s been backed up to iCloud? Well, if you’re dealing with sensitive data, there’s really only one technique I can recommend there: avoid storing it on iCloud entirely.
Getting Off iCloud to Avoid Leaks
In recent versions of iOS, much of your application’s data can be synced to a user’s iCloud account, where it can be shared across devices. By default, only three of your application directories are safe from the clutches of iCloud.
• AppName.app
• Library/Caches
• /tmp
If you want any of your other files to remain only on the device, you’ll have to take responsibility for them yourself.17 Set the NSURLIsExcludedFromBackupKey attribute on those files, using an NSURL as the path to the file, to prevent the file from backing up to iCloud, as in Listing 10-25.
- (BOOL)addSkipBackupAttributeToItemAtURL:(NSURL *)URL {
NSError *error = nil;
➊ [URL setResourceValue:[NSNumber numberWithBool:YES]
forKey:NSURLIsExcludedFromBackupKey
error:&error];
return error == nil;
}
Listing 10-25: Setting file attributes to exclude a file from backup
You can set the NSURLIsExcludedFromBackupKey with the setResourceValue NSURL method, shown at ➊.
Closing Thoughts
Data leakage on mobile devices is a broad and ever-changing area that makes up a large percentage of issues found in mobile applications when subjected to security audits. Ideally, some of the things you’ve examined in this chapter will help you find useful bugs, as well as help you identify changes when newer versions of iOS are released. I’ll now move on to cover some basic C and memory corruption attacks, which are usually rarer on iOS but potentially much more dangerous.