
Checking out your iPhone's inner iPod
Taking control of your tunes
Customizing your audio experience
Shopping with the iTunes app
As we mention elsewhere in this book, your iPhone is perhaps the best iPod ever — especially for working with audio and video. In this chapter, we show you how to use your iPhone for audio; in Chapter 8, we cover video.

We start with a quick tour of the iPhone's iPod application. Then we look at how to use your iPhone as an audio player. After you're nice and comfy with using it this way, we show you how to customize the listening experience so that it's just the way you like it. Then we offer a few tips to help you get the most out of using your iPhone as an audio player. Finally, we show you how to use the iTunes application to buy music, audiobooks, videos, and more and how to download free content, such as podcasts.
We assume that you already synced your iPhone with your computer and that your iPhone contains audio content — songs, podcasts, or audiobooks. If you don't have any audio on your iPhone yet, we humbly suggest that you get some (flip to Chapter 3 and follow the instructions) before you read the rest of this chapter — or the next chapter, for that matter.
Okay, now that you have some audio content on your iPhone to play with, are you ready to rock?
To use your iPhone as an iPod, just tap the iPod icon in the lower-right corner of the Home screen. At the bottom of the screen that appears, you should see five icons: Playlists, Artists, Songs, Videos, and More.
If you don't see these icons, tap the Back button in the upper-left corner of the screen (the one that looks like a little arrow pointing to the left).
Or, if you're holding your iPhone sideways (the long edges are parallel to the ground), rotate it 90 degrees so that it's upright (the short edges are parallel to the ground).
Tip
You'll understand why your iPhone's orientation matters when you read the later section "Go with the Cover (Flow)."
Tap the Playlists icon at the bottom of the screen and a list of playlists appears. If you have no playlists on your iPhone, don't sweat it. Just know that if you had some, this is where they'd be. (Playlists let you organize songs around a particular theme or mood: opera arias, romantic ballads, British invasion — whatever. Younger folks sometimes call them mixes.)
Tap a playlist and you see a list of the songs it contains. If the list is longer than one screen, flick upward to scroll down. Tap a song in the list and it plays. Or, tap Shuffle at the top of the list to hear a song from that playlist (and all subsequent songs) at random.
That's all there is to selecting and playing songs from a playlist.
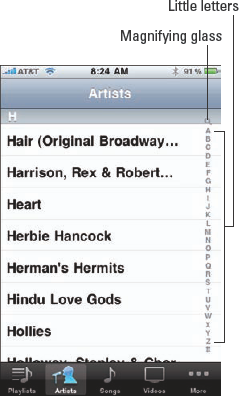
Now we tell you how to find and play a song ordered by artist name rather than by playlist. Tap the Artists icon at the bottom of the screen and an alphabetical list of artists appears.
If the list is longer than one screen (which it probably is), you can, of course, flick upward to scroll down or flick downward to scroll up. But you have easier ways to find an artist.
For example, at the top of the screen, above the first artist's name, you see a search field. Tap it and type the name of the artist you want to find. Now tap the Search button to see a list of all matching artists.
Another way to find an artist is to tap one of the little letters on the right side of the screen, to jump directly to artists whose names start with that letter. In Figure 7-1, for example, that letter is H.
Tip
Notice that a magnifying glass appears above the A on the right side of the screen. Tap the magnifying glass to jump directly to the search field.
As you can see, those letters are extremely small, so unless you have tiny fingers, you may have to settle for a letter close to the one you want or else tap several times until the correct one is added.
Tap an artist's name and one of two things occurs:
If you have songs from more than one album by an artist in your music library: A list of albums appears. Tap an album to see a list of the songs it contains. Or, tap the first item in the list of albums — All Songs — to see a list of all songs on all albums by that artist.
If all songs in your music library by that artist are on the same album or aren't associated with a specific album: A list of all songs by that artist appears.
Either way, just tap a song and it begins to play.
Now we tell you how to find a song by its title and play it. Tap the Songs icon at the bottom of the screen and a list of songs appears.
You find songs the same ways you find artists: Flick upward or downward to scroll; use the search field at the top of the list; or tap a little letter on the right side of the screen.
Tip
If you're not sure which song you want to listen to, try this: Tap the Shuffle button at the top of the list between the search field and the first song title. Your iPhone will now play songs from your music library at random.
Tip
You can also find songs (or artists, for that matter) by typing their names in a Spotlight search, as we mention in Chapter 2.
Now that you have the basics down, take a look at some other things you can do when your iPhone is in its iPod mode.
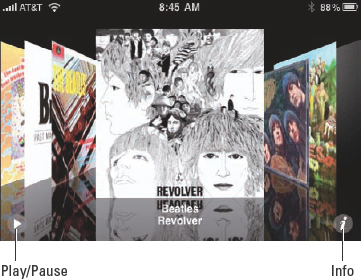
Finding tracks by playlist, artist, or song is cool, but finding them with Cover Flow is even cooler. Cover Flow lets you browse your music collection by its album artwork. To use Cover Flow, turn your iPhone sideways (long edges parallel to the ground). As long as you aren't browsing or viewing video (and, of course, you tapped the iPod icon on the Home screen so that your iPhone behaves like an iPod), Cover Flow fills the screen, as shown in Figure 7-2.
Flipping through your cover art in Cover Flow is simple. All you have to do is drag or flick your finger left or right on the screen and the covers go flying by. Flick or drag quickly and the covers whiz by; flick or drag slowly and the covers move leisurely. Or, tap a particular cover on the left or right of the current (centered) cover and that cover jumps to the center.
Try it — you'll like it! Here's how to put Cover Flow to work for you:
To see tracks (songs) on an album: Tap the cover when it's centered or tap the info button (the little i) in the lower-right corner of the screen. The track list appears.
To play a track: Tap its name in the list. If the list is long, scroll by dragging or flicking up and down on it.
To go back to Cover Flow: Tap the title bar at the top of the track list or tap the little i button again.
To play or pause the current song: Tap the Play/Pause button in the lower-left corner.
Note
If no cover art exists for an album in your collection, the iPhone displays a plain-looking cover decorated with a single musical note. The name of the album appears below this generic cover.
And that, friends, is all there is to the iPhone's cool Cover Flow mode.
As you saw earlier in this chapter, when you hold your iPhone vertically (the short edges are parallel to the ground) and tap the Playlists, Artists, or Songs button, you see a list rather than Cover Flow.
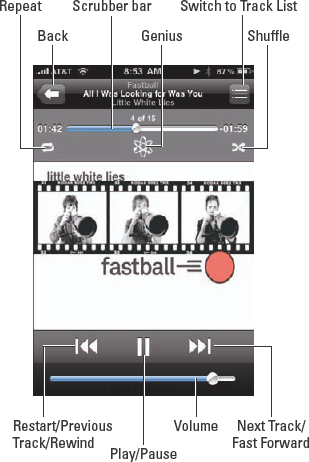
Along the same lines, when you're listening to music, the controls you see are different depending on which way you hold your iPhone. When you hold your iPhone vertically, as shown in Figure 7-3, you see controls that don't appear when you hold your iPhone sideways. Furthermore, the controls you see when viewing the Playlists, Artists, or Songs lists are slightly different from the controls you see when a song is playing.
Tip
Here's another cool side effect of holding your iPhone vertically: If you add lyrics to a song in iTunes on your computer (by selecting the song, choosing File
Here's how to use the controls that appear when the iPhone is vertical:
Back button: Tap to return to whichever list you used last — Playlists, Artists, or Songs.
Switch to Track List button: Tap to switch to a list of tracks.
Repeat button: Tap once to repeat songs in the current album or list. The button turns blue. Tap it again to play the current song repeatedly; the blue button displays the number 1 when it's in this mode. Tap the button again to turn off this feature. The button goes back to its original gray color.
Scrubber bar: Drag the little dot (the playhead) along the Scrubber bar to skip to any point within the song.
Genius button: Tap once and a Genius Playlist appears with 25 songs that iTunes thinks will go great with the song that's playing.
Warning
The less popular the song, artist, or genre, the more likely the Genius will choke on it. When that happens, you see an alert asking you to try again because this song doesn't have enough related songs to create a Genius playlist.
At the top of the Genius playlist, you find three buttons:
New: Select a different song to use as the basis for a Genius playlist.
Refresh: See a list of 25 different songs that "go great with" the song you're listening to.
Save: Save this Genius playlist so that you can listen to it whenever you like.
Tip
If you like the Genius feature, you can also create a new Genius playlist by tapping the Playlists button at the bottom of the screen and then tapping Genius, which is the first item on the list of playlists.
Shuffle button: Tap once to shuffle songs and play them in random order. The button turns blue when shuffling is enabled. Tap it again to play songs in order again. The button goes back to its original color — gray.
Tip
You can also shuffle tracks in any list of songs — such as playlists or albums — by tapping the word Shuffle, which appears at the top of the list. Regardless of whether the Shuffle button has been tapped, this technique always plays songs in that list in random order. And, as you see later in this chapter, another setting, when enabled, lets you shake your iPhone from side-to-side to shuffle and play a different song at random.
Restart/Previous Track/Rewind button: Tap once to go to the beginning of the track. Tap this button twice to go to the start of the preceding track in the list. Touch and hold this button to rewind the song at double speed.
Next Track/Fast Forward button: Tap to skip to the next track in the list. Touch and hold this button to fast-forward through the song at double speed.
Volume control: Drag the little dot left or right to reduce or increase the volume level.
Tip
If you're using the headset included with your iPhone, you can squeeze the mic to pause, and squeeze it again to play. You can also squeeze it twice in rapid succession to skip to the next song. Sweet!
When you tap the Switch to Track List button, the iPhone screen and the controls change, as shown in Figure 7-4.

Here's how to use those controls:
Switch to Now Playing button: Tap to switch to the Now Playing screen for the current track (refer to Figure 7-3).
Rating bar: Drag across the rating bar to rate the current track using zero to five stars. The track shown in Figure 7-4 has a four-star rating.
The tracks are the songs in the current list (album, playlist, or artist, for example), and the current track indicator shows you which song is now playing (or paused). Tap any song in a track list to play it.
And that, gentle reader, is all you need to know to enjoy listening to music (and podcasts and audiobooks) on your iPhone.
We cover a few features in particular in this section, in case you move on to the video side of your iPhone-as-an-iPod in Chapter 8. In this section, you find a bunch of stuff you can do to make your listening experience more enjoyable.
If you prefer to browse your audio collection by criteria other than playlist, artist, or song, you can: Tap the More button in the lower-right corner of the screen. The More list appears. Tap a choice in the list — albums, audiobooks, compilations, composers, genres, or podcasts — and your audio collection is organized by your criterion.
Wait — there's more. You can swap out the Playlists, Artists, Songs, and Video buttons for ones that better suit your needs. For example, if you listen to a lot of podcasts and never watch video, you can replace the Video button with a Podcasts button.
Here's how:
Tap the More button in the lower-right corner of the screen.
Tap the Edit button in the upper-left corner of the screen.
Drag any button on the screen — Albums, Podcasts, Audiobooks, Genres, Composers, Compilations — to the button at the bottom of the screen that you want to replace.
(Optional) Rearrange the five buttons now by dragging them to the left or right.
When you have everything just the way you like it, tap the Done button to return to the More list.
You can change a few preference settings to customize your iPhone-as-an-iPod experience.
The iTunes Sound Check option automatically adjusts the level of songs so that they play at the same volume relative to each other. That way, one song never blasts out your ears even if the recording level is much louder than that of the song before or after it. To tell the iPhone to use these volume settings, you first have to turn on the feature in iTunes on your computer. Here's how to do that:
Choose iTunes

Click the Playback tab.
Select the Sound Check check box to enable it.
Now you need to tell the iPhone to use the Sound Check settings from iTunes. Here's how to do that:
Tap the Settings icon on the iPhone's Home screen.
Tap iPod in the list of settings.
Tap Sound Check to turn it on.
An equalizer increases or decreases the relative levels of specific frequencies to enhance the sound you hear. Some equalizer settings emphasize the bass (low end) notes in a song; other equalizer settings make the higher frequencies more apparent. The iPhone has more than a dozen equalizer presets, with names such as Acoustic, Bass Booster, Bass Reducer, Dance, Electronic, Pop, and Rock. Each one is ostensibly tailored to a specific type of music.
The way to find out whether you prefer using equalization is to listen to music while trying out different settings. To do that, first start listening to a song you like. Then, while the song is playing, follow these steps:
Tap the Settings icon on the Home screen.
Tap iPod in the list of settings.
Tap EQ in the list of iPod settings.
Tap different EQ presets (Pop, Rock, R&B, or Dance, for example) and listen carefully to the way it changes how the song sounds.
When you find an equalizer preset that you think sounds good, tap the Home button and you're finished.
If you don't like any of the presets, tap Off at the top of the EQ list to turn off the equalizer.
You can instruct your iPhone to limit the loudest listening level for audio or video. To do so, here's the drill:
Tap the Settings icon on the Home screen.
Tap iPod in the list of settings.
Tap Volume Limit in the list of iPod settings.
Drag the slider to adjust the maximum volume level to your liking.
(Optional) Tap Lock Volume Limit to assign a four-digit passcode to this setting so that others can't easily change it.
Warning
The Volume Limit setting limits the volume of only music and videos. It doesn't apply to podcasts or audiobooks. And, although the setting works with any headset, headphones, or speakers plugged into the headset jack on your iPhone, it doesn't affect sound played on your iPhone's internal speaker.
Shake to Shuffle is a new setting in iPhone OS 3.0 that does just what its name implies — shake your iPhone to listen to a different song selected at random. To enable this setting, here's what to do:
Tap the Settings icon on the Home screen.
Tap iPod in the list of settings.
Tap the Shake to Shuffle button to turn the feature on or off.
From shake to shuffle — how can you not love that feature?
Of course you can make playlists in iTunes and sync them with your iPhone, but you can also create playlists on your iPhone when you're out and about. Here's how:
Tap the iPod icon in the lower-right corner of the Home screen.
Tap the Playlists button at the bottom of the screen.
Tap the first item in the list: On-the-Go.
An alphabetical list of all songs on your iPhone appears. To the right of each song is a little plus sign.
Tap the plus sign next to a song name to add the song to your On-the-Go playlist.
To add all these songs to your On-the-Go playlist, tap the plus sign next to the first item in the list: Add All Songs.
Tap the Done button in the upper-right corner.
If you create an On-the-Go playlist and then sync your iPhone with your computer, that playlist is saved both on the iPhone and in iTunes on your computer. The first time you save a playlist, it's named On-the-Go 1 automatically. Subsequent lists you create are autonamed On-the-Go 2, On-the-Go 3, and so on.
The playlists remain until you delete them from iTunes. To do that, select the playlist's name in the source list and then press Delete or Backspace.
You can also edit your On-the-Go playlist. To do so, tap the Playlists button at the bottom of the screen, tap the first item in the list (On-the-Go), and tap the Edit button. Then do one of the following:
To move a song up or down in the On-the-Go playlist: A little icon with three gray bars appears to the right of each song. Drag the icon up to move the song higher in the list or drag down to move the song lower in the list.
To add more songs to the On-the-Go playlist: Tap the plus button in the upper-left corner.
To delete a song from the On-the-Go playlist: Tap the minus sign to the left of the song name. Note that deleting a song from the On-the-Go playlist doesn't remove the song from your iPhone.
To clear the On-the-Go playlist of all songs: Tap the first item in the list: Clear Playlist.
When you finish editing, tap the Done button in the upper-right corner.
That's all you have to do to create and manage On-the-Go playlists.
If you like to fall asleep with music playing but don't want to leave your iPhone playing music all night long, you can turn on its sleep timer.
Here's how:
Tap the Clock button on the Home screen.
Tap the Timer icon in the lower-right corner.
Set the number of hours and minutes you want the iPhone-as-an-iPod to play, and then tap the When Timer Ends button.
Tap the first item in the list: Sleep iPod.
Tap the Set button in the upper-right corner.
Tap the big, green Start button.
That's it! After the appropriate period, your iPod stops playing and your iPhone goes to sleep.
Here's something cool: If you have an iPhone 3G S, you can boss around your music by using nothing but your voice. Here are the things you can say:
To play an album, an artist, or a playlist: Say "Play" and then say "album," "artist," or "playlist" and the name.
To shuffle the current playlist: Say "Shuffle."
To find out more about the song that's playing: Ask "What's playing?" "What song is this?" "Who sings this song?" or "Who is this song by?"
To use Genius to play similar songs: Say "Genius," "Play more like this," or "Play more songs like this."
And hey, because your iPod happens to be an iPhone, you won't look stupid talking to it!
Warning
Although we found that controlling your iPod by speaking aloud works most of the time, in noisy environments the iPhone may mishear your verbal request and start playing the wrong song or artist. Using the wired headset helps. And syntax counts, so remember to use the exact wording in the list.
Last but certainly not least, the iTunes application lets you use your iPhone to download, buy, or rent just about anything you can download, buy, or rent with the iTunes application on your Mac or PC, including music, audiobooks, iTunes University classes, podcasts, and videos. And, if you're fortunate enough to have an iTunes gift card or gift certificate in hand, you can redeem it directly from your iPhone.
If you want to do any of that, however, you must first sign in to your iTunes Store account:
Tap the Settings icon on the Home screen.
Tap Store in the list of settings.
Tap Sign In.
Type your username and password.
Or, in the unlikely event that you don't have an iTunes Store account already:
Tap the Settings icon on the Home screen.
Tap Store in the list of settings.
Tap Create New Account.
Follow the on-screen instructions.
After the iTunes Store knows who you are (and, more importantly, knows your credit card number), tap the iTunes icon on your Home screen and shop until you drop.