
Starting your first sync
Disconnecting during a sync
Synchronizing contacts, calendars, e-mail accounts, and bookmarks
Synchronizing ringtones, music, podcasts, video, photos, and applications
After you have passed basic training (in Chapter 2), the next thing you're likely to want to do is get some or all of your contacts, appointments, events, mail settings, bookmarks, ringtones, music, movies, TV shows, podcasts, photos, and applications into your iPhone.
We have good news and . . . more good news. The good news is that you can easily copy any or all of those items from your computer to your iPhone. And the more good news is that after you do that, you can synchronize your contacts, appointments, and events so they're kept up-to-date automatically in both places — on your computer and your iPhone — whenever you make a change in one place or the other. So when you add or change an appointment, an event, or a contact on your iPhone, that information automatically appears on your computer the next time your iPhone and computer communicate.
This communication between your iPhone and computer is called syncing (short for synchronizing). Don't worry: It's easy, and we're going to walk you through the entire process in this chapter.
But wait. There's even more good news. Items you manage on your computer, such as music, movies, TV shows, podcasts, photos, and e-mail account settings, are synchronized only one way: from your computer to your iPhone, which is the way it should be.
Tip
The information in this chapter is based on iTunes version 9 and iPhone OS version 3.1, which were the latest and greatest when these words were written. If your screens don't look like ours, upgrade to iTunes 9 and iPhone OS 3.1 (or higher). By the way, both upgrades are free, and both offer significant advantages over their predecessors.
Synchronizing your iPhone with your computer is a lot like syncing an iPod with your computer. If you're an iPod user, the process will be a piece of cake. But it's not too difficult even for those who've never used an iPod or iTunes:
Start by connecting your iPhone to your computer with the USB cable that came with your iPhone.
When you connect your iPhone to your computer, iTunes should launch automatically. If it doesn't, chances are you plugged the cable into a USB port on your keyboard, monitor, or hub. Try plugging it into one of the USB ports on your computer instead. Why? Because USB ports on your computer supply more power to a connected device than USB ports on a keyboard, monitor, or most hubs.
If iTunes still doesn't launch automatically, try launching it manually.
One last thing: If you've taken any photos with your iPhone since the last time you synced it, your photo management software (iPhoto on the Mac; Adobe Photoshop Album or Elements on the PC) will launch and ask whether you want to import the photos from your phone. (You find out all about this later in the chapter.)
Select your iPhone in the iTunes source list.
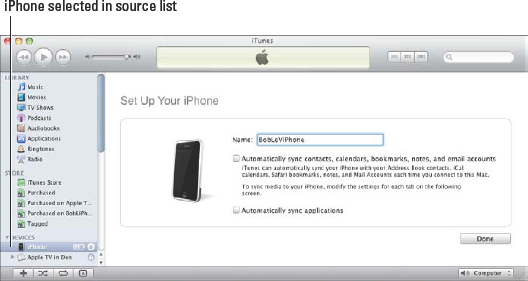
You see the Set Up Your iPhone pane, as shown in Figure 3-1. If you've already set up and named your iPhone, you can skip Steps 3 and 4a and start with Step 4b.
Tip
If you don't see an iPhone in the source list, and you're sure it's connected to a USB port on your computer (not the keyboard, monitor, or hub), restart your computer.
Name your iPhone.
We've named this one BobLeViPhone.
Decide whether you want iTunes to automatically synchronize your iPhone and your contacts, calendars, bookmarks, notes, e-mail accounts, and applications.
If that's what you want, click the check box next to the option titled Automatically Sync Contacts, Calendars, Bookmarks, Notes, and Email Accounts to make a check mark appear and click the check box next to the option titled Automatically Sync Applications. Then click the Done button and continue with the "Synchronizing Your Media" section later in this chapter.
If you want to synchronize manually, make sure both check boxes are unchecked, as shown in Figure 3-1, and click Done. The "Synchronizing Your Data" section tells you all about how to configure your contacts, calendars, bookmarks, notes, e-mail accounts, and applications manually.
We've chosen to not select either check box so we can show you how to manually set up each type of sync in the upcoming sections.
After you click the Done button (applies only to those who just performed Steps 3 and 4a), the Summary pane should appear. If it doesn't, make sure your iPhone is still selected in the source list and click the Summary tab near the top of the window, as shown in Figure 3-2.
If you want iTunes to sync your iPhone automatically whenever you connect it to your computer, click to put a check mark in the Automatically Sync When This iPhone Is Connected check box (in the Options area).
Don't select this check box if you want to sync manually by clicking the Sync button at the bottom of the window.
Your choice in Step 5 is not set in stone. If you select the Automatically Sync When This iPhone Is Connected check box, you can still prevent your iPhone from syncing automatically in several ways:
Way #1: After you connect the iPhone to your computer, click the Summary tab in iTunes and uncheck the Automatically Sync When This iPhone Is Connected check box. This prevents iTunes from opening automatically when you connect the iPhone. If you use this method, you can still start a sync manually.
Way #2: Launch iTunes. Then before you connect your iPhone to your computer, press and hold Command+Option (Mac) or Shift+Ctrl (PC) until you see your iPhone in the iTunes source list. This method prevents your iPhone from syncing automatically just this one time, without changing any settings.
If you want to sync only items that have check marks to the left of their names in your iTunes library, select the Sync Only Checked Songs and Videos check box.
If you want to turn off automatic syncing in the Music and Video panes, select the Manually Manage Music and Videos check box.
If you want to password-protect your iPhone backups (your iPhone creates a backup of its contents automatically every time you sync), select the Encrypt iPhone Backup check box.
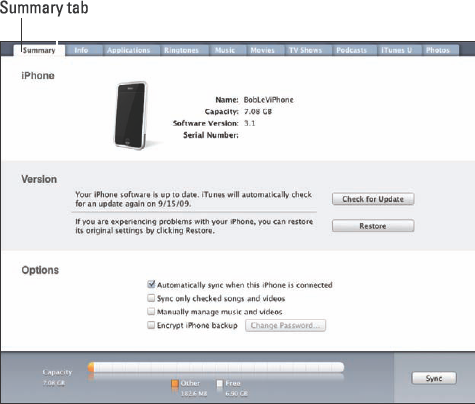
And, of course, if you decide to uncheck the Automatically Sync When This iPhone Is Connected check box, you can always synchronize manually by clicking the Sync button in the bottom-right corner of the window.
By the way, if you've changed any sync settings since the last time you synchronized, the Sync button will instead say Apply.
When the iPhone is syncing with your computer, its screen says Sync in Progress and iTunes displays a message that says that it's syncing with your iPhone. After the sync is finished, iTunes displays a message that the iPhone sync is complete and it's okay to disconnect your iPhone.
Warning
If you disconnect your iPhone before a sync is completed, all or part of the sync may fail.
To cancel a sync so that you can safely disconnect your iPhone, drag the slider on the iPhone (the one that says Slide to Cancel) during the sync.
If you get a call while you're syncing, the sync is safely cancelled so that you can safely disconnect your iPhone and answer the call. After you're finished with the call, just reconnect your iPhone to restart the sync.
Did you choose to set up data synchronization manually by not selecting the Automatically Sync Contacts, Calendars, Bookmarks, Notes, and Email Accounts check box or the Automatically Sync Applications check box in the Set Up Your iPhone pane shown in Figure 3-1? If you did, your next order of business is to tell iTunes what data you want to synchronize between your iPhone and your computer. You do this by clicking the Info tab, which is to the right of the Summary tab.
The Info pane has seven sections: MobileMe, Contacts, Calendars, Web Browser, Notes, Mail Accounts, and Advanced. The following sections look at them one by one.
MobileMe is Apple's $99-a-year service for keeping your iPhone, iPod Touch, Macs, and PCs synchronized. It is the latest iteration of what Apple used to call .Mac (pronounced "dotMac"). The big allure of MobileMe is that it can "push" information such as e-mail, calendars, contacts, and bookmarks from your computer to and from your iPhone and keep those items synchronized on your iPhone and computer(s) wirelessly and without human intervention.
If you want to have your e-mail, calendars, contacts, and bookmarks synchronized automatically and wirelessly, click the Set Up Now button. Your Web browser launches and instructions appear for subscribing to MobileMe if you're not already a subscriber or for setting up each of your devices for MobileMe if you are already a subscriber.
If you're going to use MobileMe to sync your e-mail, calendars, contacts, and bookmarks, you can safely ignore the information in four of the next six sections: "Contacts," "Calendars," "Web browser," and "Advanced." Those four sections deal with using iTunes for synchronization, and you won't need them if you're using MobileMe. The fifth and sixth sections, "Mail accounts" and "Notes," both contain information even MobileMe users may find useful.
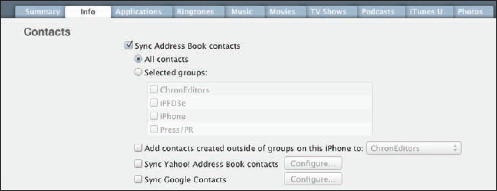
The Contacts section of the Info pane determines how synchronization is handled for your contacts. One method is to synchronize all your contacts, as shown in Figure 3-3. Or you can synchronize any or all groups of contacts you've created in your computer's address book program; just select the appropriate check boxes in the Selected Groups list, and only those groups will be synchronized.
The iPhone syncs with the following address book programs:
On a Mac, you can sync contacts with multiple applications. On a PC, you can sync contacts with only one application at a time.
If you use Yahoo! Address Book, select the Sync Yahoo! Address Book Contacts check box, and then click the Configure button to enter your Yahoo! ID and password. If you use Google Contacts, select the Sync Google Contacts check box, and then click the Configure button to enter your Google ID and password.
Syncing will never delete a contact from your Yahoo! Address Book if it has a Messenger ID, even if you delete that contact on the iPhone or on your computer.
Tip
To delete a contact that has a Messenger ID, log in to your Yahoo! account with a Web browser and delete the contact in your Yahoo! Address Book.
Warning
If you sync with your employer's Microsoft Exchange calendar and contacts, all your personal contacts and calendars will be wiped out.
The Calendars section of the Info pane determines how synchronization is handled for your appointments and events. You can synchronize all your calendars, as shown in Figure 3-4. Or you can synchronize any or all individual calendars you've created in your computer's calendar program. Just select the appropriate check boxes.

The iPhone syncs with the following calendar programs:
Mac: iCal, plus any tasks or events that currently sync with iCal on your Mac, such as events and tasks in Microsoft Entourage
PC: Microsoft Outlook 2003 or 2007
On a Mac, you can sync calendars with multiple applications. On a PC, you can sync calendars with only one application at a time.
The Web Browser section of the Info pane has but a single check box, which asks if you want to sync your bookmarks. Select it if you do; don't select it if you don't.
The iPhone syncs bookmarks with the following Web browsers:
Mac: Safari
PC: Microsoft Internet Explorer and Safari
The Notes section of the Info pane also has only one check box: Sync Notes. Select it to sync notes in the Notes application on your iPhone with notes in Apple Mail on a Mac or Microsoft Outlook on a PC.
Note that on a Mac you must have Mac OS X 10.5.7 or later installed to sync notes.
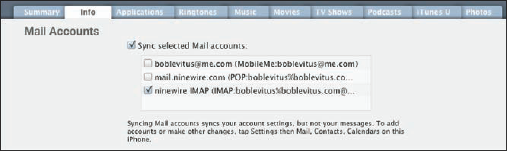
You can sync account settings for your e-mail accounts in the Mail Accounts section of the Info pane. You can synchronize all your e-mail accounts (if you have more than one), or you can synchronize individual accounts, as shown in Figure 3-5. Just select the appropriate check boxes.
The iPhone syncs with the following mail programs:
Mac: Mail and Microsoft Entourage
PC: Microsoft Outlook 2003 or 2007 and Microsoft Outlook Express
Warning
E-mail account settings are synchronized only one way: from your computer to your iPhone. If you make changes to any e-mail account settings on your iPhone, the changes will not be synchronized back to the e-mail account on your computer. Trust us, this is a very good feature and we're glad Apple did it this way.
By the way, the password for your e-mail account may or may not be saved on your computer. If you sync an e-mail account and the iPhone asks for a password when you send or receive mail, do this: Tap Settings on the Home screen, tap Mail, tap your e-mail account's name, and then type your password in the appropriate field.
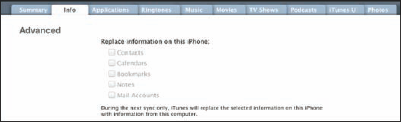
Every so often the contacts, calendars, mail accounts, or bookmarks on your iPhone get so screwed up that the easiest way to fix things is to erase that information on your iPhone and replace it with information from your computer.
If that's the case, just click to select the appropriate check boxes, as shown in Figure 3-6. Then the next time you sync, that information on your iPhone will be replaced with information from your computer.
Note
Because the Advanced section is at the bottom of the Info pane and you have to scroll down to see it, it's easy to forget that it's there. Although you probably won't need to use this feature very often (if ever), you'll be happy you remembered that it's there if you do need it.
If you chose to let iTunes manage synchronizing your data automatically, welcome back. This section looks at how you get your media — your ringtones, music, podcasts, video, and photos — from your computer to your iPhone.
Note
Ringtones, music, podcasts, and video (but not photos) are synced only one way: from your computer to your iPhone. Deleting any of these items from your iPhone does not delete them from your computer when you sync. The only exceptions are songs, ringtones, podcasts, video, and applications that you purchase or download with the iTunes or App Store apps on your iPhone. Such items are, as you'd expect, copied to your computer automatically when you sync.
You use the Ringtones, Music, Podcasts, Movies, TV Shows, and iTunes U panes to specify the media that you want to copy from your computer to your iPhone. To view any of these panes, make sure that your iPhone is still selected in the source list, and then click the appropriate tab near the top of the window.
If you have any custom ringtones in your iTunes library, select the Sync Ringtones check box in the Ringtones pane. Then you can choose either all ringtones or choose individual ringtones by selecting their check boxes.
To transfer music to your iPhone, select the Sync Music check box in the Music pane. You can then select the button for Entire Music Library or Selected Playlists, Artists, and Genres. If you choose the latter, click the check boxes next to particular playlists, artists, and genres you want to transfer. You also can choose to include music videos or voice memos or both by selecting the appropriate check boxes at the top of the pane (see Figure 3-7). Finally, if you select the Automatically Fill Free Space with Songs check box, iTunes fills any free space on your iPhone with music.
Warning
If you choose All Songs and Playlists and have more songs in your iTunes library than storage space on your iPhone — more than about 7GB on an 8GB iPhone and 14.5GB on a 16GB iPhone — you'll see one or both of the error messages shown in Figure 3-8 when you try to sync.
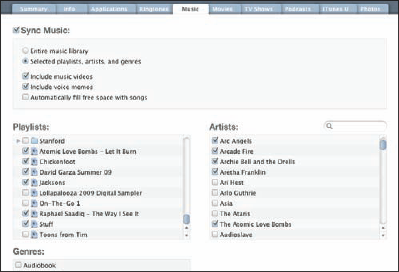
Figure 3-7. Use the Music pane to copy music, music videos, and voice notes from your computer to your iPhone.
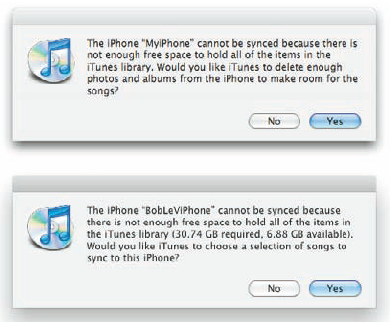
Figure 3-8. If you have more music than your iPhone has room for, this is what you'll see when you sync.
To avoid these errors, select playlists, artists, and genres that total less than 7, 15, or 31 gigabytes.
Warning
Music, podcasts, and video are notorious for chewing up massive amounts of storage space on your iPhone. If you try to sync too much media, you'll see lots of error messages like the ones in Figure 3-8. Forewarned is forearmed.
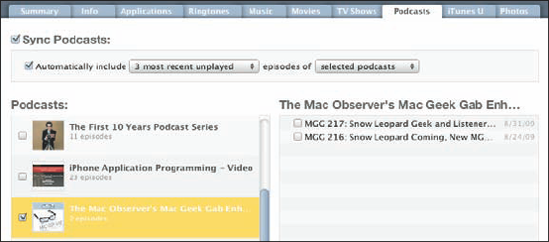
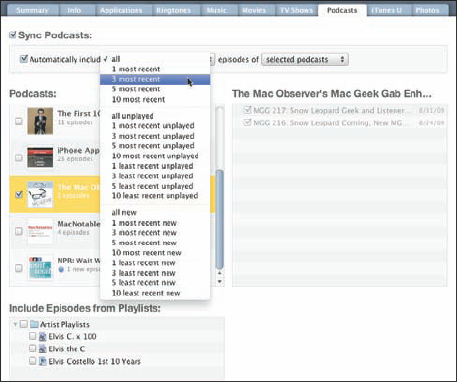
To transfer podcasts to your iPhone, select the Sync check box in the Podcasts pane. Then you can choose All Podcasts or Selected Podcasts, as shown in Figure 3-9. Regardless of whether you choose to sync all podcasts or only selected podcasts, a pop-up menu allows you to specify which episodes you want to sync, as shown in Figure 3-10. If you have podcast episodes on playlists, you can include them by selecting the appropriate check box under Include Episodes from Playlists.
To transfer movies, to your iPhone, select the Sync Movies check box and then choose an option for movies you want to include automatically from the pop-up menu, as shown in Figure 3-11. If you choose an option other than All, you can optionally select individual movies and playlists by checking the boxes in appropriate sections.
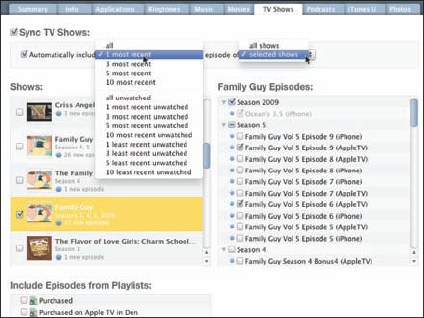
The procedure for syncing TV shows is slightly different from the procedure for syncing movies. First, select the Sync TV Shows check box to enable TV show syncing. Then choose how many episodes to include and whether you want all shows or only selected shows from the two pop-up menus, as shown in Figure 3-12. If you want to also include individual episodes or episodes on playlists, select the appropriate check boxes in the Episodes and Include Episodes from Playlists sections of the TV Shows pane.

Note
To sync educational content from iTunes U, first select the Sync iTunes U check box to enable iTunes U syncing. Then choose how many episodes to include and whether you want all collections or only selected collections from the two pop-up menus. If you want to also include individual episodes or episodes on playlists, select the appropriate check boxes in the iTunes U Collections and Items sections of the iTunes U pane.
Syncing photos is a little different from syncing other media because your iPhone has a built-in camera and you may want to copy pictures you take with the iPhone to your computer, as well as copy pictures stored on your computer to your iPhone.
The iPhone syncs photos with the following programs:
Mac: iPhoto version 4.03 or later, or Aperture
PC: Adobe Photoshop Album 2.0 or later and Adobe Photoshop Elements 3.0 or later
You can also sync photos with any folder on your computer that contains images.
To sync photos, click the Photos tab at the top of the window. In the Photos pane, select the Sync Photos From check box, and then choose an application or folder from the pop-up menu (which says iPhoto in Figure 3-13).

If you choose an application that supports photo albums, events, and/or facial recognition, as we have in Figure 3-13 by choosing iPhoto, you can automatically include events by making a selection from the pop-up menu or select specific albums, events, and/or faces to sync by selecting them in the areas below. If you're using iPhoto, you can also type a word or phrase into the search field (the oval with the magnifying glass) to search for a specific event or events. If you choose a folder full of images, you can create subfolders inside it that will appear as albums on your iPhone. But if you choose an application that doesn't support albums or events, or a single folder full of images with no subfolders, you have to transfer all or nothing.
Because we selected iPhoto in the Sync Photos From menu, and iPhoto '09 (the version installed on our Mac) supports events and faces in addition to albums, we also have the option of syncing events, faces, or both.
If you've taken any photos with your iPhone since the last time you synced it, the appropriate program launches (or the appropriate folder is selected), and you have the option of downloading the pictures to your computer.
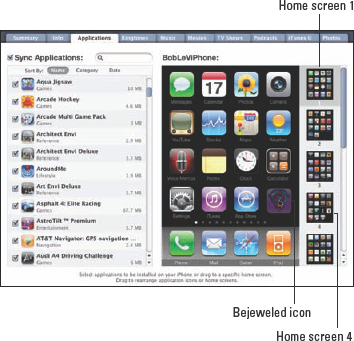
If you've downloaded or purchased any iPhone apps from the iTunes App Store, click the Applications tab, and then select the Sync Applications check box. Now choose the individual apps you want to transfer to your iPhone by selecting their check boxes.
For your convenience, you can sort your applications by name, category, or date acquired. Or you can type a word or phrase into the search field (the oval with the magnifying glass to the right of the words Sync Applications) to search for a specific application.
Finally, you can rearrange app icons in iTunes by dragging them where you want them to appear on your iPhone as shown in Figure 3-14. The next time you sync the apps on your phone will be rearranged just the way you arranged them in iTunes. If you have a lot of apps you're sure to love this feature (new in iTunes 9) as much as we do.
If you're interested in knowing how much free space is available on your iPhone, look near the bottom of the iTunes window while your iPhone is selected in the source list. You'll see a chart that shows the contents of your iPhone, color-coded for your convenience. As you can see in Figure 3-15, this 32GB iPhone 3G S has 4.11GB of free space.
