
What you can do with iPhoto
What iPhoto can do for you
Finding your way around iPhoto
Along with your Mac and all the other software you received or have purchased for it is the software that's the subject of this book — iPhoto '09.
Having been a photo enthusiast for many years using film and standard methods for developing and printing, you can imagine my curiosity, wonder, and finally, pure joy when digital photography arrived on the scene. No more running out of film or having the wrong kind. No more taking photo after photo trying to ensure I got the shot only to discover, after developing the film, that I still didn't get it.
As wondrous as digital photography is, there are still plenty of things for mere mortals to do with it — and iPhoto '09 gives you the power to do them.
In this chapter, I help you discover how to harness that power.
I believe it's a good thing when those who might describe themselves as amateurs get to use tools that approach professional status. iPhoto '09 is just such a tool. The trick isn't in bringing more and more technology to bear and deal with; it's bringing in more and more technology while keeping the software's operation at a level best described as easy to understand and easy to use.
I'm amazed at how Apple improved iPhoto. Professional photographers are expected to think of things like saving photos to ensure that they're safe, but iPhoto does that for you. And it offers a simple tool for backing them up. When you import your photos into its Library, the original photo files are placed on your hard drive. iPhoto then uses nondestructive editing; as you work on the photos, any edits you make to the photos are kept as lists of operations that iPhoto applies to the original photo files in the Library. The lists of edits are applied to the photos when you view them onscreen or print them, but the original photo files in the Library aren't changed — wonderful!
Facial recognition capabilities and geotagging (attaching geographical locations) aren't the kinds of things you'd expect at this level, yet they're present in iPhoto. iPhoto has tools within the editing environment that rival those in far more expensive photographic software, and it possesses photo effects that can make the user look like a graphics genius.
iPhoto '09 also gives you an incredible number of ways to share the photos you're so proud of. Of course, making prints is a snap. What knocks your socks off are the abilities to easily use the major social networking sites on the Internet to display your masterpieces. And turning your art into books, calendars, and greeting cards has never been easier. As I write this book, I find myself stuck making slideshows, not because they're difficult but because I'm having so much fun — syncing music to slideshows has never been easier, and the results are truly outstanding.
Enough with the gushing; time to see how this amazing piece of software does its stuff.
One of the biggest selling points for iPhoto '09 isn't really a feature at all. It's the clever, consistent, and comprehensive way it leads you through the proper steps, in the correct sequence, to ensure that your photos are as professional-looking as they can be (and safe from harmful actions — even yours!)
So why spend hours in a classroom trying to understand the best workflow for photography? Just use iPhoto and this book, and you'll get all the answers.
You do the majority of iPhoto work in these four main areas:
Organizing: This is a part of photography that everyone tends to put off until "some other day." That tends to make particular photos, like the only time Aunt Sarah ever smiled on camera, very difficult — if not impossible — to find. iPhoto can help you organize the photos that you've already taken and make organizing new photos incredibly easy and more automatic.
Editing: Any camera is capable of taking a good photograph, and if you use good photographic techniques, the outcome is a good photo. If everything is perfect in that 1/100th of a second when the camera shutter is open, there's no need for editing. Alas, in this imperfect world, that rarely happens. iPhoto provides a powerful and easy-to-use edit function that makes up for many imperfections.
Displaying: It's only natural for you to want to share your photographic triumphs with family and friends, and iPhoto helps here as well. Whether it's e-mailing Uncle Richard with photos of the new baby, putting those photos in a Shared folder so those you tell can download them, or placing those photos in your Gallery on the Web, iPhoto makes displaying photographs easy and safe.
Printing: At the mention of that word, some of you might flash back to thoughts of being in a darkroom manipulating images on paper, surrounded by chemicals that smelled bad and could be dangerous. Banish those thoughts. Digital printing is a joy, and iPhoto takes you through the entire process, with tools and choices you can use to produce first-class prints.
The sections that follow take a look at these four areas, as well as where the controls are located in the iPhoto interface. With a little practice, using the iPhoto buttons, panes, and controls becomes second nature.
I'm sure we've all had instances in our lives where we know something exists, but we have no idea where it is or how to find it. And, no, I'm not talking about "senior moments." It happens to everyone because of the sheer volume of things we deal with in this modern world.
Nowhere is it more true than in our collection of photographs. We've all had a particular photo we wanted to show someone but couldn't for the life of us remember where it was. In the digital era, we aren't limited by running out of film, so the number of photos we take can be astronomical. Organizing is key to sanity. Luckily, iPhoto gives us some choices that are truly amazing.
iPhoto provides several ways to organize according to your preferences.
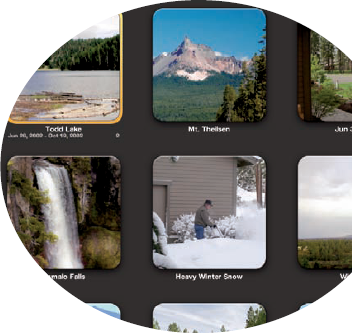
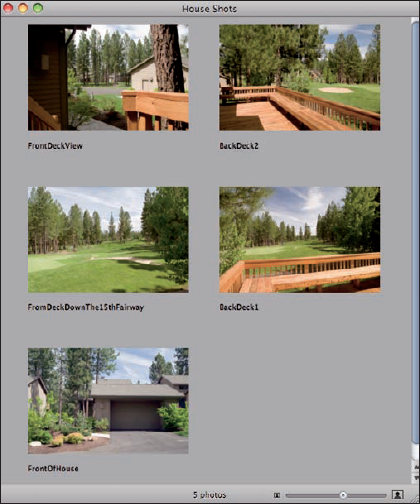
Events: The key to organizing in iPhoto is an Event. An Event can be any grouping or an occasion, such as a particular date or a birthday. As an example, Figure 1-1 shows a five-photo Event that was grouped by date. You could also group these photos by subject — say, in an Event called House Shots. There are lots of options, so be sure to read Chapter 4 for more details.
Albums: Suppose you want to take some photos from several Events and group them, under a subject or theme, while still leaving them in their original Events. That's where Albums come in. You can choose any photos from any number of Events (usually they have something in common) and put them in an Album whose name suggests the commonality. The Event groups remain unchanged. You can even use Smart Albums, which select their photos based on conditions you can set for them. Any photo matching those conditions is automatically put in that Smart Album. I tell you much more about Albums and Smart Albums in Chapter 5.
Folders: Taking organization one step further, suppose that you created several Albums that have a similar subject or theme. You can put all the Albums in a folder. For instance, if you have several Birthday Party Albums covering several years, you can put them all into a folder named Birthdays, making all these Albums easy to find.
Faces: No, it's not about making faces — it's about recognizing them. It almost sounds like science fiction, but it's a wonderful new part of iPhoto. The software recognizes that one or more faces are in a photo, outlines them, and asks you to name them. It then finds more photos that it thinks match the person, and you can confirm or deny the match. Now you can quickly find all the photos of Grandpa Pete, regardless of when you took them or where they might be in the Library. Neat, huh?
Places: If your camera puts GPS information into your photos, you can use the new iPhoto Places feature to keep track of it. And with a little help from you, iPhoto provides maps that contain pins marking the location of each photo. There's even a Location browser that lets you search for photos by location. You can also enter location information manually even if your camera doesn't. I show you how in Chapter 3. Good stuff.
Of the many great things to like about iPhoto, to me, its greatest plus is nondestructive editing. Simply put, the original photo in the iPhoto Library is never changed. Behind the scenes, iPhoto keeps track of all your edits for a photo and applies them whenever you want to view, edit, or publish the photo. Amazing, isn't it?
Note
When you edit, iPhoto compiles an edit list of all the changes you make to a photo. Later, when you re-open the photo, the original has all the items in the edit list applied to it again, to get you back where you left off. You can now make further edits — or, lo and behold! — revert to the original photo if you decide you're going down the wrong path.
And the tools available for editing are impressive, too.
Rotate: Need to turn a photo in 90° increments? This tool is made just for that.
Crop: Want to enhance the look of a photo? Sometimes, it just requires removing things that are distracting, and that's what using the Crop tool does.
Straighten: Held the camera a little crooked when you took the picture, did you? No matter — it's easy to straighten things out by using the Straighten tool and moving a slider.
Enhance: This is the tool to use to quickly adjust brightness and contrast.
Red-Eye: You'll have no more photos of people with ghoulish looks when you use the Red-Eye tool in iPhoto.
Retouch: You'll love this very effective blemish-remover tool.
Effects: Use the Effects tool and check out how your photo looks with different toning and viewing effects.
Adjust: This tool provides multiple adjustments for light and color that really make your photos sparkle.
Discover more about these editing capabilities in Chapters 8, 9, and 10.
You can show off your artistic side by displaying your photos in a number of ways. iPhoto not only helps prepare your photos to look their best, but it also assists you in letting others share in your joy. All the details are in Chapter 11. Some of the displaying possibilities are
E-mail attachments: This sharing method is probably the most common way to send out photos. iPhoto has a quick and easy-to-use interface to take your photos from the iPhoto Library into your e-mail client.
CDs and DVDs: A great way to share, CDs and DVD are also excellent media for backing up your photos.
On your Web site: Want to provide world-wide access to your photos? Whether you're using the iPhoto interface with iWeb or creating a Web page that you can send to a Web server, iPhoto can help you create your own Web site for sharing photos.
MobileMe: Apple's service that can synch files on your computer is also a fantastic platform for sharing your photos. You can create your own Gallery on MobileMe, uploading directly from iPhoto. You can allow others to download your photos or add some of their own, and they can access your Gallery via the Web.
Facebook and Flickr: You can upload photos to two of the most popular social networking sites directly from iPhoto. Publish to either of them with the click of a button.
One popular way to share your photos is by printing them for framing, greeting cards, and calendars. iPhoto has a rich assortment of choices when printing a hard copy is the way you want to go. Chapters 12 and 13 provide the details about all the wonderful printing possibilities. Some of the choices you'll find are
Printing photos yourself: A large number of photo printers are on the market for home use, with quite a price and performance range. Make sure that any printer you purchase is compatible with Macs (most of them are) and try to get the best value for your money. After all the hard work you put into your photos, you don't want to shortchange yourself on the print.
Ordering photo books and prints: You can use a service available through iPhoto to order a professional, bound book filled with your photographs.
Turning your photos into greeting cards: iPhoto gives you a choice of several greeting card sizes and styles for just about any occasion. Just drag your photo into the card format, add your message, and then either print it yourself or send it out directly from iPhoto for professional production.
Creating a calendar with your photos: This can be a great birthday or holiday gift. Choose a theme and then begin customizing. You can choose the month the calendar begins, the number of months (up to 24), and which holidays you want to appear. Then just drag in your photos, add or change special dates as you wish, and you're done. You can order a professionally printed calendar or print it yourself, all through iPhoto.
iPhoto is very easy to use and gives you wide latitude in how you accomplish your photographic goals. Like with all things in life, you need to have some items in order to use even this very forgiving application. Here's a list:
A compatible digital camera: Although, strictly speaking, a camera isn't required to import photos into iPhoto, you're going to want one if you intend to do much in the way of photography. I cover the various ways for importing photos into iPhoto in Chapter 3.
A Mac with Mac OS X and iPhoto: This requirement kind of goes without saying, seeing as how iPhoto runs only on a Mac, but I put it in for completeness. I wrote this book for the latest version of iPhoto (iPhoto '09) available at the time of this book's printing.
Universal Serial Bus (USB) ports: You'll need one port on your camera and one (at least) on your Mac. These ports allow you to connect your camera to your computer and import your photos into the iPhoto Library.
An A-to-B USB cable: This cable connects your camera to your computer (using the USB ports): hence, to iPhoto. This cable probably came with your camera, but if it didn't, you'll have to buy one. Make sure the cable you get has the proper connector on the camera end: They do vary. The USB connector for the Mac is a standard 6-pin USB connector — it's the same for all computers.
Getting familiar with the look and feel of iPhoto is absolutely required for making your experience and results with the software first class. Figure 1-2 shows the iPhoto main window.
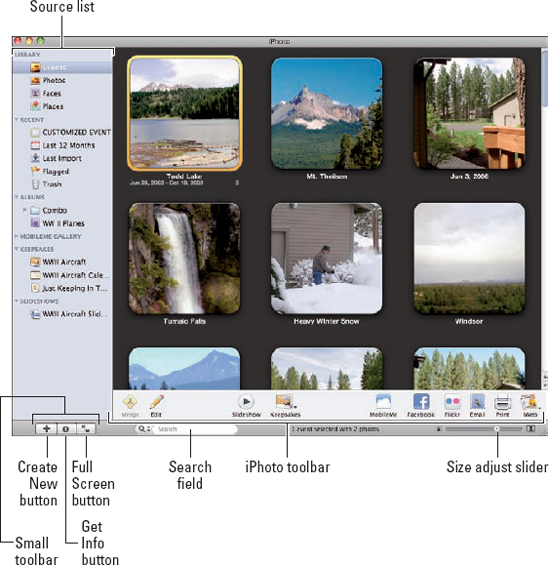
A lot of stuff is contained in the main window, so I break it down, piece by piece, in this section. (You can also refer to the figure on the book's Cheat Sheet, at the very front of the book.)
Source list: This area on the left side of the window shows all the places that can furnish photos for viewing, editing, and so on. This includes
Library: The area of iPhoto into which your photos are loaded and organized, such as Events and Places. Chapter 2 helps you practice accessing and using the Library.
Recent: Allows you to display photos imported at specific times, or photos that you've flagged. I cover flagging and its uses in Chapter 4.
Albums: Displays the contents of specified photo groups that you created. See Chapter 5 for more on Albums.
MobileMe Gallery: Shows the photos that you uploaded to MobileMe. See Chapter 11 for more on this.
Keepsakes: Contains the names of your book, calendar, and card projects. See Chapter 13 for more info.
Slideshows: Lists all your slideshows. See Chapter 13.
iPhoto toolbar: Although not all of the buttons on the toolbar are visible at the same time, this strip at the bottom of the window furnishes most of the popular user choices, including
Merge: Allows you to move photos from multiple Events into one Event.
Edit: Puts the photos from the selected Event into the Edit pane.
Slideshow: Displays the selected Events or photos as a slideshow.
Keepsakes: Button that allows you to choose to construct a book, calendar, or card. If the toolbar has enough room, you will see the individual buttons for Book, Calendar, and Card instead.
MobileMe: Begins the process of choosing how to create and share your collection of photos on MobileMe.
Facebook: Starts the publishing process to the Facebook Web site.
Flickr: Starts the publishing process to the Flickr Web site.
Email: Allows you to choose the photo size and then opens your Apple-supported e-mail application (set in General Preferences) with your attached photos, ready to address and share.
Print: Begins the print process.
Set Desktop: Makes the selected photos your computer Desktop images. When you click this button, your Desktop changes immediately.
Order Prints: Connects you to Kodak Print Services to begin ordering your professional prints.
iWeb: Sends the selected photos to iWeb.
In the lower-left of the main window is what I call the small toolbar because it contains some very useful, one-click actions. From left to right, the buttons are
Toward the center of the iPhoto main window, you can find the Search field that allows you to input your photo search criteria, such as title, description, date, keyword, or photo rating. Chapter 6 discusses the Search field in detail.
On the bottom right of the iPhoto window, the thumbnail size adjusting slider allows you to change the size of the thumbnails over a continuous range.
That's the power and the scope of iPhoto. Taking and processing your photos has never been so much fun.