Although there are those for whom a photo isn’t real unless it appears on a piece of paper (and iPhoto can satisfy those people too), one of iPhoto’s coolest features is its capability to present photos on screen in a wide variety of ways—ranging from slideshows on your Mac and Web-based presentations that anyone can view to customized screen savers and QuickTime movies.
Gone are the days of the carousel projector and a darkened room; now a slideshow involves high-resolution photographs slipping on and off a computer screen, complete with elegant transitions between pictures. But that’s only the beginning with iPhoto. Your slideshows can take advantage of the Ken Burns Effect, which zooms and pans around photos, turning them from still images to scenes in a movie.
iPhoto’s various onscreen presentation tools are not only the best way to display your photographs to friends and relatives, but also the best way for you to experience your own photos, whether through a constantly changing Desktop picture or a slideshow-based screen saver that kicks in whenever your Mac is idle.
Read on for instructions and advice on how to present your photos on screen!
iPhoto offers two types of slideshows, which I call “basic” slideshows and “saved” slideshows.
Basic slideshows are simple to use and offer a basic set of options that apply equally to all slides.
Use basic slideshows when you want to show someone a set of photos quickly, without any fuss or bother. Basic slideshows can also be useful for reviewing just-taken photos and culling the lousy shots.
Lastly, you can use only basic slideshows when viewing images from a shared iPhoto Library over a network.
Saved slideshows appear in the Source pane like albums, books, cards, and calendars, and any changes you make to them are saved for the future. You can organize saved slideshows in folders, duplicate them to experiment with different approaches, and export them to QuickTime movies.
Use saved slideshows when you want to put some effort into making a slideshow as visually impressive as possible. You can add and remove individual photos from the slideshow, apply temporary effects to photos during the slideshow, change the time each slide appears on screen, adjust the Ken Burns Effect for each slide, set the transition between any two slides, and more.
What’s particularly neat about saved slideshows is that they’re created with default settings, so you can customize them as much or as little as you like.
When you select a saved slideshow in the Source pane, iPhoto displays a new set of tools for customizing your slideshow (Figure 5.1).

A basic slideshow is the easiest way to display your photos while at your computer. For playing music during your slideshow, iPhoto integrates with iTunes.
In organize mode, select one or more photos, albums, or events, and click the triangular Play button underneath the Information pane (Figure 5.2).
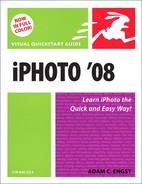
iPhoto opens the Slideshow dialog. Click the Settings tab.
Set the transition type, direction (by clicking the appropriate arrow in the round direction controller), and speed.
Enter the length of time you want each photo to remain on the screen, and select any desired additional display options.
If you want music to play during your slideshow, see “Assigning Music to Slideshows,” on the next page.
Click Save Settings or click Play.
✓ Tips
Save Settings records your settings for future uses of basic slideshows.
I recommend use of the Ken Burns Effect; it significantly improves most slideshows.
Scale Photos to Fill Screen causes a slideshow to display only the center of portrait-orientation photos but eliminates black bands on the sides.
Show My Ratings Show and Slideshow Controls aren’t necessary, since you can display the slideshow controls, which include the rating, just by moving the pointer during the slideshow.
Unless you plan to narrate your slideshow in person, playing carefully selected songs from your iTunes library during the slideshow can enhance the presentation.
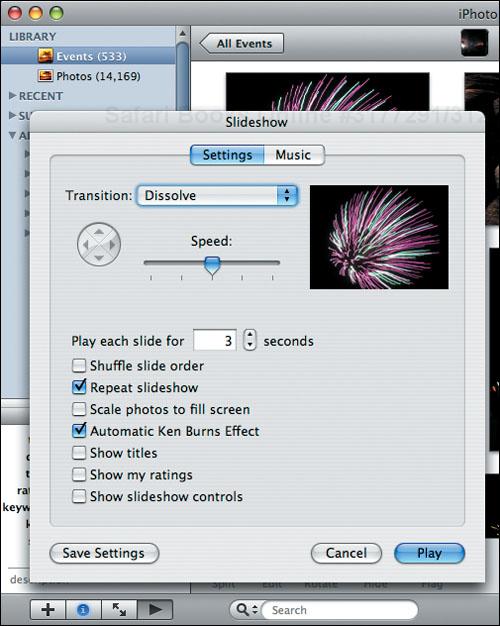
For saved slideshows, click the Music button to open the Music Settings dialog; for basic slideshows, click the Music tab in the Slideshow dialog.
Select Play Music During Slideshow.
Either select a playlist from the list above the songs or a song from the song list (Figure 5.3).
✓ Tips
iPhoto lets you select multiple songs, and will even tell you their total duration, but it can play only one. Until Apple fixes this bug, the only way to play multiple songs is to select an entire playlist (select the playlist and don’t select any songs in it).
To search for a song, enter the first few characters in its name or the artist’s name in the Search field. iPhoto narrows the list as you type. Click the × button to clear the Search field and expand the list.
To sort the list of songs, click the header of the Name, Artist, or Time column; sorting by time makes it easier to match the music to your slideshow’s length.
Click the triangular Play button to play the selected song; click it again to stop playing. You can also double-click a song to play it.
If iPhoto doesn’t pick up the sort order of a playlist from iTunes correctly, quit iTunes.
Basic slideshows are easy, but for more control over your slideshow’s presentation, create a saved slideshow instead. Saved slideshows are also ideal if you plan to show the same slideshow on multiple occasions.
Select one or more photos, albums, or events, and click the Slideshow button underneath the display pane.
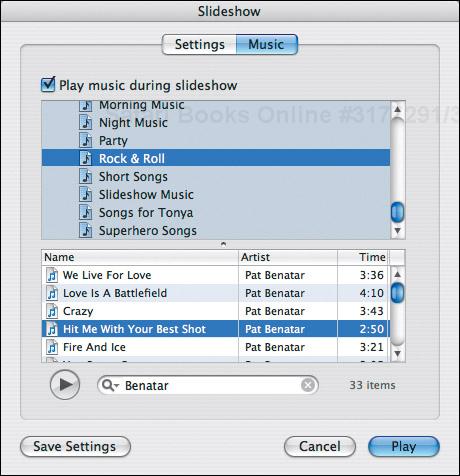
iPhoto creates a new saved slideshow in the Source pane and displays the slideshow tools under the display pane (Figure 5.4).
Figure 5.4. iPhoto provides slideshow tools under the display pane only when you select a saved slideshow in the Source pane. See Figure 5.1 for more details on the slideshow tools
Select one or more photos or albums, and click the + button underneath the Source pane.
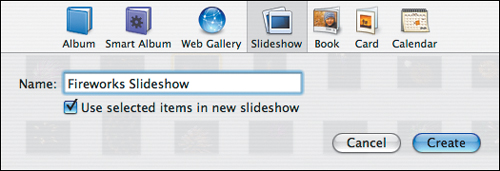
In the dialog that appears, click Slideshow in the item icon list and enter a name for the slideshow in the Name field (Figure 5.5).
iPhoto creates a new saved slideshow in the Source pane and displays the slideshow tools under the display pane.
Select the saved slideshow in the Source pane, press
 , and click Delete when iPhoto asks if you’re sure. Or just press
  to avoid the warning dialog.
Select the slideshow and, in the Source pane, either choose Delete Slideshow from the Photos menu or
 -click it and choose Delete Slideshow from the contextual menu.
✓ Tips
iPhoto automatically names your slideshow after the currently selected album.
iPhoto won’t let you create a saved slideshow if you select a book, card, calendar, or another saved slideshow instead of an event, album, or individual photos.
You can also create a slideshow by duplicating an existing one, which can be helpful if you want to experiment with different settings without losing any work. With the slideshow selected, choose Duplicate from the Photos menu or
-click it and choose Duplicate from the contextual menu.
Whereas basic slideshows merely present the selected photos in the current sort order, saved slideshows give you more control. Use these instructions to add, remove, and rearrange photos in saved slideshows.
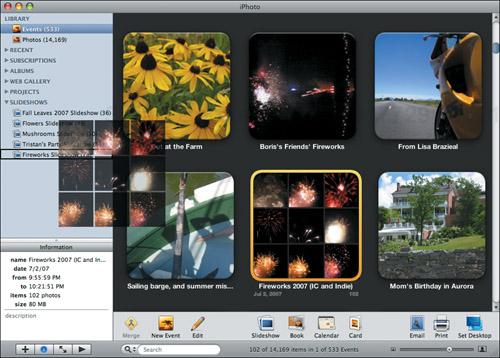
Select one or more events, albums, or photos and drag them onto the saved slideshow in the Source pane (Figure 5.6).
Before you create the slideshow, drag the photos into the order you want in an album. iPhoto retains that manual sort order in the saved slideshow.
After you’ve created a slideshow, drag photos around in the scrolling photo list above the display pane.
✓ Tips
Pay attention to the sort order of the album from which you create a slideshow. There’s no shame in deleting a saved slideshow and recreating it after sorting the source album properly.
In particular, if you’re sorting by date in any way, note that you’ll probably want to choose Ascending from the View menu’s Sort Photos submenu to ensure that your slideshow moves forward in time, rather than backward.
Although you can change the settings for each slide in a saved slideshow, you can save effort by ensuring that your defaults are set the way you want to start. Click the Settings button to bring up the settings dialog, which looks much like the Slideshow dialog used for basic slideshows (Figure 5.7).
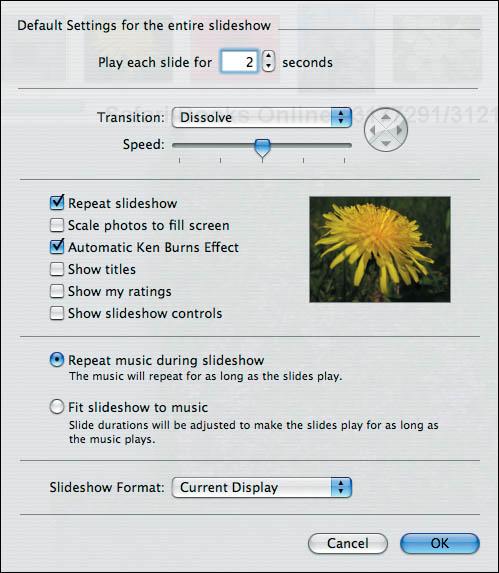
Set the length of time you want each slide to play in the Play Each Slide For field.
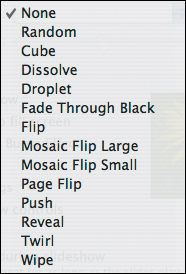
Choose a default transition, and set the transition speed and direction, if available, by clicking the appropriate arrow in the round direction controller. iPhoto offers numerous transitions (Figure 5.8).
Select the desired checkboxes for additional display options.
Decide whether you want to repeat the selected music during the slideshow or if you want iPhoto to adjust the length of the slideshow to fit the music.
Choose the screen format (Current Display, 4:3 for iDVD and TV, or 16:9 Widescreen) from the Slideshow Format pop-up menu.
Click OK when you’re done.
✓ Tips
Select Scale Photos to Fill Screen to display only the center of portrait-orientation photos and eliminate the black bands on the sides.
Checking the Show My Ratings and Show Slideshow Controls checkboxes isn’t necessary, since you can display the slideshow controls, which include the rating, just by moving the pointer during the slideshow.
The last few pages have helped you get ready; now it’s time to customize each slide. Remember that each of these actions is optional!
Select the first slide in the scrolling list above the display pane.
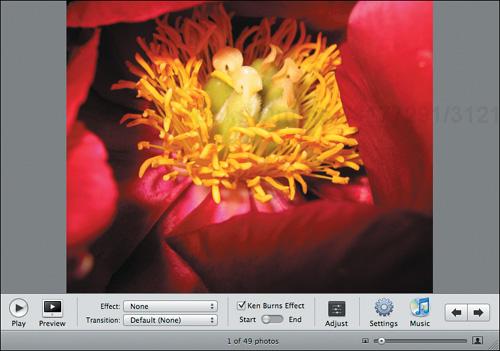
Choose an effect to apply to the photo from the Effect pop-up menu (Figure 5.9). See “Editing Slide Photos” on the next page for more information.
To override the default transition, choose a different transition from the Transition pop-up menu (Figure 5.9).
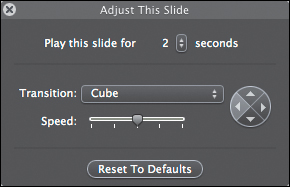
To override the default slide duration, click the Adjust button, and click the up or down triangle buttons to increase or decrease the slide duration. You can also override the default transition type, direction, and speed here (Figure 5.10).
If you’re using the Ken Burns Effect, use the Start/End switch along with the size slider to control the effect. See “Configuring the Ken Burns Effect” on page 109.
To see how your changes look, click the Preview button to preview the current and next slides in the display pane.
Select the next photo by pressing
 (the right arrow key), clicking the right arrow button, or clicking the photo in the scrolling list. Then repeat steps 2–7 until you’ve customized each slide as desired.

You will most likely have edited your photos before you create a slideshow, but if not, you can do so while customizing your slides. Some edits must be permanent; others don’t have to be.
You can make several types of temporary edits that iPhoto applies to the photo only in the saved slideshow. These changes do not affect the original photo in any way.
Choose either Black and White or Sepia from the Effect pop-up menu to render the photo either black-and-white or sepia.
If you aren’t using the Ken Burns Effect (it’s off in the settings dialog and for the current slide), you can use the size slider to zoom in on the photo.
If you zoom in on a slide, you can drag the photo to set what portion of the zoomed photo appears.
In most cases, Apple’s setting for Automatic Ken Burns Effect will provide a completely acceptable result. However, if you wish to zoom further, change the zoom direction, or even turn on the Ken Burns Effect only for a particular slide, you can do so.
Click the Start end of the toggle switch.
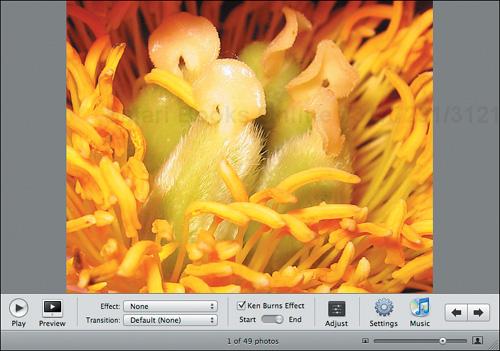
Using the size slider, zoom to the size at which you want the photo to appear first (Figure 5.11).
Drag the photo in the display pane so the starting view is showing.
Click the End side of the toggle switch.
Using the size slider, zoom to the size at which you want the photo to fade out.
Drag the photo in the display pane so the appropriate part is showing (Figure 5.12).
Click the Preview button to see if your settings work as desired.
Select the next photo and repeat steps 1–8.
Configuring slideshows is easy, but controlling them while they run is even easier. Just move the pointer during a slideshow to show the hidden slideshow controls.
To pause and restart the slideshow, click the Play/Pause button in the slideshow controls or press
 .
.To move back and forth between slides, whether or not the slideshow is paused, click the left or right arrow button in the slideshow controls or press either
 (the left arrow key) or (the right arrow key).
Press
 (the up arrow key) to speed up the slide display time by one second per slide per keypress; press
  (the down arrow key) to slow it down by one second per slide per keypress.
To stop the slideshow, press any alpha-numeric key or click the mouse.
iPhoto slideshows are great if people can gather at your computer, but iPhoto’s QuickTime movie export is the easiest way—much easier than iMovie or iDVD—to create a slideshow you can post on a Web page or send to others in email or on CD.
Select the saved slideshow you wish to export.
Choose Export from the File menu (
 ).
).iPhoto displays the Export dialog.
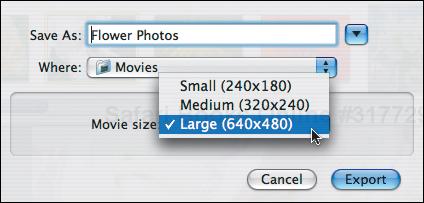
Name your movie in the Save As field, choose a destination from the Where pop-up menu, and choose how large you want the movie to be from the Movie Size pop-up menu (Figure 5.13).
Click Export to build the movie.
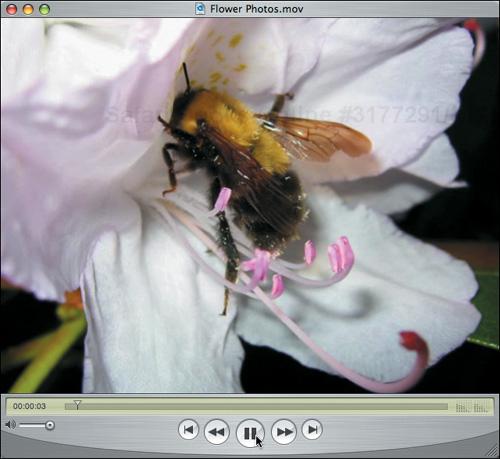
Switch to the Finder, locate your movie, and double-click it to see the results in QuickTime Player (Figure 5.14).
✓ Tips
QuickTime movies created in this fashion include the Ken Burns Effect, along with music, transitions, and other settings.
If you select Show Titles in the slideshow settings dialog, titles will appear in the QuickTime movie as well; that’s not true of ratings or slideshow controls.
If your movie stops unexpectedly, try changing the transition, slide timing, or Ken Burns Effect for the affected slide.
If you’re posting on the Web, QuickTime Pro (see next page) will help you shrink your movie to a more palatable size.
Exporting Photos to QuickTime
There’s another quick and dirty way to create a QuickTime movie, though the results lack the Ken Burns Effect and any transitions you’ve set.
Select the photos you wish to export, and choose Export from the File menu (
).In the Export Photos dialog, click the QuickTime tab.
Enter the maximum width and height for the images, a slide duration, and select a background color.
To include the music associated with basic slideshows, select Add Currently Selected Music to Movie.
Click Export, name your movie in the Save dialog, choose a destination for it, and click OK to build the movie.
QuickTime movies can be an excellent way to distribute slideshows.
Copy the full-size movie to a CD-R.
Send the movie via email, but be sensitive about the size of movies. For movies larger than 5 MB, try Pando, available from www.pando.com.
If you have FTP or Web space available with your Internet account, upload the movie (perhaps using iWeb) and send people the link. If you’re a .Mac member, you can upload the movie to your iDisk’s Public folder for others to download.
If you’re a .Mac member, copy the movie to your iDisk’s Movies folder and use the HomePage Web publishing tool to make a movie page. Unfortunately, this method results in a rather small viewing size.
If you’re a .Mac member, you can also copy the movie to your iDisk’s Sites folder and send people the link in this form: http://homepage.mac.com/membername/moviename.mov.
With this method, the movie plays at the size you chose in iPhoto, and the movie is hidden from the world (but not secured!).
Be all modern and upload it to YouTube at www.youtube.com.
✓ Tip
Using QuickTime 7 Pro (a $29.99 upgrade from the free QuickTime Player; visit www.apple.com/quicktime/buy/), you can make some changes to your movies; see Apple Pro Training Series: QuickTime Pro Quick-Reference Guide for details, or use iMovie instead.
What if you want to add captions or narration to a slideshow? Turn to Apple’s iMovie video editor. These instructions are an overview; refer to iMovie’s help or Jeff Carlson’s iMovie ’08 & iDVD ’08 for Mac OS X: Visual QuickStart Guide for more details.
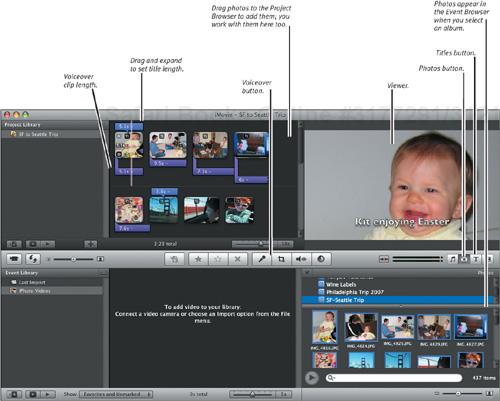
In iMovie, click the Photos button, select an album, and then drag the desired photo into the Project Browser in the order you want (Figure 5.15).
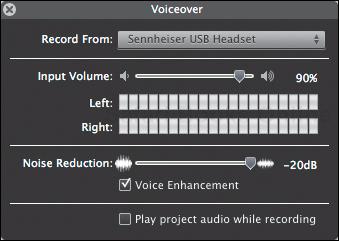
To record audio, click the Voiceover button to open the Voiceover panel, click the left edge of the photo you want to describe, and record your narration, clicking anywhere in the project to stop recording (Figure 5.16). Repeat for each photo’s voiceover. Close the Voiceover panel when done.
For each photo, click the tiny click icon in the photo to set the display time to match the length of the associated voiceover clips.
To adjust the Ken Burns Effect zoom and position, click the tiny crop button in each photo and adjust the starting and ending positions in the pane to the right. You can also click Fit to display the entire photo (with black bars) or Crop to crop it to fit.
To add a title, click the Titles button and drag a selected title style to a photo. Type your text in the display to the right of the timeline (Figure 5.17). Drag the edges of the blue title balloon to match the photo clip length. Repeat for each photo.
View your slideshow by double-clicking wherever you want it to start.

iPhoto can send a set of photos to iDVD to create a DVD slideshow that can be viewed on any TV with a DVD player. You must have a Macintosh with a SuperDrive to burn such a slideshow to disc.
Select one or more albums or slideshows (
 - or
- or  -click to select multiple items), and choose Send to iDVD from the Share menu.
iPhoto works for a bit, launches iDVD, and shows the iDVD main screen with pre-built iDVD slideshows.
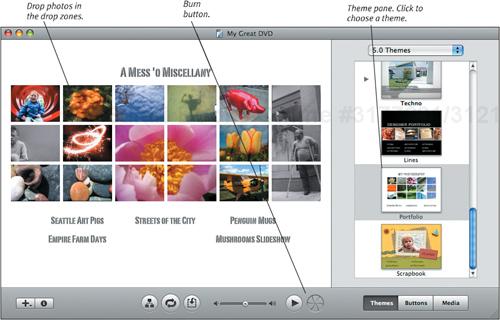
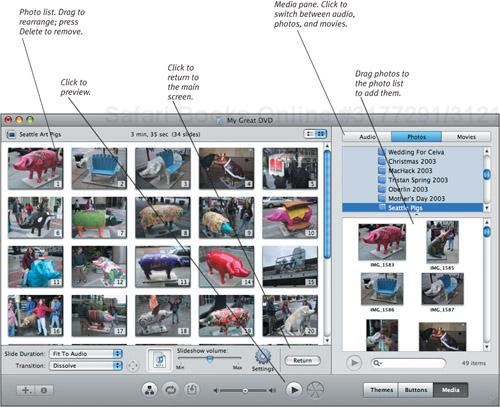
Click the Themes button in the lower right, choose a theme, and customize it with text and images (Figure 5.18).
To add audio, photos, or video to the main title screen; click the Media button; click Audio, Photos, or Movies in the upper right; and drag items to drop zones.
Double-click a slideshow icon in the main screen to switch to a screen where you can add, delete, and rearrange photos (only for the album-based slideshows), plus set a slide transition, select music, and set other options (Figure 5.19).
As you work, use the Preview button to verify that your slideshows play as you desire. A small player window simulates a DVD remote control.
When you’re ready, click the Burn button to start burning your DVD.
✓ Tip
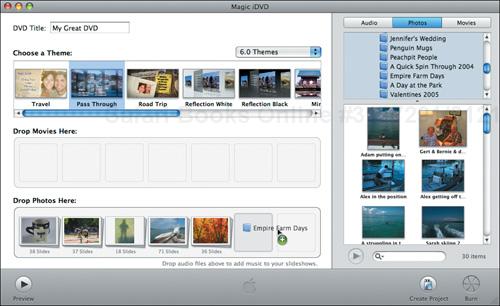
For even easier DVD slideshow creation, launch iDVD, choose Magic iDVD from the File menu, and drag albums and music into the Photos area (Figure 5.20).
Look to other sources for full instructions on how to use iDVD, such as Jeff Carlson’s iMovie HD ’08 & iDVD ’08 for Mac OS X: Visual QuickStart Guide or Jim Heid’s The Macintosh iLife ’08, also from Peachpit Press. That said, these tips should help you use iDVD more effectively.
iPhoto sends saved slideshows to iDVD as QuickTime movies, which you can’t edit inside iDVD. Remember to choose the 4:3 format for your slideshow!
The 99-photo per slideshow limitation in previous versions of iDVD is now gone.
Save your iDVD project with a good name; it’s the disc name in the Finder.
Turn on Show TV Safe Area in the View menu to verify that everything you’re doing will fit on a TV screen.
iDVD lets you choose multiple songs without selecting an entire playlist.
If you select Always Add Original Photos to DVD-ROM Contents in iDVD’s Slideshow preferences pane, iDVD also makes the photos available as files on the DVD for use with computers. These are stored as normal files and not in an iPhoto Library folder.
Quit all unnecessary applications when burning; if anything interrupts the burn process, it can ruin your DVD-R disc.
DVD-R discs hold 4.7 GB, so you probably won’t be able to fill one with slideshows. To use all the space, add video.
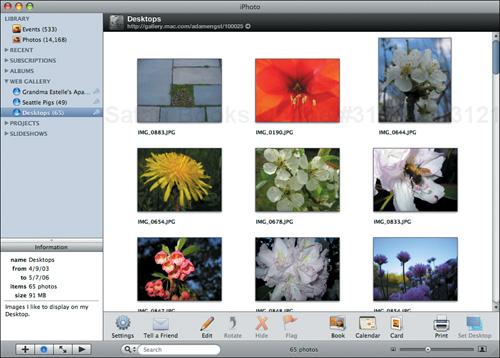
In Mac OS X, you can display a picture on your Desktop, and with iPhoto, putting one (or more, in rotation) of your photos on your Desktop is a matter of just clicking a button.
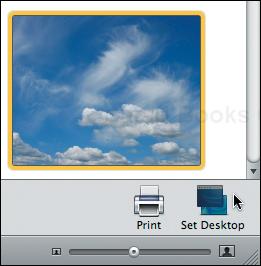
In iPhoto, select one or more photos, and click the Set Desktop button or choose Set Desktop from the Share menu (Figure 5.21).
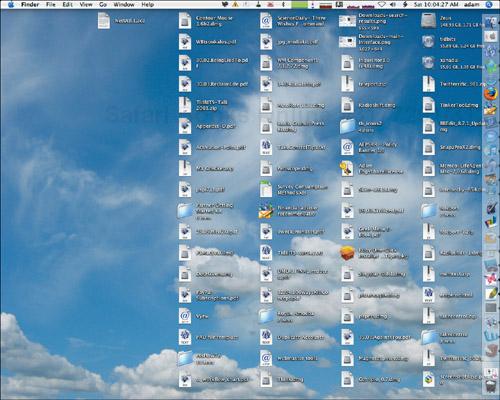
If you selected only one photo, iPhoto immediately changes the picture on your Desktop (Figure 5.22).
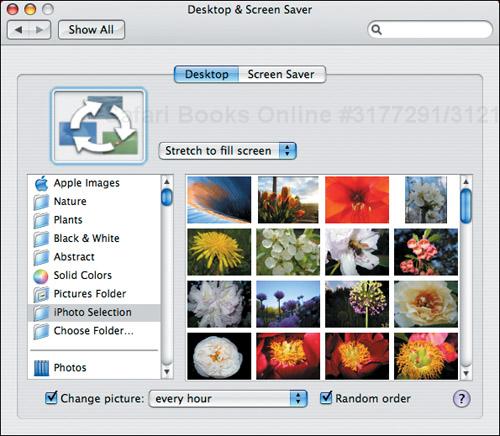
If you selected multiple photos, iPhoto opens the Desktop & Screen Saver preference pane (Figure 5.23).
If you selected multiple photos, choose how you want the images to appear on the Desktop.
✓ Tips
You can also display the photos in an iPhoto album on your Desktop by selecting the album in the folder list in the Desktop & Screen Saver preference pane’s Desktop view.
If the picture is in landscape orientation, iPhoto scales the photo to make it fit.
If the photo is in portrait orientation, iPhoto takes a landscape chunk out of the middle to display on the Desktop. Stick with photos in landscape orientation, or crop them appropriately first.
iPhoto can put a picture on only one monitor. To put a picture on the second monitor, open the Desktop & Screen Saver preference pane and select the iPhoto Selection folder to rotate through the same photos on the second monitor.
The Set Desktop button in iPhoto does double duty, not just putting one or more photos on your Desktop, but also setting them as your screen saver.
In iPhoto, with more than one or no photos selected (in the latter case, iPhoto uses the current album or event), click the Set Desktop button or choose Set Desktop from the Share menu.
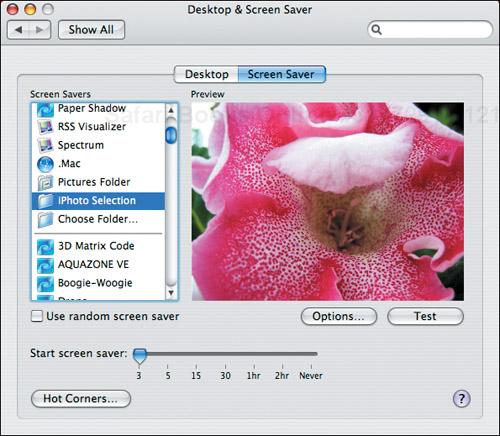
iPhoto opens the Desktop & Screen Saver preference pane (Figure 5.24).
If necessary, click the Screen Saver tab.
Adjust the Start Screen Saver slider to set how long the screen saver should wait for activity before kicking in. If you want to set a hot corner, click the Hot Corners button and pick a hot corner in the dialog that appears.
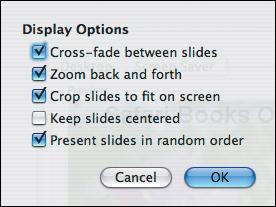
To configure options for how the screen saver slideshow looks, click Options and then select the desired checkboxes in the Display Options dialog (Figure 5.25). Click OK when you’re done.
iPhoto sets Mac OS X’s screen saver to use the selected photos or album. The next time your screen saver kicks in, you’ll see it displaying those photos.
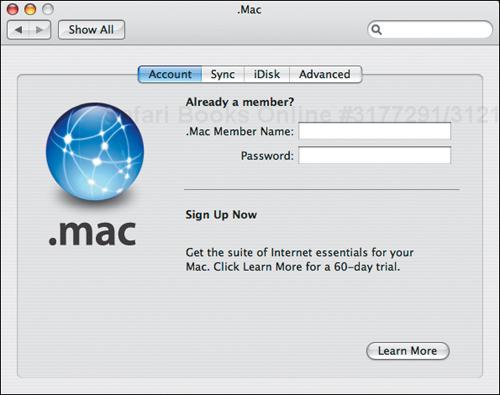
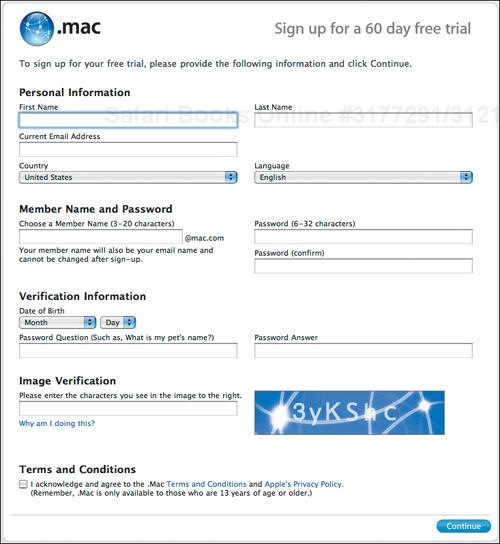
Before you can use Apple’s HomePage Web publishing tool or .Mac Slides tool, you need a .Mac account. It’s easy to set up but does cost $99 per year. Luckily, Apple offers a 60-day free trial so you can see if iWeb and .Mac Slides, along with .Mac’s other features, are worth the cost to you.
Choose System Preferences from the Apple menu to open the System Preferences window, and then click the .Mac icon to display the .Mac preference pane (Figure 5.26).
Make sure you’re connected to the Internet and click the Learn More button.
Your default Web browser launches and takes you to the .Mac home page. Click the link for a free trial.
Enter your information in the fields provided (Figure 5.27). When you’re done, click Continue.
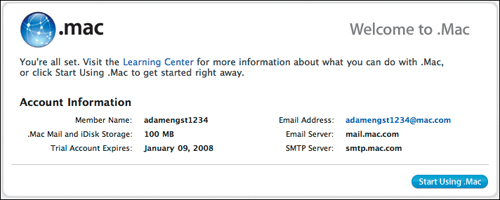
Your browser displays a summary page (Figure 5.28) and gives you a link to the .Mac Learning Center.
Return to the .Mac preference pane, and enter your new .Mac member name and password.
Close the System Preferences window.
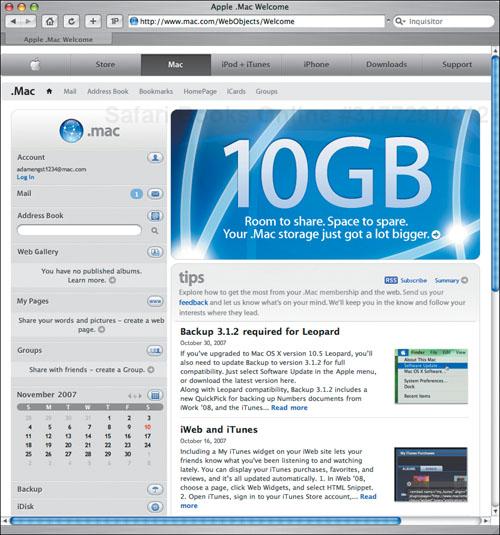
.Mac provides many features, some of which integrate with iPhoto. Explore the .Mac page at www.mac.com to configure and use each tool, to download the free software like Backup, and to access various special offers (Figure 5.29). For full, up-to-date information about .Mac, I strongly recommend Joe Kissell’s Take Control of .Mac at www.takecontrolbooks.com/dot-mac.html.
Apple’s iWeb program, part of iLife ’08, integrates with .Mac to make uploading photo slideshows (and other Web pages) easy (see the next page for details).
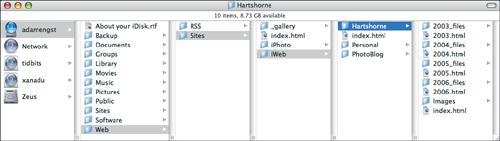
Apple provides 10 GB of disk space for each .Mac user, accessed like any other disk. To mount your iDisk, choose My iDisk from the iDisk submenu in the Finder’s Go menu (![]() ). Predefined folders store backups, documents, pictures, movies, public files to share, Web pages, music, and software you can download.
). Predefined folders store backups, documents, pictures, movies, public files to share, Web pages, music, and software you can download.
When you publish photos using .Mac Slides, the files are uploaded to your Pictures folder. Web albums you publish via iWeb live in the Web folder (Figure 5.30).
.Mac provides you with another address—[email protected]. You can either retrieve mail from it directly (via your email program or a webmail client) and/or have it forward messages to another account.
New in iPhoto 7 are .Mac Web Galleries, which provide a way of linking a group of photos in iPhoto with a Web page on .Mac. Web galleries replace iPhoto 6’s photocasting feature. To use iPhoto’s Web Gallery feature, you must have a .Mac account and be using Mac OS × 10.4.9 or later.
Web galleries can be viewable by anyone, by just you, or by a set of people with whom you’ll share a user name and password.
Select one or more photos, albums, or events (including movies!), and either click the Web Gallery button or choose Web Gallery from the Share menu.
iPhoto gives you options as to who can see your Web gallery and how it will appear (Figure 5.31).
From the Album Viewable By pop-up menu, choose Everyone, Only Me, or a user if you’ve created any.
Select the desired display, downloading, and uploading options from the checkboxes, and click Publish.
iPhoto creates a new item in the Web Gallery list in the Source pane and starts processing and uploading your photos (a slow process). When it’s done, it shows the URL to your Web gallery at the top of the screen (Figure 5.32).

From the Album Viewable By pop-up menu in the Web Gallery dialog, choose Edit Names and Passwords.
In the dialog that appears, click the + button, enter a name and password (click or press
 to switch fields), and click OK (Figure 5.33).
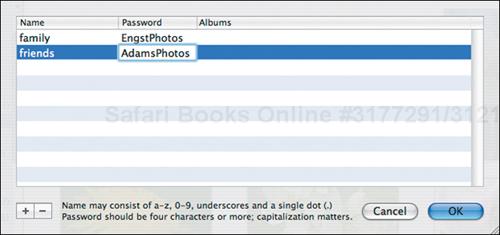
Figure 5.33. Enter names and passwords to create login credentials for people you want to be able to see your photos. See page 164 for more information.
✓ Tips
The URL to your Web gallery appears at the top of the screen; click it to visit.
The Settings button in the toolbar displays the dialog shown in Figure 5.31.
Click the Tell A Friend button to create an email message with login information.
The beauty of Web galleries is that they don’t have to be static; you can easily add and remove photos from them, and iPhoto will keep the Web version in sync.
Select one or more photos, and drag them to the desired Web gallery.
iPhoto processes and uploads the photos, providing the status in the upper-right corner of the screen (Figure 5.34).
Select one or more photos in the Web gallery and press
.iPhoto removes the photos, updating the files on .Mac and showing a spinning progress icon next to the Web gallery while that’s happening (Figure 5.35).
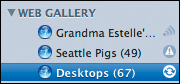
Click the little status icon next to the Web gallery name in the Source pane.
If the icon shows radio waves, iPhoto starts synchronizing.
If the icon indicates that synchronization is happening, iPhoto asks if you want to stop updating, and changes the icon to an exclamation point (Figure 5.35). Click it again to resume updates.
Select a Web gallery in the Source pane and press
.iPhoto asks for confirmation and then deletes the Web gallery and the photos on the Web, leaving the originals in iPhoto alone and offering to import any downloaded photos (Figure 5.36).
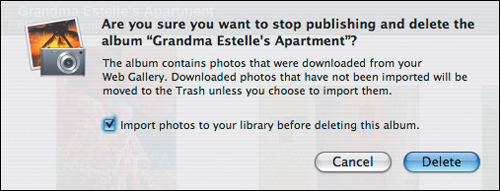
Figure 5.36. When you delete a Web gallery, iPhoto warns you if it contains any photos downloaded from the online side of the Web gallery and gives you a chance to import them. If the Web gallery contains only photos that originated in iPhoto, the dialog reassures you that deleting the Web gallery won’t affect your original photos.
iPhoto’s integration with iWeb is similar to its integration with iDVD: it just hands off selected photos. You can create two types of pages when starting from within iPhoto: photo pages and blog pages.
Select an event, album, or the individual photos you wish to publish.
From the Share menu’s Send to iWeb submenu, choose Photo Page.
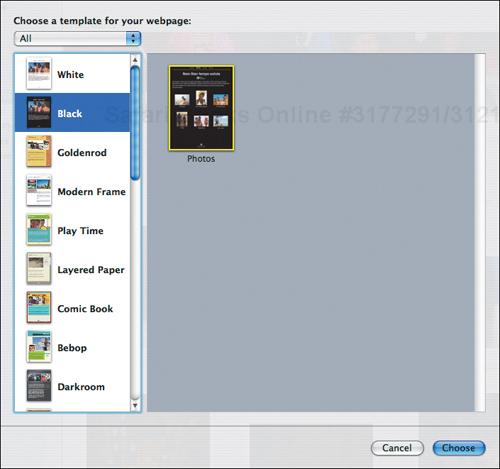
iPhoto launches iWeb, creates a new page, and asks you to select a template (Figure 5.37).
Select a template and click Choose.
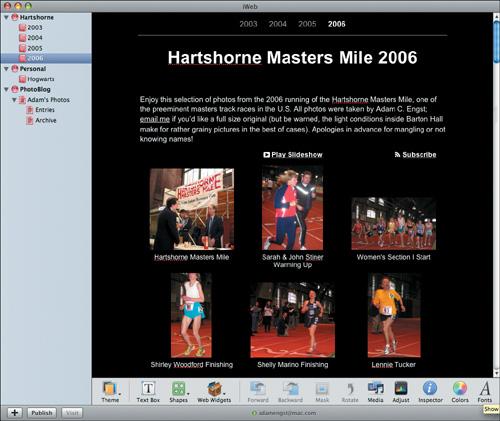
iWeb imports the photos and presents you with a page that simulates your eventual photo Web page (Figure 5.38).
Edit the various text blocks for the page name, description, and photo titles as desired (click a block twice to edit it).
From the File menu choose either Publish to .Mac or Publish to Folder.
If you choose Publish to .Mac, iPhoto uploads your pictures to your iDisk, and, when it’s done, shows a dialog that tells you the URL for your page and offers to let you visit the page or announce it.
If you choose Publish to Folder, iWeb asks for a location and saves the HTML and image files to the folder, which you can then upload manually to any Web server.
✓ Tip
For more details about iWeb, see Steven Sande’s Take Control of iWeb at www.takecontrolbooks.com/iweb.html.
✓ More Tips
Web-based slideshows are cooler when uploaded to .Mac than when displayed on another Web site. iWeb’s built-in page counter also works only on .Mac.
It's best to give your photos titles in iPhoto, rather than in iWeb, in case you wish to use the photos for any other purpose where titles would be helpful.
Arrange your photos as desired (left to right, top to bottom) in iPhoto before you send them to iWeb.
Whereas a photo page looks much as you’d expect a Web photo album to look, a photo blog features a single photo per chronological entry.
Select a photo, and from the Share menu’s Send to iWeb submenu, choose Blog.
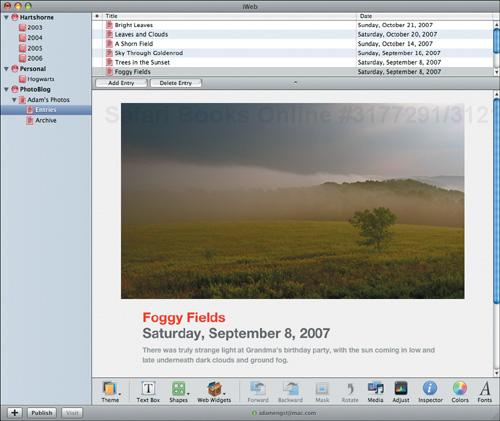
iPhoto launches iWeb and creates a new blog entry (Figure 5.39).
Edit the various text blocks for the blog post title and description as desired (click a block twice to edit it).
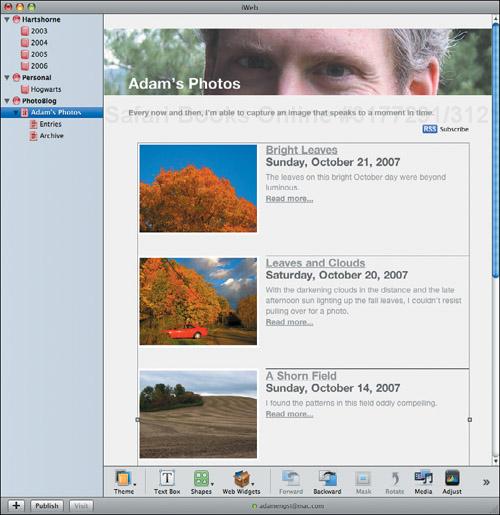
iWeb automatically updates the main page for your blog as well (Figure 5.40).
From the File menu choose either Publish to .Mac or Publish to Folder.
If you choose Publish to .Mac, iPhoto uploads your new blog post to your iDisk, and, when it’s done, shows a dialog that tells you the URL for your page and offers to let you visit the page or announce it.
If you choose Publish to Folder, iWeb asks for a location and saves the HTML and image files to the folder, which you can then upload manually to any Web server.
Using the .Mac Slides Publisher feature of .Mac along with iPhoto, .Mac members can easily upload a set of photos that anyone with a Mac running Mac OS × 10.2 or later can use as a screen saver.
Select the photos you want to publish, and click the .Mac Slides button or choose .Mac Slides from the Share menu.
iPhoto displays a confirmation dialog (Figure 5.41).
Click the Publish button.
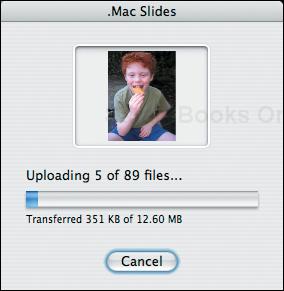
iPhoto compresses and shrinks the size of the photos to reduce transfer time and uploads the photos to your iDisk (Figure 5.42).
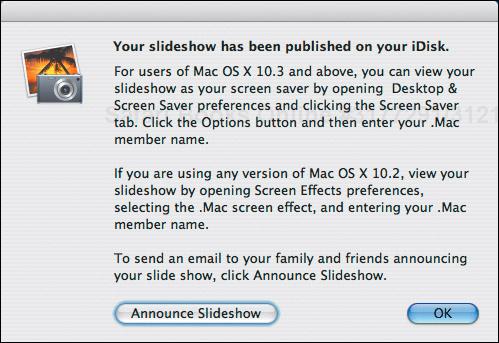
When it’s done, a confirmation dialog appears (Figure 5.43).
Click the Announce Slideshow button.
In your default email program, iPhoto creates a message with instructions you can send to the people who might want to subscribe to your .Mac Slides.

✓ Tips
You can move the .Mac Slides upload progress dialog out of the way and keep working while iPhoto uploads in the background.
You can find the .Mac Slides in your iDisk in
Pictures/Slide Shows/Public.It appears that you can select as many photos to upload as .Mac Slides as you want, subject to the amount of free disk space available on your iDisk.
You can store only one set of .Mac Slides at a time—every time you click the .Mac Slides button, the selected photos replace the previous set.
Although only .Mac members can upload .Mac Slides, anyone using Mac OS × 10.2 Jaguar or later can subscribe to them and have them shown as a screen saver.
The instructions below are for Mac OS × 10.3 Panther and later; in Jaguar, use the controls in the Screen Effects preference pane.
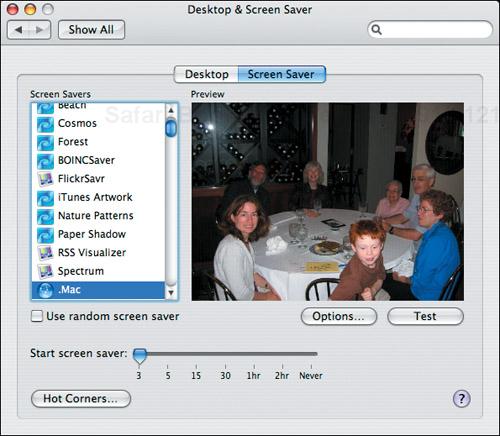
From the Apple menu, choose System Preferences, click the Desktop & Screen Saver icon, and then click the Screen Saver tab (Figure 5.44).
Click .Mac in the Screen Savers list.
Click the Options button to display the Subscriptions dialog.
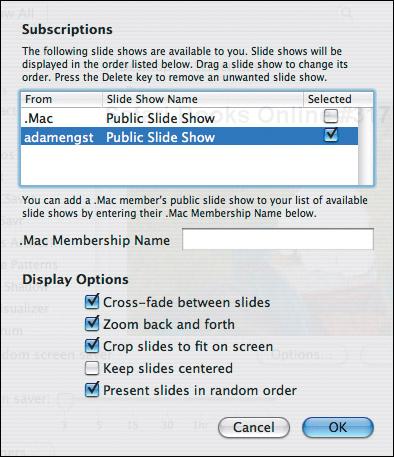
In the .Mac Membership Name field, enter the member name of the .Mac member whose slides you want to view and click OK.
iPhoto adds the .Mac member name to the available subscriptions and closes the dialog.
Click Options again to make sure the checkbox for your newly entered .Mac member name is selected, and select the other screen saver options from the checkboxes at the bottom of the dialog (Figure 5.45).
Click OK and close System Preferences.
Although iWeb can create Web pages you can upload to your own server, iPhoto has a built-in way of doing this as well that’s simple and effective, even if its results aren’t as visually interesting.
Select an album or the individual photos you wish to publish via the Web.
Choose Export from the File menu (
).iPhoto shows the Export Photos dialog.
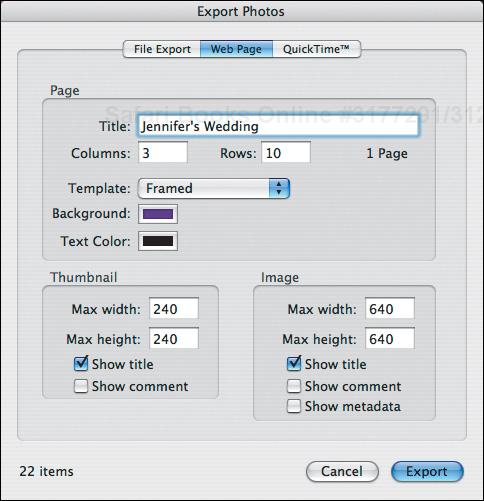
If it’s not selected, click the Web Page tab (Figure 5.46).
Enter the title for your Web page.
Enter the desired number of columns and rows of photo thumbnails.
If desired, choose a template and select background and text colors.
Select the maximum width and height for the thumbnails and the full-size images.
Select the Show Title, Show Comment, and Show Metadata checkboxes as desired.
Click Export, navigate to the desired destination folder (it’s best to create a new folder inside your user directory’s Sites folder), and click OK.
iPhoto exports the photos and builds the appropriate HTML files.
Switch to the Finder, open the folder in which you saved your Web page, and double-click the index.html file to open it in your Web browser (Figure 5.47).
If necessary, upload the folder to your Web site using an FTP program like Fetch (www.fetchsoftworks.com).

Managing Plug-ins
To manage plug-ins, select iPhoto in the Finder, choose Get Info (![]() ) from the File menu, and use the checkboxes and buttons in the Plug-ins section to enable, disable, install, and uninstall the plug-ins.
) from the File menu, and use the checkboxes and buttons in the Plug-ins section to enable, disable, install, and uninstall the plug-ins.
For a listing of plug-ins, check out the iPhoto Plugins News blog at http://wheezersociety.blogs.com/iphoto_plugins/.
iPhoto’s Web page export isn’t particularly flexible, although it’s fine for basic Web pages. There are workarounds for some of its limitations, though not for others.
iPhoto doesn’t let you add a line of descriptive text to your thumbnail page, as iWeb photo pages do by default. If you know a little HTML, you can easily add text to that page using a text editor.
Assuming you have a permanent Internet connection (like DSL or a cable modem) and an IP address that never changes, you can make your pages available on your Mac by turning on Personal Web Sharing in the Sharing preference pane.
If you have a permanent Internet connection but not a static IP address, you can work around this limitation with dynamic DNS. See www.technopagan.org/dynamic/ for more information. Also consider using iPhotoWebShare (see “Other Web Export Tools” to the left) to serve your photos directly.
If you feel as though you’re wasting a huge amount of time fussing with Web pages exported from iPhoto, I encourage you to check out Apple’s .Mac service (www.mac.com). iWeb’s integration with .Mac works very nicely, and .Mac Web galleries provide an extremely snazzy interface for visitors.
Forget about carrying dog-eared photos in your wallet—now you can copy photos to your iPod (assuming yours has a color screen) or iPhone and display them in their full glory. Though the photos come from iPhoto, you use iTunes to copy them to your iPod or iPhone.
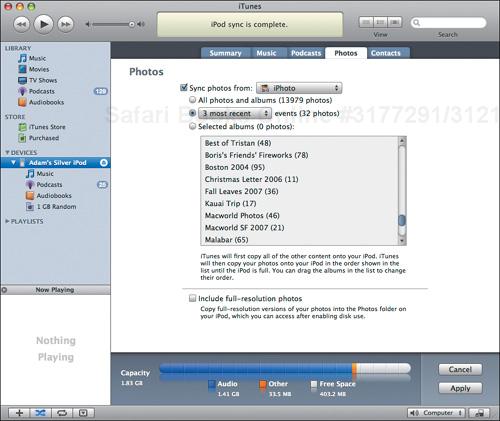
In iTunes, select your iPod in the Devices list.
Click the Photos tab to display the photo-copying preferences (Figure 5.48).
Click the Sync Photos From checkbox and select All Photos, Most Recent Events, or Selected Albums.
If you selected Most Recent Events, choose how many from the pop-up menu, and if you chose Selected Albums, select specific albums in the list.
Click Apply to save your preferences and start the synchronization process.
✓ Tips
To save space, iTunes shrinks the photos for display on the tiny screen.
If you have a lot of space on an iPod, or you want to use the iPod to transfer photos to another Mac, select the Include Full Resolution Photos checkbox.
If you have limited space on your iPod or iPhone, it’s best to copy individual events or albums rather than everything. Smart albums are especially useful here.
iTunes shows you how many photos are in each album, which can give you a rough approximation of which albums will fit.