Although there’s certainly nothing wrong with taking photos and keeping them to yourself, most people I know want to share them with others. We’ve already looked at a few ways of doing this, via .Mac Slides, exporting to a Web page, and, of course, creating prints, cards, calendars, and books.
But there’s an additional way in which you can share photos in iPhoto—sharing of the actual photo files. For instance, you might want to share photos with a family member who also uses your Mac, or a roommate whose Mac is on your network. Or maybe you want to send photos to friends via email or on a CD or DVD. iPhoto can help in all of these situations and more. I’ve organized this chapter in roughly that order; think of it as near (sharing on your Mac) to far (sending a CD to a Windows-using relative).
It’s worth keeping in mind that although Apple has provided various different tools for sharing these original photos, there are usually trade-offs. For instance, it’s trickier to burn a CD of photos for someone who uses Windows than for someone who uses iPhoto on the Mac. Sharing photos via Web galleries (but not accessing them) requires a .Mac account. And Apple still hasn’t made it easy for people on the same Mac to share an iPhoto Library.
Mac OS × is a multi-user operating system, so it’s common for people who share a Mac each to have an account. But what if you want to share the same iPhoto Library among multiple users on the same Mac? You can use Brian Webster’s $19.95 shareware iPhoto Library Manager utility, available at http://www.fatcatsoftware.com/iplm/.
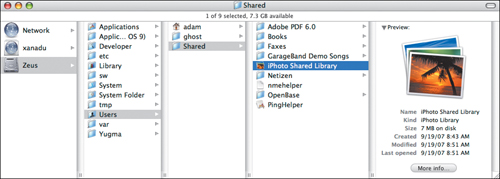
With iPhoto not running, rename your iPhoto Library to iPhoto Shared Library (to avoid confusion) and move it from the Pictures folder to the Shared folder at the same level as your user folder (Figure 7.1). The Shared folder may or may not contain other items.
Open iPhoto Library Manager, and drag the iPhoto Shared Library from the Finder into the iPhoto Libraries list in iPhoto Library Manager.
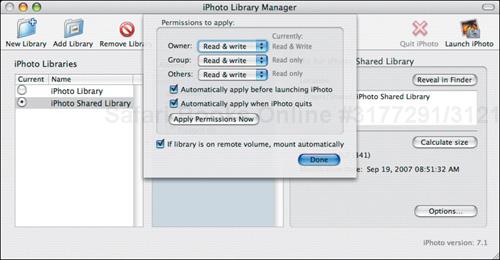
Select the iPhoto Shared Library in the list, click the Options button, choose Read & Write from each of the three Permissions pop-up menus, and select the three checkboxes underneath.
These settings cause iPhoto Library Manager to fix the permissions on the iPhoto Shared Library whenever necessary (Figure 7.2).
For each user, log in via Fast User Switching and repeat steps 2 and 3.
From now on, each user on your Mac should launch iPhoto by clicking the Launch iPhoto button in iPhoto Library Manager.
There’s another trick you can use to share photos among multiple users of the same Mac, and it also works for sharing an iPhoto Library across a network.
This technique requires a “shared volume,” which is either another hard drive or a Mac with File Sharing turned on in the Sharing preference pane. If you’re using a network, it must be at least 54 Mbps AirPort Extreme, or preferably 100 Mbps Ethernet; anything else will be too slow.
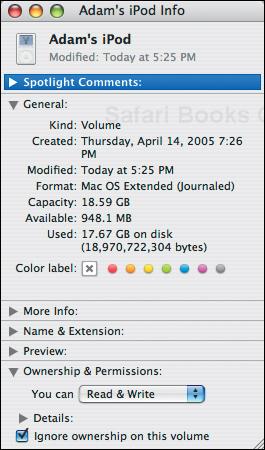
If you are using another hard drive as your shared volume, select it in the Finder, choose Get Info (
 ) from the File menu, and, in the Permissions area of the Get Info window, select the Ignore Ownership on This Volume checkbox (Figure 7.3).
With iPhoto not running, copy your iPhoto Library from the Pictures folder to where you want to store it on the shared volume.
Rename the iPhoto Library in your Pictures folder to “Old iPhoto Library.”
For each user (whether on the same Mac or over your network), open iPhoto while holding down
 , click the Choose Library button, and select the iPhoto Library on the shared volume.-launching iPhoto and selecting a library teaches iPhoto to use the selected library instead of the default.
From now on, each user should be able to use iPhoto normally, although only one person may use the shared iPhoto Library at a time.
iPhoto enables you to share all your photos, or just individual albums, with other iPhoto users on your Mac or on your network.
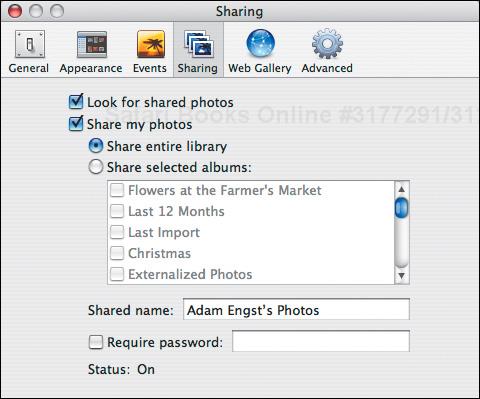
From the iPhoto menu, choose Preferences (
 ) and click the Sharing button.
iPhoto displays the Sharing preferences (Figure 7.4).
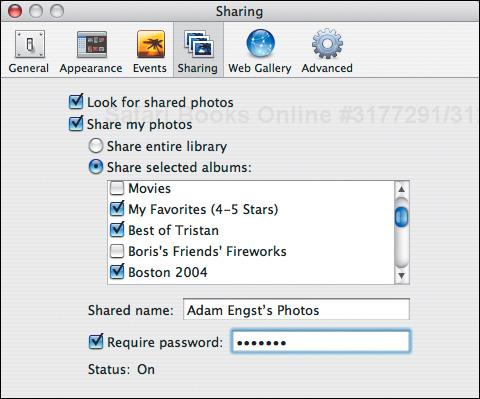
Select Share My Photos, and then select either Share Entire Library or Share Selected Albums.
If you selected Share Selected Albums, select the albums you want to share in the list below (Figure 7.5).
In the Shared Name field, enter a name for the shared folder under which your photos will appear for other users on your Mac and network.
If you want to restrict access to your shared photos, enter a password in the Require Password field. You’ll then have to give that password to approved users (Figure 7.5).
Close the Preferences window.
✓ Tips
Amazingly, iPhoto cannot share movies you take with your camera via network sharing. They simply don’t show up.
iPhoto sharing also works between users of the same Mac, when both are logged in via Fast User Switching; leave iPhoto running when switching accounts.
iPhoto automatically selects the Require Password checkbox when you type the password for the first time.
Working with shared photos is similar to using an iPhoto disc (see “Importing from an iPhoto Disc” on page 17).
Make sure the Mac with the shared photos has iPhoto launched and photo sharing turned on.
On the Mac or in the account from which you want to access the shared photos, launch iPhoto, and from the iPhoto menu, choose Preferences (
) and click the Sharing button.iPhoto displays the Sharing preferences.
Make sure Look for Shared Photos is selected (Figure 7.4; opposite).
Close the Preferences window.
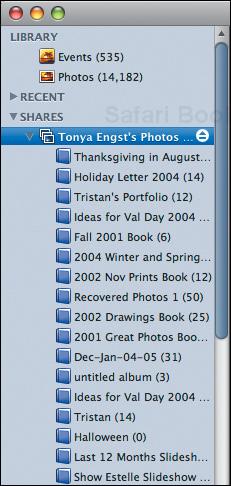
In the Source pane, iPhoto displays the shared library in the Shares list.
Click the shared library to load it. If the shared photos are protected by a password, enter it when prompted.
iPhoto loads the shared photos, displaying individual albums underneath the shared library when you click its expansion triangle (Figure 7.6).
✓ Tips
If more than one copy of iPhoto on your network is sharing photos, iPhoto creates a Shared Photos folder and puts all the shared libraries inside it.
To disconnect from a shared photo album, click the little eject button next to its name in the Source pane.
To import all the photos in a shared album, drag it to another spot in the Source pane.
In “Creating Web Galleries” and “Managing Web Galleries” on pages 120 and 121, we looked at the creation side of Web galleries. But that’s only half of the equation, and anyone can view photos in a Web gallery, whether or not they have a .Mac account.
In your Web browser, visit the URL to the Web gallery, which the creator will have sent you (Figure 7.7).
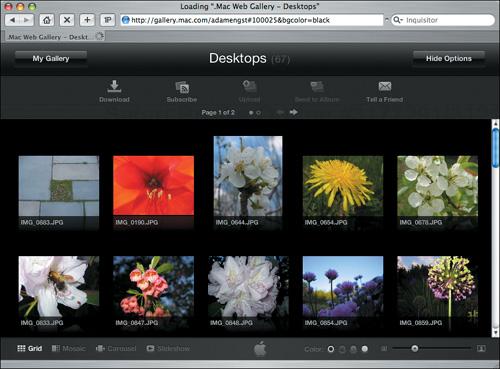
Click the My Gallery button to see all the Web galleries from that person. Notice that you can scrub through the albums as though they were events in iPhoto.
Click the Hide Options button to hide the controls at the top of the screen (discussed more fully on the opposite page).
Click the buttons at the bottom left of the screen to switch between Grid, Mosaic, Carousel, and Slideshow views.
In Carousel view, drag the slider to spin through the image thumbnails, much like the Cover Flow view in iTunes.
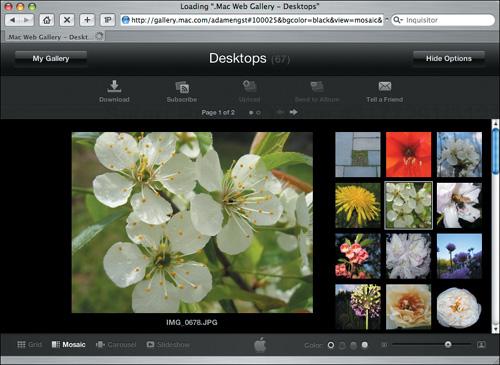
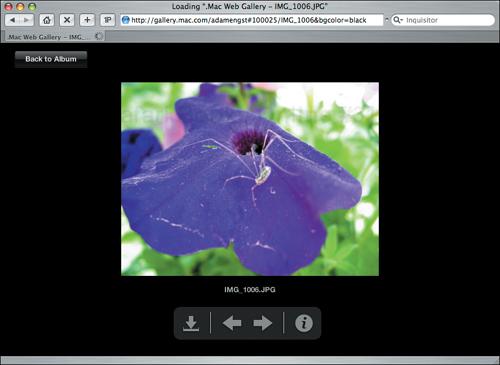
In Grid, Mosaic (Figure 7.8), or Carousel view, click a thumbnail to view the photo at full size.
When viewing a photo, use the controls to download it (to your Downloads folder; it opens in Preview), move to the next or previous photo, and get information (Figure 7.9). Click the photo or Back to Album to return to the thumbnail view.
Click the background color buttons to choose the darkness of the background.
Use the size slider to shrink and expand the size of the thumbnails.
You aren’t limited to viewing Web gallery photos online—you can both download them as individual files and subscribe to them in iPhoto or an RSS reader.
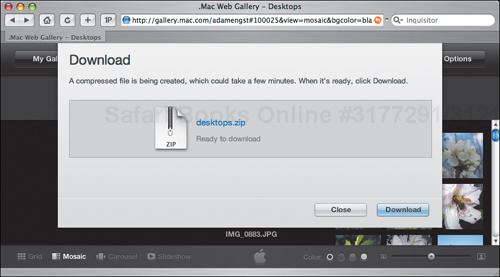
Click the Download button at the top of the screen to prepare a compressed archive for download.
Click the Download button in the dialog that appears to download the archive to your Downloads folder (Figure 7.10).
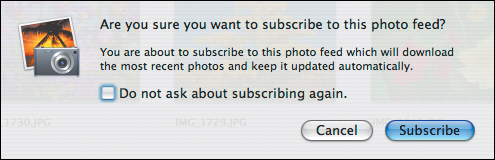
In Safari, click the Subscribe button at the top of the screen to send the feed for the Web gallery to iPhoto.
In iPhoto, confirm that you want to subscribe to the photo feed (Figure 7.11).
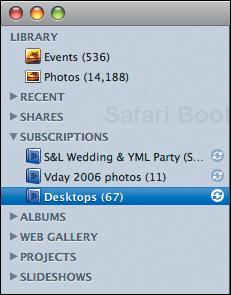
The feed appears in the Subscriptions list in the Source pane (Figure 7.12).
✓ Tips
You can use Web gallery images like other photos, although you cannot burn discs with them without copying them to a local album first.
Photocasts are stored like events within the Originals, Modified, and Data folders in your iPhoto Library.
Choose Subscribe to Photo Feed from iPhoto’s File menu and paste in a URL to subscribe to a photo feed manually.
To update a photo feed manually, click the little circling arrows icon next to it.
To unsubscribe from a photo feed, delete its album from Subscriptions.
Exporting has improved notably in iPhoto 7, offering the features most people need.
Select one or more photos, and choose Export from the File menu (
 ).
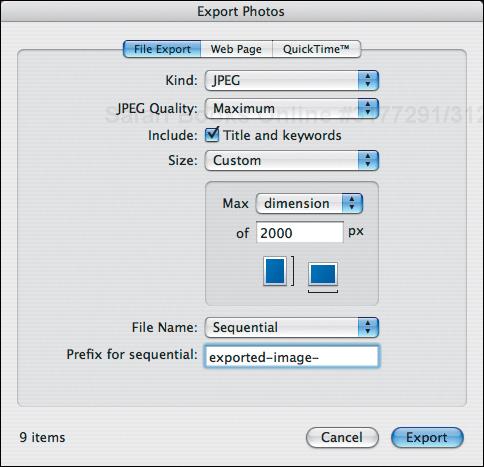
).iPhoto displays the Export Photos dialog (Figure 7.13).
Click the File Export tab.
Choose the format for the exported photos from the Kind pop-up menu, set JPEG compression if necessary, choose an image size, and set up how you want them named. Then click Export.
iPhoto displays a Save dialog. Navigate to your desired folder and click OK.
✓ Tips
iPhoto can export into only JPEG, TIFF, and PNG formats. For other formats, use GraphicConverter (www.lemkesoft.com).
For JPEG format, you can set the quality. The higher the quality, the larger the file.
Select Include Title and Keywords to export that information to the file’s IPTC tags, enabling other applications to read photo titles and keywords from iPhoto. It works only with JPEG export.
When iPhoto scales an image, it does so proportionally with the limits you set.
Use Original in the Kind pop-up menu to export a RAW file, GIF file, or other file format that iPhoto converts to JPEG when edited. Current exports the current format of such photos, without any options to scale them.
If you export only a single image, iPhoto gives you a chance to rename the image manually before saving.
If you just want copies of a couple of photos and don’t need to reformat or resize them, you can just drag the files to the Finder.
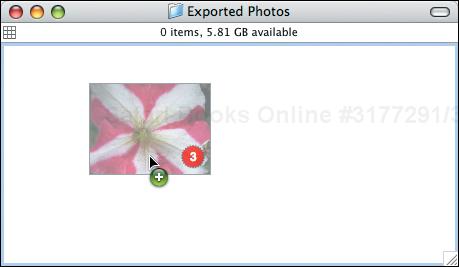
Select one or more photos and drag the selection to a folder in the Finder (Figure 7.14).
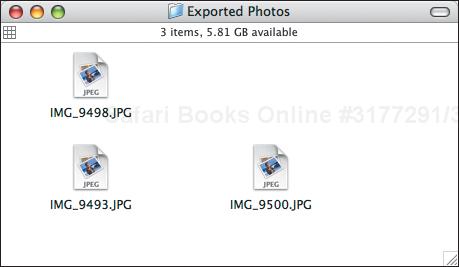
iPhoto saves the files where you drop them, using each file’s original name (Figure 7.15).
✓ Tips
With a drag-export, iPhoto is literally copying the files from its Modified (for edited photos) and Originals (for photos you haven’t touched) folders to the destination folder in the Finder. See “iPhoto Directory Structure” on page 19.
When you drag photos to export them, you aren’t given the opportunity to change their scale or image format.
You can also drag photos to other photo-related programs. This is not actually exporting, since the other program is working with the same file as iPhoto. Because of this, don’t drag files to image-editing programs and make changes, because iPhoto won’t be able to track those changes (see “Using an External Editor” on page 95). And definitely don’t delete photos from those other programs!
Unfortunately, you can’t drag an album to the Finder to create a new folder containing the album’s photos.
For many people, email is the preferred method of receiving photos from friends.
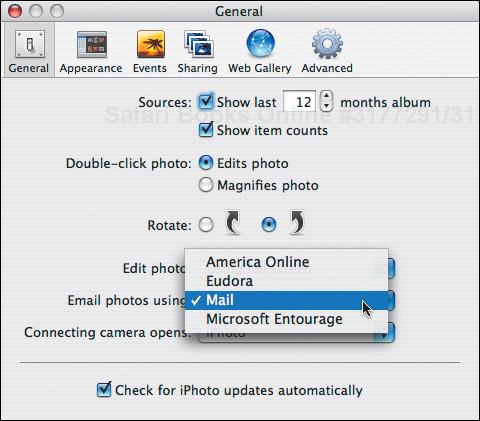
In the General pane of iPhoto’s Preferences window, choose your email program from the Email Photos Using pop-up menu (Figure 7.16).
iPhoto changes the Email button on the toolbar to match the icon of your email program.
Select the photos you want to send.
Choose Email from the Share menu, or click the Email button.
iPhoto displays a dialog with options for your photos (Figure 7.17).
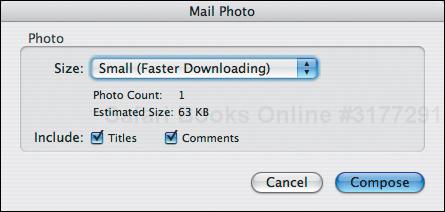
Choose the maximum size you want the photos to appear from the Size pop-up menu, and, if you want to include titles and comments (descriptions), select their checkboxes.
Click the Compose button.
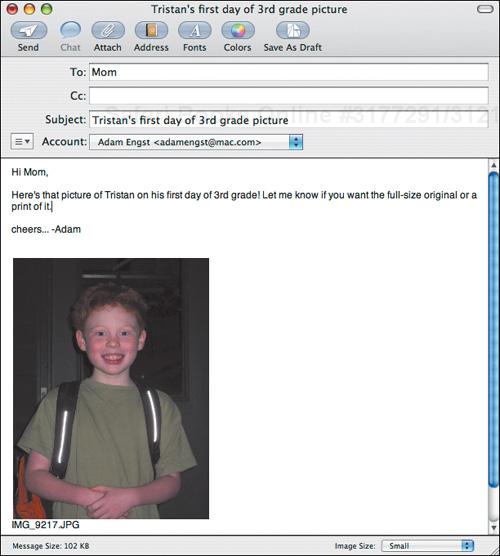
iPhoto exports the pictures (converting them to JPEG), creates a new message, and attaches the photos, which appear inline only in Apple’s Mail (Figure 7.18).
Email is fine for a few photos, but if you want to share a lot of photos, burning a CD or DVD to send to your recipient works better.
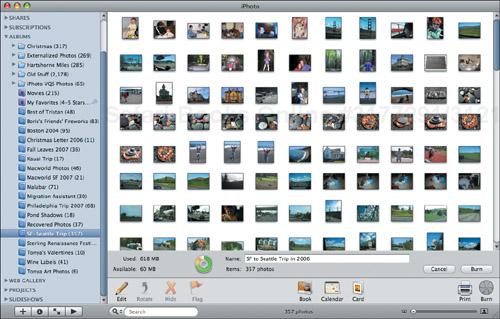
Select the items you want to burn, which is best done by selecting entire events, folders, albums, books, or slideshows (Figure 7.19).
From the Share menu, choose Burn (or click the toolbar’s Burn button), insert a blank disc if prompted, and click OK.
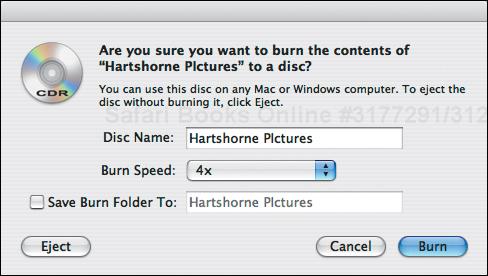
Below the display pane, iPhoto shows the name of the disc and information about how much data will be burned to the disc (Figure 7.20). The disc icon will be red if it can’t hold the selected photos.
Select fewer or more photos to use the space on your destination disc as desired.
Change the name of the disc if you want.
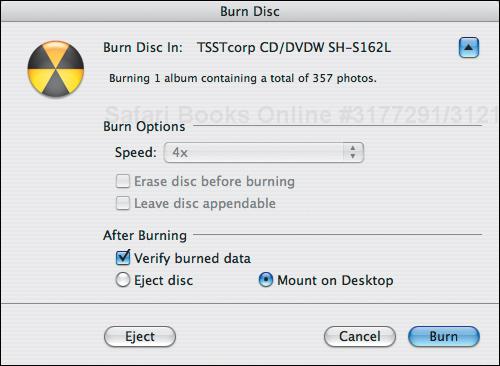
When everything looks right, click the Burn button (on the far-right side of Figure 7.20) to start the burn, and when iPhoto asks you to confirm one last time and lets you set additional burning options, click Burn (Figure 7.21).
iPhoto creates a disk image, copies the selected photos to it, and burns the disc.
Alas, not everyone uses a Mac, and not even all Mac users use iPhoto, and for these people using an iPhoto disc is difficult, since they must sort through the iPhoto Library folder’s directory structure to find the photos you’ve sent them. Follow these steps instead.
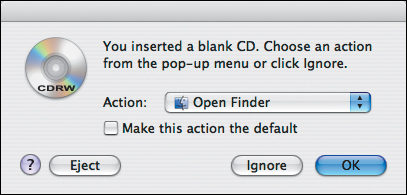
Insert a blank CD or DVD, choose Open Finder from the Action pop-up menu (Figure 7.22), and then give your disc a name like any other volume.
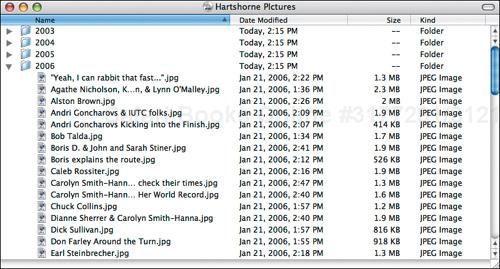
In iPhoto, select a group of photos you want to burn and export them to the just-inserted disc (see “Exporting Files” on page 166). If you wish, when saving the exported photos, click the New Folder button to create a new folder and store those photos in it.
Repeat step 2 until you’ve exported all the photos you wish to burn.
In the Finder, select the disc icon on the Desktop or in a Finder window’s sidebar, choose Burn Disc from the File menu, and verify the disc name and burn speed before clicking Burn (Figure 7.23).
The Finder proceeds to burn the disc (Figure 7.24).