
One of the best things, in my opinion, about digital photographs is that they come with their own organizational tags built in. We may not have cameras that can recognize specific people, but every modern digital camera records a great deal of information about when each picture was taken and its associated settings. For many people, including me, that information provides enough organizational power.
However, many people want to do more, and iPhoto provides a wide variety of tools for assigning keywords to your photos, collecting them in albums, and more. We’ll look at each of those capabilities in this chapter.
Of course, the only reason to organize photos at all is so you can find them quickly and easily later, and iPhoto also shines in that department, making it easy to scroll through your entire photo collection chronologically or home in on a specific set of photos with sophisticated yet simple searching tools. Want to find all the photos taken in June, July, and August of the last 5 years? Want to find all the photos whose titles or descriptions mention your mother? No problem. You can even make smart albums that constantly search your entire library for matching photos and present them in an album.
Let’s take a look.
If you’ve used previous versions of iPhoto, you’ll want to pay attention to the new features iPhoto 7 brings to organize mode.
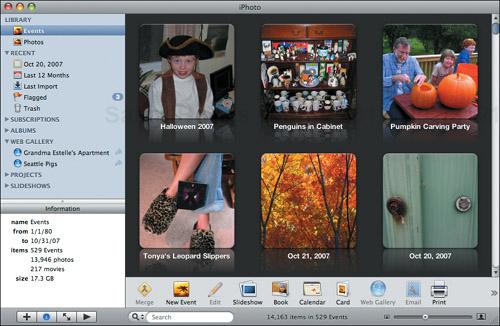
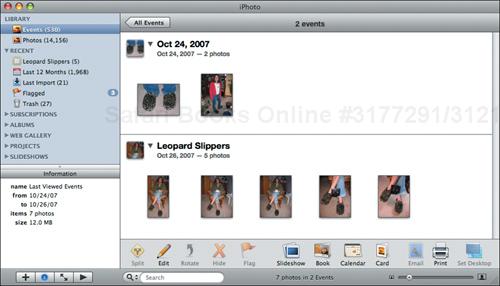
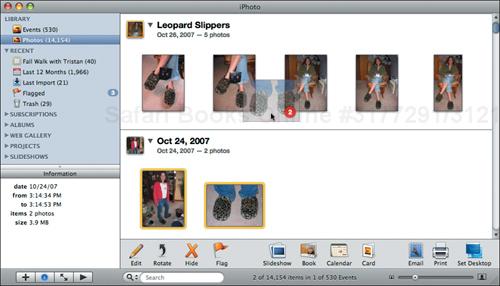
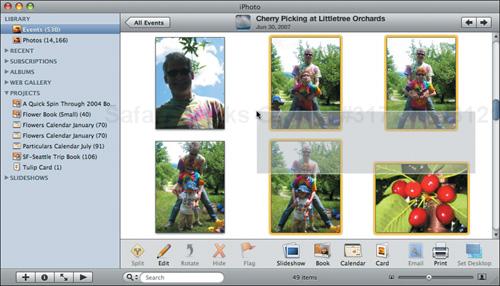
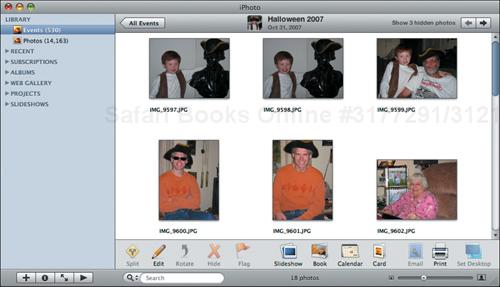
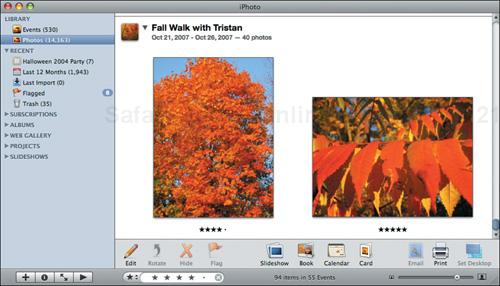
Film rolls have been replaced by events, and a new Event view shows a key photo (which you can change) from the set of pictures that make up the event (Figure 3.1). Technically speaking, there’s no real difference between events and film rolls, since you’ve been able to change the contents of a film roll for quite a number of iPhoto revisions now. But events provide a good overview of your photos.
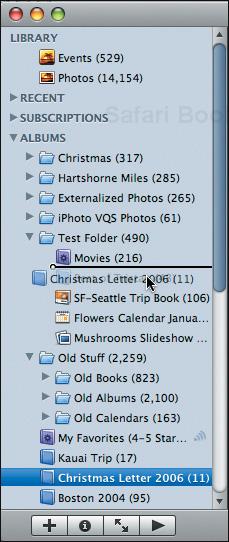
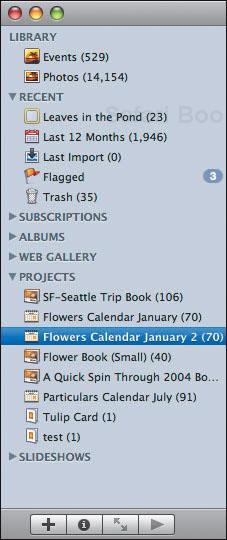
The Source pane on the left side of the iPhoto window now contains a number of categories—Library, Recent, Subscriptions, Devices, Albums, Web Gallery, Projects, and Slideshows, plus others on occasion—that can be opened and closed with expansion triangles.
Vanishing Events
Events are a little like smart albums in that they exist only as long as they have contents. If you remove all the photos from an event, or merge an event into another one, the event that no longer contains any photos simply disappears. You can also delete an event by selecting it in Events and pressing
 . Be very careful, since this sends the photos in that event to iPhoto’s Trash!
The interface for defining, assigning, and searching for keywords has changed completely, and for the better.
You can flag photos temporarily, and then work on all flagged photos in the Flagged album in the Recent category.
The Calendar pane is gone, and a new search interface brings together searching by text, date, keyword, and rating.
You can title photos and name events directly, rather than being forced to do so in the Info pane. Finally!
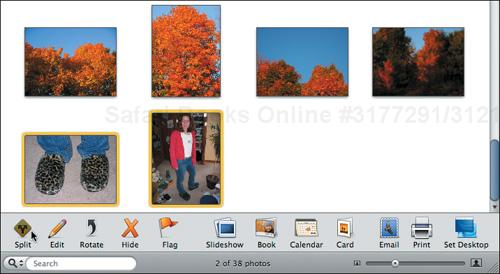
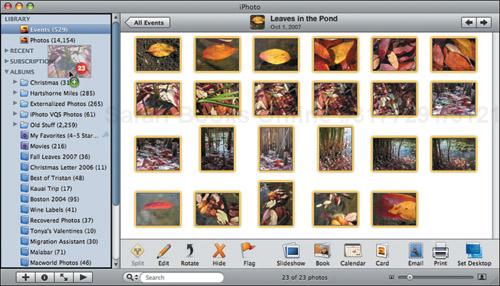
Here’s a quick reference to the controls available in organize mode (Figure 3.2). Note that this screenshot shows the Photos view, whereas Figure 3.1 shows the Events view.

You can always change the size of the thumbnails using the size slider, but there are also other things you can do to change the way the display pane looks.
Switch between Events view and Photos view by clicking them in the Source pane. Events is cooler, but Photos is more familiar for users of previous versions.
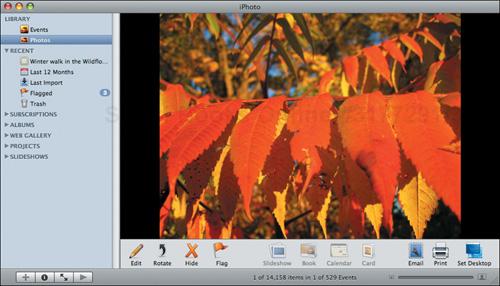
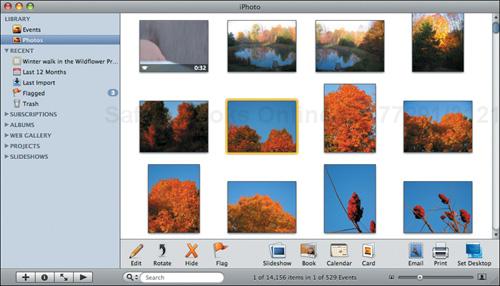
Move the size slider (or click in the desired location) to adjust the size of the thumbnails from a single large image (you can also just double-click the photo to magnify) (Figure 3.3) all the way down to as many photos as fit in the window at postage stamp size (Figure 3.4).
To show or hide titles, ratings, and keywords (Figure 3.5), choose the desired item from the View menu.
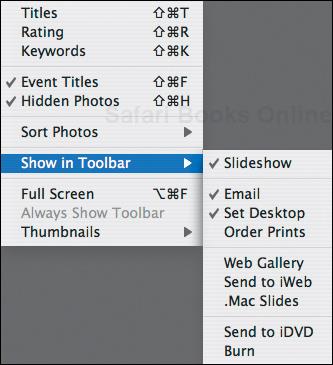
To add or remove sharing tools from the toolbar, choose the desired one from the Show in Toolbar submenu in the View menu (Figure 3.6).

✓ Tips
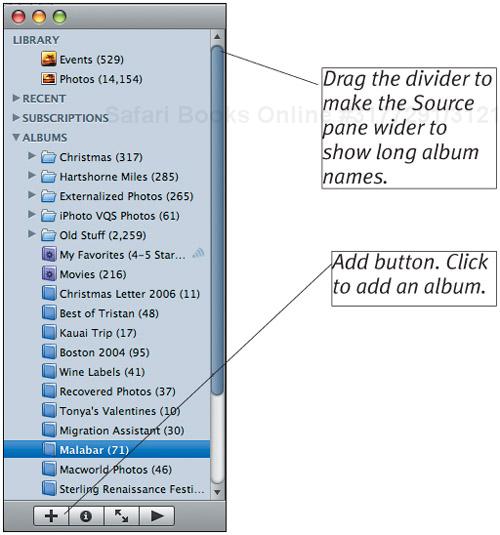
You can shrink the Source pane by dragging the line that divides it from the display pane to the left. Expand it by dragging back to the right.
Viewing titles in the display pane isn’t useful when you use smaller thumbnail sizes, but remember that the current photo’s title is in the Information pane.
Event titles help show where you are when in Photos view, so I recommend leaving them showing and giving them names.
 -click an event expansion triangle to hide or show all events.
You can also set options in iPhoto’s Preferences window that affect how the display pane looks.
From the iPhoto application menu, choose Preferences (![]() ) to open the Preferences window; you can find display preferences in the General, Appearance, and Events panes (Figure 3.7 through Figure 3.9).
) to open the Preferences window; you can find display preferences in the General, Appearance, and Events panes (Figure 3.7 through Figure 3.9).
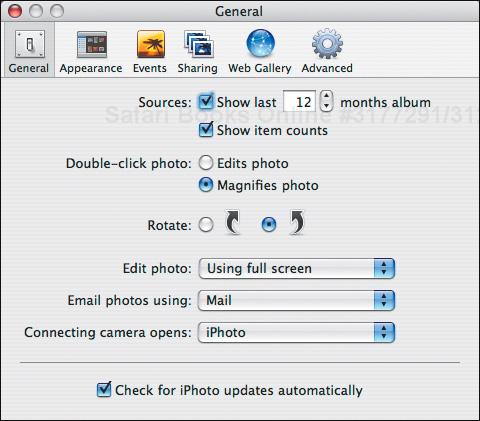
In the General preference pane, use the Sources controls to choose if the Last Months album appears and how many months it contains.
Select Show Item Counts to append the number of photos in each source item to its name in the Source pane.
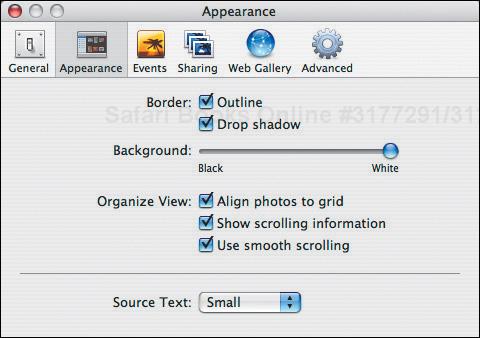
In the Appearance pane, select Outline and/or Drop Shadow border styles, and use the Background slider to change the darkness of the background.
To align all your photos to a regular grid in which the width of the widest picture sets the width for all photos, check the Align Photos to Grid checkbox.
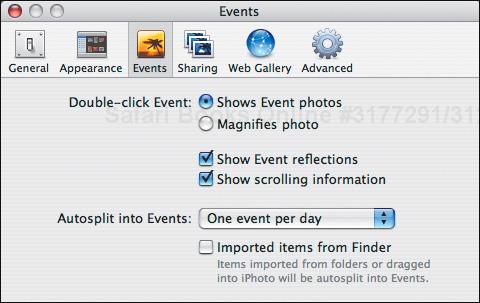
Use the Show Scrolling Information checkbox to toggle whether the translucent information pop-up appears when scrolling. In Appearance, it affects the Photos view; in Events, Event view.
The Use Smooth Scrolling option makes scrolling via the Page Up and Page Down keys smoother.
For a more spartan look, turn off event reflections in the Events preference pane.
Set what happens when you double-click an image in the General preference pane and what happens when you double-click an event in the Events pane.
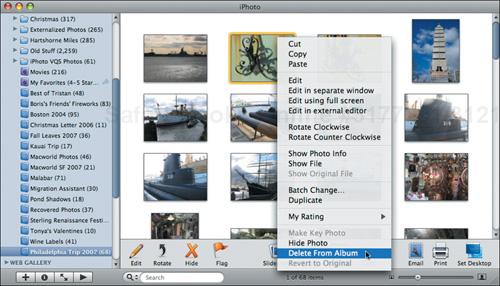
Although iPhoto does a good job of making most of what you can do visible in the interface, you can also ![]() -click (or, if you have a two-button mouse, right-click) a photo to bring up a contextual menu that lets you perform a number of actions directly on the photo you clicked (Figure 3.10).
-click (or, if you have a two-button mouse, right-click) a photo to bring up a contextual menu that lets you perform a number of actions directly on the photo you clicked (Figure 3.10).
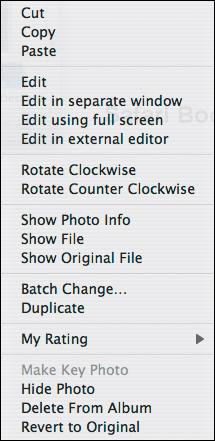
You can cut, copy, or paste photos, for use both inside iPhoto and in other applications. Cutting a photo removes it from the current album and pasting a photo adds it to the current album (neither is true of smart albums).
The Edit commands are particularly useful for opening photos in alternative ways without switching iPhoto’s preferences.
Show File and Show Original File switch you to the Finder. Show File selects the original file if no changes have been made; if there have been changes made, it selects the edited version. And if changes have been made, Show Original File selects the original. Yeah, it’s confusing.
The rest of the commands—Rotate, Show Photo Info, Batch Change, Duplicate, My Rating, Make Key Photo, Hide Photo, Delete from Album, and Revert to Original—are like those in iPhoto’s Photos and Events menus, but using the contextual menu to apply them may feel more intuitive.
Obviously, you can move around in iPhoto by scrolling, but knowing a few tricks and techniques can make navigating through your photos easier.
Click or drag in the scroll bar, just as you would in any other Mac application.
- -click the scroll bar to jump to the particular spot you clicked.
Click a photo to make sure the display pane is active; then use the arrow keys to move around.
With the display pane active, use
 and
and  to scroll through your photos one screen at a time.
With the display pane active, use
 and
and  to move to the top and bottom of the current album.
✓ Tips
The
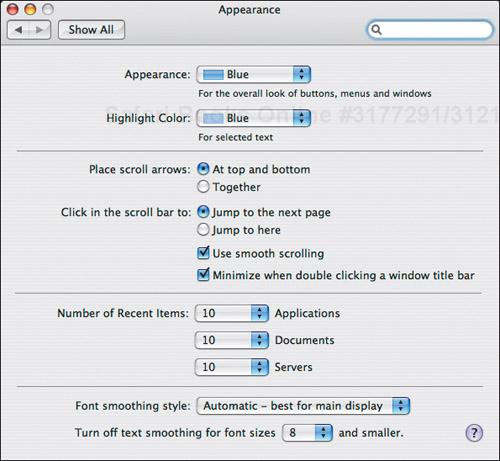
-clicking (Jump to Here) behavior applies to Mac OS × in general, and you can make it the default clicking behavior by selecting the Jump to Here radio button in Mac OS X’s Appearance preference pane (Figure 3.11). I find the Jump to Here setting disconcerting, since it’s counter to the way I’ve used scroll bars on the Mac forever.If you’re having trouble scrolling to a desired location, it might help to reduce the thumbnail size so you can see many more thumbnails on the screen at once.
Hold down
when scrolling to scroll smoothly. This feature may not help many people, but it made arranging the iPhoto window (to take nicely aligned screen shots) a lot easier for me while I was writing this book.
Events may be similar to film rolls from earlier versions of iPhoto, but Apple has built additional features around them.
Wherever you see an event title (in Events view, in Photos view, or in the Information pane), double-click it to edit, and type the new name (Figure 3.12).

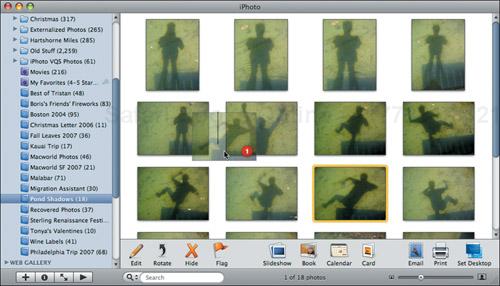
In Events view, move the mouse pointer horizontally over the key photo to view all the photos in the event. This is called scrubbing, and it’s wildly cool.
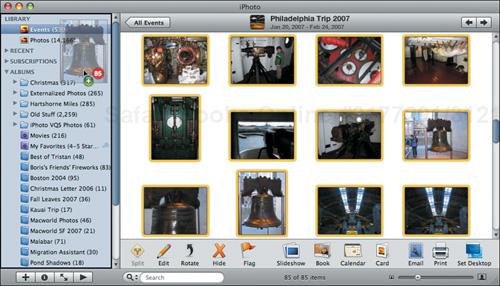
In Events view, double-click an event, or select several events and double-click one of them (Figure 3.13). To return to Events view, click the All Events button or double-click on any white space.
When viewing the photos in an event, click the arrows at the top of the window (you can see them in Figure 3.15) to move to the previous and next events.
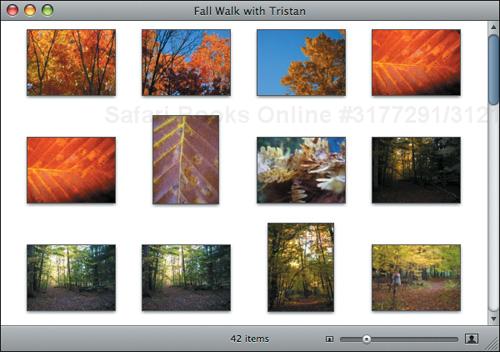
In Events view, select an event and choose Open Event in Separate Window from the Events window, or
 -click it and choose the same command from the contextual menu to open a new window showing just the photos in that event (Figure 3.14).
In Events view, scrub over the photos until the desired one is showing,
-click it, and choose Make Key Photo.When viewing the photos in an event, select one and choose Make Key Photo from the Events menu,
-click it and choose Make Key Photo, or drag it to the key photo well (Figure 3.15).
It’s all too easy to end up with photos that aren’t in the right events. You can split events apart, merge events together, and move photos from one event into another.
When you’re importing new photos, check Autosplit Events After Importing.
In Events view, select one or more events and choose Autosplit Selected Events from the Events menu.
When viewing an event’s photos, select one or more photos and click the Split button (Figure 3.16) or choose either Split Event or Create Event from the Events menu.
In Events view, drag one event into another event (Figure 3.17).
Select two or more events in Events view, double-click them to view their photos together, select one event, and either drag it to another event, click the Merge button, or choose Merge With Below/Above from the Events menu.

In Photos view, drag photos from one event into another event (Figure 3.18).
Select two or more events in Events view, double-click them to view their photos together, and then drag one or more photos from one event to another.
In one event, select one or more photos, cut them by choosing Cut from the Edit menu (
 ), switch to another event, and paste them by choosing Paste from the Edit menu (
 ).
).
iPhoto provides folders into which you can organize multiple albums, along with books, cards, calendars, saved slideshows, and even other folders. Folders are a great way to tuck away older items you don’t want to see all the time.
Drag one or more items (albums, books, saved slideshows, etc.) into or out of the folder.
iPhoto moves the items, giving the folder an expansion triangle if necessary so you can open and close it (Figure 3.19).
Select one or more folders and press
 , or -click a folder and choose Delete Folder from the contextual menu that appears.
iPhoto prompts you to make sure you know what you’re doing; click Delete to delete the folder and all its contents.
Select one or more folders and press
 to delete them and their contents (albums, slideshows, books, etc. but not the associated photos) without being prompted for confirmation.
iPhoto provides albums to help us categorize photos—these were from the Fiji trip, those were from Joe’s birthday party, and so on. Albums are also useful starting points for saved slideshows, books, and calendars.
Click the Add button (+) at the bottom of the Source pane (Figure 3.20) or choose New Album (
 ) from the File menu.
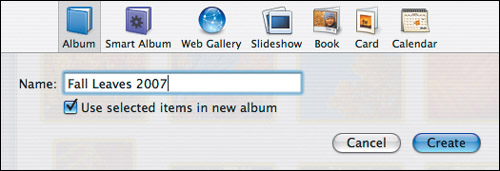
iPhoto displays a dialog asking what type of item you want to create, if you want to add the selected photos to it, and what you want to call it (Figure 3.21).
Choose Album from the item icon list, enter a name, and click Create to add it to the Source pane.
Select some photos, and then follow the steps above or just choose New Album from Selection (
 ) from the File menu.
Drag one or more photos, or an entire event, into the Source pane, onto the Albums list title (Figure 3.22).
Drag one or more photos, or a folder of photos from the Finder into the Source pane, onto the Albums list title.
✓ Tip
Use albums for categories of pictures that appear once in your photo collection. Use keywords for categories that recur throughout your collection. Albums work well for a specific trip’s photos; keywords work better for identifying pictures of your family members, landscapes, or recurring events.
You may find yourself adding photos to an album over and over again. There’s a better way: smart albums. Unlike normal albums, which you must maintain manually, smart albums use a set of rules that you create to maintain their contents automatically.
Click the Add button (+) below the Source pane, select Smart Album from the item icon list, and click Create. Better yet, either
-click the Add button or choose New Smart Album ( ) from the File menu.
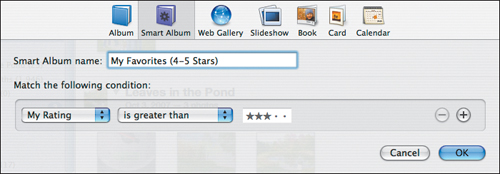
iPhoto displays a dialog for you to name and configure your album (Figure 3.23).
From the first pop-up menu, choose a criterion that photos must match to be included (Figure 3.24).
From the second pop-up menu, choose how that criterion should be evaluated (Figure 3.25).
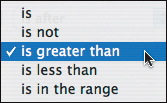
Figure 3.25. Once you’ve chosen a criterion, you must determine how it should be evaluated. The second pop-up menu changes dynamically to match the selected criterion. Here, since I’m matching on rating, and because I’d like the smart album to find only photos with 4 or 5 stars, I’ve chosen Is Greater Than.
Enter a condition against which the criterion is to be evaluated (Figure 3.26).
If you want your smart album to have multiple criteria, click the + button and repeat steps 3–5.
When you’re done, click the OK button.
iPhoto looks at all your photos and adds those that match to the smart album.

It may be hard to think about the types of smart albums you can create, so use these ideas to get started.
By matching on ratings, you can easily create a Favorites smart album that contains just your top-rated photos.
iPhoto 7 adds the Event and Photo criteria. With Event, you can make a smart album that contains photos from the last × events, or photos from events with specific text in their names. With the Photo criterion, you can select specific kinds of photos, including those that are flagged, hidden, or edited, and those that are actually movies or in RAW format.
With the Camera Model criterion, it’s easy to create a smart album that contains photos taken by cameras other than yours—in other words, photos that were taken by other people and sent to you. Of course, this doesn’t work if one of your friends or family uses the same camera as you do.
To create an album that contains all the photos of a certain person, use the Any Text criterion matching that person’s name. It won’t be perfect, but if you give your photos titles or descriptions, it’s a good start.
✓ Tips
You can’t remove photos from a smart album manually; the only way to take them out is to change either the photo or the criteria so they no longer match.
The fact that you can now find photos that have been edited could be very useful if you were ever exporting all your photos from iPhoto to another program.
Anything you can create in the Source pane—be it an album, smart album, book, card, slideshow, calendar, or folder—you can duplicate. Duplicating isn’t something you’ll use every day, but it can be useful.
- -click an item in the Source pane and choose Duplicate from the contextual menu that appears (Figure 3.27).
Select an item in the Source pane, and then choose Duplicate from the Photos menu (
 ).
).iPhoto duplicates the album, appending “2” to its name (Figure 3.28).

If you’re making picture books for two sets of grandparents, for instance, you might want to use a very similar set of photos with different text. Lay out one book, then duplicate it to eliminate the effort of arranging photos again.
If you want make differently themed books or calendars with the same set of images, create one, then duplicate it and change the theme of the duplicate.
If you’ve put quite a lot of work into a book, calendar, or slideshow, and you want to try something without potentially messing up your work, make a duplicate first.
If you’ve constructed a complex smart album and want to make another that’s only slightly different, duplicating the first one and modifying the duplicate is easier than making a new one.
You’ll undoubtedly want to rename everything in the Source pane to give the items descriptive names. Plus, since iPhoto initially lists sources in the order you created them, you’ll probably want to move them around in the list.
Double-click the source’s name, and then edit the name (Figure 3.29).
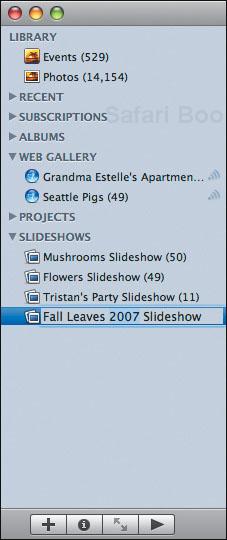
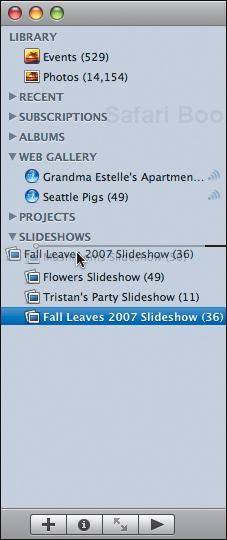
Drag a source to the desired location in the list. Note the black bar that indicates where the item will appear when you drop it (Figure 3.30).
- -click any item in the Source pane and choose Sort Albums from the contextual menu that appears.
iPhoto alphabetizes all the items in the Source pane, other than folders and their contents. It’s a little wacky.
✓ Tips
Names no longer must be unique (but it’s a good idea to avoid replicating them).
Each type of source—folders, albums, smart albums, books, cards, calendars, and saved slideshows—sorts together (both in the Source pane and inside folders), and you can rearrange items only within each type.
You can use iPhoto’s spelling tools while editing names and descriptions. For details, see “Checking Spelling as You Type” on page 155.
You can
 -click or
  -click to select and move multiple sources at once.
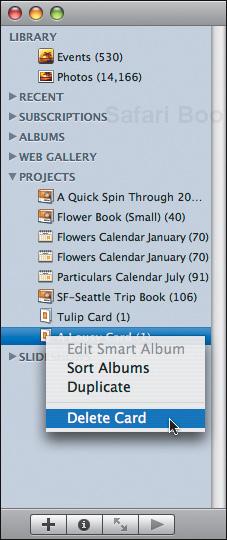
It’s easy to create items in the Source pane, and luckily, if you decide you don’t want one cluttering your list, they’re even easier to delete.
Select one or more items and press
.iPhoto prompts you to make sure you know what you’re doing; click Delete to delete the source (Figure 3.31).
- -click an album and choose Delete Album from the contextual menu that appears (Figure 3.32).
iPhoto prompts you to make sure you know what you’re doing; click Delete to delete the album (Figure 3.31).
Select one or more items and press
.iPhoto deletes the items instantly, without asking for confirmation.

✓ Tips
You can’t Undo the act of deleting something from the Source pane.
Deleting an album (or anything else in the Source pane) doesn’t affect the original photos in your library since the album merely contains pointers to the originals.
Deleting a folder also deletes all the albums, slideshows, books, etc. (but not their photos) inside it. Be careful!
Don’t feel that albums must be created carefully and then kept forever. It’s totally reasonable to group a bunch of photos in an album, work on them for a little while, and then delete the album.
On the other hand, if you think you might want to use an item again, store it away inside a folder for future reference.
Throughout the rest of this chapter, I tell you to select photos before performing some task. I’m sure you have figured out the basic ways of selecting and deselecting images, but some others aren’t so obvious.
Click a photo to select it.
Click one photo to select it, hold down
, and then click another photo to select it and all the intervening pictures.Click one photo to select it, hold down
, and then click additional photos to add them to the selection individually.Click in an empty area of the display pane, then drag a selection rectangle over the photos you want to select (Figure 3.33). If you drag to the top or bottom of the display pane, iPhoto scrolls the pane and keeps selecting additional images.
With the display pane active, choose Select All (
 ) from the Edit menu to select all the images in the current album.
In Photos view, use the View menu to make sure event titles are showing, and then click an event title to select all the images in that event.
To deselect one of several selected images,
-click it.To deselect all photos, click in the empty area surrounding the photos or choose Select None from the Edit menu (
 ).
).
Select Multiple Albums
Don’t assume you must work with only the photos in a single album at a time. You can select multiple albums at once by ![]() - or
- or ![]() -clicking album names, and when you do that, the photos from all the selected albums show in the display pane.
-clicking album names, and when you do that, the photos from all the selected albums show in the display pane.
Similarly, if you select a folder, the display pane shows all the photos in all the items inside that folder.
Even after you’ve made an album, book, calendar, Web gallery, or saved slideshow, you can add photos to it (remember that smart albums populate themselves).
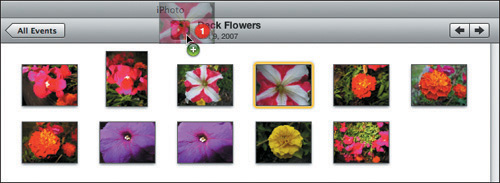
Select one or more photos in the display pane and drag them onto a source other than a folder, which can hold only other sources. Note the thick black border that appears when you drag over a source (Figure 3.34).
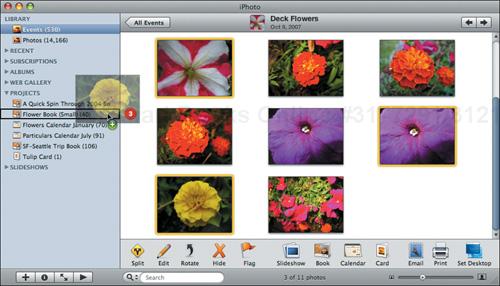
Figure 3.34. To add photos to a source, select them and drag them onto the desired source in the Source pane. Note how the destination source gets a thick black border and how the pointer changes from a plain arrow to one with a + badge. iPhoto also tells you, via a number in a red circle, how many images you’re dragging.
From the Finder, drag one or more photos, or an entire folder of photos, to a source. iPhoto imports the photos and then adds them to the source. Note that the photos will appear in the library also, not just in the source.
Drag photos from the display pane into the Source pane, but not onto a specific source (the easiest drop location is the Albums list title). This technique creates a new album and adds the images to it (Figure 3.35).
Select photos, choose Copy (
 ) from the Edit menu, click the desired destination album, and choose Paste () from the Edit menu.
- -click one or more selected photos, choose Copy from the contextual menu that appears, switch to the desired album, -click a blank spot in the display pane, and choose Paste from the contextual menu. It’s the same idea as the previous method.
✓ Tip
You can add a photo to a source only once. To put a photo in a source twice, you must duplicate it—see “Duplicating Photos” on page 71.
As you work with a source, you may decide that you don’t want some of the images in the source. Luckily, they’re easy to remove.
Making sure you’re in the desired source, select the photos you want to remove and press
.Select the photos you want to remove, and choose Delete from Album from the Photos menu (
) or, for albums only, Cut () from the Edit menu.Drag the photos you want to remove to the Trash album.
For albums only,
-click one or more selected photos, and then choose Cut or Delete from Album from the contextual menu (Figure 3.36).To remove a photo from a smart album you must either redefine the smart album or change the photo’s information such that the photo no longer matches the smart album’s criteria.
✓ Tips
Removing a photo from an album, book, card, calendar, or saved slideshow doesn’t delete it from your library.
iPhoto doesn’t ask for confirmation when you remove photos from a source; if you make a mistake, either choose Undo from the Edit menu (
 ) or add them again.
Dragging a photo to the Trash album from another album merely removes the photo from that album; it does not delete it from your library, nor does it copy the photo to the Trash album.
iPhoto can perform five sorts, or you can move images around manually, which is useful for arranging photos in albums you can use for books, calendars, and slideshows.
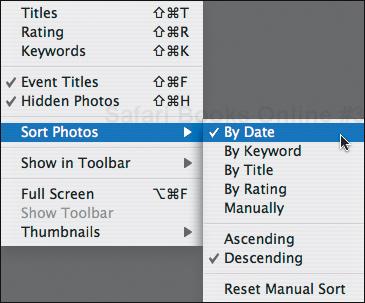
When in any album, choose the desired sort method from the View menu’s Sort Photos submenu (Figure 3.37).
From the Sort Photos submenu, choose either Ascending or Descending to control the direction of the sort (ascending sorts go from oldest to newest, A to Z, 1 to 9, whereas descending sorts go from newest to oldest, Z to A, 9 to 1).
Drag one or more photos to the desired location in the album, as marked by a black line (Figure 3.38).
To make iPhoto forget your manual changes, switch to an automatic sort and then choose Reset Manual Sort.
✓ Tips
Albums maintain individual sort settings.
iPhoto remembers how you’ve sorted photos manually even if you switch to another sort order and back to Manually.
You can’t sort photos manually in smart albums, in the Events and Photos views, or in the automatically generated albums like Last Import and Last 12 Months.
When you’re viewing Events, the Sort Photos submenu changes to Sort Events and lets you sort events the same ways you sort individual photos.
Digital cameras assign sequential numeric names to photos, but iPhoto lets you add your own descriptive titles. Smart albums can look for text in titles, and iPhoto can use the titles when you design books or publish to the Web.
Make sure titles are showing (choose Titles from the View menu;
 ), and then anywhere you see a title, double-click it and enter the new title (Figure 3.39).
Make sure the Information pane is showing, and then select a photo and enter a title for it in the Title field.

Select a number of photos, and choose Batch Change (
 ) from either the Photos menu or by -clicking the photos.
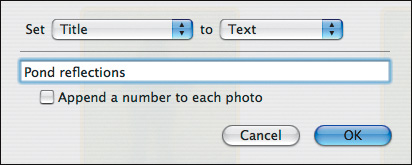
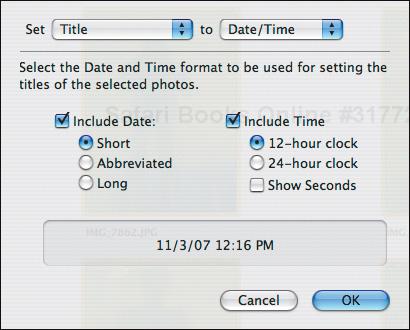
In the dialog that appears, choose Title from the Set pop-up menu, and then choose Empty, Text, Roll Info, Filename, or Date/Time from the To pop-up menu (Figure 3.40).
If you chose Text or Date/Time, select the desired options in the dialog (Figures 3.40 and 3.41).
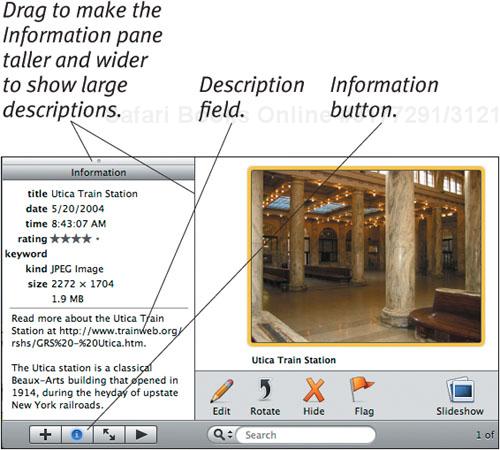
It’s often helpful to describe a photo briefly so you remember the original scene better. That’s one good use for iPhoto’s descriptions, and iPhoto also uses descriptions as text in some of the book designs.
Make sure the Information pane is showing, and then select a photo and type your description in the Descriptions field (Figure 3.42).
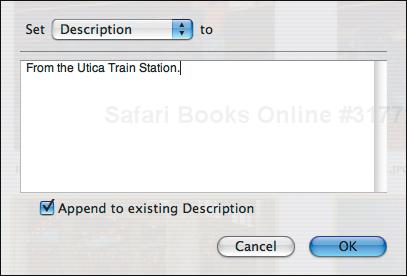
Select a number of photos, and choose Batch Change (
) from either the Photos menu or by -clicking the photos.In the dialog that appears, choose Descriptions from the Set pop-up menu, and then enter the description to attach to each photo (Figure 3.43).
If you want to append your text to each description, instead of replacing what’s there, select Append to Existing Descriptions and click OK.
iPhoto changes the descriptions.
✓ Tips
Like titles, descriptions stick to their photos no matter which mode you’re in.
You can use iPhoto’s spelling tools in the Descriptions field. For more details, see “Checking Spelling as You Type” on page 155.
Resize the Descriptions field by dragging the size handle at the top of the Information pane and the thin line at the right edge of the Source pane.
✓ More Tips
Expanding the Information pane is the only way to see more of the Descriptions field. iPhoto doesn’t provide a scroll bar, but you can drag or use the arrow keys to scroll through too-long descriptions.
The Descriptions field can hold a very large amount of text. If you need long descriptions, create them in another application and paste them into iPhoto.
You can edit photo dates in iPhoto to correct problems caused by your camera losing track of the correct date and time. Note that Batch Change sets each photo’s date, whereas Adjust Date and Time adjusts each photo’s date in relation to how you set the first one.
Make sure the Information pane is showing, and then select a photo and edit its Date and/or Time fields.
Select a number of photos, and choose Batch Change (
) from either the Photos menu or by -clicking the photos.In the dialog that appears, choose Date from the Set pop-up menu, and then use the controls to set the date and time to attach to each photo, and the amount of increment time (Figure 3.44).
iPhoto changes the dates appropriately.

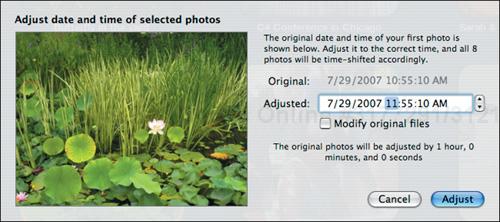
Select an event or a number of photos, and choose Adjust Date and Time from the Photos menu.
In the dialog that appears, use the controls to set the new date and/or time for the first photo (Figure 3.45).
iPhoto calculates the offset between the old and new dates for the first photo and adjusts the dates for all the other photos accordingly.
✓ Tip
Use the Modify Original Files checkbox to ensure that your changes are saved in the EXIF data for each photo file as well, rather than just being stored in iPhoto.
✓ More Tips
Modify Original Files always changes the file dates in the Finder to the current date, not the date you set.
If iPhoto is set to arrange photos by date, changing a photo’s date causes it to be re-sorted according to the new date and it may move to an unexpected place.
In the Batch Change dialog, you can type numbers into the date and time fields, use the arrow keys to move the values up and down, or click the up/down arrow controls to adjust the selected number.
When using Batch Change to modify a number of photos with a time increment, note that iPhoto changes them in the order (left to right, top to bottom) that they’re currently arranged.
It’s a good idea to use the time increment with Batch Change so you can be sure how photos will sort by date later on.
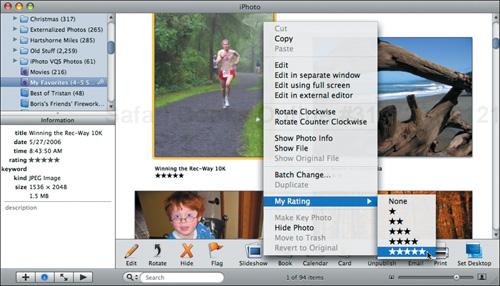
Just as with iTunes, where you can rate your favorite songs on a scale of 1 to 5 stars, you can rate your photos, which is a great way to identify your favorites easily.
With ratings showing (choose Rating from the View menu;
 ), click the appropriate star button in the rating field under a photo (Figure 3.46).
Select one or more photos, and from the My Rating submenu in the Photos menu, choose the desired rating. Note the
 through
  keyboard shortcuts—if you’re ever going to use keyboard shortcuts, now is the time.
Select one or more photos,
-click one of the selected photos, and choose the desired rating from the My Rating submenu (Figure 3.47).With a photo selected, click the appropriate star button in the Information pane.
With the slideshow controls turned on, click the star buttons to assign ratings while the slideshow runs.
After you choose a rating, iPhoto applies it to the selected photos, displaying it below each photo if you have Rating turned on in the View menu.

✓ Tips
The keyboard shortcuts for rating photos are available at all times, even when you’re playing a slideshow!
You can change the rating for a photo at any time; it’s by no means set in stone.
iPhoto considers 5 stars better than 1 star, although there’s nothing stopping you from assuming the reverse.
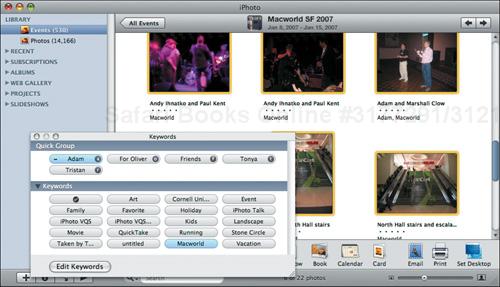
Apple created a completely new—and much better—interface to keywords in iPhoto 7. Before going further, when you’re viewing photos (as opposed to events), make sure keywords are showing by choosing Keywords from the View menu (![]() ). Also, open the Keywords window by choosing Show Keywords (
). Also, open the Keywords window by choosing Show Keywords (![]() ) from the Window menu. Then click the Edit Keywords button.
) from the Window menu. Then click the Edit Keywords button.
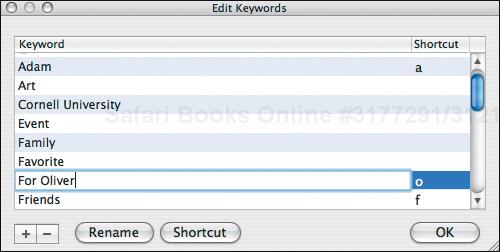
In the Edit Keywords window, either double-click a keyword or select it and click Rename, type the new name, and press
 (Figure 3.48).
The new keyword interface in iPhoto 7 makes assigning and removing keywords far easier than in the past.
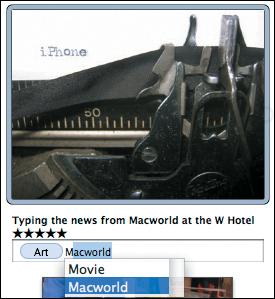
Click in the Keywords field under any photo, and type the first few letters of the keyword. iPhoto auto-completes the rest of the keyword (Figure 3.49). Press
 or to enter another keyword.
Select one or more photos, and either click a keyword in the Keywords window or press a keyword’s single-letter shortcut key.
Click a keyword in the Keywords field under a photo, and press
.With photos containing a particular keyword selected, switch to the Keywords window and click the desired keyword (which should be highlighted) to remove it from the selected photos (Figure 3.50).
✓ Tips
The single-letter shortcuts are really great! I encourage you to use them.
If you press
 after entering a keyword, iPhoto automatically jumps to the Keywords field of the next photo.
If your cursor is in the Keywords field, you must press
twice, once to select the keyword and again to delete it.Be careful when selecting photos and keywords to avoid assigning the wrong keywords to the wrong photos. You can always choose Undo (
) from the Edit menu if you make a mistake.
New in iPhoto 7 is the capability to hide photos that you don’t want to see when working, but which are worth keeping overall.
Select a photo and click the Hide button, choose Hide Photo from the Photos menu (
 ), or -click the photo and choose Hide Photo.
iPhoto puts an orange × by the upper-right corner of the selected photo's thumbnail (Figure 3.51) and, if Hidden Photos is deselected in the View menu (
 ), makes the photo disappear.
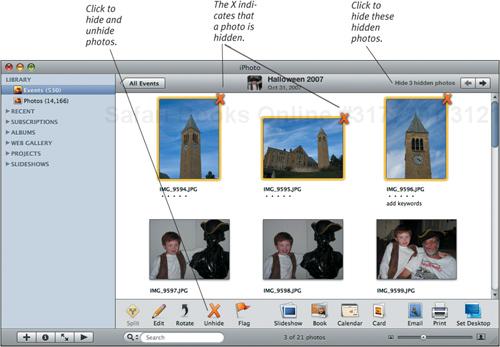
From the View menu, choose Hidden Photos (
). When Hidden Photos is selected, hidden photos are visible, though marked with an X. When it is deselected, hidden photos don’t appear.When the display pane is showing an event that contains hidden photos, click the Show Hidden Photos text that appears in the upper-right corner of iPhoto’s window (Figure 3.52) or in the event title’s line in Photos view.
That text changes to Hide Hidden Photos when they’re showing (Figure 3.51); click it again to make those photos disappear from view.
New in iPhoto 7 is the capability to flag photos that you want to work with temporarily. Flagging is much like using the checkmark keyword, but iPhoto provides a few specific features for flagged photos.
Select a photo and click the Flag button on the toolbar or choose Flag Photo from the Photos menu (
 ).
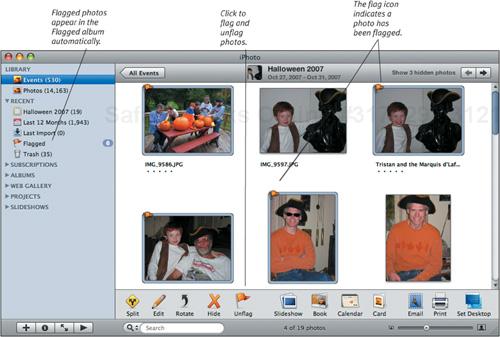
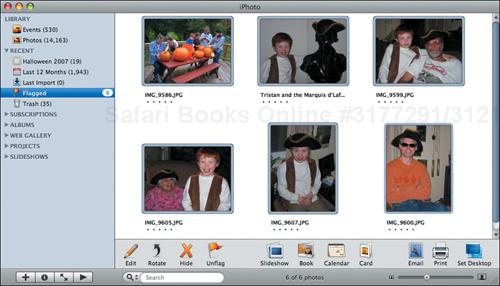
).iPhoto puts an orange flag icon by the upper-left corner of the selected photo's thumbnail (Figure 3.53), and the photo appears in the Flagged album in the Recent list (Figure 3.54).
Select a flagged photo and click the Unflag button or choose Unflag Photo from the Photos menu (
).iPhoto removes the orange flag icon from the photo's thumbnail, and the photo disappears from the Flagged album.
✓ Tips
You can make a new event from the flagged photos. Choose Create Event From Flagged Photos from the Events menu. This removes the photos from their current event and creates a new one.
You can also add flagged photos to another event, which could be an easy way to merge photos from widely separated events. Select the event you want to contain the photos and choose Add Flagged Photos To Selected Event from the Events menu.
For those of us who remember
as the universal “stop everything” keyboard shortcut from ancient versions of the Mac OS, having it assigned to Flag Photo feels very odd.
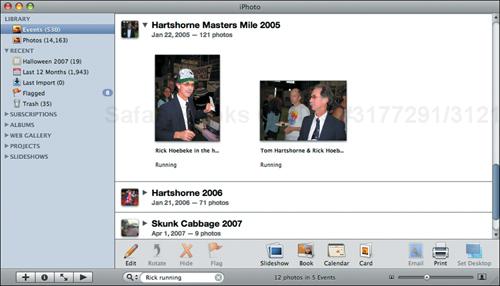
For quick searches, use the Search field that’s always showing at the bottom of the window in organize mode. The Search field finds matches in photo titles, descriptions, keywords, and event titles. It tends not to be as granular as a keyword search (searching for “Jen” finds not only pictures of my sister, but also pictures she sent me, and pictures of a high school friend named Jennifer).
Type one or more words into the Search field.
iPhoto displays all those photos that in some way are associated with all the words you typed (Figure 3.55).
✓ Tips
The way to clear a search and show all photos applies to each of the specific searches discussed next, too.
Searches take place in the current event, current album, or the currently selected set of photos. This can cause confusion, since a search you’re sure will work will fail if the wrong photos are selected.
Searches are not case-sensitive.
As you type more words, your search becomes ever more narrow.
iPhoto is happy to search for word fragments, so when I search for “Rick”, iPhoto also finds pictures of “Jim Derick.”
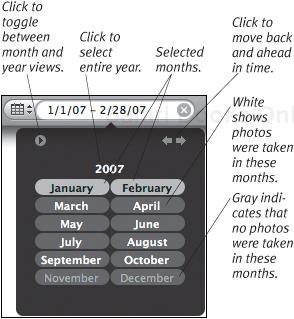
iPhoto 7’s search-by-date feature makes it easy to display just photos within certain date ranges. The tasks explained below take place in the Date pop-up; to open it, click the Search field’s magnifying glass, which is actually a pop-up menu, and choose Date.
To switch to year view, click the view triangle so it points right (Figure 3.56).
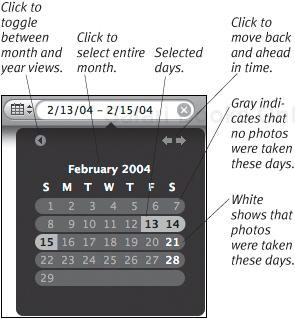
To switch to month view, click the view triangle so it points left (Figure 3.57).
To display earlier or later months or years, click the left or right arrows.
Select the days or months corresponding to the time period in which you want to find photos. You can
-click or -click to select multiple contiguous or noncontiguous dates.Click a month or year heading to select all the days or months within.
✓ Tips
Searches take place in the current event, current album, or the currently selected set of photos.
Pay attention to whether a month or day is bright white or light gray. White dates contain photos; gray dates do not.
The Date pop-up disappears if you move the pointer out of it. To bring it back, click anywhere in the Search field.
Although the selected dates appear in the Search field, you can’t type dates there.
If you’ve assigned keywords to your photos, they can make it easy to find the photos associated with certain keywords.
In the Search field, open the Keyword pop-up by clicking the magnifying glass, which is actually a pop-up menu, and choosing Keyword.
iPhoto displays all those photos that have all the selected keywords (Figure 3.58). The more keywords you select, the narrower your search becomes, and the fewer photos will match.
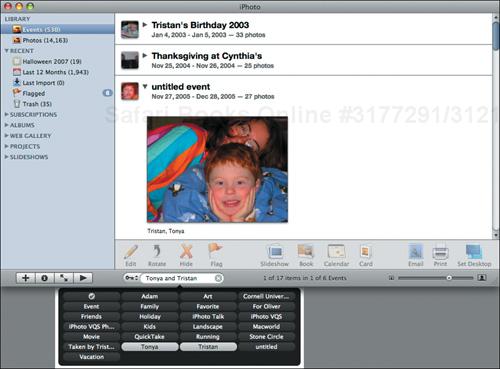
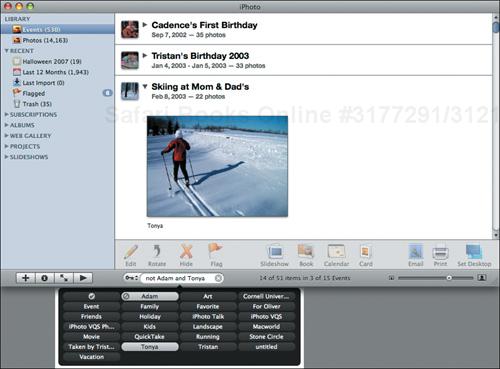
In step 2 above, instead of just clicking keywords,
-click one or more keywords whose associated photos you want to avoid finding.iPhoto removes from the set of found photos those with the
-clicked keyword(s) (Figure 3.59).
✓ Tips
Although the selected keywords appear in the Search field, you can’t type search phrases there.
There is no longer any way to perform an “any” search, which would, for instance, find both those photos with the “Tonya” keyword and those photos with the “Tristan” keyword, even if a given photo had only one of those two keywords.
Searches take place in the current event, current album, or the currently selected set of photos.
You can also search for photos with specific ratings, much as you search for dates and keywords.
In the Search field, click the magnifying glass, which is actually a pop-up menu, and choose Rating.
Click the star corresponding to at least the rating of photos you wish to find.
iPhoto displays all those photos that have the selected rating or a higher rating (Figure 3.60).
✓ Tips
You may find iPhoto’s approach of finding photos with at least the selected rating confusing. This means that when you click one star, you’re actually finding photos with 1, 2, 3, 4, or 5 stars. If you click 3 stars, you’re finding photos with 3, 4, or 5 stars. And if you click 5 stars, you’re finding only those photos with 5 stars, since there’s nothing higher (Figure 3.61). If this bothers you, work around it by creating smart albums that find exactly the number of stars you want.
Searches take place in the current event, current album, or the currently selected set of photos.

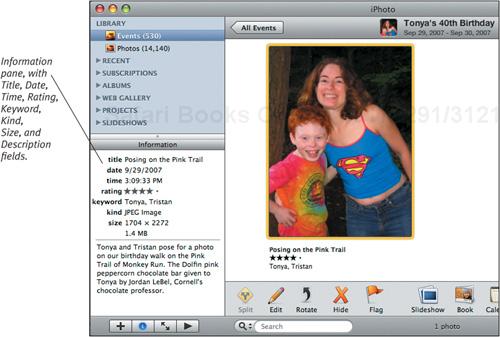
iPhoto presents information about photos in two places: the Information pane and the Photo Info window.
If the Information pane is hidden, click the Information button underneath the Source pane to display the Information pane (Figure 3.62).
Select a photo and choose Show Photo Info from the Photos menu (
 ).
).iPhoto displays the Photo Info window (Figure 3.63).
If necessary, click an expansion triangle to reveal Image, File, Camera, or Exposure information.

✓ Tips
When the Photo Info window is showing, you can click another photo to see its information immediately.
You can change photo titles, dates, and descriptions in the Information pane, but you can’t change anything in the Photo Info window.
The Photo Info window picks up its information from the EXIF (Exchangeable Image File) data stored by most digital cameras. EXIF is an industry standard that’s designed to help interoperability among cameras, printers, and other imaging devices. In theory, EXIF support could help a printer produce a better rendition of an original image, although the theory appears to fall short of reality.