
Locating songs by artist, album, or playlist
Repeating and shuffling songs and albums
Creating and saving On-The-Go and Genius playlists
Playing an iPod shuffle
Tweaking the sound on your iPod or iPhone
Changing the volume level and volume limit
Even though the iPod and iTunes have irrevocably changed the entertainment industry and how you enjoy music, one thing remains the same: You still play songs. You just play them with more panache on your iPod or iPhone.
You can pick any song that you want to hear at any time. You can also shuffle through songs to get an idea of how wide your music choices are or to surprise yourself or others. Browse by artist and album, select a playlist, and even create playlists on the fly — this chapter explains it all, for any iPod or iPhone. Note: If you have an iPod shuffle, everything you need to know is in the section "Playing an iPod shuffle."
With so many songs on your iPod or iPhone, finding a particular song by its title may take longer than finding it another way — like finding a needle in a haystack or even trying to find "Needle in a Haystack" by The Velvelettes. It may be faster to locate albums by cover art or to find songs by searching for artist (or composer), genre, album, or playlist. You can browse your music any number of ways without interrupting the music you're playing.
Cover Flow (also called the cover browser) lets you flip through your cover art to select music alphabetically by artist. The iPod classic, iPod nano, iPod touch, and iPhone (as well as some earlier sixth-generation models) can display the cover art for albums.
To browse music by cover art with an iPod touch, choose Music from the Home screen; on an iPhone, choose iPod from the Home screen. Then turn the iPod touch or iPhone quickly to view it horizontally. This movement changes the display to landscape mode and displays the cover browser, as shown in Figure 16-1.

Slide your finger across the album covers to scroll swiftly through the music library, or tap to the right or left of the cover art in the foreground to move forward or backward an album cover at a time.
Tap the Play button in the lower-left corner (shown in Figure 16-1) to start playing the first song in the foreground album; the Play button turns to a Pause button so that you can tap it again to stop playback. Tap the i button in the lower-right corner (or tap the foreground cover art) to list the songs in that album. Then you can tap a song to start playing it.
The Cover Flow browser is also available on the iPod classic and iPod nano models. Choose Music from the main menu on an iPod classic and then choose Cover Flow from the Music menu. Rotate an iPod nano 90 degrees to the left or the right, and the Cover Flow browser appears automatically. (You can also choose Cover Flow from the Music menu.)
To browse by cover art on an iPod nano or iPod classic, scroll the click wheel clockwise to move forward or counterclockwise to move backward through album covers. You can also press the Fast Forward or Rewind buttons to step forward or backward in your library one cover at a time. Press the Select button in the middle of the click wheel to select the album in the foreground; a list of songs appears. Use the click wheel to scroll the list of songs and then press the Select button to select a highlighted song.
You can quickly and easily locate a song by looking up either the song's artist or its album. Your iPod or iPhone organizes music by artist and then within each artist by album.
To browse music by artist on an iPod touch, choose Music from the Home screen; on an iPhone, choose iPod from the Home screen. Next, tap the Artists icon along the bottom row of the Music or iPod screen. A scrollable list of artists appears, with an alphabet listed vertically along the right side, as shown in Figure 16-2 — flick your finger down to see the very top, which shows the search field.
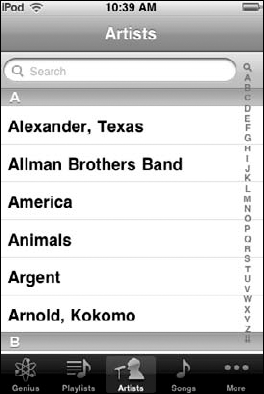
Tap any letter in the alphabet shown on the right to scroll the list directly to that letter. Tap an artist name to see a list of albums or songs by that artist. (You see multiple albums if more than one album is available — tap the album name to select the album.) Tap a song title to start playing the song. To search, tap inside the search field in the top, and start typing in the onscreen keyboard that appears. Suggestions appear below matching what you type — you can tap a suggestion to go right to it.
To browse music by album title on an iPod touch or iPhone, tap the More icon along the bottom of the iPod screen, which displays a list of options including Albums, and then tap Albums. The albums appear in a scrollable list with the album cover on the left side and an alphabet listed vertically along the right side, as shown in Figure 16-3 — flick your finger down to see the very top, which shows the search field.

Slide your finger up and down the alphabet to scroll quickly, or tap any letter in the alphabet to scroll the list directly to that letter. Tap an album title or its cover art to see a list of songs in the album. Tap a song title to start playing the song.
Follow these steps with an iPod classic or iPod nano (or earlier models) to locate a song by artist and then by album:
Choose Music from the iPod main menu.
From the Music menu that appears, choose Artists.
Tip
To be more selective, you can browse by genre first. Choose Genres and then choose a genre from the Genres menu to get a list of artists that have songs in that genre (in alphabetical order by artist name).
Select an artist from the Artists menu.
The artist names are listed in alphabetical order by last name or the first word of a group. Scroll the Artists menu until the artist name is highlighted and then press the Select button. The artist's menu of albums appears. (You can also select All Albums at the top of the Artists menu to go directly to the Albums menu.)
Choose All Songs or the name of an album from the artist's menu.
You can find All Songs at the top of the artist's menu; it should already be highlighted. Press the Select button to choose it or scroll until an album name is highlighted; then press the Select button. A song list appears after you choose either an album or All Songs.
Select a song from the list.
The songs in the album list are in album order (the order that they appear on the album); in the All Songs list, songs are listed in album order for each album.
To choose an album directly on an iPod nano or iPod classic, choose Albums from the Music menu. The Albums menu appears, displaying albums in alphabetical order. Choose an album from the Albums menu. Then select a song from the list.
When you synchronize your iPod or iPhone with your entire iTunes library, your iTunes playlists are included. Well, that makes sense, doesn't it? You can choose to synchronize your iPod or iPhone with only specified playlists, as I describe in Chapter 9.
To browse music by playlist on your iPod touch or iPhone, tap Music on the iPod touch Home screen or iPod on the iPhone Home screen, and tap the Playlists icon along the bottom row of the Music or iPod screen. A scrollable list of playlists appears. Tap a playlist title to see a list of songs in the playlist and tap a song title to start playing the song.
Follow these steps to locate a playlist on your iPod classic or iPod nano (or earlier models):
Choose Music from the iPod main menu.
From the Music menu, choose Playlists.
From the Playlists menu that appears, choose a playlist.
Playlists are listed in alphabetical order. Scroll the Playlists menu to highlight the playlist name and then press the Select button. A list of songs in the playlist appears.
Select a song from the list.
The songs in the playlist are in playlist order (the order defined for the playlist in iTunes). Scroll up or down the list to highlight the song you want.
To locate songs by title on an iPod touch or iPhone, tap Music on the iPod touch Home screen or iPod on the iPhone Home screen, and tap the Songs icon along the bottom row of the Music or iPod screen. A scrollable list of songs appears with an alphabet listed vertically along the right side — flick your finger down to see the very top, which shows the search field. Slide your finger up and down the alphabet to scroll quickly, or tap any letter in the alphabet to scroll the list directly to that letter. To search, tap inside the search field in the top, and start typing in the onscreen keyboard that appears. Suggestions appear below matching what you type — you can tap a suggestion to go right to it. Tap a song title to start playing the song.
You can also find music by composer or genre on an iPod touch or iPhone by tapping the More icon along the bottom row of the Music or iPod screen. You can then select Composers to see an alphabetical list of composers or Genres to see all the genres of the songs. Tap either a composer or a genre to see a list of songs.
Follow these steps with an iPod classic or iPod nano (or earlier models) to locate a song by its title:
Choose Music from the iPod main menu.
From the Music menu that appears, choose Songs.
Select a song from the Songs menu.
The songs are listed in alphabetical order by title. Scroll the Songs menu until the song title is highlighted and then press the Select button.
To play a song on an iPod touch or iPhone, tap the song title (or the Play button in Cover Flow). On an iPod nano, iPod classic, or older model, scroll the list as previously described to highlight the song title and then press either the Select button or the Play/Pause button to play the selected song.
When the song finishes, the iPod or iPhone plays the next song in the sequence that appeared in the list you chose it from. For example, if you chose a song on the Songs screen of an iPod touch or iPhone or the Songs menu of an iPod nano or iPod classic, the next song would be the next one in sequence on the Songs screen or menu. If you chose the last song in an album on the Albums screen or menu, the iPod or iPhone stops after playing it. If you chose a song from a playlist, the next song would be the next one in the playlist, and after playing the last song, it also stops playing, as with an album. (See the section "Repeating songs," later in this chapter, to find out how to repeat albums and playlists.)
Whenever you play a song on an iPod touch or iPhone, you see the album cover associated with the song on the Now Playing screen. You also see the buttons for playback control — Previous/Rewind, Play/Pause, and Next/Fast Forward. (See Figure 16-4.) Slide your finger along the volume slider at the bottom of the display to change the volume.

Tap the Next/Fast Forward button once to play the next song in sequence, and tap the Previous/Rewind button once at the beginning of a song, or twice during the song, to play the previous song. You can fast-forward through a song by touching and holding down the Next/Fast Forward button, and you can rewind a song by touching and holding down the Previous/Rewind button.
You can tap the bullet-list button in the upper-right corner if you want to display a list of the album's contents. You can then tap the title of another song on the album to start playing that song.
Tip
To return to menus and make other selections when playing a song, tap the left-arrow button in the upper-left corner of the display.
Tap underneath the left-arrow button or the album title while a song is playing to show more buttons and the scrubber bar for navigating through the song, as shown in Figure 16-5 — and if lyrics are available in the iTunes information, they also appear.
To skip to any point in a song, use your finger to drag the playhead along the scrubber bar. To finely scrub through a song, after dragging the playhead, slide your finger down the screen (toward the physical Home button) to slow the scrubbing.
To start a song over from the beginning, drag the playhead on the scrubber bar all the way to the left or tap the Previous/Rewind button once.
Tip
If you're viewing another content menu on the iPod touch or iPhone, tap Now Playing at the upper-right corner of the display to go directly to the Now Playing display.
While a song is playing, the artist name and song name appear on the Now Playing screen. Color-display iPods also display the album cover, and the iPod classic and iPod nano models show a progress bar as well.
To adjust the volume on an iPod nano or iPod classic, scroll the click wheel when you see the progress bar. On older iPod models, press the Select button once to show the progress bar. For more info, see the later section "Adjusting and Limiting the Volume."

Figure 16-5. Tap under the album title to show more buttons, the scrubber bar, and lyrics on an iPod touch.
To pause playback, press the Play/Pause button while a song is playing. To stop playing a song, press the Play/Pause button again (the same button).
To skip to any point in a song, press the Select button to reveal the scrubber bar (on older models, press the Select button twice). Scroll the click wheel to move the playhead across the scrubber bar forward (to the right) or backward (to the left) in the song.
Tip
Press the Select button multiple times on an iPod nano or iPod classic to cycle through the options: scrubber bar, Genius Start button, rating bullets, shuffle settings, and lyrics (if you typed them in for the song, as I describe in Chapter 12, or if they were included with a downloaded song). After the rating bullets appear, scroll the click wheel to add a rating to the song. For details on the Genius feature, see the section "Consulting the iTunes Genius," and to find out how to shuffle, see the section "Shuffling song order," both later in this chapter.
Press the Next/Fast Forward button once to play the next song in sequence, and press the Previous/Rewind button once at the beginning of a song, or twice during the song, to play the previous song. You can fast-forward through a song by pressing and holding down the Next/Fast Forward button, and rewind a song by pressing and holding down the Previous/Rewind button.
To start a song over from the beginning, move the playhead on the scrubber bar all the way to the left or press the Previous/Rewind button once.
Tip
While playing a song, you can browse the album or its artist as well as assign the song to an On-The-Go playlist or Genius playlist. Press and hold the Select button, and a menu appears with the following choices: Start Genius, Add to On-The-Go, Browse Album, Browse Artist, and Cancel. Scroll the click wheel to choose an option.
To return to the menus and make other selections when playing a song on an iPod classic or iPod nano, press the Menu button or press and hold the Select button until a menu appears on top of the cover art.
Tip
You can cross-fade songs on an iPod nano or iPod classic, just like in iTunes (as I describe in Chapter 13). A cross-fade creates a smooth transition from the ending of one song to the beginning of the next one. To set your iPod nano or iPod classic to cross-fade songs, choose Settings
If you want to drive yourself crazy repeating the same song over and over, your iPod or iPhone is happy to oblige. (You might want to try repeating "They're Coming to Take Me Away, Ha-Haaa" by Napoleon XIV, a favorite from the old The Dr. Demento Show radio broadcasts — and perhaps they will come to take you away.) More than likely, you'll want to repeat a playlist or album, which you can easily do.
On an iPod touch or iPhone, tap underneath the left-arrow button or the album title while a song is playing. The Repeat and Shuffle buttons appear, along with the scrubber bar and lyrics, directly below the top row of buttons. (Refer to Figure 16-5.)
Ordinarily when a song finishes, the iPod touch or iPhone plays the next song in the sequence that appeared on the Playlists, Artists, Songs, or Albums screen you chose it from. When it reaches the end of that list, it stops — if you chose the last song in an album on the Albums screen, the iPod touch stops after playing it. But if you tap the Repeat button once while the songs are playing, the entire sequence repeats. If you chose an album, the album repeats; if you chose a playlist, the playlist repeats.
After you tap Repeat once to repeat the sequence of songs, the Repeat button shows blue highlighting. Tap the Repeat button again to repeat only the current song — the button changes to include a blue-highlighted numeral 1. Tap it once more to return to normal playback.
You can set your iPod classic or iPod nano (or older models) to repeat a single song, or to repeat all the songs in the selected album or playlist, by following these steps:
Locate and play a song.
While the song plays, press the Menu button repeatedly to return to the main menu and then choose the Settings menu.
Scroll the Settings menu until Repeat is highlighted.
The Repeat setting displays
Off, One, orAllnext to it.Press the Select button until the setting changes to
Oneto repeat one song orAllto repeat all the songs in the album or playlist (orOffto turn Repeat off).If you press the button more than you need to, keep pressing until the setting you want reappears. The button cycles among the
Off, One, andAllsettings.
Note
You can also press the Previous/Rewind button to repeat a song.
Maybe you want your song selections to be surprising and unpredictable, and you want your iPod or iPhone to read your mind. You can shuffle song playback to play in random order, just like an automated radio station without a disk jockey or program guide.
When you are playing a song or a song is paused, you can just shake your iPod touch or iPhone, and it shuffles the songs in the album you are playing. By default, your iPod touch or iPhone is set to shuffle when shaken (not stirred). To turn this feature off, choose Settings
You can also set your iPod touch or iPhone to shuffle songs across your library. The shuffle algorithm is as random as it gets (not taking into account a fundamental tenet of chaos theory that says a pattern will emerge). When an iPod touch or iPhone creates a shuffle, it reorders the songs (like shuffling a deck of cards) and then plays them in the new order.
To turn your iPod touch or iPhone into a random song player, choose Music from the iPod touch Home screen or iPod from the iPhone Home screen, and tap the Songs icon at the bottom of the display. The song list appears, with Shuffle at the top of the list. Tap Shuffle to turn on Shuffle.
You can also set the iPod touch or iPhone to shuffle songs within an album or playlist after starting the album or playlist. Start playing a song in the album or playlist and then tap underneath the left-arrow button or the album title while a song is playing. The Repeat and Shuffle buttons appear, along with the scrubber bar, directly below the top row of buttons (refer to Figure 16-5). Tap the Shuffle button to shuffle songs within the currently playing album or playlist.
Tip
You can also set an iPod touch or iPhone to shuffle any album or playlist before playing it. First, select the playlist or album; then tap Shuffle at the top of the list of songs for that playlist or album.
Tip
Want to repeat an entire album or playlist but still shuffle the playing order each time you hear it? Start playing a song in the album or playlist and then set your iPod touch or iPhone to repeat all the songs in the album or playlist as described in the section "Repeating songs," earlier in this chapter. Then set the iPod touch or iPhone to shuffle the songs as described in this section.
To turn your iPod classic or iPod nano (or older model) into a random song player, choose Shuffle Songs from the main menu.
To shuffle songs in an album or a playlist with an iPod classic or iPod nano (or older model), or to shuffle albums, follow these steps:
Choose Settings from the main menu and scroll to Shuffle.
The Shuffle setting displays
Offnext to it.Press the Select button once (
Offchanges toSongs) to shuffle the songs in the next album or playlist you play. Press Select again (Songschanges toAlbums) to shuffle the albums without shuffling the songs within each album.When you set Shuffle to Songs, the iPod classic or iPod nano shuffles songs within the currently playing playlist or album, or if nothing is playing, the next album or playlist you choose to play. When you set Shuffle to Albums, it plays all the songs on the currently playing album (or the next album you play) in order and then randomly selects another album in the list and plays through it in order.
If you press the Select button more than you need to, keep pressing until the setting you want reappears. The button cycles among the
Off, Songs, orAlbumssettings.
Tip
While playing a song or while a song is paused, you can shake an iPod nano so that its motion detector switches to a random song. Whenever you shake it, the iPod nano shuffles again to another random song. Shaking to shuffle doesn't change your shuffle settings — it just immediately shuffles songs. Shaking to shuffle is disabled when you put the Hold switch in the Hold position (so that you don't keep changing songs as you jog or exercise strenuously) or if the iPod nano display is off. You can also disable it by choosing Settings
Speaking of shuffling, the iPod shuffle is a special iPod designed with song shuffling foremost in mind — it offers no display or menus for selecting specific songs or albums by title. The idea is to use iTunes to put songs, audio books, and podcasts — as well as playlists of these elements — on the iPod shuffle (as I describe in Chapter 9), clip it to your clothes or something, put the Apple-supplied earbuds in your ears, and listen while controlling playback with the earbud's remote controller. The VoiceOver feature tells you the name of the song you're playing (as well as your battery status) and lets you choose from a spoken menu of playlists.
The iPod shuffle has a three-position switch on the top for playing songs in playlist order, for shuffling songs randomly, and for turning it off. To start playing songs, plug the earbuds into the iPod shuffle and place them in your ears, and slide the three-position switch from Off to Play in Order (the icon with arrows chasing each other in a closed loop) or Shuffle (the icon showing arrows crossed).
Playback starts as soon as you turn the three-way switch away from Off — to indicate this, the iPod shuffle status light blinks green once. However, if the iPod shuffle is already playing before you plug in your earbuds, playback may stop. To start playback, press the center button on the remote controller or toggle the three-way switch to Off and back to Play in Order or Shuffle.
Tip
You can use any set of headphones with your iPod shuffle — attach them and slide the three-position switch from Off to Play in Order or Shuffle. To turn off playback, slide the three-position switch back to Off. The only difference is that you don't have a remote controller to control playback or adjust the volume.
To pause playback, press the earbud remote controller's center button once. The iPod shuffle status light blinks green for 30 seconds.
To go forward to the next track, press the center button twice quickly (the status light blinks green once). To fast-forward through the current track to the next track, press the center button twice, but on the second press, keep holding it down.
To go back to the previous track, press the center button three times quickly within the initial six seconds of the current track (the status light blinks green once); to go to the beginning of the current track, press the center button three times after the initial six seconds. To rewind through the current track to its beginning and then to the previous track, press the center button three times, but on the third press, keep holding it down.
If you set the three-position switch to Play in Order, going backward or forward navigates in the order the songs were copied to the iPod shuffle or the order within each playlist. However, if you set the position switch to Shuffle, the playing order is randomized first. Then going backward skips backward within the shuffle order, and going forward skips forward within the shuffle order. For example, suppose your iPod shuffle plays the 14th song, then the 5th song, and then the 20th song. In that case, pressing the center button three times quickly within the first six seconds of the 20th song takes you back to the 5th song, and pressing it three times again takes you back to the 14th song. From there, pressing the center button twice quickly skips through the songs in the same order again: the 14th song, the 5th song, and then the 20th song.
If you installed the VoiceOver kit and enabled VoiceOver for your iPod shuffle in iTunes when you set it up (as I describe in Chapter 2), you can hear the iPod shuffle talk back to you. Specifically, you can hear song titles and artist names, a menu of playlists for you to choose from, and the status of your battery charge.
VoiceOver for your iPod shuffle is enabled by default, but you can turn it on or off by connecting your iPod shuffle to your computer for synchronizing it, as I describe in Chapter 9. The Summary page of the iPod shuffle sync options appears, as shown in Figure 16-6. Under Voice Feedback, select the Enable VoiceOver check box to turn it on (or deselect it to turn it off). You also have the option to choose the language you want from the Language pop-up menu. This sets the language for spoken messages and playlist names, as well as many of the song titles and artist names. Finally, click the Apply button to apply these settings.
To hear the title and artist of the song, press and hold the center button. If you press the center button twice quickly to go to the next track, the next message plays as well.
To hear the playlist menu, press and hold the center button until you hear a tone and then release it to hear the names of playlists. The playlist menu announces the current playlist (if one is playing), "All Songs," any other playlists in alphabetical order, any podcasts, and finally any audio book titles. As you listen to the playlist menu, you can press the plus (+) or minus (−) button to move forward or backward in the playlist menu. After hearing the playlist, podcast, or audio book title you want, press the center button once to select it. If you don't want to choose anything from the playlist menu, you can exit by pressing and holding the center button.

Tip
If you've synced an iPod shuffle loaded with the VoiceOver kit with iTunes, iTunes adds a new option to the Options tab of the Get Info dialog: VoiceOver Language. You can use it to pick a different language for specific songs. After selecting the songs in iTunes, choose File
You can create a temporary, On-The-Go playlist, queuing the songs in the order you want, right on your iPod touch, iPod nano, iPod classic, or iPhone. The selections appear automatically in a playlist appropriately called On-The-Go, on the Playlists menu. This option is particularly useful for picking songs to play right before driving a car. (Hel-lo! You shouldn't be messing with your iPod or iPhone while driving.)
Follow these steps with an iPod touch or iPhone to select songs for your On-The-Go playlist:
Choose Music from the iPod touch Home screen or iPod from the iPhone Home screen.
The Music or iPod screen appears with the Playlists and other icons along the bottom of the display.
Tap the Playlists icon and choose On-The-Go from the Playlists list.
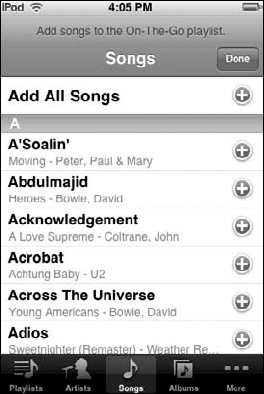
The Songs list appears with a plus (+) sign next to each song, as well as an Add All Songs option at the top, as shown in Figure 16-7. If you have only several dozen albums, this list isn't too long, and you can skip to Step 4. If you have a lot more music, narrow your search with Step 3.
(Optional) Tap Playlists, Artists, Songs, or More to narrow your search for songs to add to the On-The-Go playlist.
Tap an icon along the bottom row (see Figure 16-7) to browse your iPod touch or iPhone library — tap Playlists to select songs from playlists or entire playlists, tap Artists to browse artists, or tap Songs to select songs. On an iPod touch, tap Albums to select from albums or tap More to select songs from compilations, to browse by genre, or to select audio books or podcast episodes. On an iPhone, tap More to select songs from albums or compilations, to browse by genre, or to select audio books or podcast episodes.
Tap the plus (+) sign next to a song you want to add to the On-The-Go playlist, or tap the plus sign next to Add All Albums to add all the albums of an artist found in Step 3.
As you tap the plus sign for a song, the song is included in the On-The-Go playlist, and it turns gray in the list so that you know it has already been selected. You can tap Add All Albums as an alternative if you want to add all the songs for a particular artist — first browse for that artist in Step 3.
Repeat Steps 3 and 4, adding songs in the order you want them to be played.
You can continue to add songs to the list. Your iPod touch or iPhone keeps track of the On-The-Go playlist until you clear it (as I describe in the section "Clearing an On-The-Go playlist," later in this chapter) or synchronize it, as I describe in Chapter 9.
Tap the Done button when you're finished adding songs.
The Done button appears in the upper-right corner while you select songs, just waiting for you to finish. After touching Done, you return to the list of songs in the On-The-Go playlist, as shown in Figure 16-8.
To start playing the On-The-Go playlist, tap any song.
Scroll up or down the list (see Figure 16-8) to choose a song, and tap the song title to play the playlist starting from that song. You can tap Shuffle to shuffle the songs in the playlist.
Tip
The songs in the playlist are in playlist order (the order you added them). You can change that order by tapping the Edit button (see Figure 16-8), which displays the Edit screen with a Move icon (three horizontal bars, like half of an I-Ching symbol) on the far right side of each song. Drag the Move icon for a song to move it up or down the list. Then tap the Done button at the top of the Edit screen.
Tip
You can also add entire playlists, entire albums, or everything by an artist to the On-The-Go playlist. In Step 4, tap the Playlists, Artists, or Album icon on an iPod touch (or the More icon followed by the Albums selection on an iPhone) to show one of those menus and then select a playlist, album, or artist. Finally, tap All Songs at the top of the list of song selections.

To select and then play items in your On-The-Go playlist for an iPod classic, iPod nano, or older iPod, follow these steps:
Locate and highlight a song, album title, or audio book.
Press and hold the Select button until the menu appears, and choose Add to On-The-Go. On older models, press and hold Select until the title flashes.
Repeat Steps 1 and 2, adding items in the order you want them to be played.
You can continue to add items to the list of queued items in the On-The-Go playlist at any time. Your iPod keeps track of the On-The-Go playlist until you clear it, save it, or synchronize your iPod.
To play the On-The-Go playlist, scroll the Music menu until Playlists is highlighted and then press the Select button.
On the Playlists menu that appears, scroll to highlight On-The-Go at the bottom of the menu, and press the Select button.
A list of songs in the On-The-Go playlist appears.
Select a song from the list and press the Select button.
The songs in the playlist are in playlist order (the order you added them). Scroll up or down the list to highlight the song you want, and press the Select button to play the playlist starting from that song.
When you delete listed items, they disappear from the On-The-Go playlist but they are still in your iPod or iPhone; only the playlist is changed.
To delete an item from an On-The-Go playlist in your iPod touch or iPhone, follow these steps:
Choose Music from the iPod touch Home screen or iPod from the iPhone Home screen.
The Music or iPod menu appears with the Playlists and other touch buttons along the bottom of the display.
Touch the Playlists button and choose On-The-Go from the Playlists list.
The list of items in the playlist appears.
Touch the Edit button in the upper-left corner of the display.
Circled minus (−) signs appear in front of each song title.
Scroll the list to find the item you want to delete.
Touch the minus (−) sign next to the song to delete; then touch the Delete button.
The red Delete touch button appears after you touch the circled minus sign.
Repeat Steps 4 and 5 to find and delete each item from the playlist.
When you delete items, they disappear from the On-The-Go playlist one by one.
To delete an item from an On-The-Go playlist in your iPod classic or iPod nano, follow these steps:
Select the On-The-Go playlist.
If you don't see the iPod main menu, repeatedly press the Menu button to return to the main menu. Choose Music from the main menu, scroll the Music menu until Playlists is highlighted, and then press the Select button. The Playlists menu appears. Scroll to On-The-Go and press the Select button, and the list of items in the playlist appears.
Locate and highlight the item you want to delete.
Press and hold the Select button until the menu appears, and choose Remove from On-The-Go. On older models, press and hold Select until the title flashes.
Repeat Steps 2 and 3 for each item you want to delete from the playlist.
When you delete items, they disappear from the On-The-Go playlist one by one.
After creating the On-The-Go playlist, it remains defined in your iPod or iPhone until you clear it.
It turns out that when you synchronize your iPod or iPhone with your iTunes library, the On-The-Go playlist is automatically copied to your iTunes library and then cleared. (You can rename the playlist there, just like any other playlist — see Chapter 14.)
You can also clear the On-The-Go playlist completely in one step on an iPod touch or iPhone: just tap the Clear button. (See Figure 16-8.)
To clear the On-The-Go playlist in an iPod nano or iPod classic, follow these steps:
Choose Music

Select Clear Playlist in the list of items in the playlist.
The Clear menu appears, showing the Clear Playlist and Cancel options.
Select the Clear Playlist option.
All the items disappear from the On-The-Go playlist. If you don't want to clear the playlist, select the Cancel option.
The Genius button for creating Genius playlists in iTunes (wisely laid out for all to see in Chapter 14) has also been incorporated into the iPod nano, iPod classic, iPod touch, and iPhone to create Genius playlists. You can also listen to your Genius Mixes in your iTunes library on your iPod nano, iPod touch, or iPhone.
Note
For Genius to work, it has to recognize the song you select and you need to have enough songs on your iPod or iPhone that are (basically) similar. As for the mechanics of it all, you do need to set up an account in the iTunes Store if you don't already have one (see Chapter 7) and then enable the Genius feature in iTunes as I describe in Chapter 14. Finally, you have to synchronize your iPod or iPhone as described in Chapter 9 so that the Genius is activated. (You can also add Genius playlists along with other playlists in iTunes to your iPod or iPhone while syncing.)
To create a Genius playlist on an iPod touch or iPhone, choose Music from the iPod touch Home screen or iPod from the iPhone Home screen and follow these steps:
Locate and start playing a song to base the Genius playlist on.
The Now Playing screen appears when the song is playing.
Tap the Now Playing screen to see the control buttons.
Tap underneath the left-arrow button or the album title while a song is playing. The Repeat, Genius, and Shuffle buttons appear underneath the scrubber bar directly below the top row of buttons. (Refer to Figure 16-5.) The Genius button is the one in the center sporting the atom icon.
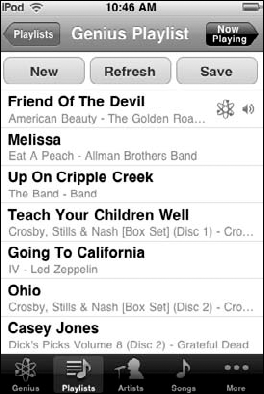
Tap the Genius button.
The Genius playlist appears, as shown in Figure 16-9, with New, Refresh, and Save buttons at the top. You can flick your finger to scroll the list. The Genius playlist can be as long as 25 songs. Tap any song to start playing the playlist from that song.
(Optional) Refresh the Genius playlist by tapping Refresh.
Refreshing a playlist changes it to include different songs based on the same song you played (depending on how many similar songs you have in your iPod touch or iPhone).
Save the Genius playlist by tapping Save.
The playlist is saved in the Playlists section of your iPod touch or iPhone using the title of the song it is based on. The playlist is copied back to your iTunes library when you sync your iPod touch or iPhone. That's all you need to do — the next steps are optional.
Warning
If you subsequently refresh a saved Genius playlist before syncing, the saved playlist is refreshed and you lose the previous version of it.
(Optional) Create a new Genius playlist by tapping New and then selecting a new song to base it on.
After touching New, the song list appears for selecting a song. Choose a song, and your iPod touch or iPhone creates a new Genius playlist and starts playing the song, displaying the Now Playing screen.
(Optional) After Step 6, return to the Genius playlist by tapping the left-arrow button in the upper-left corner of the Now Playing screen.
Tip
You can refresh any Genius playlist, whether you created it in iTunes and synced to your iPod touch or iPhone, or you created it directly on your iPod touch or iPhone. Select the playlist and tap Refresh at the top of the list (or tap Delete to delete the list).
Tip
You can set an iPod touch or iPhone to create a Genius playlist based on a song before you actually start playing the song itself. Just choose Music from the iPod touch Home screen or iPod from the iPhone Home screen, and then tap Playlists in the lower-left corner of the display. Tap Genius at the top of the list of playlists, and a list of songs appears. Select a song, and your iPod touch or iPhone creates a Genius playlist based on it and then starts playing the song you selected. To return to the Genius playlist, tap the left-arrow button in the upper-left corner of the Now Playing screen.
To create a Genius playlist on an iPod nano or iPod classic, follow these steps:
Locate and start playing a song to base the Genius playlist on.
The Now Playing screen appears when the song is playing.
Press and hold the Select button until a menu appears on top of the Now Playing screen.
Choose Start Genius and press the Select button.
The new Genius playlist appears, with Refresh and Save Playlist at the top of the list. Scroll the list to see all the songs, and select any song to start playing the playlist associated with that song.
(Optional) Refresh the Genius playlist by selecting Refresh at the top of the Genius playlist.
Refreshing a playlist changes it to include different songs based on the same song you played (depending on how many similar songs you have in your iPod).
(Optional) Save the Genius playlist by selecting Save Playlist (under Refresh at the top of the Genius playlist).
The playlist is saved in the playlists section of your iPod using the title of the song it is based on. The playlist syncs automatically with your iTunes library the next time you connect your iPod and sync it (as I describe in Chapter 9).
Warning
If you subsequently refresh a saved Genius playlist, the saved playlist is refreshed and you lose the previous version of it.
Genius Mixes are generated by iTunes from songs in your library that go great together (see Chapter 14 to learn how to apply the touch of Genius). Genius Mixes are synced automatically if you sync everything to your iPod touch, iPhone, or iPod nano, or you can sync specific Genius Mixes as playlists — see Chapter 9 to learn how to sync by playlist.
To play your Genius Mixes from your iTunes library on an iPod nano, choose Music
To play them on your iPod touch, choose Music from the Home screen and tap the Genius icon in the lower left corner. On an iPhone, choose iPod from the Home screen and tap the Genius icon in the lower left corner. You can flick with your finger left or right to browse the Genius Mixes — the dots at the bottom of the Genius Mixes screen indicate how many Genius Mixes are synced to your iPod touch or iPhone. To start playing a Genius Mix, tap the Play arrow in the middle of the screen for a Genius Mix. Genius Mixes play just like playlists.
Warning
Because an iPod or iPhone can be quite loud when set to its highest volume, I recommend turning down the volume before using headphones.
To adjust the volume on an iPod touch or iPhone, follow these steps:
Play something (like music).
While the content is playing, tap the lower portion of the display and slide your finger on the volume slider.
After tapping the lower portion of the display while playing something, the volume slider with a silver knob appears on the iPod touch or iPhone screen at the bottom underneath the playback controls. (Refer to Figure 16-4.) Use your finger to slide the knob to the right to increase the volume or to the left to decrease the volume.
To adjust volume for an iPod classic or iPod nano, follow these steps:
Play something.
While the content is playing, change the volume by scrolling the click wheel.
A volume bar appears in the iPod display to guide you. Scroll with your thumb or finger clockwise to increase the volume or counterclockwise to decrease the volume.
To adjust the volume for an iPod shuffle, press the Volume Up (+) or Volume Down (− button on the earbud remote.
You can also limit the highest volume for your iPod or iPhone to be lower than the actual maximum. This limit can help protect your hearing while you're listening to content from sources with different volume levels.
To limit the volume to be lower than the actual maximum volume on an iPod touch or iPhone, follow these steps:
Choose Settings from the Home screen.
Choose iPod from the Settings screen of an iPhone or Music from the Settings screen of an iPod touch.
Choose Volume Limit from the iPod Settings (iPhone) or Music Settings (iPod touch) screen.
A volume slider appears with a silver knob.
Slide your finger on the volume slider to limit the volume.
Slide the knob with your finger to the right to increase the volume or to the left to decrease the volume.
Tap the iPod button (iPhone) or the Music button (iPod touch) in the upper-left corner of the display to set the limit and return to the previous menu, or if you want, tap the Lock Volume Limit button to lock the volume limit.
If you accept the new limit without locking it, you get to skip the next step; you're done. The lock is useful for locking the volume limit so that others can't change it (such as your children). However, it also means that you have to enter the volume limit code to unlock the iPod touch or iPhone to change the volume limit.
Set the volume limit code for locking the volume limit.
If you tapped the Lock Volume Limit button to lock the volume limit, your iPod touch or iPhone displays four squares for entering a code number. Tap the calculator-style number pad to type numbers for your code and be sure to make up a code that you can remember! (If you don't want to enter a code, tap the Cancel button in the upper-left corner.)
To limit the volume to be lower than the actual maximum volume on an iPod shuffle, connect it to your computer for synchronizing, as I describe in Chapter 9. The Summary page of the iPod shuffle sync options appears (refer to Figure 16-6). Select the Limit Maximum Volume check box and drag the volume slider underneath this option to set the maximum volume. Finally, click the Apply button to apply the new setting.
You can do some tweaking of the sound quality in your iPod or iPhone in addition to the usual sound adjustments you make in iTunes (which I describe in amplified detail in Chapter 13). You can use the same Sound Check option provided in iTunes to standardize the volume level of all the songs. You can also use the iPod or iPhone equalizer to choose presets for different musical genres, listening environments, or speakers.
To enable Sound Check to work in your iPod or iPhone, first follow the steps in iTunes described in Chapter 13 to sound-check your iTunes library. After syncing your iPod or iPhone with the sound-checked library (as I describe in Chapter 9), you can take advantage of the volume leveling in your iPod or iPhone.
To turn on Sound Check in an iPod touch or iPhone, choose Settings
To turn on Sound Check in an iPod nano or iPod classic, choose Settings
To turn on Sound Check in an iPod shuffle, connect it to your computer for synchronizing, as I describe in Chapter 9. The Summary page of the iPod shuffle sync options appears (refer to Figure 16-6). Select the Enable Sound Check option, and click the Apply button to apply the new setting. After the iPod shuffle syncs with the iTunes library, the songs in your iPod shuffle are sound-checked.
You can use the iPod or iPhone built-in equalizer presets to improve or enhance the sound coming through a particular stereo system and speakers. With the equalizer presets, you can customize playback for different musical genres, listening environments, or speakers.
Warning
The iPod or iPhone equalizer uses a bit more battery power when it's on, so you might have less playing time.
To set an equalizer preset on an iPod touch or iPhone, choose Settings
To select an iPod equalizer preset on an iPod classic or iPod nano, choose Settings
Each equalizer preset offers a different balance of frequencies designed to enhance the sound in certain ways. For example, Bass Booster increases the volume of the low (bass) frequencies; Treble Booster does the same to the high (treble) frequencies.
To see what a preset actually does to the frequencies, choose Window
Note
Find out how to assign standard iTunes presets or your own custom presets to specific songs, audio books, podcast episodes, and videos — and use those presets when playing these items back on your iPod or iPhone — by visiting the free tips section of my Web site (www.tonybove.com).