
In This Chapter
Synchronizing your iPod or iPhone with your iTunes library
Choosing what to sync and what not to sync
Copying content directly to, or deleting from, your iPod or iPhone
iTunes is the all-knowing, all-powerful synchronizer, the software you use to put content and your iTunes Store account information on your iPod or iPhone.
Synchronizing your iPod or iPhone with iTunes means keeping it up to date with all or part of your iTunes library — matching it song for song, movie for movie, and so on. The sync operation also keeps an iPod touch or iPhone up to date with your iTunes Store account information so that you can download items from the iTunes Store or App Store directly to your iPod touch or iPhone.
If you make changes in iTunes after syncing the iPod or iPhone, those changes are automatically made in the iPod or iPhone when you sync again. Your iPod or iPhone mirrors all the content of your iTunes library, or as much of the content as will fit — and iTunes can make assumptions if the entire library won't fit, or give you options to be more selective, as I describe in this chapter.
Note
You also use iTunes to sync Apple TV, which lets you play your iTunes library content on an HDTV audio-video system. To find out more about Apple TV, visit this book's companion Web site.
When you first set up your iPod or iPhone, you can choose the option to sync your entire iTunes library automatically. From that point on, your iPod or iPhone synchronizes with your entire library automatically, right after you connect it to your computer. (See Chapter 2 for details on setting up your iPod or iPhone.)
The full, everything-but-the-kitchen-sync approach works well if your combined iTunes library and photo library are small enough to fit in their entirety on your iPod or iPhone. For example, if your iTunes and photo libraries combined are less than 29GB and you have a 32GB iPod touch, sync everything. (You can see the size of your iTunes library in GB, or gigabytes, at the bottom of the iTunes window in the center.) Syncing everything copies your entire library, and it's just as fast as copying individual items (if not faster) because you don't have to select the items to copy.
If your iTunes library has more content than your iPod or iPhone can hold, you can make decisions about which parts to sync. You can select options to synchronize music, TV shows, movies, and so on. For example, you can copy all your songs and audio books, but only some of your TV shows, none of your movies, and only the podcasts you haven't heard yet.
This chapter also describes how to copy songs, videos, podcasts, and audio books directly to your iPod or iPhone using the manual method. You can even combine automatic syncing with manual methods to build your iPod or iPhone library as you see fit.
If you store photos in an iPhoto library (on a Mac) or in a program (such as Adobe Photoshop Album in Windows), you can set up your iPod, iPhone, or Apple TV with the option to copy your entire photo library. See Chapter 18 for details.
You can sync your iPod touch or iPhone with your iTunes Store account information in advance, so that you don't have to manually sign in with your iPod touch or iPhone before downloading from the iTunes Store or App Store.
Tip
To manually sign in or create an account on your iPod touch or iPhone, choose Settings
If you were signed in to your iTunes Store account when you initially set up and synced your iPod touch or iPhone, the store account information was also synchronized. If not, or if you want to resync your store information, visit the iTunes Store and sign in to your account first, before syncing your iPod or iPhone.
You don't have to buy anything; just signing in to the store provides all the info you need for syncing an iPod touch or iPhone with the iTunes Store account. (If you haven't set up your iTunes Store account yet, flip back to Chapter 7, do the deed, and then sign in by clicking the Sign In tab in the upper-right area of the iTunes window.)
After signing into your account, go ahead and follow the steps in the next sections to sync your iPod or iPhone — "Copying Everything", "Choosing What to Sync", or "Manually Managing Music and Videos".
After syncing to your account, your iPod touch or iPhone will always sync any purchased content or apps you download directly to it with your iTunes library whenever you connect it to your computer — that way you don't lose any content or apps if, heaven forbid, something happens to your iPod touch or iPhone.
Follow these steps to sync all the content in your iTunes library to an iPod or iPhone:
Connect the iPod or iPhone and select its name when it appears in the Devices section of the Source pane.
iTunes displays the sync options to the right of the Source pane, with the Summary page (under the Summary tab) open. The Summary page shows how much space on the device is occupied by content and how much is still free. (See Figure 9-1.)
If the iPod or iPhone isn't already synchronizing, click the Sync button in the lower-right corner to synchronize it.
Most likely your iPod or iPhone is already set to automatically synchronize with iTunes after connecting it. After clicking the Sync button (or if iTunes is automatically syncing), the iTunes Status pane tells you that iTunes is syncing the iPod or iPhone.
If you haven't made any sync selections, the default is to copy everything in your iTunes library to your iPod or iPhone. (Only the music, audio books, and audio podcasts in your library are copied to an iPod shuffle.)
If your iPod or iPhone is not set to automatically synchronize, or even if synchronization is going on, you can select content to sync, as I describe later in this chapter, and click Apply to start re-syncing again with the new settings.
Wait for the synchronization to finish and then click the Eject button next to the iPod or iPhone name in the Source pane.
You should always wait until the iTunes Status pane (at the top) displays that the synchronization is complete.
Disconnect your iPod or iPhone from your computer.
That's it. Your iPod or iPhone is now synchronized.

Note
Your iTunes library is the main library for your content, while the library in your iPod or iPhone is like a satellite holding some or all of the same content. If you make changes in your iTunes library after syncing the iPod or iPhone, those changes are automatically made in the iPod or iPhone when you sync again — unless you manually manage content, as I describe in "Manually Managing Music and Videos" in this chapter. That means if you delete an album or video from your iTunes library, that album or video is also deleted from your iPod or iPhone the next time you sync. You can delete items directly from your iPod or iPhone without changing your iTunes library — see "Deleting items on your iPod or iPhone" in this chapter.
You probably don't need to know anything else in this chapter about synchronizing your iPod or iPhone with content — unless your iTunes library and additional photo library are too large to fit, or if you want to be more selective about which content to synchronize.
Note
iTunes backs up your synchronization settings for each iPod or iPhone that you connect from the last time when you synchronized the device.
Tip
Photos you've organized in an iPhoto library (on a Mac) or in a program (such as Adobe Photoshop Album in Windows) are also copied over. See Chapter 18 for details.
If your iTunes library is too large to fit on your iPod or iPhone, iTunes decides which songs and albums to include by using the ratings that you set for each song. (To find out how to set ratings, see Chapter 12.) If your iPod or iPhone already has photos on it, iTunes asks whether you want to delete them to gain more space. After clicking the Yes or No button, iTunes tries its best to fit everything. If it has to cut something, though, it skips copying new photos and displays the message Some photos were not copied.
Tip
You can squeeze more songs onto an iPod shuffle if you convert them to a lower-bit-rate format — and you can do this on the fly. If you've imported songs into iTunes at higher-bit-rate formats or with encoders such as iTunes Plus, Apple Lossless, or WAV (see Chapter 8 for details), you can set iTunes to automatically convert songs to 128-kbps AAC files while syncing with the iPod shuffle. The songs are not changed in your iTunes library. To do this, connect your iPod shuffle to your computer, click its name in the Devices section of the Source pane to show the Summary page sync options, and select the Convert Higher Bit Rate Songs to 128 kbps AAC option (which appears only for an iPod shuffle). As a result, the songs take up less space on the iPod shuffle than they occupy in your iTunes library.
If you're still short of space even after skipping photos, iTunes displays a warning about the lack of free space, and it asks whether you want to disable podcast synchronization and let iTunes create a selection of songs in a playlist based on ratings and playback counts in iTunes. (See Chapter 14 for details on using playlists.)
If you click the Yes button, iTunes creates a new playlist (titled "Your device name Selection," as in "My iPod touch Selection") and displays a message telling you so. Click the OK button, and iTunes synchronizes your iPod or iPhone using the new playlist. iTunes also sets your iPod or iPhone to synchronize music automatically by playlist, as I describe in the next section.
If you click the No button, iTunes updates automatically until it fills your iPod or iPhone without creating the playlist.
From that point on, your iPod or iPhone synchronizes with your iTunes library automatically, right after you connect it to your computer. If you add or delete content in your iTunes library, that content is added or deleted in the iPod or iPhone when you sync again.
Tip
To prevent an iPod or iPhone from automatically synchronizing, press
Warning
If you connect an iPod or iPhone previously linked to another computer to your computer, iTunes displays a message warning you that clicking the Yes button replaces the iPod or iPhone content with the content from your computer's library. If you don't want to change the content on the iPod or iPhone, click No. If you click Yes, iTunes erases the iPod or iPhone and synchronizes it with your computer's library. To avoid this warning, first set the iPod or iPhone sync settings to manually manage music and videos, as I describe later in this chapter, on the computer the iPod or iPhone was previously synced.
If you have a massive music library that doesn't fit on your iPod or iPhone, you can go the selective route, choosing which content to automatically sync with your iTunes library. By synchronizing selectively, you can still make your iPod or iPhone match at least a subset of your iTunes library. If you make changes to that subset in iTunes, those changes are automatically made in the device when you synchronize again.
Tip
You don't have to sync to one massive library in iTunes — you can create several subsets of your main library (sublibraries) so that each sublibrary could be small enough to fit on a certain type of device. For example, you might create a sublibrary for a 32GB iPod touch and another sublibrary for a 16GB iPod nano. Before connecting a device, you could switch to its corresponding sublibrary within iTunes and then synchronize automatically.
Note
To find out how to manage multiple iTunes libraries, visit the Tips section of the author's Web site (www.tonybove.com).
You can decide which items you don't want to synchronize and simply not include them by first deselecting them one by one in your iTunes library. (If you have a large iTunes library, this may take some time — you may find it easier to synchronize by playlists, artists, and genres, as I show in the next section.)
By default, all content items are selected — a check mark appears in the check box next to the item. To deselect an item in your iTunes library, click the check box next to the item so that the check mark disappears. To reselect an item, just click the check box again.
Tip
You can quickly select (or deselect) an entire album by showing the Browser (choose View
After you deselect the items you don't want to transfer, connect your iPod or iPhone to your computer and select its name when it appears in the Devices section of the Source pane (refer to Figure 9-1). Then select the Sync Only Checked Songs and Videos check box. The Sync button changes to Apply — click the Apply button.
iTunes restarts synchronization and deletes from the iPod or iPhone any items in the library that are deselected, to save space, before adding back in the items in the iTunes library that are selected. That means the items you deselected are now gone from your iPod or iPhone — replaced by whatever items were selected. Of course, the items are still in your iTunes library. Wait for the synchronization to finish and then click the Eject button next to the iPod or iPhone name in the Source pane.
You can include just the items that are defined in playlists, including Genius playlists, and/or just specific artists. Syncing by playlists, artists, and genres is a great way of syncing vast amounts of music without syncing the entire library. (To find out how to create playlists, see Chapter 14.)
For example, you can create four playlists that contain all essential rock, folk, blues, and jazz albums, and then select all four, or just one, two, or three of these playlists to sync with your iPod or iPhone, along with everything by specific artists (such as Frank Zappa, who doesn't fit into these categories). You can even include audio books in your playlists, or create a playlist of just audio books, to sync with your iPod or iPhone.
After connecting your iPod or iPhone to your computer, select its name when it appears in the Devices section of the Source pane (refer to Figure 9-1). Then click the Music tab of the sync options. The Music sync options page appears, as shown in Figure 9-2.
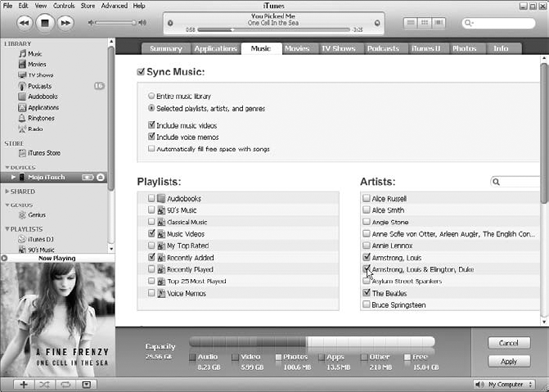
By default, the Entire Music Library option is checked, unless you are manually managing music as I describe later in this chapter. To change your sync options, select the Sync Music check box.
If you were manually managing music, a message appears asking if you are sure that you want to sync music — all content already on your iPod or iPhone will be replaced. Click the Sync Music button (or Cancel to cancel) to return to the Music sync options page.
To choose playlists, artists, and genres to sync with the iPod or iPhone, click the Selected Playlists, Artists, and Genres option at the top of the Music sync options page (refer to Figure 9-2). You can then select each playlist from the Playlists list, each artist from the Artists list, and (if you scroll the Music sync options page) each genre from the Genres list. You can choose any number of playlists, artists, and genres. (In Figure 9-2, I selected the Music Videos and Recently Added smart playlists along with a few artists.)
Finally, click the Apply button to apply changes and click the Sync button if synchronization hasn't already started automatically.
iTunes copies only what you've selected in the Playlists, Artists, and Genres sections of the Music sync options page. If you also select the Include Music Videos check box (as I do in Figure 9-2), iTunes includes music videos listed in the playlists (except, of course, for an iPod shuffle, which doesn't play video). For an iPod touch or iPhone, you can also select the Include Voice Memos check box to sync your voice memos from the Voice Memo app with iTunes. (See Chapter 21 for details on using Voice Memo.)
Note
You can also automatically fill up the rest of your iPod or iPhone free space with random songs (after syncing your selected playlists, artists, and genres) by selecting the Automatically Fill Free Space With Songs option. iTunes randomly chooses the music as I describe in the latter part of the "Copying Everything" section. If you select the Sync Only Checked Songs and Videos check box on the Summary page of the iPod or iPhone sync options (refer to Figure 9-1), only selected items are copied. iTunes ignores items that are not selected, even if they're listed in the chosen playlists for synchronization.
You can get picky about which podcast episodes should be copied during synchronization. Clicking the Podcasts tab of the sync pages presents options for choosing podcast episodes to include. (You can include audio podcasts to sync with an iPod shuffle, but not video podcasts.)
Connect your iPod or iPhone to your computer, and select its name when it appears in the Devices section of the Source pane (refer to Figure 9-1). Then click the Podcasts tab. The Podcasts sync options page appears, as shown in Figure 9-3. Click the Sync Podcasts option at the top.
The Podcast sync options let you choose unplayed or recently added episodes (as shown in Figure 9-3). Select the Automatically Include ____ Episodes Of ____ check box; choose a modifier from the first pop-up menu, such as All Unplayed or 10 Most Recent; and then choose All Podcasts or Selected Podcasts from the second pop-up menu. If you chose Selected Podcasts, you can select a podcast in the Podcasts column below these options, and then select specific episodes in the Episodes column (which may already be selected depending on your choices in the pop-up menus).
For example, in Figure 9-3, I'm synchronizing the 10 most recent episodes of selected podcasts — I've already selected The Flying Other Brothers-Music Podcast (2 new episodes out of 3), and I'm selecting the Social Folk Roots of California Rock episode of the Rockument podcast.
Finally, click the Apply button to apply changes, and click the Sync button if synchronization hasn't already started automatically.

Movies and TV shows take up a lot of space, so if you limit the movies and TV episodes you synchronize with your iPod or iPhone, you gain extra space for more music, audio books, podcasts, and photos. (This section doesn't apply to the iPod shuffle, which doesn't play movies or TV shows.)
To get choosy about movies, connect your iPod or iPhone to your computer, and select its name when it appears in the Devices section of the Source pane (refer to Figure 9-1). Then click the Movies tab of the sync options. The Movies sync options page appears as shown in Figure 9-4.
Select the Sync Movies check box (as shown in Figure 9-4). Select the Automatically Include ____ Movies check box; choose a modifier from the pop-up menu, such as All, All Unwatched, or 10 Most Recent Unwatched. If you choose any option other than All, you can then select specific movies from the list below the option. For example, in Figure 9-4 I'm automatically including 1 Most Recent movie along with the selected movie Jacob's Ladder.

To pick only the TV episodes you want, click the TV Shows tab of the sync options. The TV Shows sync options page appears, as shown in Figure 9-5.
Select the Automatically Include ____ Episodes Of ____ check box; choose a modifier from the first pop-up menu, such as All, All Unwatched, or 5 Most Recent; and then choose All Shows or Selected Shows from the second pop-up menu. If you chose Selected Shows, you can select a show in the Shows column below these options, and then select specific episodes in the Episodes column (which may already be selected depending on your choices in the pop-up menus).
For example, in Figure 9-5, I'm synchronizing all episodes of selected shows whether I've watched them or not — but I'm also selecting only two episodes of Star Trek: The Original Series and deselecting the other episodes, in order to get only the episodes I want.
Finally, click the Apply button to apply changes and click the Sync button if synchronization hasn't already started automatically.

If your entire library is too big for your iPod or iPhone, you may want to copy individual items directly. By setting your iPod or iPhone to manually manage music and videos, you can add content to your iPod or iPhone directly via iTunes, and you can delete content as well. You can even copy some songs or videos from another computer's iTunes library without deleting any content from your iPod or iPhone.
To set your iPod or iPhone to manually manage music and videos, first connect it to your computer. Then follow these steps:
Select the iPod or iPhone name in the Devices section of the iTunes Source pane.
After selecting the name, the Summary page appears, displaying the iPod or iPhone sync options (refer to Figure 9-1).
Select the Manually Manage Music and Videos check box (on an iPod shuffle, select Manually Manage Music).
iTunes displays a message for iPod nano and iPod classic models (and older models) warning you that manually managing music and videos also requires manually ejecting the iPod or iPhone before each disconnect.
Click the OK button for the warning, and click the Apply button to apply the change.
Warning
Don't disconnect your iPod or iPhone while managing music and videos manually. You have to eject it first, as spelled out in the next section. If you don't, you may find that it doesn't work properly and needs to be restored, as I describe in Chapter 22.
After setting your iPod or iPhone to manually manage music and videos, you can select and drag music and videos — songs, albums, audio books, music videos, movies, and TV shows — to your iPod or iPhone name in the Source pane. (Similarly, after setting an iPod shuffle to manually manage music, you can select and drag music, audio books, and audio podcasts to the iPod shuffle.)
You can drag the media from its section in the iTunes library or from an existing playlist, or drag an entire playlist. To do so, follow these steps:
In the iTunes Source pane, select the source of your media.
You might select Music in the Library section, for instance, or a playlist in the library.
You can select music in your library using List, Grid, or Cover Flow view (see Chapter 11 for browsing details), or select songs in a playlist.
Drag items (such as one or more songs or an album) directly from your iTunes library or playlist over the iPod or iPhone name in the Devices section of the Source pane.
You can drag individual songs or an entire album from Cover Flow view, List view, or Grid view (as I do in Figure 9-6). When you drag an album cover or album title, all the songs in the album are copied. If you drag a playlist name from the Source pane to the iPod or iPhone name, all the songs associated with the playlist copy along with the playlist itself.
Wait for the copying to finish and then click the Eject button next to the iPod or iPhone name in the Source pane to eject it.

When you manually manage music and videos on an iPod or iPhone (or manage music on an iPod shuffle), you can also delete content from the iPod or iPhone. Set the option to manually manage music and videos (if it isn't set that way already) and then follow these steps:
In the Source pane, click the triangle to the left of the iPod or iPhone name to expand its library.
The iPod or iPhone library appears in the Source pane with Music, Movies, TV Shows, and other sections, followed by playlists. The library is indented underneath the iPod or iPhone name.
Click any content type in the iPod or iPhone library to see the items.
The content items appear in the iTunes List pane to the right of the Source pane.
Select an item and press Delete/Backspace or choose Edit

iTunes displays a warning to make sure that you want to do this; click the OK button to go ahead or the Cancel button to stop. If you want to delete a playlist, select the playlist underneath the iPod or iPhone name in the Source pane and then press Delete/Backspace or choose Edit
Note
Like in the iTunes library (as I describe in Chapter 14), if you delete a playlist, the songs listed in the playlist aren't deleted. They're still on your iPod or iPhone unless you delete the songs directly from the iPod or iPhone library.
You can also automatically fill your iPod or iPhone while managing music and videos manually. Autofill randomly picks songs from your entire iTunes library or from a playlist you select in the iTunes Source pane.
Autofill is especially useful for copying random songs to an iPod shuffle every time you connect it to your computer. Eventually, you can shuffle through everything in your library if you so wish by randomly autofilling your iPod shuffle every time you sync.
Set the option to manually manage music on the iPod shuffle or to manage music and videos on the iPod or iPhone (if it isn't set that way already). Then follow these steps:
In the Source pane, click the triangle to the left of the iPod or iPhone name to expand its library.
The iPod or iPhone library appears in the Source pane.
Select Music under the iPod or iPhone name in the Devices section of the Source pane.
The music on your iPod or iPhone appears in the List pane, along with the Autofill pane along the bottom, as shown in Figure 9-7.
Choose your source of music from the Autofill From pop-up menu.
Choose either a playlist, as I did in Figure 9-7 (the Purchased smart playlist), the Genius option (which I describe in Chapter 14), or Music for the entire music library. If you choose a playlist or Genius, Autofill uses only the playlist or the Genius feature as the source to pick random songs. After choosing your source of music, iTunes creates a playlist and displays it in the List pane.
(Optional) Click the Settings button to set options and then click the OK button.
After clicking the Settings button, the Autofill Settings dialog appears. You can choose to replace all the items on the iPod or iPhone, to choose items randomly, or to choose higher rated items more often. If you don't select to replace all items, iTunes adds the items without replacing existing content. Click the OK button to close the Autofill Settings dialog.
Click the Autofill button to start copying songs.
iTunes copies the contents of the Autofill playlist to your iPod or iPhone.
Wait for the copy operation to finish and then click the Eject button.
Always wait until the iTunes Status pane (at the top) tells you that the copying is finished.

Tip
You can click the Autofill button repeatedly to create different random playlists. When you get one you like, select all its contents and choose File