
In This Chapter
Retrieving information online
Editing information for each content item
Adding information, cover art, comments, and ratings
Organization depends on information. You expect your computer to do a lot more for you than just store a song with Track 01 as the only identifier. Not only can iTunes retrieve the song's track information from the Internet, but it can also find the cover art for you.
Adding all the information for your iTunes content seems like a lot of trouble, but you can get most of the information automatically from the Internet — and without all that pesky typing. Adding track information is important because you certainly don't want to mistakenly play Frank Zappa's "My Guitar Wants to Kill Your Mama" when trying to impress your classical music teacher with the third movement of Tchaikovsky's Pathétique Symphony, do you? And because videos you make yourself or convert from other sources don't have this automatic information, you have to enter some description to tell them apart.
This chapter shows you how to add information to your content library in iTunes and edit it for better viewing so that you can organize your content by artist, album name, genre, composer, and ratings. You can then use this information to sort your content in List view or Browse view by clicking the column headings. This chapter also describes how to add cover art for navigating your library with Cover Flow.
Why bother entering information if someone else has already done it for you? You can easily get information about most music CDs from the Internet (that is, assuming you can connect to the Internet). The online database available for iTunes users holds information for millions of songs on commercial CDs and even some bootleg CDs.
When you pop a commercial music CD into your computer running iTunes, iTunes automatically looks up the track information for that CD on the Internet and fills in the information fields (name, artist, album, and so on). You don't need to do anything to make this happen. You can also edit the information after iTunes fills in the fields.
If your computer doesn't access the Internet automatically, you might want to turn off this automatic information retrieval. (You can always retrieve the information manually, as I describe in the next section.) To turn off the retrieval of track information, follow these steps:
Choose iTunes

The iTunes Preferences dialog appears with buttons along the top.
Click the General tab (if it's not already selected).
The General preferences appear.
Deselect the Automatically Retrieve CD Track Names from Internet option.
With this option turned on, iTunes connects to the Internet automatically and retrieves the track information. When turned off, iTunes doesn't retrieve the information, but you can retrieve it manually. (Cue the next section!)
You can connect manually to the Internet at any time (for example, by using a modem connection) and retrieve the song information when you're ready to use it. After you connect to the Internet, choose Advanced
Using the Gracenote database
The first time I popped a commercial music CD into a computer, song information appeared like magic. iTunes automatically displayed the song names, album title, and artist names. How did it know? This information isn't stored on a standard music CD in digital form, but iTunes has to recognize the disc somehow.
The magic is that the software knows how to reach out and find the information on the Internet — in the Gracenote CDDB service. CDDB stands for (you guessed it) CD Database. The site (www.gracenote.com) hosts CDDB on the Web and searches for music CDs by artist, song title, and other methods. The iTunes software already knows how to use this database so you don't have to!
Gracenote recognizes an audio CD by taking into account the number, sequence, and duration of tracks. (This is how the database recognizes CD-Rs that are burned with the identical songs in the same order.) The database keeps track of information for most of the music CDs that you find on the market.
The database doesn't contain any information about personal or custom CDs unless people submit information to the database about such CDs. You can submit information about your personal or custom CDs by using iTunes: Type the information for each track while the audio CD is in your computer and then choose Advanced
You have to enter the information for certain media, including CDs that aren't known by the Gracenote CDDB, custom CD-Rs, and videos and audio books that you bring into iTunes from sources other than the iTunes Store. No big deal, though; just follow these steps:
Click directly in the information field (such as Artist).
Click again so that the mouse pointer toggles to an editing cursor — but not so quickly that the track starts playing.
Type text directly into the information field.
Note
After grabbing the song information from the Internet or typing it, iTunes keeps track of the information for the CD even if you just play the CD without importing it. The next time you insert the CD, the song information is automatically filled in.
Retrieving ready-made song information from the Internet is a great help, but you might not always like the format it comes in. Maybe you want to edit artist and band names or other information the way I do — I like to list solo artists by last name rather than by first name. (Gracenote CDDB lists artists by first name.) For example, I routinely change Miles Davis to Davis, Miles.
Other annoyances sometimes occur when bands feature The at the beginning of their names, such as The Who, The Band, The Beatles, and The Beach Boys. Even though these names sort correctly (in alphabetical order, under their proper names), I dislike having The before the band name, so I routinely remove it.
You might also want to change the information that is supplied by the iTunes Store for the movies, TV shows, music videos, audio books, and podcasts you download. And if you obtain your content from other sources, you might need to add information for the first time.
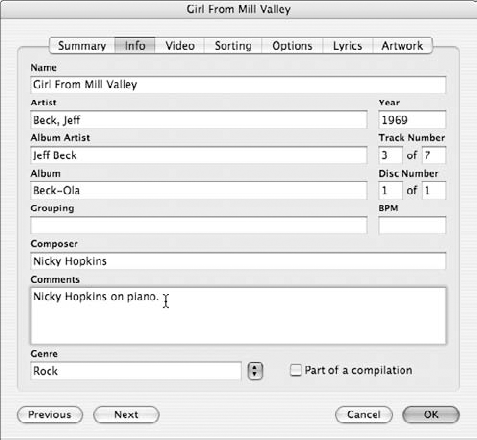
You can edit the content information by clicking directly in the specific track's field (such as the Artist field) and then clicking again so that the mouse pointer toggles to an editing cursor. You can then select the text and type over it — or use the Copy, Cut, and Paste commands on the Edit menu — to move tiny bits of text around within the field. As you can see in Figure 12-1, I changed the Artist field to Beck, Jeff.

You can edit the Name, Artist, Album, Genre, and Ratings fields in the list. However, editing this information by choosing File
Editing in the content list is fine if you're editing the information for one item, but typically you need to change all the tracks of an audio CD. For example, if a CD of songs by Bob Dylan is listed with the artist as Bob Dylan, you might want to change all the songs at once to Dylan, Bob. Changing all the information in one fell swoop is fast and clean, but like most powerful shortcuts, you need to be careful because it can be dangerous.
Follow these steps to change a group of items at once:
Select a group of content items by clicking the first item and then pressing Shift while you click the last item.
All the items between the first and last are highlighted. You can extend a selection by Shift-clicking other items or add to a selection by

Choose File
A warning message displays:
Are you sure you want to edit information for multiple items?
Warning
Speed-editing the information in multiple items at once can be dangerous for your library organization. If, for example, you change an informational snippet for one item in a selected group (the song or movie title, for example), the corresponding snippet for all items in the selected group is going to change as well! Be careful about what you edit when using this method.
Click the Yes button to edit information for multiple items.
The Multiple Item Information dialog appears, as shown in Figure 12-2.
Edit the field you want to change for all the items.
When you edit a field, a check mark appears automatically in the check box next to the field. iTunes assumes that you want that field changed in all the selected items. Make sure that no other check box is selected except the ones for the fields that you want.
Click the OK button to make the change.

Tip
iTunes offers both Artist and Album Artist fields for a song so that you can include the album artist name if it's different — such as the artist name for a compilation album that features songs by different artists (for example, Eric Clapton's Crossroads box set, in which the Album Artist is Clapton but the Artist for each song might be the Yardbirds, Cream, Blind Faith, and so on). You can also use this field for Artist name formatted differently; for example, the Artist field could have the artist as Bob Dylan and the Album Artist as Dylan, Bob. You can then change the list view options (as I describe in Chapter 11) to include the Album Artist field as a column for sorting the song list.
Although the track information grabbed from the Internet is enough for identifying a song in your iTunes library, some facts — such as composer credits — might not be included. Adding composer credits is usually worth your effort because you can then search and sort by composer and create playlists based on the composer. Videos (movies, TV shows, and music videos), podcasts, and audio books might also have information in their fields that you want to change or have blank fields that could use some helpful information.
To get a look at (and edit) what Gracenote CDDB has provided about an item, select the item and then choose File

Note
When you select one item, its information dialog appears and your edits affect only one item; when you select multiple items, the Multiple Item Information dialog appears and your edits affect multiple items.
A selection's information dialog offers the following tabs:
Summary: The Summary tab (as shown in Figure 12-3) offers useful information about the media file format and location on your hard drive, the file size, and the digital compression method (along with bit rate, sample rate, and other settings).
Info: The Info tab allows you to change the name, artist, composer, album, genre, year, and other information. You can also add comments, as shown in Figure 12-4.
Video: The Video tab lets you enter information to describe the video. The information fields are set up for TV shows, including the title of the show, episode number and ID, and season number, but you can skip them for movies and music videos and just add a description.
Sorting: The Sorting tab allows you to add information to fields for additional choices while sorting your library content. For example, you can add a different name for the artist in the Sort Artist field to the right of the Artist field, such as Dylan, Bob for Bob Dylan. Information from the Info tab appears on the left side, and you can add an alternative sort field on the right side. You can even add a Show field for the title of a concert or some other use. Choose View
Options: The Options tab, as shown in Figure 12-5, offers the following:
Volume Adjustment: You can set the volume for a song, video, podcast, or audio book in advance so that it always plays at that volume (or lower, if your overall iTunes or iPod/iPhone volume is set lower). Drag the slider to the right to increase the volume adjustment up to 100% (twice the usual volume); drag the slider to the left to decrease the volume adjustment to −100% (half the usual volume). For more details on setting the volume in advance, see Chapter 13.
Equalizer Preset: Choose an equalizer preset for an item. See Chapter 13 for details on using the Equalizer in iTunes, and Chapter 16 on how you can use an Equalizer preset to control how an item sounds on your iPod or iPhone.
Media Kind: Set (or change) the type of media. For example, after importing a video, you can change its Media Kind to movie, TV show, or music video.
Rating: Assign up to five stars to an item as a rating. (See how in the next section.)
Start Time and Stop Time: Set the start and stop times for an item. You can use these options to cut unwanted intros and outros of a song (such as announcers, audience applause, and tuning up), or to skip opening credits or commercials of movies. You can also use it in conjunction with the Convert feature to split an item (or, in the parlance of record label executives and artists, split a track) into multiple items (tracks).
Remember Playback Position: Set this option for an item so that when you select and play the item, iTunes resumes playing it from where you left off. This option is usually turned on for audio books, movies, and TV shows.
Skip When Shuffling: Set this option for an item to be skipped from Party Shuffle.
Part of a Gapless Album: Set this option for an item to be played back without a gap between songs. (See Chapter 8 to find out about the gaps between songs.)
Lyrics: The Lyrics tab offers a text field for typing or pasting lyrics (or any text). Some songs in the iTunes Store are supplied with lyrics — you can find them here.
Tip
You can view lyrics on an iPod touch or iPhone by starting a song and then, while the song is playing, tapping the song's album cover. To see lyrics on an iPod nano or iPod classic, start playing a song and then press the Select button several times until you see the lyrics. On an iPod nano, the first press shows the scrubber bar, the second shows ratings, the third shows the Shuffle slider, and the fourth shows the lyrics. If you press the Select button too many times, the iPod returns to the Now Playing display.
Artwork: The Artwork tab allows you to add or delete artwork for the item. See the upcoming section "Adding Cover Art."

Tip
If you follow the careers of certain guitarists, vocalists, or session musicians, you can sort your music in List view by something other than the given artist for the album. First, provide a new entry for the Sort Artist or Sort Album Artist fields on the Sorting tab, and then choose that field as a view option so that you can sort on it. For example, I like to use the Sort Artist field for the leader, lead guitarist, or lead singer in a band, or a session player or special guest (such as Nicky Hopkins, who played keyboards on a variety of albums by different bands including The Who, The Rolling Stones, and The Beatles). After entering Nicky Hopkins into the Sort Artist field for the songs, I can choose View
You can apply the entry of a sort field on the Sorting tab to all the tracks of the same album or to all tracks by the same artist, album artist, composer, or show. After changing the sort field for an item on the Sorting tab, select the item in List view, Control-click (Mac) or right-click (Windows) the item to display the contextual menu, and then choose Apply Sort Field. Click Yes to make the change.
Tip
To move through an album one item at a time when using Get Info (without closing and reopening the information dialog), click the Previous or Next buttons in the lower-left corner of the dialog.
iTunes allows you to rate your content. The cool thing about ratings is that they're yours. You can use ratings to mean anything you want. For example, you can rate songs based on how much you like them, whether your mother would listen to them, or how they blend into a work environment. You can also rate videos based on your watching habits, as well as audio books and podcasts.
To add a rating to a content item, click the Options tab (refer to Figure 12-5) and drag inside the My Rating field to add stars. The upper limit is five stars (for the best). You can also select the item and choose File
You might have noticed the My Top Rated playlist in the Source pane. This playlist is an example of a smart playlist — a playlist that updates when ratings are changed. The My Top Rated playlist plays all the top-rated songs in your library. You can find out more about playlists in Chapter 14.
iTunes displays the cover art for your albums, videos, movies, podcasts, audio books, and TV shows in the Cover Flow browser. (See Chapter 11 for details.) All current iPod models and the iPhone, and even Apple TV, all display the cover art. So it makes sense to get the art, especially because it's free!
Items that you buy from the iTunes Store typically include an image of the album, book, or box cover art or a photo of the artist that serves as cover art. You can see the artwork in the lower-left corner of the iTunes window by clicking the Show/Hide Artwork button (the rightmost button in the row of four buttons at the bottom of the iTunes window on the left side). The artwork changes for each item or album that you select or play. You can toggle between displaying the cover art of the item playing to the cover art of a selected item by clicking the right arrow (or the words Now Playing) above the cover art view in iTunes. Toggle back to displaying the cover art of the now-playing item by clicking the right arrow again (or the words Selected Item).
To fill your library automatically with cover art for the CDs you ripped, get yourself an iTunes Store account if you don't already have one. Log in to your account and then choose Advanced
Tip
To download cover art for ripped CDs automatically after ripping them (without having to manually choose Advanced
You can also get your cover art from other places that sell CDs, such as Amazon.com, or you can even scan them from the actual CDs. The optimal size for cover art is 300 × 300 pixels. Save it in a graphics format that iTunes (and its underlying graphics technology, QuickTime) understands — JPEG, GIF, PNG, TIFF, or Photoshop. With a Web browser, you can visit Web pages to scout for suitable art; just Control-click (Mac) or right-click (Windows) an image to download and save the image on your hard drive. With Safari on a Mac and some browsers (such as Firefox) in Windows, you can drag the image directly from the Web browser window into the iTunes art pane.
To add artwork to one or more items, select it (or them) in your iTunes library and do one of the following:
Drag the artwork's image file from a Desktop folder into the artwork viewing area (the lower-left corner of the iTunes window).
To add artwork for an entire album (rather than just individual songs) or season of TV shows, first select the album or season in the Column Browser or select all the items in List view. Then drag the image file into the artwork viewing area.
Add artwork to a single item through the information window.
Choose File
Add artwork for multiple items in the Multiple Item Information dialog.
Choose File
See the section "Editing multiple items at once," earlier in this chapter, to find out more about using the Multiple Item Information dialog.
To remove the artwork from an item, view the artwork in a larger window or resize the artwork, choose File