
An excellent guide for using MakerWare to print multicolor parts can be found on the MakerBot website at http://www.makerbot.com/support/makerware/documentation/dual/, which will aid in our discussion.
In order to print in multicolors, we need either a MakerBot Replicator (Dual) or Replicator 2X. If you have a single printhead MakerBot machine your only option for multicolor printing is a process called Z Pause, which will be covered near the end of this chapter.
Now we need to select our printer in MakerWare from the Type of MakerBot option (MakerBots | Type of MakerBot). Once we select either The Replicator (Dual) or The Replicator 2X, we notice that an Object option appears below the Scale option on the left-hand side of the screen. We will get into using this new feature right after we orient our model.
At this point, if you haven't already, you should add all the models to the build platform.
Tip
We touched on this before, but now it's extremely important to select Keep Position if prompted with a pop up. Clicking on Move to Platform with multiple parts will loose the relationship between parts inside MakerWare. If you do click on this by accident, simply delete the part and re-add it, this time selecting Keep Position.
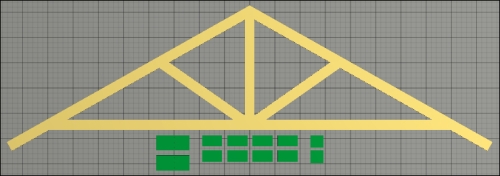
Select all of the models by holding the Shift key and left-clicking each model. Once we have all the models selected, we are going to orient the model the same way as we did in Chapter 3, 3D Printing Software, by using the Move and Turn options. We're going to orient the model to the position shown in the following screenshot, which is the print orientation we had optimized for during design:

An oriented gusset assembly
Now that we have the model oriented, we are ready to select which extruder should print which objects. Open Makerware Settings (by navigating to Edit | Settings). Here is where we select the colors that we have loaded in each of our extruders.
We need to tell MakerWare which models go with which extruders by selecting one of our models and left-clicking the Object option located to the left-hand side of the screen under Scale (this will only appear if we have selected The Replicator (Dual) or The Replicator 2X. Here we can select the extruder for each of our objects, which will color the objects accordingly. The following screenshot shows our gussets selected as a different extruder as compared to all our gussets:

The Dual extruder selection (green and yellow) gusset assembly
Once we are satisfied, we are ready to make. If we do not have a dual-headed MakerBot or if one of our heads is for whatever reason out of commission, we do have one other option for printing in dual colors—Z Pause.
To use Z Pause, we must first make sure we have Firmware 7.3 or above installed on our MakerBot. Z Pause allows us to choose a location (in mm) to pause the print during which we can manually change the filament color in the extruder.
This setting is enabled from the MakerBot interface board itself rather than in MakerWare. During a print, first ensure that you are at the home screen by hitting Left on the MakerBot D-Pad, and then scroll down and select Z Pause. Choose the height in mm for the filament you want to change. Once the print reaches this height, the printer will pause allowing you to change the filament. After you have changed the filament, hit Resume.
We are going to cover some of the options we have if we want to print this model.
MakerWare v2.2 had one major drawback when it came to multicolor printing; we were not able to use rafts or supports. This severely constricted the flexibility in design, as we were not able to print any models with sharp overhangs. The release of MakerWare v2.3.1 fixed this huge issue by introducing rafts and supports, and also allows us to specify which printer head we would like to use for these supporting structures.
If we have a MakerBot Replicator Dual or Replicator 2X, this is the simplest option to achieve multicolor prints.
Depending on geometry, we can really benefit from Z Pause. Z Pause has the benefit of rafts and supports while still being able to use multicolors (restricted to changing colors in layers). This allows us (regardless of the number of print heads) to print a model in multiple colors.
Our roof truss would print very well using Z Print. The first 0.5 mm is our first set of gussets, then the next 1.5 mm is our wooden components, and the last 0.5 mm is our second set of gussets. To do this, we need to go back and select only one extruder head for all our parts. Then, use the Z Print setting on the MakerBot, as mentioned in the Z Print section in this chapter—once at 0.5 mm and the second at 2.0 mm (0.5 mm gussets along with 1.5 mm wood).
Tip
The last layer of supporting material is sometime difficult to remove from our part, and using multicolors we may unfortunately have some different-colored supporting material attached. If it doesn't affect the look of our part too drastically, what we can do to avoid this is reduce the Z Print height by our Layer Height; this way, the last layer of supporting material will be in the color of our new layer. A second option is sandpaper.
Another option we have is to create a new assembly, as seen in the following image, which is exactly one half of the model. To do this, we need to reduce the extrusion of our wooden component to half and remove all the gussets from one side of the assembly. Both halves are identical, so we only need to print one half twice and then superglue the model back together. The advantage of this technique is that we can use multicolored printing and have our model sit flat on the build platform (we will also have to heat the build platform to ensure adhesion).

A half root truss assembly (split laterally)
The final option is to print all the components separately and again, using superglue, glue all the components into position.
Tip
We can add all of our parts to the build platform and print them all in one print, rather than having to print each individually. The following screenshot shows the build platform with all of our parts laid out. This is a very common approach and is known as a build tray. All the .stl files are inside the folder ch4_build_tray/.
Sometimes, we are faced with no other decision but to slightly redesign the part to facilitate printing. For our example, what we could do is cut a very thin (0.2 mm) square into our wooden model which the gussets will then sit inside. By doing this, we no longer require rafts or supports in our model, because the wooden component will sit flush against the build platform.
Regardless of the option chosen, our last step before printing is determining which resolution to use. Looking at our model, the only area of concern is the gusset grooves. If you remember, we made these 0.2 mm deep leaving 0.3 mm of material. We also made the gussets themselves 0.5 mm thick. Our rule of thumb is to have at absolute minimum two layers of thickness; therefore, we have no other choice than to print using high resolution. If we wanted to print on a standing resolution, we should modify our gusset, as we noted earlier, because they are the components that are dictating our resolution.
What's important to note once our print is done is the pattern on the large gusset. If you look very closely, you'll see that indeed the top of the gusset has the pattern we had outlined; however, it looks nowhere near as was on our screen during modeling. What you design isn't always what you'll get. This is a good example of us pushing the absolute limits of our MakerBot's resolution expecting something that on screen has actually been highly magnified. The fault falls on us the designer, not on the printer.
Congratulations, we have just created and assembled our first multicolor part! We are now ready to move on to more complicated assemblies, which we will cover in the next chapter.