5. FOCUS AREA
![]()
ONE OF THE most important criteria when focusing is where within the frame to focus. It may be obvious to you what part of your scene is most important, but it’s difficult for a computer to interpret what you want. The Focus Area option allows the photographer to decide where in the frame the camera should focus.
Exact terminology will vary from one brand of camera to another, but the selection option for where the camera focuses is most commonly known as the Focus Area. Check the sidebar or your camera’s instruction manual or menu to see what it is called in your camera.
There are generally three different types of areas that can be chosen for focusing: All Area Focus, Single Area Focus, and Group Area Focus. No matter what you choose, the camera will only be able to focus on an object if it is bright enough and has contrast, lines, or texture. Cameras may have a difficult time focusing on subjects like a plain wall, a blue sky, bright lights, dark shadows, or any area that the focus system can’t “grab” onto.
All Area Focus
All Area Focus indicates that the camera will be using data from all focusing points to determine where to focus. In modern cameras, this will cover a large portion of the scene you have framed up. Some DSLR cameras, especially older models, have their focusing points grouped near the center of the frame. Modern cameras can have hundreds of focus points extending almost entirely from side to side and top to bottom.
When all points are active and you press down on the shutter release button, the camera will use all focus points to determine where to focus. The camera will examine contrast levels in all areas, then focus the lens on the area closest to the camera. If the closest point to the camera is difficult to focus on, it will then go to the next closest area. The point or points that it chooses are typically indicated by green confirmation boxes or lines in the viewfinder.
The important takeaway is that the camera’s All Area Focus focuses on the closest object, not the most important. It can also be fooled by low contrast, low light, or other anomalies. If the camera isn’t focusing on what you want, you’ll need to choose a different framing of the subject or you will need to change to a smaller focusing area.
What’s in a Name?
Each camera brand has its own naming protocol for the variety of features associated with focusing. In this book we will use a generic naming system. Specific names given to various features by their respective brands are noted in the sidebars. Naming may change over time or could be different with different models.
Terms we will use:
- Focus Area: Refers to the area that is active and seeking focus.
- All Area Focus: All focus points of the focusing system are active.
- Single Area Focus: A single focus point is active.
- Group Area Focus: More than one, but less than all focus points are active.
- Focus Mode: The manner in which focus will be acquired: usually Single or Continuous.
- Single AF Mode: The camera will focus on the closest subject and then hold.
- Continuous AF Mode: Focus continually adjusts to keep focus.
- Auto AF Mode: Camera automatically switches between Single AF and Continuous AF based on movement.
*AF=Autofocus
Focus Area Nomenclature
- Canon: AF Area Selection Mode, AF Method
- Fujifilm: AF Mode
- Leica: AF Field Size
- Nikon: AF-area mode
- Olympus: AF target
- Panasonic: Auto Focus Mode
- Pentax: AF Active Area
- Sony: Focus Area
The advantage to this system is that the camera has lots of options on where it can focus. If contrast levels are low in one part of the frame, it has many to choose from in another part. This system would work perfectly for photographing a distant landscape, with everything at a mostly equal distance from the camera. It can also work quite well in simple photographic set-ups, such as a person standing in a park with nothing in between them and the camera. If your subject is standing on the back side of a tree, the camera will most likely choose to focus on the tree.
The simplicity of this system makes cameras very easy to use for basic photographic situations. If a camera has a full auto mode, this is the focus system that is usually applied. This is not a good system for those that want to be specific about their point of focus or those who work in tricky three-dimensional situations.
All Area Focus Nomenclature
- Canon: Zone AF, Automatic selection AF, FlexiZone-Multi, Smooth zone
- Fujifilm: Wide/Tracking
- Leica: Field
- Nikon: Auto-area AF
- Panasonic: All-Area, 225-Area, 23-Area, 49-Area
- Pentax: Auto
- Olympus: All Targets
- Sony: Wide
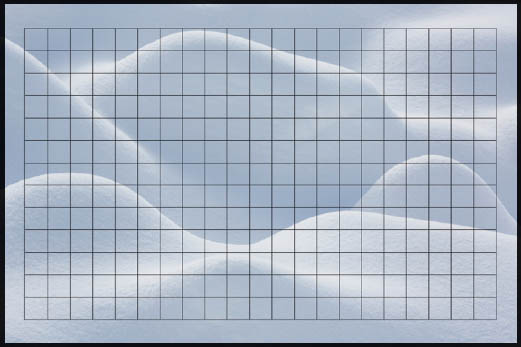
All Area Focus on a mirrorless camera will often feature a seamless grid pattern covering most of the image area.
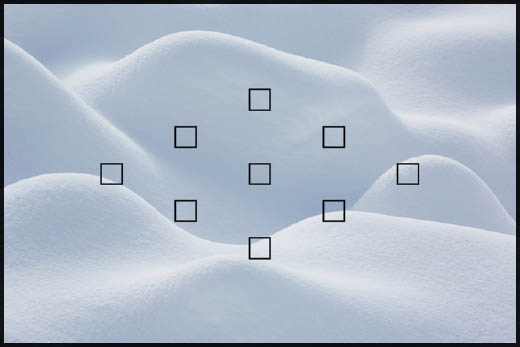
All Area Focus on a basic DSLR camera will usually be limited to a modest number of pre-selected focus boxes grouped near the middle of the frame.

All Area Focus on an advanced DSLR camera will often have many points covering a large portion of the image area.
Single Area Focus
The most precise way to focus is with Single Area Focus. To do this, you’ll need to first access your camera’s focus controls to select a single point of focus. Check your instruction manual for information on how to do this. Once selected, it should be visible in the viewfinder as a small box. When you press the shutter release button to the halfway position, the camera will look only within the confines of that little box when finding focus. For this reason, you’ll need to be very careful where you place the box. Focusing systems need to focus on contrast, horizontal lines, or vertical lines. Avoid areas that are plain, a solid color, very dark, or very bright.
If there is nothing of contrast where your focus point is, you can always focus on a subject that is equal distance away, but that has more contrast. If your camera is in Single AF Mode (section 6) you can use a technique called Focus Lock (section 18). When you press halfway down on the shutter release button, the camera will focus. Once focus is achieved, it stays locked as long as your finger remains pressed halfway on the shutter release button. By focusing on something nearby, you can keep the focus locked in that place and reposition the camera to your preferred composition, then press fully down to take the photo.
This Focus Lock technique is invaluable in cases where focusing and composition do not align correctly. When photographing two people standing side by side, focus on one of them, Focus Lock with a half press of the shutter release button, then recompose for a pleasing composition. Press the button the remainder of the way down to take the photo.
Another option for focusing on a subject away from your selected focus point is to move your selected focus point to a new position. Most cameras will allow for a focus point to be moved around in the frame. Individual cameras will vary on how this is accomplished and the range of options that are available. Some cameras will require you to enter a menu system in order to make the change. Cameras with a joystick or control pad will allow direct access for quickly moving the focus point around.
Group Area Focus
When a single box is too small to suit your subject but using all the points is too much, select Group Area Focus. There are a wide variety of group area settings for different camera systems. In some cases it’s a single point, with assistance from neighboring points in case the primary point fails to acquire focus. In other cases, the group area is a large box or a group of smaller focus boxes. Check your camera, its menu, or the manual for more information about what your camera offers.
Group Area Focus is great for situations where you want to be precise about what you are focusing on, but there are limitations on how precisely you can frame up your subject. This will likely be the case if either you or your subject is moving around. When photographing action, it can be difficult to precisely place a small focusing point on a moving subject. The same could be said if it was you who was moving, perhaps in a car or train. With either you or your subject moving, a slightly larger focusing area will give you a better chance of keeping the focusing point(s) on your subject.
Single Area Focus Nomenclature
- Canon: 1-point AF, Single-point Spot AF, Single-point AF, FlexiZone-Single, Live 1-point AF
- Fujifilm: Single Point
- Leica: 1 Point-Metering
- Nikon: Pinpoint AF, Single-point AF, Normal-area AF, Wide-area AF
- Olympus: Single Target
- Panasonic: 1-Area, Pinpoint,
- Pentax: Spot, Expanded Area AF, Select
- Sony: Center, Flexible Spot, Expand Flexible Spot
Group Area Focus Nomenclature
- Canon: Expand AF area, Expand AF area: Around, AF point expansion, Zone AF, Large Zone
- Fujifilm: Zone
- Leica: Zone
- Nikon: Dynamic-area AF, Wide-area AF
- Olympus: 5-Target Group, 9-Target Group
- Panasonic: Custom Multi, Multiple AF Points
- Pentax: Zone
- Sony: Zone
In active situations, an All Area Focus option may work better, but if there are any obstructions between you and your subject, the camera will focus on the closest object. If photographing football, you may have other players, referees, goal posts, and possibly even coaches or fans between you and your subject. A group of points about the size of your subject will allow you to be precise about your subject selection but avoid the other interfering objects.
If photographing birds in flight, an irregular flight path will be hard to track with a single point. With a group of focus points it will be much easier to keep an area of focus on the moving bird. If the bird flies near a building or tree, the group focus area can be kept on the bird and focus can be maintained in the correct area. If the bird is flying in an open area with no obstructions between photographer and bird, then All Area Focus would work just as well.
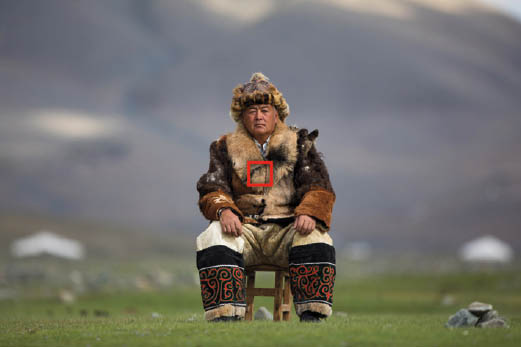
Use the single focus area to track the exact point you want to focus on. The focus system works best with areas of strong contrast and good detail.
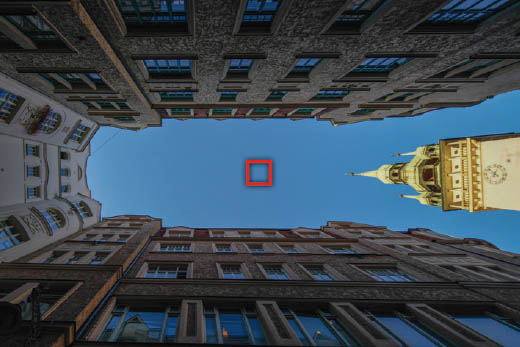
Cameras may struggle or fail to autofocus for a number of reasons, including low light, bright light, or (in the case of this image) low contrast.

By using the Focus Lock technique, you can move the single focus area around in the frame and take a number of shots without needing to recompose. If your subject is off-center and has an available focus area overlapping it, move the active focus point to that location. With your focus point in the perfect position, you are able to take repeated shots of your subject with the camera checking focus before recording each image. This can be very helpful when you are moving around and your focus distance isn’t necessarily consistent from shot to shot.

Group Area Focus is a good choice for subjects that move quickly and in situations where a single focus point would be difficult to keep on a specific subject.

Use an off-center Group Area Focus with moving subjects that you would like in the corner of the frame.