
Access control is a crucial step in implementing a secure foundation for your environment. You need to define who can access your AWS resources, as well as when, why, and how. Much of this access is governed by different access policies associated with your identities. This chapter dives deep into how to create and manage your access policies to effectively and securely govern permissions across your infrastructure.
The following topics will be covered in this chapter:
- Understanding the difference between policy types
- Identifying policy structure and syntax
- Configuring cross-account access
- IAM policy management
- Policy evaluation
- Using bucket policies to control access to S3
Technical requirements
To complete all the steps detailed in this chapter, you will need to have access to two AWS accounts and be able to administer the IAM service.
Understanding the difference between policy types
We looked into different policies when discussing users, groups, and roles in the previous chapter. So now, we will dive deeper into these policies and discuss the various different types of policies and what they look like.
Policies are associated with users, groups, roles, or resources and define who or what can or can’t access AWS resources. You may already be familiar with some policy types, but AWS supports a number of different types of policies, including the following:
- Identity-based policies
- Resource-based policies
- Permissions boundaries
- Access Control Lists (ACLs)
- Organization Service Control Policies (SCPs)
We will discuss these policies one by one in the following subsections.
Identity-based policies
If you have been using AWS for any length of time, then this type of policy is probably the most familiar to you. You can attach these policies to identities that have been created within the IAM service and they essentially associate specific permissions associated with the identity. For example, if a group had a policy allowing full Amazon Simple Storage Service (S3) access, then that is an identity-based policy as users of the group would be granted permissions based on the policies bound to that group.
Identity-based policies can either be AWS-managed, customer-managed, or in-line policies, which we will discuss now:
- AWS-managed policies: These are predefined policies that can be found within IAM and are available to use without having to create your own. The following screenshot shows a sample of the EC2-managed policies that are available:
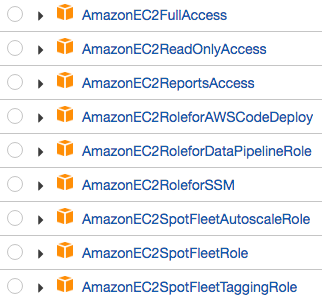
As you can see, there is a wide range of policies for each service with varying levels of access. At the time of writing this book, there are over 480 AWS-managed policies to choose from. They can all be accessed by selecting Policies from within the IAM management console.
- Customer-managed policies: These are policies that have been customized by us as customers. There might not be an AWS-managed policy that is correct; as a result, you may need to either copy and customize an existing managed policy or create your own from scratch by using the visual editor or writing it using JavaScript Object Notation (JSON) format. Customer-managed identity-based policies give you far more granular control over how you want to manage access for identities than AWS-managed policies.
- In-line policies: These are different from both AWS- and customer-managed policies in the sense that in-line policies are embedded directly into the identity object; for example, customer-managed policies are stored in IAM as separate objects and can then be assigned to multiple identities, such as groups, roles, and users. In-line policies are not stored as separate objects; they only exist within the identity that they are created—users or roles.
As a general rule, it’s a best practice to use managed policies over in-line policies where possible as you have a clear view of managed policies within IAM, whereas in-line policies are embedded into identities and are not as visible.
Resource-based policies
These are essentially in-line policies, but instead of being attached to an identity object, they are attached to resources themselves. For example, one of the most frequently used resource-based policies is Amazon S3 bucket policies.
As these policies are not attached to an identity, there needs to be a parameter within the policy that defines a principal so that AWS knows who or what these permissions apply to. This principal relates to an identity and can either reside in the same AWS account or in a different account. We will discuss principals later in this chapter when we look at the structure of policies.
Permissions boundaries
These are policies that govern the maximum permissions that an identity-based policy can associate with any user or role; however, the permissions boundary policy itself does not apply permissions to users or roles. It simply restricts those given by the identity-based policy.
To create a permissions boundary, you can perform the following steps:
- From within the IAM management console, select your user or role. In this example, we have selected a user who has been assigned permissions from a group, AmazonS3FullAccess (as per the best practices), giving full access to S3. However, if you wanted to restrict this level of access to S3 either temporarily or permanently for this particular user, you could set a permissions boundary:

- Select the arrow next to Permissions boundary (not set). This will open a drop-down menu:

- Select Set Boundary. This will then take you to a screen showing all the managed policies (both AWS- and customer-managed). From here, you can select a new policy to act as the maximum boundary—for example, AmazonS3ReadOnlyAccess. Once you have selected your policy, click Set boundary:

- This new boundary will restrict that user's permissions to S3 as read-only based on the associated managed policy of that boundary. This is despite the user being a member of a group that has access to AmazonS3FullAccess.
If you want to explore permissions boundaries in greater depth and understand how they are evaluated against all other permissions, please refer to https://docs.aws.amazon.com/IAM/latest/UserGuide/access_policies_boundaries.html.
Access control lists
Firstly, do not confuse ACLs with network access control lists (NACLs), which are used to control network traffic (discussed later in this chapter). ACLs are used in Amazon S3 and act much like resource-based policies, as these ACLs can be attached to buckets. They can also be attached to S3 objects, whereas bucket policies (discussed later in this chapter) can’t. However, ACLs are used only to control cross-account access from a different AWS account or public access.
When configuring your ACLs, you have a number of options as to who can access the object or bucket via an ACL:
- Access for other AWS Accounts: Using this option, you can enter the email address of the account owner or the canonical ID of the AWS account.
- Public Access: This is a pre-configured S3 group created by AWS and allows anyone with internet access to have access to your object. This should be used with extreme caution and should only be used if necessary. Ensure that no sensitive or confidential data is stored within an object or bucket that has public access.
- S3 Log Delivery Group: Again, this is another pre-configured S3 group created by AWS. This option allows write permission to the bucket for S3 server access logging. If this logging is configured, these logs can be useful from a security and audit point of view.
To view these options and the permission level, do the following:
- From the AWS management console, select S3:

- Select the bucket that you would like to configure permissions for.
- Select the Permissions tab:

- Select the Access Control List option:

- You will then see that there are minimal permissions that can be assigned for each of the three options, in addition to the bucket owner, as shown:

In fact, these are the only policies that are not written in JSON format. The permissions are as follows:

In this section, we looked at how we can use ACLs to control cross-account access from a different AWS account, as well as public access or access for server-access logging on a per bucket basis.
Organization SCPs
These are policies that are used by AWS organizations, which are used to manage multiple AWS accounts. Organizations can be used to allow you to centrally manage your AWS accounts in a hierarchical structure, and grouping can be done through Organization Units (OUs). SCPs act in a similar manner to permissions boundaries within identity objects. They set the maximum permission level that can be given to members of an associated AWS account or OU. They restrict what level both identity-based and resource-based policies can grant permission for both users and roles, but the SCPs do not themselves grant any permissions.
For example, the following SCP would deny anyone within the AWS account associated with the SCP from deleting VPC Flow Logs, even if they had access via an identity-based policy:
{
 "Version": "2012-10-17",
 "Statement": [
   {
     "Effect": "Deny",
     "Action": [
       "ec2:DeleteFlowLogs",
       "logs:DeleteLogGroup",
       "logs:DeleteLogStream"
     ],
     "Resource": "*"
   }
 ]
}
With this, we come to the end of the section covering the various access policies. Remember that since these policies determine who or what can or can’t access AWS resources, they are very important to understand in order to ensure the security of your environment is maintained. The syntax of this policy, as well as other JSON policies used (for example, those within IAM) are covered in the next section. So, let's take a look at that next.
Identifying policy structure and syntax
All of the policies discussed in the previous section, other than ACLs, are written in JSON format and follow a specific policy structure. Understanding this structure will enable you to quickly and easily identify what permissions are being granted or denied within a policy and for who and what service. You must be able to confidently review and interpret these policies.
An example of policy structure
The following screenshot shows an example policy. Take a note of the various parameters:
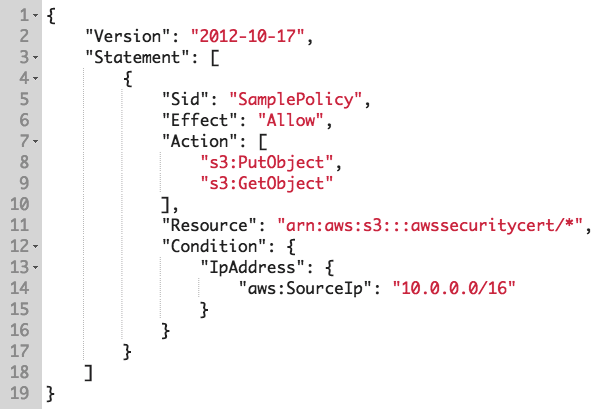
Let's understand these parameters one by one:
- Version: The 2012-10-17 version number shows the version of the policy language being used by AWS. The latest version at the time of writing this book is 2012-10-17.
- Statement: This acts as a group for the parameters that follow, and each policy can have a number of statements within them.
- Sid: This is simply a statement identification, the value of which can be anything to make logical sense of the statement itself. In this example, we have simply added a value of SamplePolicy, allowing us to easily identify what we are using the policy for.
- Effect: This can either be a value of Allow or Deny. This simply allows or denies access to the resources within the statement using the actions listed.
- Action: Here you can list a number of different actions that you want to either allow or deny access to, depending on the value of the previous parameter (Effect). In this example, we have listed two actions: s3:PutObject and s3:GetObject. The action is first defined by its service, such as S3, and is then followed by a colon (:), which precedes the action itself within the service.
- Resource: This provides the Amazon Resource Name (ARN) that tells us which resource these permissions apply to. In our example, we have an ARN: aws:s3:::awssecuritycert/*. * is a wildcard that stipulates any object within the awssecuritycert bucket.
- Condition: The Condition element is an optional parameter and allows you to dictate under what conditions or circumstances that the policy comes into effect. In my example policy, I have a single condition, which contains condition operators that specify the values of the condition. This condition is based on the IP address of the identity. For this condition to be met, the source IP address of the identity trying to access the aws:s3:::awssecuritycert/* resource, using either s3:PutObject or s3:GetObject, must be in the network range of 10.0.0.0/16.
It’s also possible to have multiple conditions, which are known as condition blocks (more than one condition). In a condition block, the conditions are evaluated together using a logical AND statement, meaning all conditions in the block must be met before the permissions are put into effect.
The parameters discussed in this example are similar to what you would expect to see in a resource-based policy. In the next section, we will focus on the core difference between the two.
The structure of a resource-based policy
The policy structure for resource-based policies is essentially the same; however, there is one significant difference. As mentioned previously, when working with resource-based policies, the policy itself is attached to a resource and not an identity. As a result, another parameter is needed within the policy to identify who or what the policy should be associated with. This parameter is known as Principal:

Principal is used within resource-based-policies to identify the user, role, account, or federated user that the permissions should be applied to in order to either allow or deny access. The preceding screenshot shows the same policy as the previous one but applied to an S3 bucket policy. The Principal parameter shows the ARN of the identity that these permissions should be applied to.
Understanding the difference between identity-based and resource-based policies will help you resolve access control and permission issues. If you can easily read a policy and understand what it allows or denies, and if that policy is associated with an identity or a resource, that will be of great benefit. Next, we'll learn to configure cross-account access.
Configuring cross-account access
To allow another identity from another AWS account to access your resources with your account, you need to configure a role to grant the access required.
Imagine we have two AWS accounts—account A (the trusting account) and account B (the trusted account). User Stuart using account B needs to have access to your Relational Database Service (RDS) database in account A:

To configure this access, we need a new cross-account access role, which will need to be configured as follows.
Creating a cross-account access role
Execute the following steps to create a cross-account access role:
- From the trusting account (in our example, this is account A), open IAM from the AWS management console.
- Select Roles from the menu, and then select Create Role.
- Select Another AWS account as the trusted identity.
- You must then enter the trusted AWS account ID; in this case, this is the ID for account B:

- Click on Next: Permissions.
- We can now add the permissions we want the role to have. I have selected AmazonRDSFullAccess, as shown:
![]()
- Once the permissions have been selected, select Next: Tags.
- For this demonstration, we don’t need to add any tags, so click on Next: Review.
- Add a role name—we will call it CrossAccountRDS—and then click Create Role:

- Select the CrossAccountRDS role in the list of roles that displays additional information about the role. From here, select the Trust relationships tab:

- You can see that the account that we listed is under Trusted entities. However, we need to narrow this access down to a specific user (Stuart) within that account, ensuring that only Stuart can assume the role. To do this, select Edit Trust Relationship.
- This will open up a policy editor that will allow us to directly edit the JSON policy. We now need to change the Principal line from "AWS": "arn:aws:iam::356903128354:root" to "AWS": "arn:aws:iam::356903128354:user/Stuart".
- This ensures that the only principal that can assume the role is user Stuart within the 356903128354 AWS account:

Now that we have configured a cross-account role and associated the trust relationship between two different accounts, we need to create a policy to allow an identity to assume this role.
Creating a policy to assume the cross-account role
For Stuart to assume this role via the AWS management console, he also needs the required permissions to allow him to assume the role. Again, a policy is required to enable the user to do that, and it looks as follows:
{
 "Version": "2012-10-17",
 "Statement": {
   "Effect": "Allow",
   "Action": "sts:AssumeRole",
   "Resource": "arn:aws:iam::730739171055:role/CrossAccountRDS"
 }
}
This role uses an Action parameter, which uses the Secure Token Service (STS) permission of AssumeRole against the resource in the trusting account. You can also use, for example, wildcards in the ARN of Resource. If you wanted Stuart to assume any role in the trusting account, you could use * as a wildcard, which would then look as follows:
"Resource": "arn:aws:iam::730739171055:role/*"
Now, the cross-account role has been created, and a policy that allows user Stuart to assume that role. So, the last step in this process is to assume that role to gain the temporary permissions that are granted in the new role.
Assuming the cross-account role
Now that I have assigned this policy allowing Stuart to assume the specific role, he can perform the following steps to assume the CrossAccountRDS role:
- From within the trusted account, Stuart can select the drop-down list in the top-right corner that shows the AWS account.
- Select Switch Role, as in the following screenshot:
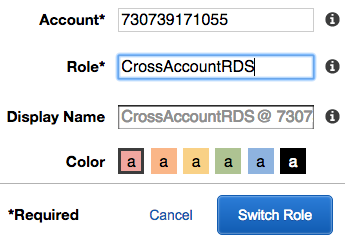
- Enter the AWS account number of the trusting account (account A), which is where the role exists.
- Enter the name of the role, CrossAccountRDS, and click Switch Role.
- To show you that the role has been assumed, the drop-down list from which you selected Switch Role initially will have changed to something similar to what is shown in the following screenshot, displaying the role name and which account it exists in:
![]()
In this section, we looked at how to create, configure, and assume a temporary set of credentials in the form of a cross-account access role. By assuming roles, it allows us to access resources in a different account without having to have an additional IAM user created within that account.
IAM policy management
Over time, you are likely to accumulate and use a long list of policies, especially as you dive into the realms of creating your own custom identity-based policies that enable you to be very precise and specific in your permission set for a user, group, or role. As a result, it’s important to understand some of the features available to you from within IAM to help you manage these roles.
When you access a policy within the AWS management console—for example, a custom policy that you have created—you will be presented with a page that looks as follows:

It will provide you with the policy ARN and the description of the policy that you added when you created the policy. Underneath this, you have the following tabs:
- Permissions
- Policy usage
- Policy versions
- Access advisor
Each of these tabs will help you to gain a better understanding of how the policy is configured. I now want to dive into each of these tabs to help you understand what each of them provides.
Permissions
The Permissions tab allows you to view a policy summary, which gives you a high-level breakdown of the permissions, which are broken down into the Service, Access level (such as read/write), Resource, and Request condition sections. From this tab, you can also view the policy in JSON format by clicking on the {}JSON tab. Finally, you can edit the policy by selecting Edit Policy:

This is a great way to gain a quick view of the permissions associated with the policy.
Policy usage
From this tab, you can attach the policy to identities, such as users, groups, and roles. In the following screenshot, you can see that this policy is attached to three users. You can also remove policies from any of these identities by selecting the user and selecting Detach:

This provides a very quick method of adding and removing users to and from your policies.
Policy versions
Each time a change is made to a policy, the AWS version controls that change and date-stamps it, allowing you to revert to a previous version of the policy. Using the Set as default and Delete options, you can easily switch between the versions of your policy and remove any unwanted and old policies to ensure they do not get used again as an additional security measure:

This version control is very useful when testing out new policy controls as it allows you to quickly roll back should an issue occur with your new policy.
Access Advisor
The Access Advisor tab allows you to determine when your identities associated with the permissions accessed the different services relating to the policy. In the following screenshot, we can see that user Stuart has not accessed S3 using these permissions for 917 days. With that in mind, it would be a good idea to remove this level of permission for the user as we can safely assume that he is not using it. Leaving these excessive permissions causes a security risk, should his credentials be compromised:

This tab can help you easily identify any policies that are granting more permission than is actually being used, which can lead to a security risk. Removing unnecessary permissions is essential in helping to ensure you have a robust security posture.
With this, we have come to the end of our section on managing policies. Remember that since you are likely to accumulate and use a long list of policies over time, managing these policies efficiently becomes of paramount importance. Next, we will move on to the topic of policy evaluation.
Policy evaluation
As your environment grows, so will your users, groups, roles, and resources. As a result, there will be times when an identity will have multiple policies that affects it, so how does AWS manage the logic of these policies?
When a request is received to gain access to a resource within AWS, the following four steps are performed to determine the permissions allowed:
- Authentication: AWS determines who the principal of the request is by way of authentication.
- Determine the context of the request: The access request is processed to define which policies should be used for permission verification. In this step the actions, resources, principals, environment data, and resource data are examined.
- Policy evaluation: AWS evaluates the policy types being used as a specific order is applied when processing the policies to determine the evaluation of permissions within a single account. Policies will be evaluated in the order of identity-based, resource-based, IAM permissions boundaries, and SCPs.
- Permission result: After the evaluation of policies has been carried out, access is either granted or denied.
As long as Allow exists in any one of the policies associated with the request, then access will be allowed for the relevant action. However if Deny exists in any of the policies that apply to the same resource and action as Allow, then access will be denied.
Let’s look at an example to help explain this policy logic.
User Lisa has got an identity-based policy attached that allows a subset of S3 permissions, including s3:putobject and s3:getobject, against a bucket of MyBucket. However, in addition to this, a bucket policy attached to MyBucket allows additional permissions to the principal Lisa user with permissions of s3:deletebucket and s3:deleteobject. What permissions does Lisa ultimately have?
In this instance, all the permissions are set to Allow, and so the permissions are accumulated, and the end result will be that Lisa has the following:
S3:putobject
S3:getobject
S3:deletebucket
S3:deleteobject
If at this point an IAM permission boundary was associated to Lisa that had a Deny effect for the action of S3:deletebucket against the resource of MyBucket, then the permissions for Lisa would be reduced to the following:
S3:putobject
S3:getobject
S3:deleteobject
Again, if at this point an SCP was added to the account where the Lisa identity was created that had a Deny effect for the action of S3:putobject against the resource of MyBucket, then Lisa’s permissions would be reduced to the following:
S3:getobject
S3:deleteobject
Remember, any deny action will overrule any allow action.
Ensure you have a good understanding of policy evaluation as you will need to understand how AWS manages this to resolve permission and access control-related issues. To do this, you will also need to be able to read policies effectively to understand the exact permissions they are enforcing.
Using bucket policies to control access to S3
As we covered previously, Amazon S3 bucket policies are a resource-based policy as the policy is directly attached the resource itself—in this case, the bucket. If you remember, resource-based policies have to have the additional parameter of Principal within the policy, so it knows which identity the permissions apply to.
We will see how to create a policy for an S3 bucket and how to apply this policy to a bucket. For this example, we have a bucket called awsbucketpolicy and we will add a bucket policy to this allowing user Lisa in a different AWS account to access the bucket. Now, previously, we looked at using roles to create cross-account access; however, for S3 resources it's also possible to emulate this cross-account access by using resource-based policies (bucket policies) and an identity-based policy attached to Lisa in the second account.
So, first, let’s create the bucket policy:
- Once you have navigated to your bucket in S3, select it, and then click on the Permissions tab and select Bucket Policy, as in the following screenshot:

- From here, we can either directly use the JSON editor provided to write the policy or, at the bottom of the screen, there is an option to use a policy generator. Now, this is a great tool if you are not confident with JSON or familiar enough with how to create policies from scratch. For those of you who are unfamiliar with the policy generator, refer to https://awspolicygen.s3.amazonaws.com/policygen.html.
It doesn’t just cater to S3 bucket policies; it can also be used to manage IAM policies, which we have already discussed (in addition to Simple Queue Service (SQS) Queue, SNS topics, and VPC endpoint policies, too).
- Once you have created the policy using either the policy generator or by adding it directly into the JSON editor from the bucket, it will look as follows:

As you can see, this policy allows user Lisa from account 356903128354 to access all S3 API calls to the awsbucketpolicy bucket.
- Now, we need to apply an identity-based policy to allow Lisa in account 356903128354 to access that bucket. The following policy is applied as follows:
{
  "Version": "2012-10-17",
  "Statement": [
    {
      "Sid": "S3BucketAccess",
      "Action": "s3:*",
      "Effect": "Allow",
      "Resource": "arn:aws:s3:::awsbucketpolicy"
    }
  ]
}
As you can see, the S3 bucket doesn’t actually detail the account that created it. This is because each S3 bucket is globally unique, and the namespace is shared by all AWS accounts.
- Now, both policies have been applied, and Lisa in account 356903128354 has full access to the awsbucketpolicy bucket, which is managed and administered by a different account.
As this is a JSON policy, you can, of course, add conditional elements, such as the ones we discussed earlier in this chapter when discussing the policy structure, to add a greater level of control if required.
Bucket policies can be used to control access not only for other AWS accounts, as we saw in this example, but also within your own account as well. You simply need to enter the ARN of the user for your own account.
Summary
This chapter took you through the various types of access policies, their structure, and how to effectively and securely manage access to your AWS resources. You need to be fully aware of the different policies that exist within AWS and how they work together to either grant or deny access to resources based on different actions.
Regardless of which policy you are using, one key point is to always implement security based on the Principle of Least Privilege (PoLP). This essentially means that you should only ever grant permissions for an identity that they actually need, and no more. For example, let's say a user needed access to be able to stop and terminate instances using ec2:stopinstances and ec2:terminateinstances. Then, you wouldn’t issue a policy that allowed access to all ec2 APIs—for example, ec2:*. If this happens, you are increasing the potential of security threats, especially from an internal perspective. For the certification exam, ensure you can read access policies with ease to determine what the policy allows or denies access to.
In the next chapter, we are going to look at access control through federation, allowing a single sign-on approach, covering both enterprise and social identity federation. We will also look at Amazon Cognito and see how it is used for access control across the mobile environment.
Questions
As we conclude, here is a list of questions for you to test your knowledge of this chapter's material. You will find the answers in the Assessments section of the Appendix:
- Which format are AWS policies written in?
- What type of policy are Amazon S3 bucket policies?
- Identity-based policies
- Resource-based policies
- Organization SCPs
- What parameter is needed within a resource-based policy to identify who or what the policy should be associated with?
- After configuring cross-account access, from which account do you assume the cross-account role from – the trusted account or the trusting account?
- True or false: the Access Advisor tab allows you to determine when identities accessed different services.
Further reading
- The IAM user guide can be found at: https://docs.aws.amazon.com/IAM/latest/UserGuide/introduction.html.