
A huge amount of effort goes into developing your web applications and services on AWS and they are often a target of intrusion attacks looking for weaknesses and vulnerabilities. To minimize and mitigate these threats, you must be able to implement solutions using different AWS services to help protect your application from being compromised. This is exactly what we will be doing in this chapter.
In this chapter, we will look at how to create a web access control list (ACL) using the AWS Web Application Firewall service, in addition to how you can set up, configure, and create firewall access policies using Firewall Manager.
This chapter will focus on the following:
- Exploring AWS Web Application Firewall (WAF)
- Managing the security configuration of your Elastic Load Balancers (ELBs)
- Securing APIs with AWS API Gateway
Technical requirements
To complete the exercises in this chapter, you will require the following:
- Access to an AWS account
- Permissions to configure services within AWS WAF
- A CloudFront distribution configured to be used only for testing
- Access to create and manage ELBs
- Access to AWS Certificate Manager
More information on how to assign and grant permissions can be found in Chapter 4, Working with Access Policies.
Exploring AWS Web WAF
The main function of the AWS WAF service is to provide protection for your web applications from malicious attacks from a wide variety of attack patterns, many of which correspond to the OWASP top 10. AWS WAF is used in conjunction with Amazon CloudFront and its distributions, the Application Load Balancer, or API Gateway to analyze requests over HTTP or HTTPS to help distinguish between harmful and legitimate requests to your applications and site. AWS WAF will then block and restrict access that is detected as forbidden.
I just mentioned OWASP in the previous paragraph, and for those who are unfamiliar with what or who that is, let me briefly explain.
As we know, there are a huge amount of security vulnerabilities embedded in applications of all sorts, and it’s important that we identify and assess the risks of potential exposure to allow us to resolve these weak points as soon as they are identified. The Open Web Applications Security Project (OWASP), https://www.owasp.org/, is a not-for-profit organization that helps the industry to improve security in software for all to benefit from.
The OWASP also provides a top-10 list, which is often updated, of the most critical security risks around application architecture facing enterprises worldwide. At the time of publication, this list includes the following:
- Injections
- Broken authentication and session management
- Cross-site scripting (XSS)
- Insecure direct object references
- Security misconfiguration
- Sensitive data exposure
- Missing function-level access control
- Cross-site request forgery (CSRF)
- Using known vulnerable components
- Unvalidated redirects and forwards
Going back to AWS WAF, to understand how it offers protection against these security risks, we need to look at the components involved in its design. There are three primary elements:
- Web ACL: Also known as a web ACL, this is used to provide protection for your AWS resources, as we shall see going forward in this chapter. They contain rules and rule groups, which are used to define what should be inspected within your requests.
- Rules: The rules themselves are essentially comprised of if/then statements and help to define specific criteria for what the web ACL should be inspecting, and what action (allow/block/count) to take upon the result of that inspection.
- Rule groups: Rule groups simply allow you to group a set of rules together.
In order to make this more clear, let me show you how to create a web ACL. During this process, we shall cover rules and rule groups to explain how each of these combine together to provide the protection given.
Creating a web ACL
To start with, we need to create a web ACL, which, during its configuration, comprises five steps. Follow along:
- From within your AWS Management Console, select WAF & Shield from the Security, Identity, & Compliance category:

- Select the Create web ACL button:

This will then take you to the first page of the creation of the web ACL. The configuration itself comprises five steps:
- Describe the web ACL and associate it with AWS resources.
- Add rules and rule groups.
- Set rule priority.
- Configure metrics.
- Review and create the web ACL.
Let's complete these steps in an orderly fashion.
Step 1 – Describing the web ACL and associating it with AWS resources
In this step, we need to provide some basic information when we create the web ACL. Let’s take a look:
- On the Describe Web ACL and associate it to AWS resources page, you will be asked to enter the first part of your configuration information, as well as to select the resources you’d like the web ACL to protect. Fill out the details as shown in the following screenshot. For this walk-through, I have selected CloudFront by selecting the Global (CloudFront) option in the Region list. The CloudWatch metric name is automatically created when you create a new web ACL:

- Next, you will need to associate your resources with this web ACL:

- Select the Add AWS resources button. This will present you with the following screen. Select a CloudFront distribution that you would like to associate and click Add:

- Your resource will now be shown as associated. Click the Next button at the bottom of the page:

You will now be on the next step, where you can add rules and rule groups.
Step 2 – Adding rules and rule groups
In this section, we are going to focus on rules and rule groups for the web ACL:

As you can see, there are three different sections here. Firstly, the rules themselves. To add a rule, do the following:
- Select Add rules:

This will give you two options:
-
- Add managed rule groups: Selecting this option allows you to select pre-built rule groups with preconfigured rules.
- Add my own rules and rule groups: This option allows you to build your own rules and rule groups.
- For the sake of this demonstration, select Add managed rule groups. This will provide you with a list of managed rule groups. The AWS managed rule groups are free to use; all other options are available through AWS Marketplace at a cost:

- Select the AWS managed groups. This will provide you with a list of managed rule groups – far more than you see here in this screenshot:

- Scroll down the list and select the Add to web ACL button for the following rule groups:
- Amazon IP reputation list
- Core rule set
An explanation of what these rule groups protect against can be seen in their description. The Capacity column that you see here relates to the number of web ACL rule capacity units used for that rule. I’ll focus more on this metric shortly.
- Select the Add rules button. You will now see these managed rule groups within your configuration:

- Under your newly added rule groups, you will see your web ACL rule capacity units (WCUs):

As you can see, this is the sum of our managed rules that we added (725). Web ACLs use rule capacity units to determine the maximum amount of rule configurations used on a single web ACL. Currently, this is defined as 1,500 WCUs. The complexity of each rule and rule group will affect the number of WCUs.
- Finally, you need to determine the actions against any requests that do not match any defined rules. Allow will simply allow the traffic to pass through as a trusted request. Block will block the request and prevent it from reaching its destination. As I have selected rule groups that are looking to block bad traffic, I will Allow any traffic that doesn’t match these rules to pass through as trusted traffic:
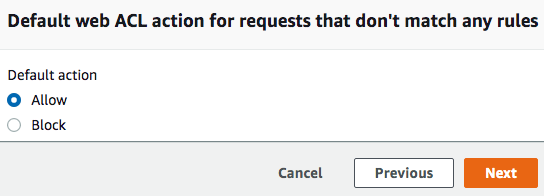
- Finally, click Next.
We have now created our rule groups, which give the web ACL instructions on what to inspect and what action to take. Let's now take a look at setting rule priority.
Step 3 – Setting rule priority
This step allows you to adjust the order of your rules as they are executed by your web ACL. It is important to note that WAF rules are executed in the order that they appear within a web ACL, and as soon as a match is found, no other rules are checked for that request. So, ensure you set these rules in the correct order to filter your requests appropriately. A common method of high-level management is to list them in order of the following:
- WhiteListed IPs – Allow
- BlackListed IPs – Block
- Bad Signatures – Block
WhiteListed IP addresses are IP addresses that are trusted and allowed to communicate with your associated resource. BlackListed IP addresses are addresses that have been defined as malicious or bad and are therefore explicitly blocked. Finally, bad signatures relate to any rules that meet other conditions, such as other attack patterns.
To adjust the order of your rules, follow these two simple steps:
- Select the rule and then select either the Move up or Move down button:

- Click Next.
Great! The rules are now ordered as per your preference. Let's move on to our next step.
Step 4 – Configuring metrics
In this step, you can create and configure Amazon CloudWatch metrics against your rules and rule groups that you selected in step 2. By default, it will add in the metric names, but you can change them as necessary. The default names in our case can be seen in the following screenshot:

These metrics can be used to help you monitor the number of web requests, web ACLs, and rules that you have within your environment. Understanding how your web ACLs are managing traffic and to what extent can be useful in understanding how much traffic you are receiving and from where.
Make any name changes to new metrics as necessary. Alternatively, if you do not want to create CloudWatch metrics for your rules/rule groups, you can deselect the checkbox. Once done, click Next.
Step 5 – Reviewing and creating the web ACL
This section allows you to review your choices from the previous four steps before creating your web ACL. Once you click on the Next button (seen in step 4), you will arrive at the following screen, presented in four different steps (I have broken down the screenshot here to focus on each step separately).
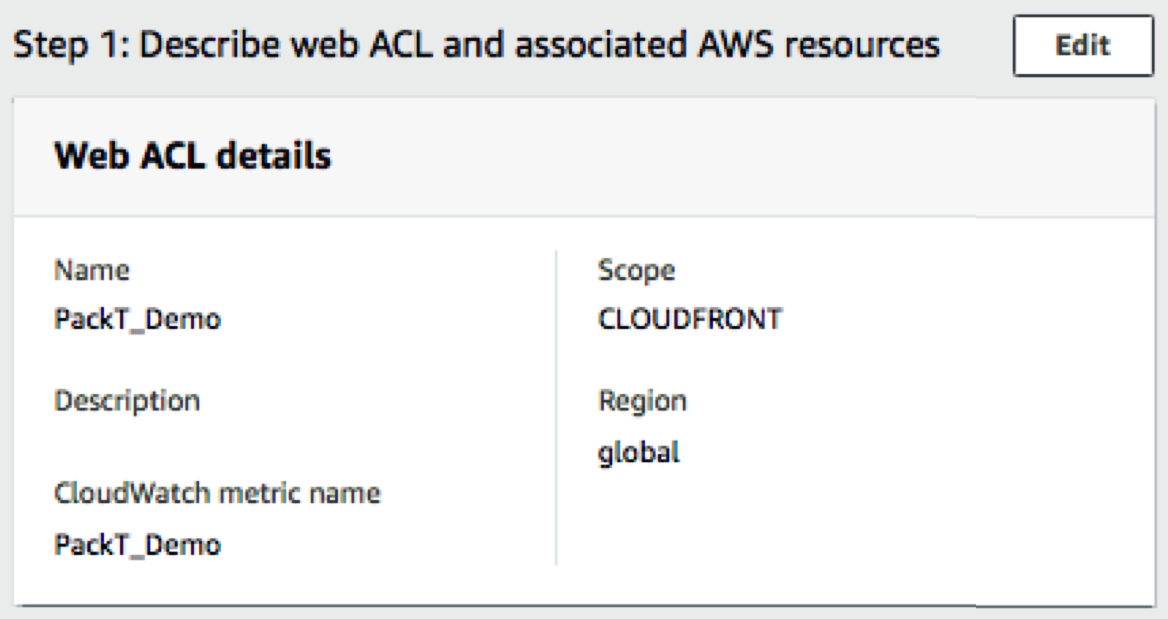
This screenshot provides us with a summary of the selections we made in step 1:
This screenshot provides us with a summary of the selections we made in steps 2 and 3:

Finally, here is a summary of the choices we made for step 4:

When you are happy with your configuration, click Create web ACL and your web ACL will then appear on the dashboard of your WAF console:

Your web ACL is now associated with your CloudFront distribution and is providing additional protection to your infrastructure. Now, every time a request is received by your CloudFront distribution, that web request will be processed by your newly configured AWS WAF web ACL, with the rules and rule groups that you configured, which will provide an enhanced level of protection for your web apps by only allowing traffic that has been deemed trustworthy.
Using AWS Firewall Manager
AWS Firewall Manager is closely linked with AWS WAF and is accessed from within the same dashboard within the AWS Management Console. AWS Firewall Manager allows you to manage WAF rules across a multi-account environment when using AWS Organizations.
If, for example, you had a number of CloudFront distributions across multiple accounts, it would be administratively heavy if you had to create your rules within each AWS account where you wanted to utilize the benefits of AWS WAF. Instead, with AWS Firewall Manager, you can centrally organize and manage your AWS WAF rulesets from a single console. One key benefit of the service is that it will protect your resources automatically as and when they are provisioned.
To enable you to utilize AWS Firewall Manager, you need to carry out a number of steps first. These include the following:
- Adding your AWS account to an AWS organization
- Selecting an AWS account to act as a primary account
- Enabling AWS Config on all accounts you want to administer
Let's complete these steps one by one.
Adding your AWS account to an AWS organization
You must first add your AWS account to an AWS organization that has all features enabled (not just consolidated billing). The AWS organization account owner will need to invite you to join the organization, at which point, you can choose to accept the invitation from the AWS organization dashboard within the AWS Management Console. Alternatively, you could set up the AWS organization yourself on your own account.
For more information on how to add your account to an AWS organization, please see the following link: https://docs.aws.amazon.com/organizations/latest/userguide/orgs_tutorials_basic.html.
Selecting your primary account to act as the Firewall Manager administrative account
The organization's master account must delegate which AWS account within the organization will become the administrator account for Firewall Manager. To do this, you can follow these steps:
- From within the AWS Management Console of the organization master, select AWS Firewall Manager under the Security, Identity, & Compliance category:

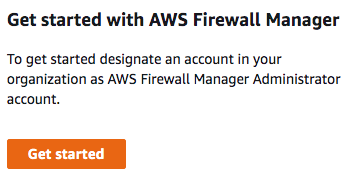
- Select Getting started under the AWS Firewall Manager option in the menu on the left:

You will see a list of the prerequisites I mentioned previously:

- Select Get started:
- Enter the AWS account ID (a 12-digit number) that you want to designate as the AWS Firewall Manager administrative account, and then click Set administrator account:

- You will then see a message stating that is has been successfully set:

It is worth noting that to set a different administrator, the current administrator must go to AWS Firewall Manager settings and remove their account as the administrator before the AWS organization owner can designate a new account.
Next, we need to enable AWS Config.
Enabling AWS Config
For instructions on how to enable and configure AWS Config within your account, please refer to Chapter 13, Auditing and Governance. AWS Config allows you to review, assess, and audit the configurations of your resources across your AWS account, including relationships between resources, configuration history, and compliance.
Once you have completed all the prerequisites of enabling the AWS Firewall Manager service, you can then create and apply an AWS Firewall Manager AWS WAF policy.
Creating and applying an AWS WAF policy to AWS Firewall Manager
These policies contain rule groups much as we discussed earlier when configuring our web ACL. In our example earlier, we used third-party rule groups, which provide a number of benefits over creating your own, such as the following:
- A reduction in the time it takes to configure and deploy. The rule groups are already built by both AWS-approved partners and AWS themselves.
- Depending on the rule group, they could help you to meet compliance controls that might be required for HIPAA or PCI.
- Some of them have been carefully curated to help mitigate against known vulnerabilities, such as those listed by the OWASP top 10. This is a great help to many organizations that might not have the skills in-house to put together rule groups that can achieve this level of security.
Now let's see how to create and apply a WAF policy to AWS Firewall Manager. Follow these steps:
- From within the AWS Firewall Manager console, select Security policies from the menu on the left:

- Select Create policy:

- You will now have a five-step process to follow. These steps include the following:
- Choose the policy type and region.
- Describe the policy.
- Define the policy type.
- Configure policy tags.
- Review and create the policy:

- The first step is Choose policy type and region. In the preceding example, I have already selected AWS WAF and the Global region. Select Next to move on to Step 2 -Describe policy.
- Add a name for the policy:

- Next, you need to add the rule groups that you would like Firewall Manager to enforce across the different accounts in the AWS organization. You can select your own rule groups that you might have created within AWS WAF, or select from a list of predefined rule groups:
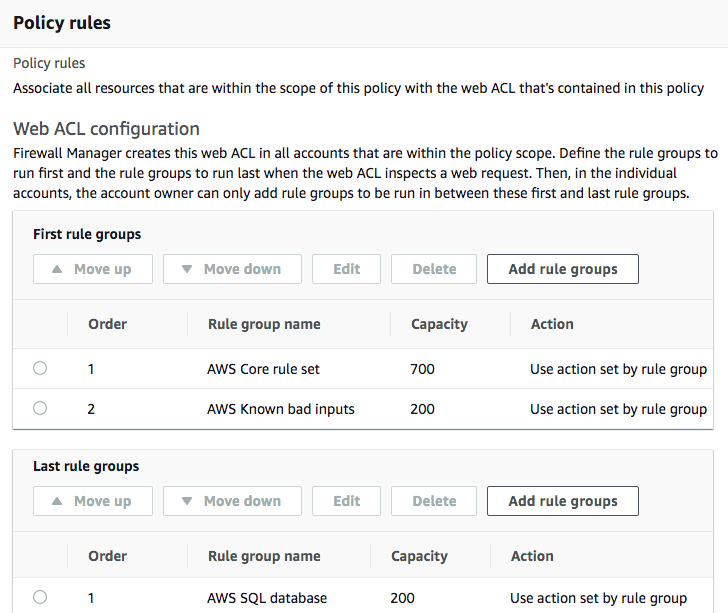
As you can see, there are two sections, First rule groups and Last rule groups. Any rule groups that are selected within First rule groups are run across all accounts associated with the web ACL that is being created before any account-specific rule groups are run. Additionally, any rule groups that are selected within Last rule groups will be run after any account-specific rule groups. In this example, I have selected 2 to be run first and 1 to be run last.
You can add your rule groups in the same way as we did when we configured them for AWS WAF.
- We then need to determine a default action to be taken for any requests that do not match any of the rules selected. In this example, I have selected Allow for trusted traffic to pass through:

- Finally, you must select a policy action. For this demonstration, I have selected the default option:

This default option creates a web ACL in each associated account within the organization; however, it will not apply the web ACL to any resources at that point. Alternatively, you could choose Auto remediate any noncompliance resources to automatically apply the new policy to all associated AWS accounts in the organization.
- Select Next to move on to step 3 - Define policy scope:

Here, you can select which accounts within the organization this firewall policy should be applied to, in addition to specifying which resources should be included/excluded. Use the appropriate options to configure the policy as you need. For this example, I have selected the defaults as shown.
- Click Next to move onto step 4: Configure policy tags:

- Add any tags that you require as needed and click Next to move onto step 5: Review and create policy. This will show you all of the configuration changes you made in the previous steps, 1 through 4.
- If you do want to proceed, then you can select Create policy.
To summarize, AWS Firewall Manager uses AWS WAF rules that are grouped together within a rule group. These rule groups are then added to an AWS Firewall Manager policy, which in turn is associated with a different account within your AWS organization.
So far, we have covered application security using AWS WAF and Firewall Manager. Let's look at how we can also offer application protection via ELBs.
Managing the security configuration of your ELBs
ELBs are seen as a fundamental component of AWS architecture when implementing solutions to automatically scale and manage requests put upon your applications and services.
ELBs are essentially used to control, manage, and distribute incoming requests to a specified resource group, therefore load balancing these requests across a fleet of designated EC2 instances, containers, Lambda functions, or IP addresses. How you architect the placement of your targets within your resource groups is down to you, but by utilizing multiple Availability Zones (AZs) will certainly help to increase the level of resiliency of your solutions should a failure occur within a specific AZ. Best practice dictates that you should architect your solutions making full use of the AWS global infrastructure.
Before we delve deeper into the topic of ELBs, let's first understand the types.
Types of AWS ELBs
At the time of writing this book, there are three different variants of the AWS ELB that you can select and configure. Understanding the differences between them will help you select the correct ELB for your needs. They are as follows:
- Application Load Balancer: This is typically used to support the incoming traffic destined for your web applications when running the HTTP or HTTPS protocols. It offers a number of advanced features, such as TLS termination and advanced routing options, allowing you to route incoming requests to different ports on the same host.
- Network Load Balancer: If low latency and high performance are key to your application architectures, then you might want to select a Network Load Balancer, which can easily support millions of incoming requests per second.
- Classic Load Balancer: This was the original AWS ELB; however, this has now been superseded by the previous two ELBs, in particular the Application Load Balancer, and AWS recommends that you use the Application Load Balancer instead of the Classic ELB – unless your application resides within the older EC2 classic environment.
Managing encrypted requests
When configuring your ELBs, they can be defined as internal or internet-facing. Internal ELBs only have private internal IP addresses and can only serve requests that originate from within your own VPC. However, internet-facing ELBs are different. They have public DNS names that are resolved to publicly accessible IP addresses, in addition to their own internal IP address used within your VPC.
Therefore, as with many services that traverse the public internet, you may want to implement a level of encryption to increase the security of your solution and minimize threats against your infrastructure. When using ELBs, this encryption can be achieved for your requests through the use of server certificates.
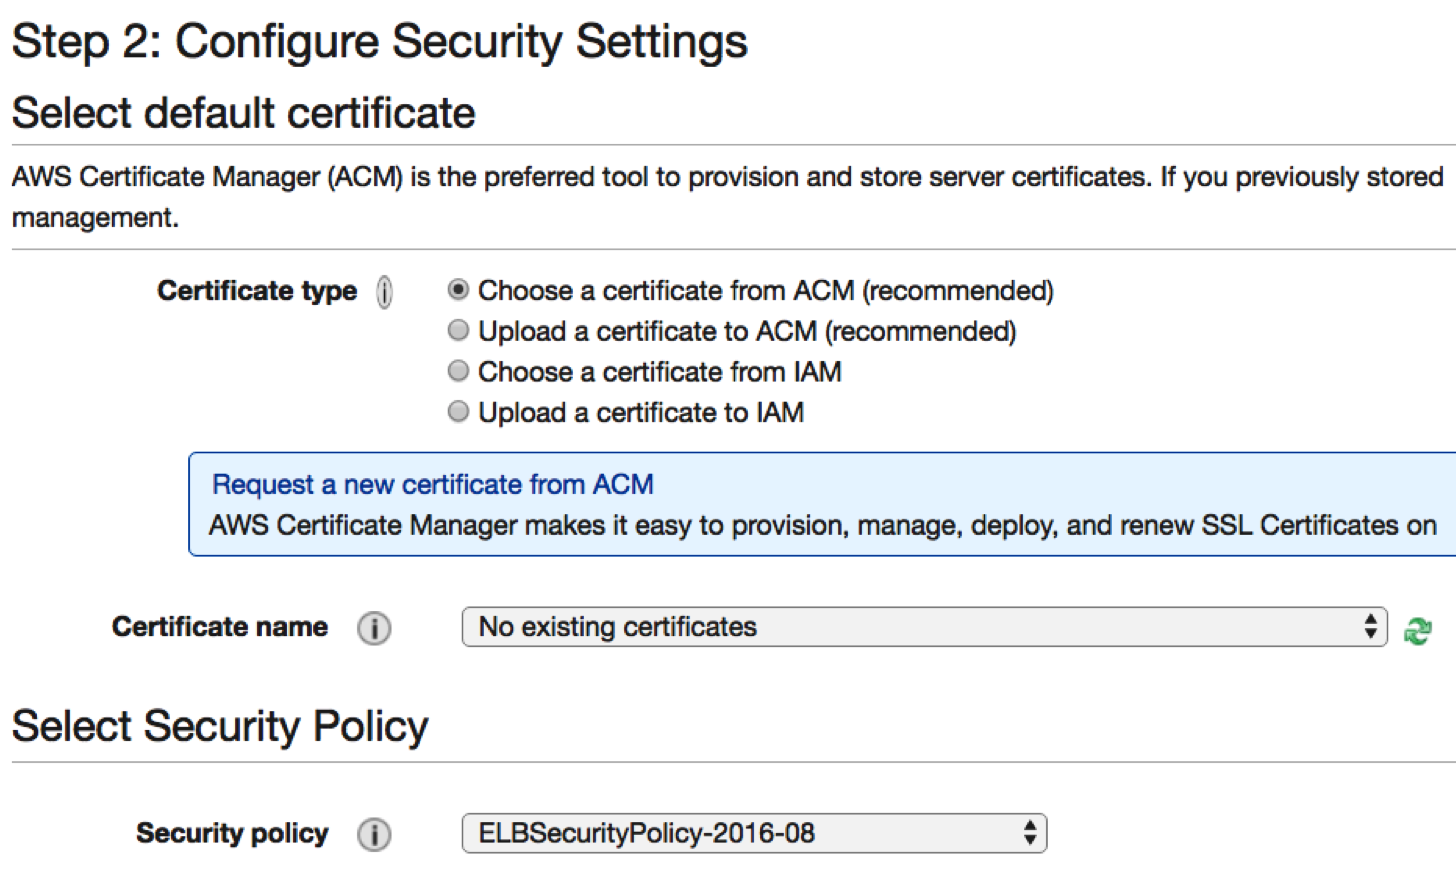
If you select the HTTPS protocol as a listener during the configuration of your ELB, then additional configuration is required under step 2 of the configuration process to manage the encryption, including a server certificate and security policies. HTTPS is simply the encrypted version of the HTTP protocol and by using the HTTPS protocol, you are able to serve encrypted requests originating from external hosts to your load balancer:

As you can see, you are required to select a certificate to be associated with your ELB when using a secure protocol, such as HTTPS. The certificate allows the ELB to terminate the incoming encrypted request from the external host, decrypting it as a part of this process before routing the same decrypted request to your ELB target group.
The certificates themselves are X.509 certificates provisioned by a certificate authority (CA). A CA is simply an entity that provisions and issues digital certificates. You can use certificates generated by your own CA outside of AWS; however, your ELBs will easily integrate with the AWS Certificate Manager (ACM) service.
When configuring your certificate type, you will be asked to select one of four different options:

As highlighted in the screenshot, its recommended by AWS to use the ACM to generate and source your SSL/TLS public certificates. This is largely due to its integration with the ELB component.
The two options relating to IAM allow you to use any existing third-party certificate that you may already have. In fact, you would have to use the IAM option if you were utilizing encryption with your ELBs within a region that was not supported by ACM. To gain an up-to-date list of the supported regions used by ACM, see the following link: https://docs.aws.amazon.com/general/latest/gr/rande.html#acm_region.
ACM allows you to import your own third-party certificates, much like the IAM option, but it also allows you to create new ones generated by ACM itself.
Requesting a public certificate using ACM
Let's look at the process behind requesting a new SSL/TLS certificate using ACM so you can understand the steps involved:
- From within the AWS Management Console, select the Certificate Manager service under the Security, Identity, & Compliance category:

- Select Get started under the Provision certificates option:

- Select the Request a public certificate option:

- Finally, select the blue Request a certificate button.
You now have a four-step process to follow, starting with Add domain names:

Let's go over them one by one:
- Enter the domain name of the site that you want to secure with your SSL/TLS certificate and click the blue Next button:

- You will then be asked to select a validation method (DNS or email):

This validation is used to verify that you have control or ownership of the domain that you entered in the previous step. You have the options of DNS validation or Email validation. As shown, you can select the DNS validation option if you have permission to modify the DNS domain in your certificate request. If you do not have permission to do so, then you can use the alternate validation method of Email validation.
When using DNS validation, ACM will create additional CNAME records that need to be added to your DNS database. If you select Email verification, then ACM will send up to eight emails – three to contacts in the WHOIS database and up to five addresses for the domain specified. These emails request the approval of the certificate for the domain in question.
- Let’s presume DNS was selected, and click on the blue Review button. Review the options you entered for the domain and validation options and select Confirm.
- From the final validation screen, you can export your DNS configuration to a file. This will contain all the information that you need to add your DNS database. If you are using Route 53 as your DNS provider and you have permission to write to the zone, then you can select the blue Create record in Route 53 button. Select the blue Continue button.
It can now take a number of hours for the DNS records to be updated, depending on your DNS provider. Until then, your certificate request will show as Pending. Once the changes have been made, the status will change to issued and your SSL certificate will be ready for use.
Once your public SSL certificate is issued within ACM, you can then select that certificate when configuring your secure listeners within your ELBs using the Choose a certificate from ACM (recommended) option:
In this section, we looked at how you can implement a level of encryption using your ELBs through the use of server certificates and how to request a certificate through ACM. Next, we'll go into depths on how you can secure your AWS API Gateway.
Securing your AWS API Gateway
API gateways are key components of many solutions that help to manage, control, secure, monitor, and deploy APIs, allowing communication with your backend applications and microservices running within your infrastructure. There are many variations of API gateways available on the market, but AWS has created its own, known as the AWS API Gateway service.
To see where API gateways fit within your architecture, let’s take a look at a scenario.
Let’s presume you are running a retail e-commerce website and customers from all over the globe can search your website, adding products to their shopping cart before ordering and paying for the items. The architecture supporting your website, to manage the multitude of requests and features on your website, would likely be orchestrated by tens or even hundreds of microservices, all operating independently, carrying out their own function.
For example, you’ll likely have different services to manage search queries, present static content, manage authentication, enable encryption, personalize content, and so on. By having API Gateway acting as the first point of call to your application architecture, it can be used to provide a number of benefits, such as the routing of APIs to microservices, security features to manage authentication and access control, request caching, and being able to monitor all requests made, which can scale to hundreds of thousands of concurrent API calls.
In this chapter, we will focus on how we can use AWS API Gateway to enhance the security of the applications we deploy across our environment.
Controlling access to APIs
Using the same scenario as described previously, it's clear that we would have different levels of security that we would need to implement for our APIs.
To appeal to the maximum customer base, we would want anyone to freely access and browse our library of products on our website. Any APIs involved with presenting our content and search results would be considered unauthenticated APIs (public APIs), meaning that these could be used by anyone accessing our website landing page.
Now consider that someone has found a product that they would like to purchase, and they would like to add it to their own shopping cart within their own account and pay for the item. Here, we would see the need for authenticated user APIs, whereby the users would need to have undergone a level of authentication.
So, how is the access to these APIs controlled? Well, with AWS API Gateway, there are a number of different mechanisms that control who or what can call an API.
When it comes to controlling authentication and authorization, the following methods can be implemented.
IAM roles and policies
Using the IAM service, you are able to create policies to associate with a user, role, or group, which can dictate what permissions an identity has. This helps to manage who has access to manage, create, delete, and invoke APIs within API Gateway.
IAM tags
Following on from the preceding point, IAM tags can be used in conjunction with IAM policies when using condition statements within the policy. When using API Gateway, it’s possible to associate tags with your resources. This allows you to reference these tags as a condition to help offer additional security controls, for example, defining which users can perform specific actions based on the resource tag. This offers an additional level of granularity to your IAM policies.
Resource policies
Whereas IAM policies are attached to a specific identity, resource-based policies are attached to resources. In this case, the resource is the API itself, allowing you to specify the principal that has been granted or denied access to invoke the associate API. Using resource policies, you can define how your API can be invoked, for example, from the following:
- Specific IP CIDR blocks/ranges/addresses
- Defined VPCs or VPC endpoints from any AWS account
- IAM users from a particular AWS account
VPC endpoint policies
These are another form of resource-based policy; however, this time the resource is a VPC endpoint, and through this policy, you can control access to any of your private APIs. VPC endpoints simply allow you to access AWS services using private IP addresses. Through their configuration, you can specify which APIs can be invoked by your internal traffic via any VPC endpoints you have configured. This can be used in conjunction with your API Gateway resource policies (mentioned previously) to offer an additional level of control.
Lambda authorizers
As the name implies, this method of security uses AWS Lambda functions to restrict who can invoke REST API methods. Lambda authorizers can either use bearer-based tokens to authenticate the request, including OAuth or SAML (Security Assertion Markup Language) or alternatively request parameters, such as HTML headers, paths, query string parameters, and stage variables.
When AWS API Gateway processes a request for API access, the identity of the request will be identified by the Lambda authorizer, which will generate a resulting IAM policy defining the access granted.
Amazon Cognito user pools
As discussed in Chapter 5, Federated and Mobile Access, Cognito user pools are scalable user directories that allow new and existing users to log in to mobile applications using the user pool, or they can alternatively federate their access via a social or enterprise IdP. Either way, a profile within the user pool is created for each and every user. These profiles contain no permissions of access to your AWS infrastructure; the purely allow the user to log in to your mobile app as a user to use the app.
With this in mind, you can configure your APIs to have a COGNITO_USER_POOLS authorizer. As a result, when this API is called, the user is authenticated via the Amazon Cognito user pool API gateway, whereby their token is validated before allowing access.
Summary
In this chapter, you might have realized that application security can be managed by a range of different AWS services, such as web ACLs, ELBs, and AWS API Gateway, depending on how your AWS architecture has been implemented. However, it is fundamental that you invest time and effort in ensuring you apply this level of security to prevent malicious activity against your applications. It is always best to implement security at every stage of your application development and deployment.
Using the services that AWS has designed and developed can help you to minimize the time and effort needed to implement your own methods that you might have used in the past. They have been tried and tested against some of the most common attack vectors, but having an understanding of these vectors will undoubtedly help you to not fall victim to such attacks. As a security practitioner, you should be aware of the OWASP top 10 and understand exactly what they are and the best methods to prevent them.
In the next chapter, we will be looking at DDoS attacks and how to prevent them using AWS Shield and the different options it provides through its advanced features.
Questions
As we conclude this chapter, here is a list of questions for you to test your knowledge regarding its material. You will find the answers in the Assessments section of the Appendix:
- True or false: The main function of the AWS WAF service is to provide protection for your web applications from malicious attacks from a wide variety of attack patterns.
- Which service allows you to manage WAF rules across a multi-account environment when using AWS Organizations?
- Which AWS service must you enable as a prerequisite to use AWS Firewall Manager?
- Which type of load balancer would you use if low latency and high performance are key to your application architectures?
Further reading
Whitepaper: Using AWS WAF to Mitigate OWASP’s Top 10 Web Application Vulnerabilities: https://d0.awsstatic.com/whitepapers/Security/aws-waf-owasp.pdf