
As you saw in the previous chapter, it's very easy using the Wizard to create your VPC, but you might want more control and management over how your VPC is configured. To do this, it's best to create your VPC from scratch and configure the components as you go, such as your route tables and network access control lists (NACLs).
When looking at your cloud architecture and infrastructure from an IaaS perspective, you as the customer are responsible for implementing, maintaining, and managing the security of that infrastructure. This includes your virtual private cloud (VPC) and all of the components that make up that VPC.
This chapter will focus on these points to show you the different areas of interest that you need to pay particular attention to in order to ensure the security of your network and resources running across it.
In this chapter, we will cover the following topics:
- Understanding a VPC
- Creating a VPC using the Wizard
- Understanding the VPC components
- Building a multi-subnet VPC manually
Technical requirements
In order to perform the activities in this chapter, you will need to have access to an AWS account and have the necessary permissions to create and manage a Virtual Private Cloud and Launch EC2 instances. Access control and permissions were covered in Chapter 4, Working with Access Policies.
Knowledge of how to create an EC2 instance within a VPC is essential. You must have a basic understanding of the TCP/IP protocol and subnetting, and lastly, an understanding of the AWS global infrastructure is important.
Understanding a VPC
A VPC is a Virtual Private Cloud, and you can think of this as your own private section of the AWS network. It allows you to create a virtual network infrastructure that you can segment into different networks. These networks can be made both public-facing and private and they use TCP/IP for addressing. They can essentially emulate a local area network that you would be running on-premises within your own data center:

During the creation of your VPC, you can configure multiple subnets to reside in different Availability Zones, helping you to architect for resilience from the get-go. When you have your VPC configured and up and running, you can then deploy other AWS resources within these subnets. For example, you could have a public-facing subnet hosting EC2 web servers accessible by the public, which can then pass traffic to your application servers within a private subnet. This in turn could talk to your database infrastructure, within another private subnet. This setup can be seen in the following diagram:

As these VPCs are all virtual, they are very easy to create, and there are two different ways to do this within the AWS Management Console – by using the VPC Wizard or manually from scratch. In the upcoming section, we will use the Wizard and see the different options available within it before looking at how to create the VPC manually from scratch.
Creating a VPC using the Wizard
Execute the following steps to create a VPC using the Wizard:
- Open the VPC dashboard from with the AWS Management Console.
- Select the blue Launch VPC Wizard button:

- You will then be asked to select a configuration type for your VPC. There are four different options to select, and each is configured differently, offering you different solutions:
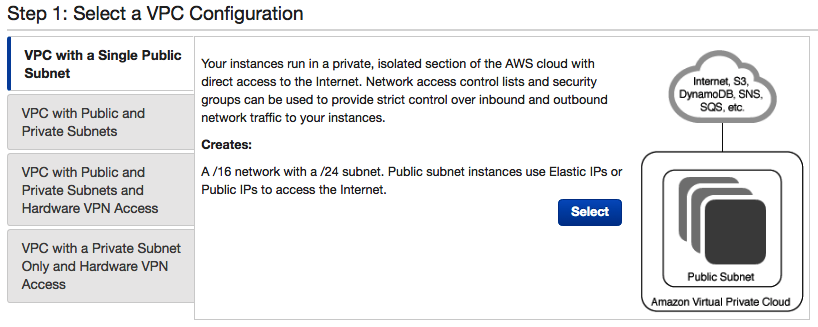
- For this demonstration, select VPC with a Single Public Subnet and click Select.
- You are now presented with the following page, where you are asked to provide additional configurable parameters that will dictate how your VPC and public subnet are configured from a CIDR block perspective. CIDR stands for Classless Inter-Domain Routing and defines the IP address ranges of your VPC and potential subnets:

- In the first section at the top, enter the size of your CIDR block, which must be between /16 and /28. If you want to use an IPv6 CIDR block range, then this will be allocated by AWS. Also, add a name for your VPC.
- Next, configure the CIDR block for your public subnet (remember, this Wizard will configure a single public subnet). Select the availability zone of your public subnet. Be aware that subnets are not able to span more than one availability zone. Add a name for your subnet.
- Now add a service endpoint if required. A service endpoint allows you to connect to services that sit outside of your VPC, such as S3 or DynamoDB, without traversing the internet. Instead, an interface would be created within your VPC to directly connect to the service using only the internal AWS network.
- Select whether you would like to enable DNS hostnames or not.
- Select the tenancy required. The available tenancy options include Default or Dedicated. Default tenancy means that the underlying host hardware of your instances run within your VPC will be shared by other customers. Dedicated tenancy ensures that only your account will be using the underlying host hardware of your instances and not sharing it with anyone else. You might need this option for specific compliance reasons.
- Finally, select Create VPC.
AWS will now create the VPC and the associated public subnet, which will also include components such as an IGW, route tables, NACLs, and many more automatically. So let's first take a look at these components and what they are. This will give you a much deeper insight into how to implement security across your environment.
Understanding the VPC components
In this section, we will be looking at the different VPC components that can be used to help you implement a level of protection in helping you to secure your resources. We will be looking at subnets, IGWs, route tables, NACLs, security groups, bastion hosts, NAT instances, and NAT gateways and virtual private gateways.
Subnets
A subnet is a network segment that falls within the CIDR block of the VPC. For example, if your VPC CIDR block is 10.0.0.0/16, you could have subnets configured as follows:
- 10.0.1.0/24
- 10.0.2.0/24
- 10.0.3.0/24
From a TCP/IP perspective, this would give you 256 addresses in each subnet. However, the first address is the network address, and the last address is the broadcast address and so they are not available as host addresses. In addition to this, AWS reserves the first three host addresses in any subnet. The first available host address is reserved for internal AWS VPC routing, the second address is then reserved for AWS DNS, and the third address is reserved for future use.
This means that a /16 subnet would produce 251 available host addresses to use for your resources within that subnet. In our example, this would be as follows:
- 10.0.1.0 - Network address
- 10.0.1.1 - Reserved for AWS routing
- 10.0.1.2 - Reserved for AWS DNS
- 10.0.1.3 - Reserved for AWS future use
- 10.0.1.255 - Broadcast address
There is a good analogy to help understand the relationship between VPCs and subnets. You could think of your house as your VPC. Within your house, you have a number of different rooms, the kitchen, the lounge, bedrooms, study, and washrooms. Each of these rooms could be thought of as your subnets. Each room in your house performs a different function. The same can apply to your subnets. Each subnet should be configured to perform a specific use. Perhaps a subnet contains all of your application servers, and another your database servers.
This segmentation helps to maintain security. By having multiple subnets with similar grouped resources, it helps to enforce security management through the use of NACLs filtering traffic through specific ports. Within your database subnet, you might only allow ports applicable to MySQL, both inbound and outbound, which would then drop all other traffic.
By selecting a subnet from within the VPC dashboard within the AWS Management Console, under Subnets on the left-hand menu, you will see that each subnet has a number of attributes and associations.
The Description tab
The Description tab provides an overall summary description of how the subnet is configured:

The main points to highlight at this stage are VPC, Availability Zone, Network ACL, IPv4 CIDR, and Route Table:
- VPC: When a subnet is created, it will exist within a single VPC. In this example, we can see the associated VPC ID and its name, Logging.
- Availability Zone: As mentioned previously, a subnet can only reside in a single availability zone; in this instance, it is located in the eu-west-1b AZ.
- Network ACL: A network ACL will always be associated with a subnet. If you don't specify a particular NACL on creation, then it will use the VPC default NACL. As shown, the NACL will also have a corresponding ID, acl-2827394e.
- IPv4 CIDR: The IPv4 CIDR value shows the current CIDR block for this subnet.
- Route Table: Finally, Route Table shows the associated route table that this subnet will use to route traffic. Again, during the creation of your subnet, if no route table is defined, it will use the default VPC route table. So, in essence, both the NACL and route table can be changed for each subnet.
To reiterate, network segmentation through subnets helps with security to maintain network borders, whereby protective measures are in place to filter network traffic, both inbound and outbound.
The flow logs tab
The Flow Logs tab allows you to set up and configure flow logs. These allow you to capture IP traffic sent between the network interfaces of your subnet. Flow logs can also be configured at the VPC level and for each of your network interfaces on your instances. However, this tab will only configure flow logs for this particular subnet. The data captured in these logs can help you resolve incidents relating to network communication issues and traffic flow. They are also useful to help identify traffic that shouldn't be traversing the network, so from a security stance, they are also very useful at IP traffic analysis. All flow log data is captured within CloudWatch Logs.
Flow logs will be covered in greater detail in Chapter 12, Implementing Logging Mechanisms.
The Route Table and Network ACL tabs
Both the Route Table and Network ACL tabs allow you to view the associated route table and NACL with the subnet and make changes as necessary.
The following screenshot shows a default route (local) with another route pointing to an Internet Gateway (IGW). Routing will be covered in more detail in the Rout tables section of this chapter:

In the following network ACL, we can see two rules, including a default rule denying ALL traffic to the subnet that doesn't meet any other rules in the access control list. NACLs are covered in more detail in a later section of this chapter titled Network Access Control Lists:

It's worth pointing out at this stage that a subnet can only be associated with a single NACL and a single route table, but multiple subnets can share the same NACL and route table. I will cover more on both of these components in the upcoming sections in this chapter.
The Tags tab
The Tags tab allows you to tag this resource with key-value pairs that you would like to configure:

Tags can be used to help you organize and group your resources.
Internet gateways
An internet gateway, commonly referred to as an IGW, is used to help create a public subnet. It is a logical component that you must create and attach to your VPC to allow traffic to traverse from your subnet in your VPC out to the internet and vice versa. Without an IGW, there is no link or connection between your VPC and the outside world.
Later in this chapter, I will show you how to build a multi-subnet VPC with an IGW. This will look at how to create and attach it to your VPC.
Route tables
Route tables simply provide a way of directing network traffic where to go. When a network packet leaves a subnet, it needs to know how to get to its destination, and it uses a route table to find that route.
Whenever a new VPC is created, by default, a main route table will also be created and will typically look as shown in the following screenshot if the VPC has been created from scratch rather than from a Wizard template:

It is very basic and will contain a single route, and this local route simply allows every subnet created within the VPC to route to each other. This main route table can't be deleted, however, you can modify it and add additional routes as and when you need to.
You aren't just limited to this single route table for your VPC, however; you can create additional route tables and associate different route tables to different subnets. Every route table you create will always have this default "local" route within it though.
The route table itself is comprised of a number of different tabs, just like the subnets.
The Summary tab
The Summary tab provides a high-level overview of data surrounding the route table, detailing which VPC it resides in, the account owner, the route table ID, and any explicit associations, as can be seen here:

These explicit associations relate to any subnets that have been configured to use this route table using the Route Table tab within the subnet configuration. Whenever you create a new subnet, it will automatically, by default, use the main route table created by your VPC. However, as I mentioned earlier, you can create different route tables. If you then configured your VPC to use one of these new route tables, then it would be implicitly associated.
The Routes tab
This tab shows the actual routes that are in place to direct traffic and contains a number of different fields, as seen here:

Let's understand these fields one by one:
- Destination: This shows a CIDR block range for a network that your traffic needs to route to.
- Target: This is essentially a gateway that allows you to reach the destination. In this example, we have a route with a destination of 0.0.0.0/0. This destination is used to imply any destinations that are not known by the route table (for example, an internet address). The Target for this route is igw-1220de77, which is an ID for an IGW. This route means that for any destination that isn't listed within the route table that resides outside of your subnet, then use the IGW to get to that address.
- Status: This shows the status of your routes within the table, for example active.
- Propagated: Route propagation is used when working with a virtual private gateway, which can automatically propagate routes if configured to do so, meaning that you don't need to manually enter VPN routes to your route tables.
When routes are added to the route table, we need to ensure that the correct subnets are using the right route table. This is achieved by configuring the subnet associations. Let's look at this next.
The Subnet Associations tab
This tab shows any explicit subnet associations with this route table that have taken place, along with any subnets within the VPC that are using the main route table:

You can have multiple subnets associated with a single route table, but only a single route table can be associated with a subnet.
The Route Propagation tab
If you have a virtual private gateway configured, you can configure the route propagation setting here:

Route propagation allows the automatic population of detected routes across your VPN connection. This helps to ensure that the correct routing is in place between your gateways.
Now we have covered route tables, I now want to look at NACLs, commonly referred to as NACLs, which help restrict traffic at a subnet level.
Network Access Control Lists
Network Access Control Lists (NACLs) are virtual network level firewalls that are associated with each and every subnet within your VPC and control ingress and egress traffic moving in and out of your subnet. Much like route tables, a default VPC NACL will be created when your VPC is also created. As a result, for any subnet that does not have an explicit NACL associated with it, this default NACL will be used.
For each NACL, there are two fundamental components: inbound rules and outbound rules. These rules control what traffic flows in and out of your subnet at a network level. NACLs are stateless, meaning that any response traffic generated from a request will have to be explicitly allowed and configured in either the inbound or outbound ruleset depending on where the response is coming from.
Let's look at the configuration of an NACL to explain how they work.
The Details tab
This provides an overview of the NACL itself, showing the VPC association and any associations with subnets within your VPC. It also details the NACL ID as well, as shown in the following screenshot:

To understand the configuration of the NACL itself, we need to look at the rules, both inbound and outbound.
The Inbound Rules and Outbound Rules tabs
These are used to control what traffic flows into and out of your subnet. The inbound and outbound rules table is comprised of six fields:

Let's go over these fields one by one:
- Rule #: The rule numbers are used to ascertain the order in which the rules are read. When your NACL processes traffic, the rules will be read in ascending order until a rule match is found. With this in mind, it's a best practice to leave number gaps within your rules to allow you to add more in over time without having to move everything around.
- Type: Here, you can select a number of common protocol types, such as LDAP, HTTP, DNS, and so on. You can alternatively specify custom TCP/UDP/ICMP protocols as well.
- Protocol: Depending on your selection in the previous Type field, you might be able to select a specific protocol (number).
- Port Range: Here, you can enter the port range for any custom protocol entries that you selected.
- Source: Much like the Source entry with your route tables, this can be a network subnet CIDR range, a single IP address using a /32 mask, or exposed to traffic from anywhere (using 0.0.0.0/0).
- Allow / Deny: With every NACL rule, you must specify whether the traffic that matches this rule should ALLOW or DENY the traffic coming into the subnet.
You will notice in this default NACL that all traffic is allowed by default, which makes using the default NACL very insecure. It doesn't actually provide any protection at all, so you should always look to update the default or, even better, create your own NACL and associate it with the relevant subnet.
The final rule in an NACL will always have an explicit Deny rule, which will drop all traffic that does not match any rule within the NACL. This is a safeguard mechanism to prevent any traffic from getting through to your subnet that you haven't specified.
The Subnet associations tab
This section shows which subnet is associated with this NACL, and as I mentioned when discussing subnets, you can have multiple subnets associated with a single NACL, but only a single NACL can be associated with a subnet:

If you fail to associate your NACLs with the correct subnets, then your subnet might not have the correct security safeguards in place and could allow unwanted network traffic to be processed. Otherwise, your NACLs would be created and configured, but not associated with any subnet, and therefore would provide no security measures.
Now we have looked at controlling security at the subnet/network level, let's now move on to a layer of security that operates at the instance level, security groups.
Security groups
Security groups are much like NACLs in that they provide a virtual firewall level of protection, but this time at the instance level, rather than the network. Security groups are associated with instances rather than subnets and control the traffic to and from your instances within your VPC. Again, only a single security group can be applied to an instance, but the same security group can be associated with multiple instances.
Unlike NACLs, which are stateless by design, security groups are stateful, which means you do not have to configure specific rules to allow returning traffic from requests. There are also other subtle differences within the rule base, so let's take a closer look at security group tabs.
The Description tab
Again, an overview is provided showing the security group ID, its name, VPC association, and rule counts:

To look at the security configuration of the security group, we need to look at the inbound and outbound rulesets.
The Inbound Rules and Outbound Rules tab
This shows the inbound traffic rules that are associated with this security group, which contains five fields of information:

Let's take a closer look:
- Type: This represents the type of protocol that you would like to open up to network traffic (for example, SSH).
- Protocol: This shows the protocol associated with the Type.
- Port Range: This shows the port range of the protocol. If using a customer Type and Protocol, you can manually enter a custom port range.
- Source: Much like the Source entry with your route tables/NACL, this can be a network subnet CIDR range, a single IP address using a /32 mask, or exposed to traffic from anywhere (using 0.0.0.0/0).
- Description: An optional field allowing you to describe what this rule is used for.
Notice that there is not a field for Allow or Deny as we have with NACLs. This is because security groups only provide Allow rules by default, therefore, if a rule is in a security group, it is considered to be allowed. If a match for traffic is not found within the security group, the traffic is simply dropped. Also, there is no Rule# field, because all rules are evaluated by a security group before a decision is made about whether access should or should not be allowed.
The following table shows a quick comparison of how NACLs and security groups operate:

The Tags tab
Here, you can create key-value pairs that can be associated with your security group. So, through the use of both NACLs and security groups, you can create layered security. For example, imagine you had an inbound NACL that looked as follows associated with a subnet:

Within that same subnet, you had an EC2 instance associated with the following security group:

Now if a host was trying to SSH to your EC2 instance, from a security standpoint it would have no problem traversing your NACL as SSH is a TCP protocol and you are allowing all TCP connections through to the subnet. However, it would not reach the instance as the security group for that instance would drop SSH as it's not listed as an allowed protocol.
Similarly, if an engineer was trying to RDP to the EC2 instance, then again access would be allowed through the NACL. If that engineer's IP address did not match 86.171.161.10/32, then again RDP would be dropped as the source is not a match in the security group. If it was a match, then RDP would be allowed.
Finally, if anyone, anywhere was trying to use HTTP to the EC2 instance then it would be allowed both through the NACL and the security group. As you can see, using NACLs and security groups allows you to layer your security at both the network and instance level.
Next, we'll discuss the bastion host, which also offers a level of protection for your instances.
Bastion hosts
Bastion hosts are used to gain access to your instances that reside within your private subnets from the internet and the bastion itself resides within the public subnet. The difference between a public subnet and a private subnet is this: subnets only become classed as public when an IGW is attached to a VPC and a route exists within the route table associated with the subnet with a Destination of 0.0.0.0/0 via the Target of an IGW, for example:

Any subnet associated with a route table pointing to an IGW with a destination address of 0.0.0.0/0 is considered a public subnet as it has direct access to the internet. Any subnet without this route is considered private, as there is no route to get out to the internet or vice versa.
So, to clarify, for a subnet to be public:
- The VPC must have an IGW attached.
- The subnet must have a route pointing to the internet (0.0.0.0/0) with a target of the IGW.
When a subnet is public, instances within this subnet will have a publicly accessible IP address and can communicate with the outside world. This allows your engineers to have the ability to SSH into your public-facing instances for support and maintenance if needed (providing NACLs and security groups have been configured to allow this access).
However, should you experience issues with your instances within your private instances, how can those same engineers SSH into them from the internet, perhaps as a remote fix? The answer is they can't, as they are private and there is no route to the outside world. To get around this, a bastion host needs to be installed within the public subnet.
The bastion host is a hardened EC2 instance with restrictive controls that acts as an ingress gateway between the internet and your private subnets without directly exchanging packets between the two environments. Hardening the host ensures that the chances of the systems being compromised are significantly reduced, and as this is a gateway to your internal private instances, you need to ensure you follow best practices to harden your instance.
As a part of the security group configuration associated with the bastion host, the source must be restricted as much as possible to restrict access from a small CIDR block or a single IP address. The security group for the private instances should allow SSH from the bastion host IP address only.
When connecting to instances, you use a key pair for authentication, which for Linux instances is stored as a *.pem file and is downloaded when the instance is created. However, once you connect to your bastion host (using a *.pem file), you will need to use the *.pem file associated within the private instance to connect, however, this will not be stored on the bastion host and should not be stored on the bastion host for security purposes, so how can you then connect to the private instance once you are connected to the bastion host? The answer is to use SSH forwarding, which provides a method of connection from your bastion host to your EC2 instance in your private subnet, without running the risk of storing your private key on your bastion host.
NAT instances and NAT gateways
A NAT instance/gateway can be thought of as performing the opposite role of a bastion host, in that it allows instances in the private subnets to initiate a connection out to the internet via the NAT resource, while blocking all inbound public-initiated traffic. NAT instances/gateways are much like bastion hosts provisioned within a public subnet and are typically used to allow your private instances access to the internet for maintenance-related tasks, such as obtaining OS updates and patch fixes, which is essential for maintaining a healthy and secure operating system.
One of the differences between a NAT instance and a NAT gateway is that the gateway is an AWS managed resource that offers enhanced bandwidth and availability when compared to that of a NAT instance. It always requires far less administrative configuration than that of a NAT instance. The following link shows a definitive difference between a NAT gateway and a NAT instance:
https://docs.aws.amazon.com/vpc/latest/userguide/vpc-nat-comparison.html
When deploying a NAT gateway, you will need to ensure you update the route tables of your private subnets that need to communicate with the gateway by adding a route Destination that points to the outside world of '0.0.0.0/0' with a Target of Your_NAT_Gateway. It's also important to remember that the route table of your public subnet where your NAT gateway is provisioned must also have a configured route to the internet via your IGW.
One final point on NAT is that, by design, any connections initiated from the internet will not reach your private subnets or instances.
Virtual private gateways
In addition to using the internet to gain access to your VPC via an IGW, you can also connect to it via a VPN connection from your own data center. This enables you to create a link between your own on-premises network and your VPC without using the public internet.
To do this, a "customer gateway" is configured at your own data center, which can either be a physical or software appliance. The other end of this customer gateway then connects a virtual private gateway, which is configured within your VPC in AWS. The VPN connection is then established between these two gateways.
A VPN connection is comprised of a dual connection, meaning there are two connections in place between the customer gateway and the virtual private gateway. This helps to establish a level of resiliency, should a connection problem occur affecting one of the lines.
It's very easy using the Wizard to create your VPC as all of these components that we just discussed will be created automatically, but you might want more control and management over how your VPC is configured. To do this, it is best to create your VPC from scratch and configure these components as you go, such as your route tables and NACLs. So let's try this out.
Building a multi-subnet VPC manually
Now you have a greater understanding of some of the key VPC components, let's build our very own VPC. This allows you to have full control and customization of how the VPC is configured, allowing you to optimize its design from an architectural and security standpoint.
This will encompass the following tasks:
- The creation of a new VPC
- The creation of two subnets, one public and one private across different Availability Zones
- The creation and configuration of an IGW and a NAT gateway
- The creation and configuration of new route tables, security groups, and NACLs
- The launch of instances in both subnets
By the end of this section, you will have built the following network infrastructure:
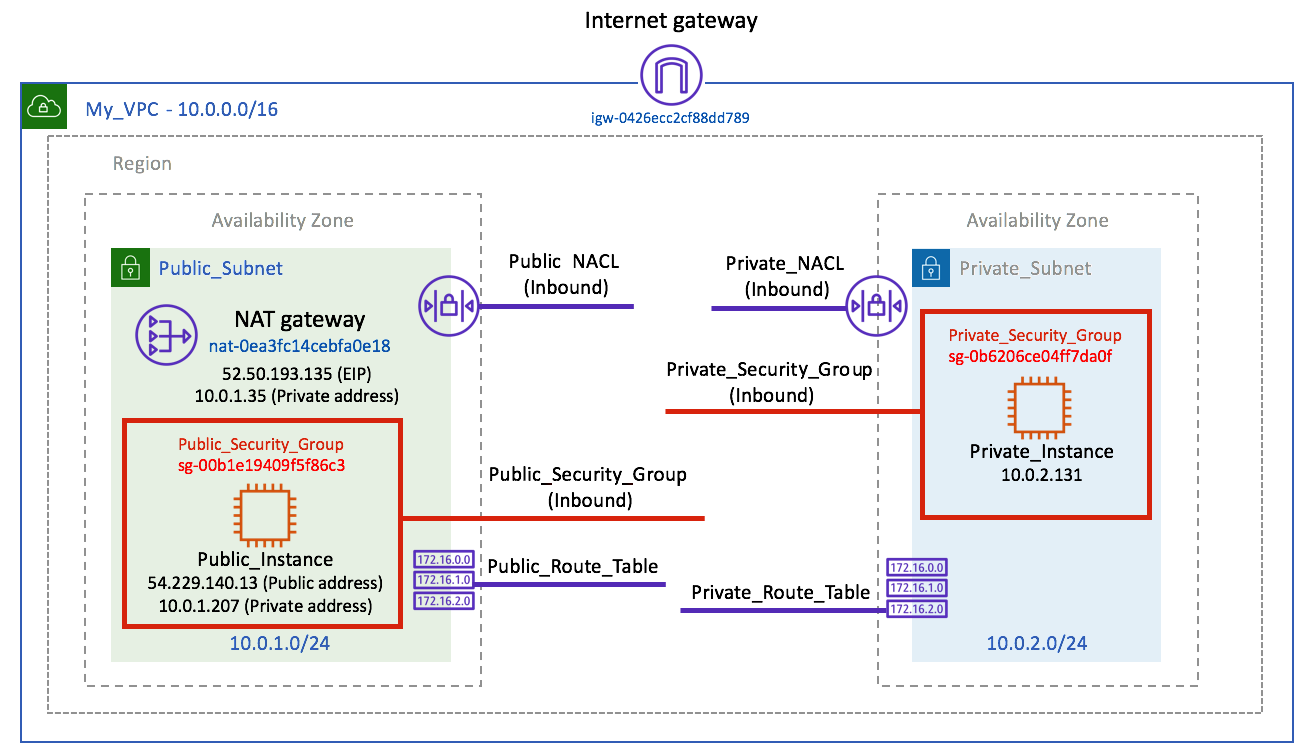
The corresponding rout tables can be seen in the image below:

Although this diagram might look complicated, when it's broken down into the individual parts it's very easy to digest and understand as long as you have an understanding of the VPC components, which we have already discussed.
Creating a VPC
In this section, we are going to create a VPC from scratch without using a Wizard. This will allow us to customize every step of the creation process. The creation of the VPC is dependant on all other VPC components.
Execute the following steps to create a VPC:
- From within the AWS Management Console, select the VPC service form within the Networking and Content Delivery category.
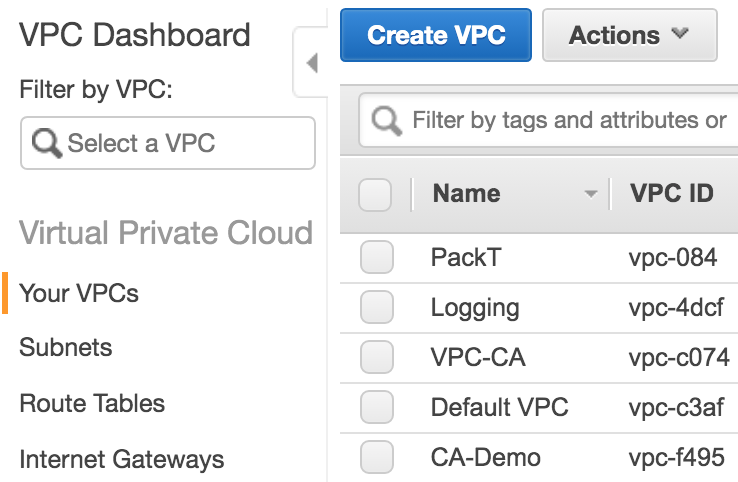
- Select Your VPCs from the menu on the left and then select the blue Create VPC button:
- When prompted, enter the following VPC configuration details and then click the blue Create button:

- Acknowledge the confirmation of the VPC creation by selecting Close. Your VPC has now been created.
You may notice that under both the Route Tables and Network ACLs menus a new entry exists. This is the default main route table for your new VPC and the default NACL.
Now we have our VPC in place, we can now create our VPC subnets – both public and private.
Creating public and private VPCs
Execute the following steps to create public and private VPCs:
- Select Subnets from the VPC Dashboard menu and then select the blue Create subnet button:

- Configure the first subnet, which will become our public subnet, as shown in the following screenshot. Depending on your region, select the first availability zone within the region:

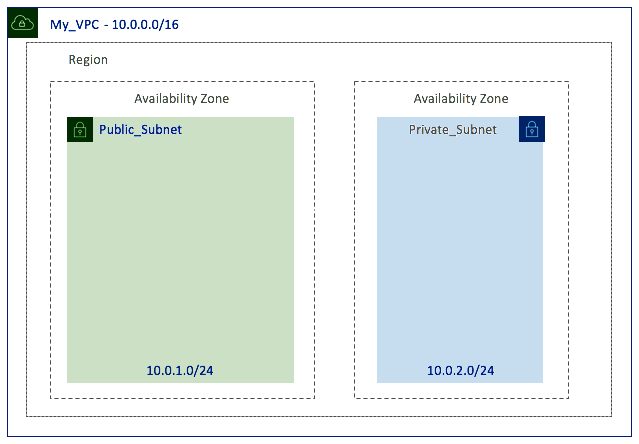
- Select Create. Your subnet named Public_Subnet has now been created. Now you need to repeat that process for a second subnet, which will become our private subnet. Configure the second subnet as shown in the following figure. This time, select the second availability zone within the region:

- Once done, select Create. Your subnet named Private_Subnet has now been created.
Your infrastructure will now look as shown here:
Now we have our VPC and subnets, and in particular, our Public_Subnet created, we can create and attach an IGW.
Creating an internet gateway
The IGW will provide a means of connecting our VPC to the internet. Execute the following steps to create an IGW:
- Select Internet Gateways from the menu on the left of the console and then select the blue Create Internet Gateway button:

- Enter a name for your IGW and select Create:

- Your IGW will now be created. At this point, the status of the IGW is detached and that is because we have not attached it to our VPC as yet:

- Select the IGW that you just created, select the Actions menu, and select Attach to VPC:

- Select your newly created VPC from the drop-down list and click Attach:

- Your VPC now has an IGW attached:

However, no subnets currently have a route pointing to this IGW to access the internet. We are now going to create a new route table with a route pointing to the internet, which will go via the target of the IGW. This route table will then be associated with our Public_Subnet.
Creating a route table
We must create a route table to ensure that our subnets know how and where to route specific traffic. Execute the following steps to create a route table:
- Select Route Tables from the menu on the left and click the blue Create Route Table button:

- Configure the route table name as shown, select your VPC, and click Create:

- Select your new route table from the list of route tables shown. This will present you with the configuration options of the route table at the bottom of the screen (see the following screenshot).
- Select the Routes tab, and you will see that it only has one route – the default local route that all route tables have, enabling all subnets to talk to each other:

- Select Edit routes in order to Add routes.
- Add the configuration as shown in the Destination field of the second route and select your own IGW as the Target. This route sends all traffic without a known route to the IGW, which will then send it out to the internet. Once done, select Save routes:

- Now select the Subnet Associations tab. You will notice that this route table does not have any subnet associations listed as we have just created this route table as a new route table. Select Edit subnet associations:

- Select Public_Subnet and select Save:

- Public_Subnet is now associated with Public_Route_Table. This association now means that the Public_Subnet knows how to route internet traffic to the internet, which is via the IGW, as identified in Public_Route_Table:

As a recap, your infrastructure will now look as shown here:

We now have an IGW attached to the VPC and a new route table associated with our public subnet with a route to the IGW for internet traffic. Now this configuration is in place, our Public_Subnet now has a direct link to the internet, with a route of how to get there.
Creating a NAT gateway
A NAT gateway allows instances in a private subnet to initiate a connection to the internet, for example, for essential operating system updates, but it prevents any inbound access to the private subnet being initiated from the internet.
Now it's time to create our NAT gateway:
- Select NAT Gateways from the VPC Dashboard menu on the left and select the blue Create NAT Gateway button:

- Configure the NAT gateway by selecting 'Public_Subnet' for the subnet and then select the Create New EIP button to populate Elastic IP Allocation ID. A NAT gateway uses Elastic IP (EIP) addresses for its addressing:

- Select Create a NAT Gateway and then select Close to go to the confirmation message.
Your NAT gateway will now be deployed within your Public_Subnet using an EIP.
Creating security groups in our subnets
To recap from earlier, security groups provide a virtual firewall level of protection at the instance level. Security groups are associated with instances rather than subnets and control the traffic to and from your instances within your VPC. So let's create security groups for our instances.
For instances in your 'Public_Subnet'
To create a security group for instances in your public subnet, follow these steps:
- From within the EC2 console, select Security Group on the menu on the left and select the blue Create Security Group button.
- Configure the security group as shown here:
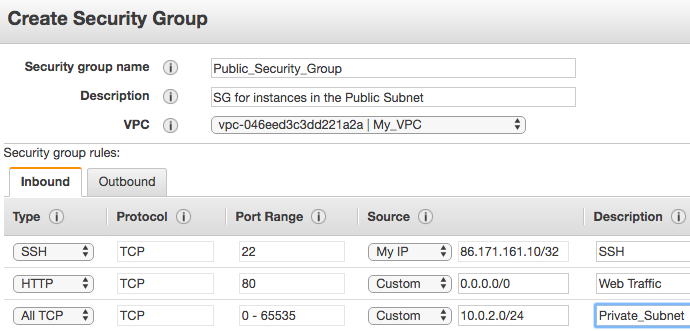
- We will leave the outbound rules as the default and select Create.
This security group allows my own IP address inbound SSH connectivity as well as allowing inbound HTTP traffic from the internet and all TCP communications from Private_Subnet.
For Instances in your Private_Subnet
To create a security group for instances in your private subnet, follow these steps:
- From within the EC2 console, select Security Group on the menu on the left and select the blue Create Security Group button.
- Configure the security group as shown here:

- For the first and second rule, use the private IP address of your NAT gateway. For the third rule, use the security group ID of the Public_Security_Group you created in the previous step.
- Leave the outbound rules as the default and select Create.
This security group allows HTTP and HTTPS inbound from the NAT gateway. This will allow any instances in the private subnet to be able to update their OS (once a route has been provisioned). This security group also allows all TCP traffic from Public_Security_Group.
Now our security groups are configured, we can create our EC2 instances and associate these security groups to our instances.
Creating EC2 instances in our subnets
We can now create an EC2 instance in each of our subnets – both the public and private subnets – and associate the security groups that we just created.
Creating E2C instances in the Private_Subnet
To create E2C instances in the private subnet, follow these steps:
- Select an Amazon Linux AMI.
- Create a t2.micro instance within your My_VPC and Private_Subnet.
- Add a Tag of Name with a Value of Private_Instance.
- Select the Private_Security_Group security group when prompted to select a security group in step 6.
- Accept all other defaults.
- Download a new key pair.
We'll now follow the same process for our public subnet.
Creating E2C instances in the Public_Subnet
To create E2C instances in the public subnet, follow these steps:
- Select an Amazon Linux AMI.
- Create a t2.micro instance within your My_VPC and Public_Subnet.
- Select the Auto-assign Public IP option as Enable.
- Add a Tag of Name with a Value of Public_Instance.
- Select the Public_Security_Group security group when prompted to select a security group at step 6.
- Accept all other defaults.
- Download a new key pair.
With our EC2 instances created, our next step is to create a route table for our private subnet.
Creating a route table for Private_Subnet
We must now create our route table for the private subnet to ensure the private instance knows how to get to the internet via the NAT gateway:
- Navigate to the VPC service under the Networking & Content Delivery category:

- Select Route Tables from the menu on the left and click the blue Create Route Table button.
- Configure the route table name as shown, select your VPC, and click Create:

- Now select your new route table from the list of route tables that will be shown. This will present you with the configuration options of the route table at the bottom of the screen.
- Select the Routes tab | Edit routes | Add routes.
- Add the configuration as shown in the Destination field of the second route and select your newly created NAT gateway as the target. This route sends all traffic without a known route to the NAT gateway, which will then send it out to the internet. Once done, click on Save routes:

- Now select Edit subnet associations.
- Select Private_Subnet and select Save:

Our infrastructure is now configured as shown:

As you can see, we have created our VPC, and the two subnets (public and private). We have attached our IGW and created route tables for each subnet and added the appropriate routes to get to the IGW and the NAT gateway. We have also configured our security groups and associated them with our EC2 instances.
Finally, I want to create a new NACL for each subnet as they are currently using the default NACL when the VPC was created, which allows all traffic through – this is not best practice.
Creating an NACL for our subnets
Using the default NACL of your VPC provides no security protection whatsoever. It allows all network traffic, both inbound and outbound. As a result, we need to create new NACLs and configure them to restrict only the network traffic we want to allow.
Creating an NACL for the public subnet
To create an NACL for the public subnet, follow these steps:
- Navigate to the VPC service within the Management Console.
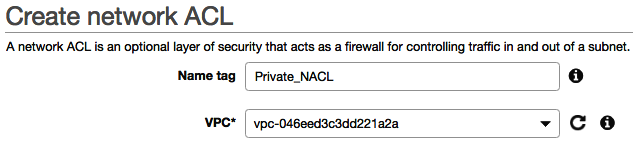
- Select Network ACLs from the menu on the left and select the blue Create network ACL button.
- Configure the NACL as shown in the following screenshot by selecting your VPC:

- Now select the newly created NACL in the list that appears and it will display its configuration at the bottom of the screen.
- Select the Inbound Rules tab. By default, a newly created NACL will DENY all traffic:

- Select Edit inbound rules and configure the NACL as shown here:

- Click Create. By default, an explicit DENY will be added at the bottom of the NACL when you click Create, as shown here:

- Select the Outbound Rules tab and configure the outbound rules as shown here. Once done, select Create:

- Much like the route tables, we now need to associate this NACL with a subnet. Select the Subnet Associations tab|Edit subnet associations. Select Public_Subnet and click on Edit:
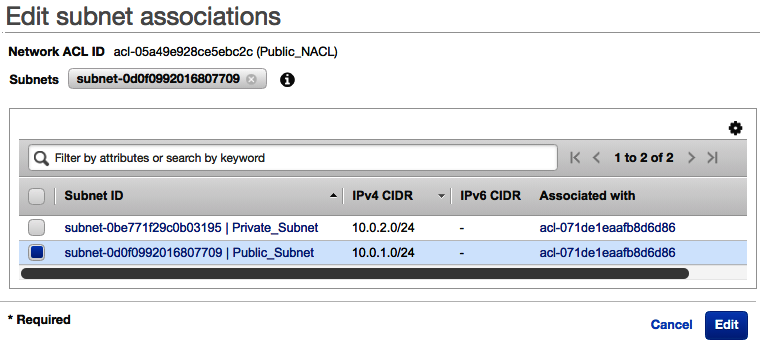
This NACL is now associated with your Public_Subnet rather than the default NACL that was created when the VPC was first created. This prevents any traffic from entering the public subnet that isn't using either HTTP or HTTPS.
Create an NACL for the private Subnet
To create an NACL for the private subnet, follow these steps:
- Navigate to the VPC service within the Management Console.
- Select Network ACLs from the menu on the left and select the blue Create network ACL button.
- Configure the NACL as shown in the following screenshot by selecting your VPC:
- Select the newly created NACL from the list and it will display its configuration at the bottom of the screen.
- Select the Inbound Rules tab | Edit inbound rules and configure the NACL as shown in the following screenshot. Once done, click on Create:

- Now go to the Outbound Rules tab and configure the outbound rules as shown in the following screenshot. Once done, select Create:

- Now, just like we did for the public subnet, select the Subnet Associations tab | Edit subnet associations. Select Private_Subnet and click on Edit.
This NACL is now associated with your Private_Subnet. That is now all of the configuration required for this scenario, and as a result, your infrastructure will now look as follows:

The corresponding rout tables can be seen in the image below:

This infrastructure allows the following:
- SSH connectivity from your own client to Public_Instance, through the use of Public_NACL and Public_Security_Group, allowing SSH from your IP address only, as well as the IGW and Public_Route_Table to allow outside connectivity to your VPC.
- Public_Instance can communicate with the internet, receiving HTTP traffic only as specified in Public_Security_Group, despite HTTPS being open on Public_NACL.
- Public_Instance can communicate with any instance within Private_Subnet using TCP, as detailed in the NACLs and security groups.
- Private_Instance can perform OS updates using the NAT gateway with its associated Private_Route_Table and Private_Security_Group.
Now we have completed our VPC build with our networking components, we can be confident that we have applied a certain level of security to help protect our infrastructure. Our EC2 instances are protected by security groups with set protocols and ports. These instances are also isolated within their own subnets, which are protected by NACLs and their own route table, directing network traffic to where we want it to go, via the IGW or the NAT gateway. So, we have put effective measures in place to allow only certain traffic to be allowed to and from specific resources.
Summary
This chapter focused heavily on the VPC and how the different components of this infrastructure can come together to restrict and control access both at a network- and instance-level through the use of Network Access Control Lists (NACLs) and security groups. It also covered how segmenting a network can also prevent unauthorized access through layered network protection by keeping some subnets private and some public.
A VPN acts as a base for your resources that can be deployed across different regions and Availability Zones, and so understanding where you can control access and how is fundamental in ensuring its protection. All rules added to NACLs and security groups, as well as rules added to route tables should be refined and as detailed as possible in line with the principle of least privilege (PoLP).
In the next chapter, we are going to look at how we can protect our web applications through the use of AWS Web Application Firewall, Elastic Load Balancers, and AWS API Gateway.
Questions
As we conclude this chapter, here is a list of questions for you to test your knowledge regarding its material. You will find the answers in the Assessments section of the Appendix:
- What does VPC stand for?
- Which VPC component provides a connection between your VPC and the outside world?
- Which VPC component allows instances in a private subnet to initiate a connection to the internet, for example, for essential operating system updates, but prevents any inbound access to the private subnet being initiated from the internet?
- True or false: Security groups provide a virtual firewall level of protection at the instance level.
- True or false: Using the default NACL of your VPC provides enhanced security protection blocking all network traffic, both inbound and outbound.
Further reading
Consult the following AWS whitepapers for more information:
- Building a Scalable and Secure Multi-VPC AWS Network Infrastructure: https://d1.awsstatic.com/whitepapers/building-a-scalable-and-secure-multi-vpc-aws-network-infrastructure.pdf
- Extend your IT Infrastructure with Amazon Virtual Private Cloud: https://d1.awsstatic.com/whitepapers/extend-your-it-infrastructure-with-amazon-vpc.pdf