
Understanding how to manage encryption keys and implement encryption is key to the Security– Specialty certification and, in particular, the AWS Key Management Service plays a big part. Data protection is always on people's minds when storing data within the cloud, and so understanding the different approaches to encryption and the different mechanisms available is an important topic to understand. Having a good understanding of how to encrypt data in AWS will allow you to confidently build secure solutions for you and your customers.
As a result, it's important that we cover KMS and that you are familiar with its workings and how it can be used by other AWS services to protect your data. Within this chapter, I will be covering the AWS Key Management Service, known as KMS, in addition to an overview of AWS CloudHSM, which is another service used to manage encryption keys.
The following topics will be covered in this chapter:
- A simple overview of encryption
- Exploring AWS Key Management Service (KMS)
- Exploring AWS CloudHSM
Technical requirements
To follow the exercises in this chapter, you must have access to the Key Management Service (KMS), including the ability to create new CMKs. For more information on how to manage your permissions, please see Chapter 4, Working with Access Policies.
You must also have the AWS CLI installed on your client. If you do not already have it installed, please follow the steps at: https://docs.aws.amazon.com/cli/latest/userguide/cli-chap-install.html.
A simple overview of encryption
In today's world, data protection and data privacy is of the utmost importance not just to individuals, but also large organizations that are dealing with customer data on a huge scale. When data is not encrypted, that data is considered to be plaintext, meaning that anyone who has access to the data is freely able to view the data without any restrictions. If this data doesn't hold any sensitive data, then having data stored as plaintext is not an issue. However, if that data contains sensitive or confidential information within it, then the data should be encrypted.
This encryption should be applied both at rest and in transit. Encryption-at-rest means that the data is encrypted where the object is stored, for example, when data is being stored on an EBS volume or in an Amazon S3 bucket. On the other hand, encryption-in-transit ensures that an encryption mechanism is applied to data when it is being sent/received between two or more locations, for example, when data is being sent from an EC2 instance to an RDS database.
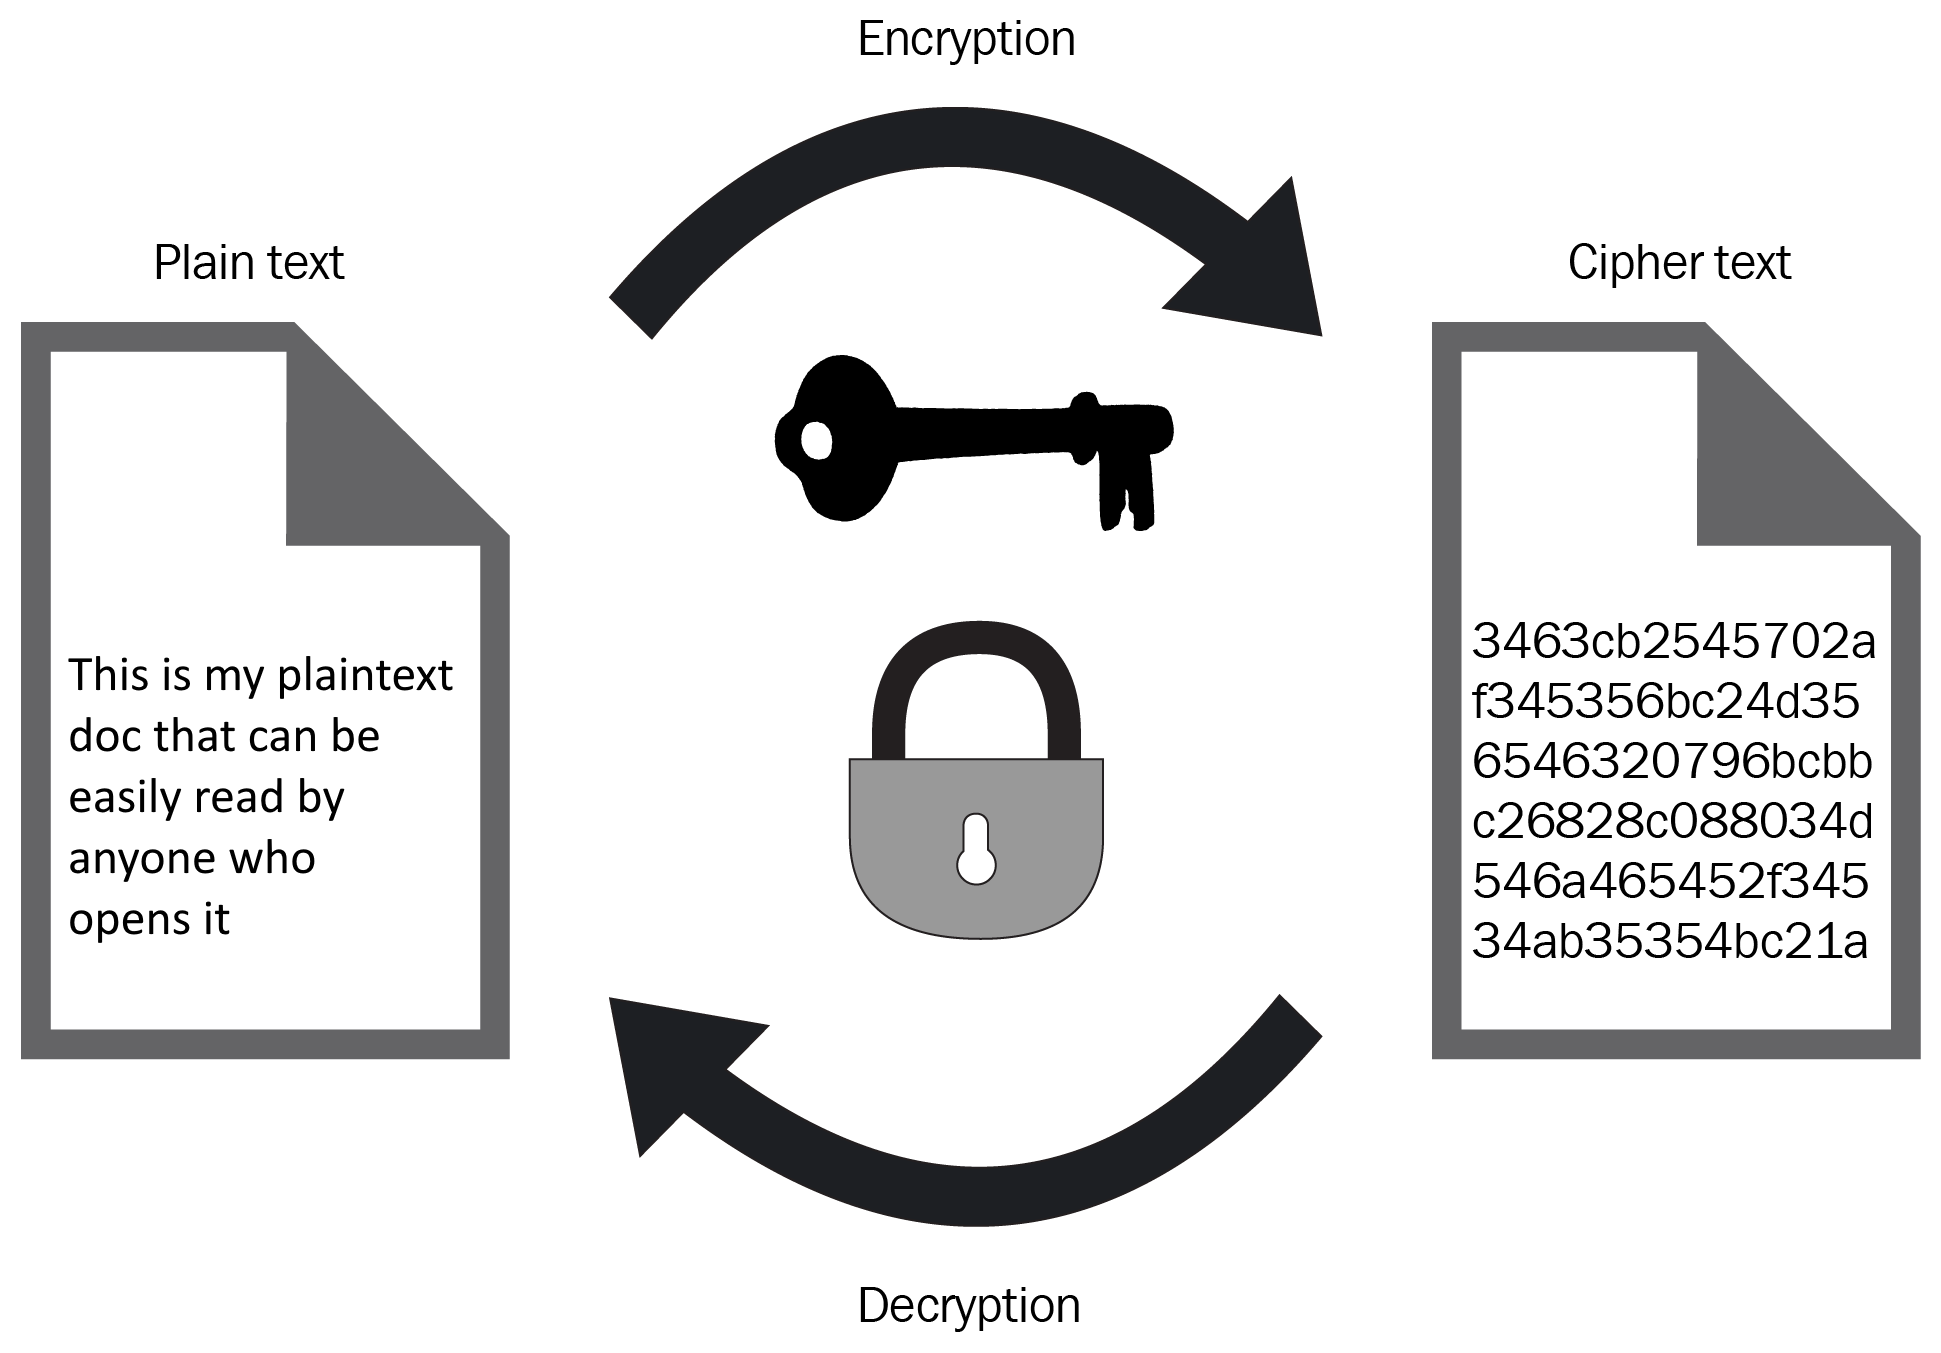
The encryption of data uses different mathematical algorithms and keys as a mechanism to alter plaintext data, making it unreadable. Once the encryption has taken place, the data is no longer considered to be plaintext; instead, it is referred to as ciphertext. The only way to decrypt the data again back to plaintext is to use the correct encryption key to revert the process. The encryption keys themselves are simply a string of characters, and the longer the string, the stronger the encryption is, and the harder it is to decrypt.
Symmetric encryption versus asymmetric encryption
At a high level, I want to explain the difference between symmetric and asymmetric encryption keys as this will help to understand how KMS works going forward, which uses both symmetric and asymmetric encryption.
Symmetric encryption uses a single key to encrypt and decrypt data. So if you were to encrypt a document using a symmetric key, in order to decrypt that same document, the user would have to have access to that very same key that performed the encryption to decrypt it. Examples of some common symmetric encryption algorithms include Advanced Encryption Standard (AES), Digital Encryption Standard (DES), and Triple DES:
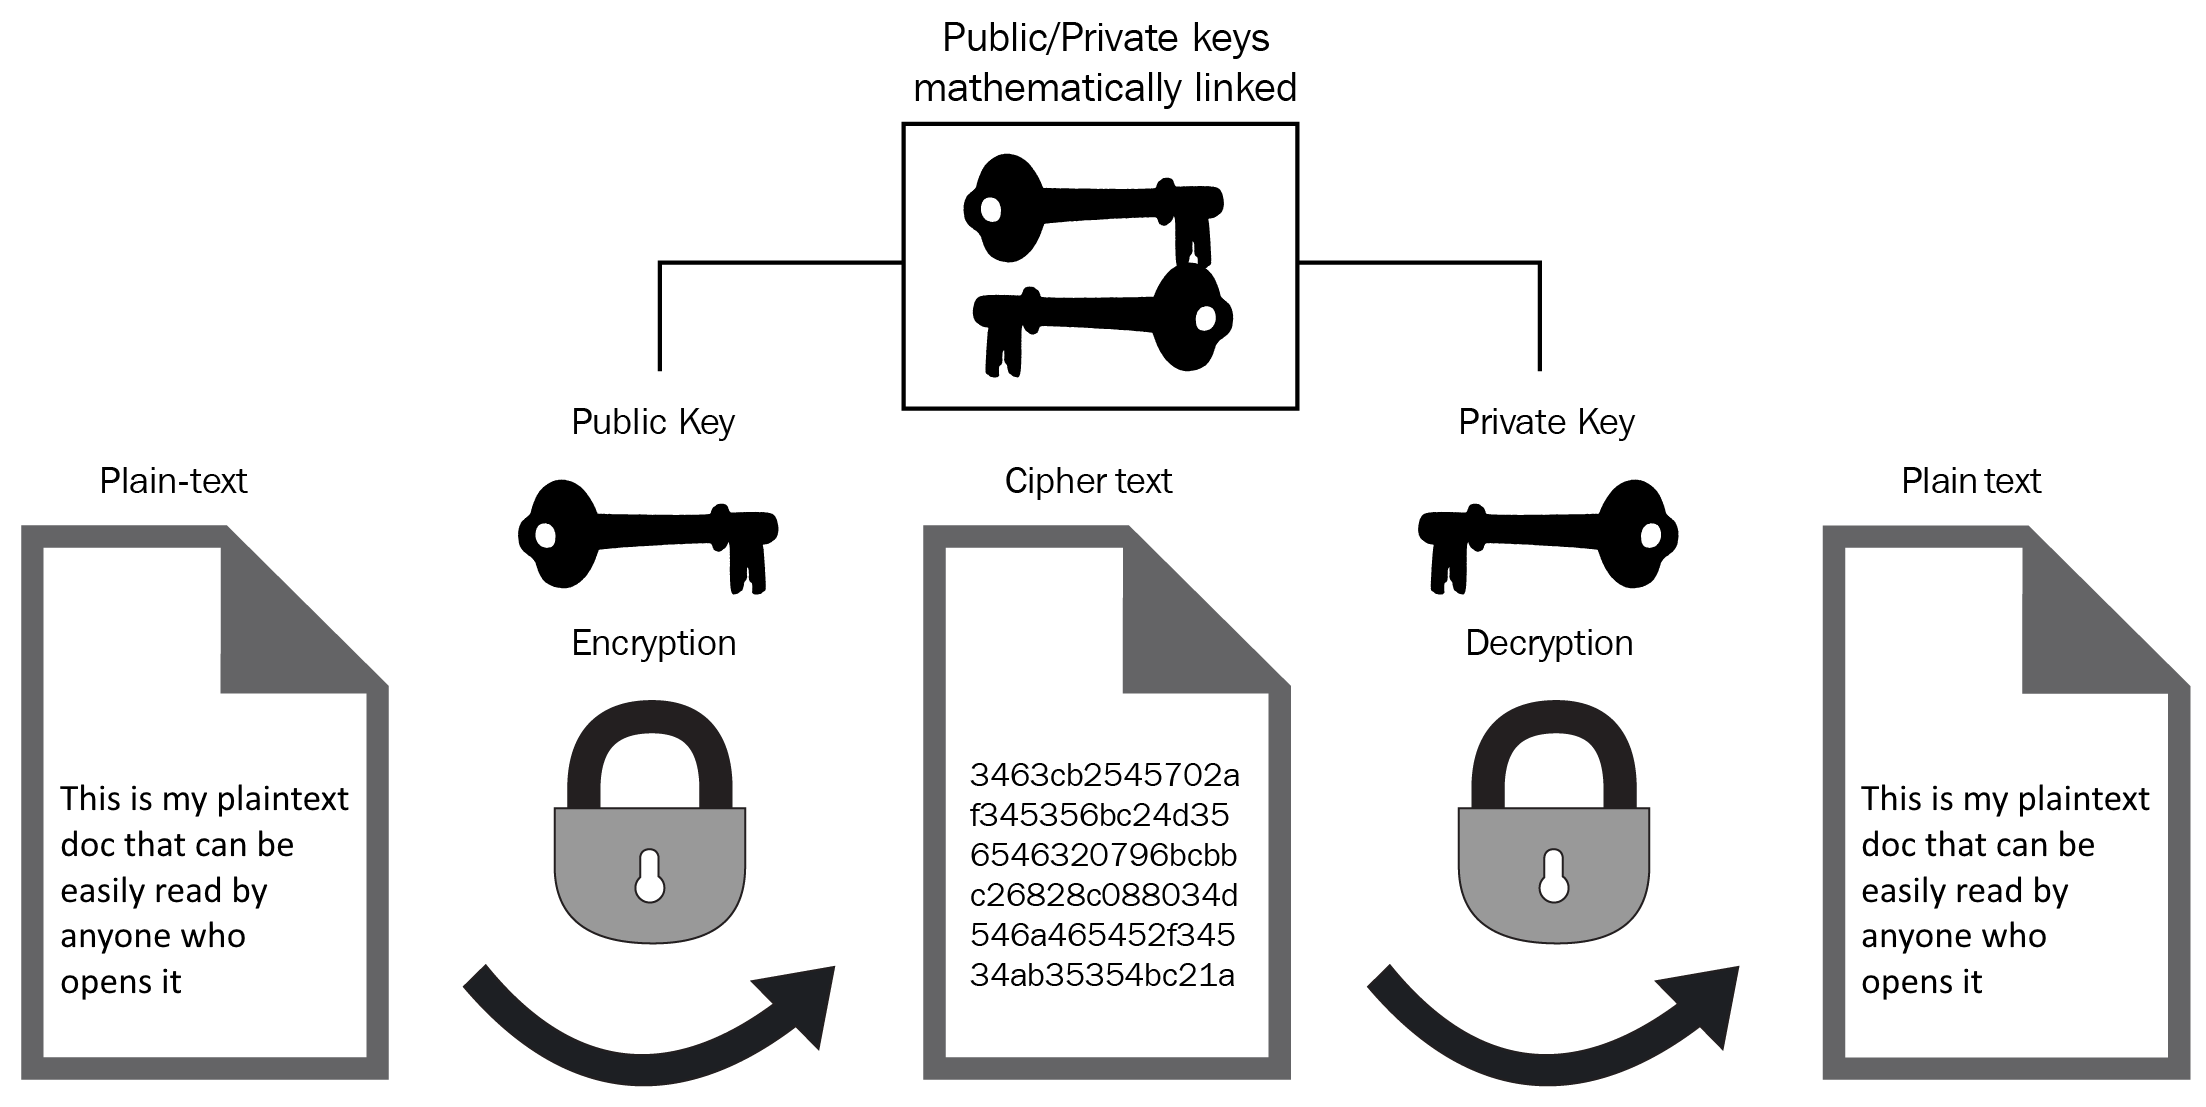
Asymmetric encryption keys differ from symmetric encryptionin that they use two keys to perform the encryption. The keys themselves are linked via a mathematical algorithm during their creation, where one of the keys can then be used to encrypt data (public key), and the second key (private key) is used in combination with the public key to decrypt the same data object. The keys themselves act as a public/private key pair. The public key can be given to anyone without restriction, whereas the private key must be kept private and NOT shared with anyone else. Anyone could encrypt data using your publicly shared public key; however, no one could decrypt that data unless they had the private key of that key pair. Some examples of asymmetric encryption include Diffie-Hellman, Digital Signature Algorithm, and RSA:
With this general understanding of symmetric and asymmetric encryption, we are now better equipped to understand how KMS works. So let's jump straight in.
Exploring AWS Key Management Service (KMS)
The AWS KMS service is essential if you want to encrypt your data at rest within your AWS environment. It is a managed service that allows you to create, store, rotate, and delete encryption keys to enable you to protect your sensitive data on AWS. It tightly integrates with a number of AWS services, such as RDS, S3, EBS, CloudTrail, and many more, offering a seamless and secure method of implementing encryption while utilizing a centralized key management repository.
KMS is a regional service, so you must be aware of this when architecting your encryption throughout your environment. You are unable to use a KMS key from one region in another region; for example, if you used a key in us-east-1, you would not be able to use that same key in eu-west-2.
As you can imagine, controlling access to KMS must be tightly monitored and, in fact, even AWS administrators are unable to access your keys within your KMS environment. Therefore, you need to be extremely careful when administering your KMS keys, since if you delete a key, AWS is unable to retrieve it back for you. You need to implement a robust set of access controls to your KMS service, ensuring that you implement the principle of least privilege to your key operators and administrators.
It's important to understand that KMS is not designed to perform encryption-in-transit. If you would like to implement in-transit encryption for your data instead of encryption-at-rest, you would need to adopt a different encryption mechanism, such as Secure Sockets Layer (SSL).
As I mentioned previously, KMS integrates with CloudTrail, which means all API calls to keys are tracked and recorded, such as the following events:
- CreateAlias
- CreateGrant
- CreateKey
- Decrypt
- DeleteAlias
Integration with CloudTrail allows you to audit when and where KMS keys and actions have been used.
Understanding the key components of AWS KMS
To truly understand how the AWS KMS service works, we need to dive into the different components of the service to see how they interact with each other. Over the next few pages, I will be discussing the following elements:
- Customer master keys
- Data encryption keys
- Key material
- Key policies
- Grants
Customer master keys
The customer master key (CMK) is the main building block of the KMS service as it contains the key material used for both encrypting and decrypting data.
KMS supports both symmetric and asymmetric CMKs. Any symmetric keys created and stored within KMS will be a 256-bit key that will, of course, be used for both encryption and decryption and will never leave the KMS service. The 'private' key of any asymmetric keys pairs that are created will be retained within the KMS service. Asymmetric keys were introduced into KMS in November 2019 and there are few differences between the two, including the following:
- Symmetric keys can be used to generate symmetric data keys in addition to asymmetric data key pairs.
- Importing your own key material is only supported for symmetric CMKs.
- Automatic key rotation is only supported for symmetric CMKs.
- When using a custom key store, you can only store symmetric CMKs.
- Asymmetric keys can either be used for encryption and decryption OR for signing and verification.
It is possible to store your CMKs in a custom key store, instead of the KMS key store. These custom key stores can be created using an AWS CloudHSM cluster that you own and manage. Having your own CloudHSM allows you to have direct control over the hardware security modules (HSMs) that are responsible for generating key material. We will be discussing CloudHSM later in this chapter in great detail.
There are three different types of CMKs used by KMS that you need to be familiar with:
- AWS-owned
- AWS-managed
- Customer-managed
AWS-owned CMKs
These CMKs are owned and used by AWS services to encrypt your data. They do not reside within your KMS console or indeed within your account, nor do you have the ability to audit and track their usage. They are essentially abstracted from your AWS account. However, because they can be used by services used within your AWS account, those services do have the capabilities to use those keys to encrypt your data within your account.
They are managed and created by AWS, and so there is no management of these keys required. When it comes to the rotation of AWS-owned CMKs, it is down to the particular service that manages that particular key, and so the rotation period is varied from service to service.
Examples of AWS-owned CMKs include the following:
- The encryption used to encrypt all Amazon DynamoDB tables, which are encrypted by default with no option to disable this encryption
- Amazon S3 encryption using the S3 master key (SSE-S3)
AWS-managed CMKs
Much like AWS-owned CMKs, AWS-managed keys are managed by AWS. However, you are able to view the keys that are being used to encrypt your data from within the AWS Management Console, in addition to being able to audit and track their usage and view their key policies. However, because they are managed by AWS, you are not able to control their rotation frequency.
These keys are used by AWS services that integrate with KMS directly and are created by the service when you first add or configure encryption using that service within each region, since you will recall that KMS is a regional service. These keys can only be used by those services and cannot be integrated into your own cryptographic operations.
Here are examples of AWS-managed CMKs:
- The first time you select object encryption using Amazon S3's server-side encryption using KMS-managed keys (SSE-KMS), you can either select a customer-managed CMK, or there will be an AWS-managed CMK identified by aws/s3 in the key selection list.
- When encrypting an EBS volume, this is again signified by aws/ebs as the key name.
Customer-managed CMKs
Finally, we have customer-managed keys, and these keys offer the greatest level of flexibility and control. Unlike AWS-owned and AWS-managed CMKs, with customer-managed keys, you have total control and governance over these keys. You are able to create, disable, or delete the key, configure the key policies associated with your key, configure grants, and also alter and adjust the key rotation periods and view full usage through the audit history of the key.
These keys can be used by other AWS services that integrate with KMS, and can be used instead of the AWS-managed keys if desired. Due to the additional flexibility offered by customer-managed keys, there is an additional charge for using your customer CMKs, whereas the other CMKs discussed can be used free of charge.
Let's try and create a customer-managed CMK. It is a simple process, so let's take a look step by step:
- From within the AWS Management Console, make sure you are in the region that you would like to have the CMK. Remember that KMS is a regional service.
- Select the Key Management Service under the Security, Identity & Compliance category.
- Select Customer managed keys from the menu on the left:

- Select the orange Create Key button. You will arrive at the following screenshot:

As you can see, there are now five steps to complete before your CMK is created. Step 1 is Configure key.
- Select either the Symmetric or Asymmetric key option depending on your use case. For this demonstration, I will create a symmetric key. Advanced options allow you to determine the origin of the key material. I will go into more depth on key material later in this chapter. For this demonstration, I will select KMS and click Next to move on to step 2, as seen in the following screenshot:

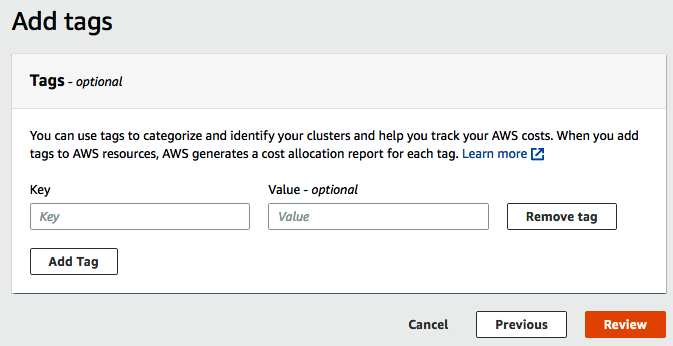
- Enter an alias and an optional description, and if you would like to tag your CMK, then you can add your key-value tagging pairs, too. When you have added your details, select the Next button to move on to step 3, as seen in the following screenshot:

- At this stage, you must select which IAM roles or users should be a key administrator. Key administrators can only administer the CMK and not use it to perform any encryption function that may be needed within the CMK. You can also decide whether you want the key administrators to have access to delete the key via a checkbox. Click Next to move on to step 4, as seen in the following screenshot:

- Here, you can now select which IAM users or roles you would like to be able to use the CMK in order to perform cryptographic operations. Additionally, you can also specify another AWS account that you would like to be able to use this key:

- Once you have made your configuration and permissions choices, select Next to move on to step 5, as seen in the following screenshot:

- This final step allows you to review the key policy that has been generated based on the parameters that you selected during the previous screens. To finish creating the CMK, select Finish. Your customer-managed key will now show in the dashboard:

In this section, we looked at how to create a customer-managed CMK, which provides you with many more configurable options relating to the key when compared to AWS-owned and AWS-managed CMKs, including editing the key permissions and key policy defining who can use the key.
Data encryption keys (DEKs)
Now we have an understanding of CMKs, I want to talk about data keys. Data keys are created by CMKs. However, they do not reside inside the KMS service like CMKs do; instead, these are used outside of KMS to perform encryption against your data.
When a request to generate a data key is received by KMS, the associated CMK in the request will create the two data encryption keys (DEKs); one will be a plaintext key, and also another identical key, but this will be encrypted:

The process of using one key to encrypt another key like this is known as envelope encryption.
During the encryption process, the plaintext data key will be used to perform the encryption of your data using an encryption algorithm. Once the encryption has taken place, this plaintext data key will then be deleted and the encrypted data key will be stored and associated with the encrypted data.
At this point, your data is now encrypted, and the only way to access this data is to request for the encrypted data key to be decrypted by the CMK. However, that could only be requested by an entity who had the kms:decrypt permission associated with the CMK. I will discuss permissions further later in this chapter when I come to key policies.
To demonstrate an example of DEKs being used within AWS services, let me take a look at how both the encryption and decryption processes work for Amazon S3 server-side encryption with KMS managed keys, known as SSE-KMS.
Encryption
The following diagram shows a graphical representation of how the encryption process works when using SSE-KMS in Amazon S3:

Let's go over the steps in the preceding diagram and see how encryption takes place:
- Firstly, the client identifies the object(s) that are to be uploaded to S3, indicating SSE-KMS as the encryption mechanism, selecting either an AWS-managed or customer-managed CMK.
- Amazon S3 will respond by initiating a request to generate DEKs from KMS to allow S3 to encrypt the data submitted by the client.
- Using the CMK selected during step 1, KMS will then generate two data keys, a plaintext data key, and an encrypted version of that same data key.
- KMS will send both of these data keys back to S3 to allow S3 to begin the encryption process using the plaintext data key.
- At this stage, S3 then encrypts the object data with the plaintext version of the data key and stores the resulting encrypted object alongside the encrypted version of the data key. The plaintext data key will then be deleted and removed from memory.
Now that we have seen how the encryption process works, let's move on to the decryption process.
Decryption
This diagram shows a graphical representation of how the decryption process works when using SSE-KMS in Amazon S3:

Let's go over the steps in the preceding diagram and see how decryption takes place:
- A request is received by S3 to access an encrypted object via a client.
- S3 is aware that the object is encrypted and sends the encrypted data key associated with the object requested to KMS.
- KMS takes the encrypted data key and uses the original CMK to decrypt the data key to generate a plaintext version of the data key.
- KMS sends the plaintext data key back to S3.
- Using the plaintext data key, the encrypted object data can then be decrypted, returning a plaintext version of the object data, and the plaintext data key is deleted from memory.
- The plaintext object is then sent back to the requesting client.
As you can see, the encryption process follows a logical process of obtaining the keys from KMS from outside of Amazon S3 before performing any encryption operations. The CMKs used in this process can either be AWS-managed or customer-managed.
KMS key material
Key material is essentially the data that is used to encrypt and decrypt data and is stored within your CMK. Hence, in the example I just covered with SSE-KMS, the CMK key material was used to encrypt a version of the data key as well as decrypt an encrypted version of the data key.
When you create your CMK, KMS automatically creates new key material for that CMK. However, when you are creating your own customer-managed CMKs, you can choose to create your CMK without any key material, allowing you to import your own into the key yourself. This method of key material assignment is known as Bring Your Own Key (BYOK).
However, it is important to note that imported key material does not support automatic key rotation, but it is possible to manually rotate your keys with imported material.
Importing your own key material
In an early demonstration when we created a new customer-managed CMK, there was an option at step 1 of configuring your key to select the key material origin under the advanced options. In the demonstration, I selected KMS, in order to use the key material generated by KMS:

However, to import your own key material into a new customer-managed CMK, you can select External for the Key material origin option:
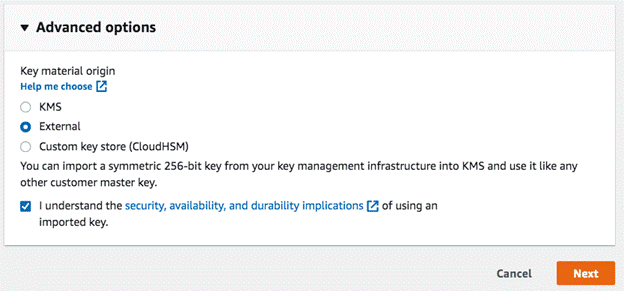
When doing so, you must also select the checkbox to confirm that you understand the security, availability, and durability implications of using an imported key.
After repeating the same steps from the earlier demonstration, you will then be asked to download the public key and import a token for your CMK. This is required in order to perform two functions.
- Firstly, the public key is used to encrypt your own key material before uploading it to KMS.
- Next, KMS will then decrypt it using the private key associated with that same public key.
The import token consists of metadata to ensure that the key material uploaded was uploaded and imported correctly.
There are a couple of additional points to bear in mind when performing this import. Firstly, the key material must be in a binary format when encrypting it with the public key. Also, when importing the key back into your CMK, you can choose to add an expiry date of the key material, at which point it will be deleted, thereby rendering the CMK unusable.
If the key material is deleted automatically through this expiration date, or manually at any time, the CMK can no longer be used for encryption. The only way to reinstate that same CMK is to import the same key material again, whereas if you were to delete the CMK, it is not possible to reinstate that same CMK.
Key policies
I now want to look at permissions associated with the CMK. Earlier, when I was explaining how to create a customer-managed CMK, we had options to review and modify key administrators and key users, which had an effect on the resulting CMK key policy.
The main function of the key policy is to determine who can both use the key to perform cryptographic operations, such as encrypt, decrypt, and GenerateDataKey, and many more, in addition to who can administer the CMK to perform functions such as deleting/revoking the CMK and importing key material into the CMK.
The policy itself is considered a resource-based policy as it is tied to the CMK itself and, as a result, it's not possible to use a CMK for any encryption unless it has a configured key policy attached.
Much like IAM policies, key policies are JSON-based and appear much like other IAM access policies from a syntax and structure point of view, so if you are familiar with IAM policies, then key policies will be easier to understand.
The key policies themselves also allow you to configure access and use of the CMKs in a variety of ways. As such, you can configure access to the CMK as follows:
- Via key policies: All access is governed by the key policy alone.
- Via key policies and IAM: Access is governed by the key policy in addition to IAM identity-based policies, allowing you to manage access via groups and other IAM features.
- Via key policies and grants: Access is governed by the key policy with the added ability to delegate access to others to use the CMK.
The key point to remember here is that, without a key policy, you are unable to control access to your CMKs. Let me now run through each of these options to explain how they operate.
Using only key policies to control access
When I created the key policy earlier in this chapter during one of the demonstrations, I was given the option to select any IAM users or roles that could act as administrators of the CMK. I selected the users Cloudacademy and Stuart, as seen here:

This resulted in an entry in the key policy as follows:
{
            "Sid": "Allow access for Key Administrators",
            "Effect": "Allow",
            "Principal": {
                "AWS": [
                    "arn:aws:iam::730739171055:user/Cloudacademy",
                    "arn:aws:iam::730739171055:user/Stuart"
                ]
            },
            "Action": [
                "kms:Create*",
                "kms:Describe*",
                "kms:Enable*",
                "kms:List*",
                "kms:Put*",
                "kms:Update*",
                "kms:Revoke*",
                "kms:Disable*",
                "kms:Get*",
                "kms:Delete*",
                "kms:TagResource",
                "kms:UntagResource",
                "kms:ScheduleKeyDeletion",
                "kms:CancelKeyDeletion"
            ],
            "Resource": "*"
        },
As you can see, the Statement Identifier (Sid) clearly identifies this section as Allow access for Key Administrators and lists both of the users that I selected using their respective ARNs. We can also see the entire range of actions that these users are allowed to perform as administrators. One point to note is that although key administrators are not able to use the CMK, they do have access to update the key policy to add themselves as a user!
Now, if we look at the user permissions set out for the users who can actually perform cryptographic operations using the CMK, which I configured as shown in the demonstration earlier in this chapter for three users, Cloudacademy, PackT, and Stuart, we have the following:
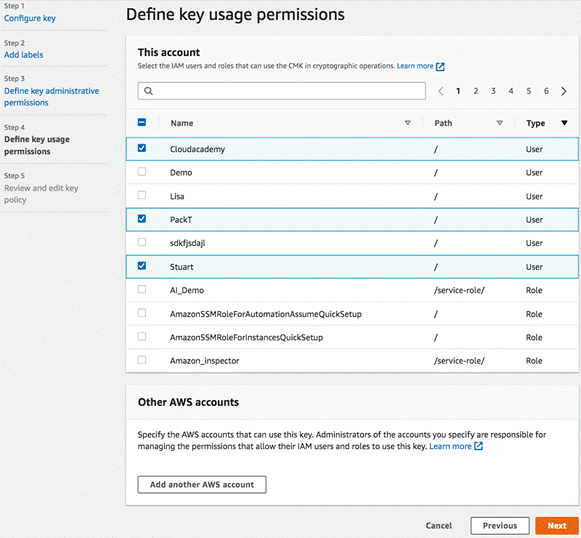
Again, this is reflected in the key policy of the CMK, as shown here:
 {
            "Sid": "Allow use of the key",
            "Effect": "Allow",
            "Principal": {
                "AWS": [
                    "arn:aws:iam::730739171055:user/Cloudacademy",
                    "arn:aws:iam::730739171055:user/Stuart",
                    "arn:aws:iam::730739171055:user/PackT"
                ]
            },
            "Action": [
                "kms:Encrypt",
                "kms:Decrypt",
                "kms:ReEncrypt*",
                "kms:GenerateDataKey*",
                "kms:DescribeKey"
            ],
            "Resource": "*"
        },
As you can see, the permissions set for the users allow them to perform the encryption/decryption actions of data using the CMK, in addition to being able to generate data keys.
Using key policies in addition to IAM
Every time a new CMK is created, the root of the account in which the CMK is created will always have full access to the CMK within the key policy. This ensures that you will always be able to have admin access to the CMK because the root account can't be deleted, whereas other user can be.
In addition to this, granting the root account with full access also provides another very useful function. It enables you to use IAM policies to grant access to the CMK for both the key administrator and users.
When a policy is created, you will see a section at the beginning of the policy that looks like this:
 {
            "Sid": "Enable IAM User Permissions",
            "Effect": "Allow",
            "Principal": {
                "AWS": "arn:aws:iam::730739171055:root"
            },
            "Action": "kms:*",
            "Resource": "*"
        },
You can see that the Sid is labeled as Enable IAM User Permissions.
Without this section within the key policy, it would not be possible to use IAM permissions to grant access for other IAM roles or users to your CMK.
Using IAM, you can then set specific permissions as you would for other resources across AWS. These permissions can be set for both key administrators and key users. For example, I could use the following identity-based policy within IAM to allow them to use the CMK for cryptographic operations:
{
  "Version": "2012-10-17",
  "Statement": [
    {
      "Sid": "Stmt1586431030713",
      "Action": [
        "kms:Decrypt",
        "kms:DescribeKey",
        "kms:Encrypt",
        "kms:GenerateDataKey"
      ],
      "Effect": "Allow",
      "Resource": "arn:aws:kms:eu-west-1:730739171055:key/dc8dcec8-c0c2-4496-b6c4-522049e963d2"
    }
  ]
}
This policy, when attached to a user, group, or role, would provide Decrypt, DescribeKey, Encrypt, and GenerateDataKey permissions to the resource arn:aws:kms:eu-west-1:730739171055:key/dc8dcec8-c0c2-4496-b6c4-522049e963d2, which is the ARN of my CMK.
Using key policies with grants
The last method of allowing access to your CMKs is via grants. Grants effectively allow you to programmatically delegate your permissions to another principal, but at a more granular level than key policies can.
It is not possible to create grants from within the AWS Management Console; they are programmatically created, and so you can use the AWS CLI instead.
A grant consists of two parties, the user who creates the grant, and the grantee who then uses that grant to perform cryptographic operations. However, the permissions given to the grantee can only be equal to, or more restrictive than, those associated with the user who issued and created the grant.
For a user to be able to create and revoke grants, they must have the following permissions, either within the key policy, or given via an IAM identity-based policy, providing IAM permissions are allowed:
- "kms:CreateGrant"
- "kms:ListGrants"
- "kms:RevokeGrant"
To facilitate understanding, let's try and create a grant ourselves.
In this demonstration, we have two users, Stuart and Alice. Stuart has permission to create grants in addition to being able to use the CMK for cryptographic operations, as we saw in the earlier key policies. Alice, however, does not have any access to use the CMK via the key policy or via IAM permissions.
For this demonstration, I will be carrying out all operations on my own laptop, so I want to create two AWS CLI profiles to be able to test access, one for Stuart and one for Alice. To do this, you will need to have the access key and secret access keys of your two users from within IAM:
- Open your terminal on your laptop and, from the command prompt, enter the following command:
aws configure --profile Stuart
- Add your access key and secret access keys for your user.
- Specify your default region (I have selected the region in which the CMK resides):

- Repeat the same process for your second user, in this case, Alice, with – aws configure --profile Alice:

Now I have two profiles set up on my AWS CLI: Stuart and Alice, each with their own credentials.
- Now, to confirm that Alice is not able to encrypt anything using our CMK, I can enter the following command using the AWS CLI:
aws kms encrypt --plaintext “Certification” --key-id alias/MyCMK --profile Alice
- This command will attempt to take the word Certification in plaintext and encrypt it using the name of my CMK, MyCMK, using the credentials of Alice:

As we can see, I received an error of AccessDeniedException. The user Alice is not authorized to perform the encryption. So this confirms that at this stage, Alice is not able to perform encryption using the CMK.
- Now if I perform the same procedure using the profile of Stuart, we can see the result here:

Now, because Stuart has permission to perform encryption, we can see that plaintext "Certification" has now been encrypted using key-id.
- Next, I want to use the Stuart profile to create a grant and delegate access to allow Alice to perform encryption. To do so, I can enter the following command at the AWS CLI:
aws kms create-grant --key-id arn:aws:kms:eu-west-1:730739171055:key/dc8dcec8-c0c2-4496-b6c4-522049e963d2 --grantee-principal arn:aws:iam::730739171055:user/Alice --operations “Encrypt” “Decrypt” --profile Stuart
This command creates a grant using the ARN of the CMK, followed by the ARN of the grantee principal, this being Alice, followed by the permissions I want Alice to inherit from Stuart, and in this example, I have selected Encrypt and Decrypt.
- The resulting action generates two items, GrantToken and GrantID. Now, this GrantToken or GrantID is used to perform the encryption and decryption operations by Alice. We can test this access immediately using GrantToken, straight from the AWS CLI. When a grant is created, there may be a delay in being able to use the permissions and this is due to eventual consistency having to take place, but GrantToken allows immediate access.
So, in order to test Alice's access, we can enter the following command:
aws kms encrypt --plaintext “Certification” --key-id arn:aws:kms:eu-west-1:730739171055:key/dc8dcec8-c0c2-4496-b6c4-522049e963d2 --grant-tokens AQpAMWIyNTQ4MjBiNzk1YjNjNTM3Y2U3YmRjOTZjOTk1Yjc0YTIxZTU4NGMxOWFkMjYzMmUxMDJlY2U1NWM2OTUzNiKKAgEBAgB4GyVIILeVs8U3znvclsmVt0oh5YTBmtJjLhAuzlXGlTYAAADhMIHeBgkqhkiG9w0BBwaggdAwgc0CAQAwgccGCSqGSIb3DQEHATAeBglghkgBZQMEAS4wEQQM34N2MA3fY_EM9Zi1AgEQgIGZYYAviHWyHWfpJ42CfVJYO8xUWDGgLnk_-TGy1uPar1Jv2ygz0Rgk-NYTV-faKNjgnP5ZO5yLNYy2gWwx4SZwZMfiX_KXxLoHt67qpin1AfOqMBkFiJNZLbcnQXwEo7MquaWlMrzInRwCRh5Ru9GUGTgFh-1DGe7k5K7PbG-b_oEzz3wBgf0oKe6gX0_gOMmkhluLbs9wfF6KKiBKZwCIA66UdutUGglVeHL45dJ5ebOAtRKJA1_xCwxKyA --profile Alice
This command will attempt to take the word Certification in plaintext and encrypt it using my CMK with the grant token that was generated by the grant using the credentials of Alice:

And here we can see that Alice can now perform encryption using the CMK.
- When eventual consistency is achieved using the the GrantID of the grant, which may require a few minutes, then you can simply issue the very first command we tried at the beginning of this demonstration to test Alice's access, as shown here:
aws kms encrypt --plaintext “Certification” --key-id alias/MyCMK --profile Alice
AWS KMS is a service tightly integrated with many other services, and for good reason. It's a great way to implement data protection controls using cryptographic keys based on a service that is validated under FIPS 140-2 (Federal Information Processing Standard Publication 140-2).
Using KMS, you can adopt a very customer-controlled approach by creating all of your own keys to have full ownership of how the CMKs are used, or you can lean on the AWS-managed CMKs to help you implement levels of encryption quickly, securely, and effectively.
AWS KMS is featured heavily within Domain 5, so it's important you understand the key principles and understand how it works. I therefore recommend getting some hands-on experience with creating some CMKs and understanding how they work and familiarizing yourself with consoles and concepts.
Next, we will move on to another managed service that is used for data encryption – AWS CloudHSM.
Exploring AWS CloudHSM
AWS CloudHSM is another managed service that is used for data encryption. Being fully managed, many aspects of implementing and maintaining the HSM are abstracted, such as the provisioning of hardware, patching, and backups, plus it also has the great advantage of automatically scaling on demand.
HSM stands for Hardware Security Module, which is specialized security hardware and validated to FIPS 140-2 Level 3. These HSMs can be used to generate and create your own encryption keys.
Using AWS CloudHSM is required when you require additional control and administrative power over your encryption compared with KMS. Although KMS is supported by its own FIPS-enabled HSM, you have no control over those HSMs behind the service, whereas with CloudHSM, you have control over those modules. You should also be aware that AWS is not able to access your keys or any cryptographic material within your HSMs.
With certain compliance and regulatory requirements, you will be required to use an HSM to generate your keys, or an HSM might be required to be used as a cryptographic key store. In addition to simply generating keys and storing them, an HSM also allows you to carry out the following tasks:
- The use of different encryption algorithms to cater for both symmetric keys and asymmetric keys
- Management of both symmetric and asymmetric cryptographic keys, including both importing and exporting keys
- Signing and verifying signatures
- The ability to use a cryptographic hash function to compute hash-based message authentication codes (HMACs)
I mentioned previously that AWS CloudHSM can integrate with AWS KMS, and this comes in the form of using AWS CloudHSM as a custom key store.
A custom key store allows you to store CMKs outside of KMS, and instead store them within a CloudHSM cluster that you have created. You might want to use CloudHSM as a custom key store in KMS if you have a requirement where your key material can't be stored within a shared environment. Additionally, you might need to ensure that your key material is backed up in multiple AWS regions.
CloudHSM clusters
When you deploy your CloudHSM, it is deployed as a cluster and, by default, this cluster size is 6 per account, per region. However, you can configure your cluster to have a single HSM all the way up to 28 HSMs. The more HSMs you have, the better the performance will be. To avoid complications with key synchronization, AWS CloudHSM manages that for you. If you add additional HSMs to your cluster after the original creation, AWS CloudHSM will take a backup of all of your users, policies, and, of course, your keys, and then deploy that backup onto the new HSM within your cluster.
For additional resiliency and high availability, you should place your HSMs within your cluster in different availability zones within your region. The cluster architecture of AWS CloudHSM can be summarized as shown here:

One important point to note is that when you configure your cluster and you specify your subnets/availability zones as locations, what in actual fact happens is an Elastic Network Interface (ENI) is deployed in your subnets, which then links to an HSM in a VPC owned and managed by AWS.
In this diagram, the VPC on the right is managed by AWS for CloudHSM, while the VPC on the left is a customer VPC.
When creating your clusters with more than one HSM, you will automatically have load balancing enabled, and when you deploy your HSMs between multiple availability zones, you inherently implement high availability for your cluster. If a particular availability zone was temporarily unavailable, you would still have access to the remaining HSMs in other availability zones.
To communicate with your HSMs, you need to use client software for AWS CloudHSM. This software can be installed on an EC2 instance. The clients used with the software must be able to communicate with the ENIs within your chosen subnets of your VPC.
Creating a CloudHSM cluster
To create a CloudHSM cluster is a very simple process. Let's take a look:
- From within the AWS Management Console, select CloudHSM from the Security, Identity and Compliance section.
- Select Create cluster:

- From here you will need to complete the first page of configuration, which will look as follows:

On this screen, make the following selections:
-
- Under VPC, select your VPC that you would like your CloudHSM cluster to be associated with.
- In the AZ(s) section, select which availability zones you would like your cluster to reside in.
- Finally, in Cluster source, you can either select to create a new cluster or restore from an existing backup. In this example, we are going to create a new CloudHSM cluster.
- Click on Next:
- Here you can add any tags that you would like to be associated with your cluster. When you have added your tag information, select Review:

- Here you will be asked to review your configuration from the previous steps. You will notice a warning that lets you know that once you have created your CloudHSM, you can't change the VPC or subnets that it is associated with, so ensure you are happy with your selection. Once you have confirmed your selections are correct, select Create cluster to create your cluster.
In this section, we looked at the simple steps involved in creating a new CloudHSM cluster within an existing VPC across multiple subnets.
AWS CloudHSM users
In the final part of this chapter, I want to explain some of the different user types that AWS CloudHSM uses and the differences between them. Different users have different permissions, and these user types are defined as follows:
- Precrypto Office
- Crypto Office
- Crypto User
- Appliance User
Precrypto Office
When you create your very first HSM within your cluster, the HSM will contain a Precrypto Office (PRECO) user that contains a default username and password. When your first HSM is set up, you will need to connect to it and log in to the HSM to activate it. Until you do so, your HSM will remain in an initialized state.
When connecting to the HSM, you will need to use the PRECO credentials and then change its own user password. Doing so will activate your HSM and your PRECO user will then become the Crypto Office user. The only permissions that PRECO has is to change its own password and perform read only operations on the HSM.
Crypto Office
The Crypto Office (CO) user has greater permissions than that of the PRECO user as it has the ability to perform some user management tasks, such as user creation, deletion, and password changes. It can also perform a number of administrative-level operations, including the following:
- Zeroise the data on the HSM, which allows the CO to delete keys, certificates, and data on the HSM.
- Identify the number of HSMs within the cluster.
- Obtain HSM metadata, including IP address, model, serial number, and firmware and device IDs.
- View synchronization statuses across HSMs in the cluster.
Crypto User
A Crypto User (CU) is able to perform cryptographic functions within AWS CloudHSM, including the following:
- Perform encryption and decryptio
- The ability to create, delete, wrap, unwrap, and modify attributes of key
- Sign and verif
- Generate digests and HMACs.
Also, much like the CO, CUs are also able to zeroise data and basic cluster information such as the IP address and serial number.
Appliance User
The Appliance User (AU) is a user that exists on all HSMs and is used to carry out the cloning and synchronization actions of your HSMs. The AWS CloudHSM service itself calls upon the AU to ensure that the synchronization of your HSMs within your cluster is maintained.
From a permission perspective, the AU carries the same permissions as the CO. However, it is unable to change passwords, or add/remove any other users.
To conclude, let's quickly compare the user permissions of all the user types we just covered:
|
Operations |
Precrypto Office (PRECO) |
Crypto Office (CO) |
Crypto User (CU) |
Appliance User (AU) |
|
Obtain basic cluster information (number of HSMs in cluster, IP address, serial number, and so on |
No |
Yes |
Yes |
Yes |
|
Zeroize HSMs (delete keys, certificates, and data on the HSM) |
No |
Yes |
Yes |
Yes |
|
Change own password |
Yes |
Yes |
Yes |
Yes |
|
Change any user's password |
No |
Yes |
No |
No |
|
Add and remove users |
No |
Yes |
No |
No |
|
Get synchronization status |
No |
Yes |
Yes |
Yes |
|
Key management operations |
No |
No |
Yes |
No |
|
Encrypt, decrypt, sign, verify, generate, and digest HMACs |
No |
No |
Yes |
No |
This table provides an easy reference for the permissions associated with the different users across AWS CloudHSM.
In this section, we looked at CloudHSM and how it can be used to give you additional administrative control when compared to that of KMS by having added control over the hardware security modules of CloudHSM. Sometimes, from a governance perspective, you might need to use CloudHSM instead of KMS if you need that added level of control and ownership.
AWS Secrets Manager
Although AWS Secrets Manager is not solely focused on key infrastructure, it does offer the ability to maintain a level of security protection for any API keys, in addition to other secrets. You might be wondering what is actually considered a secret? Within Secrets Manager, a secret is something that you want to remain hidden and protected instead of being available with open access to anyone who can read it. This can include database credentials across Amazon Redshift clusters and Amazon RDS, instance passwords, plaintext, or, like I mentioned earlier, API keys.
AWS Secrets Manager holds, protects, and contains this sensitive information for you, allowing other services and applications to call for the secret via a simple API call. This negates the need for your application developers to hardcode any secret or credentials within your applications. Instead, when a secret value is required, an API call to AWS Secrets Manager is triggered that will then return the value. This method is far more secure than hardcoding secrets.
When working with secrets, such as passwords, it is important to rotate them across a given schedule to reduce the likelihood of them becoming compromised, much like we did with the password policy we discussed in Chapter 15, Discovering Security Best Practices. As a part of AWS Secrets Manager, it can automatically manage the rotation of secrets, meaning you don't have to manually do this yourself.
We have already discussed the KMS service within this chapter, and so it might be no surprise that AWS KMS is tightly integrated into AWS Secrets Manager to help encrypt your secrets' values that are being stored. It is important that any secrets are stored as encrypted. After all, they are of significant importance and must be protected as much as possible.
Due to the critical nature of the data being stored, it is important to be able to audit the secrets as to who, what, and when they are being accessed by. Thankfully, AWS CloudTrail is also integrated to maintain a log of when each secret is requested to ensure that a full audit trail of the secret can be maintained.
Obviously, managing access to the secrets held is of the utmost importance and needs to be managed accordingly. In addition to KMS encryption, you can use fine-grained policies, both identity-based and resource-based, to efficiently and securely manage who and what has access to each secret. By maintaining the principle of least privilege (discussed in Chapter 15, Discovering Security Best Practices), you can enforce a strict level of access control.
Identity-based policies are attached to users, groups, or roles and define what actions can be used against the specified secret, and these are managed within the IAM service. Resource-based policies are attached directly to the secrets themselves and define which principals can perform which actions against that secret. It is not possible to configure these from within the AWS Management Console, and so these need to be configured and attached to your secrets using the AWS CLI. For example, the following command would add a resource policy saved as resource.json to an existing secret named My_RDS_Secret:
aws secretsmanager put-resource-policy --secret-id My_RDS_Secret --resource-policy file://resource.json
Now that we have an understanding of AWS Secrets Manager, let's take a look at how to create a secret within the service that can be called upon by other services:
- From within the AWS Management Console, select Secrets Manager from the Security, Identity & Compliance category:

- Click on Store a new secret:

- You will now need to enter a number of configuration fields as shown:

Here, you need to make the following selections:
-
- You can select the type of secret that you would like to store. In this demonstration, I have selected Credentials for RDS database. However, other options are available as well.
- If selecting Credentials for RDS database, you will need to enter the username and password that will be stored in your secret. The credentials of this username and password will grant you access to the RDS database selected.
- You will then need to select your encryption key. You can either select the DefaultEncryptionKey as shown, which will be set up by AWS Secrets Manager with KMS automatically, or you can select an existing CMK that you have already created.
- Finally, you must select the RDS database instance with which this secret will be associated.
- When you have entered your details, click on Next, where the following screen will appear:

You must supply a name for your new secret, and optionally a description with optional tagging information.
- Select Next when you have entered the relevant information where you can configure options for rotating your secret:

Here, the following selections can be made:
-
- You can either enable or disable automatic rotation. Enabling automatic rotation is the recommended option for the reasons previously mentioned.
- If you enable automatic rotation, you can select between 30, 60, and 90 day rotation periods.
- The rotation will be undertaken by a Lambda function. You can either select to have a new Lambda function created to perform the rotation, or select an existing one. If a new Lambda function is to be created, you must select a name for the function.
- Finally, you need to select which secret will be used to perform the rotation.
- Select Next when you have configured the automation rotation settings where you will be presented with a Review screen to review the options selected during the creation:

- When you are happy with the options selected, click on Store a new secret. Your secret will then be created and stored in the dashboard:

- To view the value of the secret, you can select the secret. Select Retrieve Secret Value. This will then show you the secret:

Alternatively, you could use the AWS CLI or AWS SDK to retrieve the value using the following commands, provided that access was granted to allow the retrieval of the secret value:
- API/SDK: GetSecretValue
- AWS CLI:get-secret-value
As you can see, AWS Secrets Manager is a great service that allows you to centrally manage and control access to your secrets that can be used by your applications and services without having to manage that layer yourself. Using a centrally encrypted and managed service offers many benefits and removes a lot of the administrative burden of managing it yourself, in addition to helping you to improve the security posture of your environment.
Summary
In this chapter, we covered the key services that are used to implement encryption within your AWS environment, specifically, the AWS Key Management Service, and AWS CloudHSM. We began with a quick overview of encryption and then understood AWS KMS and its components, including CMKs, DEKs, key material, key policies, and grants. In the section on CloudHSM, we understood how CloudHSM is deployed as a cluster and the cluster architecture, as well as the different types of users and permission levels.
Remember that KMS offers a managed service with the underlying HSMs containing your CMKs hidden and managed by AWS. AWS CloudHSM allows you to deploy your own HSMs within specific subnets of your AWS infrastructure, thereby allowing you to maintain the HSMs themselves with your own key infrastructure.
With the help of this chapter, you are now aware of the differences and similarities between both KMS and CloudHSM and have an understanding of when to use each of them. By applying this knowledge, you now have the key ingredients to design, architect, and implement solutions using each of these services, ensuring that your data is being protected with the appropriate level of cryptographic controls, and thereby safeguarding your data from being exposed and easily read.
In the next chapter, we will continue looking at encryption, but this time how it is implemented across a variety of different services covering both storage and database services.
Questions
As we conclude, here is a list of questions for you to test your knowledge regarding the material covered in this chapter. You will find the answers in the Assessments section of the Appendix:
- True or False: Asymmetric encryption uses a single key to encrypt and decrypt data.
- Which component is the main building block of the KMS service as it contains the key material used for both encrypting and decrypting data?
- There are three different types of CMKs used by KMS that you need to be familiar with; AWS-owned, customer-managed, and which other?
- Which component of KMS is used to determine who can use the key to perform cryptographic operations, such as encrypt, decrypt, and GenerateDataKey, in addition to who can administer the CMK?
- Which AWS service offers the ability to maintain a level of security protection for any API keys, in addition to other secrets?
Further reading
- White Paper – AWS Key Management Service Cryptographic Details: https://d0.awsstatic.com/whitepapers/KMS-Cryptographic-Details.pdf
- White Paper – AWS Key Management Service Best Practices: https://d0.awsstatic.com/whitepapers/aws-kms-best-practices.pdf
- White Paper – Security of AWS CloudHSM Backups: https://d1.awsstatic.com/whitepapers/Security/security-of-aws-cloudhsm-backups.pdf