
In the previous chapter, we learned how AWS Key Management Service (KMS) and CloudHSM are used to generate encryption keys to encrypt data across different AWS services. In this chapter, I want to look at encryption again, but with a focus on how encryption is implemented across a variety of different services, covering both storage and database services, including Amazon Elastic Block Store (EBS), Amazon Elastic File System (EFS), Amazon Simple Storage Service (S3), Amazon Relational Database Service (RDS), and Amazon DynamoDB. Some of the encryption methods that we will discuss will integrate with KMS, and some of them will not.
When using these services, you will often be storing confidential and sensitive information, and so it's key to understand some of the methods for protecting the data that is being stored in these services. You will learn how to implement encryption across these services, looking at encryption at rest and in transit.
The following topics will be covered in this chapter:
- Amazon EBS
- Amazon EFS
- Amazon S3
- Amazon RDS
- Amazon DynamoDB
Technical requirements
To follow the demonstrations in this chapter, you should have permissions to perform encryption and decryption across the following services:
- Amazon EBS
- Amazon EFS
- Amazon S3
- Amazon RDS
- Amazon DynamoDB
For more information on how to manage permissions, please refer to Chapter 4, Working with Access Policies.
Amazon EBS encryption
I want to start with the EBS encryption service as it tightly integrates with the KMS service, which we already discussed in the previous chapter. EBS volumes provide persistent block-level storage to your EC2 instance, providing more flexibility for your instance storage capabilities. One advantage of using EBS volumes is the simplicity you can apply to encrypting sensitive data stored on these volumes.
When a volume is encrypted, it does not impact or affect the Input/Output Operations per Second (IOPS) of your volume and has a very minimal effect on latency. The encryption process is also transparent in its operation, and so, as a result, there are no specific actions required by your applications to access the data.
At the time of writing, EBS encryption is supported on the following instance types; however, I suggest you review the latest supported instances at https://docs.aws.amazon.com/AWSEC2/latest/UserGuide/EBSEncryption.html#ebs-encryption-requirements:
- General-purpose: A1, M3, M4, M5, M5a, M5ad, M5d, M5dn, M5n, T2, T3, and T3a
- Compute-optimized: C3, C4, C5, C5d, and C5n
- Memory-optimized: cr1.8xlarge, R3, R4, R5, R5a, R5ad, R5d, R5dn, R5n, u-6tb1.metal, u-9tb1.metal, u-12tb1.metal, u-18tb1.metal, u-24tb1.metal, X1, X1e, and z1d
- Storage-optimized: D2, h1.2xlarge, h1.4xlarge, I2, I3, and I3en
- Accelerated computing: F1, G2, G3, G4, Inf1, P2, and P3
When EBS encryption is enabled, both the root and data volumes can be encrypted and the encryption applies to all data residing on the volume, in addition to data moving between the EBS volume itself and the associated EC2 instance. Plus, when snapshots are created, the encryption settings will be applied to the snapshot as well. By performing EBS encryption on your EC2 instances, it's possible to encrypt the boot volume as well as your data volumes.
In order to understand how this encryption works in a better way, let's try to encrypt an EBS volume ourselves.
Encrypting an EBS volume
In this section, we are going to look at a variety of ways that we can implement EBS encryption in different scenarios, as follows:
- How to configure encryption as we create a new EBS volume
- How to create an encrypted EBS volume from an unencrypted snapshot
- How to re-encrypt an existing EBS volume using a new Customer Master Key (CMK)
- How to apply default encryption to a volume
As you begin using EBS volumes, you might need to implement encryption at different stages, so let's take a look at how to perform some of these processes.
Encrypting a new EBS volume
To encrypt a new EBS volume, follow these simple steps:
- From the AWS Management Console, select EC2 from the Compute category.
- Select Volumes from the ELASTIC BLOCK STORE menu on the left:

- Select Create Volume to arrive at the following screen:

- Select your desired Volume Type, Size (GiB), and Availability Zone options. To apply encryption, select the tickbox beside Encryption, and this will provide you with additional options:

- You first need to select your Master Key setting, which is effectively your CMK. If you have already created a customer-managed CMK within KMS, then you can select that key here. Alternatively, you can select the AWS-managed key instead. In the preceding example, I have chosen to select the AWS-managed key, which is automatically created by KMS for use with EBS only.
- When you have selected your CMK to use for encryption via KMS, select Create Volume. The volume is then created and encrypted using the key selected:

If a snapshot was then taken of this volume, that snapshot would also be automatically encrypted using the same CMK. Also, at this point, you can create a new volume from an existing snapshot by selecting a Snapshot ID option, as shown:

If you select a snapshot that is encrypted, then the new volume created from this snapshot will also be encrypted. Likewise, if the volume you select is unencrypted, then the volume will automatically be encrypted. However, you can choose to create an encrypted volume from an unencrypted snapshot. Let's see how to do this.
Encrypting a volume from an unencrypted snapshot
To create an encrypted volume from an unencrypted snapshot, follow these steps:
- From within the AWS Management Console, select EC2 from the Compute category.
- Select Snapshots from the ELASTIC BLOCK STORE menu on the left:

- Select your snapshot:

As you can see, this snapshot is not encrypted.
- Select Actions | Create Volume:

- This will present the following familiar screen; however, notice how at the top, it highlights the snapshot ID that is used to create the volume. You can go ahead and select the Encryption checkbox, as in the previous demonstration, and select your required key to perform the encryption:

- After you have selected your CMK to use for encryption via KMS, select Create Volume.
Your new volume will then be encrypted from an unencrypted snapshot. You might need to do this if your company adopts a new policy or standard that requires all EBS volumes to be encrypted. This allows you to implement that level of encryption while maintaining the data.
Re-encrypting a volume from an existing snapshot with a new CMK
You might want to re-encrypt an existing EBS volume with a new CMK if an existing CMK becomes compromised. This allows you to re-encrypt your volumes with a new CMK, thereby safeguarding your data:
- From within the AWS Management Console, select EC2 from the Compute category.
- Select Snapshots from the ELASTIC BLOCK STORE menu on the left.
- Select your snapshot that is encrypted:

As you can see, this snapshot is encrypted using the AWS-managed awsebs key.
- Select Actions | Create Volume:

- You will now have the option of selecting a different encryption key. In the example here, I have selected a customer-managed CMK, called MyCMK:

- After you have selected your CMK to use for encryption via KMS, select Create Volume. Your new volume will then be encrypted using a different CMK:

Let's now look at how to apply default encryption to your EBS volumes.
Applying default encryption to a volume
You can configure your AWS account to apply a default regional encryption setting for your EBS volumes. This prevents you from having to manually select the option of an EBS volume being encrypted, which could be easily missed. Applying a default option ensures that any new EBS volumes created will be encrypted by default and so provides a greater level of protection.
This can be configured from within the AWS Management Console:
- From the AWS Management Console, select EC2 from the Compute category.
- In the top right-hand corner of the console, under Account Attributes, select Settings:

- This will display the following screen:

From here, you can select Always encrypt new EBS volumes so that encryption is done automatically. Additionally, you can select your default key; in this example, I have selected the AWS-managed aws/ebs key.
- Once you have selected your key, select Save Settings.
From this point onward, all new EBS volumes will be encrypted by default using this key. Any existing volumes will not be affected. Activating this change will also automatically encrypt new volumes when they are created from unencumbered snapshots.
In this first section of the chapter, we covered the EBS encryption service offered by AWS. In the next section, let's turn our attention to a storage service known as Amazon EFS.
Amazon EFS
Amazon EFS is used for file-level storage, which has the capacity to support access for thousands of instances at once. Being a file-level storage system, it behaves much like most other filesystems and utilizes standard filesystem semantics; for example, it adheres to a file hierarchy structure with folders and subfolders and you can easily rename and lock files, and so on. It also provides low-latency access, making this a great service for many of your file storage needs, from home directories to big data analytics.
Being a storage service, there will, of course, be times when you will need to encrypt your data for additional protection, and EFS supports both in-transit and at-rest encryption.
Again, much like EBS, which we just discussed, EFS also uses the KMS service to encrypt its data. When encryption is enabled, all data, as well as metadata, is encrypted before it is written to a disk using the configured KMS CMK key.
Let's start by looking at how to enable encryption at rest when using EFS, before moving on to how EFS also supports encryption in transit.
Encryption at rest
You can enable encryption at rest using the AWS CLI, an SDK, or the AWS EFS API; alternatively, you can use the AWS Management Console. In this example, I am going to show you how to configure encryption for a new EFS filesystem using the AWS Management Console:
- From the AWS Management Console, select EFS from the Storage category:

- Select File systems from the menu on the left, and then select Create file system:

- Select the VPC that you would like to create your EFS filesystems within, and select the subnets where you would like to create mount targets. Mount targets allow your resources to connect to your filesystem using a network interface called a mount target, which has an automatically assigned IP address. You should select all subnets that will need to connect to your EFS volume:

- Select Next Step. Here, you have the option to add any tags that you need, in addition to configuring the life cycle management options and selecting throughput modes and your performance mode. Life cycle management allows you to select a specified number of days where inactive files can be moved to a different storage class to help you save on storage costs:

- After the performance mode section, there is an option to configure encryption:
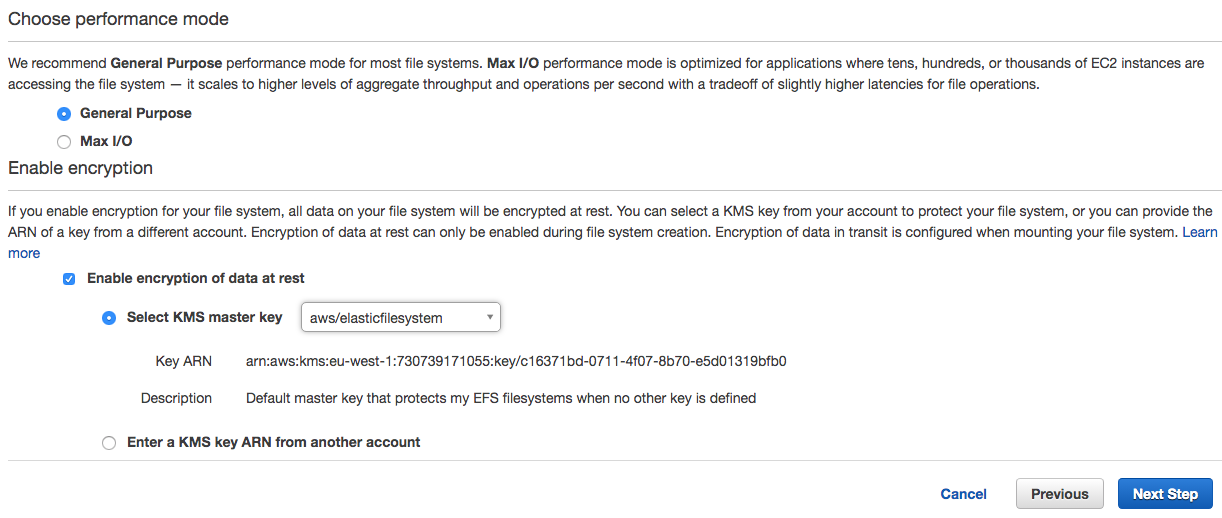
- This is enabled via a checkbox, which then allows you to select a key, much like we did with EBS encryption. You can select either a customer-managed CMK or the default AWS-managed key, which I have done in this example: aws/elasticfilesystems. You can also select a KMS key from another account. When this option is selected, you must enter the ARN of that key:

- Select Next Step. This page allows you to set filesystem policies and configure access points:

- Here, there is an Enforce in-transit encryption for all clients option. Now, I know we are configuring at-rest encryption here, but during the setup of your EFS filesystem, you might want to enable this. By doing so, it will only accept connections from clients that have initiated a connection using Transport Layer Security (TLS), which is effectively in-transit encryption. If you select this option, and the client did not connect to EFS using in-transit encryption, then the connection will be dropped.
If you select this option, you can view the policy that is applied by selecting the {}JSON tab, which appears as follows:

As you can see, between lines 6–17, the policy denies connections on the condition of secure transport not being used.
- Select Next Step to be taken to the Review screen:

- If you are happy with your configuration, select the Create File System button, and your EFS filesystem will be created:

As you can see, when it’s created, you will be shown the details screen, where you can see that your encryption is enabled for data at rest using the specified key from KMS.
With EFS being a shared storage service with many different use cases that can be used at a huge scale, it's very important to implement a level of encryption at rest if the data being stored is sensitive in any way to provide that added level of security, especially when this can be achieved with just a few clicks.
Encryption in transit
Before you can use your EFS filesystem, you need to mount an EFS target on your EC2 instance. This can be done by using the EFS mount helper, which is the easiest method. For more information on how to mount your EFS filesystem on an instance, please refer to the documentation at https://docs.aws.amazon.com/efs/latest/ug/mounting-fs.html#mounting-fs-mount-helper.
When mounting your EFS filesystem, you have the option of enabling encryption in transit using TLS as a mount option, which uses a client tunnel process. This listens on a local port where the EFS mount helper will redirect NFS traffic to.
Once you have completed the steps using the link to the AWS documentation, follow these steps to configure in-transit encryption:
- Connect to your EC2 instance using SSH and log in with the appropriate credentials for your instance.
- To complete the mount process of your EFS filesystem run the following command, replacing the text in bold and italics with your own filesystem identifier and directory:
sudo mount -t efs -o tls fs-12345678:/ /mnt/efs
Now that we have covered EFS, let's now move on to explaining how encryption is carried out in Amazon S3.
Amazon S3
Amazon S3 provides an object-level storage solution, allowing you to save objects up to 5 terabytes in size. Being a storage solution, and one of the most commonly used storage services within AWS, S3 provides a variety of encryption mechanisms to suit different requirements and compliance concerns.
There are five different encryption options available to encrypt your S3 objects, as follows:
- Server-side encryption with S3-managed keys (SSE-S3)
- Server-side encryption with KMS-managed keys (SSE-KMS)
- Server-side encryption with customer-managed keys (SSE-C)
- Client-side encryption with KMS-managed keys (CSE-KMS)
- Client-side encryption with customer-managed keys (CSE-C)
The difference between server-side and client-side encryption is fairly simple. With server-side encryption, the encryption algorithm and process are run from the server-side—in this case, within Amazon S3. Client-side encryption means that the encryption process is executed on the client first, before the data is sent to S3 for storage.
Let's take a closer look at each of these methods to work out the exact process that takes place for both the encryption and decryption actions.
Server-side encryption with S3-managed keys (SSE-S3)
This diagram shows the three-step encryption process when using SSE-S3:

Let's understand the process:
- The client selects their object(s) to upload to S3 and indicates the encryption mechanism of SSE-S3 during this process.
- S3 then takes control of the object and encrypts it with a plaintext data key generated by S3. The result is an encrypted version of the object, which is then stored in your chosen S3 bucket.
- The plaintext data key that is used to encrypt the object is then encrypted with an S3 master key, resulting in an encrypted version of the key. This now-encrypted key is also stored in S3 and is associated with the encrypted data object. Finally, the plaintext data key is removed from memory in S3.
This diagram shows the four-step decryption process when using SSE-S3:

Let's understand the process:
- A user requests access to the encrypted object via a client.
- S3 is aware that the requested object is encrypted and so takes the associated encrypted data key of the object and uses the S3 master key to decrypt the data back into a plaintext data key.
- This plaintext data key is then used to decrypt the encrypted data object to produce a plaintext version of the object.
- Once the object is decrypted, S3 returns the data object to the client.
As you can see, the encryption process is completely transparent to the user and they are not required to interact with S3 in a different way; the same access method is used and all encryption processes are handled by S3, as long as the user that requested access has the required permissions to the data object in an encrypted form.
Server-side encryption with KMS-managed keys (SSE-KMS)
I covered this in the previous chapter, but for completeness, I will reiterate the process in this section, too.
This diagram shows the five-step encryption process when using SSE-KMS:

Let's understand the process:
- Firstly, the client identifies the object(s) that are to be uploaded to S3, indicating SSE-KMS as the encryption mechanism, selecting either an AWS-managed or customer-managed CMK.
- Amazon S3 will respond by initiating a request to generate Data Encryption Keys (DEKs) from KMS to allow S3 to encrypt the data submitted by the client.
- Using the CMK selected in step 1, KMS will then generate two data keys: a plaintext data key and an encrypted version of that same data key.
- KMS will send both of these data keys back to S3 to allow S3 to begin the encryption process using the plaintext data key.
- At this stage, S3 then encrypts the object data with the plaintext version of the data key and stores the resulting encrypted object alongside the encrypted version of the data key. The plaintext data key will then be deleted and removed from memory.
This diagram shows the six-step decryption process when using SSE-KMS:

Let's understand the process:
- A request is received by S3 to access an encrypted object via a client.
- S3 is aware the object is encrypted and sends the encrypted data key associated with the requested object to KMS.
- KMS takes the encrypted data key and uses the original CMK to decrypt the data key to generate a plaintext version of it.
- KMS sends the plaintext data key back to S3.
- Using the plaintext data key, the encrypted object data can then be decrypted, returning a plaintext version of the object data, and the plaintext data key is deleted from memory.
- The plaintext object is then sent back to the requesting client.
Similarly to SSE-S3, this process is also transparent to the end client, but again, they can only access the object if the required permissions are in place.
Server-side encryption with customer-managed keys (SSE-C)
This diagram shows the two-step encryption process when using SSE-C:

Let's understand the process:
- The client uploads the object(s) to S3, along with the customer-provided key across an Hypertext Transfer Protocol Secure (HTTPS) connection. If SSE-C is being used and HTTPS is not used during the uploads, then it will fail and reject the communication. The channel needs to be encrypted as the key is being sent with the object.
- S3 will then take the customer-provided key and the object and perform the encryption of the object. In addition to this, S3 will generate a salted HMAC value of the customer key to enable the validation of future access requests. This HMAC value and the encrypted object are then stored in S3 with an association to each other. Again, the plaintext customer-provided key is then removed from memory.
This diagram shows the four-step decryption process when using SSE-C:

Let's understand the process:
- A user requests access to the encrypted object on S3 via an HTTPS connection. With this same request, the customer key is also sent to S3.
- S3 uses the stored HMAC value of the key to validate and confirm that the key sent is the correct key.
- Upon successful validation, the customer key is then used to decrypt the object data.
- The plaintext version of the object data is then sent back to the client.
As you might have noticed, here, the process was slightly different from SSE-S3 and SSE-KMS as the key is sourced from the client, rather than by S3. As a result, you need to include encryption with your request, using a number of different request headers in the AWS SDK:
- The X-amz-server-side-encryption-customer-algorithm header: Used to specify the encryption algorithm. The header value here must be AES256.
- The X-amz-server-side-encryption-customer-key header: This header is used to provide a 256-bit, Base64-encoded encryption key for S3 during both encryption and decryption operations of your objects.
- The x-amz-server-side-encryption-customer-key-MD5 header: This header provides a Base64-encoded 128-bit MD5 digest of your encryption key. This is used by S3 as a form of integrity check to make sure the encryption key wasn't tampered with or experienced any errors during transmission.
Now that we have looked at the different encryption mechanisms using server-side encryption for Amazon S3, let's look at the client-side encryption options.
Client-side encryption with KMS-managed keys (CSE-KMS)
This diagram shows the six-step encryption process when using CSE-KMS:
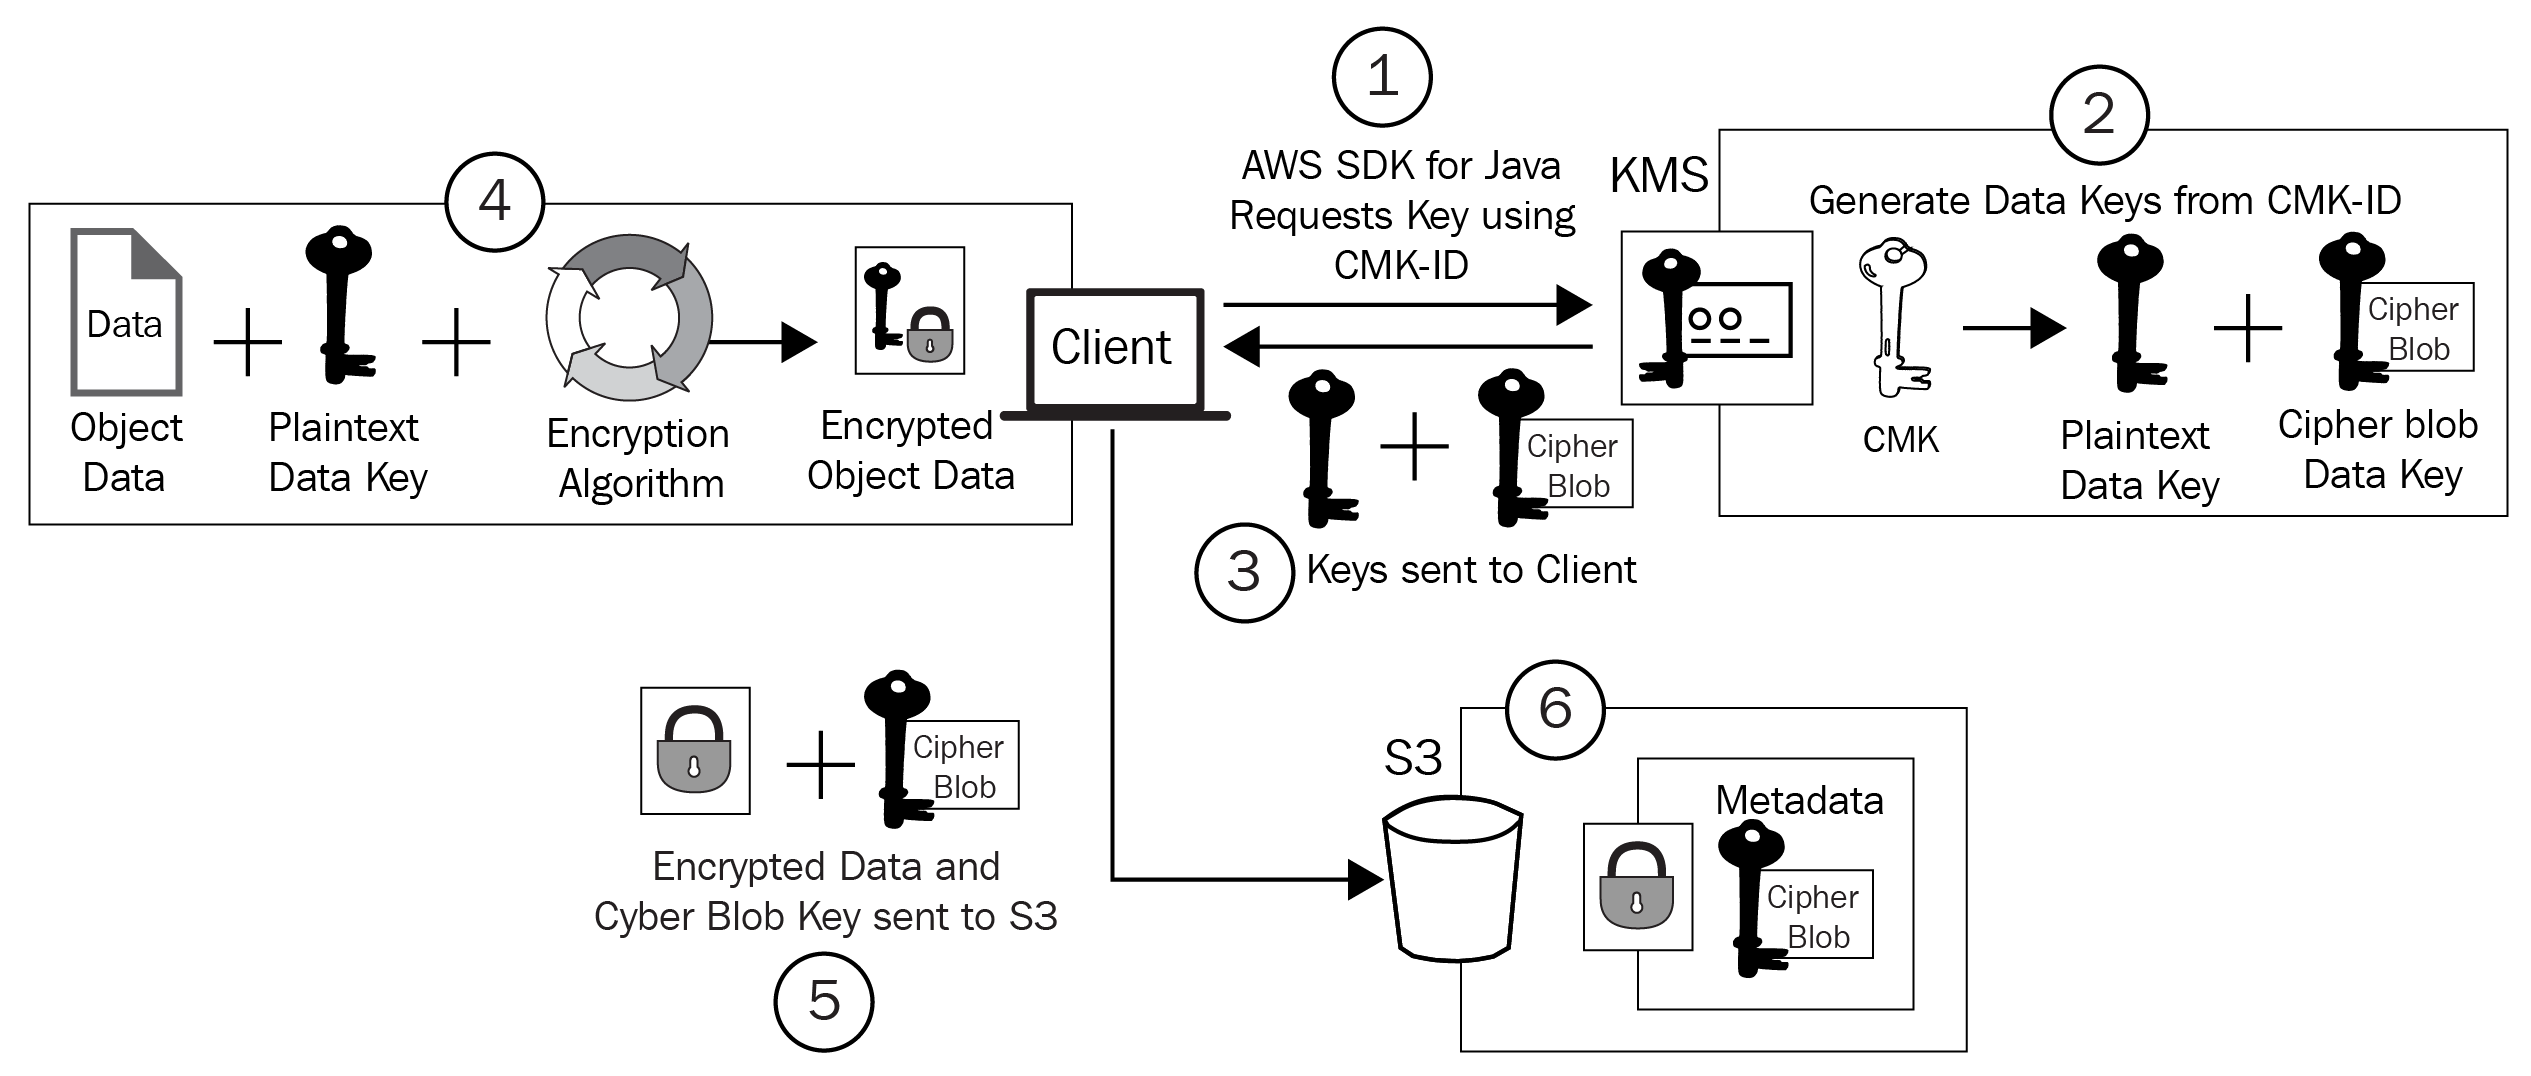
Let's understand the process:
- The client will use an AWS SDK and, in this example, the Java client, to request data keys from KMS using a specified CMK.
- Using the CMK selected in step 1, KMS will then generate two data keys: a plaintext data key and a cipher blob of the first key.
- KMS will then send these keys back to the requesting client.
- The client will perform the encryption against the object data with the plaintext version of the data key and then store the resulting encrypted object.
- The client then uploads the encrypted object data and the cipher blob version of the key created by KMS to S3.
- The final stage involves the cipher blob key being stored as metadata against the encrypted object, maintaining a linked association.
This diagram shows the six-step decryption process when using CSE-KMS:

Let's understand the process:
- A user requests access to the encrypted object in S3.
- The encrypted object is retrieved from the S3 bucket and sent back to the client, along with the associated cipher blob key.
- The Java client will then send the cipher blob back to KMS to generate a plaintext data key.
- KMS uses the original CMK that was used during the encryption process, along with the cipher blob, to create and generate a plaintext version of the data key.
- KMS then sends this plaintext data key back to the requesting Java client.
- Once the Java client receives the plaintext key, it can then use it to decrypt the object that it has already received back from S3.
You will have noticed that all of the encryption operations were conducted on the client, using the AWS SDK. At no point did S3 perform any encryption operations. Even when the object was requested to be accessed again, S3 simply sent the encrypted data object back to the client to allow the client to perform the necessary steps.
Client-side encryption with KMS-managed keys (CSE-C)
This diagram shows the four-step encryption process when using CSE-C:

Let's understand the process:
- The client will use an AWS SDK and, in this example, the Java client, which will create a randomly generated plaintext data key, which is then used to encrypt the object data.
- A CMK created by the customer then encrypts this plaintext data key.
- At this point, the encrypted data key and the encrypted object data is sent from the client to S3 for storage.
- S3 then takes the encrypted data key and associates it with the encrypted object and stores both in S3.
This diagram shows the four-step decryption process when using CSE-C:

Let's understand the process:
- A user requests access to the encrypted object in S3.
- S3 responds by sending the requested object data, along with the associated encrypted data key, back to the client.
- Using the AWS SDK, the customer CMK is then used with the encrypted data key to generate a plaintext version of that same data key.
- The encrypted object can then be decrypted using the plaintext data key and its contents accessed.
As with CSE-KMS, you can see here that all encryption/decryption operations are handled by the client itself; the server (S3) has not been involved with this process, other than storing the encrypted data that is sent.
We have now covered five different mechanisms for encrypting data on Amazon S3. Having this choice allows you to implement the best level of protection for you based on your data needs, controls, and governance. Although each method is secure, they each also provide you with a different level of management and, depending on what data you are storing, you might be required to have added control.
That now covers the encryption options available in Amazon S3. So far in this chapter, we have only covered encryption in Amazon storage services. Next up, I want to move on from encryption in storage services to instead look at encryption options for database services—in particular, Amazon RDS.
Amazon RDS
Amazon RDS is a relational database service that is capable of running multiple different database engines, which include Amazon Aurora, PostgreSQL, MariaDV, MySQL, the SQL service, and Oracle Database. They can be run across a variety of different instance types, which can be optimized for performance and memory.
Again, much like the storage services, you will need to be careful when architecting your databases based on the data that is going to be stored on them, and so, of course, they also have encryption capabilities, which are very easy to implement.
Firstly, let's take a look at encryption at rest for an RDS database.
Encryption at rest
When at-rest encryption is configured, your database instance, tables, and any snapshots or automated backups taken of that database will be encrypted using AES-256 (Advanced Encryption Standard) encryption. You should also note that you can only encrypt an RDS database during its creation, so be sure to understand your encryption requirements before creating your database.
Configuring at-rest encryption is enabled by a simple checkbox from the AWS Management Console:
- From the AWS Management Console, select RDS under the Database category:

- Select Create Database:

- Scroll down to the Additional configuration section and expand the category by selecting it:

- From here, you can scroll down to the Encryption section:

From here, you can either select a customer-managed key or, as in the preceding example, you can select the AWS-managed key for the service, aws/rds. You should be aware that once you have selected your key, you cannot change it to a different key, going forward, for that database instance.
- Once you have configured the rest of your database options and created your database, your database instance and tables will be encrypted using the specified key.
If you're using SQL Server or Oracle as your database engine type, then you can also encrypt your database instance at rest using Transparent Data Encryption (TDE). However, if you do use TDE and the RDS encryption shown in the preceding screenshot together, you might see a performance impact, and you must use different encryption keys for each method.
For more information on TDE with Oracle, go to https://docs.aws.amazon.com/AmazonRDS/latest/UserGuide/Appendix.Oracle.Options.AdvSecurity.html.
Encryption in transit
You will, of course, be connecting to your RDS database via an application of some kind, and when this data is being retrieved, you will want to ensure that the data remains encrypted. Amazon RDS utilizes Secure Sockets Layer/Transport Layer Security (SSL/TLS). Which database engine you are using will depend on the configuration process of each one.
Refer to the following links if you want to understand how to configure and implement in-transit encryption for your database type:
- Microsoft SQL Server database instance: https://docs.aws.amazon.com/AmazonRDS/latest/UserGuide/SQLServer.Concepts.General.SSL.Using.html
- Oracle Database instance: https://docs.aws.amazon.com/AmazonRDS/latest/UserGuide/CHAP_Oracle.html#Oracle.Concepts.SSL
- MySQL database instance: https://docs.aws.amazon.com/AmazonRDS/latest/UserGuide/CHAP_MySQL.html#MySQL.Concepts.SSLSupport
- MariaDB database instance: https://docs.aws.amazon.com/AmazonRDS/latest/UserGuide/CHAP_MariaDB.html#MariaDB.Concepts.SSLSupport
- PostgreSQL database instance: https://docs.aws.amazon.com/AmazonRDS/latest/UserGuide/CHAP_PostgreSQL.html#PostgreSQL.Concepts.General.SSL
Databases often contain data that is sensitive in nature, and understanding how encryption can be used at rest by RDS is something you should be familiar with when going into the exam. You will often need to maintain an enhanced level of security when using databases, and encryption is a fundamental element of that.
Finally, I want to take a look at the encryption options for Amazon DynamoDB.
Amazon DynamoDB
Amazon DynamoDB is a fully managed key-value and document NoSQL database, designed for high performance (single-digit milliseconds) across multiple regions. Being fully managed, AWS is responsible for many of the maintenance tasks, such as architecting high availability, backups, and patching.
Much like Amazon RDS, DynamoDB also comes with encryption options for both at-rest and in-transit encryption.
Encryption at rest
By default, at-rest encryption using server-side encryption is enabled on all DynamoDB tables, and this option cannot be turned off or disabled. Again, this method of encryption uses the KMS service.
Unlike Amazon RDS, where you have to use the same KMS key for the duration of the database, with DynamoDB, you can swap your encryption key at any given time. For example, you could create your DynamoDB database with the AWS-managed key for DynamoDB, and then at a later date, if you created your own customer-managed CMK, you could select this new key as the key to be used for your encryption.
By default, your DyanmoDB primary key, local and secondary indexes, backups, global tables, and DynamoDB Accelerator (DAX) clusters are all encrypted, which helps to maintain a high level of compliance.
DynamoDB encryption options
When you create your DynamoDB database, you have three options to encrypt your database with. Let's take a look at these options in the console:
- From the AWS Management Console, select DynamoDB from the Database category:

- Select Create table:

- You will then be presented with the following screen:
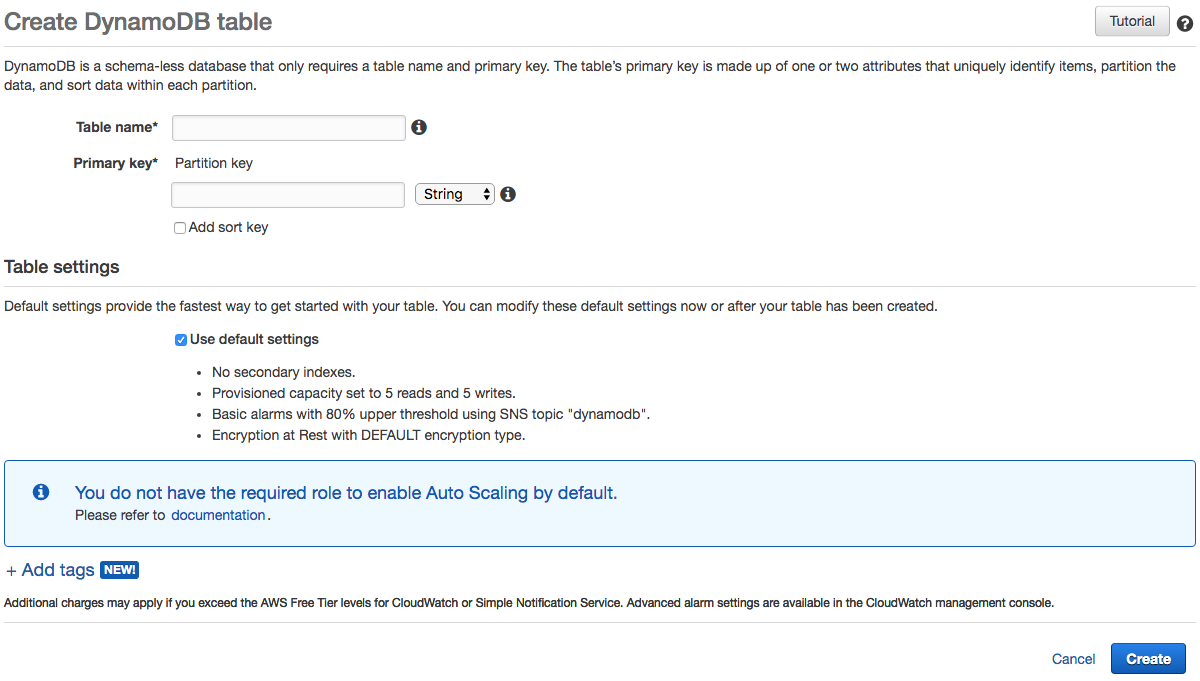
- Uncheck the Use default settings checkbox under Table settings.
- Scroll down to the Encryption At Rest section:

Here, you can see that there are three options:
-
- DEFAULT: This is a key that is owned by Amazon DynamoDB and provides the default encryption for your tables. It is free of charge and is stored outside of your AWS account
- KMS - Customer managed CMK: Select this option if you want to use your own customer-managed KMS key, which is stored in your own AWS account. Using your own CMK incurs a cost.
- KMS - AWS managed CMK: This final option allows you to use an AWS-managed key. Again, this also incurs a cost, and it is also stored in your AWS account.
The option you select largely depends on your data requirements, procedures, and what controls you are bound to from a compliance perspective. If you want the additional features that come with KMS, then you can select either of the KMS keys; but again, if you wanted further administrative control over the keys used in KMS, then you could select the customer-managed CMK option. However, if that level of administrative control is not required, then the AWS-managed CMK would suffice.
Encryption in transit
When your application needs to communicate with your DynamoDB table, it will do so using HTTPS, which is an encrypted HTTP connection. Also, all responses from DynamoDB will also use HTTPS. This ensures that communication between your application and your database remains protected and encrypted, at which point any data stored is also protected using server-side at-rest encryption.
You can also use the Amazon DyanmoDB encryption client to perform encryption of data locally before sending it to your DynamoDB database. For more information on the encryption client, please refer to the AWS documentation at https://docs.aws.amazon.com/dynamodb-encryption-client/latest/devguide/what-is-ddb-encrypt.html.
Summary
In this chapter, we covered the different mechanisms that different AWS storage and database services use to protect your data, such as EBS, EFS, S3, RDS, and DynamoDB. Most of them use KMS in some way via the CMK, which we discussed in the previous chapter. This integration of KMS makes it easy for other AWS services to implement their own server-side encryption options.
If you have your own AWS account, take a look at each of these services and the encryption option available to you to reiterate what we covered within this chapter. This will help you maintain a solid understanding of encryption across services, especially those that integrate with KMS.
In the next chapter, you will be able test the knowledge that you have gained throughout this book to check your understanding and readiness for the exam.
Questions
As we conclude, here is a list of questions for you to test your knowledge of this chapter's material. You will find the answers in the Assessments section of the Appendix:
- What does IOPS stand for?
- Which AWS service provides persistent block-level storage to your EC2 instance, providing more flexibility to your instance storage capabilities?
- Which AWS service is used for file-level storage and has the capacity to support access to thousands of instances at once?
- True or false: you can enable encryption at rest using the AWS CLI, an SDK, the AWS EFS API, or the AWS Management Console.
- By default, at-rest encryption using server-side encryption is enabled on all DynamoDB tables. Which AWS service is integrated to perform this encryption?