
Use Keynote views to make your work easier
</objective> <objective>Manage the slide order in a presentation
</objective> <objective>Keep things organized with slide groups
</objective> <objective>Keep things a secret with skipped slides
</objective> <objective>Make speaker notes to help remember the details
</objective> <objective>Spell check a presentation and more
</objective> </feature>Your slides can be a great help, but they can also throw a presentation off track if you are not careful. Why, you might ask? The answer is simple. As you work with Keynote, it is easy to get so interested in the details of each slide that you do not stop to consider the entire presentation. It is not unusual for people to circumvent this part of the planning process, but the overall order, look, and feel of a Keynote presentation is of utmost importance to a presentation’s success. This chapter examines some important issues related to the management of a presentation.
Keynote provides three different views that can make your work easier as you put together presentations. The views are Navigator, Outline, and Slide Only, and as you’ll quickly see, these views are designed to help you work with Keynote more effectively. It is important to realize that the different views don’t actually do anything. They simply organize information in a way that is best for you to work with. Also, you can switch between views as you like without affecting anything that you have done in the presentation. The main idea to keep in mind here is simply that views are designed to help you view a presentation in a way that is useful as you are creating it.
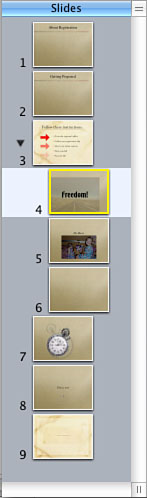
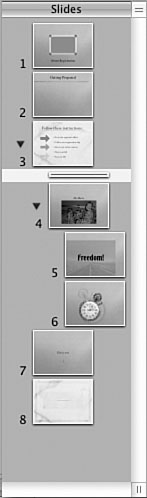
Navigator view is the default view Keynote uses. In Navigator view, you see a graphical representation of each slide in the Slide Organizer. When you click a slide in the Slide Organizer, the slide contents appear on the Slide Canvas, where you can then work with the slide in any way that you like (see Figure 7.1).

Navigator view works great for slides that primarily have a lot of graphics. However, what if a presentation presents a lot of data, which you have displayed in a simple bullet text format? Navigator view isn’t very helpful because it is basically impossible to read the content on the different slides in the Slide Organizer. In Navigator view, you have to guess which slide is which and click around through them to see what appears on the Slide Canvas.
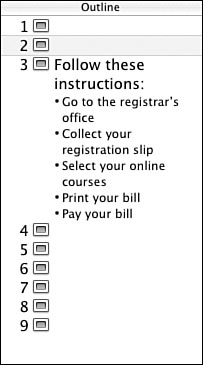
Rather than play the guessing game, you can switch to Outline view to view data-heavy slides. Select View, Outline, and the Slide Organizer changes to an outline view, as shown in Figure 7.2. In Outline view, you see a small slide icon for each slide, but you see all the text that is written on the slide, including any bullet points or other text on the slide. Outline view is, well, an outline of the presentation, right before your eyes! As you are looking through the presentation, this view can really help you get a solid feel for the content and the way it is ordered in the presentation.
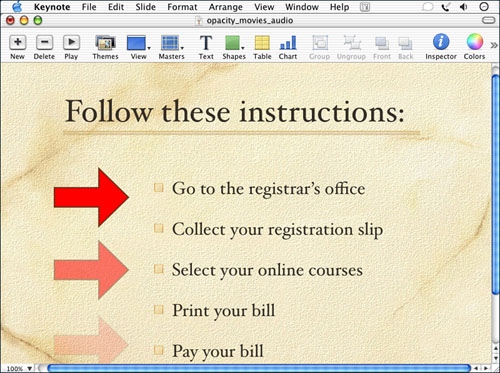
You can access Keynote’s Slide Only view by selecting View, Slide Only. This option simply removes the Slide Organizer so that you see only the currently selected slide, as shown in Figure 7.3. This is a quick way to view slides without the distraction of the Slide Organizer. The cool thing is that you can quickly move from Navigator view or Organizer view to Slide Only view and back again by using the View menu.
Let’s face it; no one is perfect. No matter how hard you might try, things can get out of order. You might be on Slide 10 of a presentation and discover that you need to add a new slide between Slides 2 and 3. Or perhaps you have already created a Keynote presentation and you later find that you want to reorganize the whole thing. You can relax. Keynote makes it very easy to rearrange your slides.
The Slide Organizer is your best friend in these circumstances, and all you have to do is simply drag slides to move them around. You can also insert slides at any point in the presentation.
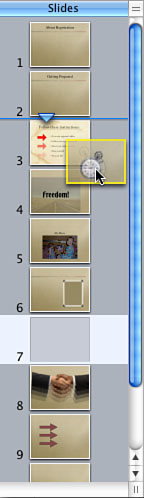
First of all, let’s say you want to move a slide around to a different location in your presentation. Simply click the slide in the Slide Organizer and drag it to the desired location, as shown in Figure 7.4. You can drag slides in either Navigator view or Outline view.
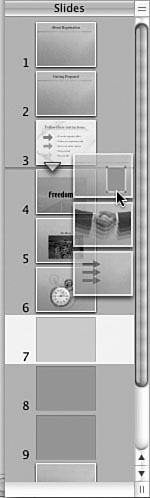
You can also drag multiple slides at the same time. For example, let’s say you create three slides but later decide that those slides need to be moved, as a group, to a different location in the presentation. No problem. Just hold down the ![]() key and click each slide to select it. Then drag the slides to the new location, as shown in Figure 7.5.
key and click each slide to select it. Then drag the slides to the new location, as shown in Figure 7.5.
Aside from dragging slides around in the Slide Organizer, you can also insert or delete slides at any time. To insert a new slide, in the Slide Organizer simply select the slide that you want the new slide to follow and then click the New button on the toolbar. The new slide appears. Similarly, you can select a slide and click the Delete button on the toolbar to remove it from the presentation.
As discussed in Chapter 1, “Beginning Skills: Getting to Know Keynote,” you can group slides together in the Slide Organizer. If that idea intrigues (or perplexes) you, you’ve come to the right place.
First of all, let me say that grouping slides doesn’t do anything to a presentation. The slides still play in the same order and in the same manner, and as far as the audience is concerned, grouping doesn’t mean anything at all. So if grouping doesn’t affect a presentation, what’s the point? The point is simply to help you. Think of slide grouping as a tool that can help keep you organized as you work with slides in the Slide Organizer.
Let’s say you are giving a presentation at your company about three different products. For each product, you have an introductory slide and about five slides concerning the product. To help you keep the slides straight, you can group the five or so slides under the introductory slide so that you can easily locate the appropriate set of slides for each product in the Slide Organizer. Once again, this doesn’t do anything to your presentation when it comes to viewing the slideshow, but grouping can help you stay more organized and keep things straight as you work on the slides.
Tip
Rather than use the Tab key, you can drag a slide to the right in the Slide Organizer to group it.
How do you group slides? The process is quick and easy. Just follow these steps:
In the Slide Organizer, select the first slide in the group.
Press the Tab key. Note that the slide indents below the previous slide, as shown in Figure 7.6.
Note

When you hide slides by using the disclosure triangle, you are simply removing them from view in the Slide Organizer. You are not hiding them during the presentation. The slides will appear as they would normally when you play the presentation. It is important to keep this concept straight in your mind. The disclosure triangle simply hides slides so that the Slide Organizer is easier to view and work with. It doesn’t do anything else.
Repeat this process for the additional slides in the group. Note that slides you want to group must be in consecutive order before you can group them.
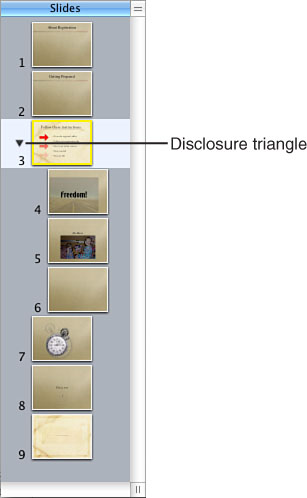
A disclosure triangle now appears beside the slide under which the new grouped slides reside. You can click the triangle to hide the slides in the grouping and click it again to disclose them, as shown in Figure 7.7.
After you group slides together, you are not stuck with the grouping. You can easily remove a slide from a grouping by simply dragging it back to the lineup of slides so that it is not indented. At this point, the slide is no longer grouped. If you need to ungroup a collection of slides, just select them by holding down the ![]() key and dragging to the left. You can also hold down the Shift key and press the Tab key to ungroup the slides.
key and dragging to the left. You can also hold down the Shift key and press the Tab key to ungroup the slides.
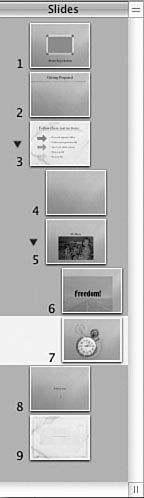
One other grouping trick you can use is to group within a group. Let’s say you have a group of three slides. However, you want to have another group of two slides under the last slide in the first group. What can you do? Just drag the slides to the right to create a secondary group, as shown in Figure 7.8. You can group as many levels as you like. Just make sure you keep things organized in a way that is useful to you.
Let’s say you have created a 30-minute sales presentation with Keynote. The sales presentation presents all aspects of a product, and you travel around to different customer sites, making this presentation. However, some customers allow you only 15 minutes for the presentation. Of course, you could speed things up and work through the Keynote presentation more quickly than usual, or you could simply create a new, scaled-down presentation, or...
As you might guess, there is a better way. Keynote gives you the option to skip slides during a presentation. You use the Slide Organizer to determine what slides you want to skip, and when you play the Keynote presentation, those slides are simply skipped over and do not appear. This is a great way to reduce the length of a presentation without having to create an entirely new one.
For example, let’s say that you have several primary slides about a sales product. You also have several grouped slides under those that go into more detail. To shorten the presentation, you can skip the extra slides that contain the additional information. As you can imagine, this trick is a great way to tailor an existing presentation to your time needs, or even the needs of the audience, without any additional labor on your part. All it takes is a few mouse clicks.
To skip a slide when viewing the slideshow, follow these steps:
In the Slide Organizer, select the slide you want to skip.
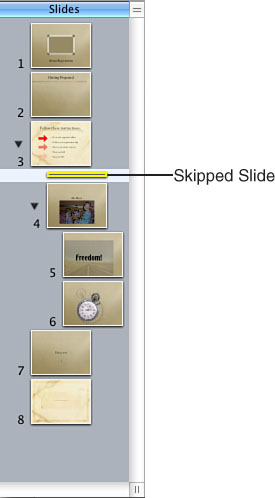
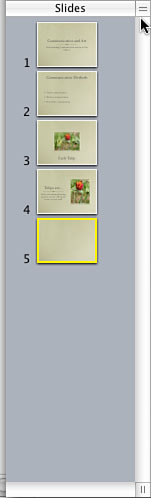
Select Slide, Skip Slide. The slide now appears as a collapsed slide in the Slide Organizer, as shown in Figure 7.9.
To stop the slide from being skipped, select it again and select Slide, Don’t Skip Slide.
As you have been working with Keynote, you have probably accessed master slides and layouts on those slides from time to time. Master slides may seem a bit daunting and confusing at first, but in reality, master slides exist to make Keynote much easier to use. In a nutshell, master slides give you a slide layout so that all you have to do is type the information or insert the content you want. This keeps you from having to stare at a blank slide and create your own slide content from scratch.
Master slides exist to make Keynote easier to use, give you a smooth slide look and layout, and make your work with Keynote faster and more productive.
As you know, you can access master slides by clicking the Masters button on the toolbar. As shown in Figure 7.10, you see an icon view of each master slide that is available, and all you have to do is click the desired master slide to see a new slide appear on the Slide Canvas.
What master slides should you use and when? That depends on your needs. If you are not sure what the master slides give you, click the Masters drop-down menu and take a look at the names of the master slides. This will give you a good clue as to what you are getting. Also, keep in mind that new master slides adhere to your current theme when you select them.
The master slide icons are a bit difficult to see, so this section provides a quick explanation of how and when you might use each one. Use the following as a quick guide to the master slides so you can see exactly what you’ll get when you choose that master:
Title & Subtitle—. This master slide, as shown in Figure 7.11, provides you with a title and subtitle area where you double-click to enter text.
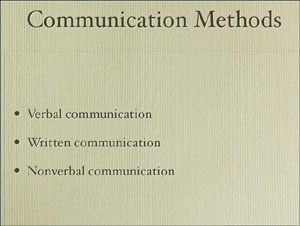
Title & Bullets—. This is a standard master slide that you use to enter a title and bullet points (see Figure 7.12). You’ll use this one a lot. Keynote automatically adjusts to the number of bullet points you want to type.
Bullets—. This master option gives you a place to create bullet points only; there is no title. This master works well if you need to extend a bulleted list from a previous slide or if you simply do not want a title getting in the way.
Blank—. As you can guess, this master doesn’t have anything on the slide. All you see is the theme design, but no text boxes or other items. Use the blank master if you need to create a custom slide.
Title—Top—. This option gives you a title box at the top of the slide but nothing else. This master works well if you want to use a title but create the rest of the slide content from scratch.
Title—Center—. This master is virtually the same as the Title—Top master, except that the title appears in the center of the slide. There is no subtitle.
Photo—Horizontal—. This master, as shown in Figure 7.13, allows you to place a horizontal photo in the center of the slide and create a title beneath the photo. See Chapter 5, “Working with Graphics,” to learn more about working with graphics.
Photo—Vertical—. This master option, as shown in Figure 7.14, gives you places for a vertical photo, a title, and standard paragraph text. This is a great master to use when you need to title a vertical photo and provide a short blurb of information about it.
Title, Bullets & Photo—. This master option is similar to Photo—Vertical, but it provides a larger title area and text box for bullet points. Use this master when you need to display a photo but provide more text on the slide.
Title and Bullets Left—. This option places the title at the top of the page and bullets to the left, leaving you an open area to place any other slide item you might want to include.
Title and Bullets Right—. This is the same as Title and Bullets Left except that the bullets are to the right of the slide instead of to the left.


There is a quick trick you might want to keep in mind as you work with master slides. You can use the Masters button on the toolbar to select the master slide you want to use and also have the master slides hiding directly behind the Slide Organizer. To access them, click the double-line area in the upper-right corner of the Slide Organizer and drag down (see Figure 7.15).
Note
If you want to further manipulate master slides and even create your own, check out Chapter 10, “Extending Keynote.”
This moves the Slide Navigator down the screen and reveals the master slides, as shown in Figure 7.16.
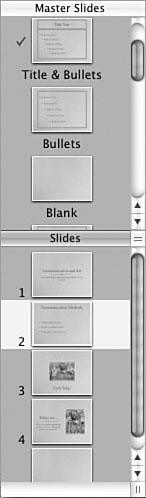
You can now easily use the Slide Organizer as well as the master slide list in a splitpane view.
As a professional speaker, you should never need speaker notes, right? Ha! Even the most professional speaker or presenter has an affinity for notes. After all, the pressure and stress of any speaking or presentation event is enough to make you forget your name, much less the finer points of your presentation.
It is perfectly fine to use speaker notes when you give a presentation. In most cases, they really are a must-have. Keynote gives you a basic outline of your presentation by its nature, but what do you do with all the extra information you want to say? For example, let’s say you have a slide with three bullet points. Under each bullet point are several pieces of information you want to point out but not include on the slide. This is the place for speaker notes, which are notes to you to help you remember what to say; the audience does not see them.
Speaker notes do not appear in the presentation, but you can add them to any slide and print them later for your own use. In this manner, Keynote can really be the tool you use to help prepare for an entire presentation, not just the slides for the presentation.
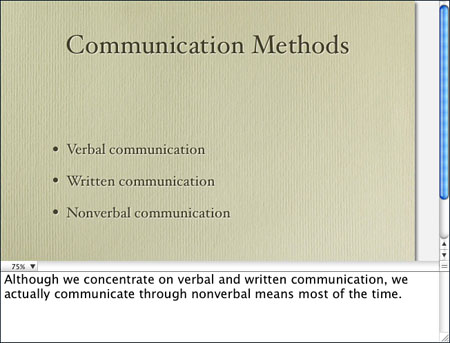
To create speaker notes, just select the desired slide in the Slide Organizer so that it appears on the Slide Canvas. Then select View, Show Notes. A text box appears at the bottom of the Slide Canvas, and in it you can type any note or information you want, as shown in Figure 7.17.
Misspelled words are a nightmare item for presentations. You are plugging along, really doing a great job with your presentation, and there it is: a glaring misspelled word on the screen. Unfortunately, despite all your hard word on the presentation, the spelling error makes you look unprofessional. It looks as though you didn’t proof your slides and you are unprepared.
Sound drastic? I’m afraid spelling errors on slides are just that, but the good news is that they are easy to avoid, thanks to Keynote’s spell checker. You can spell check a presentation and lose most of those spelling problems immediately. In fact, Keynote can even check your spelling as you type.
Before you breathe a sigh of relief, I do have word of warning. Spell checker only checks for misspelled words—not poor usage. For example, “Two bee or knot too bee” is spelled correctly, but the usage is wrong. Also, watch out for you, you’re, and your and there, their, and they’re. Spell checker will not find usage errors, so unless you have a degree in English, it is always a good idea to have someone else proofread your presentation. (I always do anyway, even though I have a degree in English!)
The point is that spelling errors are common, and they can creep into a presentation, but you can fix and avoid them with just a little proofing work on your part and some good help from Keynote.
When you select Edit, Spelling, you can choose from these three options:
Spelling—. This option checks the presentation and opens the Spelling dialog box so you can fix the errors.
Check Spelling—. This option scans the presentation and highlights any words that are potentially misspelled.
Check Spelling as You Type—. When you select this option, the spell checker checks the presentation as you type, underlining any potentially misspelled words in red. It’s a good idea to turn on this feature because it can point out problems as you work.
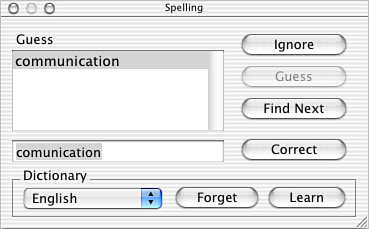
When you select Edit, Spelling, Spelling, the Spelling dialog box, which points out misspelled words, appears. As you can see in Figure 7.18, Keynote tries to guess which word you are really after. If it finds the right word, you can just select it in the Guess box and click Correct, or you can simply retype it in the provided text box and then click Correct. What if the spell checker keeps flagging a word that is correct, such as a technical or medical term? In that case, you just click the Forget button so that Keynote will stop flagging it, or better yet, click the Learn button so Keynote can add it to the dictionary.
Along with spell checking, Keynote also gives you a find and replace option. Let’s say that you have created an entire presentation, which is about using a computer. Throughout the presentation, you have used the term cat where you should have used the computer term mouse (hey, it’s my example). Instead of having to wade all the way through the presentation and make the corrections manually, you can have Keynote simply find all instances of cat and replace each one with mouse. Here’s how you do it:
Choose Edit, Find, Find Panel. The Find dialog box appears (see Figure 7.19).
In the Find dialog box, type the word to find in the Find text box and type the word you want to replace it with in the Replace with text box. Note that you can check the entire file or the current selection and you can choose to ignore case and work only with whole words. In this example, selecting Whole Words would confine the find and replace function to only finding cat, rather than words that contain cat, such as caterpillar.
Click Replace & Find to start the replacement process. Keynote finds and replaces your entries.
