
Change slide backgrounds and colors
</objective> <objective>Use the opacity setting to create exciting backgrounds
</objective> <objective>Use alignment guides to keep things straight
</objective> <objective>Add music to a presentation
</objective> <objective>Add video to a presentation
</objective> </feature>This chapter takes a look at doing more with a presentation. Specifically, it looks at how to alter the backgrounds and colors of slides, revisits the opacity and transparency tools, and shows some ways to really put those tools to work. This chapter also takes a look at how to use audio in a presentation and also how to use video clips with Keynote.
Keynote gives you plenty of slide templates to choose from. You can get even more templates from a number of Internet sites as well (see Appendix C, “Helpful Keynote Web Sites”). However, what if you want to change the slide background and color? You can! In fact, you can actually create your own template from scratch so that your entire presentation uses your custom background and colors. You’ll find out how to do that in Chapter 10, “Extending Keynote.”
But what if you only want to change a few slides within an existing presentation? For example, let’s say you are giving a presentation about your company to new employees. However, your company recently purchased another company across town. You want to devote a few of your slides to the new company, but you want to make sure you keep the two companies separate in the audience’s mind. One way you can do this is to alter the theme background for the slides that are about the other company. You don’t have to do anything radical, but the different background can help the audience transition from the main focus of your conversation. You’ll give the audience a verbal transition, of course, but the slide background can help give your audience a visual transition as well.
So, when should you change the background on a set of slides within a presentation? You should use this technique only if you are talking about a subset of something within a presentation. You should not randomly change the background on the slides for visual interest because that tends to make your presentation look choppy. Always think in terms of using a subset of slides for content that really needs to be set off from the other content.
You can change the slide background in two easy ways. First, you can simply edit the particular slide and change the background as you wish. In other words, you can change the slides you want without having to create new master slides or integrating two different presentations together. Second, you can use two different themes within the same presentation. The following sections show you how to change slide backgrounds in these two ways.
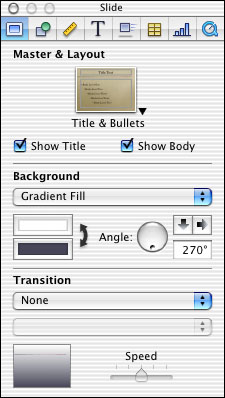
The Slide Inspector gives you options for changing the type of layout for the text on a slide, changing a slide’s background color or type of background, and deciding whether a transition is used between one slide and the next.
The Slide Inspector has a drop-down menu that lets you choose the type of background you want. You can choose from Color Fill, Gradient Fill, Image Fill, and None. Depending on what option you choose, the Slide Inspector changes so that you can configure the option. For example, if you pick Gradient Fill, the Slide Inspector gives you color boxes so that you can choose the colors for the gradient, and then you have the option to choose the angles and positioning of the gradient.
The final part of the Slide Inspector is the Transition section, which is covered in Chapter 8, “Exploring Transitions and Builds.” We won’t get into those options here.
To change the background of a slide, just follow these steps:
Select the slide that you want to change in the Slides pane.
Click Inspector on the toolbar.
On the Inspector, click the Slide button. As you can see in Figure 6.1, the Slide Inspector gives you an easy way to quickly make changes to the slide background and colors.
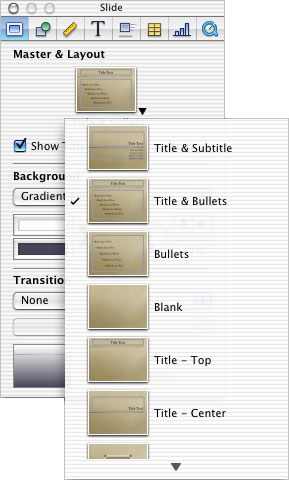
Click the Master & Layout drop-down menu to select a different slide configuration, as shown in Figure 6.2. This gives you an easy way to change the title and bullet options for the particular slide without any affecting the whole presentation.
If you want to show the title on the slide and show the body text formatting (for example, bullets), check the Show Title and Show Body check boxes. If you do not want to show this information, clear the check boxes. These options can be helpful because you can choose a Title & Bullets layout and still have the ability to customize it by using the Show Title and Show Body check boxes.
Choose a background type from the Background drop-down menu.
If you choose Gradient Fill, select a color and an angle for the gradient.
If you choose Image Fill, you’ll see a preview box for the background and buttons so that you can choose the image you want to use.
If you want to use a color fill, choose the appropriate option from the Background drop-down menu (see Figure 6.3). Click the color selection box and then choose a color from the background from the Colors dialog box that appears.
When you’re done making selections in the Slide Inspector, click the red Close button in the Slide Inspector.

The second way to change the background of a slide is to actually use two different themes in one presentation. There’s a really easy way to do that. For example, let’s say that you want to create a subset of slides that use a different theme—perhaps something similar to your main presentation theme but different enough for contrast purposes. Because you want to work with two different themes, the easiest way to create the presentation is to create your main presentation and then do the following:
Click the New button and choose a new theme. Another presentation is created.
In the new presentation, create the desired slides (which will be the subset within the main presentation), using this new theme.
When you are done, simply drag the new slides to the original presentation, as shown in Figure 6.4. The imported slides retain their theme formatting without affecting any of the original theme slides.

As you can see, you now have the original presentation with a subset of slides that use a different theme. It’s that easy!
I’ve made mention in the past couple chapters about opacity. Opacity is an image term that simply refers to the transparency, or “see-through-ness,” of an object. The more opacity an object has, the less see-through it is, and the less opacity an image has, the more transparent it is. For example, in Figure 6.5, the object on the left has 100% opacity, and the object on the right has 22% opacity. As you can see, the object on the right is rather transparent.

Opacity is a very helpful feature of Keynote because it allows you to customize the way images look on a Keynote slide, and it gives you a way to introduce interesting textures. For example, take a look at the slides in Figure 6.6. All the effects you see were created simply by placing objects on a slide and adjusting the opacity of those objects as desired.

The example shown in Figure 6.6 contains basic text, using the default theme’s font and style. I’ve simply added the arrows, which diminish—that is, become less and less opaque—down the page. Diminishing objects can really help draw attention to certain items on a slide and give your slide a graphics boost for additional visual interest.
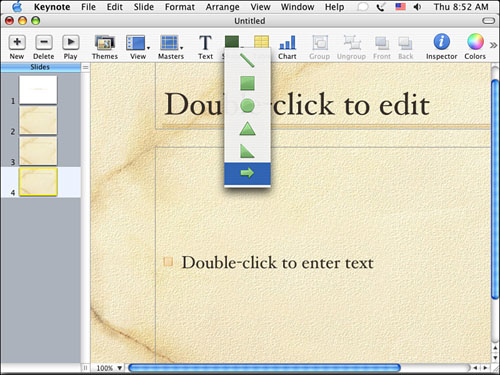
To create a slide with diminishing arrows, follow these steps:
With your desired slide open, click the Shapes drop-down menu and choose the arrow option (see Figure 6.7). An arrow appears on the slide.
Move the arrow to the desired position and resize it as necessary (see Chapter 5, “Working with Graphics,” for details).
Make sure the arrow is selected and then click the Inspector button on the toolbar and choose the Graphic button on the Inspector.
Change the color fill, stroke, and shadow as desired (see Chapter 5 for details).
Keep the opacity set to 100%.
Choose Edit, Copy and then choose Edit, Paste. A copy of your arrow appears on the slide.
Position the second arrow as desired and then go back to the Graphic Inspector and set the opacity for this arrow to around 58%.
Repeat steps 6 and 7, but set the opacity of the third arrow to 15%. This isn’t an exact science, so feel free to adjust the opacity values in the previous steps to suit your needs.
That was fun and easy! You can use this process on any type of object or picture to give your slide some additional visual interest.
Another example of using opacity to add visual interest is shown in Figure 6.8. This example uses a background picture from the Image Library. I simply put the image on the slide and then adjusted the opacity to a very low percentage. The image is still visible, but it doesn’t dominate the slide, leaving me room to do work with text. Many times, your images may work great as a background, but they tend to overwhelm the slide if you don’t tone them down with the opacity feature.

The following steps outline the basic process you follow to create a slide like the one shown in Figure 6.6:
On the desired slide, click the Masters drop-down menu on the toolbar and choose the Blank option.
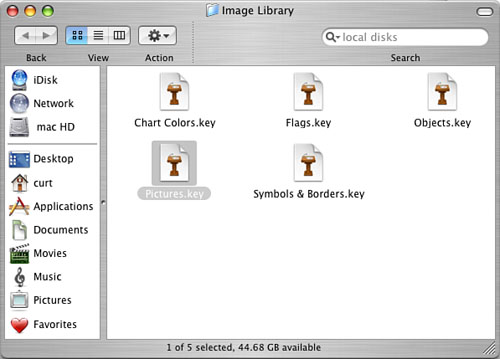
Choose File, Open Image Library (see Figure 6.9).
In the Image Library window, double-click Pictures.key. The Image Library opens.
Locate the desired picture in the Slide Organizer and select it. The image appears on the Slide Canvas.
Click the picture to select it and then choose Edit, Copy.
Close the Image Library.
Back in your presentation, choose Edit, Paste. The picture now appears on your slide. Resize the picture as necessary so that it covers the slide (see Chapter 5 for more details).
Make sure the picture is selected and then click the Inspector button on the toolbar and choose Graphic button on the Inspector.
Change the opacity to a low percentage, such as 20%. Close the Graphic Inspector.
Click the Text button on the toolbar to insert a text box. Type the wording you want to appear in the slide and then select Format, Font to change the size and style of the wording as desired. See Chapter 2, “Working with Text,” for more information about working with text.
As you can see, opacity gives you a quick and easy way to make an image work for a slide background. But that’s just the beginning! There is still more you can do with opacity settings.
The slide shown in Figure 6.10 uses the same image twice to create another type of effect. I got the stopwatch from the Keynote Image Library, simply enlarged it on the background and rotated it to the left, and then adjusted its opacity so that it is barely visible. Next, I pasted the image to the slide again, adjusted the positioning, and rotated the second image to the right by using the Metrics Inspector. This approach creates a slide that is interesting and professional looking.

The example shown in Figure 6.11 uses a process that is somewhat similar to the earlier example of the diminishing arrows. This time, however, you stack the images one on top of the other, with the highest-opacity image on top and the lowest-opacity image on the bottom. This gives the illusion of movement.

As you can see, there are many different things you can do with opacity. All the examples you just looked at were made by simply positioning objects and using the Opacity slider bar on the Graphics Inspector. No other tricks were used at all!
Working with audio naturally leads to the issue of usage. How should you use audio in a presentation, or should you use it at all? That is an important point to consider, and just because you can use audio in a Keynote presentation doesn’t necessarily mean that you should.
Note

If you have problems stacking images and getting them in the right order, use the Front and Back buttons on the toolbar to get the correct stacking effect.
As with all other things in a presentation, you should think carefully before you use audio—for two major reasons. First, if you are using the Keynote presentation in a live presentation, the audio portion may have to be miked so that all the audience members can hear it, depending on the size of the room in which you are speaking. This issue can be a problem in some locations.
Second, and more importantly, does the audio help your message? You might need to play an audio file to support your slide or show an example, but superfluous audio files do not work well. For example, have you ever watched a Keynote or PowerPoint presentation where the speaker put little sound effects throughout the slides (hands clapping, bells ringing, and so on)? What did you think? All too often, these tactics seem more like a gimmick than anything else. My advice is to be very cautious when you use audio. Make sure the audio really has a purpose and always ask yourself, “Is the audio helping or distracting from my message?”
Tip
Opacity can really give your slides a smooth look, and it can help you control the overall appearance of slides. Don’t let this helpful tool slip into the background of your mind as you are working with Keynote!
Just as you can import different kinds of photos and image files into Keynote, you can also import sound files. Specifically, Keynote supports AIFF and MP3 sound files. If this is a bunch of gibberish to you, don’t worry.
AIFF files are uncompressed, digital audio files. They are very close to the files that are on any music CD you purchase. MP3 files, on the other hand, are compressed music files that are specifically designed for computers because they take up less storage space on a hard disk. Here’s the skinny: AIFF files sound great, but they eat up a lot of disk space. MP3 files sound almost as great, but they use only a fraction of the disk space that an AIFF file uses.
So how can you get these files and how can use them in Keynote? It’s easier than you might think:
You can drag any song from your iTunes library to a slide in Keynote. iTunes stores your songs as either AAC or MP3, so there are no compatibility issues. Your iTunes library is usually found in
[Home]/Music/iTunes/iTunes Music. If it makes your life easier, just open iTunes and directly drag a song from iTunes to your desktop and then drag the song to the Slide Canvas.Note
You can use downloaded songs and sounds in live presentations without worrying about copyright. This is considered “fair use.” However, if you create a slideshow that will be used for marketing purposes, put on a CD, or sold to people in any way, you need to have permission to use the sound files. Check out the Web site where you downloaded the songs or sounds to find out more about specific copyright issues.
You can download MP3 files from the Internet and drag them to your slide. As long as the file is an MP3 file (and almost all sound files from the Internet are), everything will work just fine. The cool thing about this option is that you can find all kinds of sound effects, or “sound bites,” as they are often called. Check out www.sound-effects-library.com or www.thefreesite.com to find a bunch of sound effects. Also, you can just search for MP3 files at any search engine, such as www.google.com, to find many additional sites.
You can put a music CD into your Mac’s CD-ROM drive, open the CD, and simply drag the file from the CD to your Keynote slide. Note, however, that the AIFF format is used with this method. That’s fine, but just be aware that the AIFF file will greatly add to the overall file size of your presentation.
Now that you know how you can find audio files to add to a presentation, let’s walk through putting the link to the song into a slide.
To add audio from iTunes to a slide, follow these steps:
Select the desired slide in your Keynote presentation so that it appears on the Slide Canvas.
Open iTunes. It is probably an icon on the Dock, but if it is not there, select Macintosh HD, Applications, iTunes.
Find the song in the iTunes library and then drag it to your desktop. Or you can just directly drag it to the Slide Canvas, as shown in Figure 6.12.
Tip

When you drag a song from iTunes, the song is copied to the desktop or the Slide Canvas. Your original song stays safe and sound in your iTunes library, so don’t worry.
The song appears on the slide as an audio icon, which you can see in Figure 6.13. When you play the slide, the music will automatically play.
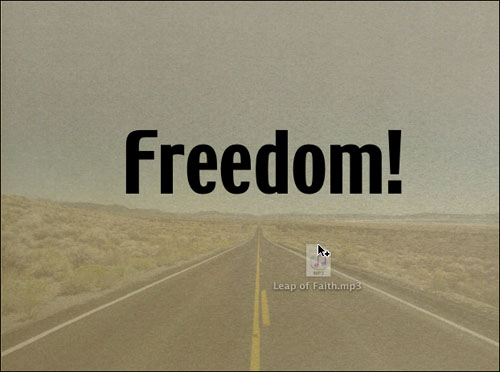

Now, if the audio icon perplexes you a bit, don’t worry. The audio icon simply tells you that a music file is attached to the slide. The icon does not appear when you actually play the slide. You can drag the audio icon around if you like and place it anywhere on the slide (so that it is out of your way), but keep in mind that the audio icon doesn’t actually do anything except tell you that there is an audio file attached to the slide.
You can double-click the audio icon to hear the music play, and if you later decide that you do not want to use the audio on the slide, you just select it and select Edit, Delete. This does not delete the song from iTunes or wherever you originally imported it from; it just removes it from the slide.
One issue to keep in mind as you use audio in presentations is simply how the audio feature works. When you advance to a slide that has an audio file, the audio file begins playing. In the case of a song, the file stops playing at the end of the song or when you advance to the next slide. You can’t place a single audio file across a whole presentation (for example, to have music playing in the background while you talk); the audio is limited to a slide-by-slide basis.
However, you can adjust the audio volume and repeat option (which can cause the audio file to play over and over as long you linger on the slide). To set these options, click the Inspector button on the toolbar and then click Media button on the Inspector. The Media Inspector appears, as shown in Figure 6.14.

By default, the audio file does not repeat, but you can cause it to by clicking the Repeat drop-down menu and choosing Loop or Loop Back and Forth (which plays the audio forward and then plays it in reverse).
You can adjust the overall volume of the audio playback by simply moving the Volume slider bar.
Finally, notice the controls at the bottom of the Media Inspector. These controls allow you to play the audio file while you are working on it.

Keynote supports both the QuickTime movie format and Flash for video, and to use video in a presentation, all you have to do is drag a movie to your slide. Of course, it is beyond the scope of this book to explore the process of making movies, but your Mac provides a really cool program called iMovie that you can use to make movies and even photo slideshows. Then you can export the movies to the QuickTime format and then simply drag them to the Slide Canvas.
Tip
To get some detailed help with using iMovie, see Chapter 17, “Making Digital Movie Magic with iMovie,” in Special Edition Using Mac OS X, v10.3 Panther.
After you drag a movie to the Slide Canvas, you see the first frame of the movie. As with any object, you can use the selection handles to resize the movie window and to drag the movie window around to position it on the screen in a desirable place. You can use text or anything else on a slide with the movie, as shown in Figure 6.15.

I don’t mind telling you that Keynote doesn’t do a great job with large movie windows. When you play such a movie, it will look rather grainy, so smaller movie windows work best.
As with audio, you can use the Media Inspector to adjust the repeat behavior and sound of a movie. You can also use the Poster Frame slider bar, shown in Figure 6.16, to choose a frame of the movie that is visible in the movie window on the slide until you start playing the movie. By default, the first frame is shown, but you can simply adjust the Poster Frame slider value to choose the frame you want to show.

Note
Although you can’t control movie playback, you can use a Keynote feature called a build to determine when the movie appears on the slide during the slideshow. If that sounds both interesting and confusing, don’t worry; we’ll talk about builds in Chapter 8.
As with audio files, a movie begins playing as soon as you advance to a slide that contains a movie. The movie stops playing when the movie ends or when you advance to the next slide. Unfortunately, there are no controls for the movie during playback. In other words, during the presentation, you cannot pause or stop the movie so that you can make comments.