Create a slideshow with Keynote slides
</objective> <objective>Create QuickTime and PDF presentations easily with Keynote slides
</objective> <objective>Print presentations for a variety of purposes
</objective> <objective>Use presentation hardware and projectors with a Mac
</objective> </feature>All the hard work has finally paid off. You are now ready to show your stuff and make a presentation! But wait, what do you want to do, exactly? Do you need a live presentation, a QuickTime movie, a PDF printout? Do you need to create speaker notes and even print copies of your presentation for audience members?
No problem! You can do all these things with a Keynote presentation. In this chapter, you’ll see how to actually use the Keynote presentation you have spent so much time preparing.
Of course, the reason you create a Keynote presentation is so that someone else can view it, whether that viewing is in a live presentation manner where you talk about the slides or in some automated format. The odds are quite good that you are preparing a Keynote presentation for onscreen viewing, which simply means that you are going to show your presentation to a live audience.
Note

If a slide is selected in the Slide Organizer when you click the Play button, the slideshow will start with the selected slide.
When you play a presentation, you control the advancement of the slides with your mouse or with a few keys on the keyboard.
To play a slideshow, just do this:
Make sure no slide is selected in the Slide Organizer and then click the Play button on the toolbar.
Note
Do you have to drag your computer around with you everywhere to use Keynote? In order to play a Keynote slideshow, you need a Macintosh computer that has Keynote installed. However, if you are in a pinch and you need a Keynote presentation to play on a Windows computer, you can export it as a PowerPoint presentation. See Chapter 10, “Extending Keynote,” for details.
When you play the show, use your mouse, press the spacebar, or use the right arrow and down arrow keys to advance the slideshow.
Use the up arrow or left arrow keys to go back to the previous slide.
Press Esc or Q to quit the slideshow.
You might also be able to use a wireless remote with a Mac so that you can advance to the next slide without staying glued to the computer. Most of the remotes available use USB ports, and overall, they work great. You can find out more about wireless remotes for a Mac at any computer store that sells Apple products, or you can check out the Keyspan presentation remote at www.keyspan.com/products/usb/presentationremote.
Aside from simply playing a slideshow on a Mac, there are a few other viewing options that you should note. In Keynote, select Keynote, Preferences. The Presentation Mode section of the Preferences dialog box, shown in Figure 9.1, has the following options:
Scale slides up to fit monitor—. When you check this check box, the slides scale up to fill the entire monitor screen. This can be helpful, but you might want to experiment with it a bit. If you have used low-resolution photos or movies in the slideshow, they become grainy or distorted looking when you scale them up. Make sure you experiment with this option to see if everything looks okay before you use this option to show the presentation to a live audience.
Exit presentation after last slide—. When this check box is selected, the presentation closes when you click your mouse or press the spacebar after the last slide. It returns you to the Keynote application. This option is selected by default, but if you don’t want Keynote to exit the show (even if you click), simply uncheck this check box. From a speaker’s point of view, it is a good idea to uncheck this option and not return to the application at the end of the presentation because that simply looks a bit unprofessional. Your best bet is to stay on the final slide or, better yet, go to a black screen.
Present on primary display and Present on secondary display—. These two radio buttons allow you to control where the presentation is played. You can play it directly on your Mac’s display, or if you are connecting another screen or projection device, you can set the show to play on the secondary display. (You’ll see how to set up a secondary display later in this section.)
Use alternate display to view slide notes—. This is a cool option that allows you to see your slide notes on an alternate display. For example, let’s say that you have your Mac set up by a podium. You configure Keynote to show the slideshow on a secondary display, such as a projection screen. If you use this option, your slide notes appear on your Mac screen rather than on the presentation. This can be a handy way to use your notes, but use caution! Often, printed notes are much easier to use, so make sure you practice with the onscreen notes option before using it in front of a live audience.

So, what if you want to show a slideshow on a secondary display? In many cases, this is exactly what you’ll need to do. You might connect your Mac to a projector that displays your slideshow on a large screen or possibly even another kind of large-format screen that connects to your Mac.
You can connect a secondary display and quickly set it up by using the Displays preference in the System Preferences dialog box. Then you simply tell Keynote what to do with the display by following these steps:
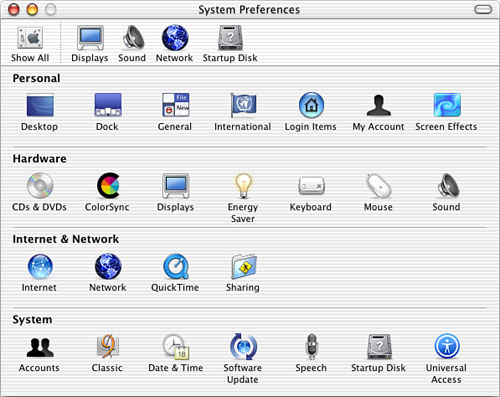
Choose Apple, System Preferences.
Click Displays (see Figure 9.2).
Click the Arrangement tab and follow the onscreen instructions to select the display. If you do not see an Arrangement tab, your system does not support a dual-monitor configuration.
In Keynote, choose Keynote, Preferences. The Preferences dialog box appears.
Select the Present on secondary display button. Close the Preferences dialog box.
You can now play your slideshow and see it on the secondary display.
QuickTime is the movie format standard for the Mac, and indeed, it has become increasingly popular for most other computer platforms. QuickTime movies are commonly used on the Internet, and there are QuickTime versions for Windows computers so that anyone can watch a QuickTime movie.
Keynote gives you the ability to easily export a presentation to the QuickTime format. You then end up with a QuickTime movie of the slideshow that can be used in a number of ways:
You can create an interactive slideshow that people can watch from a kiosk or a computer that does not have the Keynote software installed. The viewer watches the slideshow and clicks a mouse or presses the spacebar to advance the movie. You can also create the movie so that it is automated and simply plays over and over, without any human intervention.
Using the QuickTime format, you can choose a file size for a movie. This allows you to export the slideshow in full quality or reduce its size so that you can burn it to a CD or use it on the Web.
Because the slideshow is exported in the QuickTime format, you can even import the QuickTime slideshow into iMovie and further edit it by adding other video clips, sound, effects, and so on. You can even use iDVD to burn the slideshow to a DVD so that it can be watched on any standard DVD player.
Before you export a slideshow to QuickTime, think about how you’ll want to use it, such as onscreen, on the Web, burned to a CD, and so on, because Keynote will give you those options during the export process. When you are ready to export a movie, just follow these steps:
In Keynote, open the presentation you want to export and then select File, Export.
In the drop-down window that appears, choose the QuickTime radio button, as shown in Figure 9.3, and click Next.
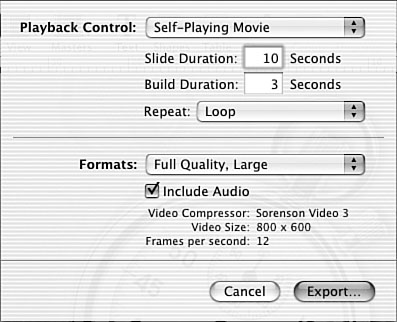
In the next drop-down window that appears, you can choose the playback control and the format, as shown in Figure 9.4. Click the Playback Control drop-down menu to choose either Interactive Slideshow or Self-Playing Movie. If you choose Interactive Slideshow, the viewer must click his or her mouse or spacebar in order to advance the movie. Also if you choose Interactive Slideshow, you can choose to change the Slide Duration, Build Duration, and Repeat options. Under the Repeat drop-down menu, you can choose from None, Loop, and Back and Forth.
Under Formats, you can choose the following:
Full Quality, Large
CD-ROM Movie, Medium
Web Movie, Small
Custom
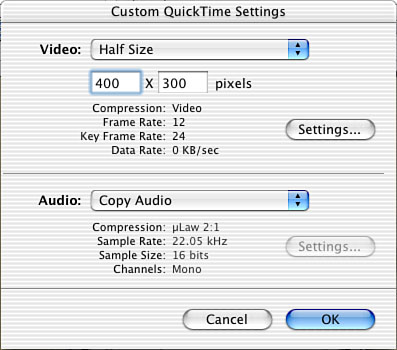
If you choose Custom, a Custom QuickTime Settings dialog box appears, as shown in Figure 9.5, where you can determine the video size and whether you want to copy audio. Choose the video size and audio feature you want. You can also click Settings in either the Video section or the Audio section to open a settings window, as shown in Figure 9.6. In this settings window, you can select the overall features and quality. As a general rule, the default options are fine, but you should experiment with them a bit in order to tweak the quality and movie-watching experience. When you are done, click OK to continue.
In the next window that appears, shown in Figure 9.7, give the movie a name and choose where you want to save it by using the drop-down menu. When you are done, click the Export button.


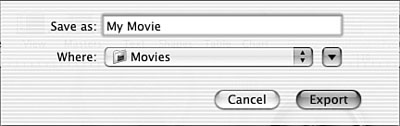
Keynote exports all the slides in the movie, and you end up with a QuickTime presentation. Just double-click the QuickTime file to watch it.
Exporting to PowerPoint is covered in Chapter 10.
PDF, or Portable Document Format, is a standard file format made popular by Adobe and viewable using the free Adobe Reader, which is installed on your Mac by default and is also available at www.adobe.com. PDF has become the standard document format because it does such a great job of displaying text and graphics. With the proliferation of the Internet and downloadable files, PDF has become the document format of choice. It is universally readable on different platforms and operating systems and generally works great.
Keynote gives you the ability to easily export a Keynote presentation as a PDF document. Using Adobe Reader, anyone on any kind of computer and using any operating system can then read the presentation. If you are using the full version of Adobe Reader, you can even edit the PDF of the presentation.
Why would you want to export to PDF anyway? Here are some common scenarios:
You can use a PDF file to share a presentation with others across different operating systems and platforms. Although when it is a PDF file, the presentation is not a slideshow, it still contains all your information and slide content. Furthermore, it can be easily printed.
By making a presentation into a PDF file, you can post the presentation on the Web or email it to others. Because the PDF format is a standard, anyone using the free Adobe Reader can open it.
You can collaborate with others. Those who use the full version of Adobe Reader can edit and work with the presentation in any way they like.
As you can see, there are several reasons you might want to export a presentation to a PDF file, and the good news is that the export process requires only three steps:
Select File, Export.
In the drop-down window that appears, choose the PDF radio button and click Next.
In the next drop-down box that appears, enter a name for the file and choose a place to save it. Click Export.
Your Keynote presentation is converted to a PDF file.
When you think of Keynote, you most likely think of an onscreen presentation, and after all, that’s a great reason to use Keynote. However, you might not realize up front that Keynote also gives you some very nice printing capabilities. What if you are giving a presentation to a group of people, and you want to send them home with your presentation? What if you need to create speaker notes? What if you want the audience to have your slides and your speaker notes? No problem! You can use Keynote to print all these items with just a few mouse clicks.
Keynote allows you to print slides, using several different printing options, or you can simply print an outline of the presentation. Either way, the printing process is quick and easy, and you end up with good-looking printouts.
First, if you simply want to print the outline, select File, Print Outline. The standard print dialog box appears, and in it you can choose the number of copies you want. Keynote then prints the outline view of the slides, just as you would see if you chose to view the Slide Organizer in Outline view.
To print the slides themselves, you select File, Print Slides. Once again, this opens the standard print dialog box, shown in Figure 9.8. If you are using more than one printer, make sure you click the Printer drop-down menu and choose the printer you want to print to.
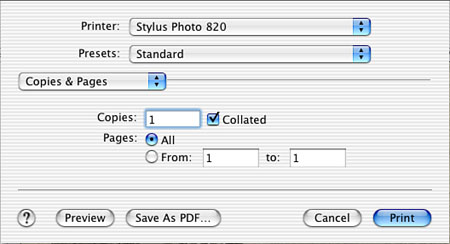
However, before you click the Print button, you have some options you need to check out. You can click the Copies & Pages drop-down menu and select Keynote, as shown in Figure 9.9.
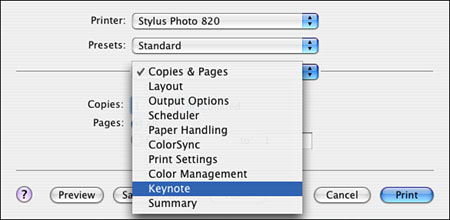
This changes the print dialog box to include some Keynote-specific options, as you can see in Figure 9.10.

Under Print you can select from the following:
Slides—. This option prints all the slides, one per page. You can configure Keynote to use a number of print options, which are described in the following bulleted list.
Slides With Notes—. This option prints each slide on a sheet of paper but includes any slide notes you have created under the slides. You have the same additional printing options that you have when you choose the Slides option.
Handouts—. This option creates audience handouts by printing four slides to a page. Speaker notes are not printed when you print handouts, but you have the same additional printing options that you have when you select the Slides option.
You can also choose from a list of print options:
Print dark backgrounds as white—. This option simply saves printer ink. It prints dark backgrounds as white, reducing the amount of ink required to reproduce each slide.
Print each stage of builds—. When this option is selected, Keynote prints each stage of the build as a separate slide. Although this option can be effective in some cases, you should experiment to see how the print looks and whether the succession of slide builds is easy to read.
Include skipped slides—. If you have selected to skip any slides in your presentation, they are not printed by default. However, if you want to print them, just click this check box.
Add borders around slides—. This feature puts a border around each slide, making it look like a slide on the printed page. This option is selected by default.
Include slide numbers—. When this option is selected, the slide numbers are shown on the slides.
After you make selections, you can click the Preview button. Your Mac formats the print job as a PDF and opens Adobe Reader so you can preview everything and see how it will look. When you are happy, just close Acrobat Reader and click the Print button on the print dialog box. That’s all there is to it!
Unless you are giving a presentation in a small conference room where the audience members can simply look at your Mac screen, you will probably be faced with some sort of presentation hardware connection. There is no need for this technological wonder to strike fear into your heart: Presentation hardware has become rather commonplace these days, and it is generally easy to use.
However, a word to the wise: Murphy’s Law tells us that if something can go wrong, it certainly will. This sentiment is true with presentation hardware, also called AV equipment. You arrive at the conference room and the projector didn’t show up, or even if it is there, it doesn’t work and no one is available to help you. These happenings are common, so if you travel from place to place, making presentations, you should certainly be prepared for the unexpected.
The best advice I can give is an old public speaking piece of advice: You should be able to give a presentation without your Keynote slides. There, I said it (although you probably didn’t want to hear it). In a technology age, we should certainly use technology, but we should not become so entrapped by it that we cannot function without it. Therefore, you should have a presentation polished enough that you can do it (and do it well) should you not be able to use your Keynote slides. This way, no matter what happens, you’ll still be able to communicate your message to your audience.
Tip
It is a good idea to print handout copies of a presentation so that you can give the handouts to your audience as a visual aid, in case you have equipment problems. Print these ahead of time and keep them on hand should you need them.
With that said, the presentation hardware you are most likely to use is a projector of some kind. An AV projector connects to your computer and allows you to either display exactly the same thing as you see onscreen, or to present slides on the projector while you use the speaker notes onscreen. An AV projector is the standard kind of projector you see in conference rooms and larger auditoriums. If you are traveling from place to place, you might need an onsite technician to help you get everything connected because each projector brand works a bit differently.
The three common projector types are LCD, DLP, and CRT.
LCD, or liquid crystal display, projectors have been used for a long time. They work well, but they tend not to display graphics too beautifully. Also, if you need to project a Keynote presentation onto a large screen, such as you might use with an audience of 100 people or more, LCD isn’t your best choice because overall it does not provide the best resolution. Also, LCD projectors are not very bright, so you’ll need a rather dark room for them to display well.
A DLP, or digital light processing, projector is a very good projector that uses digital processing and manages to keep the images in a presentation very sharp. DLP projectors are still rather new and are rather expensive as well. However, they do look great and are very bright, requiring less darkness in the room than an LCD projector.
CRT, or cathode ray tube, is a rather old technology, but it’s still one that is commonly used with projectors. The best thing about CRT is that it tends to provide sharper images than LCD, and CRT projectors are commonly available for rent or purchase. Also, many conference rooms and auditoriums provide CRT projectors. Overall, a CRT projector provides a bright image, giving you more flexibility with room darkness.
You might not have much of a choice about which projector will be used, unless you have to provide your own. The key point is that you arrive at the meeting place in plenty of time to get any technical issues worked out. Have you ever seen a speaker who came into the room when the speech was supposed to start and then spent the next 10 minutes trying to get AV equipment to work? I thought so. Audience members do not appreciate this lack of organization and poor time management. So be sure to arrive early and give yourself plenty of time to get connected.
Note
AV projectors normally connect to your video ports or possibly even USB ports. If you are using an iBook or PowerBook, you might need the Apple VGA display adapter (which generally comes with your computer). The display adapter fits onto the Video Out port so that you can connect to the projector.
If you give a lot of presentations, you might consider purchasing your own projector, especially if you are having to foot the bill for renting one. If you use a projector a lot, you can recover the cost of it in a few months, and you’ll get to use the same projector over and over without having to master a learning curve with each new projector you get. Of course, you’ll have to haul it from place to place, so carefully weigh the advantages and disadvantages before parting with your hard-earned money.