
If you have a home computer, it’s probably already a big part of your home entertainment and home organization picture. Why not use it to control your home with X10? This chapter shows you how to use your computer to control X10 devices and make your home automation system smarter than ever before.
If you want to use your PC to control your X10 home automation system, you need hardware and software.
The hardware you’ll need
USB or serial (COM) port X10 controller
Cable (usually provided with the controller)
The required software
Various home automation programs compatible with X10 and with your X10 controller; the controller usually includes software, but third-party or enhanced titles might also be available
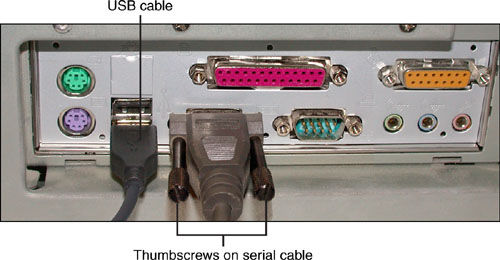
The USB and serial ports are usually located on the rear of a desktop or laptop computer. Figure 11.1 shows typical locations for these ports on the rear of a desktop computer.

The first X10 interfaces for PCs used the venerable 9-pin serial (COM) port shown in Figure 11.1. The serial port continues to be used for some types of X10 computer interfaces, but its slow speed, lack of resource sharing with other ports, and the increasing numbers of PCs that lack a serial port suggest that this is not the most desirable way to interface your PC with X10.
Some major types of serial-port-to-X10 interfaces are the following:
FireCracker (CM17)—. A simple serial (COM) port pass-through device that emulates an X10 wireless remote. It is often sold in a bundle that includes an X10 wireless remote, wireless transceiver, and lamp module. Add FireCracker Fuse software to create timed events or the FireCracker Macro Recorder to create a series of commands you can play back whenever needed.
X10 Activehome Computer Interface (CM11A)—. Stores programs in battery-backed memory and includes home automation software.
PowerLinc II Serial—. A more powerful serial interface that can also be used in place of TW523 interfaces. The PowerLinc II Serial uses a module that plugs into an AC wall socket, rather than being wireless as is FireCracker. This interface includes X10 program development software.
A USB (universal serial bus) interface can be used by any computer running Windows 98, Second Edition or greater as well as Macintoshes. USB ports are designed to coexist with each other, and if you don’t have enough USB ports on your system, you can add additional ports by connecting a USB hub to another system. Most recent desktop and laptop computers have anywhere from two to as many as eight USB ports, making USB the preferred interface type for long-term use.
Some major types of USB interfaces to X10 home automation systems are the following:
PowerLinc USB—. An entry-level USB interface that includes Smarthome Manager Essential home automation software; the computer must be kept on to run timed or macro-triggered events
PowerLinc Controller USB—. This interface features built-in memory and timer, enabling you to shut off the PC and still control devices with timers and macros; bundled with Smarthome Manager Essential or Smarthome Manager (full version) home automation software.
X10 ActiveHome Pro Controller CM15A—. This interface features built-in memory and timer, enabling you to shut off your PC and still control devices with timers and macros; includes an all-house-code RF transceiver; bundled with ActiveHome Pro home automation software.
When you select a PC interface for your X10 home automation system, look for these features:
Built-in timer and memory—. If your PC interface doesn’t have these features, you must leave your PC on at all times to control your X10 devices. Keep in mind that if you plan to control your X10 home automation system via a home network or via the Internet, you don’t need this feature.
USB interface—. USB plugs into virtually every computer built in the current decade, can plug into a USB hub, and doesn’t require complex hardware configuration.
Bundled software features—. Some vendors provide stripped-down home automation software, which might control only a few devices, with their PC interface modules; other vendors provide full-featured products with more capabilities. If you decide to buy an interface bundled with an entry-level home automation program, find out how much it will cost to upgrade to the full version product.
Third-party software compatibility—. If you decide at a later point to change software, find out whether other software programs will support your interface.
Mac OS software support (if you use a Mac)—. Some interfaces can be used with Mac OS by purchasing additional home automation software, but some work with Windows only.
The installation process for your computer interface will vary, depending on whether you are using a serial (COM) port or a USB port interface device. With either type of device, however, you normally install the software first (check the directions for your specific device to make sure). Be sure the computer you connect to the X10 interface has a working Internet connection. No matter what software you use, you will want to check for upgrades as soon as you install the program. Some programs require a working Internet connection so that the program can be registered. After the software has been installed, you typically then connect your interface to your PC. With a serial interface, connect the device to a serial port on the rear of your PC. If the cable has thumbscrews, be sure to fasten them securely (see Figure 11.2).
To connect a USB interface, connect the flat end (Type A connector) of the USB cable to a USB port on your PC (see Figure 11.2) or to a USB hub if you are out of USB ports. The other end of the cable (Type B) connects to the interface box that plugs into the wall.
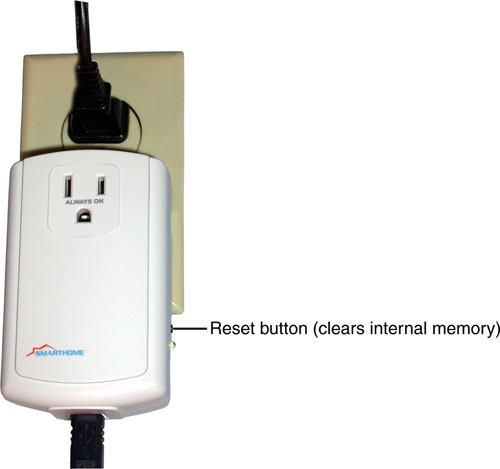
After the interface has been connected to the PC, plug the interface box into the AC wall socket (see Figure 11.3).
If the unit requires batteries to maintain timers and programs, such as the X10 CM15A, insert batteries only after connecting the unit to the AC outlet and your computer’s USB port.
After you’ve connected your computer-X10 interface to an AC power line and your computer, start the software provided with the unit. Note that the FireCracker interface transmits signals to an X10 wireless transceiver plugged into an AC outlet instead of a wired transceiver.
Make sure you have a listing of the X10 devices in your home automation system, their locations, their house/unit codes, and their capabilities. You can use the forms provided in earlier chapters to list this information.
Smarthome Manager Essential requires Windows 98SE, Me, 2000, or XP. It is bundled with the Smarthome PowerLinc Controller USB and other Smarthome X10-compatible computer controllers. You can upgrade to the full version of Smarthome Manager at any time, or you might be able to buy a bundle featuring the PowerLinc Controller USB and Smarthome Manager.
The full version of Smarthome Manager works the same way as Essential, but adds the capability to automatically detect some types of modules and create additional conditions within actions. In this chapter, I will use Smarthome Manager to refer to both versions except when I discuss features present only in the full version. When you start Smarthome Manager, it opens a Windows Explorer–like interface called My House, which features four objects:
Locations
All Devices
Event Triggered Action
Time Triggered Action
Select the Locations icon to create a location, such as a room or section of your home. Click Add a New Location (see Figure 11.4) to add a location. A new location is named New Location by default; type over the name with your preferred name.
You can also right-click the Locations icon and select Add a Location. The location is used as part of the name of any action you create.
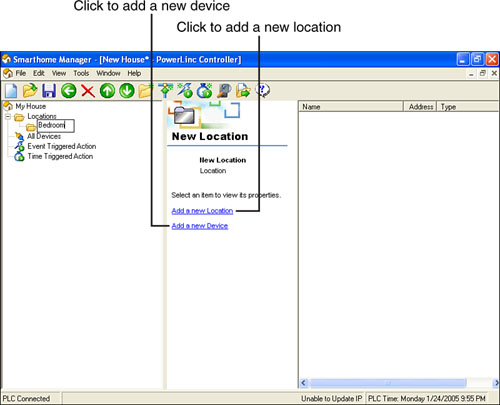
After you’ve added a location, you can add a device to that location or add another location. Click Add a New Device or right-click All Devices and Select Add Device (refer to Figure 11.4) to bring up a device properties dialog (see Figure 11.5). Specify the device type, house and unit codes, and provide a descriptive name. When you select a particular module, the properties menu changes to reflect the features of that module. For example, if you have a dimmer switch, you can select the ramp rate (how quickly the light fades on and off) and the default brightness level when you turn it on.

To add another device to the same location, click the location in the left window, and then click Add a New Device in the center pane. Each device is listed in the right-side pane (see Figure 11.6).

To turn on a device that’s off, double-click it in the right pane. If the device is already on, double-clicking it turns it off. For additional control options, right-click the device and select Control Device from the contextual menu. You can send the following commands:
With some types of Smarthome modules, you can select Keypress to speed up operation. With two-way modules, select Status Request to see whether the module is on or off, or to view its current settings.
The real power of an X10 computer interface is its capability to create events that can run automatically. With Smarthome Manager, you can create actions that are triggered by time or by a particular event.
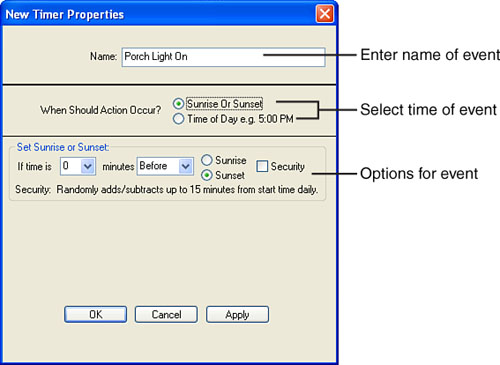
To create a timed action, click Time Triggered Action in the left pane. Then click Add a New Timer in the center pane. The New Timer Properties dialog (see Figure 11.7) is displayed. Enter a descriptive name for the event, specify when the action should occur, and click OK.
Your new timer is stored under the Time Triggered Action object in the left pane. Next, right-click the new timer object and select Add Event Step to open the Select Device Action dialog (see Figure 11.8).

Select the action you want to take from the listing, and then click OK. You can use the increment bright, increment dim, or repeat dim commands with any dimmable module, including entry-level lamp modules.
To add a step to an action, right-click the action, select Add Event Step, and select another device and another action. Repeat as desired. For example, you can create an action that turns on various interior lights at a specified time (or at sunset), as in Figure 11.9.

It can be useful to add delays to an action. For example, you can create an elegant effect in your home if you turn on lights one by one at sunset or at a specified time. To add a delay to an action, right-click the action and select Add Delay. In the Enter Delay dialog that appears, specify the length of the delay in the form minutes:seconds. A delay object then appears at the end of the list of event objects.
To move the delay to the location you want it to occur in the action, click the green up-arrow button until the delay is in the correct location. To perform an action after the delay, drag the action desired to the delay to create a nested effect as in Figure 11.10.

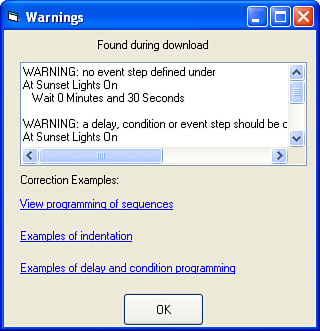
If you don’t nest the desired actions after each delay, the delays will be ignored. A Warnings dialog (shown in Figure 11.11) will be displayed when you download the program to the controller (see the “Downloading Your Smarthome Configuration to the Controller” section later in this chapter for details). Click the links in the Warnings dialog to see examples of incorrect and correct program logic.
To add another delay, repeat these steps. When you are finished, your action might resemble the one shown in Figure 11.12, which has three steps, separated by two delays.

If you want one X10 module to turn on others, you need to create an event-triggered action. For example, you can use an X10 motion detection module to turn on an X10 camera and a lamp in the same room, or use an X10 door or window sensor to trigger a call from an X10 telephone module to your remote location.
To create an event-triggered action, right-click the Event Triggered Action object in the left pane and select Add Trigger. This displays the Event Triggered Action dialog. Select the device you want to use as the trigger from the pull-down menu, and then select the device action you want to use as the trigger. Depending on the device, you can choose from on, off, bright, dim, or a preset dim level. Click OK after you’ve made your selections. This creates a conditional statement at the start of your action (If this event ...).
Next, right-click the conditional (If) action you just created and select one of the following options from the right-click menu:
Add trigger—. Use this only if you want to create an action that depends on two or more triggers taking place.
Add delay—. Use this to insert a pause between the start of the action and the next step. For example, if you want to use a motion detector to turn off a room light, add a delay of a few minutes to ensure that the room is really empty.
Add condition—. With the Essential version of Smarthome Manager, you can add a day of the week condition, which enables you to select which day or days this action applies to. Upgrade to the full version, and you can also set up other conditions, including device state, time of day, day of month, or month of year.
Add event step—. Select this option to control another X10 device.
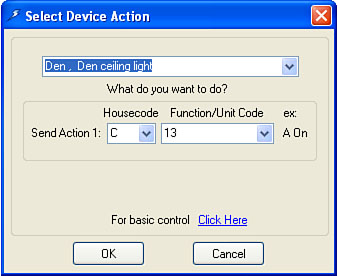
Figure 11.13 shows an action that turns off the ceiling light in the den if the motion detector turns off and 30 minutes have elapsed.
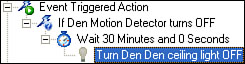
To create this action, I used the following procedure:
Right-click Event Triggered Action.
Select Add Trigger.
Select the trigger device (Motion Detector in Den) and state (Off) from dialog and click OK.
Right-click the new object If Den Motion Detector Turns OFF.
Select Add Delay.
Enter delay time (30 minutes) from dialog and click OK.
Right-click the object Wait 30 minutes and 0 seconds.
Select Add Event Step.
Select device (Den Ceiling Light) and action (Off); click OK to complete the action.
As soon as you set up your X10 modules, you should save your home automation configuration. Saving your configuration enables you to recall it in case of computer power failure. As you create actions to go with your modules, you can use different names to save different configurations. This enables you to create configurations suitable to different times of the year or different situations.
To save your current configuration:
Click File, Save As.
Enter a unique name for your configuration (see Figure 11.14).
Click Save.

The name of your saved configuration is displayed at the top of the Smarthome Manager screen. When you change a saved configuration, the configuration name ends with an asterisk at the top of the Smarthome Manager screen. This serves as a visual reminder that you have made changes.
If you are using a controller with onboard memory and timers, such as the Smarthome Controller USB, you need to download your configuration before it can be used to run your home. To download the configuration, click File, Download or press the F12 key.
During the download process, a series of status messages is displayed, and a Download Complete dialog box appears when the download is completed. Click OK.
Caution

If you’re experimenting with different configurations, keep in mind that after the configuration has been downloaded into the controller, the controller will run your X10 devices until you download a different configuration—or until you disconnect the controller from the AC wall outlet or clear the controller’s memory (refer to Figure 11.3).
The Tools menu provides a variety of utilities that you can use to make your home automation configuration easier.
Signal Test—. This test sends a stream of on/off signals to a house/unit code combination of your choice.
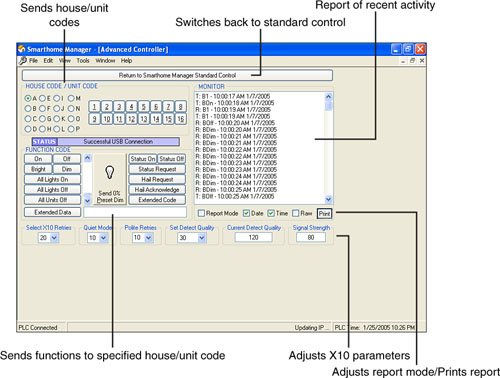
Advanced Controller—. This dialog (shown in Figure 11.15) enables you to send commands directly to a specified house/unit code send house/unit codes for programming, enables you to adjust various X10 parameters for more reliable operation, and provides a printable report of recent commands.
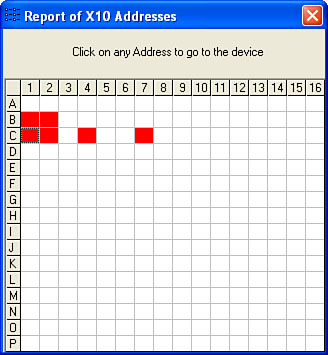
View All X10 Codes—. Displays codes assigned to switches and modules (see Figure 11.16). Note that this grid does not list codes used for scenes.
Set Time—. Sends the time you select (default is the current time) to the controller. To test a stored program using time-triggered actions, you can use this option to send a specified time to the controller.
Synchronize Time to PC—. Sets the controller to the current time stored on the PC.
Get Time—. Displays the time stored in the controller. Use this to verify that your controller has the correct time stored in its memory.
Set Sunrise/Sunset—. Displays a dialog where you can choose the nearest city and state to determine sunrise. Click Advanced to enter latitude, longitude, and time in relation to GMT (Greenwich Mean Time) if the city/state calculation of sunrise/sunset is incorrect, or if you don’t find a city close enough to your location.
Connect to Power Line Controller (PLC)—. Use this option with serial (COM) port controllers to ensure that you are connected.
Auto Detect Devices—. (Full version only) Automatically detects two-way devices.
Options—. Changes various options for Smarthome Manager.
Smarthome Manager can help you create scenes if you use Smarthome’s SwitchLinc/LampLinc/ToggleLinc programmable switches and modules in your X10 home automation system.
To create a new scene, click View, SwitchLinc/LampLinc Window. This displays the SwitchLinc/LampLinc dialog shown in Figure 11.17.

The SwitchLinc/LampLinc dialog provides your choice of manual control or wizards for configuration. To create a new scene using the scene wizard, do the following:
Click the Scenes button (refer to Figure 11.17).
Click Add to Scene, and then click Next. The clear code is transmitted to the switch or module to prepare it for a new scene.
Adjust the lamp’s brightness using the switch, an X10 remote, or Smarthome Manager’s direct control (refer to the “Controlling a Device Interactively with Smarthome Manager” section earlier in this chapter) .
Enter the desired scene address. You can use an unused unit code from the house code setting you normally use or choose any unused house/unit code address. Write down the house/unit code address, and click Next.
Smarthome Manager sends the scene setting to the switch or module. Click Finish to close the wizard.
Other wizards you can run from the SwitchLinc/LampLinc dialog include the following:
Ramp Rate—. Use this wizard to adjust the speed at which the switch or lamp module brightens or dims.
On Level—. Use this wizard to set the brightness level used when the switch or lamp module is turned on.
If you previously used an X10 Maxi Controller to configure your Smarthome programmable light switches and modules (see the “Configuring Programmable Modules” section in Chapter 6, “Using Timers and Advanced Remotes for X10,” for details), you can save yourself some dial-turning and button-pushing by using the following manual options in the dialog:
Clear Active Bit—. Click this button instead of sending the clear command sequence O16, N16, M16, P16, M16.
Set Scene—. Click this button instead of sending the scene membership command sequence M16, N16, O16, P16.
Delete Scene—. Click this button instead of sending the remove command sequence O16, P16, M16, N16.
Set Ramp Rate—. Click this button instead of sending the scene fade-on rate command sequence N16, O16, P16, M16.
Disable Programming—. Click this button instead of sending the disable programming command sequence M16, O16, P16, N16, P16.
Enable Programming—. Click this button instead of sending the enable programming sequence N16, M16, O16, P16, P16.
X10 Transmit—. Open this dialog to select disable X10 transmit (available with two-way switches and modules) instead of sending the Disable PLC transmissions command sequence M16, N16, P16, O16, P16. You can also use this dialog to enable X10 transmit instead of sending the Enable PLC transmissions command sequence O16, M16, N16, P16, P16.
After you’ve created a scene, you can incorporate it into an action you create with Smarthome Manager. Use the following steps to do so:
Create the action as described in the section “Creating a Timed Action” earlier in this chapter or “Creating an Event-Triggered Action,” also earlier in this chapter.
When you want to add a step that triggers a scene, right-click the preceding step and select Add Event Step.
From the Select Device Action menu, click the Click Here link to display advanced options (see Figure 11.18). Select the device containing the scene.
Enter the house and unit code of the scene you want to trigger. Click OK.
Add additional steps as desired.
HomeSeer, which is available from HomeSeer Technologies (www.homeseer.com), supports X10 as well as many other home automation systems, including Z-Wave, Napco Gemini, Global Cache, On-Q System, Lightolier Compose, HAI Omni, and others. It does so through the use of ActiveX plug-ins developed by HomeSeer and third-party vendors. HomeSeer is an excellent choice to manage a multistandard home automation system.
HomeSeer also includes a web server, enabling you to access your home automation system remotely via a home network or the Internet. For more information about using the HomeSeer web server, see Chapter 11.
HomeSeer is available in two forms:
HomeSeer SE supports only Z-Wave hardware, and is sold as part of various Z-Wave kits by HomeSeer.
HomeSeer (full) is sold separately. As shipped, it’s ready to work with X10, Z-Wave, and some other home automation controllers. You can add extra-cost optional plug-ins to support other home automation systems.
The following discussion is based on HomeSeer version 1.7.x; you can download a free 30-day trial of the latest version from the HomeSeer website.
When you start HomeSeer, a setup wizard known as the HomeSeer Assistant Wizard appears . Unless you disable it, this wizard appears by default each time you start HomeSeer.
The wizard offers options to
Configure HomeSeer’s web server (see Chapter 12 for details)
Enable Z-Wave control
Set up X10 devices
Import configuration data from X10.com’s ActiveHome or IBM’s Home Director home control programs
Create a schedule for a device
Check for updates
Set up a microphone for voice recognition
Set up your hardware interfaces to your home automation system
Because the wizard makes it easy to configure the various parts of a home automation system, I recommend you allow the wizard to run at startup until you have configured the hardware you plan to control with HomeSeer.
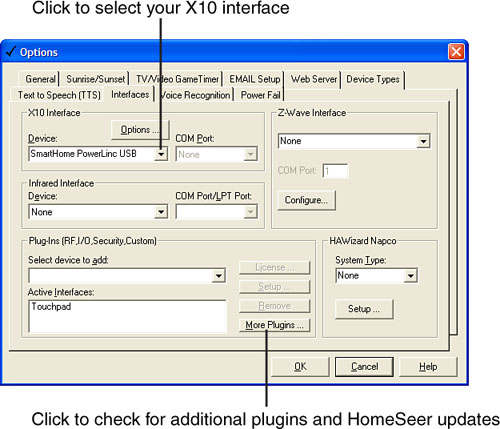
When you start HomeSeer for the first time, you should configure the hardware interface(s) that connect your PC to your home automation system. From the Hardware Assistant Wizard , select Tell HomeSeer about my hardware interfaces, and then click Next in this dialog and the following dialog to display the Interfaces tab of the Options menu (shown in Figure 11.19).
The X10 Interface section occupies the upper-left corner of the dialog. Click the down-arrow next to Device and select your X10 interface device from those listed. If your X10 device uses a serial (COM) port, be sure to select the correct COM port number. Click Options if you need to adjust other settings for your interface. Click OK when you’re finished. Click Finish to close the wizard.
You can check for free and extra-cost program updates to HomeSeer in two ways:
Select Check for Updates to HomeSeer using the Updater in the HomeSeer Assistant Wizard
Click More Plugins from the Interfaces tab of the Options menu (refer to Figure 11.19), and then click Next.
To open this dialog after you’ve started HomeSeer, click View, Options, and click the Interfaces tab.
The Check for Application Updates dialog appears when you start the update process. From this dialog, you can enable HomeSeer to check for updates at startup or at a particular time of day, and to run a specified event when updates are available. Make any changes desired, click Next, and again click Next on the following page to continue.
The HomeSeer Updater displays updates, plug-ins, and scripts that you can install (see Figure 11.20). The Cost column indicates which updates are free and the cost of optional plug-ins and scripts. The list is color-coded. Click Configure to adjust how updates are displayed. To get more information about an update or plug-in, click the item to select it, and then click Package Description.
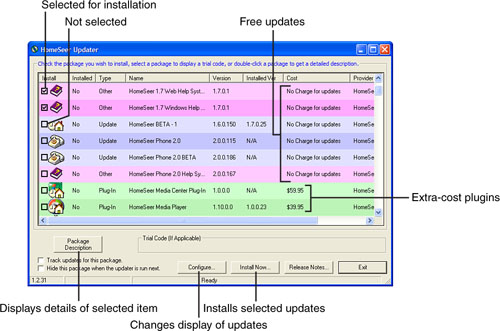
Click the box next to each update you want to install. To install selected updates, click Install Now. A progress window appears and displays installation details. Click Exit when the installation process is complete.
To specify the types of X10 devices in your home automation system when you start HomeSeer, click Tell HomeSeer About My X10 devices in the HomeSeer Assistant Wizard. If you have already started HomeSeer, click View, Options, Device Types. Either method opens the Device Types dialog shown in Figure 11.21.
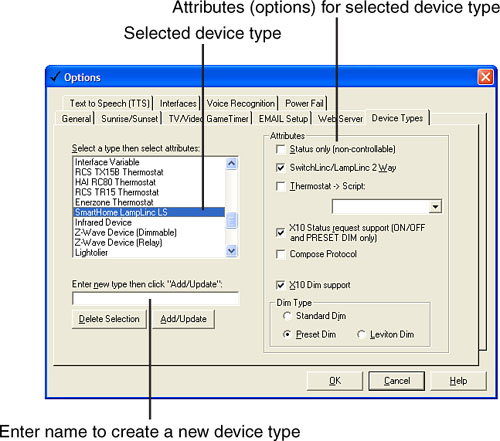
Select the type of X10 device you have from the list of devices at left. The attributes menu at right automatically displays available attributes, such as dimming, two-way options, and so forth. Select additional attributes if they apply to your hardware. Click OK when finished. Repeat this process as needed until all the X10 modules and switches that you want to control with HomeSeer have been identified. You can also add an unspecified module type and customize its attributes.
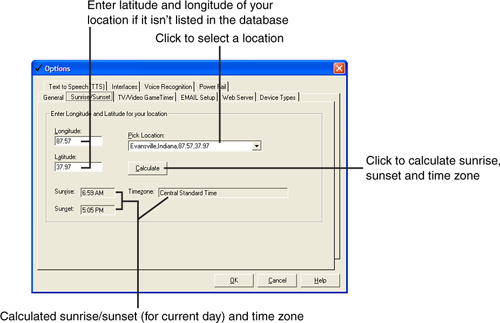
If you want to create lighting, security, or other actions that are triggered by sunrise or sunset, select the Sunrise/Sunset tab from the Options menu. Choose a location from the Pick Location menu or specify your latitude and longitude. Click Calculate to display sunrise and sunset for the current date and location you specified (see Figure 11.22). Click OK to lock in your selection. HomeSeer uses this information for all actions that depend on sunrise/sunset timing.
Other options you can specify within HomeSeer’s Options menu include
TV/Video Game Timer—. Use this option to create one or more users for a TV or video game connected to a specified X10 plug-in module or wall outlet. Each user can be assigned a particular length of time to use the specified module on a daily or weekly basis (see Figure 11.23). To access the device connected to the module, the user must enter the house code and password specified by using a Maxi Controller.
Text-to-Speech—. Use this dialog to enable HomeSeer to talk to you and to specify a voice.
Voice Recognition—. Use this dialog to enable HomeSeer to respond to voice commands.
Power Fail—. Use this dialog to enable HomeSeer to recover from a power failure and continue to control your home.
General—. Use this dialog to configure how HomeSeer starts, shuts down, logs events, edits scripts, and adjusts specified event times when security mode is enabled.

After HomeSeer has started, you’ve configured your hardware interface and X10 devices with the wizard, and you’ve closed the wizard, you should start to add specific devices to your home automation configuration. To add a device, click the Devices (light bulb) icon under the Views menu at the left side of the HomeSeer interface (refer to Figure 11.26). Then right-click within the list of Devices and select Add Device from the contextual menu to bring up the Device Properties dialog shown in Figure 11.24.

To set up a device, specify these items:
The device name
Device location (enter the location or select an existing location from the pull-down menu)
Device type (based on the list you viewed or modified in the “Specifying X10 Device Types” section earlier in this chapter)
Select options, such as voice command, logging, and others
Specify the house (red) and unit (black) code for the device
Configure the device’s dimmer and other options
Click OK when you’ve finished. Repeat as needed until all the devices you want to control with HomeSeer have been identified.
To adjust properties for an existing device, right-click the device and select Device Properties. The same Device Properties dialog shown in Figure 11.24 will be displayed.
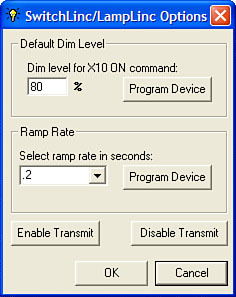
If the device you are installing has specific options that you can configure, the dialog enables you to make suitable changes. For example, if you are installing a Smarthome SwitchLinc, LampLinc, or similar modules, as in Figure 11.24, click the Options button to specify the preset dim level and ramp rate and to enable or disable transmit (two-way operation) for modules supporting these features (see Figure 11.25).
Other types of devices have different options, such as a serial port setting for some types of thermostats, key definitions for infrared devices, and house code values beyond P. Click Help if you need assistance in setting up some types of devices; click OK when you’ve finished.
After you have configured some devices, the HomeSeer display resembles the one shown in Figure 11.26.

To send commands to any device defined in HomeSeer, right-click the Device and select Device Command from the contextual menu. Depending upon the device, you can select On, Off, Dim To, Thermostat, or Control.
If you select Dim To, you can select levels ranging from 0–100% in 10% increments. If the device is a thermostat, you can set the temperature, and turn on heating, cooling, or the fan.
After you’ve configured your X10 devices in HomeSeer, you can create events. HomeSeer uses a single dialog to create all types of events, including those triggered by time, conditions, or other factors. To create an event, click the Events (alarm clock) icon in the Views menu to display existing events. Then right-click anywhere in the list of events and select Add Event to display the Event Properties dialog (shown in Figure 11.27).
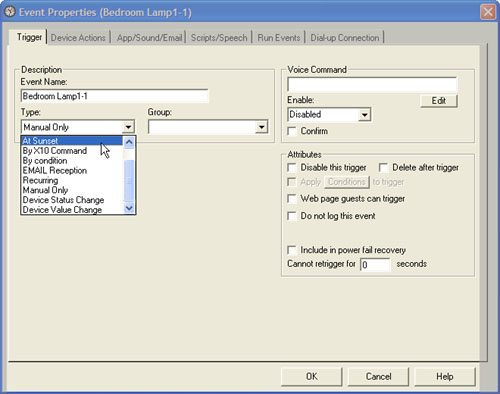
You can choose any of the options shown in Table 11.1 as a trigger for an event.
Enter the name you want to use for the event, specify its type, and specify the group (optional). Depending on the trigger type you select, the dialog changes to reflect the options, as shown in Table 11.1.
Table 11.1. HomeSeer Trigger Options
Trigger Type | Trigger Options | Notes/Tips |
|---|---|---|
Absolute time | Time; any date or optional calendar; | Security option varies actual trigger |
Time/Date | security option | by amount of minutes specified in General options tab |
At Sunrise | Before or after sunrise; security option | |
At Sunset | Before or after sunset security option | |
By X10 Command | House/unit code; one of the following: on, off, dim, all units off, all lights on, dim, bright, all lights off, extended, hailrequest, hail ack, preset dim, ext data, status on, status off, status request, any | |
By Condition | Time is, date is, status of installed X10 modules | Status options include on, off, duration of time on or off, changed to on/off/dim/bright, value equals, others |
EMAIL Reception | Mail received from specified address or any address | |
Recurring | Repeats on user-specified schedule | Useful for testing a remote device; device keeps working until you can view it |
Manual Only | Use with voice commands | Used with HomeSeer Phone option (see Chapter 10 for details). |
Device Status Change | Any installed device specified device; status on/off; status changed to on/off/dim/any; status unknown | |
Device Value Change | Greater than, less than, equal to, not equal to, set to, any value | Useful for controlling thermostats or when a script has been written assigning text values to certain conditions |
You can also specify whether to use voice commands to trigger the event, what attributes to assign to the event, days and times to run the event, and whether to enable the event as part of power fail recovery.
Select the option(s) desired and click OK to close the dialog, or click the tabs to view other options.
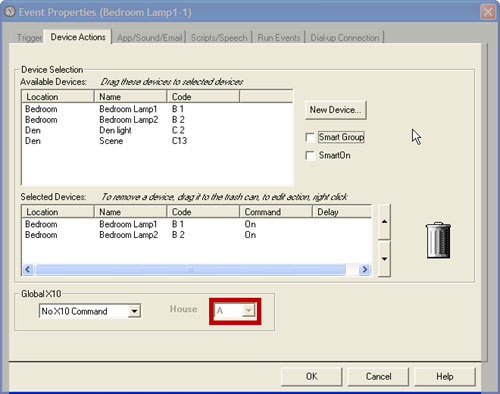
To select the devices you want to use in the action, click the Device Actions tab. Select the devices you want to use in the action from the Available Devices list and drag them to the Selected Device: section of the dialog (see Figure 11.28).
Double-click each device in the Selected Devices portion of the dialog to display the Device Command dialog (see Figure 11.29). Configure the device as desired. Figure 11.29 shows typical options for a lamp module.

You can turn all lights on or off, all units off, turn on or turn off a lamp, set the brightness level, and specify a time delay if desired.
Click the App/Sound/Email tab if you want to run an application as part of an event, play a sound, or send an email (including an optional attachment) during an event.
This tab offers many possibilities:
Use the launch application option to start a slide show or a media player to set the mood for a romantic evening or to kick off a party
Use the play sound option as part of a security or door-opening event to alert a visually impaired user to a potential problem
Use the EMAIL option along with a security event such as a motion detector, or a door or window trigger to send an alert to your office or school email address that there might be problems at home
Use the Scripts/Speech tab (shown in Figure 11.30) to select a script to run during an action or to add computer-generated speech to your action.

Click Run Events to chain existing events together into a single event. This is easier than re-creating an event.
Click Dial-Up Connection to configure HomeSeer’s connection to the Internet if you don’t use a broadband home network.
Click OK to complete the event.
HomeSeer, as you have already seen, is a powerful and complex program. To review what you have done with it since installation or to determine whether there are any errors in a script you are using, click the Log (notebook) icon at the left side of the screen. The event log is displayed (as in Figure 11.31).
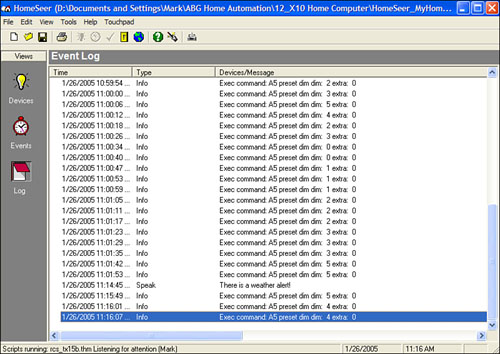
To clear the log, stop updates, or open the log in a new window, right-click anywhere in the Event Log window and select the appropriate option from the contextual menu.
Instead of drilling down through the device menu to control a particular device, you can click the Control Panel icon (the yellow light switch icon) at the top of the HomeSeer display to open the Device Control dialog. The Device Control dialog enables you to send commands to a specified device, to all lights (on/off), to all units (off only), or to only the specified address. With a light switch, you can use it to send standard, preset, or Leviton dim commands. You can also use this dialog to send address strings to a SwitchLinc or LampLinc module for scene programming as discussed in Chapter 6; click Address Only to send the address without a command.
The Tools menu features a variety of utilities you can use to configure various parts of HomeSeer. These include the following:
Get Device Status—. Use this utility to determine the status of a two-way device
Security Mode—. Turns on security mode for events that are security enabled (refer to the “Selecting a Trigger for an Event” section earlier in this chapter)
Enable All Events
Disable All Events
Listen for Commands—. Enable this option if you use voice commands
MSAgent Properties—. Configures speech options for Genie and other agents
Assistant Wizard—. Opens HomeSeer Assistant Wizard
Voice Recognition Properties—. Use this utility to fine-tune the sensitivity and accuracy of HomeSeer’s voice recognition engine
Voice Recognition Training—. Runs the Microsoft Speech Training Wizard, which optimizes voice recognition performance and accuracy
Reset Device Status—. Resets all devices to unknown; use if your devices do not properly report their status
Edit Startup Script—. Opens the Startup script in Notepad
Edit Shutdown Script—. Opens the Shutdown script in Notepad
Caution
The scripting tools in HomeSeer (it supports VBScript and other programming languages) enable it to perform almost any home automation task, but be careful if you’re not familiar with writing scripts (which are, essentially, short computer programs). Carefully study the help files and script examples provided as part of HomeSeer (use the Updater to download examples) before you modify a script. Modify existing scripts, save the changes with different names, and make sure that you understand how they work before you try creating a script from scratch.
X10’s ActiveHome Pro is an enhanced version of the original X10 ActiveHome software. ActiveHome Pro is bundled with the X10 CM15A two-way X10 computer interface. The CM15A also acts as an all-house-code RF transceiver for use with X10 and X10-compatible wireless remote controls. The CM15A uses four AAA batteries to back up its built-in memory and timer, enabling you to use it to run your home automation system without a PC.
Caution
During installation of the CM15A, make sure you follow the manufacturer’s instructions to insert the batteries only after the module has been connected to an AC wall outlet and to your PC’s USB ports. If you install the batteries first, Windows will detect the module as an “unknown device” and it will not work until you remove the batteries and install it correctly.
ActiveHome Pro has built-in support for X10-brand and Leviton-brand modules, light switches, and other X10 devices. ActiveHome Pro can also be used with other X10-compatible modules and switches. ActiveHome Pro requires Windows 98SE, Windows Me, Windows 2000, or Windows XP. It supports interactive control of X10 modules, timers, and macros. Purchase the optional Smart Macros plugin to add conditional macros using If-Then and AND-OR-ELSE logic.
When you start ActiveHome Pro for the first time, you need to enter the registration code emailed to you by X10.com. Enter the code and click Register Now! When the registration code entry field changes to “Registered,” click Close to use the program. If your installation uses plugins, they also need to be registered.
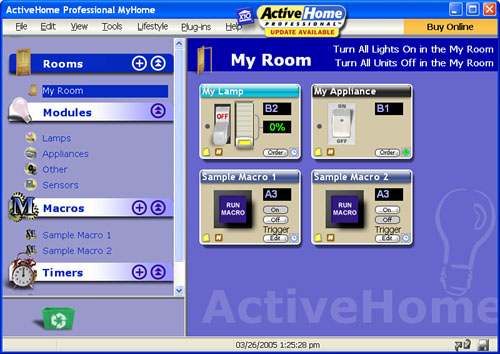
When you start ActiveHome Pro for the first time, you automatically open a sample home automation configuration called “My Room.” My Room has four predefined components (refer to Figure 11.32):
My Lamp (control for an X10 lamp module); A1
My Appliance (control for an X10 appliance module); A2
Sample Macro 1; A3 Off
Sample Macro 2; A3 On
To learn how to use ActiveHome Pro, I recommend you modify these components to match a room in your current home automation configuration.
To change the house and unit code (X10 address) used by the lamp module, click the address field in My Lamp and type in the correct house/unit code. To change the X10 address used by the appliance module, click the address field in My Appliance and type in the correct house/unit code. Figure 11.32 shows the My Lamp and My Appliance controls after being changed to match the modules installed in my home.
To rename My Room to the name of an actual room in your house, right-click My Room in the Rooms menu in the left-hand window and select Rename Room. Enter the name of the room in the Rename Room dialog that appears and select a header color for the modules in this room. Click OK.
To edit the name or other information for a module, right-click the module control and select Edit Module. In the Edit Module dialog (see Figure 11.33), enter a new name for the module, select the module type (lamp, appliance, sensor, retail, pro modules, security, other), select a specific model of module, the room where the module is located, and the X10 address (house/unit code). Click OK when finished.

To remove a module from a room, right-click the module in the right-side menu and select Delete Module. Click OK on the confirming dialog. Note that any timers used by the module are also deleted.
Deleted modules are placed in ActiveHome Professional’s own Recycle Bin, which is located at the bottom of the left-hand menu. To learn how to retrieve deleted modules, see “Retrieving a Deleted Module,” later in this chapter.
To add a module to a room, click the type of module you want to add from the Modules section of the left-hand menu. Click the double-down arrow next to Modules to display the list if it not visible. After you select the module type, a new window opens on the bottom of the screen (see Figure 11.34).

Click the module you want to add to the room and drag it to the room section of the dialog. Release the module, and an Edit Module dialog appears similar to the one shown in Figure 11.33. Enter the name you want to use to identify the module, enter the X10 address the module uses, edit any other settings necessary, and click OK.
After you have added the modules you want, close the Modules dialog at the bottom of the screen by clicking the X next to the Order Direct button.
You can control modules interactively with ActiveHome Pro. Click the switch to turn on a lamp or appliance module. With a lamp module, drag the slider to the desired brightness. See Figure 11.35 for an example.

To unleash the real power of computer control of X10 modules with ActiveHome Pro, add a timer to a module. A timer (comparable to a timed event in other home automation programs) turns on and turns off a module according to the time of day, dawn, or dusk. To view existing timers or set up a new timer, click the timer button (refer to Figure 11.35) to open the Timer Designer (see Figure 11.36).
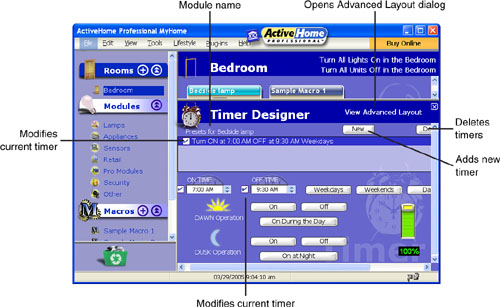
To modify an existing timer, highlight it at the top of the Timer Designer. From the default (simple) mode, you can
Adjust on/off time
Select dusk-to-dawn or dawn-to-dusk operation
Turn module on at dawn or on at dusk
Select dimming level for lamp modules
Weekday, Weekend, or Daily operation
Delete the timer
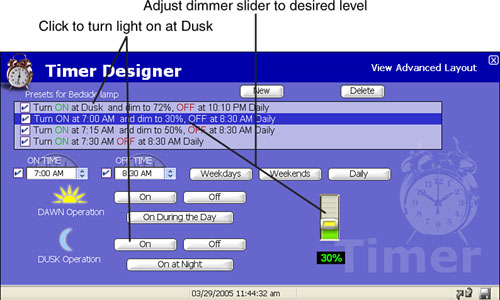
To set a particular time to turn on a module, make sure the time field is white. If the time field is grayed out, click the On button for Dawn or Dusk until the field is white. Enter the time, or scroll through time in five-minute increments with the up and down arrows.
To select dusk-to-dawn operation, click On at Night. To select dawn-to-dusk operation, click On During the Day. To turn a module on or off at dawn or dusk, click the On or Off button next to DAWN Operation or DUSK Operation.
To adjust the dimming level for a lamp module, drag the slider to the desired dimming level.
To specify daily operation of this timer, click Daily. To use the timer on Monday-Friday only, click Weekdays. To use the timer on Saturday and Sunday only, click Weekends.
To delete the highlighted timer, click Delete.
To add a new timer, click New. The same options are available for a new timer as for an existing timer.
Figure 11.37 shows the full Timer Designer in default (simple) mode after creating new timers for the bedside lamp.
If you want to specify particular days of the week in a timer or adjust the start and ending times of a timer for improved security, click View Advanced Layout (refer to Figure 11.36) to open the dialog shown in Figure 11.38.

To add a room to ActiveHome Pro, click the plus (+) sign next to Rooms in the left-hand menu. When the Add a Room dialog appears, enter the name of the room to create, select a header color for the modules in the room, and click OK to create the room. After you add a new room to your configuration, use the Modules menu to add modules to the room. See “Adding a Module to a Room” earlier in this chapter, for details.
To save changes and additions to the default ActiveHome Pro configuration under a different name, click File, Save As. Enter the name you want to use for the new configuration, and click Save. By default, your configurations are stored in the default ActiveHome Pro folder unless you choose a different location. See Figure 11.39.

Caution
ActiveHome Pro must be shut down during the update process. It will save over the existing configuration. If you have modified My Home and prefer to save your changes to your own filename, save the changes as discussed in “Storing Changes to Your Configuration.”
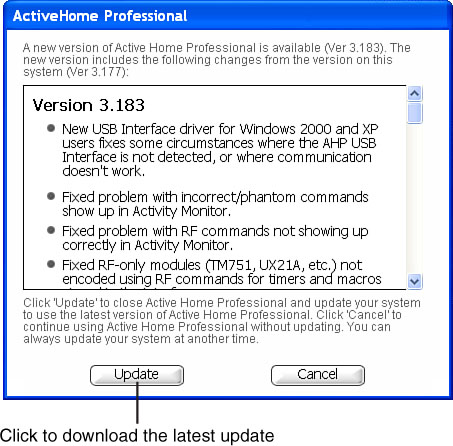
By default, ActiveHome Professional checks for updates automatically and displays an “Update Available” button at the top of the screen when an update is available. Click this button to start the update process. You can also check for updates through the Help menu.
An update history dialog (see Figure 11.40) is displayed when you click the Update Available button. Information about the latest update is listed at the top; scroll down for earlier versions. Click Update to continue the process.
On the Welcome dialog that follows, click Next to continue. Click OK on the Application Shutdown dialog to shut down ActiveHome Professional. The Installing dialog appears briefly, listing each file as it is downloaded to your system. If the download includes updates for the CM15A ActiveHome Pro USB interface, make sure it is connected to your computer before you click OK on the X10 Hardware Setup dialog. To complete the update process, click OK on the ActiveHome Pro Update dialog. ActiveHome Pro restarts automatically.
You can make your ActiveHome Pro system even more powerful by creating macros, which are a sequence of events that can involve one or more modules. ActiveHome Pro includes two sample macros:
Sample Macro 1 is blank.
Sample Macro 2 has three pauses built into it.
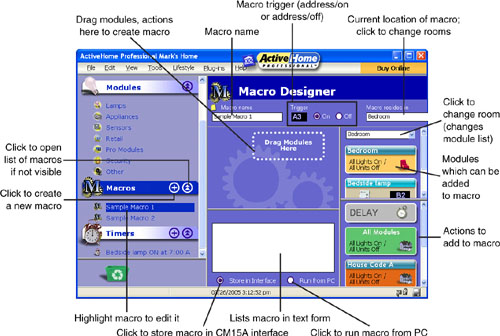
To edit one of the sample macros, click the macro name in the Macros section of the left-side menu. To create a new macro, click the plus (+) sign next to Macros in the left-side menu. In either case, the Macro Designer (shown in Figure 11.41) opens.
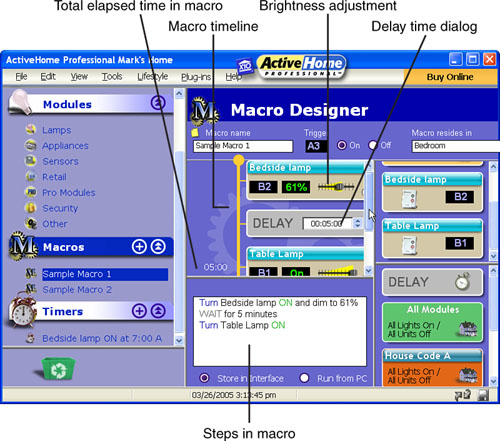
Add steps to the macro by dragging a module from the modules list or an action from the actions list shown in Figure 11.41. For example, to create the macro shown in Figure 11.42, I performed the following steps:
I dragged the Bedside Lamp module into place to create step 1.
I set the brightness slider to 61%.
I dragged the Delay action into place to create step 2.
The Delay time is 00:05:00 (5 minutes) by default. If I had wanted to change the default to a different time, I could have typed in the delay I wanted or clicked on the up/down arrow buttons in the Delay icon.
I dragged the Table Lamp module into place to create step 3. I did not adjust the brightness of this lamp.
After you create your macro, you should test it. To test the macro, right-click on the macro in the Macros section of the left-side menu. Select Trigger Macro.
To edit a macro, right-click it and select Edit Macro or just click the macro name. To view all your macros in a compact form, right-click any macro and select Macro Summary View (see Figure 11.43).
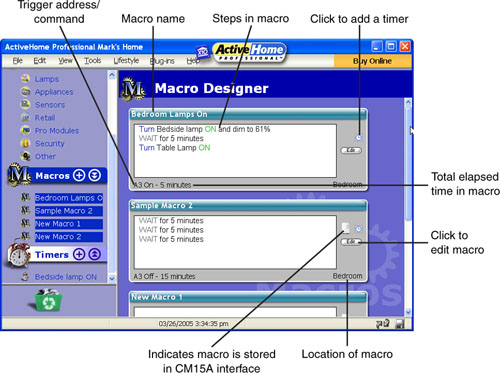
To edit the steps in any macro from Macro Summary View, click the Edit button. To add a timer to any macro from Macro Summary View, click the Timer button.
To delete a macro, right-click the macro in the Macros listing and select Delete Macro. When the Delete this Module dialog appears, click OK to delete the macro. If you don’t want to confirm the deletion each time, click the Don’t Ask Again box in the Delete this Module dialog before you click OK.
Use the Tools menu (see Figure 11.44) to perform a variety of tasks including
Turning all lights on
Turning all units off
Working with the CM15A interface module (downloading, clearing the memory, setting up the module)
Controlling lights, appliances, and units
Monitoring activity
Configuring preferences

The CM15A interface provided as part of ActiveHome Pro can store programs and run them without being connected to your computer. After you save your configuration (see “Storing Changes to Your Configuration” earlier in this chapter for details), click Tools in the top-level menu, and then click Download Timers and Macros. Click Yes on the Warning dialog that appears to continue. At the end of the process, a Message dialog indicating the timers and macros have been downloaded appears. Click OK to close the dialog.
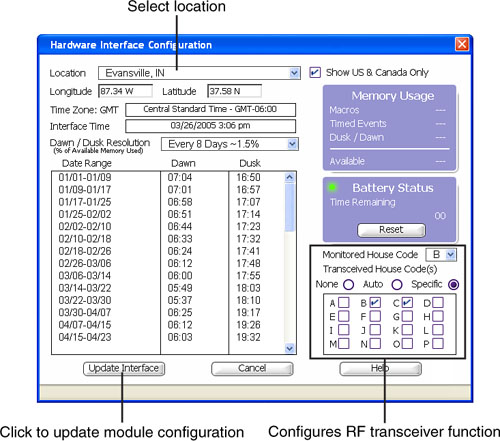
The first time you download your configuration to the CM15A, you will need to configure your hardware interface if you did not do so through the Hardware Interface Configuration option in the Tools menu. When prompted, select the location, set up the CM15A’s RF transceiver, and select the house code you want to monitor. Click Update Interface when done. See Figure 11.45.
To change the default settings used by ActiveHome Pro, select Preferences from the Tools menu. The Preferences menu is in two parts. The first part includes Action Warnings; for every action in this section that is checkmarked, you must confirm the action before it takes place. This default helps you to avoid deleting modules or other settings by mistake. Clear the checkmarks to skip the confirmation dialog. The second part of the preferences menu is used to configure other parts of the program. Figure 11.46 shows the entire preferences menu’s list of defaults. (Note that you might need to scroll to see all of it on your PC.) Click Close when you have reviewed or edited the settings in the Preferences dialog.

ActiveHome Professional stores all X10 commands you have sent to modules in its Activity Monitor. This includes commands given with remote controls, tabletop controllers, or X10-enabled wall switches. To see the contents of the Activity Monitor (Figure 11.47), press the F2 key or click Activity Monitor from the Tools menu.

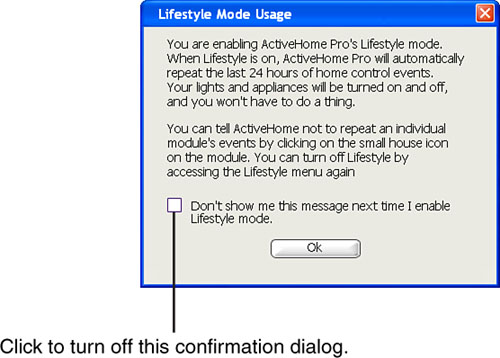
As an alternative to setting up macros and timers, you can use the Lifestyle Mode to automatically play back every X10 command sent by ActiveHome Professional in the last 24 hours. To activate Lifestyle Mode, click Lifestyle in the top-level menu and then click Enable Lifestyle. Click OK on the confirming dialog (see Figure 11.48).
When ActiveHome Pro is running in Lifestyle Mode, an animated house icon appears in the lower right-hand corner of the program screen. To prevent a particular module from being controlled by Lifestyle Mode, click the small red house button on each module dialog. When the house turns blue, it is not controlled by Lifestyle Mode. See Figure 11.49.

To disable Lifestyle Mode, click Lifestyle, Lifestyle Mode again to uncheck it.
After you delete a module, you might need to retrieve it. To see deleted modules, click the Recycle Bin icon in the bottom left-hand corner of the ActiveHome Professional screen (see Figure 11.50). To retrieve a deleted module, drag the module to the room you want to use it in. Click OK on the Restore This Module dialog.

To delete modules from the Recycle Bin, right-click it and select Empty Deleted Modules.
To see which plug-ins are available for ActiveHome Pro, click the Plug-Ins menu and select Download Plug-Ins. This opens the ActiveHome Pro plug-ins page at www.activehomepro.com/plugins/index.html.
The SmartMacros plug-in adds conditional logic to macros, the ability to trigger macros with various types of X10 hardware, timers, and macros, and an Advanced Mode that adds IF/AND/OR/ELSE logic and other features. SmartMacros are created using drag-and-drop editing.
The iWitness plugin enables you to view and control X10 security cameras with ActiveHome Pro.
For pricing, order information, and screen shots, see the ActiveHome Pro plug-ins page.
Use the File, Reports menu to create three types of reports about your SmartHome system:
The General report opens a web page listing each room in your home, each module, and each macro.
The Macros report opens a web page listing each macro and the commands it contains.
The Status report opens a web page listing information for the CM15A interface.
Use the File menu in your web browser to save or print each report.
Use the File, Print Labels command to print labels for PalmPad remote controls. Specify the house code you want to use, or select All to print labels for all house codes.
To determine which X10 address ranges might be in use in your vicinity, click Tools, Find Other Computers. The X10 Code Usage–Historical window lists modules and macros you have added to your ActiveHome Pro system in green, activity from modules you have not yet added (or might belong to another home automation system nearby) in red, and ranges it might not be safe to use in yellow. See Figure 11.51 for an example.

If you are using X10 or X10-compatible modules you have not yet added to your ActiveHome Pro configuration, they will show up as yellow or red blocks in this grid. After you have added all of your modules, switches and other devices to your configuration, this report will be useful in determining if you are receiving signals from another X10 installation.
If you’re having problems with computer control of your X10 system, follow these guidelines to help solve the problem:
Make sure that you are using only one method to control your system. Unplug mini-timers and don’t let other family members fiddle around with remotes while you configure your system.
If you switch home automation programs and you use an interface with a built-in timer and memory, clear the interface’s onboard memory with its reset button. This will prevent the interface from running its existing program, which might interfere with new configurations you create.
If some events don’t work correctly, double-check your house and unit code settings for your devices and for any scenes you have created.
Make sure that you select the correct device type for your module. For example, if you select a generic lamp module for a two-way module with scene capability, you won’t be able to configure the module’s advanced features with your program unless you program the module with a Maxi Controller and set up your program to control the module with the scene address rather than its physical address.
Check for program updates frequently.
If you are unable to send home automation commands with your selected controller, make sure that you are using a working USB or serial (COM) port. Try a different type of device with the selected port. If nothing works with the port you are using, the port is disabled or defective. See your computer’s instruction manual to learn how to enable a disabled port or contact the vendor for help.
If you are using a serial interface controller, make sure that you have properly identified the port in the setup procedure for your program.
Use the reset button or reset command in your home automation program to clear the interface’s memory and download fresh configuration and programming information.
If the module uses batteries, check battery condition and the battery terminals. Replace leaky or corroded batteries immediately to avoid damaging your module.