Troubleshooting Home Network and Broadband Access to Your X10 System
</objective> </feature>If you use a home computer to control your X10-based home automation system (as discussed in Chapter 11, “Accessing X10 Home Control via Your Home Computer”), it’s natural to wonder whether you can control your home from another computer on the network or from another location via the Internet. As this chapter reveals, you can indeed use the power of a home network and the Internet to make remote home control a reality.
There are several methods you can use to control your X10 based home automation system via a home network or the Internet:
Web server application running on your computer
Remote access software
Remote access service
Depending on the software and hardware you use for PC-based home control (refer to Chapter 11 for some typical examples), you might be able to choose between two or more of these solutions.
Caution

To learn how to choose, install, configure, and secure your home network and broadband Internet connection, see my book Absolute Beginner’s Guide to Home Networking (ISBN 078973205X, Que, 2005).
If you want to control your X10 home automation system from another computer in your home, you need to install some type of wired or wireless home network. If you want to use the Internet to manage your home automation system, you need to install an always-on network connection such as cable or DSL and connect your home computer(s) to it.
Some X10 home automation programs include an integrated web server to enable remote access. A web server provides a web-based interface with your home automation software, enabling you to view and edit settings from other computers on your home network or the Internet. To access the web server from another computer on your home network, enter the IP address of the computer running the web server. To access the web server from a remote computer, enter your home network’s public IP address and the TCP port used by the web server or an alias you obtain from a dynamic DNS provider.
See the sidebar “Discovering Web-Enabled X10 PLC Software Solutions,” later in this chapter, for a list of home automation programs with integrated web servers and their websites.
If your preferred home automation software does not include or cannot be upgraded to provide built-in web access, you still have remote access options. You can use remote access software or remote access services from various vendors to create a connection between the home PC and a remote PC. Remote access software programs such as PC Anywhere (Symantec) or LapLink Gold are difficult for nonprofessionals to use and require you to install complex client and server software. On the other hand, remote access services offer web-based access with minimal configuration of the server and an easy-to-use client. Some remote access services support remote connections from PDAs, smart phone devices, and PCs running a non-Windows operating system, such as Mac OS or Linux.
Caution
Although web server support might be built into your X10 home automation software, it might not be a totally free upgrade.
If you’re lucky enough to have a static (never-changing) IP address and only one computer connected to your broadband Internet connection, connecting to your web server remotely is as easy as entering the IP address of your home computer. However, if your ISP provides you with a dynamic (changing) IP address, you need to use a dynamic DNS service that can track the changes in your IP address and enable you to connect using an alias. And if your home computer is on a home network, you need to reconfigure your router or gateway to send traffic to the computer that runs your home automation software. See the “Using an Integrated Web Server” section later in this chapter for details.
As you learned in previous sections, you can choose from several methods for remote network or Web access to your X10 home automation system. Which one is right for you? Consider these issues when you select a home networking/Web access solution:
Does the vendor of your current hardware/software offer a software or service upgrade to provide web-based access?—. If so, this can be the least expensive choice, especially if your home computer has a static IP address. It’s also the simplest because you don’t need to install anything on the client PC you will use to access your home automation software remotely. All you need is a working Internet connection.
If you cannot upgrade your current software, do you need to control your X10 home automation system from more than one PC?—. If so, consider remote access services. As a bonus, remote access services, unlike a web server application, enable you to run all the programs on your home PC from a remote PC.
Table 12.1 helps provide a visual checklist to help you make the right choice.
Table 12.1. Moving to Network or Web-Based X10 Home Automation Control
Built-in Web Server Software | Web Server Upgrade | Online Service Upgrade | Remote Access Service | Remote Access Software | |
|---|---|---|---|---|---|
Works with any X10 controller and software | No | No | No | Yes | Yes |
Free solution | No, 2 | No | |||
One-time cost solution | — | Yes, 2 | No | No | |
Monthly, yearly subscription | No | No | Yes | No | |
Works with any remote PC with Web connection | Yes | Yes | Yes | Yes | No |
1. Some vendors offer free basic remote access services. Advanced features such as file transfer and synchronization (which are not required for home automation remote control but are useful for other types of remote work) require a paid subscription. | |||||
2. Requires the user to use a static IP address to enable remote computers to access the web server or to subscribe to a dynamic DNS (DDNS) service to enable the web server to be accessed when the PC or home network uses a dynamic IP address (typical with almost all home broadband Internet access types). | |||||
To get ready for remote access to your home automation software, you might need to
Enable the web server feature in your home automation software
Upgrade your home automation software to a version containing a web server
Subscribe to a service provided by your home automation software vendor to make your system network/Web-enabled
Install a hardware device to make your system network/Web-enabled
Install remote access software
Subscribe to a remote-access service
If you need to upgrade your X10 home automation software to add web server capabilities, contact your vendor for upgrade details. Generally, you will need to
Pay an upgrade fee to move to a more sophisticated version
Download the upgrade
Install the upgrade
If you are using a noncurrent version of a home automation program, you might still be able to upgrade to a current version with a built-in web server. However, in most cases, a version/feature upgrade is more expensive than a feature upgrade in the same version.
X10 home automation software that contains a web server (either built-in or as an upgrade) will generally have a menu option for starting and configuring the web server. HomeSeer, the example we’ll look at in the following sections, enables you to start a web server either at startup or from its View menu.
To start the web server from the HomeSeer Assistant Wizard, select Enable and Set Up the Web Server and View My Web Page; click Next to continue. Click Next on each of the next two dialogs until your default web browser opens and displays the HomeSeer Web Control dialog (see Figure 12.1).
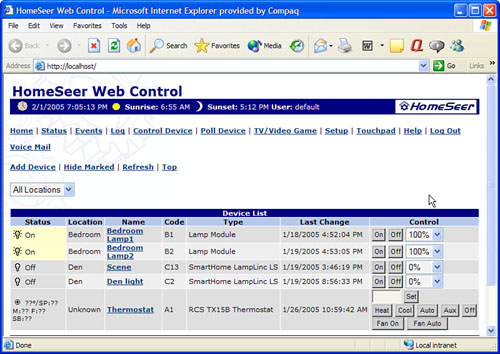
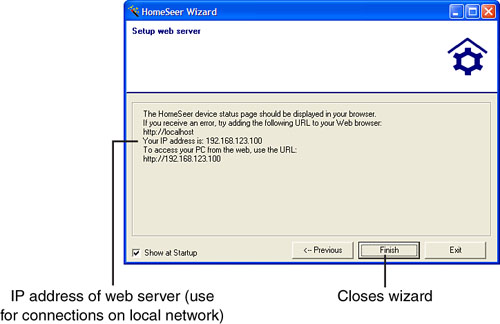
Users who log in to the web server will see a similar display. To close the configuration dialog and leave the web server running, click Finish on the Setup Web Server dialog shown in Figure 12.2. Before closing this dialog, be sure to note the IP address listed; you’ll need it to log in to this computer from another computer on your home network.
Every time you start HomeSeer or another home automation program that includes a web server, make sure that you enable the web server. To keep it running for remote access, don’t shut down your home automation program or computer.
To log on to the web server from another computer on your home network, enter the IP address of the computer running the web server into the web browser’s address window on the remote computer. For example, if the computer hosting the web server is using an IP address of 172.16.0.100, open your preferred web browser, enter http://172.16.0.100 into the address bar, and press the Enter key to open the web server interface to your home automation software.
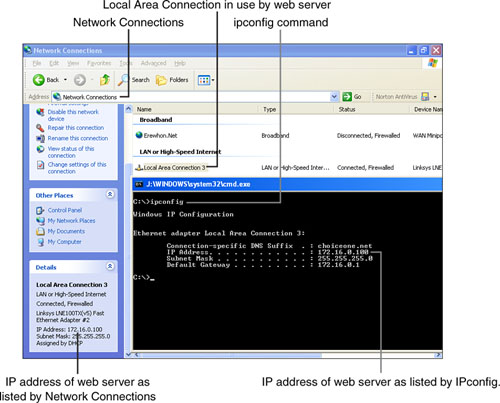
As Figure 12.2 shows, HomeSeer displays this information in its Web Server Setup Wizard. If your home automation program’s web server does not display the IP address of your PC, you can use the ipconfig command-line program or the Network Connections dialog, which shows your computer’s local area connection, to determine your IP address in Windows XP or Windows 2000. See Figure 12.3 for examples of both methods. Note that the actual IP address on your computer will be different. The Winipcfg program provides similar information for Windows 9x/Me.
To log on to a web server from a remote computer not located on your home network, you normally cannot use the actual IP address of the computer on the home network. Here’s why: On a home network, private IP addresses (addresses in the ranges 192.168.xxx.xxx or 172.16.xxx.xxx–172.31.xxx.xxx) are used; the 192.168.xxx.xxx network address range is the most common one. These addresses cannot be used on a public network. To connect to a public network, the router (the device used to connect a home network to a broadband Internet access device such as a cable or DSL modem) translates private IP addresses into a single public IP address and routes traffic between the computers on the home network and the Internet. Your home network’s private IP addresses are never seen by the Internet. Even if the computer running your home automation software is connected directly to a cable or DSL modem, the modem usually provides a private IP address to your computer to help protect it against online hackers.
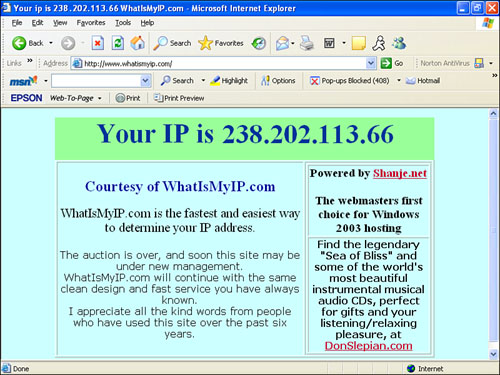
Given this information, how can you log on to your web server from your office, a vacation home, or another remote location? You need to know the public IP address used by your home network or home computer. A no-cost way to learn this information is to use the WhatIsMyIP.com website (www.whatismyip.com) or the Current IP Check page provided by DynDNS.org (checkip.dyndns.org/) to view current public IP address of the computer used to run your home automation system (see Figure 12.4). Use this IP address to log in to your web server remotely.
For example, if your home network or home computer’s public IP address is 15.8.92.200, open an Internet connection on a remote computer, start your favorite web browser, enter http://15.8.92.200 and press the Enter key to view the web server interface to your home automation software.
Be sure to configure your web server to ask for usernames and passwords to prevent unauthorized users from logging on to your home automation system and altering settings.
TCP ports assigned by default to typical Internet processes, such as web browsers (TCP port 80), file transfer protocol (FTP) programs (TCP ports 20 and 21), SMTP (email) programs (TCP port 25) are often called well-known port assignments. These port assignments can be vulnerable to attack from remote hackers. Most web servers enable you to change the default TCP port 80 normally used for the web server to a user-selected port number to improve security. If your home automation program provides for a user-selected TCP port, it will usually be found in the program’s configuration screens. Consult your program’s documentation for details.
Caution
Most residential broadband Internet services use dynamic IP addresses. A dynamic IP address can change.
Consequently, you should not assume that the public IP address you have today will be the same tomorrow. Sure, you could check your public IP address before heading out to work everyday so that you can control your home automation system from work, but when you go on a vacation or business trip, the address might change before you get back. To learn how to connect with your web server no matter what its public IP address is, see the “Dealing with Dynamic IP Addresses in Your Internet Connection” section later in this chapter.
If you change your web server’s default TCP port to a different value, you must also make the following changes to your network configuration to enable continued connection to your web server:
You must add the TCP port number to the IP address you use to access the web server on your home network. For example, if you choose TCP port 1000 and your web server is using IP address 172.16.0.100, you would enter the following into your web browser to log on to the web server: http://172.16.0.100:1000
When you access the web server from a remote location via the Internet, use the public IP address followed by the TCP port number. For example, if your home computer or home network uses a public IP address of 15.8.92.200 and your web server uses TCP port 1000, start the Internet connection on the remote PC and enter http://15.8.92.200:1000.
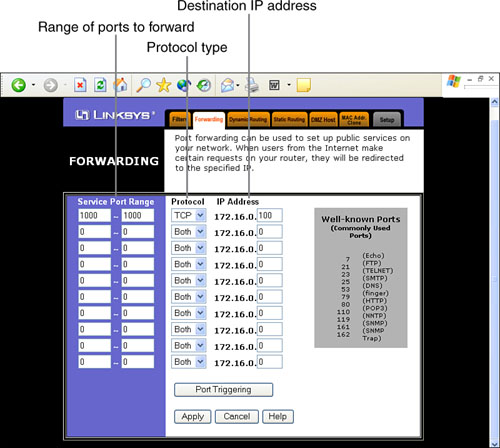
You must also configure your router or wireless access point to allow traffic through the TCP port number you use. This is called port forwarding. See Figure 12.5 for a typical example on a Linksys router.
If the computer running your home automation software is on a home network, accessing it remotely can be tricky. Here’s why: Most home networks shield users from the complexities of setting up an IP address by using server-assigned IP addresses. The IP addresses used to identify computers and devices on a home network are provided by a dynamic host configuration protocol (DHCP) server built into a router or gateway. For typical home network and Internet access, this works very nicely. The problem for a computer running a web server (such as a computer running home automation software with web access enabled) is that the computer with the web server might be assigned to one IP address today and a different IP address tomorrow because of the order in which computers and other devices that use IP addresses are turned on and connect to the network.
To enable port forwarding (refer to Figure 12.5) to send traffic to the correct IP address every time, you should configure the computer with the web server to use a fixed IP address.
To configure the computer running home automation software with web access to have a fixed IP address, you need to determine the following:
IP address and subnet mask—. Use an IP address in the same range as the rest of your network. It must not overlap the IP address range used by your router’s DHCP server or the router’s LAN address. Check the router’s DHCP configuration to see allowable address ranges.
Default gateway—. This is the LAN address of your router.
DNS servers—. These are the IP addresses of the servers that translate hostnames such as www.erewhon.net into IP addresses.
Tip
You’ll probably want to use DHCP for most network clients. So, to leave room, make sure that the IP addresses that you assign are not directly after or directly before the IP addresses provided by the router. Assign the computer running a web server an IP address about 10 addresses before the first IP address provided by the router or after the last IP address provided by the router.
To determine what IP address to use, reopen your router’s DHCP configuration screen and note the IP address range it provides. Use a nonconflicting address in the same range. For example, if the router uses 192.168.123.254 for its LAN address and provides IP addresses from 192.168.123.100 to 192.168.123.105 to clients, any IP address from 192.168.123.0 through 192.168.0.99 and from 192.168.123.106 through 192.168.123.253 would be acceptable. Figure 12.6 illustrates the range of in-use IP addresses as configured on a typical home network using a U.S. Robotics router.

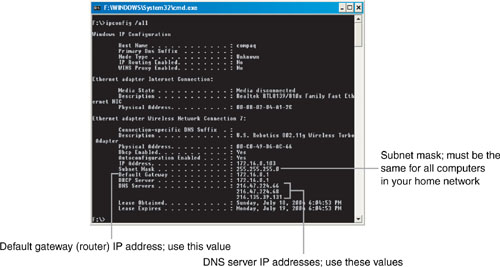
The easiest way to get the rest of the information you need is to go to any computer that is working correctly on the network and use the ipconfig (Windows XP, Windows 2000) utility to display network information (see Figure 12.7).
Use Tables 12.2 and 12.3 to list the information you need for any manual IP addresses you decide to use on your network.
Table 12.2. Available IP Address Configuration Worksheet
IP Address Used by (LAN Use for Default address; Gateway in Table 12.3) | IP Addresses Used by DHCP Server in Router | Available IP Addresses Range #1 | Available IP Router Addresses Range #2 |
— | — | — | — |
Table 12.3. Manual IP Address Configuration Information
Device Description | Available IP Address (from Table 12.2) | Subnet (from ipconfig or Winipcfg) | Default Gateway (Router LAN Address from Table 12.2) | DNS Servers (from ipconfig or Winipcfg) |
— | — | — | — | — |
To configure a manual IP address on a computer running Windows XP or Windows 2000:
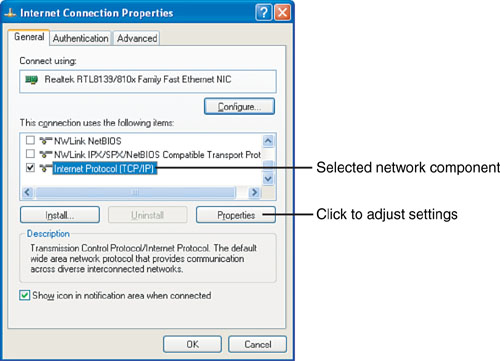
Right-click My Network Places and select Properties.
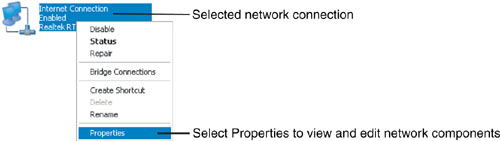
Right-click the connection you are configuring and select Properties (see Figure 12.8).
Scroll through the list of network components to Internet Protocol (TCP/IP) and select it.
Click Properties (see Figure 12.9).
By default, Windows 2000 and XP are configured to obtain an IP address automatically (see Figure 12.10). To change this configuration, click Use the Following IP Address and enter the information requested from your worksheet (see Table 12.3):
IP address
Subnet mask
Default gateway
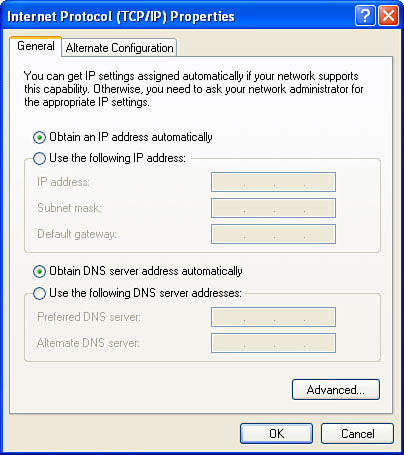
To add the DNS server information, click Use the Following DNS Server Addresses and enter the DNS servers’ addresses from Table 12.3.
Figure 12.10 shows a typical configuration before making changes, and Figure 12.11 shows the same system after adding configuration information.
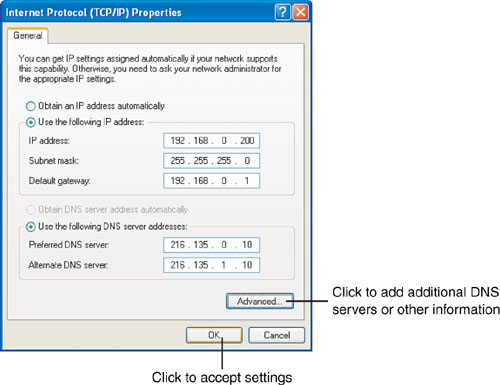
After you’ve clicked OK, you might need to reboot your computer before the settings will take effect.
Just as computers on a home network receive IP addresses from a range of possible addresses provided by a DHCP server, most home broadband Internet connections use a similar type of dynamic IP address provided by the cable or DSL modem. Although you can use a program to see the current public IP address of your home computer or home network (refer to Figure 12.3), the IP address might not stay the same over time. As with any other type of Internet activity, if you enter the wrong IP address into your web browser, you will end up on a different website or resource than you expected or not find any resource at all to view.
There are two ways to make sure that you can always log in to your web server from a remote location:
Ask your ISP to provide a static IP address (one that always stays the same)
Use a dynamic DNS service that supports port forwarding
Many broadband ISPs can provide a static IP address, but this feature is usually standard for business rather than home users. Expect to pay at least $5 more/month for a static IP address if available for your residential service. With a static IP address, you no longer need to use WhatIsMyIP.com or similar sites to determine the public IP address of your web server.
For many users, a dynamic DNS service with port forwarding support is a better deal. How does dynamic DNS work? Dynamic DNS servers provide an always-working link between the changing IP address of your home automation or other web server and an alias provided by the dynamic DNS provider. Instead of entering the IP address:TCP port number to access the web server, you enter the alias provided by the dynamic DNS service. Dynamic DNS routes the request for the web server through the Internet and the router or gateway on your home network to the computer on your home network that is running the web server. If you don’t want to add the TCP port used by your web server to the URL you use to access your home automation system’s web server, use the optional port forwarding services offered by most dynamic DNS service providers. Figure 12.12 illustrates remote access using a dynamic DNS service that supports port forwarding.
Keep in mind that you must configure your router to forward TCP port requests to the IP address used by your home automation program’s web server as discussed in the “Dealing with Dynamic IP Addresses on Your Home Network” section earlier in this chapter.
When you log on to your web server, regardless of whether you’re using another computer on your home network or remotely via the Internet, you can access most of the features of your home automation program through your web browser, as shown in Figure 12.13.

HomeSeer’s web server, shown in Figure 12.13, shows all the devices in your home automation system in all rooms by default. Click All Locations and select a particular location to see only the devices in that location.
You can run events, view a log of activities, or control a particular device interactively through a typical web server. If your home automation system includes web cameras, you can also view video they capture.
If your home automation software does not include a built-in web server, you can use remote access services or remote access software to control your computer remotely. Remote access enables you to perform the following tasks remotely:
Control any program on your PC, not just those that are specifically web-enabled
Run maintenance applications such as defragmenting, disk checking, and antivirus programs
Some also support features such as file transfer between home and remote computers or file synchronization.
There are two ways to add remote access to your home computer:
Purchase and install remote access software
Sign up for a remote access service
Both types of remote access require you to install a host program on your home computer. The host program receives the connection from a remote PC and enables the remote PC to control your home computer. Remote access software programs such as PC Anywhere (www.symantec.com) and LapLink Gold 12 (www.laplink.com) are designed primarily for corporate networking. They are too expensive and complex for most home users, and require that you use a client PC running their client software. For most home users, remote access services are a better choice.
Like a traditional remote-access program, a remote access service requires you to install a host program on your home computer. However, you don’t need to worry about router configurations or IP addresses to use a remote access service. Instead, a secure server operated by the remote access provider tracks changes in your home computer’s IP address and provides a secure connection between your home computer and any remote location with Internet access.
The basic process of configuring a remote access service works like this:
Download and install the server application on your home computer.
Set up the credentials required (password or username/password) in the server’s configuration program.
If you use a software firewall, permit the server application to access the Internet.
Leave the home computer that is connected to your home automation system and your broadband Internet connection (cable or DSL) running.
To access your home computer remotely
Caution
If you use firewall software such as Zone Alarm or Norton Internet Security, the first time you run the server component of a remote access program or service, the firewall program will ask you if it’s okay to allow the server to access the Internet. To allow the server to work, be sure to approve access and to remember your answer. Some servers use more than one program, so you might need to grant access to more than one program.
Start up an Internet connection on a remote computer.
Connect to the remote access provider’s secure login site.
Log in to the service.
Select your PC.
Download a small client when prompted.
Log in to your PC with the credentials you provided when you set up the service.
Figure 12.14 shows a remote connection to my home computer made with LogMeIn Pro, which also offers a free basic remote control version (LogMeIn).

Some of these remote access services also enable you to control one PC on your home network from another PC. Try it to see if it works! Some leading vendors (many of which offer free trials or free limited versions) include
GoToMyPC—. I use this for remote access of my office PCs from home; www.gotomypc.com
I’m in Touch—. Works with PCs, PDAs, and BlackBerry devices; www.01com.com
Access-Remote-PC.com—. The companion RPC Service helps handle dynamic IP addresses; www.access-remote-pc.com
LogMeIn and LogMeIn Pro—. Pro offers file transfer and synchronization; https://secure.logmein.com
RealVNC—. Works with Mac OS, Linux, Windows; www.realvnc.com
WebExPC—. From the developers of WebEx; www.mywebexpc.com
LapLink Everywhere 3/LapLink Secure VNC—. Works with any Java-enabled browser; www.laplink.com
If you are considering a remote access service, keep the following issues in mind:
What operating systems are supported on the server side (the computer you use to run your home automation system)?—. Most remote access services support Windows, but if you use Mac OS or Linux, make sure that you choose a remote access service that supports your operating system.
What operating systems are supported on the client (remote computer) side?—. If you travel frequently and don’t always use your own office or laptop computer, look for remote access services that support any web browser that uses Java. Some support only Windows clients or only Internet Explorer.
Cost per month or per year—. Although a few vendors offer free remote access solutions, most cost anywhere from $100–$150/year. You can most easily cost-justify this if you need the additional features provided with a paid subscription service, such as file transfer or file synchronization.
Some home automation systems that support web servers or use a hardware module can support webcams. Webcams, unlike the video security cameras discussed in Chapter 9, “Using X10 to Provide Security,” are designed to connect to a PC’s USB port or to an ethernet port on a router.
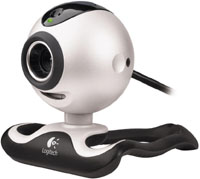
Webcams connected to a PC’s USB port are controlled through the PC hosting them. Depending on the home automation software you use, you might need to add a plugin (sometimes at extra cost) to permit webcam support. Figure 12.15 shows a typical USB webcam, the Logitech QuickCam Pro 4000.
As an alternative to webcams, you can use a video capture card or USB video adapter to connect X10-compatible security cameras. X10’s USB Video Adapter VA11 (www.x10.com/products/x10_va11a.htm) enables you to control a security camera with remote viewing software such as MultiView/WebView, Xray Vision, or PanTiltPro.
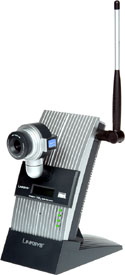
Webcams connected to an ethernet port or via wireless ethernet (Wi-Fi) are known as IP webcams or netcams (see Figure 12.16). These cameras often contain their own web servers for remote access.
Before you purchase a webcam for use with your X10 security system, check with the vendor to determine which types of cameras are supported and how. Many of the vendors listed in the “Discovering Web-Enabled X10 Software Solutions” sidebar earlier in this chapter offer support for USB or IP-based webcams. If the vendor has experience with particular models, those models (if available) are the best choice. Even if you want to use multiple cameras as part of your remote security setup, I recommend you try one camera first before you expand your setup.
When you add Internet access and home networks to an X10-compatible home automation system, you add a lot of complexity as well as a lot of versatility. Use the following sections to help you solve remote access problems.
If you use the integrated web server built in to your home automation software for remote access but you’re unable to access it, check the following:
Do you know the correct address and TCP port to specify?—. To access the web server from another station on your home network, provide the web server’s actual IP address and TCP port (if necessary). To access the web server from a remote location on the Internet, use the public IP address or a dynamic DNS alias.
Can you access the web server from your home network, but not the Internet?—. If you can, you need to configure your router to forward the appropriate TCP ports monitored by the web server to the IP address used by your web server.
Are you using dynamic DNS to access the web server remotely?—. Make sure that you have registered the correct name. You must specify the name you selected at registration. Contact the vendor for help.
Have you correctly specified usernames and passwords in the web server configuration?—. Recheck your user setup.
If you use remote access software or a remote access service to connect to your computer remotely, check the following if you’re having problems:
Have you correctly installed the server application on the computer running your home automation software?—. Check settings, download any available patches or updates, and reinstall if necessary.
Have you configured your router properly?—. If your remote access software requires port forwarding or other nonstandard router settings, make sure that these settings are correct. You might also need to set up your host PC with a static IP address in some cases.
Where does the server get its list of allowable users from?—. Some programs and services use the computer’s default users, but others might require you to specify usernames and passwords. If you use Windows XP on your computer but do not log in with a username, you might need to create a user and use that name and password to log in remotely with some programs and services.
Is your client supported?—. If you can log in from some remote PCs but not others, some PCs might not be using a supported web browser, might not have Java installed, or might not be running a supported operating system. If you plan to use unfamiliar computers in cybercafés, libraries, or other public locations to access your home remotely, make sure that you carry a list of client requirements for your remote access solution and make sure that the client PC meets those requirements.
Is your client software properly installed?—. Make sure that your remote client is installed and properly configured. If you use a remote access service that uses a download-on-demand client, watch out for security settings that might block pop-ups or prevent downloaded applications from being run. If you plan to use public-access computers to remotely control your home computer, you should consider remote access services that offer client software that does not need to be downloaded to run, such as GoToMyPC’s universal viewer client.