The de facto home-automation standard for do-it-yourself home control is X10. More than 5 million homes have X10 devices installed, and more than 100 million X10 devices have been shipped—numbers that far exceed any other home automation technology. As discussed in Appendix A, “Integrating X10 with Other Home Control Systems,” X10 hardware is sold under many brand names. This chapter introduces you to the wide-ranging world of X10 home automation and shows you how easy it is to start automating your home with a typical X10 starter kit.
Although X10 is a simple system to install (as you’ll learn later in this chapter), it can be used to control most electrical appliances in your home, such as the following:
Interior and exterior lighting
Heating and cooling (HVAC) systems
Electrical appliances of all types
Portable heating and cooling devices
Hot tubs and spas
X10 devices can also work with security systems, which include
Alarms
Motion detectors
Security cameras
Using X10 home automation has many benefits:
Control lights anywhere in your home at the touch of a button
Dim and brighten lights on command for an elegant mood when entertaining
Provide safety and security outdoors and indoors with motion-triggered or timed lights and security cameras
Turn on and turn off lights and appliances at random times when you’re out of the house to give your home a lived-in look
Control lights, appliances, and other electrical devices remotely via touch-tone telephone, home network, or broadband Internet connections
Whether you need to improve safety and security, reduce the cost of heating and cooling, put in elegant lighting, or just add convenience, X10 home automation can do it.
As compared to other systems, X10 offers quite a few advantages for home control:
You can install many parts of the X10 system by yourself. You don’t need an electrician to install X10 control for floor or table lamps or for small home appliances.
X10 products are inexpensive: You can purchase an X10 starter kit for less than $30. Control modules for lamps start at less than $15, and modules for use with many other appliances and devices are also reasonably priced.
X10 is a modular system: You can buy what you need when you need it. You can add additional control modules when you want to control additional devices. Although you can save money by purchasing kits from some vendors, you can also buy individual components to customize your home-automation system to meet your exact needs.
X10 can be controlled on a time basis. You can use a Mini Timer to trigger individual devices at specified or random times—wake up to bright room lights instead of a blaring alarm clock.
X10 can be operated remotely. You can control X10 appliances through your telephone by installing a touch-tone controller that connects to your telephone line and your X10 system. You can also control X10 remotely through your home computer if you have a broadband Internet connection.
X10 can be programmed. By using a home computer to interface with your X10 system, you can create macros that can trigger multiple events.
An X10 system has two basic components:
A module that receives signals from the X10 transceiver through your home’s AC wiring and controls the device connected to it. Figure 2.1 illustrates a typical lamp module used with incandescent table or floor lamps. Modules can also be wired into the AC wiring (switches or outlets) or built into a device. Because X10 signals are transmitted through AC wiring, X10 is also sometimes referred to as power line control (PLC).
A controller that sends X10 signals to the module.
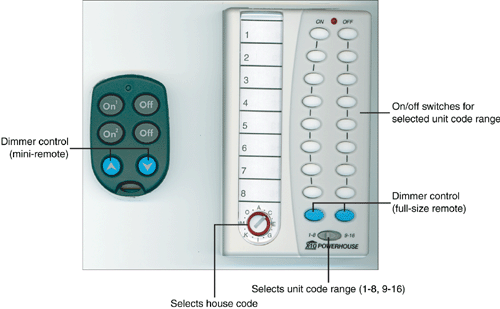
There are three major types of controllers. Many X10 starter kits include a transceiver that plugs into an AC outlet (see Figure 2.2), receives signals from a wireless remote control (see Figure 2.3), and sends X10 commands to the modules.
You can also purchase various types of tabletop controllers that plug directly into an AC outlet (see Figure 2.4). Both types of controllers can be used in an X10 system. You can also use a universal remote control, which sends infrared (IR) and X10 wireless signals. This type of controller can be used with home entertainment devices and X10 home automation systems (again see Figure 2.4).
Figure 2.5 shows how wired and wireless X10 controllers can be used to control X10 modules.
A module has two settings: a house code and a unit code (refer to Figure 2.6). Each module in an X10 network must have a unique unit code, whereas all devices and the controller must have the same house code. When you install X10 modules and a controller, you select the house code you want to use for the system, and select a unique unit for each module.
X10 works over your home AC power lines. In North America, alternating current (AC) current works by fluctuating 60 times a second between 120V+ and 120V-. In other parts of the world, the voltage (240V) and cycle times (50 times a second) are different, but the principle is the same. During the cycle, voltage periodically reaches zero. This zero crossing point is the time window (200 milliseconds long) at which X10 signals are sent and received. An X10 signal is a 5V, 120kHz pulse sent during the zero crossing point. The pulse is coded to carry house and unit codes and commands (on, off, dim, bright).
Surge suppressors interfere with this signal, which is why X10 modules, transceivers, and tabletop controllers should not be plugged into a surge suppressor.
Now that you understand the basic elements of an X10 home-control system and what makes it work, it’s time to show you how to set up a simple X10 system.
Although X10 can be used to control most electrical devices in your home, you can begin your exploration of what X10 can do very simply. I suggest that you start by automating a floor or table lamp and a portable appliance such as a fan. The components in a typical X10 starter kit work with these devices, and you have instant feedback: You’ll see the lights and fan turn on and off at the touch of a button.
The simplest X10 system you can install contains these components:
An X10 controller
One or more X10 modules
The following sections show you how to plan, configure, set up, and test your first X10 home-control project.
Caution

By default, most X10 devices are preset to use A as the house code and 1 as the device code. You should change the default house code to make it more difficult for another user to control your devices. For example, you wouldn’t want a nosy neighbor to turn all your lights on at midnight. (X10, unlike computer-based home networks, doesn’t offer any signal encryption.) Don’t put more than one device on the same device code unless you want them turned on or turned off at the same time.
As you learned in an earlier part of the chapter, the rules for X10 network configuration include the following:
All modules controlled by a single X10 transceiver or plug-in controller must use the same house code. The house code dial is marked with a red rim and has positions from A–P.
The transceiver or plug-in controller must be configured to use the same house code as the modules that it controls.
The remote control must be configured to use the same house code as the transceiver and modules.
Each module you want to control independently must use a unique unit code. These unit codes need not be sequential. The unit code dial is marked with a black rim and has positions from 1–16. If you want two or more devices to work with a single command, you can assign each of them the same unit code. Even if you are starting out with just a lamp module or two in your X10 configuration, you should record your X10 configuration using a simple chart like this:
House code B
Lamp module unit code 2
Appliance module unit code 3
Transceiver unit code 1
Most wireless remote controls and tabletop controllers have a space for recording unit codes and module descriptions, or you can put your notes on removable tape.
To configure your X10 devices, follow this procedure:
After you’ve decided what house code and unit codes to use, use a coin or small straight-blade screwdriver to set the house code and unit codes on each device.
Make sure that the lamp or other device you want to use is turned on.
Plug a lamp into a lamp module; plug a lamp or other device into an appliance module.
Plug the lamp or appliance module into an AC wall outlet.
If you use a transceiver and you want it to control another lamp or an appliance, plug the lamp or appliance into the transceiver. Check the transceiver’s amperage rating (see rear of module) to determine what you can plug into the transceiver. Check the documentation to determine what unit code(s) it supports.
Set the house code (and unit codes, if necessary) on your remote control or tabletop controller. Some remote controls, such as the larger one shown in Figure 2.3, use a round dial for house codes and have preset buttons for unit codes. Other remote controls, such as the small keychain remote also shown in Figure 2.3, store house and unit codes in battery-backed memory. Keep in mind that you must reprogram the house and unit codes when you replace the battery in a keychain remote. A tabletop controller also has preset buttons for unit codes.
Figure 2.7 illustrates correctly and incorrectly configured devices.
To test your first X10 installation, do the following:
Make sure that the lamp or appliance plugged into each X10 module or transceiver has its on/off switch turned on.
Make sure that the transceiver or tabletop controller is securely plugged into an AC outlet.
Press the On button corresponding with the unit code of the device to turn it on. If you use a tabletop controller that utilizes separate unit codes and On/Off buttons, press the unit code button and then the On button to turn on the device.
If the device doesn’t come on, make sure that the switch on the device is set properly. For example, a three-way lamp might be turned off, or on low, medium, or high. If the device is turned off, refer to the “Local Control and X10” sidebar earlier in this chapter.
When the lamp or other device comes on, congratulate yourself. You’ve entered the world of X10 home automation!
If you’re having problems with your first X10 installation, check the following:
Make sure that you are using the same house code on all modules and controllers (tabletop, transceiver, remote) in your system.
Make sure that you know which module is set to a particular unit code.
Make sure that the house and unit code dials are turned to the desired position. For example, a dial set partway between house codes A and B, or between unit codes 1 and 2 isn’t going to work.
If you use a keychain remote, make sure that you follow the directions for configuring it. Instead of using house and unit code dials, you must push buttons in particular sequences to store the house and unit codes you want the keychain remote to control. If you have problems, remove and replace the batteries to purge onboard memory and start over again.
Make sure that the transceiver or plug-in controller is plugged securely into the AC outlet (not a surge suppressor).
Try a different outlet for the transceiver or plug-in controller if you can’t control some or all of your modules.
If one particular device won’t turn on when commanded, it might be turned off with its own on/off switch. Refer to the “Local Control and X10” sidebar earlier in this chapter for help.


