
15. Mixing
• Use Audition to help test your room acoustics and determine its suitability for creating accurate mixes
• Review tracks for glitches or other issues prior to mixing
• Change a song’s arrangement through mixing and remixing techniques
• Optimize tracks to mesh well together using effects
• Take into account artistic considerations in mixing
• Set up the mixing environment for an efficient workflow
• Use automation in the Mixer view to record and edit your fader, panning, and other moves as you perfect each component of a mix
• Create clip groups
• Add a fade-out using the Master Track
• Export the completed song in a variety of formats
• Burn an audio CD of the completed song
Creating a mix is an art and a science. Audition’s Mixer view combined with automation, long-throw faders, the ability to detach the mixer and “float” it on another monitor, and various other crucial tools help create the mix. You can then save it in a variety of file formats (including MP3 for uploading to the web), as well as burn an audio CD of the final stereo mix.
About mixing
After recording your parts and doing any overdubs, you’re ready for the next step: mixing and ultimately, mastering and publishing/distributing your project. Reduced to its basics, mixing simply means adjusting the levels, tonal balance, stereo or surround placement, and adding effects as needed to create a wonderful sonic experience.
However, part of mixing is making numerous value judgments. Which instrument should be most prominent at any given time? Do you want to mute some sections that seem redundant? Which is more appropriate—a raw, in-your-face sound or a smooth, well-produced sound? Do you want a massive guitar timbre or something that shares its space with other instruments? Who is your target audience?
How successfully you answer these types of questions determines the success of your mix. Mixing is a combination of art—being able to judge what sounds good—and science, knowing what technologies and processes will produce the sounds you want. This lesson covers both aspects.
Note that there are as many ways to approach mixing as there are people who mix, so consider the information in this lesson as guidelines, not rules.
Testing your acoustics
Any effort you put into mixing means nothing if your monitoring system—which includes your hearing, the room’s acoustics, the amp and cables that drive your monitors, and the speakers—aren’t accurate. If you’ve ever done a mix that sounded great on your system but sounded wrong when played elsewhere, you’ve experienced what can go wrong with the monitoring process. A good mix should be able to “translate” over a wide variety of systems.
Fortunately, Audition provides tools you can use to do some basic diagnostic tests on your listening environment prior to mixing.
1. With Audition open, navigate to the Lesson15 folder, open the TestTones folder, and then open the file 100Hz_SineWave.wav.
2. Start with your monitoring system’s volume control full off, and then click the Transport Play button.
3. Slowly turn up the monitoring system’s volume to a comfortable listening level.
Tip
Placing large, acoustically treated tubes called bass traps in the corners of a room can help even out the bass response.
4. Walk around the room and listen. In an untreated acoustical space, there will be places where the sound gets louder and others where it gets softer. This is because the sound waves are reflecting around the room and interact with each other to cause peaks and cancellations.
5. Now navigate to the Test Tones folder and open the file 1000Hz_SineWave.wav.
Tip
Acoustical diffusion and absorption panels can improve high-frequency response and smooth out the midrange response to create a more accurate monitoring environment.
6. Again, walk around the room and listen. You’ll probably note that in some places the sound will become very quiet if you reach a “null point” in the room where the sound waves cancel.
7. Navigate to the Test Tones folder and open the file 10000Hz_SineWave.wav.
8. If you can’t hear this tone, consult an audiologist. Otherwise, walk around the room and listen. Because high-frequency wavelengths are so short, there will be even more peaks and cancellations than with the other frequencies.
Note
Even acoustically treated rooms will have some anomalies. The most important aspect to check is that you do not hear significant null points in these waveforms at your mixing position.
Testing for phase
Before doing any mixing, it’s good practice to make sure your system’s audio is in phase. For example, if the wiring to one speaker is reversed compared to the other speaker, its cone will push while the other cone pulls. This causes cancellations.
1. With Audition open, navigate to the Lesson15 folder, open the TestTones folder, and then open the file 100Hz_OutOfPhase.wav. Also make sure the file 100Hz_SineWave.wav file is loaded in Audition.
2. Use the Waveform Editor’s drop-down menu to select the 100Hz_SineWave.wav file. Click Play and listen for several seconds.
3. Use the Waveform Editor’s drop-down menu to select the 100Hz_OutOfPhase.wav file. Click Play and listen for several seconds. If this test tone is quieter than the 100Hz_SineWave.wav file, your system’s stereo channels are in phase.
Creating your own test tones
The three test tones you listened to are fairly standard choices in terms of frequency. However, you might want to create your own test tones to test the low-frequency response of your speakers, the upper limit of your own hearing, how your room responds to frequencies other than the frequencies you just tested, and so on.
1. With Audition open to the Waveform Editor, choose File > New > Audio File.
2. Name the file 20Hz_LowsTest, choose the sample rate and bit depth (leave Channels set to Stereo), and click OK.
3. Choose Effects > Generate Tones.
4. Specify the test tone’s characteristics. The crucial ones are Shape (Sine), Modulation Depth (0), and Base Frequency (the frequency you want to create). Amplitude will typically be -6 to -10dB. Duration doesn’t really matter if you toggle the Loop button on.

5. Click the dialog box Play button to hear the tone.
Tip
Being able to change the Base Frequency and then click the dialog box Play button is helpful for testing. For example, to check out a speaker’s low-frequency response, start with a Base Frequency of 50Hz, and then click Play. If you can hear that, enter 40Hz and click Play; continue lowering the Base Frequency until you find the frequency where the speaker can no longer reproduce the bass.
6. Close Audition without saving anything in preparation for the next lesson.
The mixing process
Mixing involves several distinct stages, which is what we’ll cover next. Again this is subjective view of mixing, but you’ll find most mixes proceed along the same general trajectory.
The project you’ll be mixing is intended to create background music for a 60-second, narrationless kiosk video that will fade out at the end. You’ll be working with very basic tracks that you will arrange (“remix”) as well as do more traditional mixing. Digital audio editors facilitate remixing where the mix engineer makes decisions about not just the mix, but the arrangement as well. In addition to pop music remixes, this can happen with audio for video where, for example, a single piece of music is arranged for 15-second, 30-second, and 60-second spots.
Preparation
Before mixing, it’s important to do a little “mix environment housekeeping.”
1. With Audition open, navigate to the Lesson15 folder, open the Mixdown folder, and then open the file Mixdown.sesx.
2. Right-click (Control-click) in the timeline and choose Time Display > Bars and Beats.
3. Right-click (Control-click) in the timeline and choose Time Display > Edit Tempo. Enter a tempo of 128 beats/minute, with a Time Signature of 4/4 and a Subdivisions value of 16. Click OK.
4. Right-click (Control-click) in the timeline and choose Snapping > Snap to Ruler (Coarse). Also make sure Snap to Markers and Enabled are selected, but deselect any other Snapping options for now.
5. Arrange your workspace for mixing. The most important panels are the Multitrack Editor, Mixer (in the same tabbed frame), Effects Rack, Markers, Selection/View, Time, and Levels meters.
6. If you come up with a particularly good workspace for mixing, consider creating a new workspace. Choose Window > Workspace > New Workspace; when the New Workspace dialog box appears, enter the name Mixing (or a similar name), and then click OK.
Reviewing the tracks
Before you start moving any faders, listen to each track in isolation in case there are any glitches, hum, noise, or other issues that need to be fixed prior to mixing. Using headphones for review can make it easier to hear subtle issues you might miss over big speakers.
1. Return the playhead to the beginning of the Session. Click the Solo button for the first track (Drums), and listen to it all the way through.
2. Because there aren’t any issues that need attention prior to mixing, return the playhead to the beginning of the Session. Deselect this Drum track’s Solo button, and click the Solo button for the second track (Bass). Listen to it all the way through.
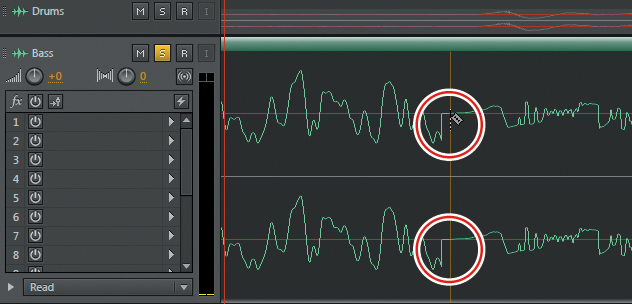
3. There’s a click at the beginning of measure 17 that needs to be eliminated. Drag the playhead to measure 17, and click Zoom In repeatedly until you can see the reason for the click. You’ll also want to extend the Bass track’s height.
4. There’s an abrupt transition at measure 17; adding a short fade can fix that. Click the Bass clip to select it, and then choose the Razor Selected Clips Tool from the top toolbar. Place it just after the abrupt transition, and then click to split the clip.
5. Choose the Time Select tool and click the left Bass clip. Click the Fade Out handle, and then drag to the left until around the next zero-crossing (i.e., where the waveform crosses the red centerline), as well as slightly down to a Cosine value of -25.
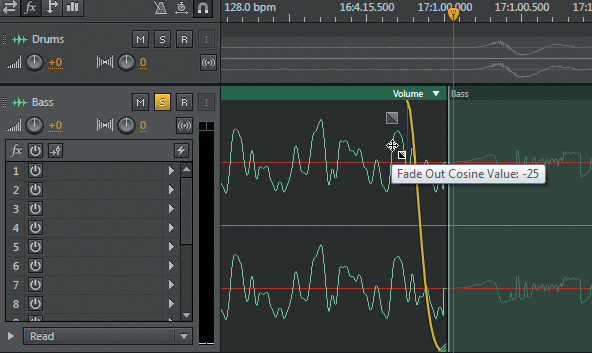
Note
If the Fade Out curve is set to Linear, hold down the Ctrl (Command) key while moving the Fade Out handle to toggle to the Cosine option. Either option will work in most situations requiring a fade, but Cosine can sound a tiny bit smoother.
6. Click the Zoom Out Full button, place the playhead before measure 17, click Play, and verify that the click is fixed.
7. Continue soloing and auditioning each track to look for more glitches (spoiler alert: there aren’t any more) and also to become familiar with the tracks that make up the mix. Note that the tracks Wood Percussion, Bounce, Lead Synth, Lead Guitar, and Pad don’t make any sound until measure 17; to save time, you don’t need to listen to the first 16 measures.
8. Deselect the last Solo button you enabled. Keep Audition open in preparation for the next section.
Making arrangement changes
The lead parts start at measure 17, so the song can logically be divided into two sections. The first 16 measures lead into the song and build, and set the music up for the “payoff”—the lead parts that carry the song to the end.
Currently, the Drums, Bass, 12-String Synth, and Rhythm Guitar tracks all play continuously for the first 16 measures, which doesn’t build much. You can make the song more dramatic by modifying the arrangement so that the first 16 measures build over time. This involves value judgments about what would make the most effective beginning, so consider the following possible variation.
1. It’s always dramatic to have drums come in after the song has already started. Click the Drums clip to select it, and then position the Time Selection tool over the clip’s left edge so it becomes a Trimmer tool. Click and drag inward (right) to the beginning of measure 9.
2. The 12-String Synth part flows well and makes a good intro to the song. The bass seems sort of heavy, so you can delay its introduction for a more dramatic entrance. Click the left Bass clip (remember, we split it to fix a glitch) and use the Trimmer tool to drag the beginning of the Bass part to measure 5.
3. The rhythm guitar isn’t necessary yet, so click the Rhythm Guitar track to select it, and then use the Trimmer tool to trim its beginning to measure 9. Now it will come in with the drums.
4. Return to the beginning of the song, and then click Play to hear the song so far.
5. The bass comes in a little suddenly; it might be preferable to have a short lead-in. Position the playhead at measure 5, and then zoom in to see the first few notes in the beginning of the clip. Use the Trimmer tool to extend the beginning of the Bass clip back to measure 4, beat 3 (4:3).

6. Position the playhead before 4:3 and start playback. You’ll hear a slight click on the bass part at 4:3 because there’s an abrupt transition from silence to the bass note. Click the Fade In handle, and add a very short fade-in (e.g., don’t drag the Fade In handle any farther to the right than 4:3:01).
7. Most drummers use a fill to lead in to their part; unfortunately, no lead-in was recorded prior to where the drum beginning was trimmed. However, if you recall from listening to the Drum track, there’s a good fill starting at measure 16. Position the playhead just before measure 16, and then click Play to verify that there’s a fill there.
8. Let’s steal that fill and use it at the beginning. With the Time Selection tool, click the Drums clip to select it, and then click at measure 16 and drag right to measure 17 to define measure 16 as a selection.
9. Choose Clip > Split to isolate this selection, and then Alt-click (Option-click) on the Drum clip’s header. Drag the copy left so it starts on measure 8.
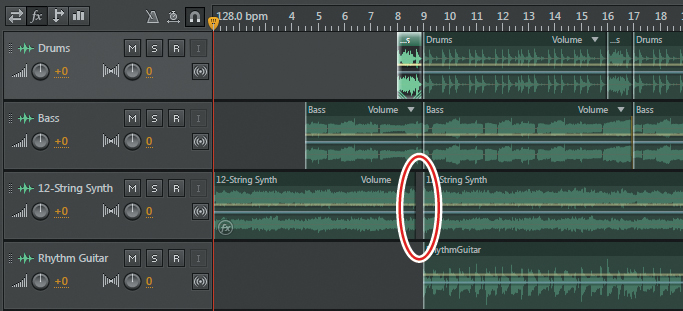
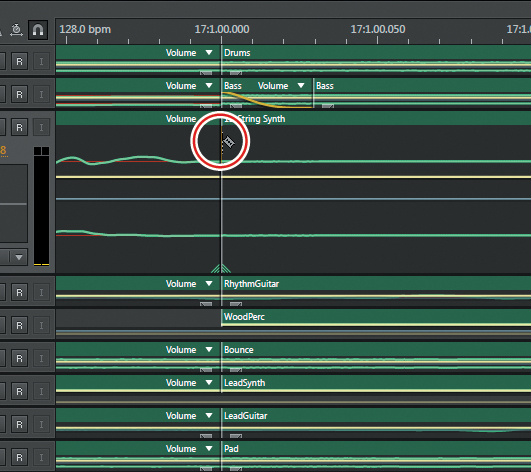
10. To emphasize the last beat of the drum fill, use the Time Selection tool to create a selection from 8:4:0 to 9:1:0 (you’ll probably need to zoom in so that snap can be active for this). Select the 12-String Synth clip, and then choose Clip > Split. Click the header of the 12-String Synth note you just clicked, and press Delete. Now the 12-String Synth part is silent for the beat just before measure 9.
11. Position the playhead back at the beginning of the song, click Play, and listen up to measure 17 or so. This arrangement is far better than just playing the four tracks at the same time—and nothing else (levels, panning, effects, etc.) has been adjusted yet.
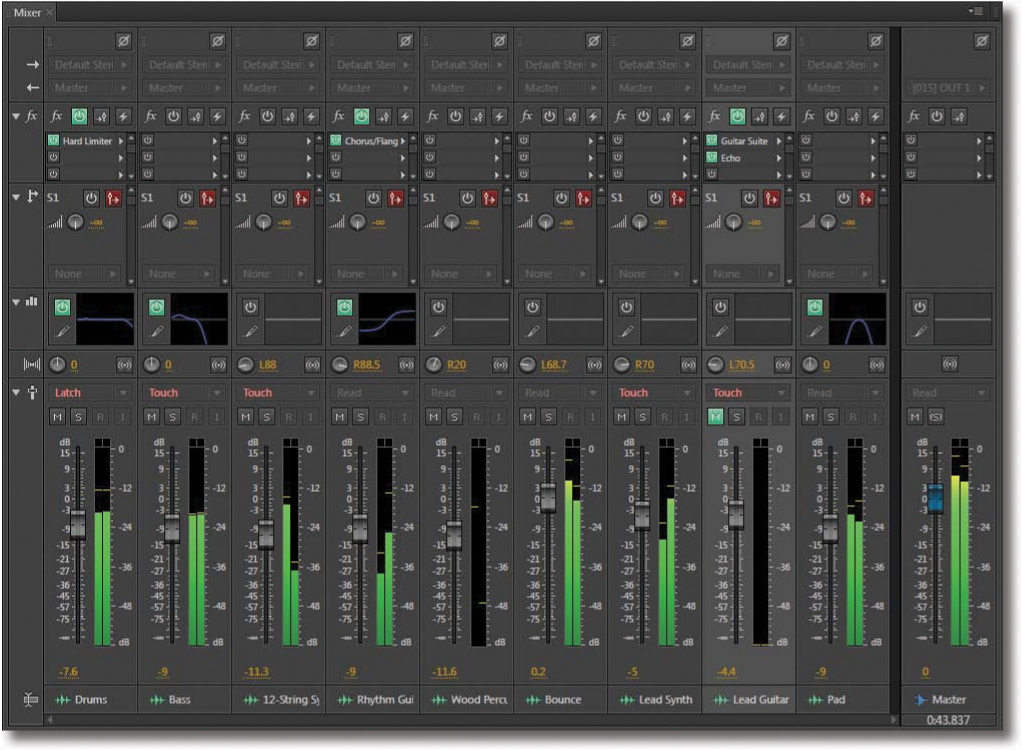
12. Note that the Master Track Output is overloading. Now would be a good time to lower all the track levels before the mixing process actually starts, because doing a major level change while mixing might unbalance the mix. Click the Mixer tab in the Multitrack Editor frame, and set all the track faders to -9.5dB. Don’t adjust the Master Track Output Volume to compensate for the reduced level: If you want it louder, turn up your monitoring system’s level. You want to keep the Master Track Volume as close to 0 as practical and use it only at the end to make any final output adjustments (if necessary).
13. Click the Multitrack Editor tab to continue working on the arrangement.
14. Listen to the first 16 measures. Aside from the drum fill at measure 16, the parts are pretty constant from measures 9 through 17. This would be a good space to bring in short pieces of some of the later parts as “teasers.”
15. With the Time Selection tool, or by dragging the selection In and Out point handles, select all of measure 17.
16. Click the Wood Percussion clip to select it, and choose Clip > Split to isolate measure 17.
17. Alt-click (Option-click) this isolated clip’s header, and drag the copy left so it starts at measure 11.
18. Create two more copies. Start one at measure 13 and the other at measure 15.
19. Start playback from before measure 11. You probably won’t hear the wood percussion part very distinctly, because the other parts are louder. These will become more prominent during the level-setting process.
20. Keep Audition open in preparation for the next lesson. If you want to hear what this arrangement sounds like, listen to the file SongArrangement.wav in the Lesson15 folder.
Optimizing tracks by using effects: drums and bass
The first part’s basic arrangement is complete (notwithstanding any final tweaks you might make as the song develops further); you can change the second part’s arrangement during the rest of the mixing process. Next, you’ll turn your attention toward optimizing the sound of the various tracks with effects.
How you do this, as well as modify other aspects of the mix, will depend largely on the music’s intended application. If there will be a voice-over, the music will probably need to be more subdued to provide a “bed” for the voice. On the other hand, to accompany a kiosk video with no narration, you might want a more attention-getting mix.
1. Solo the Drums track, and then select measures 9–17 because all instruments in the beginning play in that section. Click the Transport Loop Playback button or press Ctrl+L (Command+L), and then start playback. The drums sound a little muffled and could use more “punch.”
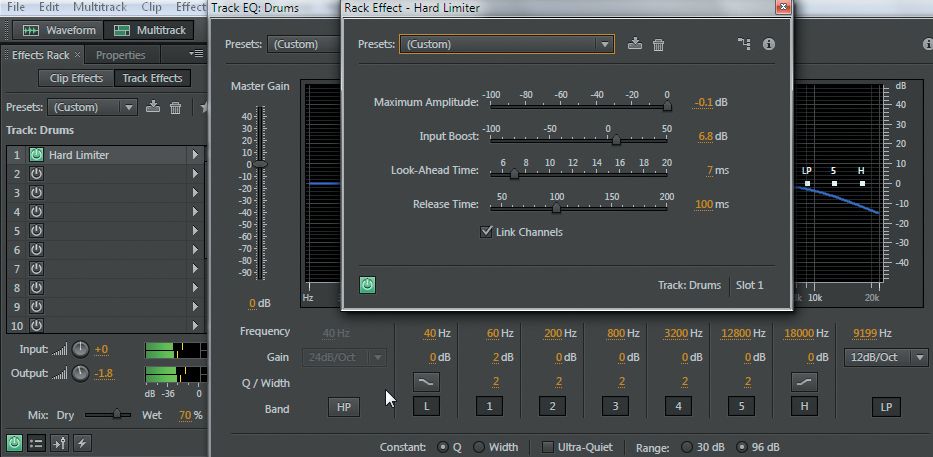
2. Click the Multitrack Editor’s fx area. Click the first insert’s right arrow and choose Amplitude and Compression > Hard Limiter. From the Presets drop-down menu, choose Default.
3. Increase the Input Boost to 6.8dB. Toggle the Hard Limiter’s power state button to hear how the processing gives the drums more presence and an “in-your-face” characteristic.
4. Set the Effects Rack’s Mix slider to about 70%. This mixes in some of the more percussive peaks from the unprocessed sound with the hard limited sound. (If you can’t see the Mix slider and Input/Output controls and meters, click the Toggle Input/Output Mix Controls button to the right of the Effects Rack’s master power state button.)
5. The limiting brings out the cymbals a bit too much, and it would be good to have more “thud” with the kick. Click the Multitrack Editor’s EQ area; extend the Drums track height if needed to see the EQ area.
6. Click the pencil icon to open the EQ’s interface. From the EQ’s Presets menu, choose Default.
7. Enable the LP band, and choose 24dB/octave. For Frequency, choose around 9200Hz. This tames the highs.
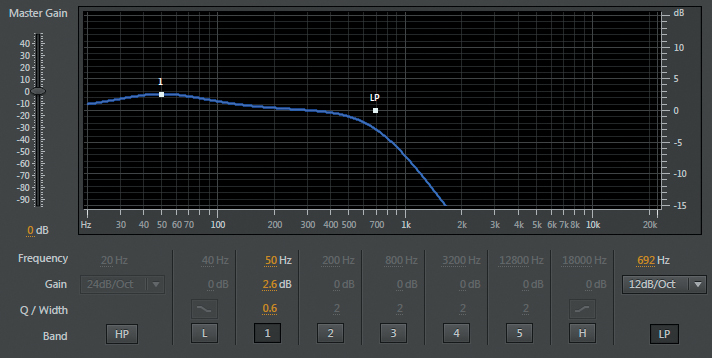
8. For more kick, set Band 1’s Frequency to 60Hz, Gain to 2dB, and Q to 2. The drums sound less thin and much beefier.
9. Now turn off Solo for the drums, and solo the bass. This instrument has the opposite problem: The bass is too aggressive and present, so you’ll make it smoother and rounder.
10. With the EQ area still showing, open the Bass track’s EQ section.
11. Enable the LP section, set Gain to 12dB/octave, and Frequency to about 700Hz. This reduces the brightness. To make the bass “rounder,” set Band 1’s Frequency to 50Hz, Gain to 2.6dB, and Q to 0.6.
12. Now solo the Drums so you hear the Bass and Drums tracks simultaneously. Turn off the Bass track EQ’s power state, and you’ll hear how the bass timbre gets in the way of the drums.
Optimizing tracks by using effects: rhythm guitar
The Rhythm Guitar and 12-String Synth complement each other. The Rhythm Guitar is more percussive, and the 12-String Synth is more legato. They’ll likely end up panned to opposite channels, but the guitar sound is too bland; it won’t hold its own against the 12-String Synth. You’ll use processing to fix that.
1. Solo the Rhythm Guitar track. It needs to sound more shimmering and bright but also less muddy—like the sound on the early Police albums.
2. Open the Rhythm Guitar’s track EQ from the EQ area.
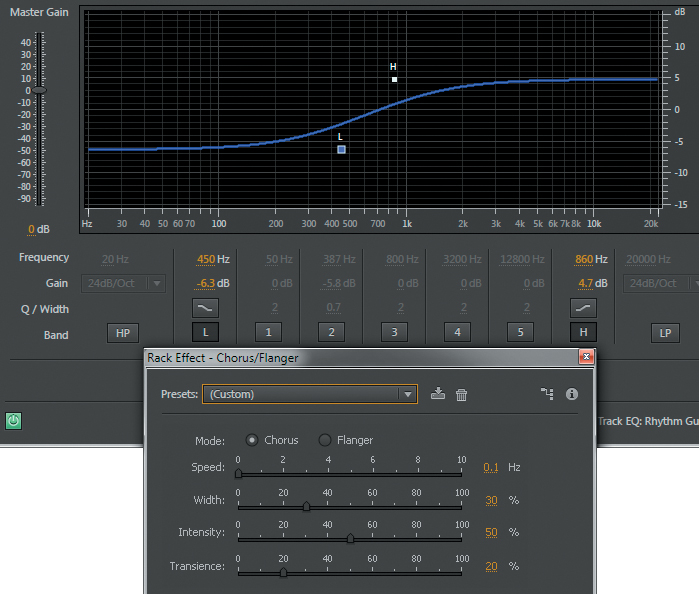
3. Set the L band around 450Hz, Gain to -6.3dB, and Q to the more shallow slope. Set the H band around 860Hz, Gain to 4.7dB, and again set the shallow slope for EQ.
4. The EQ took care of the lack of brightness and excess bass. To add a shimmering, animated quality to the sound, click the right arrow in the first insert of the Rhythm Guitar track’s Effects Rack and choose Modulation > Chorus/Flanger. From the Presets drop-down menu, choose Default.
5. Change the Speed parameters to 0.1Hz, and Width to 30%.
6. Now solo the 12-String Synth and Rhythm Guitar. Having both of them play at the same time is somewhat cluttered, but this can be addressed with levels and panning.
Optimizing tracks by using effects: pads
A pad tends to be a fairly sustained, background sound designed to fill in some of the space in a piece of music and provide a “bed.” Pads can be bright and thin, bassy, mostly midrange, or whatever is required to fulfill their function. The pad in this song needs to be tamed, which can be done with EQ.
1. There are three background tracks featured in the second half of the song—Wood Percussion, Bounce, and Pad. Solo those three tracks and nothing else.
2. Unsolo the Pad track, and note how Wood Percussion and Bounce sound much more percussive—the pad fills in the background too much.
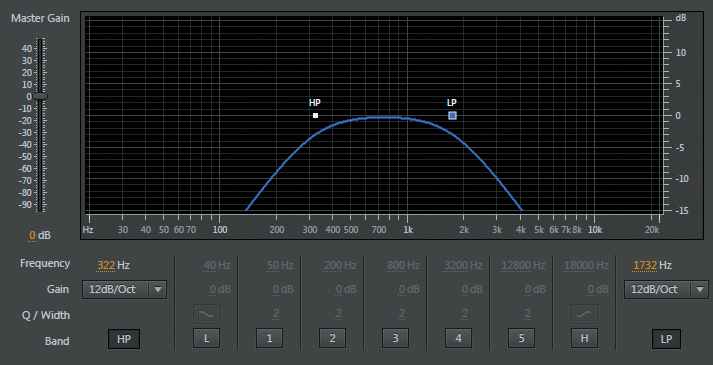
3. Open the Pad track’s EQ from the EQ area. Turn of all Bands except HP (set it to around 300Hz with 13dB/Octave gain) and LP (set it to around 1700Hz, also with 12dB/Octave gain). Note how this makes the pad subservient to the Wood Percussion and Bounce.
Optimizing tracks by using effects: lead guitar
Two lead tracks remain, Lead Synth and Lead Guitar. Because they’re essentially doubling each other, it’s probably best for them to trade back and forth during the final mix. However, the Lead Guitar needs some serious processing in order to cut through the mix.
1. Unsolo all tracks and solo the Lead Guitar.
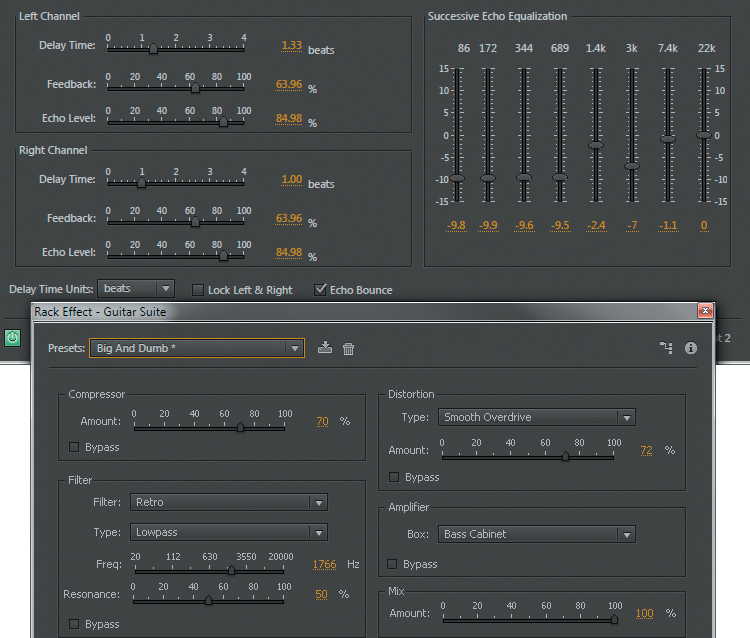
2. Click the right arrow in the first insert in the Lead Guitar track’s Effects Rack and choose Special > Guitar Suite. From the Presets drop-down menu, choose Big and Dumb.
3. Deselect the Filter Bypass. Change Frequency to around 1700Hz and Resonance to around 50%.
4. Click the right arrow in the second insert in the Lead Guitar track’s Effects Rack and choose Delay and Echo > Echo. From the Presets drop-down menu, choose Default.
5. Change Delay Time Units to Beats and select Echo Bounce. For the Left Channel Delay Time, type in 1.33 beats. For the Right Channel Delay time, type in 1.00 beats.
6. Toggle the Guitar Track Effects Rack’s power state button to compare the sound before and after processing. That’s quite a difference!
Setting up the mixing environment
Now that the sounds are dialed in, it’s time to set up levels and stereo imaging. Note that all of these edits are interactive: You might find while setting levels that you need to go back and tweak EQ on a track or delete a track altogether.
1. Let’s create some markers so it’s easy to get around in the song. If any part of the song is selected, click in the waveform (outside the selection) to deselect it.
Note
If you find it difficult to place the playhead exactly on the measure, you can type in the desired value in the Markers panel Start field—for example, 16:1.00.
2. Place the playhead at the beginning and press M. In the Markers panel name this marker Start.
3. Place the playhead at measure 16 and press M. In the Markers panel, name this marker Solo Start. It’s set one measure before the solo starts on purpose, so you have a one-measure “count-in” before you reach the start of the solo.
4. Place the playhead at measure 24 and press M. In the Markers panel, name this marker Solo Halfway. Again, this is one measure before the actual halfway point.
Tip
If you have a two-monitor display, you can float the Mixer to one of the displays while keeping the Multitrack Editor open in the other.
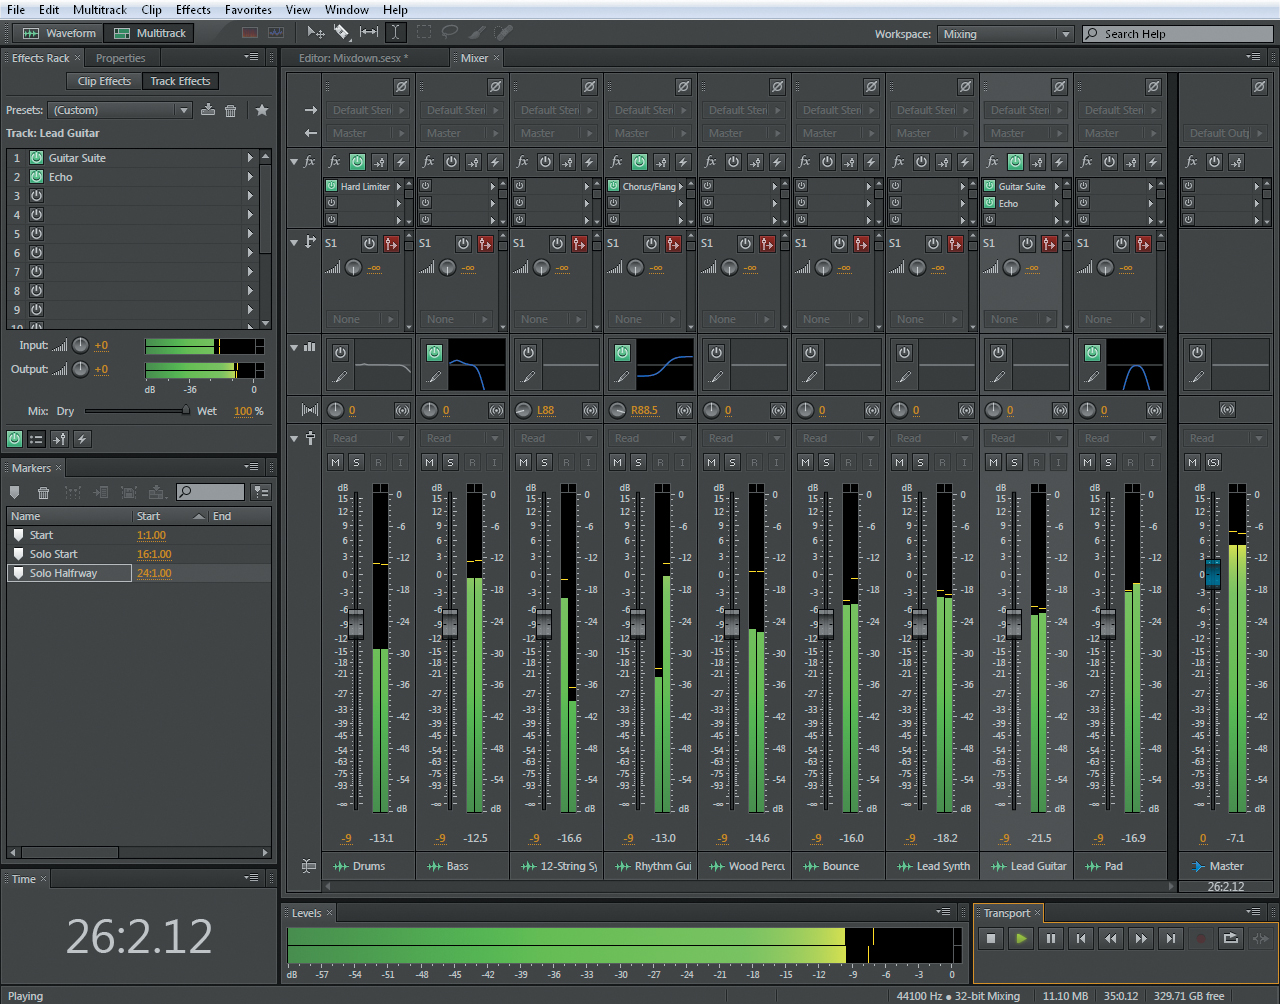
5. Click the Mixer tab, because that environment is optimized for what you’re about to do next. Expand all the Mixer disclosure triangles, and if possible, expand the Mixer panel so you can see all tracks and the Master Track at the same time.
6. Choose Window > Transport to make it easy to get around while in the Mixer environment. Docking it next to the Levels panel is one possible place to put it. Check that all the track levels are at -9.5dB (or -9dB; it doesn’t matter as long as they’re consistent) and the mixing environment is now ready.
Setting levels and balance
Until now, all the tracks have been centered in the stereo field and all levels have been the same. Starting without stereo placement makes it apparent which tracks conflict with respect to frequency response; this might not be obvious when tracks are panned oppositely. In other words, if the music sounds “open” and distinct with all the parts centered, it will sound even more open and more distinct once you start working with the stereo placement. The reason for keeping levels the same is to establish a baseline level, which can then be altered during mixing.
You’ll start by mixing the introduction, in other words, the section up to measure 17.
1. Double-click the Start marker, click the Transport Play button, and just listen to the introduction.
Tip
Remember that you can right-click (Control-click) the Transport Play button and choose Return Playhead to Start Position on Stop. This can be helpful when you’re mixing the introduction and want to return to the beginning.
2. Pan the 12-String Synth to around L88, and pan the Rhythm Guitar to around R88. These will “bookend” the centered Drums and Bass tracks.
3. Listen again. It’s good that the 12-String Synth starts off strong, because nothing else is playing. But it needs to come down a bit when the bass comes in and also because it will be too loud compared to the rhythm guitar when it enters. So, start playback, and when the bass comes in, move the 12-String Synth channel’s fader down to around -11dB (check the yellow number just below the fader in Mixer view) so it hits that level before the drums come in. Practice this “move” a couple times to get a feel for how the fader responds.
4. When you have the move down, write it as automation. In the 12-String Synth Track, set the Automation drop-down menu to Latch. You can then write your move, and when you stop, the level will remain at -11dB (or wherever you left it).
5. Return the fader to -9 or so, and click Play. Make your fader change at the appropriate time, and click Stop when you’ve completed the move. Change the 12-String Synth automation drop-down menu to Read, so you don’t write new automation by accident.
6. Now automate the drums. They seem a little soft overall, so they should end up around -7.6dB. But they should also come on strong during the opening fill. Practice starting with the Drums track at -6dB and then bringing it down to around -7.6dB when the rhythm guitar comes in. Bring it up to -6dB again during the fill that happens at measure 16. Then reduce it to -7.6dB or so when measure 17 starts. Practice this move a few times.
7. When you’re ready, set the Drums track automation drop-down menu to Latch, and do your automation. Click Stop when you’ve completed the move, and change the Drums automation drop-down menu to Read.
8. Jump ahead to the two leads and let’s automate them as well, because the plan is to trade off between the two leads. Double-click the marker Solo Start.
9. Pan the Lead Synth to R70 and the Lead Guitar to L70. The reason for this choice is so the Lead Guitar is in the opposite channel from the Rhythm Guitar, and the Lead Synth is in the opposite channel from the 12-String Synth. This helps differentiate the instruments.
10. Automate the Lead Guitar first. Start with it at around -4.4dB (after all, it is the lead). Then just before measure 21 starts, click the Mute button. Leave Mute enabled until just before measure 25, and then turn off Mute to hear the Lead Guitar again. Leave Mute off, because both leads will play at the end.
11. Practice this move until you have it down, and then set the Lead Guitar automation drop-down menu to Latch. Click Play and do your automation moves. When you’re done, click Stop, and set the automation drop-down menu to Read.
12. Now practice the Lead Synth automation moves. This time you can’t use the Mute button because the lead plays continuously. So, start with the Lead Synth fader all the way off, and then fade it from 0 to -3.9dB during measure 20. Bring it back down again at measure 25. At measure 29, bring it up to about -7.5—loud enough to support the other lead but not compete with it.
13. Once you have this move rehearsed, set the Lead Synth automation drop-down menu to Latch, click Play, and do your automation moves. When you’re finished click Stop, and set the automation drop-down menu to Read.
Note
If you don’t get your automation moves right or get them only partially right, set the track’s automation drop-down menu to Touch. Any new moves you make will overwrite old ones as soon as you click on the fader and revert to the older moves when you release the mouse button.
14. Now try some dynamic automation with the Wood Percussion track. Leave it parked around -15dB when the leads are playing notes, but in the spaces where the lead note just sustains, bring the Wood Percussion up to around -3dB to add an accent. Perform the same routine as before: Practice, choose Latch, click Play, make your moves, click Stop, and change the automation drop-down menu to Read.
15. Bring in the Bounce track to support the Lead Synth track. Pan it opposite to the Lead Synth at L70. Leave it around -15dB, but bring it up to around 0 whenever the Lead Synth is playing.
16. Double-click the Start marker, and listen to what you have so far.
17. You need to complete two more tweaks: Some Wood Percussion bits existed before the solo started, but you couldn’t really hear them. Set the Wood Percussion automation to Touch and the playhead back to the beginning of the song. Click Play, and then bring the Wood Percussion fader to -6. Leave it there until the solo starts, and then click Stop. Leave the automation on Touch.
18. Pan the little Wood Percussion bits in the beginning. Click Play, and move the Wood Percussion track’s Panner knob all the way to the left before measure 11. During measure 12, move the Panner knob all the way to the right. During measure 14, move it all the way to the left again. When the solo starts, keep moving it around to add some motion to the Wood Percussion part that plays in the spaces between solos.
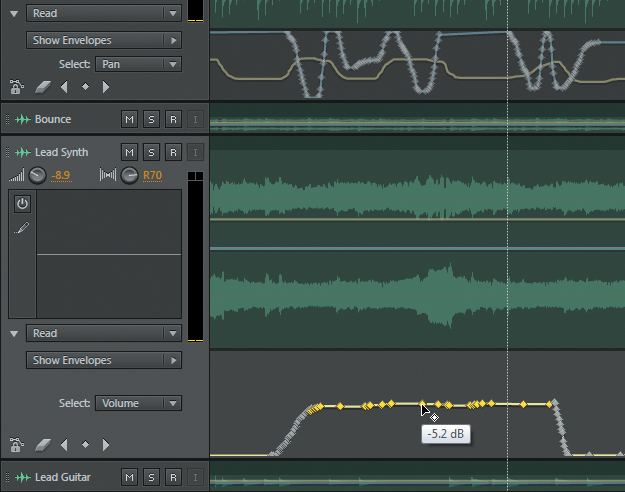
19. Click the Multitrack Editor tab, and extend the Track Height of a track where there’s automation, like the Lead Synth part. The first time the volume was raised was a little too much, so in the Select field choose Volume (if it isn’t already chosen), click the first keyframe of the section you want to change, Shift-click on the last keyframe in the section you want to change, and adjust the level as desired by dragging the envelope down a bit. In some cases, this is faster and/or a more precise method than trying to repeat the automation moves in Touch mode.
20. After you’ve finished your mix, keep the project open because you’re about to get a phone call.
Using Groups
You’ve finished your mix, automated your moves, and played the song over the phone to the clients who commissioned the soundtrack. Then the phone rings: They love it, but the video was extended to 1 minute 30 seconds, so they ask if there is any chance you could add the last part using the song’s rhythm track, but without the leads, and have a long fade from 1:15 to 1:30?
In this situation you can separate just the section after the solo section begins with the Razor tool, group all the separated clips together except for the leads, and then copy the group to extend the song.
1. Choose the Razor Selected Tracks tool (or press R).
2. Zoom in on measure 17 where the solo begins, and extend the height of one of the clips so you can see the waveform. The Razor Selected Tracks tool must be inside a waveform in order to snap.
3. Position the Razor Selected Tracks tool so you can see the line it creates at 17:1.00.
4. Press Ctrl+A (Command+A) to select all tracks. The Razor Selected Tracks tool will split any tracks that are selected.
5. Select the clips you want to group, either by drawing a marquee around them and/or Ctrl-clicking (Command-clicking) to add or subtract clips from the group.
Note
Groups can be treated like an individual clip. You can move, copy, paste, or delete a group. Each copy of a group has a unique color. Groups also act like an individual clip in terms of mute, lock, loop, and other clip attributes: Applying an attribute applies it to the entire group. You can also choose Clip > Suspend Group if you want to make changes to an individual clip within a group, such as when you drag-copy a particular clip out of a group.
6. With the clips to be grouped still selected, choose Clip > Group Clips. The group turns a different color, and each clip shows a group symbol in the lower left.
7. Alt-click (Option-click) on a clip header, and then drag-copy the group to the current end of the song. Now you have a piece of music that lasts 1 minute and 30 seconds.
Adding a fade at the end
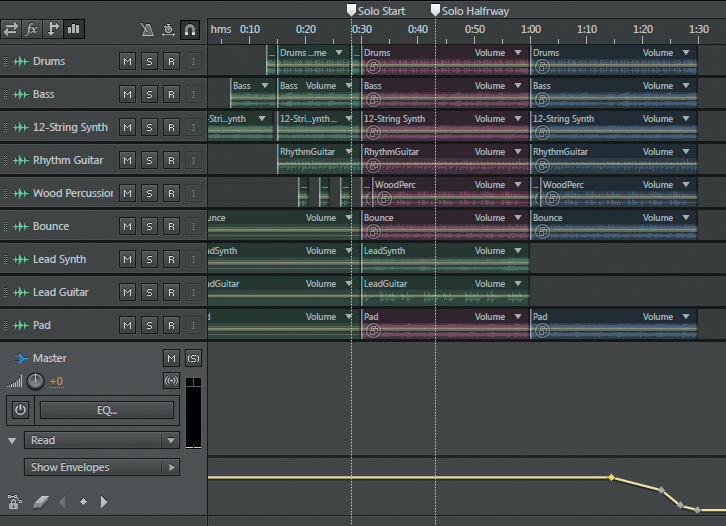
The easiest way to add a fade-out to the entire mix is to add Volume automation to the Master Track.
1. Extend the height of the Master Track until you can see the automation lane.
2. Click the automation disclosure triangle to expand the list.
3. Click Show Envelopes and select Volume.
4. Add a node to the envelope where you want the fade to begin, for example, around 15 seconds from the end.
5. Add another node at the end of the song, and drag it down to 0.
6. Add intermediate nodes or use spline curves to shape the fade further.
Exporting a stereo mix of the song
Now that the song is mixed, you can export it as a stereo file in a variety of formats.
1. Choose File > Export > Multitrack Mixdown, and then choose either Time Selection (if you’ve defined what should be exported as a time selection) or Entire Session (from the start of the first clip to the end of the last clip).
Note
Audition can export multiple file types, including WAV, AIF, MP3, MP2, FLAC, Ogg Vorbis, MOV (QuickTime, audio only), libsndifle, and APE (Monkey’s Audio).
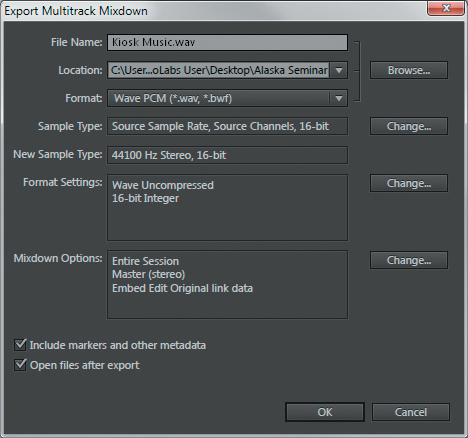
2. The Export Multitrack Mixdown dialog box appears. Enter a filename, the location where you want to save it, and the format.
3. Click the Change button for Sample Type to change the sample rate and bit depth (resolution). Click the dialog box’s Advanced disclosure triangle to specify the type of dithering you want to use. Dithering can offset the effects of truncating bit resolution when converting from a higher resolution to a lower one, such as mixing audio recorded in 24-bit resolution down to the 16-bit resolution required by CDs. Enabling the default is the simplest option.
Tip
Under Mixdown Options, click Change and you’ll see a dialog box where you can choose to mix every track as its own file. This is a great way to back up a project or exchange a project with someone who uses a different recording program than Audition.
4. Click OK, and the song will be exported as a stereo mix to the specified location.
Burning an audio CD of the song
When you save a stereo mixdown, the file automatically becomes available from the Waveform Editor’s drop-down menu. You can then master it or burn the mix to an audio CD.
1. Choose the file using the Waveform Editor’s drop-down menu.
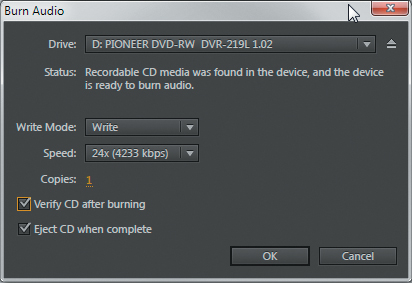
2. Choose File > Export > Burn Audio CD.
3. Insert a blank recordable CD in your computer’s CD/DVD writeable optical drive.
4. Click OK.
5. Choose the desired options from the Burn Audio dialog box.
6. Click OK, and your CD will be ready shortly thereafter.
Review questions
1. Why is it important to mix in an acoustically treated space?
2. What is a common signal processor that’s used in mixing so tracks mesh well together?
3. Why is it a good idea to start a mix with all tracks centered in the stereo field?
4. What’s the easiest way to add an overall fade-out to a song?
5. How does Audition make it easy to burn an audio CD?
Review answers
1. You cannot produce a mix that will sound good over a variety of systems if the audio you’re hearing is not accurate.
2. Equalization (EQ) can prevent tracks from interfering with each other by restricting them to particular frequency ranges.
3. If you can get the tracks to sound separate when they’re all panned to center, they’ll sound even more open and separate when placed in the stereo field.
4. Volume automation in the Master Track makes it easy to add a fade-out to all tracks simultaneously.
5. When you do a mixdown of a stereo file, it’s automatically available in the Waveform Editor, from which you can then burn an audio CD.