
9. Multitrack Editor Orientation
• Integrate the Waveform and Multitrack Editors so you can switch back and forth between the two
• Play back a specific part of music repeatedly (looped playback)
• Edit track level and position in the stereo field
• Apply EQ, effect, and send areas in tracks
• Apply EQ to tracks using the Multitrack Editor’s built-in parametric EQ
• Apply effects to individual tracks
• Process multiple tracks with a single effect to save CPU power and produce more consistent results
• Map effects channels so that outputs can feed different audio channels than the default settings
• Set up side-chain effects so that one track can control the effect in another track
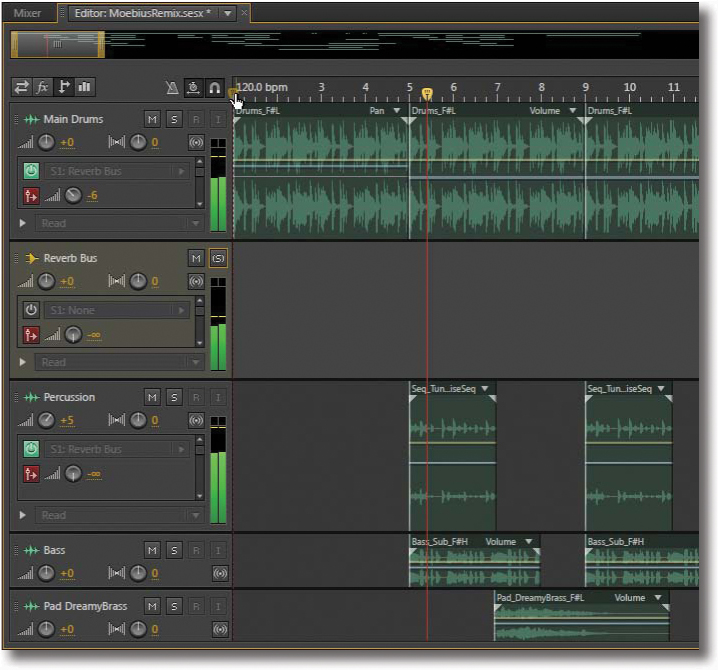
The Multitrack Editor is where you assemble clips, add effects, change levels and panning, and create buses for routing tracks to various effects.
About multitrack production
Before beginning the lessons, it’s important to understand a Multitrack Session’s workflow so the lessons have a context.
In the Waveform Editor, a single clip is the only audio element. A multitrack production assembles multiple audio clips to create a musical composition. The audio resides in tracks, which you can think of as “containers” for clips. For example, one track could contain drum sounds, another bass, a third vocals, and so on. A track can contain a single long clip or multiple short clips that can be identical or different. A clip can even be positioned on top of another clip in a track (however, only the clip that is on top will play back), or clips can overlap to create crossfades (described in Lesson 11).
The production process consists of four main stages:
• Tracking. This involves recording or importing audio into the Multitrack Session. For example, with a rock band, tracking could consist of recording drums, bass, guitar, and vocals. These might be recorded individually (each player records a track, typically while listening to a metronome for reference) in particular combinations (e.g., drums and bass recorded simultaneously) or as an ensemble (all instruments play live and are recorded as they play).
• Overdubbing. This is the process of recording additional tracks. For example, a singer might sing a harmony line to supplement the original vocal.
• Editing. After recording the tracks, editing can polish them. For example, with a vocal track you could remove the audio between verses and choruses to reduce any residual noise or leakage from other instruments. You might even alter the arrangement, like cut a solo section to half its original length.
• Mixing. After editing, the tracks are blended together into a final stereo or surround file. The mixing process primarily involves adjusting levels and adding effects. A Multitrack Session in Audition CS6 provides the tools to do basic editing tasks during the mixing process, but if detailed edits are needed, Session audio can be transferred to the Waveform Editor for further editing.
Note
Some processes are available only in one editor or the other. If a menu option is gray in either editor, that option is not available.
Multitrack and Waveform Editor integration
A unique Adobe Audition feature is that it offers different environments for waveform editing and multitrack production. In addition, these are not isolated from each other. Audio in the Multitrack Editor is catalogued in the Waveform Editor’s file selector and can be opened in the Waveform Editor for editing. This lesson illustrates how the Multitrack and Waveform Editors work together.
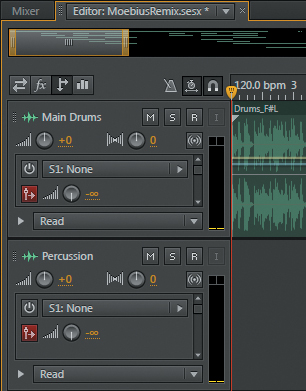
1. With Audition open, navigate to the Lesson09 folder, and open the Multitrack Session MoebiusRemix.sesx from the MoebiusRemix folder.
Note
You’ll often see multiple versions of the same clip in the Multitrack Editor. However, there is only one physical clip, which is stored in RAM; the graphic clips in the Multitrack Editor just reference the physical clip. For example, if there are four copies of the same clip in a row, four separate clips don’t play back sequentially—the clip stored in RAM plays four times, as instructed by the Multitrack Editor.
2. Place the playhead at the beginning of the file, and click the Transport Play button. Like the Waveform Editor, the Multitrack Editor plays linearly from start to finish. However, because the Multitrack Editor consists of multiple, parallel tracks, each of which can play back a clip, multiple clips can play back simultaneously. Play the song to become familiar with it.
3. To check out the Waveform and Multitrack Editor integration, click the first clip in the Main Drums track (Drums_F#L) to select it.
4. Click the Waveform tab to switch to the Waveform Editor.
5. The clip you clicked on appears in the Waveform Editor, ready for editing.
6. Click the Waveform Editor’s file selector drop-down menu. It shows all the clips in the Multitrack Session so that you can choose any of them for editing.

7. Choose the file Bass_Sub_F#H for editing. It sounds a bit too loud in the track, so you’ll reduce the level by 1dB.
Note
You could adjust the level of each clip in the Multitrack Editor or lower the level while mixing, but sometimes it’s simpler just to modify the clip so all instances that “point” to this clip use the edited version.
8. Press Ctrl+A (Control+A) to select the entire file.
9. Choose Effects > Amplitude and Compression > Amplify.
10. Reduce the right and left channels by typing in the value -1dB, and then click Apply.
11. Click the Multitrack tab to return to the Multitrack Session. All the Bass_Sub_F#H clip levels have been reduced by 1dB.
12. Keep the project open for the next lesson.
Looped playback
In several of these lessons, you’ll be hearing what happens when several tracks with parallel clips play back simultaneously. As a result, you’ll likely want to loop sections containing these clips for playback so that you don’t have to wait through parts of the music that don’t contain the clips you want to hear. Here’s how to select a section of music for looped playback.
1. Choose the Time Selection tool from the main program toolbar, or press T.
2. In an empty part of the Multitrack Editor (e.g., the Master Track at the bottom of the Multitrack Editor), drag the white handles in the timeline to set the In and Out loop points, or drag across the portion of the music you want to loop.
3. Click the Transport Loop Playback button.
4. Click the Transport Play button. The looped area will play continuously.
5. Click the Transport Stop button, and click the Transport Loop Playback button to deselect it.
6. Return to the Move tool by choosing it from the main program toolbar, or press V.
Track controls
Each track has multiple controls arranged as two sections, which primarily affect playback. One section has a fixed set of controls, whereas the other section is an area whose controls change according to a particular selected function. To reveal these controls, complete the following steps.
1. Click the splitter bar between the Main Drums track and Bass track, and continue holding down the mouse button.
Tip
You can resize the heights of all tracks simultaneously by placing the cursor over the track controls area and using the mouse scroll wheel.
2. Drag down to extend the height of the Main Drums track.
Main track controls
The main track controls are the most commonly adjusted parameters for mixing.
1. Click the Transport Play button to begin playback.
Note
If both the Mute and Solo buttons are enabled, the Mute button has priority.
2. Click the Main Drums track’s M (Mute) button to silence it. Note that the Mute button is green when active and gray when it is off (not muted).
3. Click the Mute button again to unmute.
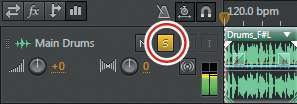
4. Click the track’s S button to solo the track. Only the Main Drums track will sound. (The R button is for recording; do not click it for now.) Leave the Main Drums track soloed for all the following lessons unless instructed to do otherwise.
Note
There are two solo modes—Exclusive (soloing one track mutes all other tracks) and Non-Exclusive (the default; you can solo multiple tracks simultaneously). To override either mode, Ctrl-click (Command-click) on the Solo button. To choose one mode or the other as a default, choose Edit > Preferences > Multitrack (Audition > Preferences > Multitrack) and select the desired Track Solo preference.
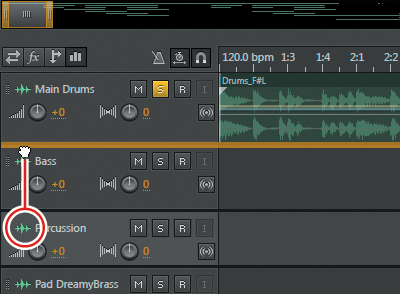
5. You can move tracks to reorganize them in a way that makes sense to you. For example, you might prefer to have the Percussion track below the Main Drums track instead of the Bass track. On the same row as the Mute and Solo buttons, click the waveform icon to the left of the Percussion track, and drag it up until a yellow line appears at the bottom of the Main Drums track. This line indicates where the top of the dragged track will “land.” Release the mouse button to leave the Percussion track below the Main Drums track.
Tip
If a track’s signal goes “into the red,” the track meters’ red lights will remain lit so you know the track exceeded the maximum level, even if you weren’t looking at it. To reset the red lights and turn them off, click on the lights.
Note
If dragging the Pan knob left places in the audio to the right, check the connections going to your speakers and audio interface.
Tip
A shortcut to return the Volume or Pan control to the default of 0 is to Alt-click (Option-click) on the control that you want to reset.
6. With the transport playing, click the Volume knob immediately below the left part of the Main Drums name, and then drag up/down or left/right to vary the playback volume. The track meters will go “into the red” if you turn this up too high. For now, leave the Volume at 0.
7. Click the Pan knob to its right. This changes the track position in the stereo field. Drag left, and you’ll hear the audio coming out of only the left speaker or headphone. Drag right, and the audio will play from only the right speaker or headphone.
8. Click the Sum to Mono button to the right. This “collapses” the stereo field to the center so the stereo file plays back in mono. Click on it again to return to stereo.
9. Return the Pan control to 0.
Track area
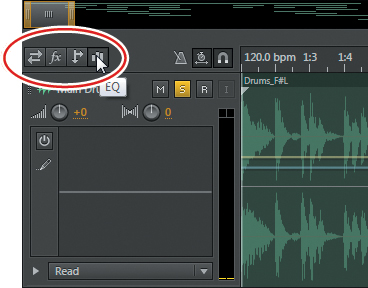
Extending a track’s height, either by click-dragging the track’s lower splitter bar downward or clicking in the Track Editor area and rotating the mouse scroll wheel, reveals an area below the main track controls. You can display one of four sets of controls in this area, as determined by the four buttons in the left section of the Multitrack Editor’s toolbar:
• Input and outputs
• Track Effects Rack
• Sends
• EQ
The EQ area
EQ is widely considered one of the most important effects for multitrack production, because it allows each track to “carve out” its own sonic space in the audio frequency spectrum (see Lesson 15, “Mixing,” for an in-depth discussion of applying EQ during multitrack production). As a result, each track has the option to insert a Parametric EQ effect. Let’s do that now.
1. Drag the Main Drums track’s lower splitter bar downward to show the track area, and click the toolbar’s EQ button (the rightmost button with vertical lines). The EQ area displays an EQ graph; it’s currently a straight line, because no changes have been made.
2. Click the pencil button to the left of the EQ graph.
3. The Parametric EQ effect appears. This is identical to the Parametric EQ effect covered in the “Filter and EQ effects” section in Lesson 4.
4. Choose Acoustic Guitar from the Presets menu—just because it’s named Acoustic Guitar doesn’t mean it can’t be used for drums!
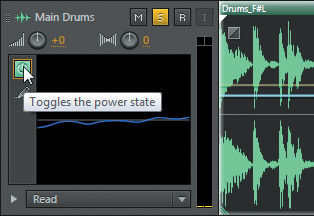
5. Close the EQ window. Note that the EQ area now shows the EQ curve. Click the EQ area’s power state toggle button; the EQ frequency response curve turns blue to show that the EQ is active, and the power state button glows green. Leave the EQ enabled.
Note
If before closing the Parametric EQ’s window you toggle the Parametric EQ window’s power state button so the power is on, the power will already be on in the EQ area.
6. Click the Transport Play button. You’ll hear that the EQ makes the drums sound a little more defined.
The Effects Rack area
Each track has its own Effects Rack so you can add signal processing to individual tracks; this Effects Rack is almost identical to the Waveform Editor Effects Rack covered in Lesson 4. This lesson covers using the features that differ.
1. Click the fx button in the Multitrack Editor’s main four-button toolbar.
2. The track’s Effects Rack area appears. Increase the track height so you see 16 slots—just like the Effects Rack in the Waveform Editor. You can choose from the same effects, including VST (Windows or Mac) and AU (Mac-only) effects.
3. The main difference compared to the Waveform Editor Effects Rack is that you can change the position of the effects in the Multitrack Editor’s signal flow. To hear how this works, click the Main Drums track’s insert 1 right arrow, and then choose Delay and Echo > Analog Delay.
4. Choose Canyon Echos from the Presets menu, and then set Feedback to 70. Click the Transport Play button; you should hear lots of repeating echoes.
5. Three buttons are located above the inserts. The leftmost button is a master effects on/off button, which is enabled automatically when you insert an effect. Click it to turn off the Analog Delay effect, and then click it again to turn the Analog Delay effect back on.
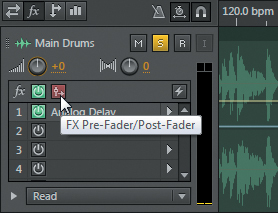
6. The next button to the right is the FX Pre-Fader/Post-Fader control, which selects whether the Effects Rack is before (the default) or after the track’s Volume control. With the track playing, turn down the track’s Volume control. Note that this turns down the echoes as well, because the effect is pre-fader—in other words, “upstream” of the fader.
7. Turn the track Volume control back to 0, and then click the FX Pre-Fader/Post-Fader button. It turns red to indicate that the effect is now post-fader.
8. Let the track play for several seconds, and then turn down the track’s Volume control. The echoes continue because you’ve turned down only the signal going to the Analog Delay, not the signal coming out of it.
Note
If the track Volume control remains turned down, eventually the echoes will stop because there won’t be any more audio going into the Analog Delay, so there won’t be any audio subject to being delayed.
9. Click on the first insert’s right triangle, and then choose Remove Effect so that the Analog Delay effect is no longer inserted.
10. Turn off the Main Drums track’s Solo button so you can hear all tracks play simultaneously.
The Master Track output
Before you look at the Sends area in the next section, you first need to understand the concept of a bus. Although buses appear in the Multitrack Editor like tracks and have several elements in common, they serve a different purpose.
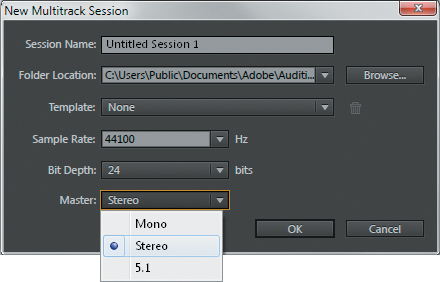
A bus does not contain audio clips but instead carries a specific mix of one or more tracks. Every Multitrack Session has at least one bus—the Master bus, which provides the Master Track output. This can be mono, stereo, or 5.1 surround, as specified by the Master parameter when you open a new Multitrack Session.
All tracks feed into the Master bus, and therefore, the Master Track’s Volume control regulates the master volume of all tracks. This is essential because as you add more tracks to a composition, the output level increases. Eventually, it will likely start distorting, but you can use the Master Track Volume control to adjust the output level and prevent distortion.
1. Scroll down to the bottom of the Multitrack Editor and locate the Master Track.
Tip
Most engineers agree that you don’t want to have to reduce a Master Volume control too much. If it becomes necessary to lower it much more than -12dB or so, reduce the Volume controls for individual tracks to reduce the output level. This allows the Master bus Volume control to remain between 0 and -6dB.
2. Expand the Master Track height sufficiently to see the output meters.
3. Click the Play button to start playback. Note that the Master Track Volume control is set to -4.5dB; the project was saved this way so when you opened the file and started to play it, you wouldn’t hear distortion. At no point does the Master Track output meter go into the red.
4. Stop playback, and then return the playhead to the file’s beginning.
5. Alt-click (Option-click) the Master Track Volume control to return it to zero, and then click Play to start playback.
6. Note that the meter goes into the red starting around measure 5 when the Main Drums are joined by other tracks.
Note
The Master Track is unique and omits some features that standard buses have (as described in the sidebar “About Buses”).
7. Click Stop to stop playback. Return the Master Track Volume control to -4.5dB.
The Sends area
Each track has a Sends area. You can create buses in this area, as well as control bus levels and other parameters.
1. Click the Sends button (the one between the fx and EQ buttons) in the Multitrack Editor’s main four-button toolbar. The track’s Sends area appears.
2. Increase the Main Drums and Percussion track heights so you can see the Send area’s controls.
3. To add stereo reverb to both tracks, click the Main Drums’ Send area drop-down menu and choose Add Bus > Stereo. This creates a Bus immediately below the Main Drums track.
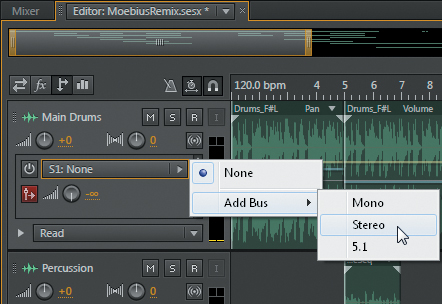
Note
You can also add a bus by right-clicking (Control-clicking) in a blank space in a track and then choosing Track > Add (Mono, Stereo, or 5.1) Bus Track. The bus appears immediately below the track where you right-clicked. Also, note that when you create a bus, its output is assigned automatically to the Master bus as the default.
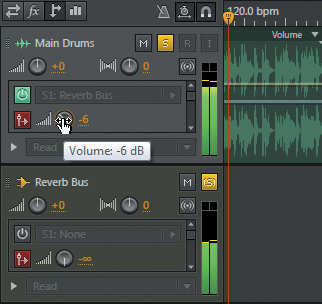
4. Click in the Bus A name field and type Reverb Bus. Note that the bus name changes automatically in the Main Drums Send area drop-down menu.
5. Click the Percussion Send area drop-down menu. Because you created a Reverb bus, it appears in the list of available send destinations. Choose Reverb bus.
6. Now insert a reverb in the Reverb bus. Start by clicking the fx button in the track toolbar.
7. An Effects Rack appears in the Reverb bus that works identically to the Effects Rack in individual tracks.
8. Click the right triangle in the Reverb bus’s first insert, and then choose Reverb > Studio Reverb.
9. When the Studio Reverb dialog box appears, choose Drum Plate (large) from the Presets drop-down menu. Set the Dry slider to 0 and Wet to 100%. Close the Studio Reverb dialog box.
Note
When you’re using effects with Wet/Dry controls as send effects, the tracks providing the sends are already providing dry audio to the Master bus. Therefore, the effects are set to full wet audio and no dry audio. The bus Volume control sets the overall amount of wet signal present in the Master bus.
10. Return to the Sends area by clicking the Sends button in the toolbar.
11. Solo the Main Drums and Percussion tracks to make it easy to hear the effect of adding reverb. Audition “knows” to solo the Reverb bus automatically, because the Main Drums and Percussion tracks send signal to it.
12. Click the Transport Play button to begin playback.
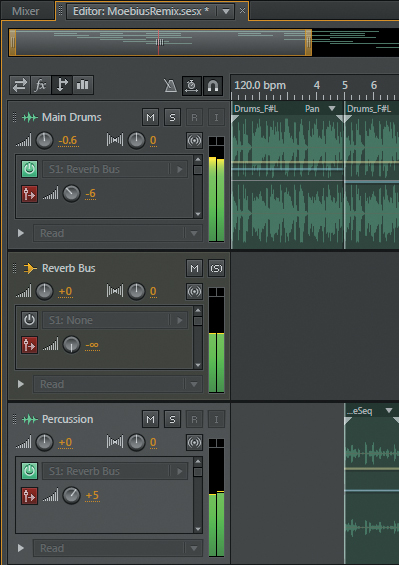
13. Turn up the Main Drums send Volume control to around -6dB. You’ll now hear reverb added to the Main Drums track.
14. Turn up the Percussion send Volume control to around +5dB. When the Percussion clips play, you’ll hear lots of reverb. The reason is that more audio is being sent to the Reverb bus compared to the Main Drums.
15. You can set the overall amount of wet (reverb) sound with the Reverb bus Volume control. Vary this control between -8dB and +8dB to hear how this affects the sound. Then Alt-click (Option-click) this control to return it to 0.
16. You can also pan a bus in the stereo field. Vary the Reverb bus Pan control from L100 to R100, and you’ll hear the reverb effect move from left to right, respectively. Alt-click (Option-click) this control to return it to 0.
17. Turn off the Solo buttons for the Main Drums and Percussion tracks. In preparation for the next lesson, leave this project open with the various track and bus controls set as shown.
Tip
A track’s Send area also includes an FX Pre-Fader/Post-Fader button. This determines whether the signal going to the Send volume control is pre or post the Track Volume control. The default is post-fader, because if you reduce the track level, you generally don’t want to still hear the wet sound at the same level as when the track level was higher. If you do (perhaps for a special effect where a track goes from dry+wet to full wet), click the FX Pre-Fader/Post-Fader button so that the button is not red.
Sending buses to buses
Buses can also send audio to other buses, which multiplies your signal processing options even further. In this lesson, you’ll send two tracks to a Delay bus, and that bus will feed the Reverb bus created in the previous lesson.
1. Right-click on a blank space in the Pad DreamyBrass track, and choose Track > Add Stereo Bus Track to create a bus immediately below the Pad DreamyBrass track.
2. Click in the Bus B name field and type Delay Bus.
3. If necessary, extend the heights of the Pad DreamyBrass, Delay Bus, and Organ Church tracks so you can see their Send areas.
4. Click the Pad DreamyBrass Send drop-down menu and choose Delay Bus.
5. Click the Organ Church Send drop-down menu and choose Delay Bus.
6. Now insert a Delay in the Delay bus. Start by clicking on the Multitrack Editor’s main toolbar’s fx button.
7. Click the right triangle in the Delay bus’s first insert, and then choose Delay and Echo > Analog Delay.
8. When the Analog Delay dialog box appears, choose Round-robin Delay from the Presets drop-down menu. Set the Dry Out slider to 0, Wet to 100%, and Spread to 200%; enter exactly 2000ms for Delay, and set Trash to 0. Close the Analog Delay dialog box.
Note
The Delay value of 2000ms (in the “Sending buses to buses” section) is chosen so that the delay correlates to the tempo. For details on how to arrive at this number, review the “Analog Delay” section in Lesson 4.
9. Return to the Sends area by clicking the Sends button in the toolbar.
10. Solo the Pad DreamyBrass and Organ Church tracks, and then set each of these track’s send Volume controls to around -8dB to add just a bit of delay.
11. Position the playhead at the start of measure 7, and then click the Transport Play button to begin playback and hear the effect of the added delay.
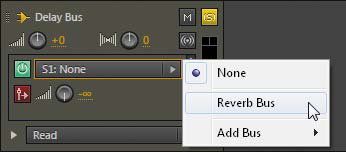
12. Now that the delay effect is set up, choose Reverb Bus from the Delay Bus send drop-down menu. This sends the Delay bus output to the Reverb bus, and you’ll hear delay going through reverb.
13. Turn up the Delay bus Send control to around +4dB. You’ll now hear reverberated delay.
14. To contrast the delay sound with and without reverb, toggle the Delay bus power state button.
15. Close Adobe Audition without saving your changes (choose No to All in the dialog box) in preparation for the next lesson.
Channel mapping in the Multitrack Editor
The channel mapping feature is available for all effects in the Waveform Editor and the Multitrack Editor but is most appropriate for multitrack productions. It allows for mapping any effect input to any effect input and any effect output to any effect output. This is primarily of interest for surround mixes, because you can place an effect output into a particular surround channel. However, this lesson shows that channel mapping can also be useful with stereo effects for altering the stereo image.
1. Open Audition and choose File > Open Recent > MoebiusRemix.sesx.
2. Click the Main Drums Solo button, and click the fx button in the toolbar. Extend the Main Drums track enough to see the Effects Rack inserts.
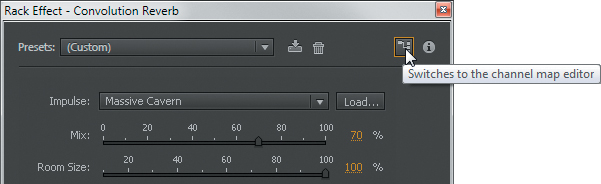
3. Click insert 1’s right arrow and choose Reverb > Convolution Reverb.
4. From the Impulse (not Presets) drop-down menu, choose Massive Cavern. Set Width to 300% and Mix to 70%.
5. Loop a portion of the Main Drums track, and click the Transport Play button.
6. Click the Convolution Reverb effect’s Channel Map Editor button.
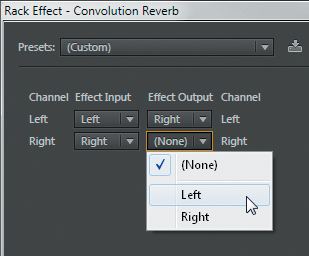
7. The Channel Map Editor opens. Click the Left Effect Output field drop-down menu, and choose Right.
Note
Because both outputs can’t be assigned to the same audio channel in the Channel Map Editor, the Right Effect Output, which had been assigned to Right, is now assigned to (None). Therefore, you will hear the Right channel Effect Output in the Left audio channel, and no effect output in the Right audio channel.
8. Click the Right Effect Output field drop-down menu, and choose Left. The output channels are now reversed, which reverses the reverb output’s stereo image. The image is wider, because some of the left input now appears in the right output, and some of the right input is now in the left output.
9. To hear the difference, click the Channel Map Editor’s Reset Routing button. If you listen on headphones, you’ll hear a definite collapsing (narrowing) of the stereo image; this will be more subtle on speakers.
Side-chaining effects
The side-chaining effects-related technique is available only in the Multitrack Editor, because it requires at least two tracks.
Side-chaining uses the output from one track to control an effect in a different track. In this lesson, you’ll use side-chaining to automatically reduce the level of a background music bed when narration occurs.
1. With Audition open, navigate to the Lesson09 folder, and open the Multitrack Session Side-chaining.sesx located in the Side-chaining folder.
2. Click the Transport Play button. Note how the background music drowns out the narration.
3. Click the Multitrack Editor’s main toolbar fx button to open the Effects area.
4. Click the right arrow in the BackgroundMusic track’s first effects insert, and then choose Amplitude and Compression > Dynamics Processing.
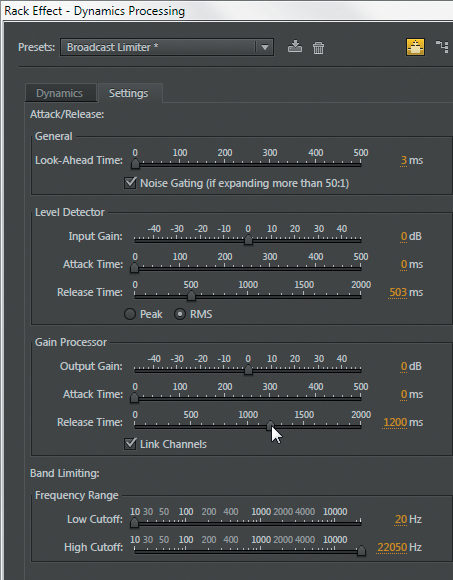
5. When the Dynamics Processing interface opens, choose Broadcast Limiter from the Presets menu.
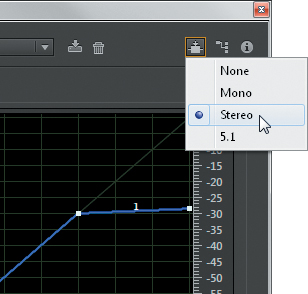
6. Click the Set Side-Chain Input button and choose Stereo. Leave the Dynamics Processing effect open, because you’ll need to tweak its settings.
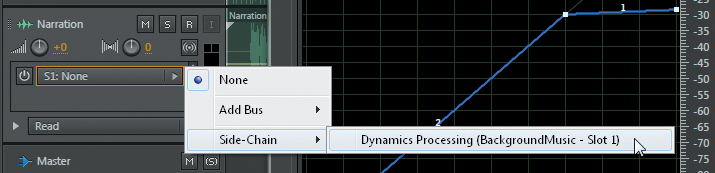
7. Click the Multitrack Editor’s main toolbar Sends button to open the Sends area.
8. In the Narration track, click the send and choose Side-Chain > Dynamics Processing (Background Music – Slot 1).
9. Return the playhead to the beginning, and click the Transport Play button.
10. The background music does get softer when narration occurs, but it follows the narration too closely; the sound isn’t smooth, because the background music spikes higher in level during even brief pauses in narration. To fix this, click the Dynamics Processing Settings tab to change various settings.
Tip
If the level of the background music is too soft, reduce the amount of compression in the Dynamics Processing effect. For example, set Segment 1 so that its end points are at -20dB instead of -30dB.
11. Select Noise Gating under the general header Attack and Release, because expanding levels downward will exceed 50:1, and more of a gating action—where the background music is either “loud” or “soft”—is the desired type of response.
12. Click the Link Channels button (in the Gain Processor section under the Settings tab) to ensure that changes in one channel are imposed on the other channel, so there aren’t significant level variations between the two channels.
Note
The Dynamics Processing effect is the only one within Audition that has a side-chain input. However, some VST3 effects have side-chain inputs as well. The effects most likely to have side-chain inputs are dynamics processors and Noise Gates.
13. Set the Level Detector and Gain Processor Attack Times to 0ms. This will cause compression to start as soon as the Dynamics Processing side-chain input detects narration.
14. Increasing release times retains the compression action for the specified time in the absence of narration. Set the Level Detector Release Time to around 500ms.
15. Adjust the Gain Processor Release Time slider for the most even response. A setting of approximately 1200ms seems about optimum.
16. Click the Transport Play button. Note how when the narration stops, the background music fades up, based on the Release Time settings. When the narration resumes, compression lowers the level of the background music.
Review questions
1. What is the main difference between the Waveform Editor and Multitrack Editor?
2. What’s the advantage of sending tracks to a single effect through a bus instead of inserting the same effect multiple times, once for each track?
3. Is it possible to have buses send signal to other buses?
4. On what type of project is channel mapping most useful?
5. What are the most common effects used for side-chaining?
Review answers
1. The Waveform Editor can play back one file at a time, whereas the Multitrack Editor can play multiple files simultaneously.
2. Using a bus saves CPU power and is desirable when you want to apply the same effect (e.g., a specific acoustic space) to multiple tracks.
3. Yes, any bus can send audio to any other bus.
4. Channel mapping is most useful on surround productions, although channel mapping can also be used with stereo.
5. The most common effects used are dynamics processors like Compressors and Noise Gates.