8. Creating and Recording Files
• Record into the Waveform Editor
• Record into the Multitrack Editor
• Drag and drop files into the Multitrack Editor
• Import tracks from CDs into the Waveform Editor
• Create custom templates for the Multitrack Editor

Not only can you record audio into Audition’s Waveform Editor or Multitrack Editor, you can also extract audio from standard Red Book Compact Discs or drag files from the desktop directly into either Audition Editor.
Recording into the Waveform Editor
Lesson 1, “Audio Interfacing,” covered audio interfaces and how to map the interface’s physical inputs and outputs to Audition’s virtual inputs and outputs. This lesson covers how to record and import audio into Audition, as well as how to extract audio from CDs. If necessary, review Lesson 1 to make sure you understand the principles behind interfacing. This lesson assumes you know how to map inputs and outputs. You’ll start by recording audio into the Waveform Editor.
1. Connect a microphone, guitar, portable music player output, cell phone audio output, or other signal source into a compatible audio interface input or internal audio input on your computer.
Note
You will need an audio CD to do one of these lessons.
2. Adjust the interface’s Input level control for an appropriate signal level. The interface will have either a physical meter or dedicated control panel software that monitors the inputs and outputs, and displays signal strength. You’ll need to rely on the interface’s meters when setting levels because Audition’s Waveform Editor indicates levels only when recording or paused, not when stopped.
Note
The optimum input level should never go into the red on a level meter. Today’s digital recording technology allows for sufficient headroom, so it’s not necessary to have the highest levels possible. Also, once you’ve recorded in Audition, you can use the Amplify or Normalize effects to bring up the level as needed.
3. Open Audition. Choose File > New > Audio File.
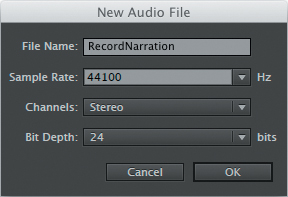
4. A dialog box appears with an editable File Name field, and three fields with drop-down menus. Enter the File Name RecordNarration.
5. Audition defaults to a 48000Hz sample rate, which is standard for video. However, for this lesson choose 44100Hz—the standard for CD audio—as the sample rate from the drop-down menu. The most common choices for sample rates include:
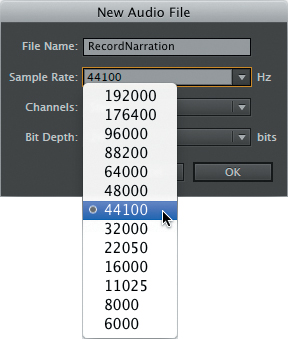
• 44100Hz is the same rate used for CDs and is the most “universal” sample rate for audio.
• 48000Hz is the standard choice for video projects.
• 32000Hz is common in broadcast and satellite transmissions.
• 22050Hz was a popular choice for games and low-resolution digital audio. Sample rates lower than 22050Hz are of very low fidelity and are generally used for speech, dictation, toys, and so on.
• Sample rates above 48000 are rarely used, although some studios record at 88200 or 96000, believing that it has the potential to improve sound quality or provides a better archival medium. Most studies show that few people can accurately tell the difference between 44100 and 48000 or higher sample rates. Higher sample rates also require more storage space; that is, a one-minute 96kHz file will require twice the space as the same file at 48kHz.
6. Choose the desired number of channels from the Channels drop-down menu. For a mic or electric guitar, choose Mono. For a portable music player or other stereo signal source, choose Stereo. The option 5.1 is for recording in surround sound.
7. Choose 24 bits from the Bit Depth drop-down menu. Here is a list of the choices and their descriptions:
• 8 bits is low resolution and is not used for professional audio. It’s common for games and consumer devices.
• 16 bits is the resolution for CDs and offers industry-standard audio quality.
• 24 bits is preferred by most recording engineers because it provides more headroom, and setting levels is less critical because there is greater dynamic range. Files that are 24-bits take up 50 percent more space than 16-bit files, but given the low cost of hard disk storage, this is an acceptable trade-off.
• 32 (float) results in the highest resolution but offers no significant advantage over 24-bit files. They take up more space, and many programs are not compatible with 32-bit float files.
8. After making the selections in steps 4–7, click OK.
9. Assuming you’re using an external audio interface, choose Edit > Preferences (Audition > Preferences) > Audio Hardware. Verify that the correct Device Class, I/O Buffer size, and Sample Rate are selected. For Windows users, also verify that the Device Class and Device settings are correct. Click OK.
10. To see levels in Audition while recording, choose Window > Level Meters if the meters are not already in your workspace. Dock the meters horizontally along the bottom of your workspace for the best meter resolution.
11. Click the Transport’s red Record button. Recording begins immediately. Speak into the mic or play back whatever sound source connects to your interface. You’ll see the waveform being drawn in the Waveform Editor in real time, and the meters will reflect the current input signal level.
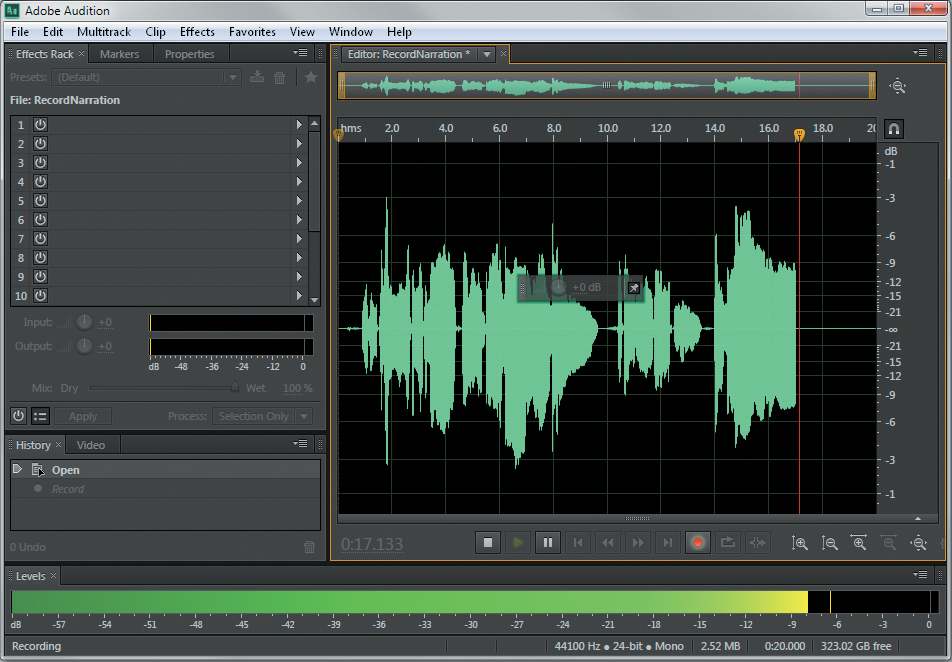
12. Click the Transport Pause button. Recording will pause, but the meters will still show the incoming signal level.
13. To resume recording, click the Pause button or Record button.
14. Click the Stop button to stop recording. The waveform you recorded will be selected.
15. Click somewhere in the middle of the Waveform Editor (i.e., where you’ve already recorded something), and then click the Record button to record over the previously recorded material.
Tip
Being able to record over previously recorded material can speed up the recording of narration. If you make a mistake in a particular line, click at the beginning of the line and re-record it.
16. Record for a few seconds, and click Stop. The audio between where you started and stopped recording will be selected.
17. Leave Audition open and your signal source and interface set up in preparation for the next lesson.
Recording into the Multitrack Editor
Audition not only integrates the Waveform Editor and Multitrack Editor, but can transfer files easily between the two. This lesson shows you how to record into the Multitrack Editor, explains how to transfer your recording into the Waveform Editor for editing, and then describes how to return it to the Multitrack Editor.
Tip
It’s good practice to have a separate, high-speed (at least 7200 rpm) drive with a dedicated folder for storing your projects. This separates streaming audio on the audio drive from program operations on your main drive. Also, backing up the audio drive backs up all of your projects.
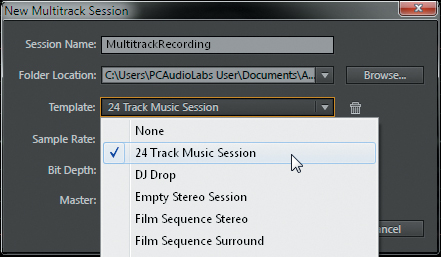
1. Choose File > New > Multitrack Session.
A dialog box appears with fields for an editable File Name, Folder Location for storing the project, and project Template. The dialog box also includes Sample Rate and Bit Depth fields identical to those in the New Audio File dialog box, and a Master field that determines whether the output is Mono, Stereo, or a surround format (if supported by your interface).
2. Enter the Session Name MultitrackRecording.
3. The default folder location for saving projects is within the User’s Documents folder (Windows or Mac). For this tutorial, accept the default folder.
4. Choose the 24 Track Music Session template. Later in this lesson we’ll cover how you can create your own templates.
Note
Sample Rate, Bit Depth, and the Master output are stored with the Template, so once you’ve chosen a template, these options are grayed out. If you want to edit these settings, select None for Template.
5. Click OK. The Multitrack Editor opens.
6. Each track has an Input field; an arrow to its left points right toward the input field. For Track 1, choose the interface input to which your signal source connects from the Input field’s drop-down menu. A track can be stereo or mono.

Note
If the Input field is not visible, click the double-arrow button in the upper left of the Multitrack Editor’s toolbar.
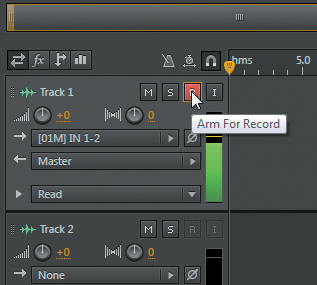
7. As soon as you select an input, a track’s R button becomes available to Arm For Record (arming means the track is ready to record as soon as you click the Transport’s Record button). Click the R button and talk into the mic; note that the track’s meter indicates the incoming level.
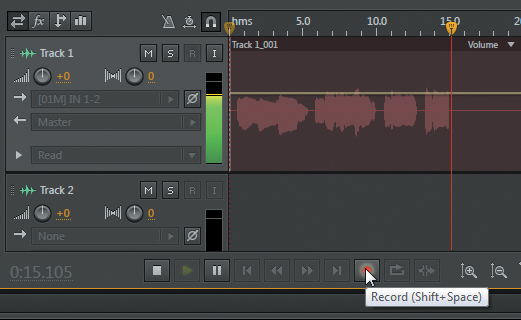
8. Click the Transport Record button to begin recording. Record your signal source for at least 15–20 seconds. As when recording in the Waveform Editor, you can pause and resume recording by clicking the Pause button. After you’ve finished recording, click the Transport Stop button.
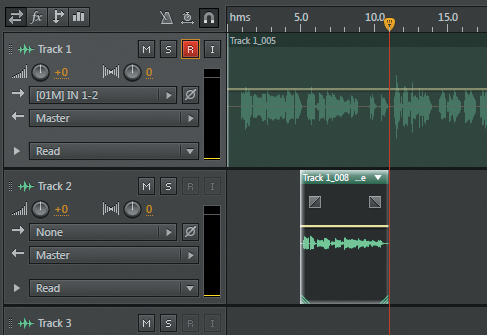
9. Place the playhead around 5 seconds into the file.
10. Click the Transport Record button, and record for about 5 seconds or so. Then click Stop.
11. Click on the track where you just recorded (i.e., between the 5- and 10-second marks). Notice that there is a separate layer recorded on top of the previously recorded track. By clicking on it, you can drag it left or right, as well as drag it down into Track 2.
Note
Audition makes it easy to transfer files back and forth between the Multitrack Editor and Waveform Editor. To open a Multitrack Editor audio file in the Waveform Editor, double-click the clip in the Multitrack Editor or right-click (Control-click) on it and choose Edit Source File.
Note
To transfer the file back into the Multitrack Editor at the position from which it came, click the Multitrack button or type 0. To transfer it elsewhere in the session, or even to a different session, right-click (Control-click) in the Waveform Editor and choose Insert into Multitrack > [name of Multitrack Session]. The file will start at the Multitrack Editor’s playhead position and be inserted into the first available track where no audio is recorded at the playhead position.
12. In preparation for the next lesson, click on each recorded audio selection, and press the Delete key to remove all audio from the project. Click the Transport’s Move Playhead to Previous button.
Drag and drop into an Audition Editor
In addition to recording files into Audition, you can drag and drop files from the desktop or any open computer folder (whose contents are visible) into the Waveform Editor or a Multitrack Editor track. The file can be in any file format that Audition recognizes; in the Multitrack Editor, it will automatically be converted to the project settings. For example, if you created a project with 24-bit resolution, you can bring it in as a 16-bit WAV file or even an MP3 format file.
With the Waveform Editor, you simply drag the file from the desktop into the editor. This lesson demonstrates how to drag and drop a file into the Multitrack Editor.
1. This lesson assumes the Multitrack Editor from the previous lesson is still open. If not, choose File > New > Multitrack Session. Leave the default folder location as is, and select 24 Track Music Session as the template.
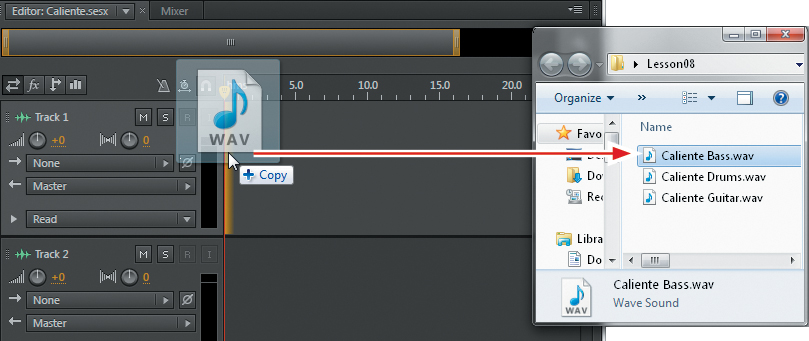
2. Make sure the Lesson08 folder is on your desktop, and open it to reveal its three files. If needed, resize Audition’s window so you can see Audition’s tracks and the open Lesson08 folder at the same time.
3. Drag the file Caliente Bass.wav to the start of Track 1. A yellow line appears where the dragged file will start; this should be flush with the beginning of the track. Note that if you drag slightly past (to the left of) the track’s beginning, the yellow line will “snap” to the track’s start. Release the mouse button.
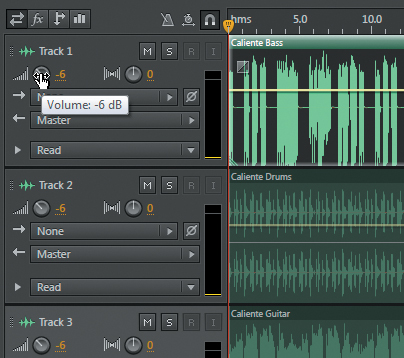
4. Similarly, drag the file Caliente Drums.wav into Track 2 and the file Caliente Guitar.wav into Track 3.
Note
The line that separates the bottom of one track and the top of another is a splitter bar. You can click on this line and drag up or down to decrease or increase, respectively, the above track’s height.
5. Click the Transport Play button to hear the tracks play back simultaneously.
6. These tracks were recorded at a high volume, and they are overloading the output. Adjust each track’s volume control to -6dB (the Transport can either be playing or stopped).
7. Click the Transport’s Move Playhead to Previous button until the playhead is at the beginning of the song.
8. Click Play. The sound is now undistorted, and none of the meters go into the red (clipping) zone.
Importing a track from an audio CD
Because the tracks on audio CDs are in a specific file format, they cannot be dragged directly into Audition without processing. However, you can access a function that extracts audio from CDs and places it into the Waveform Editor. You can then edit it or transfer it to the Multitrack Editor as described previously.
You need a standard audio CD to complete this lesson.
1. Close Audition and don’t save anything in order to start fresh.
2. Open Audition. You can extract audio from CDs in either the Waveform Editor or Multitrack Editor, or even if no project is open.
3. Insert a standard audio CD into your computer’s optical drive.
4. Choose File > Extract Audio from CD.
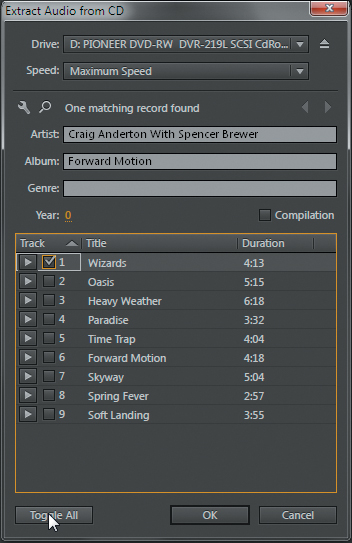
A dialog box appears that shows the drive, and if the computer is connected to the Internet, Audition retrieves information from the freedb database to populate the Track, Title, and Duration fields.
5. The Speed drop-down menu lets you choose the extraction speed. Leave it at the default (Maximum Speed); if errors occur during the extraction process, choose a slower speed.
6. All CD tracks are selected as the default. They will be extracted one at a time, each as a separate file. You need to extract only one track for this lesson, so click the Toggle All button to deselect all tracks, and then select one track.
7. Click OK. The extraction process begins and places the audio in the Waveform Editor. Leave Audition open in preparation for the next lesson.
Saving a template
A template is a snapshot of all the session settings at the time of saving the template. Audition includes several template files for Multitrack Sessions, but you can also create your own.
1. Choose File > New > Multitrack Session.
2. The Session Name and Folder Location don’t matter.
3. Choose None as the Template from the drop-down menu, and then choose the desired Sample Rate, Bit Depth, and Master Output. Click OK.
4. Arrange the Multitrack Session session as desired including the number of tracks, layout, processors in the tracks, levels, and so on. These settings will be incorporated into the template.
5. After you have everything set to your liking and are ready to make a template, choose File > Save As.
6. Name the session with the desired template name (e.g., VO + Stereo Sound Track).
7. For the Location, click Browse. On Windows, navigate to Computer > C: Drive > Users > Public > Public Documents > Adobe > Audition > 6.0. Click Session Templates, click Open, and then click Save. On a Mac, browse to root drive > Users > Shared > Adobe > Audition > 5.0. Click Session Templates, and then click Save. Next time you open a new Multitrack Session, the template you created will be available in the drop-down menu of templates.
Review questions
1. Can you monitor input levels with Audition’s metering when the Transport is stopped?
2. What is the most common sample rate for digital audio?
3. What is the preferred bit resolution for professional audio?
4. How can you add audio to the Waveform Editor or Multitrack Editor without employing the process of recording?
5. Is there a way to create a custom template so your session is already preconfigured the way you want it to be?
Review answers
1. You can monitor input levels with Audition’s metering when the Transport is stopped in the Multitrack Editor but not the Waveform Editor.
2. The most common sample rate is 44100Hz, which is used for CDs and many other digital audio applications.
3. Most engineers prefer to record with 24-bit resolution, although recording with 16-bit resolution is also common.
4. You can drag and drop files to either editor and extract audio from audio CD tracks into the Waveform Editor.
5. Yes, you can create as many custom templates as you like for various applications.