7. Sound Design
With Audition’s array of signal processors, it’s possible to modify common, everyday sounds into something completely different—like transforming a wall fan into a spaceship’s engine room or a running faucet into crickets at night.
About sound design
Sound design is the process of capturing, recording, and/or manipulating the audio elements used in movies, television, video games, museum installations, theater, postproduction, and other art forms that require sound. Sound design can refer to music, but this lesson emphasizes sound effects and ambience. These types of sounds are also common in sonic logos (like the sound you hear to identify Intel Inside or NBC) or the sounds layered in movie scenes to create a particular mood.
For example, a scene in a science-fiction movie might have the characters in a spaceship’s engine room where the drone of the engine provides a suspenseful backdrop as the protagonists search for the cause of a radiation leak. Occasionally, against this engine sound backdrop, sudden, sharp sounds might appear to indicate a new leak breaking through the engine wall. Of course, no one is in space recording these sounds; it’s up to the sound designer to create appropriate effects.
Sound effects libraries are available from several companies, but a sound designer will often modify these or record sounds using a field recorder. For example, in the beginning of the movie Raiders of the Lost Ark, a giant boulder rolls toward Indiana Jones. The sound of the rolling boulder was created by taping a microphone to the rear bumper of a Honda and recording the sound of the car backing down a gravel driveway. Subsequent sound design work turned this into a huge, ominous sound. Another example involves the TIE fighters in Star Wars: The sound of them diving is a modified elephant cry.
Two files were recorded for the following lessons using a portable digital recorder: water running into a sink from a faucet and a wall fan. You’ll learn how to turn these sounds into a variety of sound effects and ambience.
Creating rain sounds
With sound design, it helps to start with a sound in the same genre. To create rain, the running water would most likely produce a better end result than the recording of the fan.
1. Choose File > Open, navigate to the Lesson07 folder, and open the file RunningWater.wav.
2. Click the Transport Loop button so the water sound plays back continuously. Click the Transport Play button to audition the loop.
3. You’ll first change this sound to a light, spring rain. Click the Effects Rack tab, and drag the panel’s lower splitter bar downward to extend the panel to its full height because you’ll be using several effects.
4. Click Effects Rack insert 1’s right arrow button and choose Filter and EQ > Graphic Equalizer (10 Bands). Ensure that Range is 48dB and Master Gain is 0.
5. Pull the sliders for all bands other than 4k and 8k all the way down to -24dB.
6. Bring the 4k sand 8k sliders down to -10dB.
7. Toggle the effect’s power state on and off a few times to compare how the EQ has changed the overall sound. With the EQ power on, you now have a light spring rain. You might find the effect more realistic if you bring the 8k slider down to -15dB.
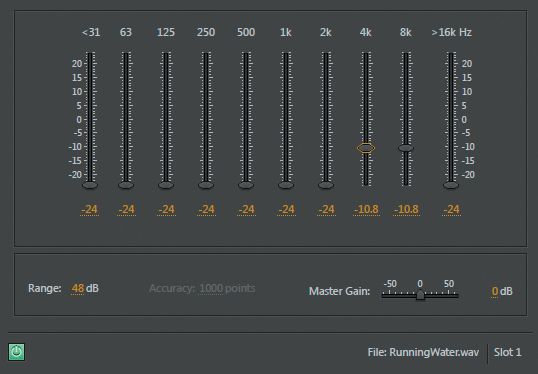
8. Suppose you wanted to do sound design for a scene where the character is inside a house, and it is raining outside. In this case there would be fewer high frequencies due to the house walls and windows blocking the highs. Pull the 8k slider down all the way, and the rain sounds more like it’s outside.
9. To surround the character with rain if the character, say, opens the door, leaves the house, and is in the middle of the rain, click insert 2’s right arrow button and choose Delay and Echo > Delay.
10. The Default patch spreads out the sound, but it’s too separated: Rain wouldn’t fall only to the character’s right and left, but all around. Change both Mix controls to 50% so there’s a convincing panorama of rain.
11. It’s important that the delay not create any kind of rhythm. Set the Left Channel Delay Time to around 420ms and the Right Channel Delay Time to 500ms. These delays are long enough that you won’t perceive a rhythm.
12. If the character then goes outside again, return to the Graphic Equalizer window by double-clicking its insert in the Effects Rack, and increase the 8kHz slider to around -14kHz. Keep this project open as you move to the next lesson.
Creating a babbling brook
Changing the scene from rain to a babbling brook in the distance simply involves removing the delay and changing the EQ setting.
1. Click the Delay insert’s arrow, and choose Remove Effect. A babbling brook has a more distinct sound than sheets of rain, so you don’t need the additional “rain drops” created by the Delay.
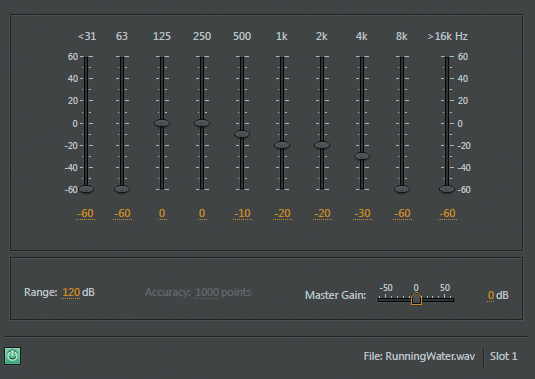
2. Click on the Graphic Equalizer’s window to select it. Set Range to 120dB and Master Gain to 0dB.
3. Set the Graphic Equalizer sliders as follows: <31, 63, 8k, and >16k all to -60dB. Set 125 and 250 to 0, 500 to -10, 1k to -20, 2k to -30, and 4k to -40.
4. The babbling brook is now in the distance. As the character moves closer to the brook, increase 2k to -20 and 4k to -30. Now the brook sounds closer. Keep this project open as you move on to the next lesson.
Creating insects at night
It’s even possible to use the running water to create a nighttime insect/crickets sound. This lesson demonstrates how signal processing can turn one sound into something completely different.
1. Double-click in the Waveform Editor to select the entire waveform.
2. From the Effects menu near the top of the window, choose Time and Pitch > Stretch and Pitch (process).
3. In the Stretch and Pitch window, select the Default preset if it is not already selected.
4. Move the Pitch Shift slider all the way to the left (-36 semitones), and then click OK. It will take several seconds for processing to occur.
5. Click on the Graphic Equalizer window to select it. With Range still at 120dB, move all sliders to -60dB except set 4k to 10dB. Click the Transport Play button to hear the processed sound.
Note
Extreme pitch shifting can add anomalies, like volume spikes or clicks, at the file’s beginning and end. If so, make an audio selection that excludes the first and last two seconds, and then choose Edit > Crop. Extreme shifting may also lower the volume, so you might want to increase the Effects Rack’s Output control.
6. You can smooth out the sound and make it sound a little more distant by adding reverb. In the Effects Rack’s insert 3, click the right arrow button and choose Reverb > Studio Reverb. Stop playback by clicking the Transport Stop button so you can select a reverb preset.
7. Click the Presets drop-down menu and choose Great Hall.
8. Click the Transport Play button, and listen to your refined insects at night sound.
Creating an alien choir
For the last effect using the running water sound, you’ll create a totally abstract sound that’s ethereal and quite evocative.
1. If the entire waveform isn’t already selected, double-click in the Waveform Editor.
2. Choose Effects > Time and Pitch > Stretch and Pitch (process). The settings should be the same as they were previously, but if not, choose the preset Default from the drop-down menu.
3. If needed, move the Pitch Shift slider all the way to the left (-36 semitones), and then click OK. It will take several seconds for processing to occur.
4. Make an audio selection that excludes the first and last two seconds, and then choose Edit > Crop.
5. The level will be very low, so let’s bring it up. With the waveform still selected, choose Effects >Amplitude and Compression > Normalize (process).
6. Select Normalize To and enter 50%. Normalize All Channels Equally should also be selected. Click OK.
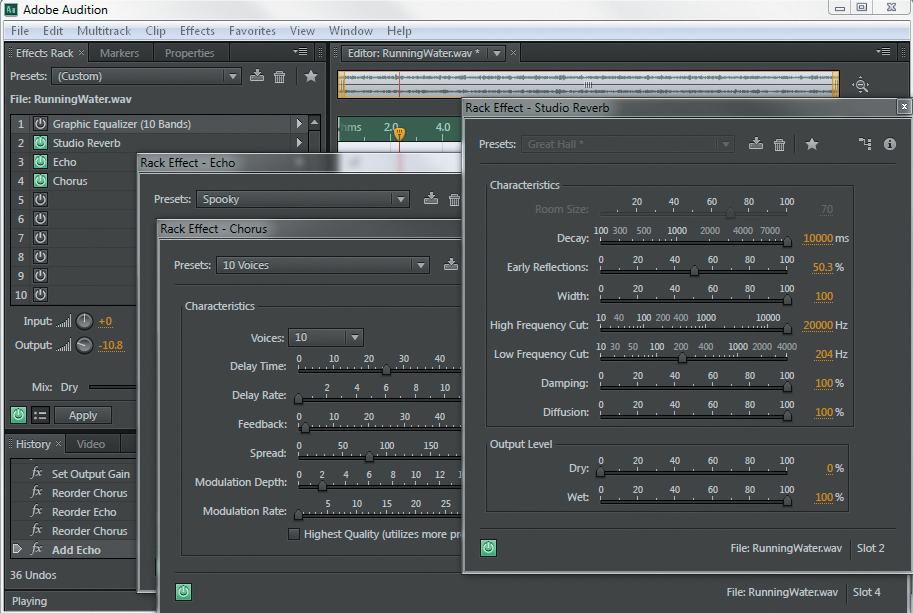
7. Bypass the Graphic Equalizer. The Reverb should still have the Great Hall preset selected. Move the Decay, Width, Diffusion, and Wet sliders all the way to the right. Move the Dry slider all the way to the left. When you click the Transport Play button, you should now hear an ethereal, animated pad.
8. Now add some animation for the final touch. In an Effects Rack’s insert after the Studio Reverb, click the insert’s right arrow and choose Delay and Echo > Echo. Select the preset Spooky.
9. In an Effects Rack’s insert after the Echo, click the insert’s right arrow and choose Modulation > Chorus. Select the preset 10 Voices. You may need to turn down the Effects Rack’s Output control to avoid clipping. Note how extensive pitch stretching coupled with effects from the Studio Reverb, Echo, and Chorus can turn running water into an alien soundscape.
Creating sci-fi machine effects
Just as you used running water to generate water-based effects, the fan sound makes a good basis for machine and mechanical sounds. This lesson describes how to turn an ordinary wall fan sound into a variety of science-fiction, spaceship sound effects.
1. If Audition is open, close it without saving to start fresh. Open the program, choose File > Open, navigate to the Lesson07 folder, and open the file Fan.wav. Click the Transport Play button to hear what the file sounds like.
2. Double-click inside the Waveform Editor to select the entire waveform.
3. Choose Effects > Time and Pitch > Stretch and Pitch (process).
4. Select the preset Default if it is not already selected.
5. Set the Pitch Shift slider to -24 semitones. Lowering the pitch makes the engine sound “bigger,” but lowering beyond -24 semitones makes the sound indistinct. Click OK; processing will take a few seconds.
6. As in the previous lessons, for the smoothest sound, make an audio selection that excludes the first and last two seconds, and then choose Edit > Crop.
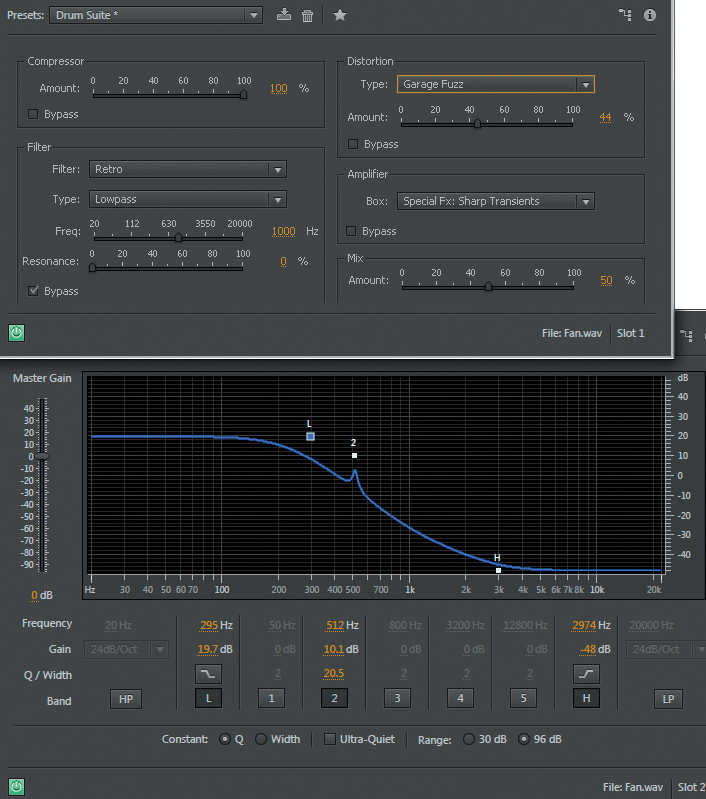
7. Click the Effects Rack insert 1’s right arrow button and choose Special > Guitar Suite. From the Presets drop-down menu, choose Drum Suite. Click the Transport Play button, and note how the sound becomes more metallic and machine-like.
8. Click the Effects Rack insert 2’s right arrow button and choose Filter and EQ > Parametric Equalizer. If the preset Default is not already selected, choose it from the Presets drop-down menu.
9. Deselect bands 1–5 to leave only the L (low) and H (high) bands active.
10. Click the L and H Q/Width button to select the steepest (the button’s center line is most vertical) slope.
11. If the file isn’t already playing, click the Transport Play button. Pull the H box all the way down and left to around 3kHz.
12. Pull the L box up to 20 and right to about 300Hz.
13. Add some character to the engine with a resonant peak that increases the level in a narrow band of frequencies. Click the Band 2 button to enable that parametric stage. Edit Frequency to 500Hz, Gain to 10dB, and Q/Width to around 20. The Guitar Suite and Parametric EQ effects provide the main engine sound.
14. Now let’s travel to a different section of the virtual spaceship, away from the main hum of the machine room but where you can still hear the engine rumble. Click the Effects Rack insert 3’s right arrow button, and choose Reverb > Studio Reverb.
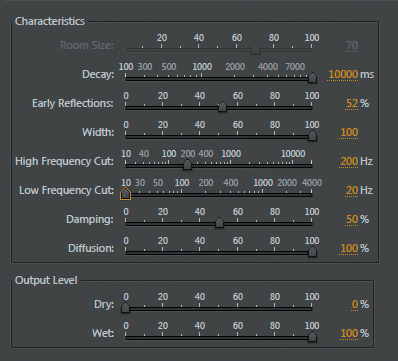
15. Click the Transport Stop button to change the Studio Reverb preset, and then choose Great Hall from the Presets drop-down menu.
16. You’ll now add lots of reverb but only to the low frequencies to emphasize the rumble. Set the Decay, Width, Diffusion, and Wet sliders all the way to the right. Set the High Frequency Cut slider to 200Hz, the Low Frequency Cut slider full left, and the Dry slider full left. Click the Transport Play button.
17. Bypass the Studio Reverb to return to the engine room sound, or enable it to move farther away to a different part of the spaceship. Leave this project open in preparation for the next lesson.
Creating an alien drone flyby
In addition to creating static sound effects, Audition includes a Doppler Shifter processor that imparts motion—from left to right, around in circles, tracing an arc, and so on. In this lesson you’ll take advantage of the Doppler Shifter processor to “animate” the sound of an alien drone.
1. If the waveform isn’t already selected, double-click within the Waveform Editor to select the entire waveform.
2. Choose Effects > Time and Pitch > Stretch and Pitch (process).
3. Choose the preset Default from the Presets menu. Set the Stretch slider to 200%. Click OK; processing will take a few seconds.
4. Either bypass the Parametric Equalizer effect, or click its insert’s arrow and choose Remove Effect.
5. Either bypass the Studio Reverb effect, or click its insert’s arrow and choose Remove Effect.
6. If the Guitar Suite window isn’t open already, double-click its insert in the Effects Rack. Choose the preset Lowest Fidelity from the Presets drop-down menu.
7. With the entire waveform still selected, choose Effects > Special > Doppler Shifter (process).
8. Choose the preset Whizzing by From Left to Right from the Doppler Shifter’s Presets drop-down menu, and then click OK. Click the Transport Play button to hear the drone fly by from left to right.
9. Because the sound is most effective if it fades up from nothing and fades out to nothing, in the Waveform Editor click the Fade In button in the upper-left corner, and drag it to the right about two seconds.
10. Similarly, click the Fade Out button in the Waveform Editor’s upper right, and drag it left to about eight seconds.
11. To enhance the Doppler Shifter effect, click an Effects Rack insert’s right arrow and choose Modulation > Flanger.
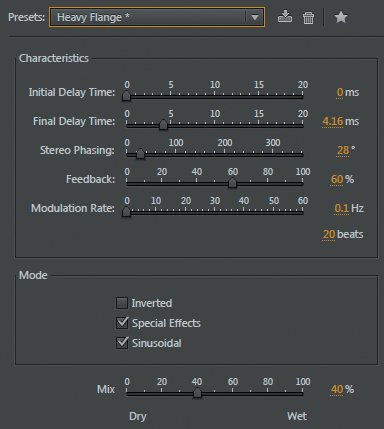
12. In the Flanger window, choose the preset Heavy Flange from the Presets drop-down menu.
13. Click on the Modulation Rate parameter, type 0.1, and then press Enter. Using the slider would make it almost impossible to choose this precise a value.
14. Click the Transport Play button, and the alien drone will sound even more realistic as it flies by from left to right.
Review questions
1. What is sound design?
2. What effects can provide spatial placement within Audition?
3. What artifacts can extreme pitch shifting add?
4. Is the Guitar Suite useful only for guitar effects?
5. Do you need to use commercial sound libraries to create sound effects?
Review answers
1. Sound design is the process of capturing, recording, and/or manipulating the audio elements used in movies, television, video games, museum installations, theater, postproduction, and other art forms that require sound.
2. EQ, reverb, delay/echo, and the Doppler Shifter can all contribute to placing a sound in the stereo or surround field.
3. Extreme pitch shifting may cause unpredictable amplitude spikes at the beginning and/or end of the file, as well as lower the file’s overall level.
4. The Guitar Suite offers huge possibilities for sound design; this lesson has tapped only a bit of its potential.
5. Not always. Because of Audition’s rich selection of signal processors, ordinary sounds can be transformed into entirely different sounds.
