
1. Audio Interfacing
• Configure a Macintosh computer’s on-board audio for use with Audition
• Choose the appropriate sample rate for a project
• Set up the on-board audio in Windows computers for use with Audition
• Set up Windows audio interfacing regardless of whether you’re running XP (with Service Pack 3) or Windows 7 (Service Pack 1, 32-bit, or 64-bit)
• Configure Audition to work with Macintosh or Windows computers
• Test your configurations to make sure all connections are correct
Before you can use Audition, you need to configure your computer and audio system to work with the program. This lesson covers audio interfacing for both Mac and Windows computers.
Audio interface basics
Recording audio into a computer requires converting audio signals into digital data that your computer and Audition can recognize. Similarly, playback requires converting that digital data back to analog audio so you can hear it. The device that performs these conversions is usually called a sound card when built into the computer or audio interface if it’s an external piece of hardware. Both include analog-to-digital (A/D) and digital-to-analog (D/A) converters. In addition, software drivers handle communications between your computer and audio hardware.
This lesson concentrates on a computer’s on-board audio capabilities, because the same concepts translate to more sophisticated (and higher performance) audio interfaces. Note that there are many brands and models of audio interfaces, making universally applicable lessons impossible. As a result, multiple sidebars in this lesson explain audio interface characteristics to provide important background information.
Several lessons are divided into versions for Macintosh and Windows computers. You won’t need to read the Windows-specific lessons if you use a Mac, and vice versa. However, all users should read the sidebars, because they cover information that’s applicable to both platforms.
To make the best use of these lessons, you’ll need the following:
• An audio source, such as an MP3 or CD player with a 1/8-inch minijack output (or other device with a suitable adapter to give a 1/8-inch minijack output). Laptops may also have an internal microphone you can use; however, using a line-level device is recommended, and the lessons will reference that type of input. You can also use USB microphones that plug directly into a computer’s USB port; however, note that they may introduce significant latency, as described later in this lesson, when used as class-compliant devices with Windows computers.
• Patch cable with male-to-male 1/8-inch plug to connect the audio source to your computer’s audio input jack.
• Your computer’s internal speakers for monitoring or earbuds/headphones with a 1/8-inch stereo plug suitable for plugging into your computer’s stereo output. You can also patch the output to a monitoring system if you have suitable cables.
Mac OS X audio setup
This lesson describes how to configure Audition to work with the Macintosh’s inputs and outputs. Apple standardized on Core Audio drivers for Macintosh-series computers starting with OS X; Macs running earlier operating systems are not compatible with Audition.
1. Connect the audio source to the Mac’s 1/8-inch line input jack via the 1/8-inch patch cord. If you’re not using internal speakers, plug the earbuds/headphones or monitoring system input to the Mac’s line-level output or headphones jack.
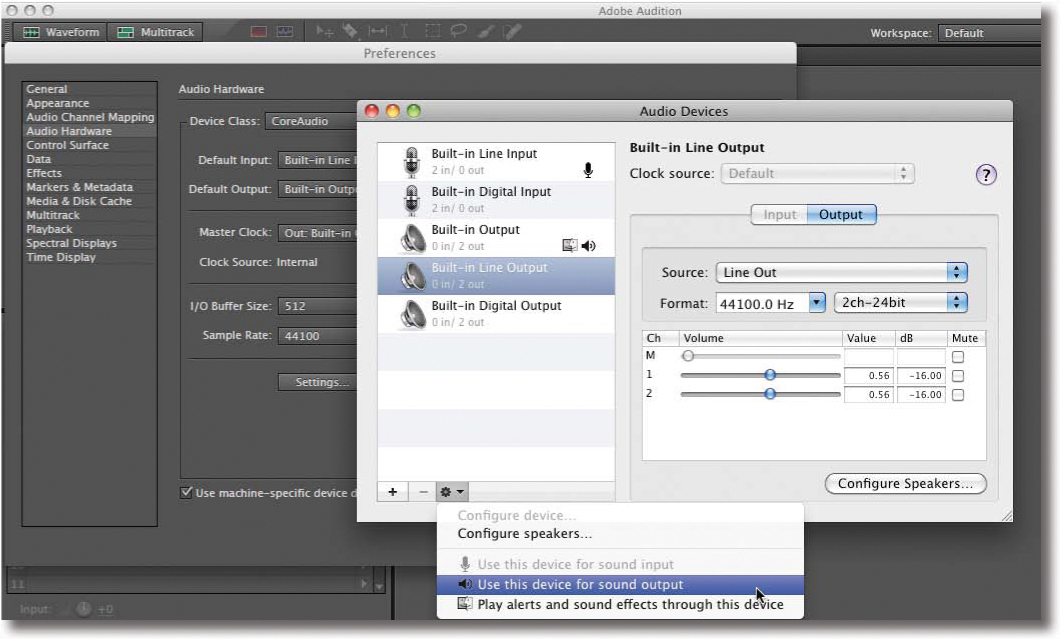
2. Open Audition and choose Audition > Preferences > Audio Hardware.
3. Don’t change the Device Class or Master Clock preferences, because they will default correctly. The Default Input drop-down menu lists all available audio inputs. Choose Built-In Line Input.
4. The Default Output drop-down menu lists all available audio outputs. If you’re using the built-in speaker, choose Built-In Output; for the line-level output, choose Built-In Line Output.
5. I/O Buffer Size determines the system latency. (See the sidebar “About latency [computer-based delay]” for more information.) Low values result in less delay through the system, whereas higher values increase stability. A value of 512 samples is a good compromise.
Note
Compared to the Mac’s Sound setup under System Preferences, the Audio/MIDI Setup accessed from Audition’s Settings button (Preferences > Audio Hardware) offers additional level controls, the option to mute inputs, and the ability to click on any input or output and examine its characteristics.
6. The Sample Rate drop-down menu lists all available sample rates. For most Macs, the choices are 44100, 48000, 88200, and 96000kHz; choose 44100, which is the standard for CDs. (In theory, higher sample rates improve fidelity, but the difference is subtle at best.) Windows computers and external audio interfaces generally offer a wider choice of sample rates.
7. Click Settings to open the Mac OS Audio/MIDI Setup dialog box, and then click Built-In Line Input.
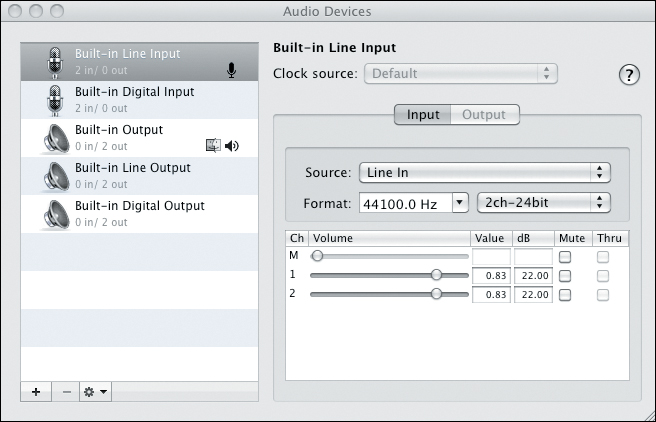
The settings will mimic what you set in Preferences (e.g., if you selected a 44.1kHz sample rate, this will be shown as the sample rate under Format).
8. The other format field specifies Bit Resolution; choose 2-channel, 24-bit.
9. All Mac OS X audio-related parameters are now set. Close the Audio Devices dialog box, and click OK in Audition’s Preferences dialog box.
10. Choose Audition > Preferences > Audio Channel Mapping. This correlates Audition’s channels to the hardware inputs and outputs. For example, Audition’s 1(L) channel will be mapped to Built-in Output 1. Click OK to close this dialog box.
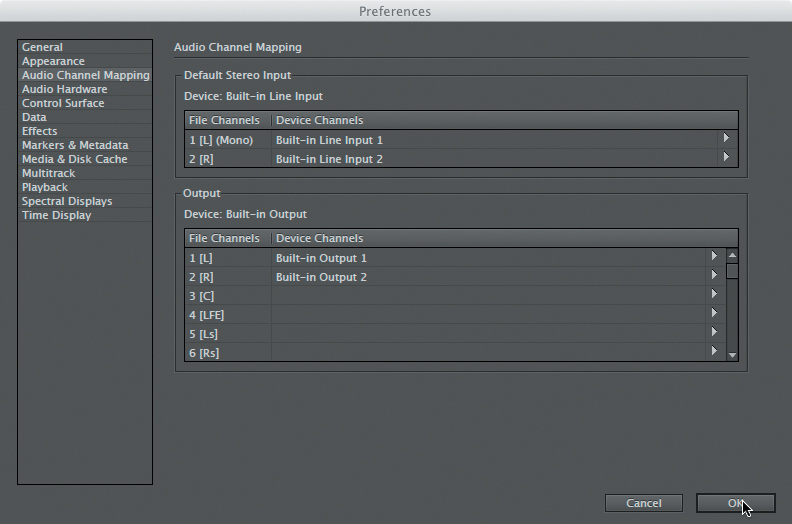
Note
The mapped defaults seldom need to be changed; however, you can remap if (for example) you were given a file where the right and left channels were accidentally reversed: Map Audition’s 1(L) channel to the Built-in Output 2, which connects to the physical right output.
Proceed to the section “Testing inputs and outputs with Audition (Mac or Windows).”
Windows setup
Unlike newer Macs, Windows systems typically have several drivers: legacy drivers (primarily MME and DirectSound) for backward compatibility and higher-performance drivers (WDM/KS, which is different from yet another driver type called WDM). However, for Windows music applications, the most popular high-performance audio driver is ASIO (Advanced Stream Input/Output), created by software developer Steinberg. Virtually all professional audio interfaces include ASIO drivers, and many include WDM/KS drivers.
Unfortunately, ASIO is not part of the Windows operating system, so for these lessons you’ll use the MME (Multimedia Extensions) protocol. It has relatively high latency but is stable and predictable. Experienced computer users can download the general-purpose ASIO driver ASIO4ALL, which is available free of charge from www.asio4all.com. It is the de facto ASIO driver for laptop owners who want to use ASIO with internal sound chips. Although you’ll use MME for now, with a professional audio interface, use the ASIO or WDM/KS drivers provided with it, or as an alternative, ASIO4ALL.
1. Windows motherboards typically have both mic and line 1/8-inch inputs. Connect the audio source to the computer’s 1/8-inch line input jack via the 1/8-inch patch cord.
Tip
If there’s a microphone input and you’re not using it, make sure it’s not selected (or its fader is down) to prevent it from contributing any noise.
2. If you’re not using internal speakers, plug the earbuds/headphones or monitoring system input to the computer’s line-level output.
3. Proceed to the section describing the operating system you’re using.
Windows 7 (32- or 64-bit) assignments
This lesson describes how to configure Audition to work with a typical Windows 7 machine’s inputs and outputs.
1. In Windows, choose Start > Control Panel, and then in the Control panel double-click the Sound icon.
2. Click the Playback tab. Click either Speakers or Headphones, depending on what you have plugged into the computer’s output jack. After clicking the appropriate choice, click the Set Default button to make this your default audio output.
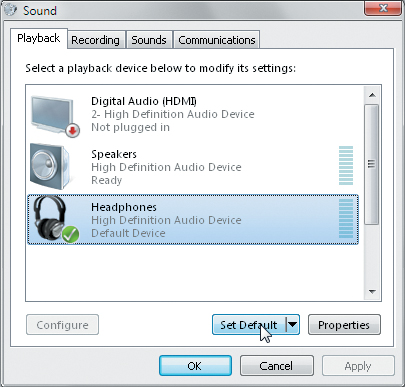
Tip
Click the Sound Playback dialog box’s Properties to bring up a dialog box where you can click the Levels tab and adjust the volume and balance, and also mute the output.
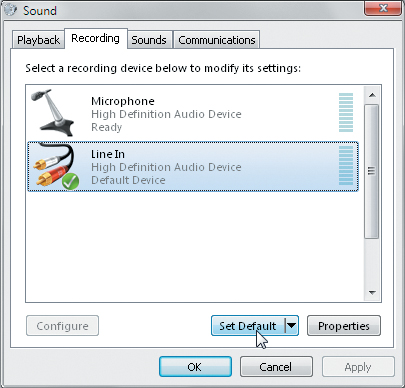
3. Click the Sound dialog box’s Recording tab.
4. Click Line In, and then click Set Default. Click the Sounds tab, and for Sound Scheme, choose No Sounds—it’s distracting to hear system sounds while you’re working with audio. Click OK.
Tip
Click the Sound Recording dialog box’s Properties to bring up a dialog box where you can click the Levels tab and adjust the volume and balance, and also mute the input.
Windows XP assignments
This lesson describes how to configure Audition to work with a typical Windows XP machine’s inputs and outputs. Note that Windows XP is no longer recommended for most modern music programs, because several improvements have been made in Windows 7 with respect to handling audio, memory management, and hard disks.
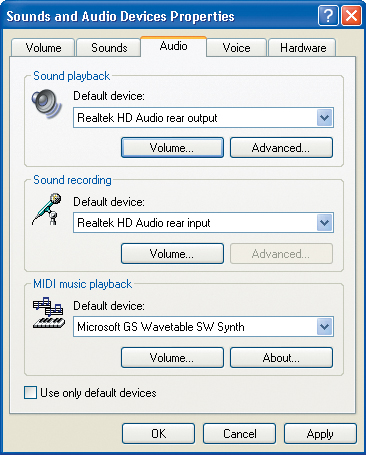
1. In Windows, choose Start > Control Panel, and then in the Control panel double-click the Sound and Audio Devices icon.
2. Click the Audio tab. Choose the desired input and output devices from the Sound Playback Default device and Sound Recording Default device drop-down menus, respectively.
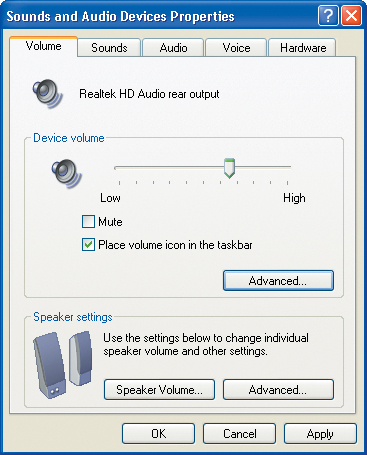
3. To adjust the input volume, click the Volume button in the Sound Recording section. A small mixer appears; select the Stereo Mix Select check box, and use the associated fader to adjust the input levels.
Tip
If there’s a microphone input and you’re not using it, make sure it’s not selected, or its fader is down, to prevent it from contributing any noise.
4. To adjust the output volume, click the Volume tab. A master fader lets you adjust the volume; select the “Place volume icon in the taskbar” check box to be able to adjust the output volume without having to open any windows or dialog boxes.
5. Click the Sound dialog box’s Recording tab.
6. Click the desired input (for a laptop, this will often show Stereo Mix), and then click Set Default. Click the Sounds tab, and for Sound Scheme, choose No Sounds—it’s distracting to hear system sounds while you’re working with audio. Click OK.
Audition settings for Windows audio
Now that the computer has been configured properly for the audio inputs and outputs, you need to configure settings in Audition as well.
1. Open Audition, and choose Edit > Preferences > Audio Hardware.
2. From the Device Class drop-down menu, choose MME.
3. From the Default Input drop-down menu, choose the default input device (Line In) you specified previously; from the Default Output drop-down menu, choose the default output device (Speaker or Headphones) you specified previously. Do not change the Master Clock preference.
4. Latency determines the delay through the computer. Low values result in less delay through the system, whereas high values increase stability. A value of 200ms is “safe” for most computers.
5. The Sample Rate drop-down menu lists all available sample rates. Most Windows internal audio chips offer a wide variety of sample rates, often from 6000Hz to 192000Hz. Choose 44100 (in theory, higher sample rates improve fidelity, although few people can hear a difference). External audio interfaces typically offer fewer options that are intended for professional audio and video projects. After selecting the Sample Rate, click OK.
6. Choose Edit > Preferences > Audio Channel Mapping. This correlates Audition’s channels to the hardware inputs and outputs. For example, Audition’s 1(L) channel will be mapped to Line 1. Click OK to close this dialog box.
Note
The mapped defaults for channel mapping seldom need to be changed. However, you can remap if (for example) you were given a file where the right and left channels were accidentally reversed: Map Audition’s 1(L) channel to the Built-in Output 2, which connects to the physical right output.
Testing inputs and outputs with Audition (Mac or Windows)
Because you already specified default inputs and outputs in the previous lessons, Audition will default to using these for recording and playback. Now you’ll test these connections to ensure that the inputs and outputs are set up properly.
1. Choose File > New > Audio File to create a new file in the Waveform Editor. A dialog box opens.
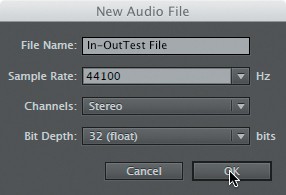
2. Name the file. The sample rate should default to the value you selected in Preferences.
3. Choose the number of channels. Their inputs will default to what you specified in Preferences. If you choose Mono, only the first channel of the input channel pair will be recorded.
4. The bit depth represents the project’s internal bit depth, not the bit resolution of your interface’s converters. This resolution will be used to calculate changes in volume, effects, and the like, so choose the highest resolution, which is 32 (float).
5. Click OK to close the dialog box.
6. Click the Transport Record button, and then start playback from your audio source. If all connections are defined and all levels set properly, you’ll see a waveform being drawn in the Waveform Editor window. Record several seconds of audio.
7. Click the Move Playhead to Previous button in the Transport, or drag the playhead (also called the current time indicator [CTI]) back to the beginning of the file. Click Play, and you should hear what you recorded in your chosen output device (internal speakers, earbuds, headphones, or monitoring system). Click the Transport Stop button to end playback.
8. Now test recording and playback in the Multitrack Editor. Choose File > New > Multitrack session. A dialog box opens.
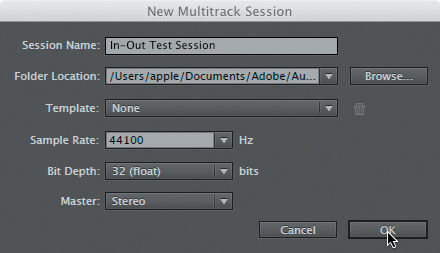
9. Name the file. For Template, choose None. The sample rate should default to the value you selected in Preferences.
10. As with the Waveform Editor, choose the highest resolution of 32 (float), and then choose the number of output channels (Stereo) for the Master Track.
11. Click OK to close the dialog box.
12. Arm a track by clicking the R (Record) button. Start playing your audio source; the channel’s meter should indicate signal. Note that the input will connect automatically to the default input; however, if you click the input field’s right arrow, you can choose just one input for mono tracks or you can open the hardware section under Preferences if you have a multi-input audio interface and want to choose an input other than the default.

13. Click the Transport Record button. If all connections are defined and all levels set properly, you’ll see a waveform being drawn in the Multitrack Editor window. Record several seconds of audio.
14. Click the Transport Move Playhead to Previous button, or drag the playhead (CTI) back to the beginning of the file. Click Play, and you should hear what you recorded in your chosen output device (internal speakers, earbuds, headphones, or monitoring system). Click the Transport Stop button to end playback.
Using external interfaces
It’s not possible to present an exercise in this lesson, because there is no way to know what interface you’re using. However, keep the following in mind when you’re using external interfaces:
• Professional interfaces usually have capabilities beyond those offered by internal audio and therefore have their own control panels for routing signals, controlling levels, and the like.
• Interfaces often have more than one set of stereo inputs and outputs. When you’re choosing default inputs and outputs, you’ll have a much wider selection compared to using a computer’s internal sound capabilities.
• With interfaces that provide USB 2.0 and FireWire connections, try both on extended sessions to determine if one option works better than the other.
• Windows USB interfaces can be class-compliant, meaning they don’t need custom drivers. However, always use the custom ASIO or WDM drivers provided with an interface for maximum functionality and minimum latency.
• With Windows computers, never use a driver called “emulated,” such as “ASIO (emulated).” These result in the worst performance of all possible drivers.
• Some interfaces include a feature called zero-latency monitoring. This means the input can be mixed directly to the output, and the mixing is typically controlled by using an applet that shows up onscreen to bypass any latency caused by going through the computer.
• With ASIO interfaces, Audition will default to monopolizing any sound capabilities. To access the ASIO interface in other applications that are running, select the “Release ASIO driver in background” check box in Audition’s Preferences > Audio Hardware dialog box. Giving the other application the focus will allow it use the ASIO interface, unless Audition is recording.
Review questions
1. What are the most popular driver protocols for Mac and Windows?
2. What is an unavoidable, negative by-product of working with computer-based audio?
3. How can you minimize latency?
4. What are the advantages and disadvantages of high sample rates and high bit resolutions?
5. Although many external audio interfaces include ASIO drivers, the Windows operating system does not. How can you use ASIO with laptop sound chips?
Review answers
1. Core Audio for the Mac and ASIO for Windows are the most popular driver protocols for pro audio.
2. System latency causes a time delay between the output and what’s being recorded at the input.
3. Change the number of sample buffers to alter latency. Using the smallest number possible, consistent with the audio not producing clicks or pops, provides minimum latency.
4. High sample rates and bit resolutions have the potential to deliver better audio quality but create larger audio files and stress the computer more than lower rates and resolutions.
5. Free driver software, ASIO4ALL, provides ASIO drivers for sound hardware that was not designed for ASIO compatibility.