16. Scoring Audio to Video
• Load a video preview file into Audition
• Analyze the video and alter Audition’s tempo to create “hit points” so the music closely correlates to the video
• Create a soundtrack music bed
• Add musical or sonic “hits” in musically appropriate places to accent the visuals
• Synchronize ADR (dubbed) dialogue with original dialogue
• Evaluate which type of dialogue synchronization provides the best audio quality
Audition can load video preview files; when composing soundtracks or adding dialogue, the video window provides a crucially important reference.
Importing a video
When working with video, Audition can create a separate video preview track at the top of the workspace. If you import video that also includes an audio track, the audio will likewise be imported into Audition and placed in the audio track immediately below the video track.
1. Open Audition and choose File > New > Multitrack Session.
Note
Audition recognizes the following video formats: AVI, DV, MOV, MPEG-1, MPEG-4, 3GPP, and 3GPP2. Audition is not a video editor and cannot edit the video preview; any video edits need to be done in a program like Adobe Premiere Pro prior to loading the file into Audition. However, its start point can be moved within the video track.
2. Name the file Audio for Video. Choose None for Template, 44100Hz for Sample Rate, 16 for Bits, and Stereo for Master. Click OK.
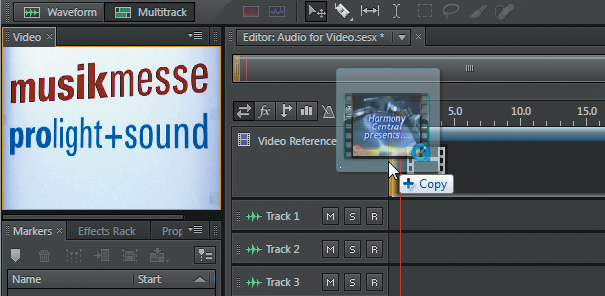
3. From the Media Browser, click on the Lesson16 folder and then open the folder Audio for Video Files and drag the file Promo.mp4 into the beginning of Track 1. This creates a video track automatically, as well as opens a Video panel where you can see the video. You may want, or need, to resize the Video panel to see the entire video. (Note: The video file is provided courtesy of HarmonyCentral.com.)
Tip
You can right-click (Control-click) in the Video panel and choose five different scaling options and three different resolutions. Best Fit Scaling is usually the optimal choice, because the video size will conform to the size of the panel.
Using markers to create hit points
The process of creating a soundtrack typically involves more than just throwing some library music into a couple of tracks and hoping that it matches the video. Sound libraries make it easy to create your own music; even if you consider yourself a “video” person instead of a musician, you might be surprised at how easily you can create a soundtrack, and with a little extra effort, customize the music to correlate to what’s happening onscreen.
One way to create this correlation is to identify places in the video where there are important transitions or events and then try different tempos to see which one allows the music to match these “hit points” best.
1. Right-click (Control-click) in the timeline and choose Time Display > Decimal.
2. Start playback from the beginning of the video. When there’s a major transition in the video, press M to place a marker in the timeline and create a location point to aid you in placing musical effects (often called a “hit point”). For example, one point would be just before “the world’s largest music show.” Others would be just before “live updates from the show floor,” “daily highlight videos,” “dedicated discussion forum,” “press release central,” and just before “...and more.”
3. Now fine-tune the placement of the location points, because there will always be a slight lag between the time you view something onscreen and the time you press M. Fortunately, except at the first hit point area, the video has a white flash screen just before these important transitions. Drag the current time indicator (CTI, or playhead) to just before “the world’s largest music show,” and then drag Marker 01 to align with it.
4. Drag the CTI until it lands on the white frames just before “live updates from the show flow.” Drag Marker 02 to align with the CTI.
5. Follow the same procedure to position the markers at the remaining white frames before the transition points.
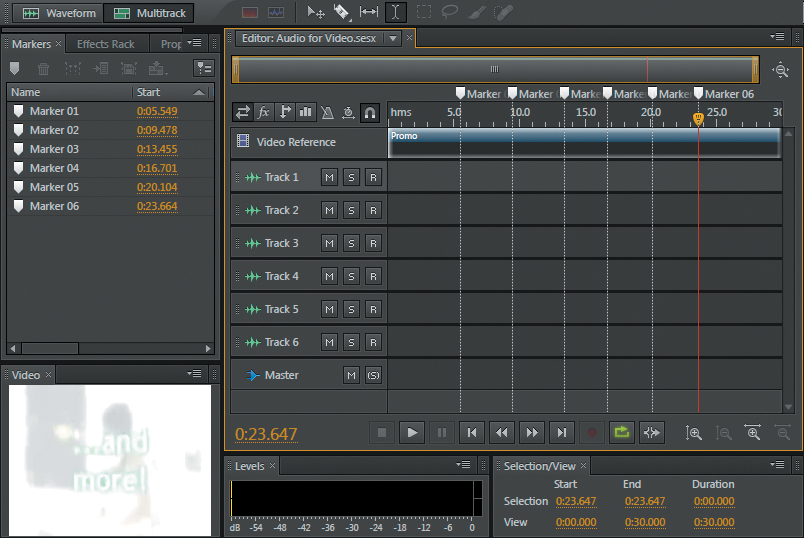
6. Click on the Markers panel (choose Window > Markers if it’s not visible). You should see markers at approximately 0:05.549, 0:09.478, 0:13.455, 0:16.701, 0:20.104, and 0:23.664. These values don’t have to be exact as long as the last five markers are where the video shows a white flash. Double-click on each marker in the Markers panel to verify this.
7. Right-click (Control-click) the timeline and choose Bars and Beats; then right-click (Control-click) the timeline and choose Edit Tempo. Enter 100BPM to start, and then click OK.
Note
Conveniently, the video ends just after measure 17. Most pop music is constructed in groups of four measures, so the music used for this soundtrack can last for four groups of four measures and then fade out to the end of the video on something like a cymbal crash, sustained note, orchestral hit, or the like.
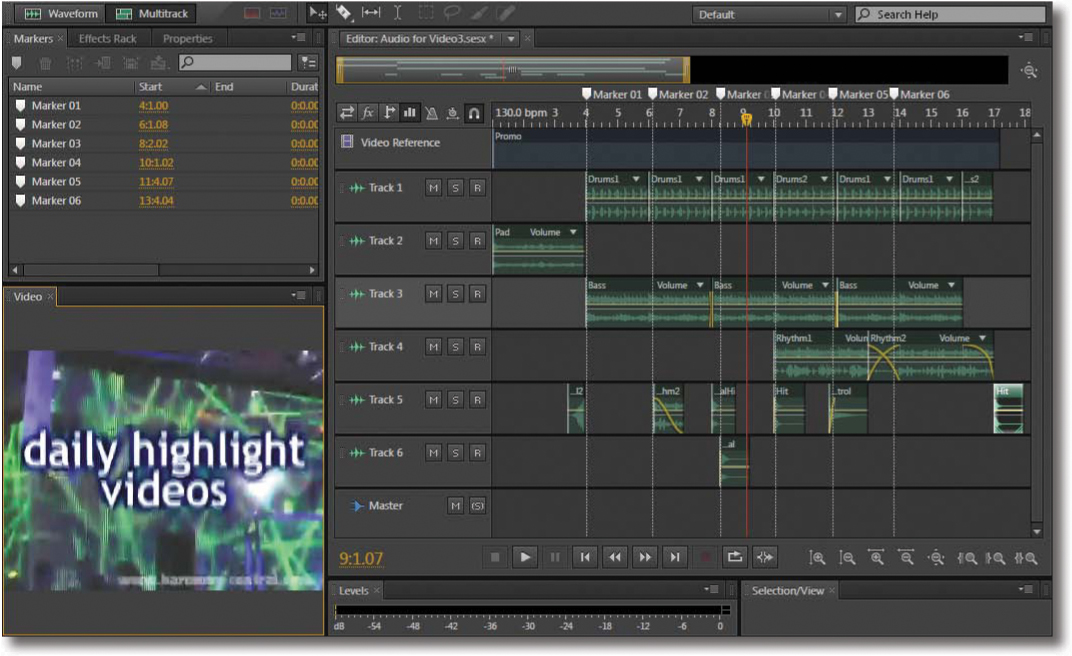
8. Look at the extent to which the markers align with the tempo. Two fall on measure boundaries, but the rest fall in several places that have little to do with the tempo. You’ll need to find a better match.
9. Change Edit Tempo to 130BPM. This tempo works quite well—Markers 01, 04, and 05 are very close to a measure boundary. Markers 02 and 06 are quite close, too. The one that’s still off a bit is Marker 03, but because the hit point occurs slightly after the measure boundary, you could add a sound that starts on the beat and builds slightly to the hit point. So, 130BPM is a good tempo for the video and fits the video’s theme as well—it’s upbeat and danceable. Note that finding hit points sometimes involves trial and error; you may need to try several different tempos before finding one that “fits.”
10. Keep this project open in preparation for the next lesson.
Building the soundtrack
The basic strategy for this project is to lay down a rhythmic “bed” in the background that lasts the duration of the video and then overlay hits and additional sounds to emphasize the transitions.
1. Right-click (Control-click) the timeline and choose Snapping. Disable all options except Snap to Ruler (Coarse).
Note
In this lesson it’s very important that clips snap to precise measure beginnings. Zoom in to verify that the snapping is correct.
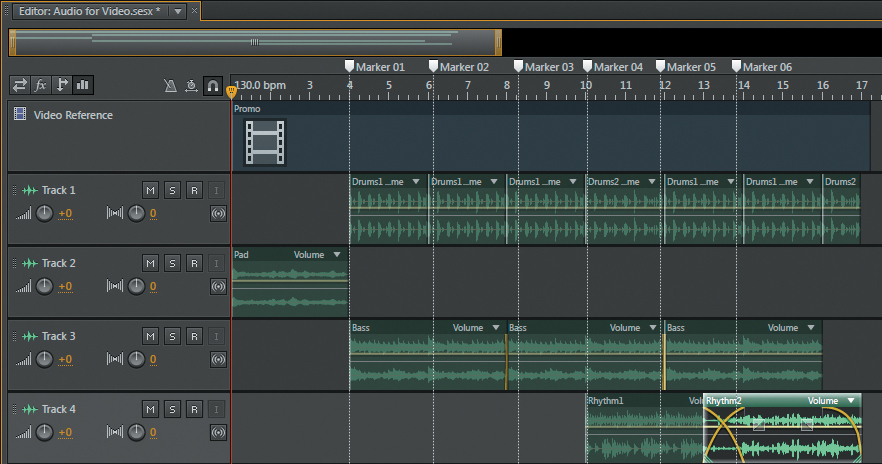
2. Use the Media Browser to navigate to the Lesson16 folder, and open the folder Audio for Video Files. Drag Drums1.wav into Track 1, and snap its start to measure 4.
3. Alt-click (Option-click) the Drums1.wav clip’s header to copy the file, and drag so that its start snaps to measure 6. Then make three more copies. Snap one clip’s start to measure 8, one to measure 12, and the third to measure 14.
4. Drag Drums2.wav from the Audio for Video Files folder into Track 1, and snap its start to measure 10.
5. The last half of the Drums2.wav clip would make a good ending. Alt-click (Option-click) the header of the Drums2.wav clip that starts at measure 10, and drag it so that its start snaps to measure 15. To end up with only the second half, hover the cursor over the last Drums2.wav clip’s left edge, and use the Trim tool to drag the clip’s edge right so it snaps to the beginning of measure 16.
6. Play the file from the beginning to verify that the Drum track plays back correctly and that there aren’t any gaps from not properly snapping to a measure beginning.
7. Drag the Pad.wav file into the session so it starts at the beginning of Track 2.

8. Drag the Bass.wav file into Track 3 and snap its start to measure 4. Copy it twice, and snap the beginning of one clip to measure 8 and the beginning of the other clip to measure 12.
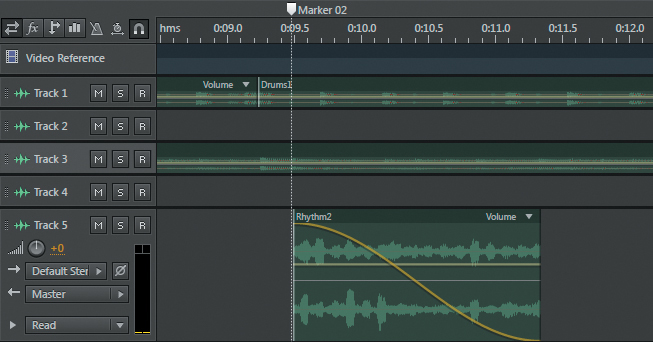
9. Drag Rhythm1.wav from the Audio for Video Files folder into Track 4 and snap its beginning to measure 10; then drag Rhythm2.wav into Track 4 and snap its beginning to measure 13 so it crossfades with Rhythm1.wav over measure 13.
10. Click Rhythm2.wav’s fade-out handle, and drag it to the left so the fade begins at measure 16. Also, drag down for a Cosine value of around 50.
11. The rhythm track is now complete. Play it from start to finish while looking at the video. You’ll see that many of the musical transitions correlate to changes in the video, although some don’t quite match up. You’ll use the additional tracks to tighten up these transitions.
12. Keep the project open in preparation for the next lesson. Also note that you can open the Session file AudioForVideo to bring Audition to this point.
Adding hits to the marker location points
Now you’ll use short, usually percussive, sounds called hits to add audio accents to the video’s highlights and transitions.
1. Drag RevCymbal2.wav into Track 5 so that the clip ends at the start of measure 4. This leads right into the “the world’s largest music show” and makes a good transition from the opening pad to where the rhythmic bed starts. Play this transition.
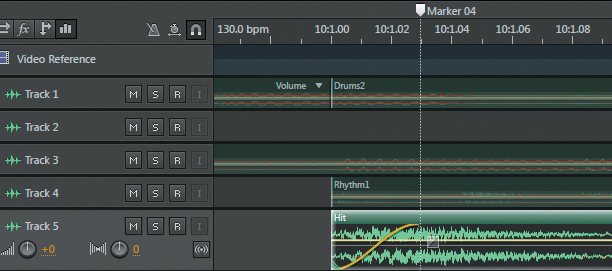
2. You’ll do the easiest transitions first, and then revisit the more difficult ones. Drag Hit.wav into Track 5, and position the clip’s start at measure 10. Click the fade-in handle, and drag it right so it fades into Marker 04. The hit will then start in time with the music but only reach full volume at the video’s transition point, so it will seem like the audio syncs up perfectly with the video. Play this transition to verify that the hit seems to happen at the same time as the white flash in the video.
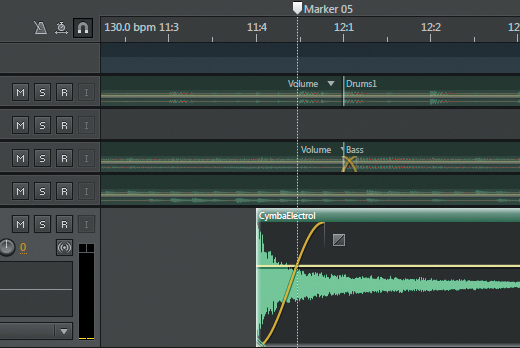
3. With the transition around measure 12, note that the white flash frames happen prior to the start of the measure. Drag CymbalElectro.wav into Track 5 so the clip starts at 11:4, and then click the fade-in handle and drag right to just a little before the start of measure 12. The cymbal fades into the flash and then fades out into the start of the measure. This is a “looser” transition (as opposed to a “tight” transition) that nonetheless bridges the visual flash and music. Play this transition.
4. The transition at measure 8 is a challenge. Drag Cymbal.wav into Track 6, and position its start at 8:1. Play this transition. It doesn’t work; the cymbal hits too early compared to the flash.
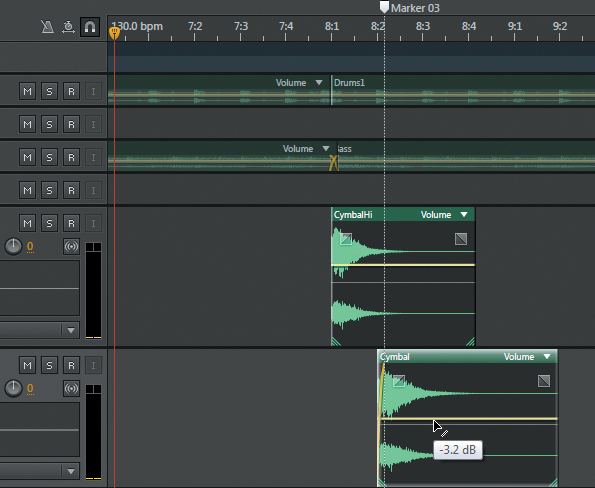
5. Drag Cymbal.wav’s start to Marker 03 to see if that works. Play this transition; it doesn’t work either. However, note that Marker 03 is very close to 8:2, which at least falls on a beat. Snap Cymbal.wav’s start to 8:2.
6. Drag CymbalHi.wav into Track 5, and snap its start to the start of measure 8. Having the two cymbals hit a beat apart works musically, and the second cymbal hit matches up perfectly with the white flash. A slight fade-in with the second cymbal improves the transition slightly, as does lowering its clip Volume envelope by around -3dB.
7. The transition around measure 6 (Marker 02) is also somewhat of a challenge, so you’ll use a different strategy by adapting a clip to provide a slight flourish when the white flash hits in the video. Although it won’t follow the beat of the music, by seeming more like an effect, it will still work well. You need to trim Rhythm2.wav to exactly one measure, drag it into the end of Track 5, and snap its end to a measure start. Next, hover the cursor over the clip’s left side, and then drag it right so that the clip lasts exactly one measure.
8. Now drag this clip into its final position. Align the clip start with Marker 02, and then click the fade-out handle and drag it all the way to the left with a Cosine value of 0.
9. Place the playhead before Marker 06, and play through the transition at Marker 06. Note that this doesn’t really need additional audio because it’s a two-step transition—first there’s the flash and then the video shows “...and more!” The background rhythm pattern changes more or less at the same time as this change in the video.
10. To wrap it up with a big finish, drag Hit.wav into Track 5 so the clip starts at measure 17. Now play the entire video through from start to finish to hear the soundtrack and hits, and how they relate to the video.
Automatic Speech Alignment
Automatic speech alignment is very important when processing dialogue in movies. Dialogue that’s recorded on location is often subject to noise, an inability to get actors close enough to the microphone without the mic appearing in the picture, and other issues. As a result, the actors will come in after the shoot and dub new parts. This process is also called looping or ADR (Automated Dialogue Replacement).
Dubbing is not easy to do. The actor typically listens to the original part on headphones in a recording studio (as opposed to being on location) and tries to match the original speech as closely as possible. Sometimes actors do ADR even if it’s not absolutely necessary, because they want to add a different emotional inflection than what they originally used while shooting the scene.
Audition’s Automatic Speech Alignment feature automates this process. You load the original reference dialogue (which can even be relatively noisy) into an Audition track, and then record the new dialogue into a second track. Audition can then compare the new dialogue to the original and use a combination of stretching and alignment processes to match the new dialogue to the reference track.
1. With Audition open, navigate to the Lesson16 folder, and open the Multitrack Session Vocal Alignment that’s located in the Vocal Alignment folder.
2. The Session has two tracks, OriginalVocal and ADRVocal. You can use the ADRVocal to experiment with the Automatic Speech Alignment feature, but it’s instructive to record your own dialogue and try to match the OriginalVocal track. Mute the ADRVocal track and while listening to the OriginalVocal track on headphones, record a new vocal track where you try to match the OriginalVocal phrasing as closely as possible. If you decide to create your own ADR track, the B-movie-type dialogue is “Helen said she thought she’d found Tesla’s lab notes on wireless power transmission, and if she did, that would explain her disappearance. She would instantly be targeted as one of the most wanted people on this planet.”
Note
The ADRVocal supplied with this project is deliberately way out of sync with the original dialogue so you can hear how Automatic Speech Alignment affects the sound quality of the dialogue when it has to do lots of correction.
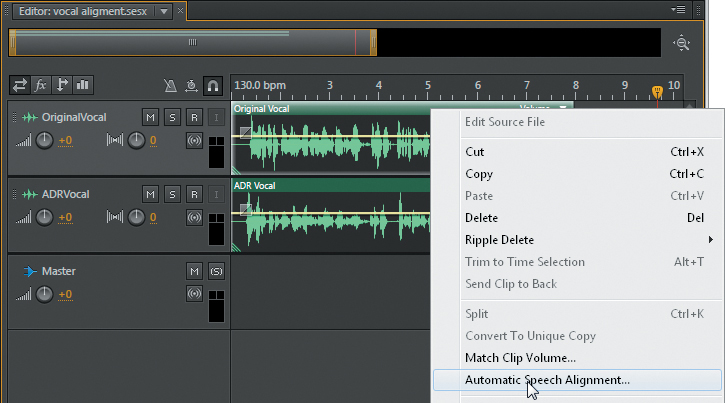
3. You now have two tracks to align, using either the one supplied with the lesson or one you created. If you recorded a vocal, trim the new clip to the same length as the OriginalVocal track. Select the Move tool, and draw a marquee to select both tracks.
4. Right-click (Control-click) the clip that will serve as the reference to which the other clip should be aligned, and choose Automatic Speech Alignment.
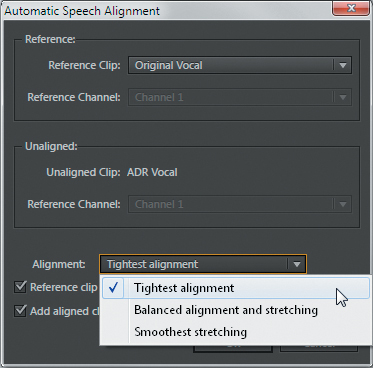
5. A dialog box appears. For the Reference Clip, if needed, choose the clip to which you want the new dialogue aligned (in this project, OriginalVocal). There are three Alignment options; you’ll try all three, so start with Tightest Alignment. Select the “Reference clip is noisy” check box because in this case, it is; also select the “Add aligned clip to new track” check box to allow for easy comparison. Click OK.
6. The aligned track appears below the reference track. Solo the OriginalVocal and ADRVocal tracks (or OriginalVocal and the ADR track you recorded), and then play them back together so you can hear the differences between the two.
Note
The “Smoothest stretching” option usually provides the best audio quality, yet the alignment will still be very tight. Of course, the closer the ADR vocal is to the original, the less processing the Automatic Speech Alignment needs to do and therefore the higher the sound quality.
7. Now solo the OriginalVocal track and the new, aligned track. You’ll hear far fewer differences.
8. Click on the OriginalVocal clip, and then Ctrl-click (Command-click) on the ADRVocal track. Repeat steps 4 and 5, but this time select “Balanced alignment and stretching” in the Alignment drop-down menu. Click OK.
9. Repeat step 8, but this time select “Smoothest stretching” in the Alignment drop-down menu. Click OK.
10. You now have three clips with the suffix “Aligned.” Solo each one to hear how the three different processes affect the sound quality.
Audition integration with Adobe Premiere Pro
Premiere Pro includes an Edit In Adobe Audition command. This makes it easy to send anything from individual clips to a selected work area (including reference video) to Audition for restoration, mastering, or processing (“sweetening”). With individual clips, any edits made in Audition will automatically update the clips in Adobe Premiere Pro. The same is true if you’re editing clips from After Effects.
You can also link Audition Multitrack Sessions to exported mixdown files, so when you select the exported file in Premiere Pro, you can do editing and remixing in Audition. This makes it easy to modify a soundtrack when editing in Premiere Pro causes a video to change over time. However, if you don’t need this level of flexibility, the two applications can simply share a mixed file from Audition’s Multitrack Editor. Note that when you select a mixed file, you can choose to open either the Audition Multitrack Session that created it or open it in the Waveform Editor for simple sweetening.
The level of integration between Audition and Premiere Pro can smooth your workflow dramatically when you’re combining audio and video projects. Although covering all aspects of this integration is beyond the scope of this book, there are many tutorials, blog posts, and additional information on the Adobe website.
Review questions
1. Does Audition do video editing?
2. What is a “hit point”?
3. What is ADR or looping?
4. Why is it necessary to do automatic speech alignment in the Multitrack Editor instead of the Waveform Editor?
5. Are you limited to a single speech alignment process?
Review answers
1. No. An imported video file is used as a preview, and Audition can add audio to the video.
2. A hit point is a transition or event in the video that you want to accent with some musical element.
3. ADR and looping are techniques that allow actors to replace low-quality dialogue in a movie with higher-quality dialogue, typically recorded in a studio instead of on location.
4. You must do automatic speech alignment in the Multitrack Editor because you need to have two tracks in the Session—the original dialogue and the replacement dialogue you want to align to the original dialogue.
5. No; there are three different ways to do alignment that trade off tighter alignment for smoother vocal quality.