

Color keying is the big lie that somehow manages to kinda, sorta reflect the truth. Someday perhaps, when we have cameras that can perform full 3D scene reconstruction—not just what the lens lays down in a two-dimensional image, but a scan of the full spatial and temporal information of the scene—we'll laugh about the old days when we used to send actors out on to a mostly empty stage of saturated blue or green, in some cases completely psyching out their performance (it's been compared to “acting in a void” or “acting in the desert”), so that later, the color could stand in for transparency.
Meanwhile, as they have for over half a century, blue screens (and their digital-era cousins, green screens) remain the state of the art for situations in which you want to shoot figures—usually actors—in one setting and composite them into another.
Note
Novices often ask if a background has to be blue or green to be keyed. The answer is no. It just happens that, because blue and green are primary colors not dominant in human skin tones (unlike the third additive primary, red), they are well positioned to be clearly differentiated from the foreground colors, which generally will not be in as pure a tonal range but made of up values from all three color channels.
The process goes by many names: color keying, blue screening, green screening, pulling a matte, color differencing, and even chroma keying, a term more likely to conjure the image of a weather forecaster on your local news, waving her hands to make the clouds clear out over Columbus—or just Bill Murray in Groundhog Day.
This chapter will discuss not only color keying with blue- and green-screen footage but also all cases in which pixel values (color, luminance, saturation, and so on) stand in for transparency, allowing compositors to effectively separate foreground from background based on channel levels. You will learn how to create several types of keys using techniques that create luminance information that is then applied to the alpha channel of a layer (or layers). The black areas will be transparent, the white areas opaque, and the gray areas gradations of semi-opacity.
Note
In many ways this chapter follows on directly from Chapter 3, “Selections: The Key to Compositing,” which covered many of the fundamentals in creating selections and discussed what constitutes a good matte. In this chapter, and the one following, we move beyond the fundamentals.
Before I get into detail about specific keying methods and when to use them, I want to mention some useful bits of advice that apply no matter which technique you choose:
Get used to soloing your foreground against a brightly colored background as you work in After Effects. This will generally mean setting the background of the composition (Ctrl+Shift+B/Cmd+Shift+B) to a saturated yellow, red, orange, or purple (Figure 6.1). Choose a color that is distinct from both the foreground you are keying and the shot's existing background. If the foreground is going to be matted into a dark scene, you can use a dark shade, but in most cases you'll want it fairly bright to contrast with your foreground, showing any holes in the matte, or edge problems and noise in the background (Figure 6.2).


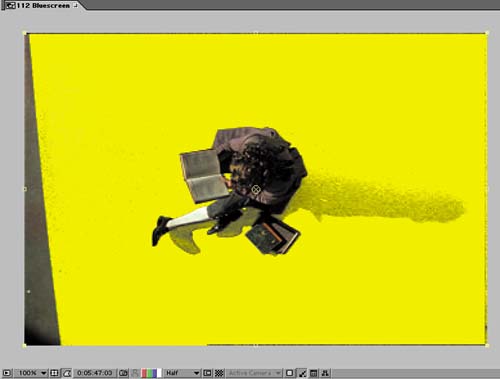
Figure 6.1. Your choice of background influences what you see. Against the default black, almost no detail is visible. With the checkerboard turned on, you can begin to see some flaws with the shadow. These flaws become clearer with a bright, solid, contrasting background. (Newton source images courtesy of Tim Fink Productions.)
When isolating a foreground, protect edge detail at all costs. Unless you're in a situation where your edges won't show up clearly, the game here is basically the same whatever tool you use: Solidify the opaque areas of the foreground, erase the background areas, but don't overdo either or your edge will suffer. Pushing edge pixels too far makes crunchy, chewy mattes (Figure 6.3).
Keep it simple, and don't be afraid to start over. Particularly with the more sophisticated keyers, such as Primatte and Keylight, there are enough variables that you can easily overadjust your image to the point where you can't bring back detail that is already lost, try as you might, because too many different adjustments are fighting one another. As with rotoscoping (Chapter 7, “Rotoscoping and Paint”), there is something very Zen about keying: You can only explain so much before intuition and common sense about what you're dealing with have to kick in, or you'll fight endlessly with your shot. This is one case where throwing in the towel and starting over can save you an hour or two.
Get used to zooming in and looking hard for problems. Don't spend all of your time on a single frame of the shot, and if possible, find a difficult frame to start on—one that has motion blur or one in which a little gust caught the character's wispy hair. That way you'll avoid nasty surprises after a lot of hard work. Also, even when you're on a single frame, use different methods to keep looking around the frame. Keep the Info window prominent as you scan around the background, noting whether the alpha values of the background are truly at zero, zoom in and out, and flip between the alpha and color channels (Figure 6.4).

Figure 6.4. Enabling the alpha channel can reveal all kinds of other problems. The settings here are the same as in Figure 6.1.
Be prepared to combine multiple passes. This is probably the most important step that too many artists try to skip, thinking it's simpler to get everything in one pass. One common misconception with keying is that it's an automated process: You click a couple of buttons, and you're done. That can be true, on the rare occasions when the source footage is perfectly shot for keying. Even on a big-budget blockbuster, however, this happens only on the most straightforward of medium close-ups. In many cases, it is useful to create a core matte whose foreground is 100% opaque before refining the edges on a second pass. I'll describe this is in detail later in the Keylight section.


With these basics in mind, read on to learn about the various strengths of your keying options. I also urge you to revisit this list of best practices when it comes time to apply a key to your own shot, especially if you're new to keying.
When, Exactly, Are Linear Keyers Useful?
Situations in which you'd want to separate levels in a single channel or by average the levels of multiple channels include
Isolating a color range for the purpose of correcting it to a different color.
Using garbage mattes and holdout mattes (defined later in this chapter).
Matting elements that were shot over pure blackness or a close approximation. For example, fire is usually shot not on a blue-screen stage but outdoors at night or in a dark studio against a black background.
Matting an element with itself to hold out specific portions of the element for enhancement. For example, you duplicate a layer and matte its highlights to add a bloom effect to enhance them (see Chapter 12, “Working with Light”).
There are, of course, cases in which edge detail is not so critical, because you don't need to completely isolate an element: For example, you are matting it over itself, creating a high-contrast, or hi-con, matte. For cases where you just need to specify one area of a clip to adjust it, linear keyers will often do the trick.
I'm starting with these before bringing out the big guns of keying for a couple of reasons. Linear keyers are simpler to use and are useful in a wide variety of cases, beyond just blue- and green-screen shots. They contain fundamentals that carry forward into the more specialized keyers, such as Keylight, which is designed specifically to deal with blue and green screens.
Linear keyers differ from dedicated matte tools in that they do not do any kind of differencing of one channel or set of values against another (which is the key to blue and green screens); they are based merely on defining a range within a set of values.
The most useful linear keyers are
Extract
Linear Color Key
Luma Key
Color Key
Color Key and Luma Key have no softness in their thresholding and should be filed under “never use.” The means for grading edges provided by these keyers is a kludge; they offer Edge Thin and Edge Feather, which are crude methods for choking, spreading, and blurring the matte. Essentially they are binary keyers. They create pixels that are either transparent or opaque; the semitransparency is added afterward with no respect whatsoever to the source data. Linear Color Key is always a better option than Color Key; set to black or white, it can be used to generate luminance mattes (as does Extract).
Although both are linear keyers, Linear Color Key and Extract excel in different areas. Extract is the most useful tool for luminance keying, using the black and white points of an image or any of its individual channels. Linear Color Key is more appropriate in cases in which you want to isolate a particular color or chrominance range.
Extract uses histograms to help isolate the black and white cut-off points for your matte and then grades the thresholds with black and white softness settings. Furthermore, you can easily use it for more than just luminance, as it offers a pull-down menu to access histogram controls for all four color channels (red, green, blue, and alpha).
Keep in mind that even when you're luma keying, one of the three color channels may be more suitable than overall luminance, which is just an average of the three. Green is often (but by no means always) the brightest and most contrasty channel, and blue tends to be the noisiest (Figures 6.5a, b, and c). If you are using full RGB for your luma key instead of a single channel, keep in mind that the luminance values are actually weighted.
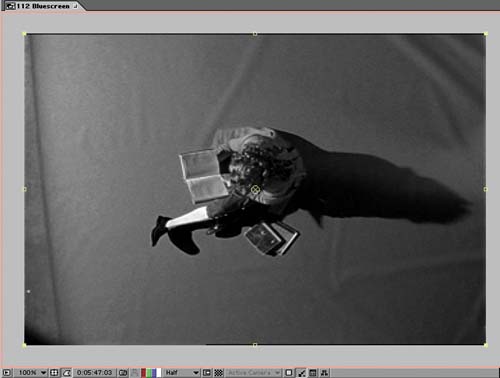

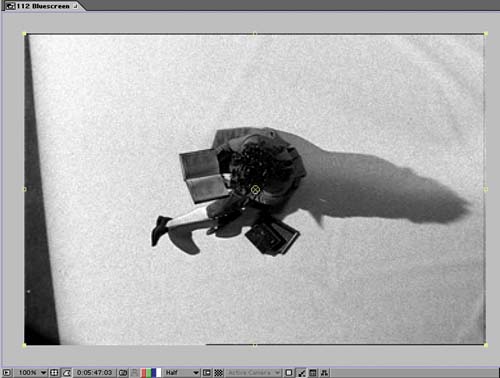
Figure 6.5a, b, and c. You'll get different results from each of the three channels. In this case, blue (6.5c) is the brightest, because the blue screen is the dominant object in the image. It also contains the most noise, however, despite the fact that the footage was transferred from film with no compression.
All Channels Are Not Created Equal
If you set an RGB image as a luma matte, the red, green, and blue channels are averaged together to determine the luminance of the overall image. But they are not weighted evenly.
CompareFigure 6.6 with Figure 6.5c, and you will note that the background of the averaged result is far less bright than the blue channel of the same image. The three channels are weighted according to how the eye sees them: Red at 29%, Green at 59%, and Blue at 12% luminance. This topic is explored in greater depth in Chapter 12, in the section on “Creating a Look with Color.”
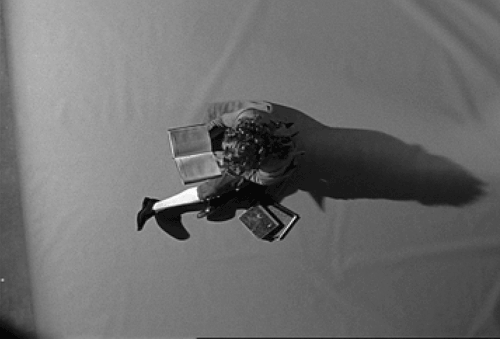
Figure 6.6. If this were an exact average of the grayscale versions of the channels shown in Figures 6.5a, b, and c, the background would be brighter due to the brightness of the blue channel. But to mimic how the eye sees color, the averaging weights the three channels according to how the eye sees them, and the eye is far less sensitive to blue than green.
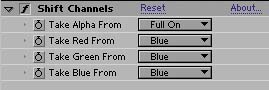
If you find yourself wanting to use one particular channel as a luma matte, use the Shift Channels effect (Figure 6.7).
Linear Color Key offers direct selection of a key color using an eyedropper tool. The default color is blue—ironic because a basic blue-screen key is exactly what you shouldn't do with this tool. The other odd thing about the defaults is the 10% Matching Softness setting, which is arbitrary and gives a rather loose range of matched tones. I often end up with settings closer to 1%.
Note that there are, in fact, three eyedropper tools between the thumbnail images in the Linear Color Key effect. The top one replicates the Key Color eyedropper, and the other two add and subtract from the Matching Tolerance. You can click the eyedroppers on either of the adjacent thumbnail images, or if these are too small, you can open the Layer window and choose the effect in its View pull-down, using the eyedropper there (Figure 6.8). Do not try using these eyedroppers directly in the Composition window in a comp with multiple layers—the result may be odd.

Figure 6.8. The eyedropper tools of the Linear Color Key can be used in the Composition or Layer windows to select and refine the color range. This tool is useful for non-primary color matting; in this case, a maroon color is selected.
You can match the color using RGB, Hue, or Chroma values. In most cases, RGB will do the trick, but the best idea in unusual situations is probably to try each one before you start fine-tuning the controls. You can adjust the Tolerance, which specifies how close the colors have to be to the chosen value to be fully matted, and Softness, which then grades the threshold, softening the edges according to how close the color values are to the target range.
The default setting for the Key Operation is to Key Colors, which is straightforward enough. You might think, therefore, that the other option, Keep Colors, would simply invert the result. In fact, Keep Colors was designed with a separate purpose in mind that of using Linear Color Key multiple times. If your first instance of the effect eliminates something you want to bring back, you have the opportunity to do so by adding a second instance of the effect targeting the color you want to bring back and set to Keep Colors. To set the second instance, you must first deselect the Effect option for the first instance, temporarily disabling it so you can set the color to keep (Figure 6.9).

Figure 6.9. Two instances of Linear Color Key, the first set to Key Colors, the second set to Keep Colors. The key controls for setting up the second instance are highlighted: The first instance has been temporarily disabled so the full color of the image can be sampled for the color to be brought back in the second instance. Once setup is complete, all instances must be once again enabled.
The concept of a difference matte sounds simple: Frame two shots identically, one of them with your foreground subject present, the other with no foreground subject (commonly called a clean plate). Now, let the computer compare the two images and remove everything that matches between them, leaving only the foreground subject.
Unfortunately, there are all sorts of criteria that preclude this from actually working very well, specifically
Both shots likely need to be locked off or motion stabilized, and even then it is common for there to be an offset that precludes a clean key.
Luma Mattes

A confession: I often use track mattes (detailed in Chapter 3) and a duplicate of my layer, instead of luminance keys applied directly to the layer. What I like about track mattes is that I can use Levels, a tool I know inside and out, and which gives me refined control of ranges on all channels, to refine transparency. Other artists may consider this approach more cumbersome, preferring to work with a single layer and an effect.
The foreground element probably is not completely devoid of whatever is in the background; low luminance areas, in particular, are prone to appear as background to the Difference Matte effect.
Even such subtleties as grain and slight changes of lighting can cause a mismatch to two otherwise identical shots. Raising the Blur Before Difference setting helps correct for this, but by introducing inaccuracy.
You can gauge the challenges for yourself using any locked-off shot with movement in it, ideally one in which a character enters the frame. Lock off a frame of the source shot; you can apply Time Remap and use a single keyframe with the time of the clean plate shot. Turn off visibility of that layer, and apply Difference Matte to the other layer. Viewing final output, adjust Tolerance and Softness to try to get the key you're after. If the result has noise in it, try raising the Blur Before Difference value.
Figure 6.10 shows many of the problems with a difference matte by itself. It's not a terrible way to isolate something if the edge is not critical, but it cannot compare with more sophisticated methods for removing a solid color background.
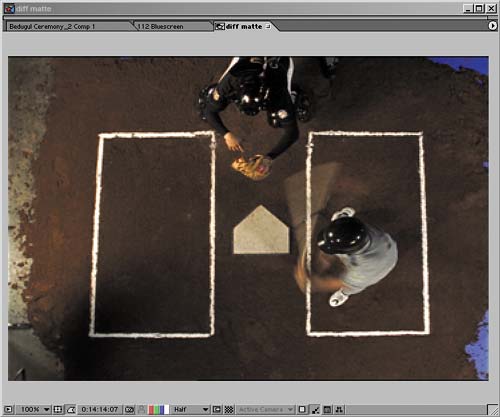


Figure 6.10. This would seem to be a perfect scenario for using a Difference Matte effect. A locked-off camera was used to shoot a clean-plate image of the set as well as the action, and the two line up perfectly. Like Luma Key, however, this effect has no threshold controls, so you're pretty much stuck with whatever you are able to get by dialing in the Tolerance. Softness and Blur controls only make the matte less accurate.
It used to be that if you wanted to go beyond the rather pedestrian Color Difference Key in After Effects you had to invest in a third-party keyer, and for a few years you had two choices: Ultimatte for After Effects (now AdvantEdge, Ultimate Corporation) and Primatte Keyer (Red Giant Software, formerly Pinnacle Systems, and before that, Puffin Designs).
Then with version 6.0, Adobe licensed a custom version of Keylight, a third well-known software keyer popular among Shake users, for After Effects Professional. It is still bundled with After Effects 6.5 Professional. Use of the other keyers has by no means disappeared. Personally I'm still a fan of Primatte for film keying, simply because I've been using it for so many years, and Ultimatte was a breakthrough when it was first released.
Primatte is particularly valuable for situations in which preserving transparency and edge detail is critical, because it allows direct selection of edge colors to be included and excluded from the key. Keylight allows direct selection only once—when picking the initial color to be keyed. But Keylight has other particular strengths, such as the ability to work with poorly lit mattes, and I have known fewer users to become frustrated with it than with Primatte. Therefore, I will focus on Keylight.
Note
When I refer to Color Difference Key as pedestrian, I speak as someone who matted a feature's worth of footage with it, back before there were alternatives in After Effects. Its methodology is tried and true and can be replicated using channel math and Levels controls. In fact, the same basic methodology was used on some of the earliest digital composites in such blockbuster films as Terminator 2, and it's based on the optical compositing method that is as old as color film compositing itself.
Keylight is useful in many keying situations, not just studio-optimized blue- or green- screen shots. For example, you can use Keylight for removal of a murky blue sky (Figure 6.11). You would not want to use Keylight when pulling a luminance key, however, or when simply trying to isolate a certain color range within the shot.


Figure 6.11. In one pass, with no adjustments other than selecting the sky color, Keylight does a fairly effective job of knocking out the background even around the motion blurred bird in flight. The sky is nowhere near a perfect blue screen in this case, other than it's uniformity: blue saturation is around 50% and only about double the amount of red.
So when do you use Keylight? When your footage was shot against a uniform, saturated color background and when preserving edges is of utmost importance—in other words, most typically (but not exclusively) when working with footage that was specifically shot to be keyed, against a screen of blue or green.
No two artists follow the exact same steps to key a complex shot, and no two complex shots are the same, but from all the variations you can distill a rough order of common steps for pulling a good matte, regardless of which tools you use. In the next section I'll show you how to apply some of these steps specifically using Keylight.
Note
The gauntlet I'm throwing down is that you make a habit of breaking down your footage into separate passes. The first pass can be a hard “core” matte that fills any holes you might have in your foreground without regard to the edge, the second is an overlaid edge matte to focus on edge detail only, without having to worry about those holes. Extra passes would be masked out to work on specific problem areas.
Don't worry about details until you get to the next section. For now, the basic steps, no matter what keyer you use, are
Garbage matte any areas of the background that can easily be masked out. By easily I mean, without needing to articulate the matte and animating individual mask points or without masking the whole shot—unless it's really a gnarly one—for more than about 20 minutes (Figure 6.12).
Attempt a first pass key quickly, keeping this matte on the loose side, keeping as much edge detail as possible, with the idea that you'll be refining it later. Preview this at full resolution, in full motion, against a bright primary color. In rare cases, you will be done at this step.
Examine the alpha channel. Switch to a view that clearly displays the alpha channel (Keylight has several ways of doing this). Note any obvious holes in the foreground or areas of the background that have failed to key out, note any noise where the foreground or background areas should be solid (Figure 6.13), and move on to Step 4.

Figure 6.13. A quick diagnosis of Keylight's first pass at this shot: A separate matte will be required to key out the underside of the leg, where there is evidently substantial reflected blue. The shadows will require separate mattes of their own if they are to be included in the key. The hair may have to be separated to retain softness and detail.
If things look too noisy and chaotic in the alpha channel or too clamped down on the edges, consider these strategies:
Start over and try again from scratch with the basic key.
Apply noise reduction to the foreground image and start over (there is a section called “Noise Suppression” later in this chapter).
Use articulated or tracked garbage/holdout mattes to isolate one problem portion of the footage (discussed in the section called “Fixing Typical Problems”).
Decision time about separating the core and edge mattes. If your foreground has transparent areas that should be opaque and closing them in affects the edges adversely, duplicate the foreground and solo the duplicated layer. Push the settings further to create a hard core matte, and choke it far enough in that it does not affect the edges of the other foreground layer whatsoever.
Refine the edge. Focusing now on the edge matte, zoom in on a challenging area of the foreground edge (200% to 400%), and refine the key to try to accommodate it, using strategies outlined in the following sections. Challenging areas of the foreground whose edges you may need to carefully preserve include
Fine detail such as hair
Motion blurred foreground elements
Cast shadows
Watch out for, and consider rotoscoping, foreground features that can threaten an effective key, such as
Reflective areas
Edge areas whose levels closely match those of the background
Non-contrasting foreground and background areas (in poorly lit regions of the shot)
Preview the shot in full motion. Again, note holes and noise, and now work on strategies (outlined in the “Fixing Typical Problems” section) to overcome these problems. Approaches you may employ at this stage are
Using masks to create holdout mattes, either for the purpose of keying them individually or rotoscoping them out of the shot (Figure 6.14)
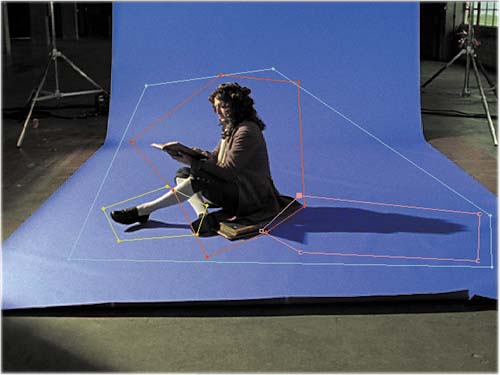
Figure 6.14. This is the step too many artists aren't willing to take. Most of the problems with keying this figure stem from the fact that he's seated on the floor, but that is also to your advantage, because he's not going to move much. Therefore, you could create holdout masks for separate areas to key, working individually on the body and the shadow-casting areas. In a closeup, it can be helpful to mask the hair, refining that separately.
Holding out the matte edge only, for the purpose of refining or blurring it (see the section called “Edge Matting” later in this chapter)

That's the general approach with any keyer; the point I want to hammer home here is that trying to key a clip in a single pass is often too lazy an approach that, ironically, results in more work as you struggle to make all areas of your shot accommodate unified settings.
Now take a look at some specifics when working with Keylight.
The very most important of the Keylight parameters, in all cases, is the Screen Colour selection (Keylight reveals its UK origins with that u). Choose wisely, and you have a shot at getting your footage to key in one pass. Choose poorly, and you'll be fighting an uphill battle from here onward. More about what this selection does appears in “The Inner Workings of Keylight,” later in this chapter.
In the best case scenario, after creating any basic garbage mattes as usual, your steps will be
Use the eyedropper to sample a pixel in your background that you believe is roughly the median of the background. The view defaults to Final Result, so you can immediately examine the result of this one choice. (Remember to set your background to a bright color and solo the layer.)
If you think there is any chance of getting a better initial result, switch to the alpha channel (Alt+4/Option+4), reset Keylight (do not undo) or switch the view to Source, and select again. Repeat again if you like. Now you have as many as three attempts saved in your undo buffer. If you're getting a pretty good result, you can accept a loose matte, but if not, look for the one that seems to have eliminated the most unwanted background (Figures 6.15a, b, and c). If necessary, examine the alpha channel of the soloed layer (Alt+4/Option+4).
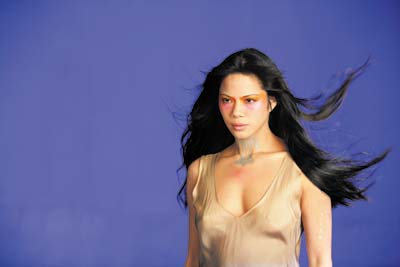


Figure 6.15a, b, and c. Even with source footage as well shot as this (6.15a), you will get very different initial results depending on whether you use the eyedropper to sample color at the low-lit edges (6.15b) or in the well-lit center of the image (6.15c). Zooming in on the wispy hair over a bright color shows the difference clearly: You want that extra detail, but you don't want that matte line along the arm. (Source image courtesy of The Foundry UK.)
Note
Why not take snapshots of each attempt? You can (Shift+F5 to F8 to take snapshots, hold down F5 to F8 to see them), but the method described holds each pass in your undo buffer; the idea is to be able to recover the one you like.
Now, as needed, you look for areas that could use refining:
Switch the view to Status in the View pull-down menu. This reveals the pixels that are fully opaque as white, those that are fully transparent as black, and those that are in-between as gray (Figure 6.16). It's like an exaggerated version of a normal alpha channel view. Try Screen Balance at settings of 5.0, the default 50.0, and 95.0, and choose whichever one yields improvement (more on this in the next section).

Figure 6.16. Moving forward with the matte from Figure 6.15c, Status view shows lots of gray areas, with semitransparent pixels, in the background, but not many on the foreground figure other than where you want them (in the hair). This is a good initial result.
If there are gray semitransparent pixels in your background, boost the Screen Strength setting until the gray is mostly gone in Status view. Try to preserve any gray that is at the edges of your foreground. If gray remains in the background, but away from the edges of your figure such that you can easily garbage matte it, do that (Figures 6.17a, b, and c) if you want to preserve maximum edge detail, or if it's not costly to do so, tighten the matte at this point by raising screen strength.


Figure 6.17a, b, and c. Screen Strength has been raised to remove the gray. At this point it's an artistic decision whether to go with the loose matte (6.17a) and garbage matte out the noise in the corner, which doesn't affect the edge, or go for the tighter matte (6.17b), which still gives a very good result with lots of wispy hair preserved (6.17c).
The footage used in Figures 6.15 through 6.17 was nearly perfectly shot, and although the footage includes flowing hair, which is a challenge, it does not include the floor, which is usually more of a challenge. The final step for this image is to raise the Despill Bias and with it, the Alpha Bias, which affects the matte, so recheck Status for holes. Raising it slightly reduces the blue matte line on the arm. In this ideal scenario, you are done without ever having gone beyond the first five controls at the heart of Keylight (Figure 6.18).

Figure 6.18. These controls make up the core of Keylight. Everything else is there only to compensate for footage that was not well lit, shot, recorded, or transferred.
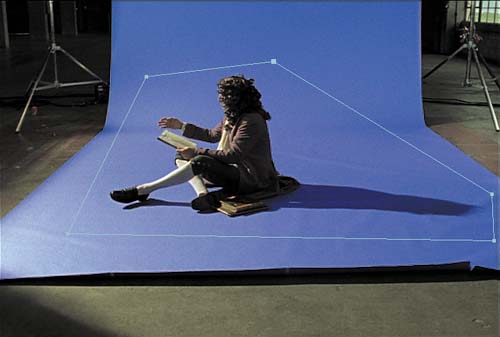
At the opposite extreme is the nightmare scenario of Newton seated directly on the blue stage in his white stockings, whose Status setting with a high Screen Strength boost reveals quite a few more problems (Figure 6.19).

Figure 6.19. Ouch. All of those grays in the foreground figure are the result of reflected blue, due to the actor being seated on the floor. Why didn't Newton pack a picnic blanket?
If your shot also now contains some unwanted transparent areas in the foreground area—gray pixels amongst the white in Status view—this is an opportunity to shortcut the process by creating one or several core mattes. The Newton example is complicated by the shadows on the floor, so concentrate first only on the main body holdout area (from Figure 6.14).
Duplicate the layer with Keylight applied, so that the initial settings are now held by two layers, and solo the duplicate. You can rename the new layer core and the original layer edge. Press F3 to make sure the core Keylight effect is displayed in the Effect controls—you don't want to adjust the wrong one!
On the core layer and still in Status view, twirl down the Screen Matte parameters. Adjust the Clip White value down until you start to see a matte that consists of entirely black pixels in the background, fully white pixels in the foreground, and gray pixels at the edges of the foreground. You may see some green coloration appear as well, which indicates pixels that had some of the background color in them that Keylight will replace (Figure 6.20). If areas of gray have reappeared in the background, raise Clip Black to eliminate them.

Figure 6.20. Even with the problematic shadow and leg areas held out, the figure's torso requires a fairly heavy Clip White adjustment, resulting in a lot of green areas. These are warning you that the color in these areas may be contaminated by the background, which can be remedied with the Replace Colour control.
Choke the core matte. Turn on soloing for the edge matte as well, set both to Final Result, and toggle the core matte on and off in RGB and Alpha view. You will probably notice that it changes the appearance of the edge, thickening it in an undesirable way. Use the Screen Grow/Shrink control in Keylight to shrink the matte (using positive values) until you can toggle the core matte on and off and see no effect on the edges whatsoever; only the holes fill in. Be liberal here: Make sure that your core matte has no edge data in it anywhere; it's not atypical to have a setting of 2.0 or more.
Preview the clip in motion over the bright background. Note any problems you see with the edges; the next section focuses on methods to refine them.
Note
Keylight includes its own controls for adding holdout areas to mattes via the Inside Mask and Outside Mask controls. The way it works is that you draw a mask, set it to None, and then select it under Inside Mask or Outside Mask. It's an optional replacement for doing fills and garbage mattes on a separate layer.
At this point, you should have succeeded in eliminating any holes in your foreground. If you divided your image into separate holdout areas, as in the Newton example, you repeat the same process for setting up a core and edge matte for those layers. From that point, all the work left to do is on your edges alone, which is where you want to be able to focus your efforts.
If you carefully followed the instructions in the previous section, your composite is now either closer to looking good or has an obvious problem. If you think it's looking good, focus in on a few details, and note if there are any problems with the following in your full motion preview:
Hair detail: Are all of the “wispies” coming through?
Motion blur or, in unusual cases with a defocus, lens blur: Do blurred objects appear chunky or noisy, or do they partially disappear?
Screen contamination areas: Are there any remaining holes in the foreground?
Shadows: Are they keying as desired?
You are, of course, free to find niggling problems of your own and share them with your friends (Figures 6.21a through d).


Figure 6.21a through d. Fun challenges you may encounter when pulling a color key include wispy hair (6.21a), motion blur (6.21b), contamination of foreground elements by the background color (6.21c), and shadows (6.21d).
Alternatively, there may be something fundamentally wrong with your matte, including
Ill-defined foreground/background separation or semitransparency throughout the foreground or background
Crunchy, chewy, chattery edges
Other noise in the matte
Edge fringing or an overly choked matte
Errors in the spill suppression
Keylight anticipates all of these issues, offering specific tools and techniques to address them. Before you delve into those (which I'm saving for the “Focusing In” section) take a look under the hood at how Keylight actually works.
A few decisions are the key to Keylight, and most of the other controls compensate for how effectively you made those few decisions. This section offers a glimpse into the inner workings of Keylight, which will greatly aid your intuition when pulling a matte.
The core of Keylight involves generating the screen matte, and the most essential step is choosing the screen color. From that one color choice, Keylight makes nonlinear comparisons between its saturation and hue and each pixel, as detailed in Table 6.1.
Table 6.1. How Keylight Makes Its Key Decisions
COMPARED TO SCREEN COLOR, PIXEL IS | KEYLIGHT WILL |
|---|---|
Of a different hue | Consider it foreground, make it opaque |
Of a similar hue and more saturated | Key it out completely, making it transparent |
Of a similar hue, but less saturated | Subtract a mathematically weighted amount of the screen color and make it semitransparent |
The main lesson of Table 6.1 is that a healthy background color is of a reasonably high saturation level and of a distinct hue.
Those sound like vague criteria, not easily met—and it's true, they are somewhat vague. That's why Keylight adds the Screen Strength, Screen Balance, and Alpha and Despill Bias controls just below Screen Colour. Screen Strength helps define the saturation of the background pixels, and Screen Balance delineates its hue. The Bias controls color correct the image. All of these controls differ from the controls below them in Keylight in that they work on the color comparison process itself, rather than the resulting matte.
The major enemy of a successful blue-screen shot is muddy, desaturated colors. One clear symptom that saturation in your background isn't sufficiently high for an easy key is that areas of the background are of a consistent hue yet fail to key out. Similarly, a clear symptom that your foreground has become contaminated with reflected color from the background is that it becomes semi-opaque after setting the Screen Colour. In either case, the Screen Strength control becomes useful.
The Screen Strength control boosts or reduces the saturation of each pixel before comparing it to the screen color. This effectively brings more desaturated background pixels into the keying range if raised or, if lowered, knocks back pixels in the foreground containing the background color.
That takes care of saturation, but what about hue? Keylight is designed to expect one of the three color values to be much more prevalent than the other two. But it can do an even better job if it knows which of the two remaining colors is more prevalent.
By default, the primary color is weighted evenly against the two other components of a pixel. In the real world, however, there might be far more of one than the other, and Screen Balance allows you to alert Keylight to this fact. A Rosco Ultimatte Blue screen will have quite a bit of green in it—much more than red, unless someone has lit it wrong. Ultimatte Green screens are almost pure green (Figure 6.22).

Figure 6.22. The Rosco colors: Ultimatte Blue, Ultimatte Green, and Ultimatte Super Blue. The blue colors are not pure blue, but contain twice as much blue as green, and twice as much green as red. The green is nearly pure, with only a quarter the amount of red and no blue whatsoever. Lighting will change their hue, which has also changed by being taken to print. They're called Ultimatte because that's the hardware system for which they were initially optimized.
On this theory, you would use a balance of 95% with blue screens and leave it at 50% for green screens. The true recommendation from The Foundry, however, is to put it near 0, put it near 100, and compare these to the default setting of 50 to evaluate which one works best. In other words, you should think of there being three settings to try (instead of 100): 5%, 50%, and 95%.
Note
Not only is it good form to derive the best matte you can with these core tools, there are extra, hidden reasons to do it. For one thing, none of the core controls described in this section slows the keying process down, while the other controls within Keylight, and outside of it, will to an extent dependent on the size of your source footage. Also, tools discussed in the next section, such as Clip Rollback, depend on the core matte as a reference.
The Bias settings, Alpha Bias and Despill Bias, effectively color correct the image before the key is pulled, by scaling the primary color component up or down (enhancing or reducing its difference from the other two components). Use the Bias settings if the screen color has been infected with a secondary color, causing it to turn muddy, moving it toward gray.
Once you are satisfied that you have as good an edge matte as possible, you are ready to zoom in on a detail area and work on solving specific problems.
If you see an area that looks like a candidate for refinement, save (so that you can Revert to this as your ultimate undo point), zoom in, and create a region of interest around the area in question.
Note
Saving a stage of your shot that you might want to revert to is conveniently done with the Increment and Save feature in the File menu.
Now take a look at some common problems you might encounter and the tools built into Keylight to solve them.
The double-matte method shortcuts a lot of the tug of war that would otherwise exist between filling holes in the foreground and increasing the chunkiness to the edge, which inevitably results. Even with this advantage, your edge matte probably will require adjustments to the Clip Black and Clip White controls that you used on the core matte to reduce noise in the background and make foreground edge detail more prominent.
Screen Strength versus Clip Black
These two controls seem to have a similar effect on the result, causing the background to become more transparent. How do you know which one to use? You can get the same result from both, but there are differences.
Screen Strength
Is part of the basic screen matte calculation and doesn't slow the process down
Is not affected by edge rollback
Does not trigger color replacement if the matte is made more or less transparent
Clip Black
Is a post process requiring extra time and memory
Is affected by edge rollback
Triggers color replacement if the matte is made more or less transparent
So although it is not crucial to choose one of these over the other at any given time, understanding the differences can certainly help you along.
The game is to keep as large a difference between the two settings as possible. The closer those two numbers approach one another, the closer you are to having a bitmap alpha channel in which each pixel is either black or white—a bad thing (Figure 6.23). The delta, or difference between the clipping numbers, represents the area in which all your gray, semitransparent alpha pixels are allowed to exist, so the goal is to give them as much real estate as possible.


Figure 6.23. This is why you divide difficult shots into pieces. Eliminating all the problems with this key has resulted in a chunky, chewy, quantized matte.
If you take the Clip controls too far and are looking for a way out of the corner without starting over, raise the Clip Rollback setting. This control is designed specifically to restore detail only to the edge, and used in moderation and with a close eye on the result it can be quite effective (Figure 6.24).


Figure 6.24. In this case, raising the Clip Black setting and rolling it back, instead of raising Screen Strength (as was advocated for this shot in the step-by-step) gets the nod. The hair detail can be given a thicker matte without introducing noise into the background.
Here's how Clip Rollback works: The number assigned to this control is the number of pixels from the edge that are rolled back. The edge pixels reference the original, unhardened screen matte. So if your edges were looking nice and soft on the first pass but pulling noise out of the matte hardened them, this tool could help you out by restoring them.
Are your mattes chattering? Keylight includes a Screen Pre-blur option that you should use only in the zoomed-in view and only with footage that has a clearly evident noise problem, such as source shot on miniDV. Essentially, this option is the same as blurring your source footage before keying it, so it adds error and is something of a desperation move. The result of the blurring does not appear in the footage itself; it is visible only internally to Keylight.
A better alternative if your matte is fundamentally sound is Screen Softness, found under the Screen Matte controls. The difference is that Screen Softness blurs the matte itself after the key has already been pulled, so it has a much better chance of retaining detail. As was touched upon in Chapter 3, edges in nature are slightly soft for various reasons; so used to a modest degree (considering that it is introducing error into your key), this control can enhance the realism of your matte (Figures 6.25a, b, and c).


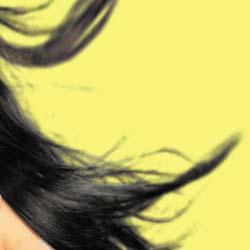
Figure 6.25a, b, and c. Okay, you might have to squint your eyes, but look closely enough and you'll see how much more hair detail is retained using Screen Softness (6.25b) than Screen Pre-blur (6.25a). Both have a nicer look up so close than the unsoftened matte (6.25c).
A more drastic approach, when softening and blurring cannot reach larger chunks in the footage, is to use the Despot controls to simplify the matte. If you use these at all, use them at low levels. Crank them up, and you'll see that they cause an undesirable blobbiness in your matte. For this reason, I've never quite trusted these controls and usually leave them alone.
A better approach, particularly with miniDV and HDV footage (which by the way are both guaranteed to add undesirable noise and are typically not recommended for blue-screen and green-screen shoots), is one that was refined to perfection by a member of the After Effects community at large, Mats Olsson (and drawn to my attention by Alex of Disciple Films in Paris). The steps are
Convert your footage from default RGB to YUV using Channel Combiner (the From pull-down). This will make your clip look very strange. Do not be alarmed (Figure 6.26).

Figure 6.26. Do not attempt to adjust the controls. Someone, somewhere, must have mistaken Channel Combiner for a trippy color effect, but the truth is that After Effects is set up to display only RGB, not YUV (which conveniently also uses three channels, just not those three). The round-trip around a Channel Blur appears in the Effect controls (but the second Channel Combiner effect is temporarily disabled, hence the strange look).
Apply Channel Blur to the green and blue channels only, at modest amounts (to gauge this, go to each channel-press Alt+2 /Option+2 or Alt+3/Option+3—and zoom in on a noisy area of the frame). Make sure Repeat Edge Pixels is checked.
Round-trip back from YUV to RGB, again with Channel Combiner.
Apply Keylight, and breathe a sigh of relief.
YUV is a color space associated with broadcast video and used in component PAL television. It is functionally similar to YIQ, the NTSC variant. In After Effects YUV, the red channel actually displays the luminance value of the shot, while the green and blue channels display blue and red weighed against green. It's a complicated analog color method, which is why you may never have encountered it, but DV formats work in a similar manner, giving more weight and clarity to luminance than to color (and giving the least weight and clarity of all to the blue channel, an obvious drawback).
Sometimes, despite all best efforts, you will work on a matte and find that you are left either with extra unwanted edge pixels (fringing) or that your keyed subject has lost all subtle edge detail because the matte is overchoked.
On the one hand, Keylight does include the Screen Grow/Shrink control for such situations. On the other hand, if you find yourself having to shrink or expand your matte, it may be a symptom of other problems. Faced with the need to choke or spread my matte (another way of saying shrink or grow), I typically go back and try my initial key again, possibly breaking it down into more component parts using holdout masks. (More on choking and spreading coming up.)
The thing to understand about Keylight's suppression of color spill (foreground pixels contaminated by reflected color from the background) is that spill suppression in Keylight all happens when the matte is initially pulled. Whatever matte you get from Keylight's core controls has spill suppression. So spill-kill is practically automatic if you pull a good initial key (Figures 6.27a and b).

Figure 6.27a and b. Setting the correct Screen Balance is critical not only to pulling a good key but to getting automatic spill suppression. If you see spill with Screen Balance at the default 50% (6.27a), just try 5% and 95% (6.27b) before you move on to more drastic measures.
When does this lovely elegant freebie disappear? First of all, when it's an unwanted by-product. There are situations when parts of the foreground that you want to keep are close enough in color range to the background that their color is suppressed. On The Day After Tomorrow our problem was that the helicopter pilots on their way to Balmoral were wearing blue uniforms, which would turn gray with spill suppression. For example, I had to rotoscope an epaulet to bring it back to blue.
Furthermore, adjustments to the matte can expose areas of the clip that didn't get the spill suppression. Those are the green pixels in the Status view (back in Figure 6.20); these show the areas of the matte whose spill suppression may now be off. In such cases, you specify a Replace Method; Soft Colour set to medium gray is a good choice if the only affected pixels are at the edge. It is a cheat, but it will make your key look better by gently desaturating pixels that might otherwise pop.
If too much of your edge will be affected for replacing in gray to work, you still have an option in Keylight: Uncheck the Lock Biases Together toggle and raise the Despill Bias, leaving the Alpha Bias at 0. This tells Keylight that there is more of the foreground color than expected to suppress, but that the areas that are contaminated with blue should not be made more transparent.
Finally, in cases in which Keylight's spill suppression becomes unwieldy or not useful (as with the soldier in dress blues), there is an easy out. Create a good key without worrying about blue spill, pre-compose the result, and apply it as an alpha matte to the foreground source. You can then use one of the methods described in the next section to try and remove color spill without adversely affecting your footage.
As you now well know, because I've taken every opportunity to drill it into your head, the number one solution to most matte problems is to break the image being matted into multiple sections rather than trying to get one matte in one pass. You can divide the matte as follows:
Core and edge matte (hard and soft matte)
Holdout masks for particular areas of the frame (useful if lighting varies greatly within the frame, or if one area contains a particularly challenging element, such as hair or motion blur)
Temporal split (if light conditions change as the shot progresses)
All other tricks fall short if you're not willing to take the trouble to do this. And now for some more bad news.
No matter how advanced and well paid you are, in most cases, your time is going to be far cheaper than that of a film crew on set. That means—shocking, I know—you're going to have the opportunity to fix some things in post that should have been handled correctly on set, but weren't. I would call it job security but that's just too cynical.
The Right Color Background
The digital age has made some directors pretty fast and loose with what they consider a keyable background. You may be asked (or try on your own) to pull mattes from a blue sky, from a blue swimming pool, or from other monochrome backgrounds.
If you are looking to create a colored backdrop that you will key, however, there is one brand to look for when purchasing your paint, fabric backdrop, or adhesive tape: Rosco. Rosco's Digicomp products are of a color designed specifically to allow for the most effective keying, with a purity and intensity of saturation unavailable at your local paint store. They are available in three colors—you guessed it—blue, green, and red.
In terms of how different the background color has to be from your foreground, the answer is “not very.” Red is generally avoided not least because human skin tones contain a lot of it, but a girl in a light blue dress or a soldier in a dress blue uniform would probably key just fine from a blue screen (although spill suppression might require special attention).
If you're fortunate enough to be supervising the effects shoot itself (it's worth it for the craft services alone), you can do all sorts of things to ensure that the footage will key successfully later on.
A hard cyclorama, or cyc (pronounced like psych), painted a uniform key color is far preferable to a temp cloth background. If you can't rent a stage that has one, the next best thing might be to invest in a roll of floor covering and paint that, so that you get the smooth transition from floor to wall, as in Figure 6.28 (assuming you're including the floor in your shot). Regarding the floor, it's also important for people not to walk across the cyc in street shoes, which will quickly contaminate it.

Figure 6.28. On a stage with no hard cyclorama, you can create the effect of one—the curve where the wall meets the floor—using blue-screen cloth instead. It doesn't behave as well (note the hotspot on the curve), but it will certainly do in a pinch and is much preferable to removing the seam caused by the corner between the wall and floor.
Assuming you're starting with a background that is not only the correct color but is footprint free and has as few seams and other variations as possible, the most important concerns are lighting it correctly and balancing the foreground and background lighting.
This job is, of course, best left to a professional, and any kind of recommendations for a physical lighting setup are beyond the scope of this book. But, hey, here are a few things you can keep in mind even if your role is only that of the effects supervisor on set:
Ideally, the light levels on the foreground and background should match. A spot light meter will tell you if they do.
Diffuse lights are great for the background (often a set of large 1 K, 2 K, or 5 K lights with a silk sock covering them), but fluorescent lights will do in a pinch. With fluorescents you just need more instruments to light the same space.
It is helpful to keep a good deal of space between the foreground and background. Ten feet is ideal.
Avoid unwanted shadows like coal in your stocking, but by all means light for shadows if it looks like you can get some clean ones on the floor.
If your scene is set outdoors, consider shooting it outside (almost certainly in that case with solid color cloth backdrops and carpets). You may need fill lights on the background, but daylight is a difficult—almost impossible-light quality to recreate on a stage, especially for a large exterior shot.
Record on the highest quality, least compressed component video format you can afford. Even if the rest of your project will be shot on miniDV, it might be worth shooting the effects on Digital Betacam and converting them later if you can.
If the setup permits, bring a laptop with After Effects on it and with some representation of the scene into which the footage you're taking is going to be keyed. This can be enormously helpful not only to you but to the gaffer and director of photography, to give them an idea of where to focus their efforts. You will have to work with the camera operator to get a live signal, and with a film camera it may require the addition of a video tap, but it is possible and useful.
Finally, particularly if you're on set when a locked shot is being set up, once the lighting has been finalized and before action is called on the shot, ask the camera operator to shoot a few frames of clean plate—the background with no foreground characters or objects to be keyed out later. There are all sorts of ways this can be handy.
It's an ugly fact of life that there will be times that you have to cheat and alter your matte. If you're going to do it and you're not using the built-in tools for it in Keylight, make sure you're at least using the right tool for the job—and that you're using it with as light a touch as you can manage.
Isolating and Working with Edges
It's a pity that some of the best tools for dealing with mattes are found in a third-party collection of 8-bit plug-ins that haven't been updated in years. But there it is. The collection is, at least, still available from Red Giant Software—it is called Composite Wizard.
For the most part these plug-ins do not do anything you can't do on your own in After Effects. They just save you some steps. The “Edge Selection” section outlines some of the more useful tools in Composite Wizard and the workaround if you don't have the plug-ins. Only one effect in Composite Wizard, the Miracle Alpha Cleaner, has no equivalent that you can create on your own, but it's a slightly dangerous tool anyhow.
For whatever reason—the placement of the effect in the Effects menu or maybe the name—Minimax is employed by artists who would enjoy far more success with one of the Matte Tools: Matte Choker or Simple Choker. Minimax is old school: It works in whole pixel increments to choke and spread pixel values. It has some interesting uses—but not for subtle matte edits. It is a quick way to spread or choke a matte, particularly when you lack alpha channel information.
In most cases, however, Simple Choker is the tool you're looking for. It allows you to choke or spread a matte (by entering a positive or negative number, respectively) at the subpixel level (by inputting decimal values). That's all it does. It's really no different from the corresponding control in Keylight, but you can use it on any alpha channel, not just one created by Keylight (or any keyer).
Matte Choker adds tools to introduce softness to the choke. The good thing is that its default is set at an effective starting point for many mattes. The bad thing is that softness controls tend to add more error to the process and are often the sign of a bad key. Don't be afraid to “settle” for Simple Choker: It is often up to the job without monkey-wrenching anything.
If you have a copy of the Composite Wizard plug-ins, Deluxe Edge Finder is one of the most useful tools in there: It allows you to make a grayscale map outlining only the edges of your alpha channel, which you can apply as a luma matte to an adjustment layer. Then you have an adjustment layer whose effects—a blur, a levels adjustment, or a holdout—apply only to the edge.
If you don't have Composite Wizard, no worries; you just have to take a few extra steps to make your own. The simplest way to do this is to apply Shift Channels with Take Alpha From set to Full On and the three color channels set to Alpha. Next, apply Find Edges (often mistaken for a useless, trippy, psychedelic effect because, as with Photoshop, it appears in the Stylize menu), and check the Invert box (Figure 6.29).

Figure 6.29. The output from Keylight is shifted from the alpha channel to the color channels. Find Edges then takes all the contrast (gray) areas and makes a lovely edge selection from them, which can be used as a luma matte applied directly to the footage or to an Adjustment layer with the effects you want to apply. A typical use is to blur the edge slightly using this selection, in which case you want to blur the background and foreground together.
If you want to choke or spread this edge matte, this is a good time to bust out Minimax. The default setting under Operation in this effect is Maximum, which spreads the white edge pixels by whatever amount you specify in the Radius setting. Minimum chokes the edge in the same manner. If the result appears a little crude, an additional Fast Blur will soften the edge (Figure 6.30).

Figure 6.30. Need thicker, softer edges? A quick Minimax set to the default Maximum allows you to specify a Radius by which the white area will grow. If the result looks a little chunky, a quick Fast Blur will soften it back. This is very useful, for example, when there is motion blur on the object that needs to be controlled in the edges.
Once you're done, apply the result as a luma matte. You should not need to pre-compose before doing so.
So what can you do with an adjustment layer with an edge matte applied to it? One great use is to apply a blur on the adjustment layer in the master comp, so that any blur you apply affects the blend area between the foreground and background. This is another way around a matte that is too hard and crunchy. Sometimes a subtle Levels adjustment helps your composited edge, and a desaturation operation using Hue/Saturation has the same effect as choosing gray as an edge replacement color in Keylight.
If you followed my instructions for keying closely, you should not have a problem with noise or holes in your foreground, because you are using a heavily choked core matte to close them.
However, in cases where your background on set had fundamental problems—uneven lighting, seams, dirt on the floor—you may find noise and holes in your background. You need a way to close these without affecting your edges. The perfect software solution for such cases exists, but unfortunately it is a third-party tool: Miracle Alpha Cleaner, which is also a part of the Composite Wizard set. But before you run out to buy Composite Wizard, a further caveat: Most artists ultimately give up using Miracle Alpha Cleaner because they stop believing in miracles. That is to say, it's an automated tool that frequently fills holes that should have remained unfilled, such as the little triangular gap that sometimes opens up under outstretched arms (Figure 6.31).

Figure 6.31. Using an automated solution, such as Pinnacle's Miracle Alpha Cleaner (part of the Composite Wizard pack), to fill holes in the foreground matte will also close holes that you want to keep, such as this tiny gap under the pitcher's arm. For that reason, veteran effects compositors tend to avoid these solutions, although they are tempting.
I hate to be the one to break it to you, but holes in your matte present a situation in which you're probably going to have to break out your rotoscoping skills (or refine them using tips from the next chapter). It's usually not as bad as you think to work this way; the painstaking part of keying is defining the edge. Things like holes can be fixed with crude masks or by tracking in paint strokes (more on this in the next two chapters).
Fringing around the edge of a feather matte is usually the result of an alpha having been applied separately. For example, it could occur if, in attempting to process color spill outside of Keylight, you applied the Keylight matte as a track matte.
Don't panic and choke all that detail out of your edge! There is a better solution, but it is hidden away in the Channel menu. Remove Color Matting is designed specifically to suck color out of edges that are behaving as premultiplied rather than straight (if that distinction eludes you, review Chapter 3).
Typically, premultiplied images have been matted against black, leaving a dark fringe around the edges. Remove Color Matting uses black as the default Background Color, and this is the only user-adjustable parameter in this effect. Therefore you may apply this plug-in and find that, boom, your problem is solved.
If not, you can use the eyedropper to sample the background. If the fringing is bright colored, premultiplication may have occurred against white or gray.
Note
If the fringing seems to be black but applying the default black Background Color in Remove Color Matting causes the edge pixels to pop to bright white, try creeping up the values slightly: Click on Background Color, and raise the RGB values from 0, 0, 0 to 1, 1, 1. The black in this case has been “contaminated” and the image pedestal somehow raised.
Color Spill doesn't have to be a big deal. If you're not happy with the spill suppression you get from Keylight or whatever keyer you are using, you have other options once you apply the matte as an alpha track matte to the source footage.
Sometimes the Spill Suppressor tool that is included with After Effects will do the trick for you. It uses a simple channel multiplication formula to pull the background color out of the foreground pixels. All you have to do is use the eyedropper tool to select a sample from the background color (you can even copy your original choice of screen color from Keylight) and leave the setting at 100%.
If even Spill Suppressor pulls out foreground color that you want to keep, then it is probably advisable to open up Hue/Saturation and try to target and desaturate the specific hue that is causing you problems.
This sounds positively Neanderthal in its lack of subtlety, but it works a surprising amount of the time, provided you can identify the spill color that needs to be removed. Open Hue/Saturation, and select a channel under Channel Control that you think might be the one that needs attention—say, blues.
Look closely at Channel Range. You might not have noticed the little controls underneath the upper color spectrum (Figure 6.32). These allow you to set the color range as precisely as you like. The inner hash marks control the range affected by the controls below; the region between those and the outer, triangular markers is the feather area.
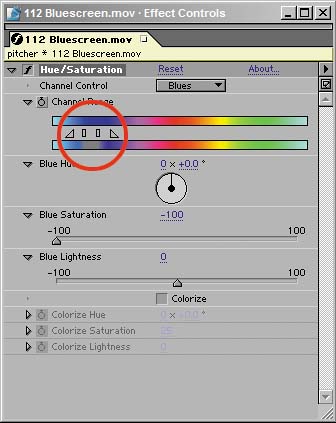
Figure 6.32. The little hash marks and triangles under the upper gradient of the Channel Range control let you specify a region to desaturate. It's crude but in some cases effective for knocking a particular color out of your scene.
In most cases what you'll be doing to remove spill is selecting a channel, refining it, and lowering Saturation to reduce spill. Here's how to gauge which pixels are affected: Before lowering saturation, crank it up to 100. The pixels in the affected range will be easy to spot.
Keylight is a great tool, and tips in this chapter should help you get the results you're after. It's not the only option, of course. Primatte Keyer is just as powerful, with a completely different methodology, but you must purchase it separately. (The book's CD-ROM includes a demo if you want to check it out.)
The other potential candidate for pulling a professional blue-screen or green-screen key is Color Difference Key, which like Keylight is available as part of After Effects Professional. It uses an old and straightforward method of comparing the primary color being keyed (blue or green) against the other two color channels and using whichever channel offers the greatest difference to create the matte. This is similar to how optical keyers operate, although they do it photochemically, and how mattes were created in the earliest days of digital compositing—say, on Terminator 2. If you want to try it, follow the directions under “Applying the Color Difference Key” in the online Effects Help.
The next chapter offers assistance for situations where keying can't do the job, or can't do everything, and rotoscoping is necessary.