

Good surfing is power, speed, and flow. The rest of it doesn't matter to me at all. | ||
| --Gary Elkerton, Australian surfer | ||
After Effects is, above all, a visual problem-solving tool. It is complete and logical in its ability to help you solve visual effects problems—so complete that many advanced users feel as though they are thinking with it, using the program's interface and workflow to dissect and analyze tricky situations.
Not everyone reaches that point, however, and experienced artists, especially those used to working in other applications, can miss the core logic of how things operate in After Effects. Others become frustrated stumbling through specific steps in the user interface, not knowing that their needs have been anticipated and that a better alternative is readily available.
This first chapter, then, is a tour through the user interface as a whole, pointing out specific opportunities for you to take full advantage of the best working methods available to you in After Effects.
We're not, in fact, starting at the very beginning (although I've heard it's a very good place to start). I assume that you've used After Effects before—perhaps just a few times, perhaps hundreds—and you've sensed that there are options you're missing and better ways to work. This chapter will provide some strong suggestions as to how you can make your use of the application lucid and efficient, and how to overcome some of the stumbling blocks that seem to trip up many users, beginning and advanced alike.
Note
If you feel this book is beginning at too advanced a level for you, check out After Effects Classroom in a Book (Adobe Press) and After Effects Visual QuickPro Guide (Peachpit Press), two excellent beginner's resources.
True, there is no single “best” approach, and After Effects offers many different ways to accomplish a task. In the end, work the way that is most comfortable and effective for you. For now, however, consider the options as they are laid out for you in this chapter, and throughout Section I of this book.
I find great pleasure in streamlining processes, in accomplishing tasks with the fewest steps possible. In over a decade of using After Effects, I have developed my own set of approaches that I find not only most efficient but also most pleasing to use. There is something truly energizing about having banged your head against what you perceived to be a flaw in the way software is designed, only to find out that there is a different approach available that anticipates your needs perfectly. Even if you consider yourself an experienced user, therefore, I encourage you to look through this chapter and the rest of Section I to see if there's anything you've been missing.
For better or worse, the After Effects 6.5 user interface—like all of the versions that preceded it—is heavily based on palettes and menus. When you open After Effects for the first time, the interface itself doesn't tell you a whole lot about how to work with the program (Figure 1.1); you see an empty Project window and a few palettes (Tools, Info, Audio, Time Controls, and Effects and Presets, to be precise).
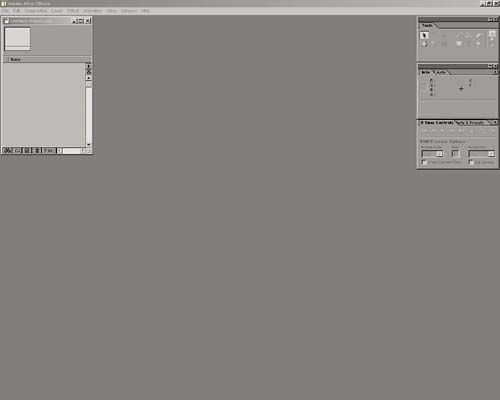
Figure 1.1. The default After Effects user interface implies little, if anything, about how you use it.
What you don't see are the areas of the program—the Timeline, Composition, and Layer windows, not to mention the Effect Controls window and Render Queue—where you will do most of your work. (Meanwhile, you could have a ten-year feature film career using After Effects and never once use the Audio palette.)
Also, if you're on a Mac, you may see other open programs or your desktop in the background; on Windows, you should see only a gray background field (and if you have two monitors, you'll see the field and any windows on only one of them when you begin). What happens next is that you begin the sequential work of creating a shot in After Effects—moving from the Project window to the Composition window and timeline, applying effects, masks, and so on, and rendering the result. You open lots of windows and palettes (Figure 1.2), move them around as needed, and maybe start to feel like you're spending as much time moving things around as you are getting work done.
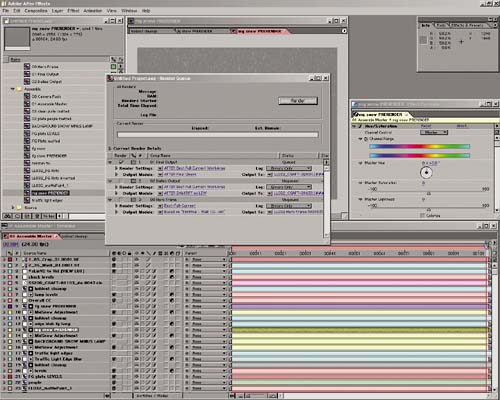
Figure 1.2. By the time you're ready to render a complex shot, After Effects may look more like this—assuming you're being tidy!
None of the many windows and palettes has a default position, and if you go around to ten different artists' desks, you'll see these tools splayed out differently on each monitor. With too little screen real estate—and even with two monitors there never seems to be enough—it can quickly become a bit of a mess, really. There is no perfect, universal solution to this problem, but there are steps that you can take to introduce balance and flow to the interface.
Workspaces are an underused feature in After Effects. Everyone knows that you can use the Tab key in Adobe applications to make palettes appear and disappear, but not so many people know that you can make all of your windows snap into place so that the palettes that you actually need remain visible. Some users dislike and avoid this feature before they get very far with it, partly because if you don't take the necessary steps to set it up the way you like it, it's not so helpful.
Under the Window menu, choose Workspace; you'll see it offers three default workspaces and the ability to save more of your own. If you haven't set a workspace before and your screen has become a bit of a mess, you can always choose Window > Workspace > One Comp View to reset the location of your windows and palettes to their defaults (Figure 1.3).

Figure 1.3. One Comp View is like a panic button for resetting your UI if things get too far out of hand.
Note
The other default options, Two Comp Views and Four Comp Views, are intended for use with the 3D features of After Effects to view a 3D scene from more than one point of view.
Note
How do you get rid of a tab that shares a palette with a tab you want to keep? Simple: Click and drag the unwanted tab away from its palette, which automatically creates a new palette window with just that tab. Now click the X button at the top to close it.
In most cases, however, you want to do better than that, and the way to improve things is to set your own workspace. This means that you set all of the windows and views the way you are likely to want them most of the time, according to the following guidelines, and save this layout as a custom workspace of your own. Here's how:
Consolidate palettes. In most cases you don't even need Audio, and Time Controls is not so essential either once you have it set the way you want it and know the shortcut for creating a RAM preview (the 0 key on your numeric keypad). I recommend pulling the Info tab off of the palette with Audio, and dragging Tools and Effects & Presets to that same palette (Figure 1.4). If you prefer, make Info the only palette in your workspace, and activate the other palettes as needed using shortcuts (Ctrl/Cmd+1 through Ctrl/Cmd+9, listed in order in the Window menu).
Open, resize, and position your most frequently used windows. The Project window is always open but not always used; most of your work is done in the Timeline, Composition, Layer, and Effects Control windows, so open all of these. With an empty project open, create a composition that is the size you normally work at. Add a solid to that composition and apply any effect to that solid—now you have the windows you need to position. Give prominence to the Composition window because that's where your focus is; note that your choice of magnification will be recorded as part of the workspace. Now leave as much space as possible for the timeline. Position the Effects Control window and palettes adjacent to the Composition window (Figure 1.5).
Save your new workspace. Choose Window > Workspace > Save Workspace, give your workspace a name, and then click OK. The name now appears in the Workspace menu, and you can return to that layout anytime your user interface needs to be cleaned up.


Note
Workspaces can get you out of tight spots; if some portion of your user interface seems to be missing, it may have moved to an area of the display where you can no longer click and drag it out, particularly on Windows. This doesn't happen often, but when it does, switching to a saved or default workspace is about the only solution.
One more step you should consider is turning off Auto Resize for the Effects Control window (toggle it off from the window's wing menu). I find a fixed length and position preferable to a window that resizes itself to cover other windows. While you're at it, you can turn off Animation Presets for a less-cluttered UI (Figure 1.6).

Create as many workspaces as you need—one with a dominant timeline, another with a dominant Composition window, and variations for one- or two-monitor setups if you have that option.
Adding a second monitor is a little luxury you might consider affording yourself if you budget your own equipment (and you might request it if you don't, considering how inexpensive it typically is). You can use it for user interface elements only and keep the Composition window on your main screen. Figure 1.7 shows the kind of layout possible with a two-monitor setup. Generally, one monitor is your carefully calibrated master monitor on which your color and intensity are carefully adjusted, while the other monitor can be any old monitor you have around, holding only your timeline, Project window and other informational palettes.

Note
Beware that you can get into certain kinds of trouble with a two-monitor setup on Windows, particularly if the two monitors are not the same size. For example, you must stretch the main After Effects window to cover both monitors, which means you can end up with inaccessible areas of the window if the two monitors are not the same pixel aspect). Furthermore, the application sometimes will snap back to occupying only one monitor—for example, if it is minimized—yet there will still be hidden contents of the project in the no-longer-visible area. Luckily, in all such cases, resetting your workspace will allow you a clear view and a fresh start.
Most professional laptops will drive a second monitor right out of the box, and with desktop computers it may mean only adding a video card or changing settings on the one you have. Because the monitor doesn't have to be spectacular, you can go for an inexpensive, even small one (and gamers are an excellent source for cheap, late model display cards because they upgrade theirs constantly). Where I live, used CRT monitors are often offered for free as everyone switches to flat panel displays.
While you're getting your workspace more comfortable, take some time to optimize your Preferences and Project Settings for the way you work—not the way the default settings thought you would probably work. Specifically, you may want to make these adjustments right off the bat:
Preferences > General: The default is 20. Somehow, at this level, I occasionally run out of undos, whereas if it's set somewhere between 30 and 50, I never notice the limit. Setting it to the maximum value of 99 won't bring the application to a grinding halt, but it may shorten the amount of time available in RAM previews.
Preferences > Display: Check on Show Rendering in Progress in Info Palette & Flowchart. This is absolutely one of the Info palette's most useful features: It allows you to see what After Effects is doing anytime you are waiting for a frame to update (Figure 1.8).
Preferences > Display: Go ahead, set Disable Thumbnails in Project Window. If you never look at the thumbnails at the top of the Project window, you might as well disable the feature. Otherwise, be prepared for situations in which you wait for it to update. If you're working on film resolution files, for example, you can expect delays while you wait for those updating thumbnail images.
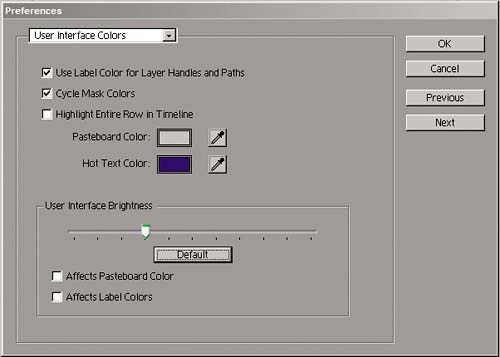
Preferences > User Interface Colors: You may wish to darken the UI using the User Interface Brightness slider (Figure 1.9). In the same dialog, consider turning on Cycle Mask Colors so that multiple masks applied to a layer automatically have different colors.
Preferences > Memory & Cache: If you can dedicate a disk with the default 2 GB (or more) of free space, check Enable Disk Cache. This adds swap space for After Effects beyond what is available in your physical memory (RAM). Any part of the pipeline that would take longer to re-render than recover will be stored in the cache (Figure 1.10). More on this in the “Caching and Previewing” section of this chapter.
File > Project Settings (Ctrl+Alt+Shift+K/Cmd+Option+Shift+K): Yes, there are yet more preferences on a project-by-project basis (Figure 1.11). If you're going to be working on film projects, change the Timecode Base to 24 fps. It's also standard practice to work in Frames rather than Timecode, so check that. Color depth can be toggled in the Project window (and is explained in depth in Chapter 11, “Issues Specific to Film and HDR Images”).


Digging in Deep: Editing the Prefs File
My top recommendation of a preference to change isn't even found in the After Effects user interface. You must locate the Preferences file itself and edit it. The name of the file is Adobe After Effects 6.5 Prefs.txt, and you generally can find it in the C:Documents and Settings“username”Application DataAdobeAfter EffectsPrefs folder (Windows) or Users/“username”/Library/Preferences (Mac). You can also just search on the filename.
Open the file with a text editing program that doesn't add headers, such as Notepad for Windows or Textedit for Macs; avoid Microsoft Word for this purpose. Search for Drop Footage At Time Zero. Now change the number that follows the equals sign from 00 to 01. Touch nothing else, save, and quit. Any footage you add to a composition now automatically starts at the beginning of the comp rather than the current time.
This can get you out of all kinds of unforeseen difficulty with effects work; you won't see layers suddenly and unexpectedly pop on in the middle of a composition, and you're saved the trouble of dragging them to the beginning of the composition.
Maybe someday this will even be the default, who knows?
To restore Preferences to their defaults, hold down Alt+Ctrl+Shift/Option+Cmd+Shift immediately after launching After Effects, and click OK on the prompt.
There are many different ways to use After Effects, and typically there is more than one way to solve even the simplest visual effects problem. Nevertheless, not all approaches are created equal.
Here, then, are some overall tips and opinions as to how to work quickly and effortlessly in After Effects. Setting up the UI properly, as you just did, is a good start, but now you need to look at specific interactions that come up all of the time.
There are many compelling reasons for keeping a well-organized Project window, and they sound a lot like the reasons for keeping a well-organized hard drive. You create individual folders for individual types of items and organize them hierarchically. Why bother?
To avoid frustration and wasted time when you go looking for an item in your project.
To help someone else if they ever have to open and make sense of your project.
To help you think through and organize the steps of your composition. In a complex project, a well-organized Project window can actually help you do this.
Say that a simple project uses some source footage, a main composition, a couple of pre-comps, some reference footage, and at least one solid layer. For this project, I would propose the organization shown in Figure 1.12 as a minimum; each type of item resides in its own folder. You can quickly see the location of the key composition—the one where all the work is—as well as where its main components reside. No one would have trouble digging right into this project, even if they were completely unfamiliar with it.
On larger and more ambitious projects, you may want to create a project template that anticipates a certain workflow, so that many anticipated items beyond the main composition are easy to find. Chapter 4, “Optimizing the Pipeline,” outlines an example of such a template and discusses working with multiple compositions.

Throughout this book you will see references to context-clicking on interface items. I would call it right-clicking, but, even at this late date, the Mac does not ship with a multi-button mouse (although every Mac-based artist I know has one). Therefore, on the Mac, to get the same effect without a right mouse button, you must hold down the Control key while clicking.
After Effects does not let you take your hands off the mouse very often; many important operations are not possible with keyboard shortcuts alone. Although I highly advocate learning and using keyboard shortcuts wherever possible, and offer effective keyboard shortcuts throughout the book, I advocate context-clicking just as strongly because it is such a good fit with an interface that has the mouse always in your hand, engaged in the process.
Between keyboard shortcuts and context menus, I practically never visit the menu bar in After Effects. The amount of mouse dragging and clicking I've saved might not stretch from my studio to the moon, but if I lost this workflow, I would be much less happy.
I actively encourage you to choose context clicking and shortcuts over the menu bar whenever possible. There are dozens of context menus available, too many to discuss in detail without boring the pants off of you. Figure 1.13 displays a couple of the menus I use all of the time in the Project and Timeline windows.


Figure 1.13. Context menus are everywhere and very effective. Context-click the tab of your Timeline window, and you will see very different selections than if you context-click a layer in that window. And depending on whether that layer is a camera, a solid, or footage, you will see different options, as well.
If you've been using After Effects for any amount of time, you understand that it is a nondestructive application that edits pointers to source files but has no way of editing those files directly. Therefore, it's very rare that any After Effects project is an island unto itself on your hard drive or server; to operate properly it also requires the presence of source footage files.
It's all very well to keep a well organized project, but what if you have a constant problem with source footage files becoming unlinked? This problem arises particularly when you move a project from one location on your drive to another, to another drive, or to another computer or server altogether.
Should a footage item become unlinked and you know where the source is located, or you can search for it on your drive, the solution is simple: Just choose your favorite method to bring up the Replace Footage File dialog:
Double-click the missing footage item in the Project window
Context-click the missing footage, choose Replace Footage, and then choose File
Highlight the missing footage, and press Ctrl+H/Cmd+H
Note
If you want to reload footage because it was updated in the background after you opened your project, choose Reload Footage from the context menu (Ctrl+Alt+L/Cmd+Option+L). After Effects avoids, where possible, re-reading a file on your drive or server, caching it instead. This command refreshes the cache.
In the Replace Footage File dialog, navigate to and choose the missing footage item (Figure 1.14).
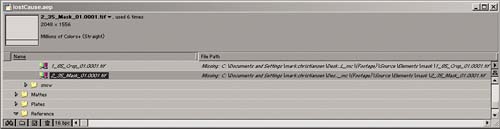
Figure 1.14. Missing footage appears with small color bar icons. In the File Path column, After Effects also displays the path where the file was expected to be, which can help when searching on your drive or network for a missing, unlinked file.
If you receive a warning on opening a project that a file or files are missing, but you don't know which ones (sometimes a project is too big or complex to spot them easily), try clicking on the little binoculars icon at the bottom of your Project window (Figure 1.15). Leave the text field blank and check the Find Missing Footage box; After Effects will search through your project for items that have become unlinked. If you have more than one, repeat this process and After Effects will search for each missing item in turn. It's not sophisticated, but it works. If you want to search for a specific file instead, simply clear the check box and type the filename in the text field.

Figure 1.15. Click the binoculars icon at the lower left of the Project window and then check Find Missing Footage, entering nothing in the Find field. After Effects will look for unlinked files in your project.
If all of your source files are missing, there is probably a better option than relinking each item individually. If all of the files are contained in one source folder (or one of only a few), after you link the first missing file After Effects may surprise you with the message that it has found and relinked others: The program automatically searches for other missing items in folders to which you relink. (For advice on guarding against the need to relink, see the section “Collect Files.”)
If for some reason a file refuses to relink (the item you are attempting to select is gray and cannot be highlighted in the dialog), After Effects is somehow not recognizing that footage as the format that it should be. There are a few potential reasons for this, but the most common is simply moving a project from Mac to Windows, or vice versa. The most common solution is to add a missing three-character extension to the file (for example, .jpg for a JPEG file). Note that this problem is not limited to Windows; when the headers are stripped from a file by transferring it via FTP or e-mail, OS X will fail to recognize it until the extension is restored. Get in the habit of always naming files with these extensions; unfortunately, some applications (such as Apple's Final Cut Pro) do not actively support this practice.
If the file still won't relink even with the proper extension, it may have become corrupted or it may be one of the file types that does not work equally well on Mac and Windows. For example, Mac PICT files don't work well on Windows.
To avoid this, use formats that are universally understood on all platforms: TIFF, TGA, PNG, or JPEG. (For more on choosing formats, see the section “Footage and Composition Settings.”)
Of course, a better approach is to avoid having to relink files at all, and you do have some elegant options for preparing After Effects projects and their source files to be moved or backed up. The old-fashioned way was to place the After Effects project in a master directory and all of its source files in subdirectories because this is how the program automatically searches for linked files (using relative, rather than absolute files paths). If you don't want to organize your files this way, however, consider the Collect Files alternative, which does this for you automatically.
Located in the File menu, the Collect Files command was originally designed to support the Watch Folder command, which enables you to render an After Effects project on several machines (see Chapter 4). If you leave all the default settings for Collect Files and click the Collect button, you can select the location for creating a new folder that contains a copy of the project and all of its source files (Figure 1.16).
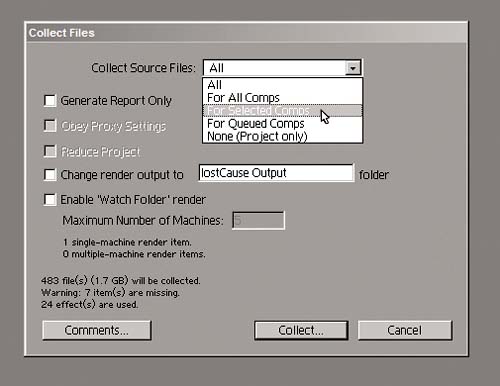
Figure 1.16. The Collect Files dialog includes several options. It's useful to select the final rendering composition prior to activating Collect Files if the project is complete—that way you don't collect files you don't need. In the lower left is a summary of what will be collected, what is missing, and how many effects are employed.
This is incredibly useful for transporting or archiving After Effects projects and their source files, a “no file left behind” policy for your workflow. To streamline even further, you can reduce your project down to only the files that are used in existing compositions. Instead of leaving Collect Source Files set to All, choose a subset of files—only those used in comps in this project or in comps in the Render Queue, for example. Or you can select a composition prior to choosing Collect Files and reduce the project to only the files used in that one composition.
Reduce Project is available as a command under the File menu, in addition to being part of the Collect Files process, so you can engage its services at any time to clean up a project. With a composition selected, choose Reduce Project; After Effects removes all of the source files in the project that are not used in that comp (Figure 1.17). After Effects even lets you know (in a dialog box) how many files it removed and reminds you of the ability to undo this process.
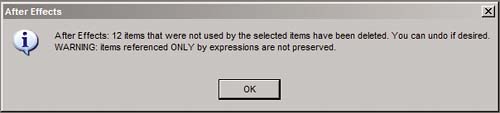
Figure 1.17. Do not be alarmed. After Effects is only reminding you that Reduce Project will delete items from the project. Click OK and then double-check to make sure you really had the comp you wanted selected.
Editing and Replacing Source
Perhaps you are working away in After Effects and notice something you want to change about a piece of source material that you created or edited in another application. There is a shortcut for opening that file in the program that created it (according to its file tag): Ctrl+E/Cmd+E. You then make your edits in the other application and save the result. After Effects checks to see if the file has been updated (by looking at the modification date, so remember to save) and imports the result.
This very convenient feature doesn't always work properly, however, particularly when dealing with a multi-image source (either an image sequence or a multiple layer Photoshop or Illustrator file). Many users, myself included, have instead become used to context-clicking the item in the Project window and selecting Reveal in Explorer/Reveal in Finder, then opening and editing the image, saving it, and coming back to After Effects to reload it, one layer of the file at a time, if necessary.
But wait, that's not all. Just above Reduce Project in the File menu are a couple of other highly useful tools for cleaning up your project: Consolidate All Footage and Remove Unused Footage. Consolidate All Footage looks for two or more instances of the same source file and combines them, choosing the first instance, top to bottom, in the Project window to replace all other instances (Figure 1.18). Remove Unused Footage does exactly as it says, ridding your project of all footage that is not included in any composition.

Figure 1.18. A similar warning appears when you choose File > Consolidate Footage, which looks for duplicate instances of the same source file in the project and chooses the first of these from top to bottom to represent all instances.
Alas, Consolidate All Footage does not eliminate solids clutter—the presence of several identical solids in the Solids folder of your project. After Effects assumes that you are keeping each instance unique so as not to inadvertently edit them all by changing one (despite also offering a check box in the Solid Footage Settings dialog to Affect All Layers that Use This Solid).
Why devote a section to footage and composition settings if After Effects does its best to automate them and stay out of your way? Because by trying to make your life easier, After Effects is inadvertently making it more difficult: Shielding you from the details contributes to user ignorance of them. And you need to understand these details, so you can get them right from the start. A misinterpreted alpha channel, nonsquare pixel footage interpreted as square, undetected scan lines, and similar issues will leave you fighting an uphill battle if you don't make the proper settings before you ever start putting together a composition.
Although the automatic settings in After Effect are great most of the time, it pays to understand how they work for those times you need to do some manual tweaking. Take a closer look.
This book generally eschews the practice of taking you menu by menu through After Effects. Sometimes, however, the UI perfectly encapsulates a set of production challenges. The Interpret Footage dialog, then, is like a section-by-section checklist of all that can go wrong when you import footage: misinterpreted Alpha, incorrect Frame Rate, misadjusted Fields and Pulldown settings, incorrect Pixel Aspect Ratio. To bring up the Interpret Footage dialog, select some footage in the Project window and press Ctrl+F/Cmd+F or context-click and select Interpret Footage > Main.
Alpha settings are more complicated than you might think when it comes to compositing; most After Effects users have no idea just how complicated, in fact. Figure 1.19 shows the common symptoms of a misinterpreted alpha channel.

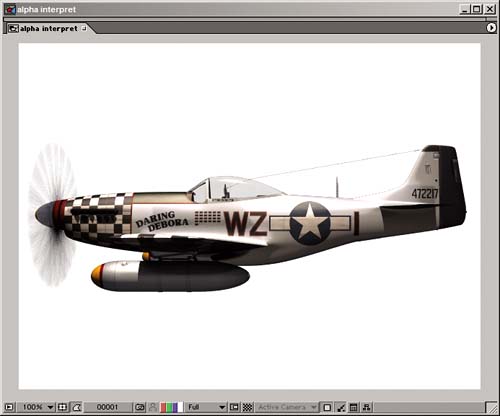
Figure 1.19. It's easy to distinguish a good (right) from a bad alpha channel (left). Note the grey area in the cockpit canopy and the black line around the misinterpreted version (left). In this case, the image had a premultiplied alpha, and the black data in the edges is the result of misinterpreting it as straight.
For the time being, I offer a couple pointers and reminders:
If you're unclear about which type of alpha channel you're working with, click Guess in the Interpretation dialog that shows up when you import footage with alpha. This will typically get the setting right.
Under Preferences > Import is a setting for how you want After Effects to handle footage that comes in with an alpha channel. Beware of setting this to anything besides Ask User until you are certain you know what you are doing with alpha channels and that circumstances aren't likely to change without you noticing.
For a more in-depth discussion of alpha channels and how they operate in the After Effects pipeline, see Chapter 3, “Selections: The Key to Compositing.”
The clearest symptom of an incorrectly set frame rate is footage that does not play smoothly in a composition with the target frame rate. Interpreting frame rate properly is an issue only when you import image sequences, which, of course, is the most common way that you will import moving footage in a visual effects setting. Image sequences are preferred to formats such as QuickTime (.mov) or Windows Media (.avi) in a production setting because
If something goes wrong with a rendered image sequence, only the missing frames need to be replaced. With a movie file, the whole file typically has to be discarded and replaced, potentially costing hours of render time.
Movie file formats are not as universally recognized and standardized across various platforms and programs as still image formats. QuickTime is the most robust and flexible of the moving image formats, yet many Windows-based programs do not even natively support it.
Therefore, when importing still image sequences to use as moving footage, remember
Just because you've set your Project Settings to the proper frame rate (say, 24 fps for a feature film project), your image sequences may still import at 30 fps by default. You can change this default setting under Preferences > Import.
You can assign whatever frame rate you like to a footage sequence if you determine the default setting is not correct.
Just because an imported moving image file (such as QuickTime) has its own frame rate does not mean you cannot override this rate as needed by checking Assume This Frame Rate and entering a value. Be certain, however, that this is really what you want to do; typically, it is only a correction for outputs that were set incorrectly in another application.
Keep in mind that you can highlight any clip in your Project window and see its current frame rate, along with other default settings, displayed at the top of the window (Figure 1.20).

Figure 1.20. To find useful information about any file in the Project window, highlight the file and look at the top of the window. You'll find frame rate, duration, color depth, pixel aspect, and how many times the clip is used in the project. To see and select specific comps in which it is used, click the little arrow at the end of the file name.
As creators of digital movie clips, we all look forward to the day when interlaced footage is a thing of the past. In the meantime, you must guard against symptoms such as those depicted in Figure 1.21. The best way to avoid field artifacts in moving footage is by making sure your Field setting matches that of your incoming footage; Separate Fields unweaves the two fields embedded in a single frame to be two separate frames, allowing you to transform them without creating a complete mess.

Figure 1.21. The foreground pickup truck spells trouble if you're planning on doing much more than a simple color correction; fields were not removed for this clip. If you see a problem like this, check your footage interpret settings immediately.
For DV footage, this process is automated and After Effects knows what to do by default. For other formats, you need to know not only whether your footage is coming in with fields but also whether the upper or lower field is first. Furthermore, with film footage you may have to deal with pulldown.
After Effects is capable of importing and exporting a wide array of footage formats, yet only a small subset of these recur typically in visual effects production. Here are some of the most popular raster image formats and their advantages (for a summary, see Table 1.1):
TIFF (.tif): In many ways the most flexible of formats, with the possible exception of PNG, TIFF is longstanding enough to be supported by most applications. It can be compressed effectively (and losslessly) by enabling LZW compression, which looks for recurring instances and patterns in the image and encodes them. Although 16-bit support is not native to After Effects, it is available via a free third-party plug-in (for more on this see Chapter 11).
Targa (.tga): This format has the dual advantages of being universal to most computer graphics applications and offering lossless RLE (run length encoding) compression, which looks for sets of identical pixels that can be losslessly grouped together (such as a solid color in the background or alpha channel).
PNG (.png): In many ways the most misunderstood of formats, PNG natively supports images of 8 or 16 bits per channel in Photoshop, and it often does the most effective job of losslessly keeping files sizes small. Because PNG has a reputation as a Web-oriented format, users sometimes mistakenly assume that it adds lossy compression, as is the case with JPEG files.
Cineon (.cin): A common format for transferring digitized film images, this format works in nonlinear, 10-bit color and is discussed in greater detail in Chapter 11.
Photoshop (.psd): Although a universally supported format with many built-in extras, such as support for individual layer transparency, these files can be huge, as Photoshop offers no lossless compression options.
Open EXR (.exr): This is an advanced format for use solely with high dynamic range imaging (HDRI), source that has been taken in bit depths higher than linear 16 bit. Moreover, it is not supported natively by After Effects but requires a special plug-in. If this all sounds like gobbledygook but you still want to learn more, have a look at Chapter 11.
Table 1.1. Raster Image Formats and Their Advantages
FORMAT | BIT DEPTH | LOSSLESS COMPRESSION | ALPHA CHANNEL |
|---|---|---|---|
TIFF | 8 or 16 bit | Y | Y |
TGA | 8 bit | Y | Y |
PNG | 8 or 16 bit | Y | Y |
CIN | 10 bit | ||
PSD | 8 or 16 bit | Y (multiple via layers) | |
EXR (non-native) | 16 bit, 32 bit (floating point) | Y |
So which format should you use? I would give TIFF the edge for 8-bit images, but use PNG for 16-bit images, because the file sizes are losslessly so much smaller. Cineon is the only choice for 10-bit log files, and there's nothing particularly wrong with Targa (except perhaps slow run length encoding) or Photoshop (except the huge file sizes).
Note
Be sure to note that 8 bit means 8 bits per channel, for a total 24 bits in an RGB image or 32 bits in an RGBA image. Targa includes a 16-bit option that actually means 16 bits total, or 5 per channel plus 1. Avoid this.
After Effects supports some special features for dealing with files created by other Adobe applications. For effects work, the most handy one is support for multilayer Photoshop images, including layer names, transfer modes, and transparency settings.
To take advantage of this feature, import the Photoshop source as a composition, which leaves all of the properties of each individual layer editable in After Effects. The alternative is to import only a single layer or to flatten all layers and import the entire file as one image.
The ability to import a Photoshop file as a composition means you can set up a shot as a Photoshop still and import it with everything already in place. This is particularly useful with matte paintings that include separate elements, such as multiple planes of depth.
If you don't need the elements ready to go as layers of a composition, however, I would forego this option because it makes editing and updating the source trickier. Each layer becomes a separate element that must be updated separately, and it's wasted effort if you're never editing the associated composition.
There are two relatively sure-fire methods for ensuring that your composition settings are exactly as they should be:
Use a prebuilt project template that includes compositions whose settings are already correct.
Create new compositions by dragging a clip to the Create a New Composition icon and using only clips whose settings match the target output size and frame rate (Figure 1.22).

Figure 1.22. Dragging a source background clip to the highlighted icon at the bottom of the Project window creates a new composition with the clip's duration, pixel dimensions, pixel aspect, and frame rate. It's a reasonably foolproof way to set up a new composition if you are working with a master background clip.
The crucial settings to get correct in the Composition Settings window are the pixel dimensions, Pixel Aspect Ratio, Frame Rate, and Duration. (Actually, even Duration is negotiable so long as it is not too short.) If you're working with a footage format that isn't accurately described in any of the Preset options and you're going to be using this format again and again, then by all means create your own Preset setting by clicking on the small icon adjacent to the Preset pull-down menu, the icon that looks like a little floppy disk (Figure 1.23).

Figure 1.23. Feel free to create your own preset if none of the listed ones match one that you will be using continually for your project.
And what of that other tab, labeled Advanced in the Composition Settings dialog? It pertains to specific options for dealing with time and space (see Chapter 4) and for working with motion blur and 3D (see Chapter 9, “Virtual Cinematography”).
Nothing sets you apart as a visual effects pro more than the way you examine footage. I had a tax accountant years ago who dealt solely with artists, who encouraged me to write off my VCR (this was before DVDs were common currency) and any movies I rented. She told me that the IRS had no idea of the way that effects people look at movies—back and forth over the same section, frame by frame, and so on—nor the wear and tear it puts on video equipment.
Obviously, the way you look at a clip in After Effects is much different than the way your audience will look at it once it's in the finished movie. So to get to the heart of the matter: How exactly does a professional work with footage in After Effects? This section offers some of the habits of highly effective compositors, so to speak.
The strategies outlined here are particularly helpful when working with such large format footage as 2 K film plates (film resolution footage measuring approximately 2000 pixels horizontally), but they're not bad habits for speeding you along regardless of format (or the speed of your workstation).
After Effects 6.5 finally made it standard for any new layers in a composition to be set to Best quality in the timeline (with a check box for the setting in Preferences > General). Long ago, in the era of truly slow desktop computers, Draft quality was an effective hedge against slow previews, but in this day and age there are far more effective ways to manage preview speed without creating inaccurate previews, as Draft quality does. In other words, don't use it, because the potential pitfalls generally are not outweighed by the benefits.
There are several other effective ways to speed up previews and interactivity without ever resorting to Draft quality:
Change Resolution/Down Sample Factor to Half; or in extreme cases, change it to Quarter
Preview a Region of Interest (ROI)
Change the way controls update using Preview settings and the Option key (for more on this, see the section “Caching and Previewing”)
Enable the Caps Lock key to prevent further updates to rendered views; use only in cases of extreme slowdown
Most production monitors do not themselves have a horizontal resolution of 2000 pixels—even 23-inch CRT monitors make you squint at this resolution—but artists tend to use this to their advantage by leaving the footage at 50% magnification and Half resolution (Figure 1.24). There is a preference that will keep magnification locked to resolution, but most users don't like it because it causes the View window to pop in and out suddenly.

Figure 1.24. It's usually good to keep the resolution (highlighted, right) matched to the current magnification setting (highlighted, left); that way, you don't overrender for the view you're using, given how typical it is to work with film resolution footage at 50% until it's time to render.
This setup allows four times as much data to fill a RAM preview, and preview renders are created in a fraction—sometimes one half or, in extreme cases, one tenth—of the time required for Full resolution, which is reserved for cases in which it is necessary to zoom in and look closely, and for final render preparation.
Note
The Auto-Zoom When Resolution Changes setting found in Preferences > Display enables you to use the keyboard shortcuts to change resolution, and the Composition window zooms in or out so that the Magnification setting matches resolution. I find this useful only in cases where I'm doing a lot of zooming in and out to check details followed by short previews, such as when pulling a color key or rotoscoping.
To quickly change the display resolution in the Composition window, use the keyboard shortcuts shown in Table 1.2.
Table 1.2. Keyboard Commands for Changing Display Resolution
RESOLUTION | KEYBOARD SHORTCUT |
Full | Ctrl+J/Cmd+J |
Half | Ctrl+Shift+J/Cmd+Shift+J |
Quarter | Ctrl+Shift+Alt+J/Cmd+Shift+Option+J |
Zooming and navigating around footage at first seems the same as in other Adobe applications: Hold down the spacebar or activate the Hand tool (H) to move its position around in the window. Use Ctrl+=/Cmd+= or the Zoom tool (Z) to zoom in, and use Ctrl+-/Cmd+- or the Zoom tool with the Alt/Option key pressed to zoom out. Note,however, that there is a significant difference in the two methods of zooming in and out—the keyboard shortcut causes the Composition (or Layer) window to scale up or down relative to the size of the format area. To keep your windows the same size and only zoom the footage, use the comma and period keys as zoom shortcuts instead.
Note
Although it's easier to remember the zoom shortcuts as < and > instead of comma and period, don't hold down the Shift key to choose these characters instead of the comma and period. Doing so activates a completely different, although equally useful shortcut, which allows you to skip from one tab to the next or previous one.
When you really need to look at something at full resolution in full motion, consider whether you need to see the full frame or just some area of it, as is often the case. In such a situation, use the Region of Interest (ROI) tool (Figure 1.25).

Figure 1.25. Activating the Region of Interest is like cropping your composition. In fact, there is even a Crop Comp to Region of Interest command in the Composition menu, should you decide you like what you see. You save much of the render time involved for other parts of the frame, and all of the preview storage.
Clicking the ROI tool turns your cursor into a set of crosshairs that you use to define the rectangular region you wish to isolate. Now as you preview, only the layer data that you need to render is calculated, and only this area of the screen buffers into physical memory, lengthening the temporal capacity of RAM previews (detailed further in “Caching and Previewing”).
One major gotcha in After Effects occurs in heavily render-intensive projects that need a lot of tweaking (say, fine adjustments of effect controls). The problem is that, as the processor becomes heavily loaded updating the frame display, UI interaction itself is slowed down—so much so in some cases that dragging a slider or a layer position becomes stuttery and noninteractive.
In some cases, deactivating Live Update is enough to prevent the problem (Figure 1.26). If you're working with high-resolution footage, you probably want this toggled off so that waiting for updates does not drive you crazy. Holding down the Alt/Option key as you make adjustments in the UI causes the Live Update setting to toggle; some users prefer to leave Live Update on and to hold down Alt/Option when needing to freeze the update.

Figure 1.26. Live Update is activated by this switch in the timeline; it is active by default. When it is active, the Composition and Layer windows update in real time, as you adjust sliders. Holding down Alt/Option as you adjust a slider prevents the views from updating. If Live Update is not activated, then holding down Alt/Option updates the view (the functionality is reversed).
In extreme cases, the panic button is the Caps Lock key. Activating this key (Figure 1.27) prevents any further updates to any rendered displays until it is deactivated. I have worked on productions where the server load was so heavy that it was necessary to work “blind” with Caps Lock active for several consecutive edits before being brave enough to reactivate the update and take a little break while the frame updated. Ah, the good old bad old days (which continue to this day, given the number of facilities that insist on leaving all source files on a remote server connected via gigabit Ethernet, and given how completely slammed those servers can become).

One key to getting the best performance possible out of After Effects is to get the application to cache as much of your footage as possible into physical memory. This is something that After Effects does automatically, whether you are simply navigating from frame to frame (Page Up and Page Down keys) or loading frames into memory for a RAM preview (0 on your numeric keypad).
You can optimize the caching, however. For example, you can extend the amount of space available to the cache to physical media (a high-speed local drive) by enabling Disk Cache in Preferences > Memory & Cache. This locks away a portion of your drive for use only by After Effects. Just as green areas at the top of your Timeline window indicate frames that have been cached to RAM, blue areas have been cached to the Disk Cache. In most cases, even setting this to the default 2 GB (2000 MB) size greatly extends your caching capability without occupying needed disk space (because you shouldn't be filling your drives to more than 90% of capacity anyhow, and even modest machines have tens if not hundreds of gigabytes of space these days).
If RAM previews are still slowing you down by taking too long to render and refined motion is not critical to your preview, you can take advantage of the option to skip frames in RAM preview. This is accessible only via the Time Controls palette, which I usually leave closed other than to adjust the number of frames skipped. Under the wing menu of that palette, choose Show Shift+RAM Preview Options if they're not already visible (Figure 1.28). To preview every other frame, saving half the render time, set Skip to 1 (or set it to 4 to render only every fifth frame, and so on). The shortcut to access Shift+RAM Preview is, naturally enough, Shift+0 (again, on the numeric keypad).

Figure 1.28. The wing menu of the Time Controls palette contains the menu options for revealing the RAM Preview and Shift+RAM Preview options
By default, the RAM Preview feature caches and previews all frames in the work area, starting with the first. This is not always what you want. One alternative is to check the box in Time Controls to preview From Current Time. With this setting, the Work Area is ignored and the preview begins wherever the time needle is, continuing to the end of the composition.
You can also change the Work Area to limit your preview timing, but this is a pain—unless you use shortcuts. Specifically, Ctrl+Alt+B/Cmd+Option+B sets the Work Area to the length of any highlighted layer, and double-clicking on the hash marks at the center of the Work Area bar resets it to the length of the composition. It's not perfect, as editing the Work Area for a RAM preview can inadvertently cause the wrong frames to render, but it's often handy.
For a lot of effects work, setting a custom background while you work with foreground layers only can be useful. You probably already know that you can change the background color to anything you want (use the keyboard shortcut Ctrl+Shift+B/Cmd+Shift+B or choose Background Color in the Composition menu). No doubt you also know about the toggle at the bottom of the Composition window to display the Transparency Grid (familiar to Photoshop users).
Sometimes that's not enough, however, which is one area where guide layers, new to After Effects 6.5, become handy. If you want to insert background plate footage into a nested foreground composition without it ever appearing in any subsequent comps or in the final render, try this: Add the background layer at the bottom of the timeline, then context-click (or go to the Layer menu) and choose Guide Layer (Figure 1.29). You just made this layer into a special kind of layer that will show up only when you preview the composition—not when you render it, nor when you insert it in another comp.

Figure 1.29. Guide Layer has been set for the background layer, evident by the small aqua-colored icon that appears beside the layer name.
This allows you to create custom backgrounds for the sole purpose of previewing, as well. For example, a gradient can help reveal qualities that are difficult to spot against a solid color or the Transparency Grid, particularly when you're refining a matte. Apply the Ramp effect to a solid, then toggle on Guide Layer and you have a perfect preview background (Figure 1.30).


Figure 1.30. You can often get a much better view as you work in a subcomposition with a gradient background (left), rather than a solid color or a checkerboard. Guide Layer prevents the gradient from appearing in any subsequent comp or render; here it is nested into a main comp that shows only a checkerboard background (right).
Note
Why are single channels useful? They are part of breaking down a source image or examining a final one, as you'll learn in depth in Section II, “Effects Compositing Essentials.”
Another way in which you will want to continually check your work is by studying footage one color channel at a time or by looking only at the alpha channel. Those four little color rectangles at the bottom of the Composition window are there for this purpose, and a line in the color of the channel you've chosen helpfully appears around the edge of the window when one of them is toggled on (Figure 1.31). The corresponding keyboard shortcuts—Alt/Option+1 through Alt/Option+4—accomplish the same end.

Figure 1.31. The thin green line around the edge of the Composition window indicates that only the green channel is displayed.
Unfortunately, After Effects does not allow you to display a RAM preview in individual channel mode. You can work around this by pressing the spacebar to preview instead, in which case whatever channel is active will remain so. Unfortunately, your preview speed may be much slower. You could also set an adjustment layer at the top layer of the timeline with the Shift Channels effect applied andset all channels to the desired preview channel (Figure 1.32). Assuming that you don't want this adjustment layer to render, you can set it, too, to be a guide layer. Most of the time, this won't be necessary. If you ever complain that you can't preview a single channel at full-speed, however, remember this simple work-around. It will work for any preview-only effect you wish to set.
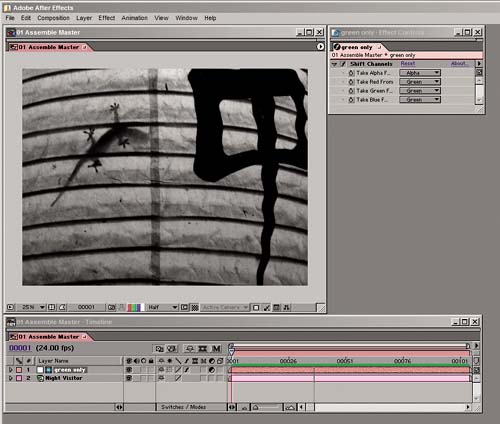
Figure 1.32. The same result, displaying only the green channel, but this time using the Shift Channels effect applied to an adjustment layer, which is also set as a guide layer. This allows you to preview a channel at full speed, without having to worry that the effect will remain active when you render.
There's an old joke among effects artists working in After Effects that virtually any visual effect can be accomplished with just two effects: Levels and Fast Blur. This is, of course, a major exaggeration (I would want at least half a dozen!), but it makes a couple of important points about After Effects and its users:
Most users will never use the majority of effects in the Effect menu. Many effects, in fact, are there only to support old, otherwise outdated projects created in previous versions of After Effects.
After Effects artists get a bad rap in the visual effects community for always wanting an effect plug-in to do for them what can actually be done with the core tools, if the artist knows how the effect is achieved.
Meanwhile, there's a big problem with the Effect menu and the Effects & Presets palette: the categories. They're ancient, often nonintuitive, and each category contains a mishmash of constantly used and rarely to never used effects. The Adjust menu has Levels, the single most-used effect in the program, right above Photo Filter, a Photoshop rip-off better suited to still images. You can colorize footage with Hue/Saturation (from that same category) or with Tint, Change to Color, or Colorama from the Image Control menu.
Luckily, there are alternatives. For one thing, you don't ever have to use the Effect menu. The Effects & Presets palette has options for displaying effects without their categories (Figure 1.33). Once you know what you're looking for, listing effects in alphabetical order and searching for them in the palette's text field can speed things along a bit. You then apply the selected effect by double-clicking it (if the target layer is selected) or by dragging it to the target layer in the Timeline window (or to its Effect Controls window).

Figure 1.33. Wondering how many different blur options you have available? Type blur in the Contains field and find out. It may not be this many, as some here are from third-parties. This display is in Alphabetical mode (chosen from the wing menu, top right).
You may have noticed those little icons that appear next to the effect names in the Effects & Presets palette. There are four main types: 8- and 16-bit effects, Animation Presets, and Audio. You may not be working at 16-bit depth yet, but it is worth noting which effects are 16-bit ready; for the most part, those are the core After Effects plug-ins, the ones you'll consider using first and most often. Note that these effects are capable of supporting 16 bits, but they don't require that you work at that setting. Chapter 12 contains more about the difference between 8- and 16-bit depths and how to work with them.
Note
Hardly anyone uses the third available view, Explorer folders/Finder folders. These allow you to organize your plug-ins however you like them where they are stored, in your Plug-ins folder, and see them that way in the Effects & Presets palette. By the time most users are confident enough to sort plug-ins this way, however, they've already adapted to the default organization.
Using the wing menu you can specify which type of effect you want to see (Figure 1.34). For example, you can show only 16-bit effects, or you can see the contents of an Animation Preset (what it actually does, step by step). Beware if you set this option, however, because you may find yourself looking for an effect that is unexpectedly missing from the palette.

Formerly known as Effects Favorites, Animation Presets are particularly useful when you're working with a team and sharing standardized practices. You can recognize an Animation Preset in your system by its .ffx file suffix.
In the Effect Controls window or the timeline, select whatever effects and properties you want to save and choose Animation > Save Animation Preset. You can save the preset wherever you like, but for it to show up in the Effects & Presets palette automatically, save it to the Presets folder (the default choice for After Effects). In a studio situation, you can roll a preset out to a number of users by placing it in this folder for them. The next time they restart After Effects or update the palette (using the Refresh List command in the wing menu), the preset appears, ready for use.
The wing menu of the Effect Controls window contains two options that interfere with a clean and consistent UI, so I turn them off (by default they are on). Auto Resize messes up the effort made by setting workspaces, making the effects window an arbitrary length, and Show Animation Presets leaves an extra little pull-down menu at the top of each effect instance that, frankly, rarely gets used.
Note
I rarely save Animation Presets with keyframes on them, because keyframes vary with the timing of the shot. When possible, I use expressions that advance with time instead (detailed in Chapter 10, “Expressions”).
There are a few different ways to adjust individual effects settings, depending on the type of setting. For the majority of them, which include a blue numerical setting, you can click and drag directly on the number, dragging left or right to decrease or increase it, respectively. And there are even the following refinements:
Hold down shift while dragging and the number increments by ten times its normal amount
Hold down Ctrl+Alt (Cmd+Option) and the increments are one-tenth the normal amount
These same shortcuts work in the timeline as well, where applied effects can be revealed by highlighting a layer and pressing E on the keyboard. (More on optimal usage of the timeline follows in the next chapter.)
Note
New in version 6.5 of After Effects is the Increment and Save feature (Ctrl+Alt+Shift+S/Cmd+Option+Shift+S). This saves a new version of your project with a forward incrementing number at the end of the project name. If no number was present in the original project name, After Effects adds one. It's a good habit to use this feature every time you're about to try something major, new, and potentially destructive in an effects shot.
The Render Queue itself is not terribly puzzling, but like many other key portions of the After Effects UI it contains a few features that many users miss, and a few gotchas that hit them from time to time.
There are two key sections for each Render Queue item: Render Settings and Output Module. You can click on each to adjust settings, but I find that almost immediately you will want to get into the habit of choosing a preset, or template, from the pull-down menu. And in the altogether likely case that one does not already exist, you choose the selection at the bottom of each menu: Make Template.
Why make a template for each render? Render Settings tends to be standardized across a project, and you likely will use one of just a few output modules throughout the duration of the project. So why waste time thinking about settings each time you render, when that only leads to a higher likelihood of careless errors (which are, probably more than anything else, the bane of a compositor's existence)?
After Effects is flexible about how you add an item to the Render Queue. You have a choice of two keyboard shortcuts: Ctrl+M/Cmd+M and the one I always tend to use, Ctrl+Shift+/ (Cmd+Shift+/ for those of you on Macs). You can also select a number of items in the Project window and drag them to the Render Queue. If you drag footage without a comp to the Render Queue, After Effects makes a default comp for you to render the footage as-is, which can be handy for quick format conversions.
The output path you choose for the first of your active Render Queue items becomes the default for the rest of them, which is handy until you find yourself rendering lots of image sequences, because each of those typically needs its own folder to keep things well organized.
There's probably one set of parameters from the Render Settings dialog that you will prefer throughout your project; in fact, on a film or high-definition project, Best is probably pretty much that group, whether you are outputting still image sequences or movies.
Mostly the Render Settings dialog contains manual overrides for the settings in your composition itself (Figure 1.35). The window is divided into three sections:

Figure 1.35. The Render Settings dialog has three sections: overrides for the composition settings (top), specific time sampling overrides and settings (center), and two extra options for where and how files are rendered (bottom).
The Composition area (top) has a series of settings that optionally override the Quality, Resolution, and Disk Cache settings, as well as the layer-by-layer Proxy, Effects, Solo, and Guide Layer toggles. The Best setting assumes you want to use all of these as they were designed, with Quality forced to Best and Resolution at Full. There is a school of thought (of which I've never been a member) that says you should default Effects to All On. The idea here is not to present yourself with any unexpected gotchas, but forcing on all effects turns on an effect you meant to delete at least as often as it toggles on an effect you accidentally turned off.
The Time Sampling section (center) contains settings that override decisions that exist in the composition itself: the Frame Blending and Motion Blur toggles, plus the Shutter Angle setting for motion blur. Field Render and 3:2 Pulldown pertain only to preparing the comp for broadcast video output; on projects you will either use them all the time or not at all for final output. The Time Span setting comes into play in situations where you need to re-render some portion of your total comp (otherwise, Work Area or Length of Comp should be preferable).
The Options section (bottom) contains precisely two mutually exclusive options: If you check Use Storage Overflow then the overflow volumes that you can specify in Preferences > Output come into play (Figure 1.36). If the first one fills up, the second is used, and so on. If you do not check this option, you can let After Effects look in the destination folder and skip any files that it finds whose output names match files already in that folder. This is designed specifically for the Watch Folder option, but you can use it in any case where you are creating an image sequence and have some, but not all, of the rendered images already completed.

Figure 1.36. Storage overflow is insurance against bad planning; if you run out of space on the primary rendering drive, the volumes specified in this Preference dialog can be set to handle the overflow. With ample disk space, you should not need this, but it's preferable to a failed overnight render.
The way to use Render Settings overall is as a checklist of all the things you need to think about to get your output footage to look the way you want. It may work to simply use Best settings and walk away, or you may be reminded of something specific that needs to be custom set.
Throughout the course of your After Effects career you will probably create a large number of Output Module templates. The settings themselves are not so tricky if you know what you're after: Once you've chosen a format, and set the appropriate options (under Video Output), you have the additional options of stretching or cropping the output, and adding audio.
Note that Output Module appears after Render Settings, item by item. This is with good reason: As you will see in detail in Chapter 4, the order in the user interface shows the rendering order, and so Render Settings are applied to the render prior to the application of the Output Module settings.
This becomes important, for example, when scaling output: To scale down a clip and retain the highest quality, you will in most cases want to apply the scaling as a Stretch setting in the Output Module rather than a Resolution setting in the Render Settings (unless speeding up the render is more important than quality, in which case the inverse advice applies).
There are several elegant problem-solving tools embedded in the Output Module setup, some of which many users tend to miss. Among the most significant are
You are allowed more than one Output Module per Render Queue item (Figure 1.37).

Figure 1.37. So many users—and not just beginners, by any means—fail to notice that you can add multiple Output Modules to a single render queue item, via Composition > Add Output Module. This can be an immense timesaver, as several versions of a render can be created in one pass (for example, one at full resolution stills and a Web-compressed version).
You can change the Output Module of all of your Render Queue items by selecting the Output Module (rather than the Render Queue item itself) of the first item and then Shift-selecting the Output Module (again, rather than the item itself) of the last item (Figure 1.38).

Figure 1.38. Oh no, I have to change all those? Fear not, you can select any number of consecutive Output Modules to change them, but don't select the render queue items themselves. Instead, select the first Output Module in the group and Shift-select the last, then change any of the selected ones and they all follow.
You can start numbering an image sequence from any number you like (Figure 1.39).
Stretching and cropping your output is often a quick, elegant solution to an otherwise thorny rendering problem.
Included in the Output Module Settings, and also hidden under the twirl-down arrow (Figure 1.40) is an extra option, to perform one of three Post-Render Actions to import or replace the composition that was the source of the render. Chapter 4 contains more about how to use these.
The shorthand for creating a numbered image sequence is simple if you follow the rules: After Effects replaces the string [###] within the overall output name with a three digit sequential number. The number of # characters in this string corresponds to the amount of digits in the sequential number; if you want extra padding, add extra # characters.


Paying attention to the options available with Output Modules and taking the time to customize and apply presets that you can use again and again are big parts of getting optimum output out of After Effects.
Here are some general guidelines for the output settings (Render Settings and Output Modules) that you can use in specific situations:
Lossless output: Interframe compression (QuickTime with Animation/Most) is acceptable for movie files, lossless encoding (TGA with RLE, TIFF with LZW, or PNG) and for still images.
Low-loss output: QuickTime with Photo-JPEG at 70% is ideal for creating test renders that are relatively small at full resolution yet show little in the way of compression artifacts.
Web review: This is a fast-changing area. At this writing, QuickTime with MPEG-4 files offer some of the best results, but your mileage may vary.
DV/HDV: If working with these or other compressed source formats, remember that they recompress pre-renders, so make all of your edits to the source file and render once!
Obviously, there is much more to choosing your output settings than I've covered here; I only intended to help you get started. In many cases, the settings you need to use will be dictated by your delivery format or by what is needed by the next person after you in the production pipeline.
If you've never had your work reviewed in dailies at an effects studio, your first time in that setting may be a bit of a shock. Seasoned visual effects supervisors miss nothing, and in some cases they do not even need to see a clip twice to tell you what needs to change—even if it is only 40 frames long. In other cases, your shot will loop on and on for several minutes while the whole team gangs up on it, picking it apart.
Typically, however, footage is examined in dailies the same way that you want to look at it in After Effects, but in After Effects, you have a huge advantage—extra tools at your disposal to show you what is going on, and no surly supervisor sitting near you!
Throughout the book, and in your work, as you preview your shot you are encouraged to
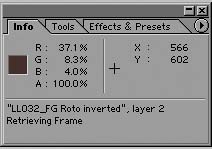
Check your Info palette (Figure 1.41)
Loop and rock and roll previews (Figure 1.42)
Zoom in and take a close look
Examine footage channel by channel
“Slam” your levels to see your work in extreme contrast; this is the practice of temporarily (via a top level Adjustment Layer) applying high-contrast to your composition to make sure that blacks, midtones, and highlights still match (introduced in Chapter 5)
Keep looking for the thing you cannot initially see, and remain critical of the result (without being unfair to yourself)
Expect that you will make careless errors; many final takes are lost to this factor. Effects compositing is a little like computer programming: a series of exacting decisions, where one careless error can invalidate the whole effort.


If I were teaching you this subject in person, I would remind you of these practices constantly; because doing that throughout a book isn't practical (and could get downright annoying), I encourage you to remind yourself. You will reap the benefits: a shot that is final in fewer takes, thanks to few careless mistakes, resulting in a pleased effects team who lauds your efforts and awards you with trickier, even more impressive shots (and an occasional break).