Chapter 4. Previewing ColdFusion
Preparing to Learn ColdFusion
You’re just about ready to go. But before you do, you need to know a little about the sample applications you’ll be using.
Orange Whip Studio is a low-budget movie studio waiting for its first big break. To help it get there, you need to create a series of Web applications. These include:
• A public Web site that will allow viewers to learn about the movies
• Intranet screens for movie management (budgets, actors, directors, and more)
• A public e-commerce site allowing fans to purchase movie goodies and memorabilia
Your job throughout this book is to build these and other applications.
Tip
Most of the applications created in this book share common resources (images and data, for example) but are actually stand-alone, meaning they don’t require components or code created elsewhere. Although this isn’t typical of real-world application development, in this book it is deliberate and by design.
Here are a few things you must know about how to manage code and resources:
• You’ll create and store the Orange Whip Studio applications in a folder named ows beneath the Web root. This is the folder for you created a project in Chapter 3, “Introducing ColdFusion Builder.”
• The ows folder contains a folder named images, which—this should come as no surprise—contains images used in many of the applications.
• The database used by our application resides in a special folder under the ColdFusion root.
• Web applications are usually organized into a directory structure that maps to application features or sections. However, you won’t do that here. To simplify the learning process, you’ll create a folder beneath ows for each chapter in the book: 4 for Chapter 4, 5 for Chapter 5, and so on. The files you create in each chapter should go in the appropriate folders.
Assuming you are running ColdFusion locally (this is advised), and assuming you installed the files in the default locations, the URL to access the ows folder will be http://localhost:8500/ows/ if you’re using the integrated HTTP server, or http://localhost/ows/ if you’re using an external HTTP server. You would then access folders beneath ows, such as the folder for this chapter, as http://localhost:8500/ows/4/ or http://localhost/ows/4/ (again, depending on whether you’re using ColdFusion’s integrated HTTP server).
Note
Once again, 8500 is the default port used by ColdFusion’s integrated Web server. The default port used by the integrated Web server in a JRun/ColdFusion installation is 8300. If you are using an external Web server (IIS or Apache, for example) then the default port of 80 will likely be used (and can also be entirely omitted from URLs).
Tip
If you have problems resolving host localhost, try using IP address 127.0.0.1 instead. 127.0.0.1 is a special IP address that always refers to your own host, and localhost is the host name that should always resolve to 127.0.0.1.
Your First ColdFusion Application
Let’s start with a really simple example, just to get comfortable using ColdFusion Builder. Here are the steps:
1. Create a new folder in the ows project named 4 (to indicate Chapter 4, this chapter). (If you need a reminder about how to do this, see section “Working with Files” in Chapter 3).
2. Create a new file in the 4 folder and name it welcome.cfm.
3. Your new file will automatically be opened, ready for you to write your code. Enter the following code (don’t worry about what it all means just yet; we’ll have plenty of time to review CFML in detail in upcoming chapters):
It is #DateFormat(Now())#<br>
Welcome to ColdFusion!
Notice that as you typed, ColdFusion Builder provided assistance. For example, when you typed the #, the matching # was automatically inserted. Also, notice the automatic color coding, with different language elements colored differently.
4. This code needs to be within <cfouput> tags. Select and highlight both lines and then click the Wrap In Cfoutput button above the editor area (it’s the fourth button from the left, the one that looks like a computer monitor). ColdFusion Builder will insert the <cfoutput> and </cfoutput> tags for you. You could also have used the keyboard shortcut Ctrl-Shift-O. And yes, you could have written the tags yourself, of course.
5. Open the Outline panel and see how your code outline has automatically been populated. Expand the list and click each item, noticing what gets selected in the editor window. This particular outline is small and not overly useful, but as your code grows in length and complexity, the Outline panel provides an easy way to see how tags are nested and allows you to click elements to quickly jump to them.
6. Run the code. Look at the bottom of the editor window area. You’ll see a series of tabs. The leftmost one is named Source, and it is currently selected. To the right you’ll see one or more tabs with names of Web browsers (Internet Explorer, Firefox, and others, depending on your operating system and on the browsers you have installed). Click a browser tab to run your code in that browser. You should see a welcome message containing today’s date.
Tip
Experienced developers regularly test their code in multiple Web browsers, just to make sure everything works properly regardless of the browser used.
ColdFusion Builder lets you run your applications right within the development environment using embedded Web browsers. But, of course, you can also test your code using an actual Web browser. For example, to run welcome.cfm in your Web browser, open that browser, and go to http://localhost:8500/ows/4/welcome.cfm.
A More Complete Example
Here is a more complete example, one that is composed of multiple files (as is usually the case). I won’t go into the details of the code itself; for now, concentrate on creating and executing CFM files so they work. If you can get all these to function, you’ll have a much easier time working through the book.
The bday application is really simple; it prompts you for your name and date of birth and calculates your age, using simple date arithmetic. The application is made up of two files:
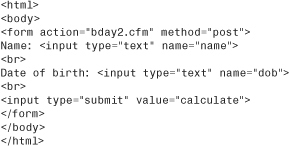
• bday1.cfm (shown in Listing 4.1) is the form that prompts for the name and date of birth.
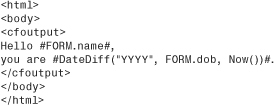
• bday2.cfm (shown in Listing 4.2) processes the form and displays the results.
Using Dreamweaver, create these two new files, saving them both in the 4 directory. Then enter the code that follows in each file exactly as it appears here—your files should contain this code and nothing else.
The code in bday1.cfm is simple HTML—there’s no ColdFusion code at all. In fact, you could have named the file with an .html extension and it would have worked properly.
bday1.cfm contains an HTML form with two form fields: name for the username and dob for the date of birth.
The code in bday2.cfm is a mixture of HTML and CFML. The name form field displays the Hello message, and the dob field calculates the age.
To try the application, run file bday1.cfm. (Don’t run file bday2.cfm or you’ll receive an error message.) You can run it either within ColdFusion Builder (just click the browser tab below the editor) or in your Web browser at the following URL:
http://localhost:8500/ows/4/bday1.cfm
Note
If you aren’t using the integrated HTTP server, adjust the URL accordingly.
A form will prompt you for your name and date of birth. Fill in the two fields, and then click the form submission button to display your age.
Browsing the Examples and Tutorials
ColdFusion comes with extensive examples, tutorials, and help. These are installed along with ColdFusion (assuming that they were actually selected during the installation). The Getting Started applications are available via links in the ColdFusion Administrator welcome screen.
Two of the options on this page deserve special mention:
• Select Explore Real-World Example Applications to browse two applications that demonstrate lots of ColdFusion functionality, along with the code used to build them.
• Select Code Snippets by Feature and Task to display a Code Snippet Explorer that provides you with instant access to ColdFusion code used to perform various tasks, as well as narrated and interactive tutorials.
Conclusion
Hopefully this chapter has given you a taste for what is to come. But before we continue learning ColdFusion, we need to take a little detour into the world of databases and SQL.