
Chapter 18. Introducing the Web Application Framework
ColdFusion provides a small but very important set of features for building sophisticated Web applications. The features have to do with making all your ColdFusion templates for a particular site or project behave as if they were related to one another—that is, to make them behave as a single application. These features are referred to collectively as the Web application framework.
The Web application framework is designed to help you with the following:
• Consistent look and feel. The application framework enables you to easily include a consistent header or footer at the top and bottom of every page in your application. It also lets you apply the same look and feel to user error messages. You can also use it to keep things like fonts and headings consistent from page to page.
• Sharing variables between pages. So far, the variables you have worked with in this book all “die” when each page request has been processed. The Web application framework gives you a variety of ways to maintain the values of variables between page requests. The variables can be maintained on a per-user, per-session, or application-wide basis.
• Before and after processing. The application framework gives you an easy way to execute custom code you want just before each page request. A common use for this capability is to provide password security for your application. You can also execute custom code just after the request. Along with executing code before and after a request, you can execute code when the application starts and when it expires. This lets you specify application-wide variables when it starts up, and doing cleanup once the application expires.
• Handling errors. In a perfect world, developers would never make mistakes, but for those of us who live in this world, mistakes happen. The application framework provides a simple way to handle errors. It also handles requests for missing ColdFusion templates.
Considered together, it’s the Web application framework that really lets you present a Web experience to your users. Without these features, your individual templates would always stand on their own, acting as little mini-programs. The framework is the force that binds your templates together.
Using Application.cfc
To get started with the Web application framework, you first must create a special file called Application.cfc. In most respects, this file is just an ordinary ColdFusion component. (Components are discussed in depth in Chapter 24, “Creating Advanced ColdFusion Components,” in Adobe ColdFusion 9 Web Application Construction Kit, Volume 2: Application Development.) Only two things make Application.cfc special:
• The code in your Application.cfc file will be automatically executed just before any of the pages in your application.
• You can’t visit an Application.cfc page directly. If you attempt to visit an Application.cfc page with a browser, you will receive an error message from ColdFusion.
The Application.cfc file is sometimes referred to as the application component. It might not sound all that special so far, but you will find that the two special properties actually go a long way toward making your applications more cohesive and easier to develop.
Note
On Unix/Linux systems, file names are case sensitive. The Application.cfc file must be spelled exactly as shown here, using a capital A. Even if you are doing your development with Windows systems in mind, pay attention to the case so ColdFusion will be capable of finding the file if you decide to move your application to a Linux or Unix server later.
Note
Previous versions of ColdFusion used another file, Application.cfm, to enable the application framework. This still works in the current version of ColdFusion. However, the use of Application.cfc is now recommended instead of Application.cfm.
Placement of Application.cfc
As we said, the code in your Application.cfc file is automatically executed just before each of the pages that make up your application. You might be wondering how exactly ColdFusion does this. How will it know which files make up your application and which ones don’t?
The answer is quite simple: Whenever a user visits a .cfm page, ColdFusion looks to see whether a file named Application.cfc exists in the same directory as the requested page. If so, ColdFusion automatically executes it. Later on, you’ll see exactly which methods of the CFC are executed.
If no Application.cfc exists in the same folder as the requested page, ColdFusion looks in that folder’s parent folder. If no Application.cfc file exists there, it looks in that parent’s folder, and so on, until there are no more parent folders to look in.
Note
This behavior can be modified on the ColdFusion Administrator’s Server Settings page.
All this means is that you should do something you were probably already going to do anyway, namely, put all the ColdFusion templates for a particular application within a single folder, somewhere within your Web server’s document root. Let’s call that directory your application folder. Within the application folder, you can organize your ColdFusion templates any way you choose, using any number of subfolders, sub-subfolders, and so on. If you put an Application.cfc file in the application folder, it will be executed when any the application’s templates are run. It’s that simple.
For instance, consider the fictional folder structure shown in Figure 18.1. Here, the application folder is the folder named MyApp, which is sitting within the Web server’s document root. Some basic Web pages are located in there, such as the company’s Home page (Index.cfm), a How To Contact Us page (ContactUs.cfm), and a Company Info page (CompanyInfo.cfm). There is also a SiteHeader.cfm template there, which we intend to include at the top of each page.
Figure 18.1 The Application.cfc file gets included before any of your application’s templates.
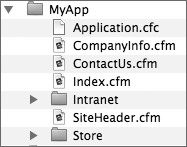
Because a file called Application.cfc also exists in this folder, it’s automatically included every time a user visits Index.cfm or ContactUs.cfm. It’s also included whenever a user visits any of the ColdFusion templates stored in the Intranet or Store folders, or any of the subfolders of the Intranet folder. No matter how deep the subfolder structure gets, the Application.cfc file in the MyApp folder will be automatically included.
Note
Don’t worry about re-creating this folder structure yourself. None of the code examples for this chapter rely on it. We’re just trying to clarify where your Application.cfc template might go in a real-world application.
Application.cfc Structure
As you will learn in Chapter 24, a ColdFusion Component is a collection of methods and data. You can think of it as a package of information (the data) and things you can do with the information (the methods). The Application.cfc file lets you do just that—create both data and methods. However, some methods are special. For example, if you create a method called onRequestStart, the method will execute before each and every page request. Table 18.1 lists these methods and how they work. Later in the chapter we will demonstrate how these work.
Table 18.1 Application.cfc Methods
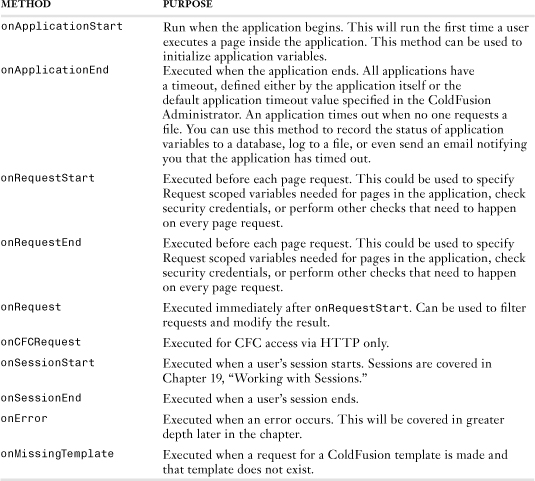
In our examples for this chapter, we will focus mainly on the onApplicationStart, onRequestStart, onError, and onMissingTemplate methods. Chapter 19 will cover onSessionStart and onSessionEnd.
A Basic Application.cfc Template
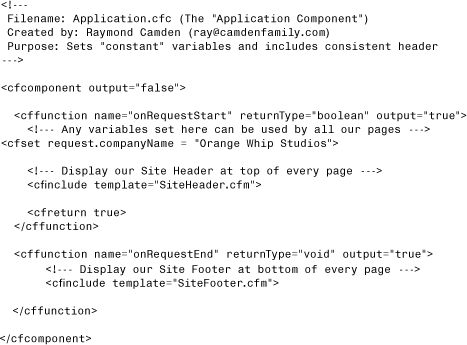
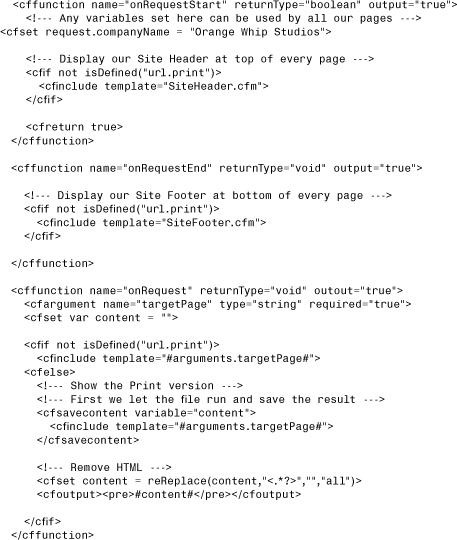
Take a look at Listing 18.1, a simple Application.cfc file. This example makes use of the onRequestStart method. Because the <cfset> tag is executed before each page request, the companyName variable can be referred to within any of the application’s ColdFusion templates. For instance, the value of the companyName variable will always be Orange Whip Studios.
Listing 18.1 Application1.cfc—A Simple Application Template
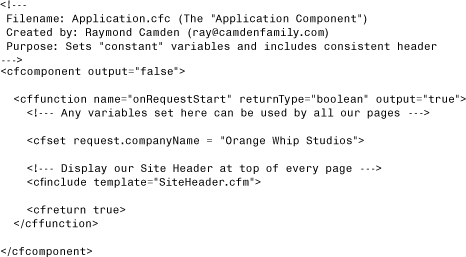
If you save this listing, be sure to save it as Application.cfc, not Application1.cfc.
As you will learn in Chapter 24, all components begin and end with the <cfcomponent> tag. This component only uses one method, onRequestStart. This method will execute before each request. The method begins by defining two request scope variables, dataSource and companyName.
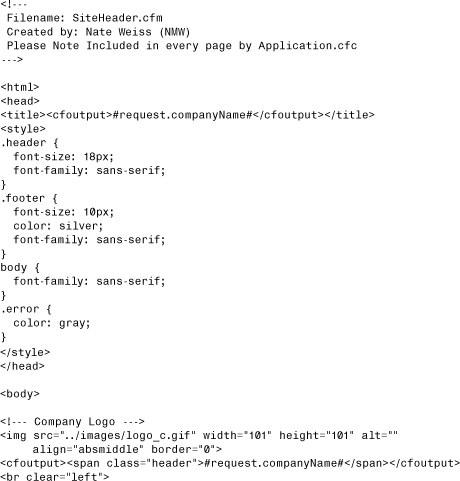
In addition, the <cfinclude> tag in Listing 18.1 ensures that the company’s standard page header will be shown at the top of each page. Listing 18.2 shows the SiteHeader.cfm template itself. Note that it can use the CompanyName variable that gets set by Application.cfc.
Listing 18.2 SiteHeader.cfm—Simple Header Included on Each Page
If this were your application, you would no longer have to put that <cfinclude> tag at the top of the Index.cfm or CompanyInfo.cfm pages (see Figure 18.1), and you wouldn’t have to remember to include it in any new templates. ColdFusion would now be taking care of that for you.
Using onRequestEnd()
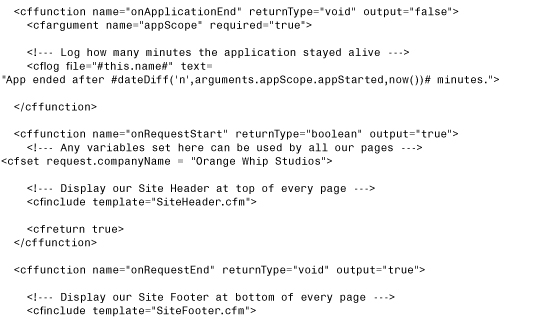
The Web application framework also reserves the special OnRequestEnd method, which is executed automatically at the end of every page request, rather than at the beginning. Listing 18.3 is a modification of Listing 18.1. This time our Application.cfc includes an onRequestEnd method. It has just one line of code, a simple <cfinclude> tag to include the SiteFooter.cfm template at the bottom of every page. Listing 18.4 shows the SiteFooter.cfm file itself, which displays a copyright notice. The net effect is that the copyright notice is displayed at the bottom of every page in the application.
Listing 18.3 Application2.cfc—Including a Site Footer at the Bottom of Every Page
Listing 18.4 SiteFooter.cfm—Simple Footer That Gets Included by OnRequestEnd()

Of course, there are other ways to get this effect. You could forget about this OnRequestEnd() business and just put the <cfinclude> tag at the bottom of every page in your application. But that might be tedious, and you might occasionally forget to do it. Or, you could just put the copyright notice in the OnRequestEnd method and get rid of the SiteFooter.cfm file altogether. That would be fine, but leaving them in separate files keeps things more manageable if the footer becomes more complicated in the future.
If you save Listing 18.3, be sure to save it as Application.cfc, not Application2.cfc.
Note
The expression #year(now())# is a simple way to display the current year. You also could use #dateFormat(now(),"yyyy")# to get the same effect.
Tip
While Application.cfc makes it easy to automatically add headers or footers (or both!) to your site, it is typically not recommended for such purposes. As you can imagine, there may be times when you don’t want a footer on a page. In those cases, you would have to manually add a clause to prevent the footer. As time goes on, that code may get more and more complex. In general, best practices recommend using either <cfinclude> or custom tags for layout purposes.
Listing 18.5 provides preliminary code for Orange Whip Studio’s home page. As you can see, it’s just a simple message that welcomes the user to the site. Of course, in practice, this is where you would provide links to all the interesting parts of the application. The point of this template is to demonstrate that the site header and footer are now going to be automatically included at the top and bottom of all ordinary ColdFusion templates in this folder (or its subfolders). Note that this template is also able to use the REQUEST.companyName variable that was set in the Application.cfc file.
Listing 18.5 Index1.cfm—A Basic Home Page for Orange Whip Studios
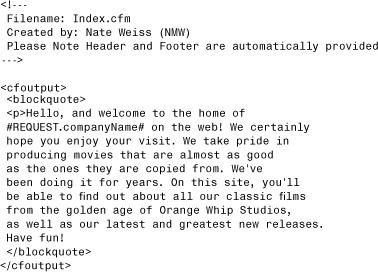
If you save this file, be sure to save it as Index.cfm, not Index1.cfm.
Using Application Variables
So far in this chapter, you have seen how ColdFusion’s Web application framework features help you maintain a consistent look and feel throughout your application. You’ve also seen how easy it is to set up “before and after” processing with the special Application.cfc component and the onRequestStart and onRequestEnd methods. In other words, your pages are starting to look and behave cohesively.
Next, you will learn how your application’s templates can start sharing variables between page requests. Basically, this is the part where your application gets a piece of the server’s memory in which to store values. This is where it gets a brain.
What Are Application Variables?
Pretend it’s Oscar season. Orange Whip Studios feels that all of its films are contenders. Tensions are high, and the president wants a new “Featured Movie” box on the studio’s home page to help create more “buzz” than its bitter rival, Miramax. The featured movie should be different each time the home page is viewed, shamelessly rotating through all of the studio’s movies. It’s your job to get this project done, pronto.
Hmmm. You could retrieve all the movies from the database for each page request and somehow pick one at random, but that wouldn’t guarantee that the same movie wouldn’t get picked three or four times in a row. What you want is some way to remember your current spot in the list of movies, so they all get shown evenly, in order. You consider making a table to remember which movies have been shown and then deleting all rows from the table when it’s time to rotate through them again, but that seems like overkill. You wish there was some kind of variable that would persist between page requests, instead of dying at the bottom of each page like the ColdFusion variables you’re used to.
Well, that’s exactly what application variables are for. Instead of a variable called lastMovieID, you could set a variable called application.lastMovieID. After you set this variable value to 5, say, it remains set at 5 until you change it again (or until the server is restarted). In essence, application variables let you set aside a little piece of ColdFusion’s memory that your application can use for its own purposes.
When to Use Application Variables
Generally, you can use application variables whenever you need a variable to be shared among all pages and all visitors to your application. The variable is kept in ColdFusion’s memory, and any page in your application can access or change its value. If some code on one of your pages changes the value of an application variable, the next hit to any of your application’s pages will reflect the new value.
Note
This means you should not use application variables if you want a separate copy of the variable to exist for each visitor to your site. In other words, application variables shouldn’t be used for anything personalized, because they don’t distinguish between your site’s visitors.
→ Chapter 19 explains how to create variables that are maintained separately for each visitor.
Consider application variables for
• Rotating banner ads evenly, so that all ads get shown the same number of times
• Keeping counters of various types of events, such as the number of people currently online or the number of hits since the server was started
• Maintaining some type of information that changes only occasionally or perhaps doesn’t change at all, but can take time to compute or retrieve; your site’s title and root URL are examples
Do not use application variables for per-user tasks, such as these:
• Maintaining a shopping cart
• Remembering a user’s email address or username from visit to visit
• Keeping a history of the pages a user has visited while he has been on your site
Using the Application.cfc Component
We’ve already discussed the special purpose of the Application.cfc file. What we didn’t mention was that by including an Application.cfc file, you automatically enable the use of Application variables. Application variables are one type of persistent variable; you will learn about two other types—client and session variables—in Chapter 19.
So far, the example Application.cfc files we have shown have only demonstrated methods. Components can also contain data. There are two main scopes in a component used to store data: VARIABLES and THIS. Earlier we mentioned that components can use any method names you want. But in the Application.cfc component, some method names were special. The same applies to the THIS scope. By setting particular values in the THIS scope you can control how the application behaves. For now we will focus on just three of those values, demonstrated in Table 18.2.
Table 18.2 THIS Scope Values Relevant to Application Variables

Note
ColdFusion maintains your application variables based on the THIS scopes NAME value. Therefore, it’s important that no other applications on the same ColdFusion server use the same NAME. If they do, ColdFusion will consider them to be the same application and will share the variables among all the combined pages. Changing a variable in one also changes it in the other, and so on. It’s conceivable to find yourself in a situation where this is actually what you want (if for some reason all the pages in your application simply can’t be nested within a single folder); otherwise, make sure that each Application.cfc’s THIS scope gets its own NAME.
Using Application Variables
Now that application variables have been enabled, using them is quite simple. Basically, you create or set an application variable the same way you would set a normal variable, generally using the <cfset> tag. The only difference is the presence of the word APPLICATION, followed by a dot. For instance, the following line would set the APPLICATION.ourHitCount variable to 0. The variable would then be available to all pages in the application and would hold the value of 0 until it was changed:
<cfset APPLICATION.ourHitCount = 0>
You can use application variables in any of the same places you would use ordinary ones. For instance, the following code adds one to an application variable and then outputs the new value, rounded to the nearest thousandth:
<cfset APPLICATION.ourHitCount = APPLICATION.ourHitCount + 1>
<cfoutput>#round(APPLICATION.ourHitCount / 1000)># thousand</cfoutput>
You also can use application variables with ColdFusion tags, such as <cfif>, <cfparam>, and <cfoutput>. See Chapter 8, “The Basics of ColdFusion,” and Chapter 9, “Programming with CFML,” if you want to review the use of variables in general.
Initializing Application Variables
Application variables are persistent. That simply means that once you create them, they stick around. Because of this, there is no reason to set them on every request. Once you create an Application variable, you don’t need to create it. Once simple way to handle that would be with the isDefined() function.
![]()
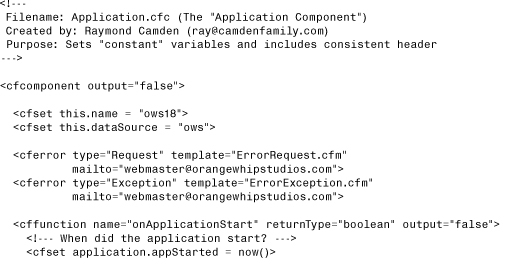
This code will check to see if the variable application.foo exists. If it doesn’t, it will create it. However, the Application.cfc component provides an even easier way to do this. One of the special methods mention in Table 18.1 is the onApplicationStart() method. This method will execute only when the application starts. Conversely, there is also an onApplicationEnd() method. This could be used to do a variety of things. Listing 18.6 shows a newer version of the Application.cfc worked on earlier.
Listing 18.6 Application3.cfc—Using onApplicationStart and onApplicationEnd
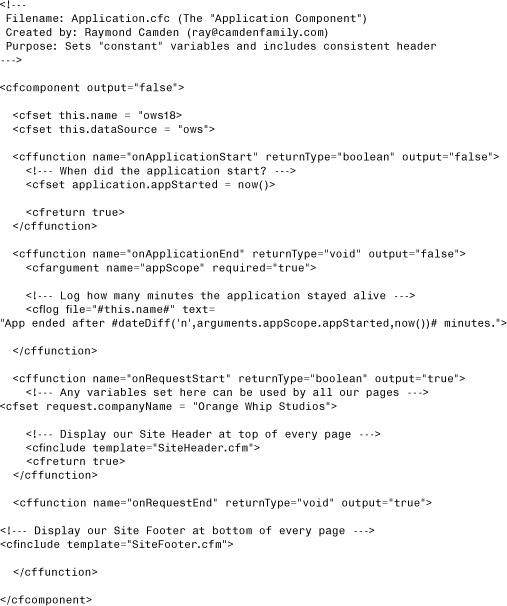
If you save this file, be sure to save it as Application.cfc, not Application3.cfc.
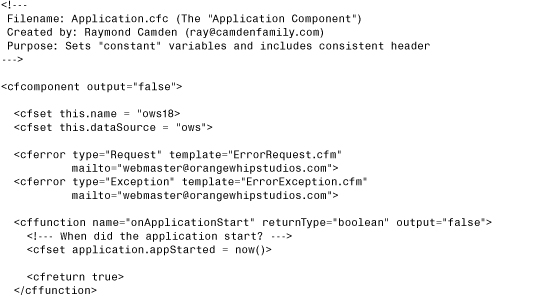
There’s a lot of new code here, so let’s tackle it bit by bit. The first new line is
<cfset this.name = "ows18>
This line uses the THIS scope to name the application. Remember, every name for your application should be unique. If you use the same name for multiple Application.cfc files, they will essentially act as the same application. Notice that this line of code is outside any method. This line will be run when the Application.cfc file is loaded by ColdFusion.
In the same block you will find this line:
<cfset this.dataSource = "ows">
As described earlier, this code sets a default data source for all queries and other database-driven tags within the application.
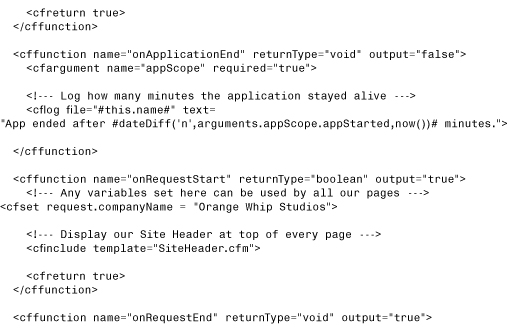
The next set of new code is the onApplicationStart method. This method really does only one thing: it creates a variable called APPLICATION.appStarted initialized with the current time. The idea is to simply store the time the application started. ColdFusion automatically calls this method when the application is first started by a user. You don’t have to do anything special to enable this function—ColdFusion handles it for you.
Next we have the onApplicationEnd method. This method will fire when the application ends. Normally the only way to execute ColdFusion code automatically is with the ColdFusion Scheduler. Outside of that, ColdFusion code only executes when someone requests a file. The onApplicationEnd method (as well as the onSessionEnd method) runs without anyone actually requesting a ColdFusion document.
Because this method is triggered when the application ends and not by a user request, you can’t output anything from this method. Even if you did, no one could see it! What you can do is clean up the application. This can include logging information to a database or file, firing off an email, or doing any number of things that would make sense when an application ends. Let’s examine the method line by line. The first line is
<cfargument name="appScope" required="true">
This simply defines an argument sent to the method. In our case, the ColdFusion server automatically sends a copy of the APPLICATION scope (all the data you stored in it) to the onApplicationEnd method. This is important. You can’t access the APPLICATION scope they way you can normally. Instead, you have to use the copy passed in the method. The next line will show an example of this:
<cflog file="#this.name#" text=
"App ended after #dateDiff('n',arguments.appScope.appStarted,now())# minutes.">
The <cflog> tag simply logs information to a file. We are only using two of the attributes in this line. The file attribute simply tells <cflog> what name to use for the file. When providing a file name, you don’t add the “.log” to the name; <cflog> will do that for you. In our code, we use the value of the Application’s name. Recall that we set the name using the THIS scope earlier in the component. The text attribute defines what is sent to the file. If you remember, we stored the time the application loaded in a variable called application.appStarted. As we said above, we can’t access the APPLICATION scope in the onApplicationEnd method. Instead, we have to use the copy passed in. We called this argument appScope, so we can access our original value as arguments.appScope.appStarted. We use the dateDiff function to return the number of minutes between when the application started and the current time. This lets us log the total time the application was running before it timed out.
The rest of the file simply duplicates the onRequestStart and onRequestEnd methods we described earlier.
Putting Application Variables to Work
Application variables can make it relatively easy to get the little featured movie widget up and running. Again, the idea is for a callout-style box, which cycles through each of Orange Whip Studio’s films, to display on the site’s home page. The box should change each time the page is accessed, rotating evenly through all the movies.
Listing 18.7 shows one simple way to get this done, using application variables. Note that the template is broken into two separate parts. The first half is the interesting part, in which an application variable called MovieList is used to rotate the featured movie correctly. The second half simply outputs the name and description to the page.
Listing 18.7 FeaturedMovie.cfm—Using Application Variables to Track Content Rotation
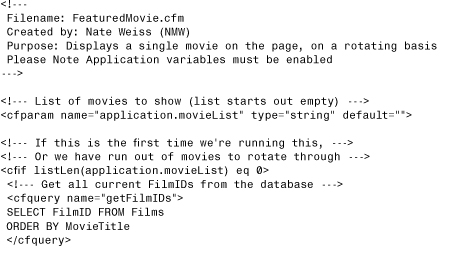
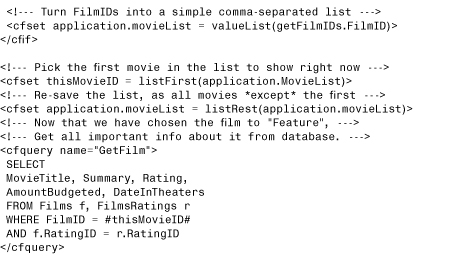
As you can see, the top half of the template is pretty simple. The idea is to use an application variable called movieList to hold a list of available movies. If 20 movies are in the database, the list holds 20 movie IDs at first. The first time the home page is visited, the first movie is featured and then removed from the list, leaving 19 movies in the list. The next time, the second movie is featured (leaving 18), and so on until all the movies have been featured. Then the process begins again.
Looking at the code line by line, you can see how this actually happens.
The <cfparam> tag is used to set the application.movieList variable to an empty string if it doesn’t exist already. Because the variable will essentially live forever once set, this line has an effect only the first time this template runs (until the server is restarted). This line could be moved to the onApplicationStart method of the Application.cfc file. We are keeping it here to make it a bit simpler to see what is going on with this template.
The <cfif> tag is used to test whether the movieList variable is currently empty. It is empty if this is the first time the template has run or if all the available movies have been featured in rotation already. If the list is empty, it is filled with the list of current movie IDs. Getting the current list is a simple two-step process of querying the database and then using the valueList function to create the list from the query results.
The listFirst() function is used to get the first movie’s ID from the list. The value is placed in the thisMovieID variable. This is the movie to feature on the page.
Finally, the listRest() function is used to chop off the first movie ID from the APPLICATION.movieList variable. The variable now holds one fewer movie. Eventually, its length will dwindle to zero, in which case the <cfif> tag will again test whether the movieList variable is currently empty, repeating the cycle.
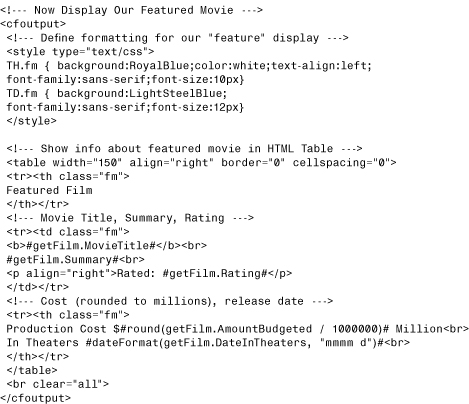
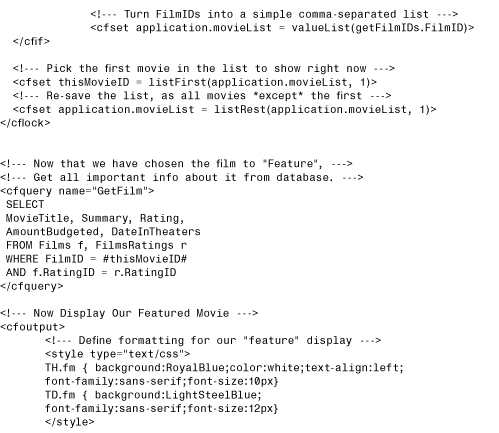
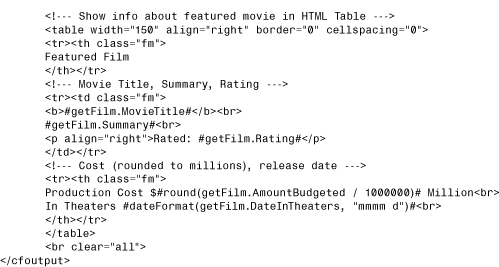
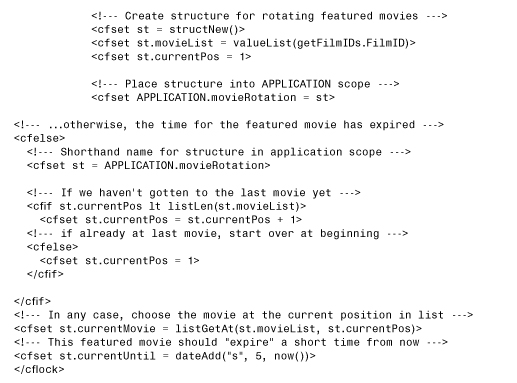
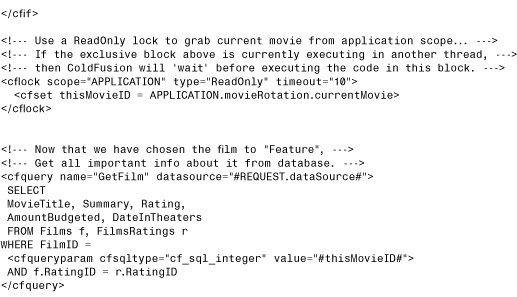
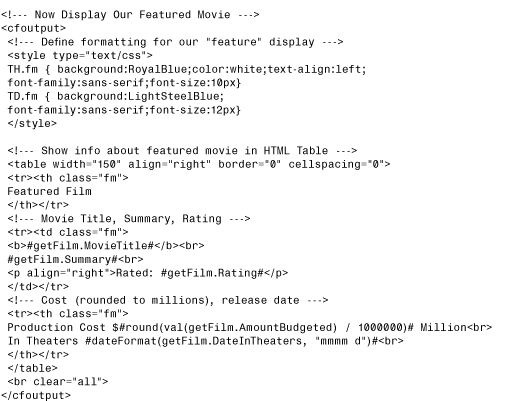
Now that the movie to be featured has been picked (it’s in the thisMovieID variable), actually displaying the movie’s name and other information is straightforward. The <cfquery> in the second half of Listing 18.7 selects the necessary information from the database, and then a simple HTML table is used to display the movie in a nicely formatted box.
At this point, Listing 18.7 can be visited on its own, but it was really meant to show the featured movie on Orange Whip’s home page. Simply include the template using the <cfinclude> tag, as shown in Listing 18.8.
Listing 18.8 Index2.cfm—Including the Featured Movie in the Company’s Home Page
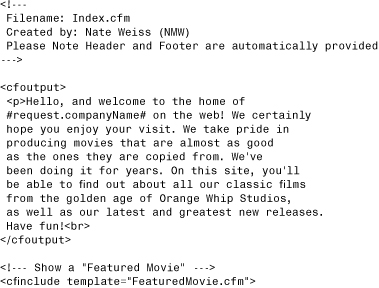
Figure 18.2 shows the results.
Figure 18.2 Application variables enable the featured movie to be rotated evenly among all page requests.

Customizing the Look of Error Messages
The Web application framework provides a simple way to customize the look of error messages that can occur while users are accessing your pages. As you know, error messages might appear because of syntax problems in your code, because of database connection problems, or just because users have left out one or more required fields while filling out a form.
The application framework lets you customize any of these error messages. You can even hide them from the user’s view entirely if you want. This enables you to maintain a consistent look and feel throughout your application, even when those dreaded error messages occur. You even have multiple ways to handle exceptions. We will cover both, dealing with the simplest solution first.
Introducing the <cferror> Tag
You use the <cferror> tag to specify how error messages should be displayed. Customizing the error messages that appear throughout your application is generally a two-step process:
1. First, you create an error display template, which displays the error message along with whatever graphics or other formatting you consider appropriate.
2. Next, you include a <cferror> tag that tells ColdFusion to display errors using the error display template you just created. In general, you place the <cferror> tag in your Application.cfc file.
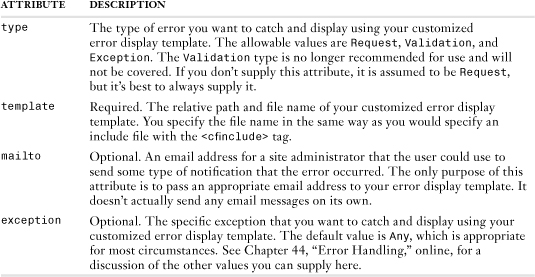
Table 18.3 shows the attributes supported by the <cferror> tag.
Table 18.3 <cferror> Tag Attributes
The next two sections discuss how to customize the error messages displayed for exception errors (syntax errors, database errors, and so on) and validation errors (when the user fails to fill out a form correctly).
Request Versus Exception Error Templates
If you want to customize the way error messages are displayed, you first must create an error display template. This template is displayed to the user whenever a page request can’t be completed because of some type of uncaught error condition.
ColdFusion actually allows you to create two types of error display templates:
• Request error display templates. The simplest way to show a customized error message. You can include whatever images or formatting you want so that the error matches your site’s look and feel. However, CFML tags, such as <cfoutput>, <cfset>, or <cfinclude>, are not allowed. CFML functions and variables also are not allowed. Request error templates provide a last-resort way to handle errors. They normally are run after an exception error template fails.
• Exception error display templates. These are more flexible. You can use whatever CFML tags you want. For instance, you might want to have ColdFusion automatically send an email to the webmaster when certain types of errors occur. The main caveat is that ColdFusion can’t display such a template for certain serious errors.
In general, the best practice is to create one template of each type. Then the exception template is displayed most often, unless the error is so serious that ColdFusion can’t safely continue interpreting CFML tags, in which case the request template is displayed. The request template also kicks in if the exception template itself causes an error or can’t be found.
Note
If you don’t care about being able to use CFML tags in these error display templates, you can just create the request template and skip creating the exception one.
Note
For those history buffs out there, the request type of error display template is a holdover from earlier versions of ColdFusion. At one time, you could never respond intelligently to any type of error. Thankfully, those days are over.
Creating a Customized Request Error Page
To create the request display template, do the following:
1. Create a new ColdFusion template called ErrorRequest.cfm, located in the same directory as your Application.cfc file. Include whatever images or formatting you want, using whatever <img> or other tags you would normally. Remember to not put any CFML tags in this template.
2. Include the special error.diagnostics variable wherever you want the actual error message to appear, if you want it to appear at all. Contrary to what you are used to, the variable does not have to be between <cfoutput> tags.
3. If you want, you can include the special error.mailTo variable to display the email address of your site’s webmaster or some other appropriate person. You also can use any of the other variables shown in Table 18.4.
Table 18.4 Special error Variables Available in an Error Display Template
4. Include a <cferror> tag in your Application.cfc file, with the type attribute set to Request and the template attribute set to ErrorRequest.cfm. This is what associates your error display template with your application.
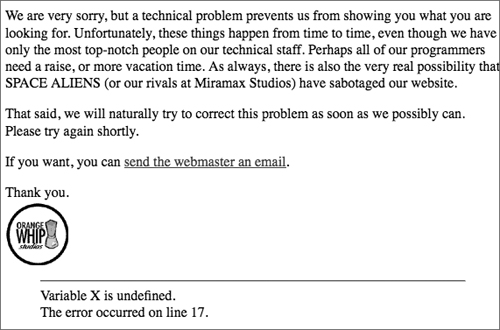
Listing 18.9 is a good example of a request error display template. Note that no <cfoutput> or other CFML tags are present. Also note that the only variables used are the special error variables mentioned previously.
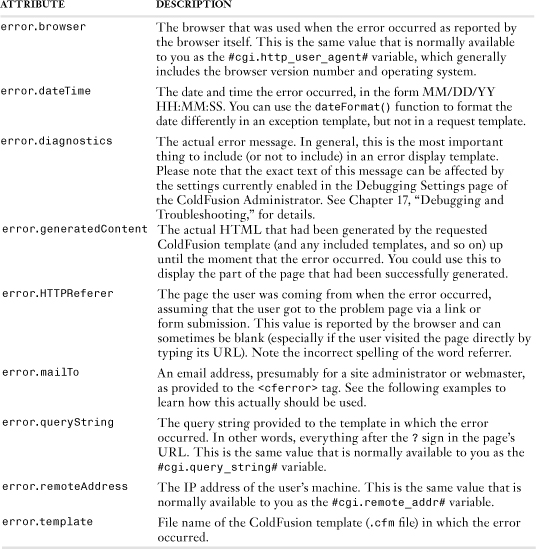
Listing 18.9 ErrorRequest.cfm—Customizing the Display of Error Messages
→ ColdFusion also provides the <cftry> and <cfcatch> tags, which enable you to trap specific errors and respond to or recover from them as appropriate. For details, see Chapter 45, “Using the Debugger,” online.
Listing 18.10 shows how to use the <cferror> tag in your Application.cfc file. Note that the email address [email protected] is being provided as the tag’s mailTo attribute, which means that the webmaster’s email address will be inserted in place of the error.mailTo reference in Listing 18.9. Figure 18.3 shows how an error message would now be shown if you were to make a coding error in one of your templates.
Listing 18.10 Application4.cfc—Use of the <cferror> Tag in Application.cfc
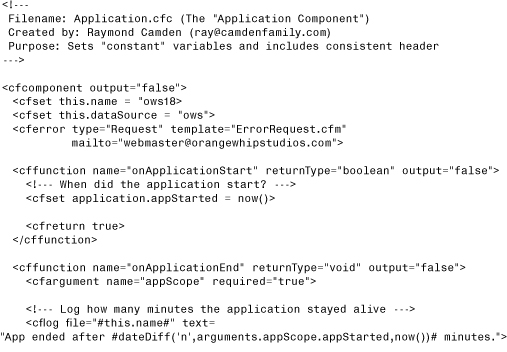
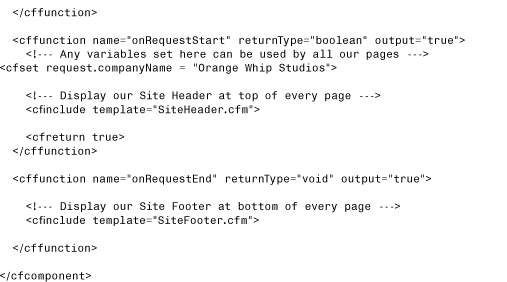
Figure 18.3 Customized error pages help maintain your application’s look and feel.
To test this listing, save it as Application.cfc, not Application4.cfc.
Additional error Variables
In Listing 18.9, you saw how the error.diagnostics variable can be used to show the user which specific error actually occurred. A number of additional variables can be used in the same way. You will see several of these used in Listing 18.11 in the next section.
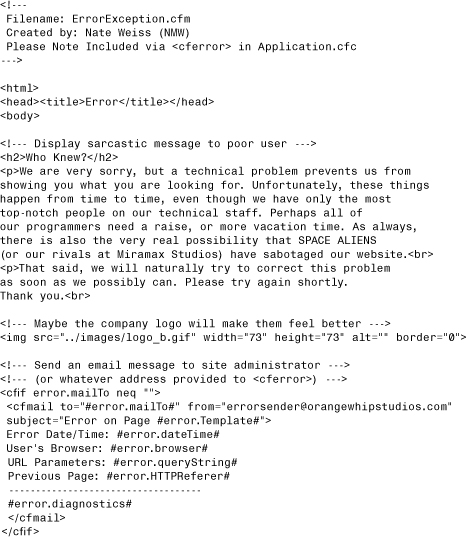
Listing 18.11 ErrorException.cfm—Sending an Email When an Error Occurs
Note
Note that the error.generatedContent variable is not available in request error display templates.
Tip
These are the only variables you can use in request error display templates. You can use all types of ColdFusion variables in exception error display templates, discussed next.
Creating a Customized Exception Error Page
You have seen how to create a request error display template, in which you are prevented from using any CFML tags or functions. Now you can create an exception error template, in which you can use whatever CFML tags and functions you want.
For instance, Listing 18.11 is similar to Listing 18.10, but it doesn’t display the error.diagnostics message to the user. This means that the user won’t know which type of error actually occurred. After all, your users might not care about the specifics, and you might not want them to see the actual error message in the first place. In addition, instead of allowing the user to send an email message to the webmaster, this template has ColdFusion send an email message to the webmaster automatically, via the <cfmail> tag.
Now all you have to do is add a second <cferror> tag to your Application.cfc file, this time specifying type="Exception" and template="ErrorException.cfm". You should put this <cferror> tag right after the first one, so the first one can execute if some problem occurs with your exception error display template. Since this modification is so simple, it won’t be listed in the chapter. It is available at the book Web site with the name Application5.cfc.
Note
Because sending automated error emails is a great way to show how exception templates can be used, the <cfmail> tag has been introduced a bit ahead of time here. Its use in Listing 18.11 should be self-explanatory: The ColdFusion server sends a simple email message to the webmaster. The email will contain the error message, date, browser version, and so on because of the error variables referred to between the opening and closing <cfmail> tags.
→ See Chapter 20, “Interacting with Email,” for details.
→ The webmaster could also look in ColdFusion’s logs to see any errors that might be occurring throughout the application. See Chapter 17 for details.
Using the OnError Method
As we discussed earlier in the chapter, the Application.cfc contains a set of special methods that are executed depending on certain situations. We demonstrated how the onApplicationStart and onApplicationEnd methods are executed automatically based on the life of the ColdFusion application. One more special method is the onError method. As you can probably guess, this method is called whenever an exception occurs. Unlike the <cferror> tag, which is tied to a specific error type or exception, the onError method will fire on any error.
So how can you use this method? The method could do many of the things demonstrated in the listings we’ve already covered. You can mail the error to the administrator, or log the error to a file or database. You can even display a message to the user, but remember that the onError method will be run for any error. So for example, if your onApplicationEnd method throws an error, the onError method will run. The output won’t be displayed, obviously, since no one is there to actually see it.
Another option to consider when using the onError method is to use it to handle the non-visual portions of the error (emailing the administrator, logging, etc.), and use the <cfthrow> tag to let your <cferror> tags take over. The <cfthrow> tag is discussed in Chapter 44. Think of the onError method as simply taking care of the error temporarily, and then passing it back to ColdFusion. If you have already created your request, exception, and validation templates, this approach lets you continue using those templates, while adding a bit of extra functionality to your application. Listing 18.12 demonstrates the latest version of our Application.cfc file, this time with an onError method. If you save this template, be sure to save it as Application.cfc, not Application5.cfc.
Listing 18.12 Application5.cfc—Working with onError
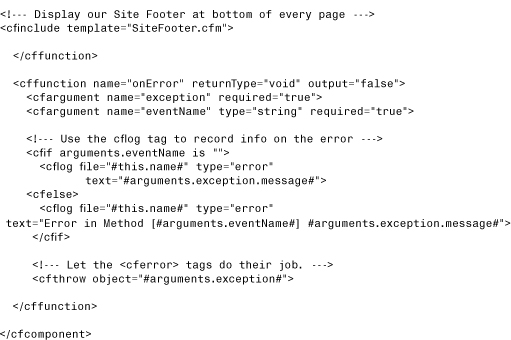
The only thing new in this template is the onError method at the end, so we’ll focus on that portion. The onError method is automatically passed two arguments. The first is the exception itself. This is just like the ERROR structure discussed earlier. It has the same values and we can use it to email, log to a file, or anything else. The second argument passed to the method is the name of the event that was running when the exception occurred. This argument will only have a value when the error occurs within the Application.cfc file itself. So for example, if the onApplicationStart method threw an error, that method name would be passed to the onError method. The onError method in Listing 18.12 checks to see if an eventName argument has a value. If it doesn’t, it simply logs the error. Note that it uses the same file value as the onApplicationEnd’s <cflog> tag. The value passed to the log is just the exception message. If the eventName argument wasn’t blank, the text passed to the log is modified slightly to contain the event name as well. Lastly, we use the <cfthrow> tag to pass the error back out again from the onError method. Don’t worry too much about this tag now; it’s covered in Chapter 44. Just consider the onError method here as being part of a “chain” of code blocks that will handle the error.
→ ColdFusion also provides the <cftry> and <cfcatch> tags, which allow you to trap specific errors and respond to or recover from them as appropriate. See Chapter 44 for details.
Handling Missing Templates
ColdFusion 8 added the capability to handle requests for ColdFusion files that do not exist. In the past, handling these requests was problematic and required updating of the Web server settings. Now you can simply add another method to your Application.cfc file to handle these missing templates.
Note, though, that this support for missing templates helps only with requests for missing ColdFusion files. If a user requests dharma.html (notice that the extension is html, not cfm), then ColdFusion can’t help you; instead, the 404 handler of your Web server will handle the request.
Using onMissingTemplate
The new method that we’ll be adding to our Application.cfc file is the onMissingTemplate function. This method is passed one argument: the name of the script that was requested. Listing 18.13 shows the latest version of the Application.cfc file. Be sure to save this file as Application.cfc, not Application6.cfc.
Listing 18.13 Application6.cfc—Working with onMissingTemplate
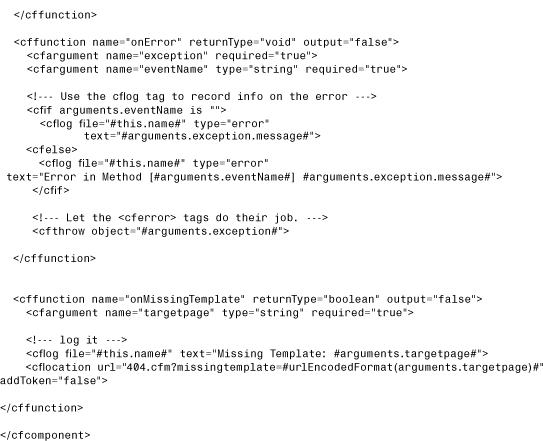
Let’s focus on the new code in this document: the onMissingTemplate method. As stated earlier, this method takes one argument: the name of the template being requested. So if you requested jedi.cfm and that file did not exist, that is the value that would be passed to the function. The complete path is passed as well as the name, so you would really end up with something like this: /ows/c18/dharma.cfm. We do two things in the method. First we log the fact that a missing-template event occurred. This is important because if you commonly see people loading a file that does not exist, you may want to add the file anyway. Second, we send the user to a file named 404.cfm. We pass the template as a URL variable. 404.cfm will display a nice error message for the user. You can see this in Listing 18.14.
Listing 18.14 404.cfm—Handling Missing Templates

This file doesn’t do very much. It first ensures that the URL variable, missingtemplate, has a default value. It then tells the user that the requested file didn’t exist and kindly provides a link back to the home page.
Special Considerations
In some circumstances, ColdFusion will notice if you request a subdirectory that does not contain an index page. An index page is any file that the Web server recognizes as a file to run in a folder if no particular file name is specified. If no such file exists, the Web server may respond with a list of files. Typically, though, this is not done because it presents a security risk. If you do want this behavior, then you need to specify a new THIS scope variable named welcomeFileList. This variable consists of a list of files that match the index files specified by your Web server. It tells ColdFusion when it should and should not run onMissingTemplate for a subdirectory. However, this scenario applies only to the embedded JRun Web server. It does not apply to common Web servers such as Apache or IIS.
Using Locks to Protect Against Race Conditions
ColdFusion is a multithreaded application, meaning that the server can process more than one page request at a time. Generally speaking, this is a wonderful feature. Because the server can in effect do more than one thing at a time, it can tend to two or three (or 50) simultaneous visitors to your application.
But as wonderful as multithreading is, it also means that you need to think carefully about situations where more than one person is accessing a particular page at the same time. Unless you take steps to prevent it, the two page requests can be reading or changing the same application variable at the very same moment. If you are using application variables to track any type of data that changes over time, and the integrity of the data is critical to your application (such as any type of counter, total, or statistic), you must tell ColdFusion what to do when two page requests are trying to execute the same “shared data-changing” code at the same time.
Note
This isn’t something that only ColdFusion programmers face. In one fashion or another, you’ll run into these issues in any multithreaded programming environment. ColdFusion just makes the issue really easy to deal with.
Of course, ColdFusion provides solutions to help you deal with concurrent page requests quite easily. One possible solution is the <cflock> tag. You can use the <cflock> tag to mark the areas of your code that set, change, access, or display application variables. The <cflock> tag ensures that those potentially problematic parts of your code don’t execute at the same time as other potentially problematic parts. As you will learn in this section, your locking instructions will cause one page to wait a moment while the other does its work, thus avoiding any potential problems. In other words, you keep your code thread-safe yourself.
Note
If you use the onApplicationStart method, you don’t need to use any <cflock> tags. All application variables created there are entirely thread-safe. The same applies for onSessionStart.
What Is a Race Condition?
It’s time to pause for just a moment of theory. You need to understand the concept of a race condition and how such conditions can occur in your ColdFusion applications. Simply put, a race condition is any situation where two different page requests can change the same information at the very same moment in time. In many situations, race conditions can lead to undesired results. In other situations, you may not care about them at all.
Note
We seriously recommend taking a few moments to really visualize and understand this stuff, especially if you are going to be using application variables to hold values that change over time (especially values that increment numerically as your application does its work).
Here’s an example that should make this really easy to understand. Imagine an application variable called application.HitCount. The purpose of this variable is to track the number of individual page views that an application has responded to since the ColdFusion server was started. Simple code like the following is used in the onRequestStart method to advance the counter by one every time a user visits a page:
<cfset application.hitCount = application.hitCount + 1>
So far, so good. The code seems to do what it’s supposed to. Every time a page is viewed, the variable’s value is increased by one. You can output it at any time to display the current number of hits. No problem.
But what happens if two people visit a page at the same time? We know that ColdFusion doesn’t process the pages one after another; it processes them at the very same time. Keeping that in mind, consider what ColdFusion has to do to execute the <cfset> tag shown above. Three basic mini-steps are required to complete it:
1. ColdFusion gets the current value of application.hitCount.
2. It adds one to the value.
3. Finally, it sets the application.hitCount to the new, incremented value.
The big problem is that another page request may have changed the value of the variable between steps 1 and 2, or between steps 2 and 3. Just for fun, let’s say the hit count variable is currently holding a value of 100. Now two users, Bob and Jane, both type in your application’s URL at the same time. For whatever reason, Jane’s request gets to the server a split moment after Bob’s. Bob’s request performs the first mini-step (getting the value of 100). Now, while Bob’s request is performing the second mini-step (the addition), Jane’s request is doing its first step: finding out what ColdFusion has for the current value of the application variable (uh-oh, still 100). While Bob’s request performs the third mini-step (updating the counter to 101), Jane’s request is still doing its second step (adding one to 100). Jane’s request now finishes its third step, which sets the application variable to, you guessed it, 101. That is, when both requests are finished, the hit count has only increased by one, even though two requests have come through since hit number 100. A bit of information has been lost.
Granted, for a simple hit counter like this, a teensy bit of information loss probably isn’t all that important. You may not care that the hit count is off by one or two every once in a while. But what if the application variable in question was something more like application.totalSalesToDate? If a similar kind of “mistake” occurred in something like a sales total, you might have a real problem on your hands.
Note
Again, it is important to note that this isn’t a problem specific to ColdFusion. It’s a simple, logical problem that would present itself in almost any real-world situation where several different “people” (here, the people are Web users) are trying to look at or change the same information at the same time.
Note
By definition, the chances of a race condition problem actually occurring in an application will increase as the number of people using the application increases. That is, these kinds of problems tend to be “stealth” problems that are difficult to catch until an application is battle-tested.
The solution is to use <cflock> tags to make sure that two requests don’t execute the <cfset> tag (or whatever problematic code) at the same exact moment. For example, <cflock> tags would cause Jane’s request to wait for Bob’s request to be finished with that <cfset> before it started working on the <cfset> itself.
<cflock> Tag Syntax
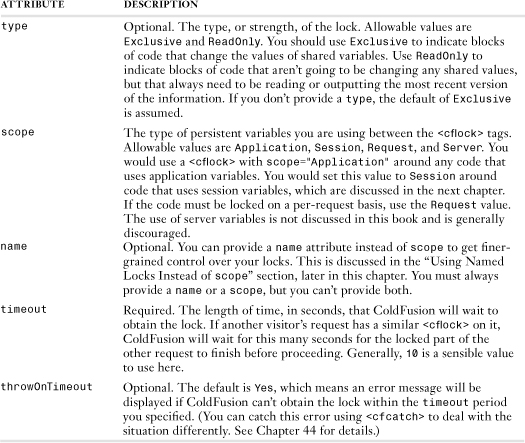
Now that you know what race conditions are and how they can lead to unpredictable results, it’s time to learn how to use locking to avoid them. We’ll get into the nuances shortly, but the basic idea is to place opening and closing <cflock> tags around any part of your code that changes application variables (or session variables, which are discussed in the next chapter) or any other type of information that might be shared or changed by concurrent page requests. Table 18.5 takes a closer look at the tag’s syntax.
Table 18.5 <cflock> Tag Syntax
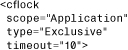
Using Exclusive Locks
As Table 18.5 shows, there are two types of locks: Exclusive and ReadOnly. Let’s start off simple, and talk about <cflock> tags of type="Exclusive". If you want, you can solve your race condition problems using only Exclusive locks.
Exclusive locks work like this. When your template gets to an opening <cflock> tag in your code, it requests the corresponding lock from the server. There is only one available lock for each scope (Application, Session, Request, or Server), which is why it’s called “exclusive.” Once this Exclusive lock has been bestowed upon your template, it stays there until the closing </cflock> tag in your code, at which point the lock is released and returned to the server. While your template has the lock (that is, while the code between the <cflock> tags is running), all other templates that want an application-level lock must wait in line. ColdFusion pauses the other templates (right at their opening <cflock> tags) until your template releases the lock.
The code shown in Listing 18.15 shows how to place Exclusive locks in your code. This listing is similar to the previous version of the Featured Movie template (Listing 18.7). The only important difference is the pair of <cflock> tags at the top of the code. Note that the <cflock> tags surround the entire portion of the template that is capable of changing the current value of the APPLICATION.movieList variable.
Listing 18.15 FeaturedMovie2.cfm—Using Exclusive Locks to Safely Update Application Data
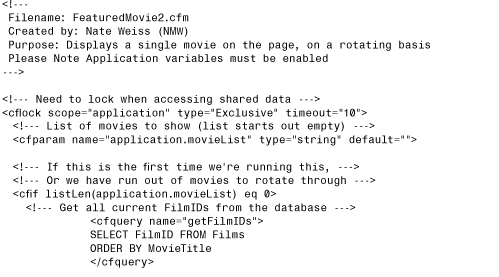
The purpose of the <cflock> tag in Listing 18.15 is to ensure that only one instance of the block is ever allowed to occur at the very same moment in time. For example, consider what happens if two different users request the page within a moment of each other. If by chance the second page request gets to the start of the block before the first one has exited it, the second request will be forced to wait until the first instance of the block has completed its work. This guarantees that funny race condition behavior doesn’t take place (like one of the movies getting skipped or shown twice).
Tip
If it helps, think of locks as being like hall passes back in grade school. If you wanted to go to the bathroom, you needed to get a pass from the teacher. Nobody else was allowed to go to the bathroom until you came back and returned the pass. This was to protect the students (and the bathroom) from becoming, um, corrupted, right?
Using ReadOnly Locks
Okay, you’ve seen how Exclusive locks work. They simply make sure that no two blocks of the same scope are allowed to execute at once. If two requests need the same lock at the same time, the first one blocks the second one. But in some situations this can be overkill, and lead to more waiting around than is really necessary.
ColdFusion also provides ReadOnly locks, which are less extreme. ReadOnly locks don’t block each other. They only get blocked by Exclusive locks. In plain English, a ReadOnly lock means, “If the variables in this block are being changed somewhere else, wait until the changes are finished before running this block.” Use a ReadOnly lock if you have some code that definitely needs to read the correct, current value of an application variable, but isn’t going to change it at all. Then just double-check that all code that does change the variable is between Exclusive locks. This way, you are guaranteed to always be reading or displaying the correct, most current value of the variable, but without the unwanted side effect of forcing other page requests to wait in line.
Do this whenever you are going to be reading the value of a variable a lot, but changing its value only occasionally.
Note
In other words, ReadOnly locks don’t have any effect on their own. They only have an effect when some other page request has an Exclusive lock.
To demonstrate how much sense this all makes, let’s adapt the featured movie example a bit. So far, the featured movie has rotated with every page request. What if you still wanted the movies to rotate evenly and in order, but instead of rotating with every page request, you want the movie to change once every five minutes (or ten minutes, or once an hour)?
Here is an adapted version of the featured movie template that gets this job done (see Listing 18.16). The code is a bit more complicated than the last version. For the moment, don’t worry about the code itself. Just note that the portion of the code that makes changes in the APPLICATION scope is in an Exclusive lock. The portion of the code that grabs the current feature movie from the APPLICATION scope (which is also really short and quick) is inside a ReadOnly lock.
Listing 18.16 FeaturedMovie3.cfm—Using Exclusive and ReadOnly Locks
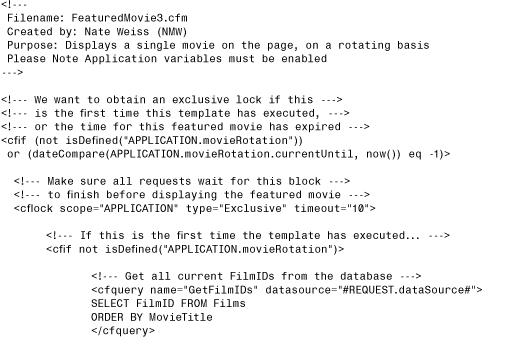
The first thing this template does is check whether changes need to be made in the APPLICATION scope. Changes will be made if the template hasn’t been run before, or if it’s time to rotate the featured movie. (Remember, the rotation is now based on time.) If changes are called for, an Exclusive lock is opened. Within the lock, if the template hasn’t been run before, a list of movies is retrieved from the database and stored as a value called movieList, just as before. In addition, a value called currentPos is set to 1 (to indicate the first movie). This value will increase as the movies are cycled through. Execution then proceeds to the bottom of the <cflock> block, where the current movie id is plucked from the list, and a value called currentUntil is set to a moment in time a few seconds in the future.
On the other hand, if the lock was opened because the currentUntil value has passed (we’re still inside the Exclusive lock block), then it’s time to pick the next movie from the list. As long as the end of the list hasn’t already been reached, the only thing required is to advance currentPos by one. If the last movie has already been reached, the currentPos is reset to the beginning of the list.
Note
At any rate, the entire Exclusive lock block at the top of the template executes only once in a while, when the movie needs to change. If you are rotating movies every 10 minutes and have a fair number of visitors, the lock is needed only in the vast minority of page requests.
Underneath, a second <cflock> block of type="ReadOnly" uses a <cfset> to read the current featured movie from the APPLICATION scope into a local variable. The ReadOnly lock ensures that if the featured movie is currently being changed in some other page request, the <cfset> will wait until the change is complete. Since the change occurs only once in a while, the page is usually able to execute without having to wait at all.
Tip
Think of ReadOnly locks as a way of optimizing the performance of code that needs some kind of locking to remain correct. For instance, this template could have been written using only Exclusive locks, and doing so would have made sure that the results were always correct (no race conditions). The introduction of the ReadOnly lock is a way of making sure that the locks have as little impact on performance as possible.
Note
You’ll encounter the notion of explicitly locking potentially concurrent actions in database products as well. Conceptually, database products use the SQL keywords BEGIN TRANSACTION and COMMIT TRANSACTION in a way that’s analogous to ColdFusion’s interpretation of beginning and ending <cflock> tags.
Using Named Locks Instead of SCOPE
You’ve seen why locks are sometimes needed to avoid race conditions. You’ve seen the simplest way to implement them—with Exclusive locks. You’ve seen how to avoid potential bottlenecks by using a mix of Exclusive and ReadOnly locks. Hopefully, you’ve noticed a pattern emerging: If you’re worried about race conditions, your goal should be to protect your data with <cflock>, but to do so in the least obtrusive way possible. That is, you want your code to be “smart” about when page requests wait for each other.
So far, all of the <cflock> tags in this chapter have been scoped locks. Each has used a scope="Application" attribute to say, “This lock should block or be blocked by all other locks in the application.” As you have seen, scoped locks are really simple to implement once you “get” the conceptual issue at hand. The problem with scoped locks is that they often end up locking too much.
There’s no problem when you’re using only application variables to represent a single concept. For instance, the various versions of the Featured Movie template track a few different variables, but they are all related to the same concept of a featured movie that rotates over time.
Consider what happens, though, if you need to add a rotating Featured Actor widget to your application. Such a widget would be similar to the featured movie but it would rotate at a different rate or according to some other logic. Just for the heck of it, pretend there’s also a Featured Director widget, plus a couple of hit counters that also maintain data at the application level, and so on. Assume for the moment that these various widgets appear on different pages, rather than all on the same page.
Using the techniques you’ve learned so far, whenever one of these mini-applications needs to change the data it keeps in the APPLICATION scope, it will use a <cflock> with scope="Application" to protect itself against race conditions. The problem is that the scope="Application" lock is not only going to block or be blocked by instances of that same widget in other page requests. It’s going to block or be blocked by all locks in the entire application. If all of your widgets are only touching their own application variables, this approach is overkill. If the Featured Actor widget doesn’t touch the same variables that the featured movie widget uses, then there’s no possibility of a race condition. Therefore, allowing reads and writes by the two widgets to block one another is a waste of time, but scope="Application" doesn’t know that.
ColdFusion gives you further control over this kind of problem by supporting named locks. To add named locks to your code, you use a name attribute in your <cflock> tags, instead of a scope attribute. Named lock blocks will only block or wait for other lock blocks that have the same name.
For instance, instead of using a scoped lock, like this:
you could use a named lock, like this:
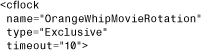
This way, you can feel comfortable manipulating the variables used by the featured movie widget, knowing that the Exclusive lock you’ve asked for will affect only those pieces of code that are also dealing with the same variables. Page requests that need to display the Featured Movie or Featured Director widget won’t be blocked needlessly.
The name of the lock is considered globally for the entire server, not just for your application, so you need to make sure that the name of the lock isn’t used in other applications. The easiest way to do this is to always incorporate the application’s name (or something similar) as a part of the lock name. That’s why the <cflock> tag shown above includes OrangeWhip at the start of the name attribute. Another way to get the same effect would be to use the automatic APPLICATION.applicationName variable as a part of the name, like so:

The Web site for this book includes a FeauturedMovie4.cfm template, which is almost the same as FeaturedMovie3.cfm, shown in Listing 18.16. The only difference is that it uses name="OrangeWhipMovieRotation" (as shown above) instead of scope="Application" in each of the <cflock> tags.
Note
So it turns out that the scope="Application" attribute is really just a shortcut. Its effect is equivalent to writing a named lock that uses the name of your application (or some other identifier that is unique to your application) as the name.
Nested Locks and Deadlocks
It’s usually okay to nest named locks within one another, as long as the name for each lock block is different. However, if they aren’t nested in the same order in all parts of your code, it’s possible that your application will encounter deadlocks while it runs. Deadlocks are situations where it’s impossible for two page requests to move forward because they are each requesting a lock that the other already has. Consider a template with an Exclusive lock named LockA, with another <cflock> named LockB nested within it. Now consider another template, which nests LockA within LockB. If both templates execute at the same time, the first page request might be granted an Exclusive lock for LockA, and the second could get an Exclusive lock for LockB. Now neither template can move forward. Both locks will time out and throw errors. This is deadlock.
Entire books have been written about various ways to solve this kind of puzzle; there’s no way we can tell you how to handle every possible situation. Our advice is this: If you need to nest named locks, go ahead as long as they will be nested in the same combination and order in all of your templates. If the combination or order needs to be different in different places, use scoped locks instead. The overhead and aggravation you might encounter in trying to manage and debug potential deadlocks isn’t worth the added cost introduced by the scope shorthand.
Don’t confuse this discussion (nesting locks with different names) with nesting locks that have the same name or scope. In general, you should never nest <cflock> tags that have the same scope or name. A ReadOnly lock that is nested within an Exclusive lock with the same scope or name has no additional benefit (it’s always safe to read if you already have an Exclusive lock). And if the Exclusive lock is nested within a ReadOnly lock, then the Exclusive lock can never be obtained (because it needs to wait for all ReadOnly locks to end first), and thus will always time out and throw an error.
Application Variable Timeouts
By default, application variables are kept on the server almost indefinitely. They die only if two whole days pass without any visits to any of the application’s pages. After two days of inactivity, ColdFusion considers the APPLICATION scope to have expired, and the onApplicationEnd method of the Application.cfc file is called, if it exists. Whether or not this method exists, all associated application variables are flushed from its memory.
If one of your applications uses a large number of application variables but is used very rarely, you could consider decreasing the amount of time that the APPLICATION scope takes to expire. Doing so would let ColdFusion reuse the memory taken up by the application variables. In practice, there might be few situations in which this flexibility is useful, but you should still know what your options are if you want to think about ways to tweak the way your applications behave.
Two ways are available to adjust the application timeout period from its two-day default value. You can use the ColdFusion Administrator or the applicationTimeout value of the THIS scope in the Application.cfc file.
Adjusting Timeouts Using APPLICATIONTIMEOUT
The Application.CFC THIS scope takes an optional applicationTimeout value. You can use this to explicitly specify how long an unused APPLICATION scope will remain in memory before it expires.
The applicationTimeout value expects a ColdFusion time span value, which is a special type of numeric information used to describe a period of time in terms of days, hours, minutes, and seconds. All this means is that you must specify the application timeout using the createTimeSpan() function, which takes four numeric arguments to represent the desired number of days, hours, minutes, and seconds, respectively.
For instance, to specify that an application should time out after two hours of inactivity, you would use code such as this:
<cfset this.applicationTimeout="#createTimeSpan(0,2,0,0)#">
Note
If you don’t specify an applicationTimeout attribute, the Default Timeout value in the Variables page of the ColdFusion Administrator is used. See the next section, “Adjusting Timeouts Using the ColdFusion Administrator,” for details.
Note
If you specify an applicationTimeout that exceeds the Maximum Timeout value in the Variables page of the ColdFusion Administrator, the Maximum Timeout in the Administrator is used instead. See the next section for details.
Don’t forget that you can now execute code when the application times out. Listing 18.6 demonstrated a simple use of the onApplicationEnd method.
Adjusting Timeouts Using the ColdFusion Administrator
To adjust the amount of time that each application’s APPLICATION scope should live before it expires, follow these steps:
1. Navigate to the Memory Variables page of the ColdFusion Administrator.
2. Under Default Timeout, fill in the days, hours, minutes, and seconds fields for application variables.
3. If you want, you also can adjust the Maximum Timeout for application variables here. If any developers attempt to use a longer timeout with the applicationTimeout value in the Application.cfc THIS scope, this value will be used instead (no error message is displayed).
4. Click Submit Changes.
Using onRequest()
So far we have seen examples of how you can run code before and after a page request, as well as during the startup and end of the application. Another way to modify the behavior of your pages is with the onRequest method. This method is executed after the onRequestStart method, and before the onRequestEnd method. It takes one argument, the template currently being executed. If you don’t actually include the template, using <cfinclude>, then your page won’t show up.
This method has some drawbacks. The method tends to “leak” variables into the template itself. If all of this sounds confusing, don’t worry. Typically you won’t need to use the onRequest method. If you simply want to wrap a page with a header and footer, for example, you can just use onRequestStart and onRequestEnd.
With that in mind, let’s look at a simple example of where the onRequest method can be helpful. You may have seen some Web sites that have “Print” versions of their articles. These are versions of the article that normally have much reduced HTML. This is easy to build to do with advanced style sheets, or dynamically with ColdFusion, but what if you have old content, or pages, that weren’t built to support a Print version? We can use the onRequest method to handle this situation. Listing 18.17 shows a modified version of our latest Application.cfc file. Since we are only modifying two methods and adding the onRequest method, we only list them below. The book Web site has the entire file.
Listing 18.17 Application7.cfc—Using onRequest
Let’s start with the onRequestStart and onRequestEnd methods. Both of these methods are the same as in the earlier version, except now they check for the existence of a URL variable print. If the variable exists, these methods don’t include the header and footer. Now let’s look at the onRequest method. This method takes one argument, the file name of the template being executed. You must include this template or it will never show up. Once again we check for the existence of the URL variable print. If it doesn’t exist, we simply include the file.
The interesting part comes up when the variable does exist. First, we <cfinclude> the template, but wrap it with the <cfsavecontent> tag. This runs the template and saves all the content into a variable, in this case, content. Next, we use a regular expression (discussed in Chapter 39, “Using Regular Expressions,” in Volume 2) to remove the HTML. Don’t worry too much about this code—just know that it will remove all the HTML and leave the text behind. Lastly, we output the result wrapped in <pre> tags. The net result is that HTML that looks like so:
<h1>Welcome to our Site</h1>
Thanks for <b>visiting!</b>.
will be rendered like so:
Welcome to our Site
Thanks for visiting!
Now a Print version of your site can be generated by just adding a print=1 to the current URL.
Handling Server Startup
ColdFusion 9 adds support for a new feature, Server.cfc, that allows you to specify a special component that will be run when the server starts. This feature is enabled on the ColdFusion Administrator settings page. You must first enable the feature, and then you must specify which component will contain the code to be run upon server startup. By default, this is a component called Server within your Web root.
When enabled, ColdFusion will execute one method, onServerStart, when your server starts. Because the server is in the midst of starting, you can’t use CFHTTP to hit another .cfm file on the server, but you can do other things. The following code creates a simple component that both logs and sends an email when the server starts:
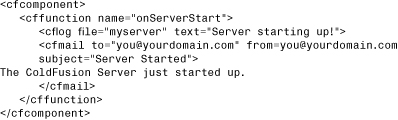
To actually enable this functionality, first go to your ColdFusion Administrator, Settings page and click the Component with onServerStart() Method check box. In the box next to this, specify ows.18.Server as the path to the component. This tells ColdFusion where to look for the component. Last, restart your ColdFusion server. After the server has started, you can check both the log file and the email to confirm that ColdFusion ran the component. Remember that the ColdFusion Administrator provides a log viewer as well as a way to view undelivered email. The Server.cfc component cannot prevent the server from starting. If you need functionality like that, consider using Server.cfc to set a server scope variable that other applications can check when they start.