
Chapter 6. Introducing SQL
SQL—pronounced “sequel" or “S-Q-L”—is an acronym for Structured Query Language, a language you use to access and manipulate data in a relational database. It was designed to be easy to learn and extremely powerful, and its mass acceptance by many database vendors proves that it has succeeded in both.
In 1970, Dr. E. F. Codd, the man called the father of the relational database, described a universal language for data access. In 1974, engineers at IBM’s San Jose Research Center created the Structured English Query Language, or SEQUEL, built on Codd’s ideas. This language was incorporated into System R, IBM’s pioneering relational database system.
Toward the end of the 1980s, two of the most important standards bodies, the American National Standards Institute (ANSI) and the International Standards Organization (ISO), published SQL standards, opening the door to mass acceptance. With these standards in place, SQL was poised to become the de facto standard used by every major database vendor.
Although SQL has evolved a great deal since its early SEQUEL days, the basic language concepts and its founding premises remain the same. The beauty of SQL is its simplicity. But don’t let that simplicity deceive you. SQL is a powerful language, and it encourages you to be creative in your problem solving. You can almost always find more than one way to perform a complex query or to extract desired data. Each solution has pros and cons, and no solution is explicitly right or wrong.
Lest you panic at the thought of learning a new language, let me reassure you: SQL is easy to learn. In fact, you need to learn only four statements to be able to perform almost all the data manipulation you will need on a regular basis. Table 6.1 lists these statements.
Table 6.1 SQL-Based Data Manipulation Statements
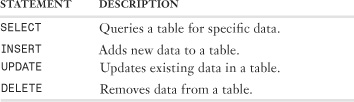
Each of these statements takes one or more keywords as parameters. By combining various statements and keywords, you can manipulate your data in as many ways as you can imagine.
ColdFusion provides you with all the tools you need to add Web-based interaction to your databases. ColdFusion itself has no built-in database, however. Instead, it communicates with whatever database you select, passing updates and requests and returning query results.
Tip
This chapter (and the next) is by no means a complete SQL tutorial, so a good book on SQL is a must for ColdFusion developers. If you want a crash course on all the major SQL language elements, you might want to pick a copy of my book Teach Yourself SQL in 10 Minutes (ISBN: 0-672-32567-5).
Understanding Data Sources
As explained in Chapter 5, “Reviewing the Databases,” a database is a collection of tables that store related data. Databases are generally used in one of two ways:
• Directly within a DBMS application such as Microsoft Access, MySQL, Query Browser, or SQL Server’s Enterprise Manager. These applications tend to be very database specific (they are usually designed by the database vendor for use with specific databases).
• Via third-party applications, commercial or custom, that know how to interact with existing external databases.
ColdFusion is in the second group. It isn’t a database product, but it lets you write applications that interact with databases.
How do third-party applications interact with databases, which are usually created by other vendors? That’s where data sources come in to the picture. But first, we need to look at the database driver. Almost every database out there has available database drivers—special bits of software that provide access to the database. Each database product requires its own driver (the Oracle driver, for example, won’t work for SQL Server), although a single driver can support multiple databases (the same SQL Server driver can access many different SQL Server installations).
There are two primary standards for databases drivers:
• ODBC has been around for a long time, and is one of the most widely used database driver standards. ODBC is primarily used on Windows, although other platforms are supported, too.
• JDBC is Java’s database driver implementation, and is supported on all platforms and environments running Java.
Note
ColdFusion 5 and earlier used ODBC database drivers. ColdFusion MX and later, which are Java based, primarily use JDBC instead.
Regardless of the database driver or standard used, the purpose of the driver is the same—to hide databases differences and provide simplified access to databases. For example, the internal workings of Microsoft Access and Oracle are very different, but when accessed via a database driver they look the same (or at least more alike). This allows the same application to interact with all sorts of databases, without needing to be customized or modified for each one. Database drivers are very database specific, so access to databases need not be database specific at all.
Of course, different database drivers need different information. For example, the Microsoft Access and Apache Derby Embedded drivers simply need to know the name and location of the data files to be used, whereas the Oracle and SQL Server database drivers require server information and an account login and password.
This driver-specific information could be provided each time it’s needed, or a data source could be created. A data source, like the one we created in Chapter 2, “Accessing the ColdFusion Administrator,” is simply a driver plus any related information stored for future use. Client applications, like ColdFusion, use data sources to interact with databases.
Preparing to Write SQL Queries
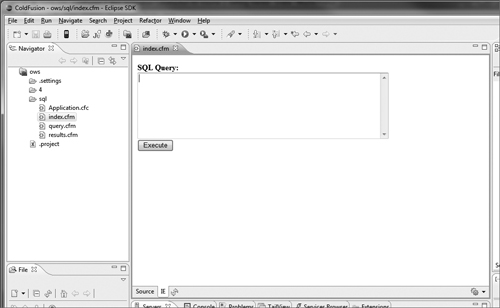
You already have a data source, so all you need is a client application with which to access the data. Ultimately, the client you will use is ColdFusion via CFML code; after all, that is why you’re reading this book. But to start learning SQL, we’ll use something simpler: a SQL Query Tool (written in ColdFusion). The tool can be accessed from inside ColdFusion Builder by opening and running index.cfm, which is in the sql folder under the ows folder. Alternatively, it can be accessed via a Web browser using the following URL:
http://localhost:8500/ows/sql/index.cfm
Note
If you are using the integrated server in a multi-server installation, use port 8300 instead of 8500.
The SQL Query Tool, shown in Figure 6.1, allows you to enter SQL statements in the box provided; they are executed when the Execute button is clicked. Results are displayed in the bottom half of the screen.
Figure 6.1 The SQL Query Tool allows SQL statements to be entered manually and then executed.
Caution
The SQL Query Tool is provided here as a convenience to you. It is intended for use on development computers and should never be installed on live (production) servers—and I do mean NEVER!
Note
The SQL Query Tool allows SQL statements to be executed against databases. This type of tool is dangerous, as it could be used to delete or change data (accidentally or maliciously). To help prevent this, SQL Query Tool has several built-in security measures: by default it only allows SELECT statements; it has a hard-coded data source; and it only allows SQL statements to be executed locally (local IP address only). To use SQL Query Tool remotely, you must explicitly allow your own IP address access to the tool by modifying the Application.cfc file specifying the address in the ip_restrict variable. If you modify these Application.cfc settings only to find that access is still blocked, then add ?reset to the URL (after index.cfm) to force the code to read your changes.
Creating Queries
With all the preliminaries taken care of, you can roll up your sleeves and start writing SQL. The SQL statement you will use most is the SELECT statement. As its name implies, you use SELECT to select data from a table.
Most SELECT statements require at least the following two parameters:
• What data you want to select, known as the select list. If you specify more than one item, you must separate each with a comma.
• The table (or tables) from which to select the data, specified with the FROM keyword.
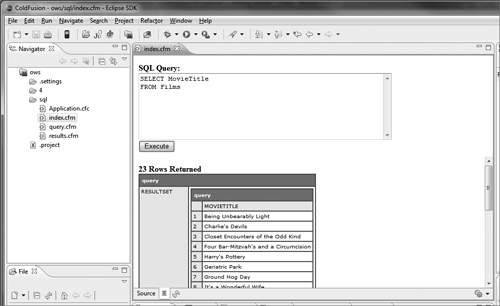
The first SQL SELECT you will create is a query for a list of movies in the Films table. Type the code in Listing 6.1 in the SQL Query box and then execute the statement by clicking the Execute button.
Listing 6.1 Simple SELECT Statement
![]()
That’s it! You’ve written your first SQL statement. The results will be shown as seen in Figure 6.2.
Figure 6.2 The SQL Query Tool displays query results in the bottom half of the screen along with the SQL used and the number of rows returned.
Tip
You can enter SQL statements on one long line or break them up over multiple lines. All white-space characters (spaces, tabs, newline characters) are ignored when the command is processed. Breaking a statement into multiple lines and indent parameters makes it easier to read and debug.
Here’s another example. Type the code in Listing 6.2, then click the Execute button to display two columns.
Listing 6.2 Multi-column SELECT Statement
![]()
Before you go any further, take a closer look at the SQL code in Listing 6.2. The first parameter you pass to the SELECT statement is a list of the two columns you want to see. A column is specified by its name (for example, MovieTitle) or as table.column (such as Films.MovieTitle, where Films is the table name and MovieTitle is the column name).
Because you want to specify two columns, you must separate them with commas. No comma appears after the last column name, so if you have only one column in your select list, you don’t need a comma.
Right after the select list, you specify the table on which you want to perform the query. You always precede the table name with the keyword FROM. The table is specified by name, in this case Films.
Note
SQL statements aren’t case sensitive, so you can specify the SELECT statement as SELECT, select, Select, or however you want. Common practice, however, is to enter all SQL keywords in uppercase and parameters in lowercase or mixed case. This way, you can read the SQL code and spot typos more easily.
Now modify the SELECT statement so it looks like the code in Listing 6.3, then execute it.
Listing 6.3 SELECT All Columns
![]()
This time, instead of specifying explicit columns to select, you use an asterisk (*). The asterisk is a special select list option that represents all columns. The data pane now shows all the columns in the table in the order in which they are returned by the database table itself.
Caution
Don’t use an asterisk in the select list unless you really need every column. Each column you select requires its own processing, and retrieving unnecessary columns can dramatically affect retrieval times as your tables get larger.
Sorting Query Results
When you use the SELECT statement, the results are returned to you in the order in which they appear in the table. This is usually the order in which the rows were added to the table. Since that probably isn’t the order you want, here is how to sort the query results. To sort rows, you need to add the ORDER BY clause. ORDER BY always comes after the table name; if you try to use it before, you generate a SQL error.
Now click the SQL button, enter the SQL code shown in Listing 6.4, and then click OK.
Listing 6.4 SELECT with Sorted Output
![]()
Your output is then sorted by the MovieTitle column.
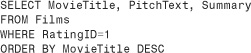
What if you need to sort by more than one column? No problem. You can pass multiple columns to the ORDER BY clause. Once again, if you have multiple columns listed, you must separate them with commas. The SQL code in Listing 6.5 demonstrates how to sort on more than one column by sorting by RatingID, and then by MovieTitle within each RatingID.
Listing 6.5 SELECT with Output Sorted on More than One Column
![]()
You also can use ORDER BY to sort data in descending order (Z–A). To sort a column in descending order, just use the DESC (short for descending) parameter. Listing 6.6 retrieves all the movies and sorts them by title in reverse order.
Listing 6.6 SELECT with Output Sorted in Reverse Order
![]()
Filtering Data
So far, your queries have retrieved all the rows in the table. You also can use the SELECT statement to retrieve only data that matches specific search criteria. To do so, you must use the WHERE clause and provide a restricting condition. If a WHERE clause is present, when the SQL SELECT statement is processed, every row is evaluated against the condition. Only rows that pass the restriction are selected.
If you use a WHERE clause, it must appear after the table name. If you use both the ORDER BY and WHERE clauses, the WHERE clause must appear after the table name but before the ORDER BY clause.
Filtering on a Single Column
To demonstrate filtering, modify the SELECT statement to retrieve only movies with a RatingID of 1. Listing 6.7 contains the SELECT statement.
Listing 6.7 SELECT with WHERE Clause
Filtering on Multiple Columns
The WHERE clause also can take multiple conditions. To search for Ben Forta, for example, you can specify a search condition in which the first name is Ben and the last name is Forta, as shown in Listing 6.8.
Listing 6.8 SELECT with Multiple WHERE Clauses
![]()
Caution
Text passed to a SQL query must be enclosed within quotation marks. If you omit the quotation marks, the SQL parser thinks that the text you specified is the name of a column, and you receive an error because that column doesn’t exist. Pure SQL allows strings to be enclosed within single quotation marks (‘like this’) or within double quotation marks (“like this”). But when passing text in a SQL statement to an ODBC or JDBC driver, you must use single quotation marks. If you use double ones, the parser treats the first double quotation mark as a statement terminator, and ignores all text after it.
The AND and OR Operators
Multiple WHERE clauses can be evaluated as AND conditions or OR conditions. The example in Listing 6.8 is an AND condition. Only rows in which both the last name is Forta and the first name is Ben will be retrieved. If you change the clause to the following, contacts with a first name of Ben will be retrieved (regardless of last name) and contacts with a last name of Forta will be retrieved (regardless of first name):
WHERE FirstName='Ben' OR LastName='Forta'
You can combine the AND and OR operators to create any search condition you need. Listing 6.9 shows a WHERE clause that can be used to retrieve only Ben Forta and Rick Richards.
Listing 6.9 Combining WHERE Clauses with AND and OR Operators

Evaluation Precedence
When a WHERE clause is processed, the operators are evaluated in the following order of precedence:
• Parentheses have the highest precedence.
• The AND operator has the next level of precedence.
• The OR operator has the lowest level of precedence.
What does this mean? Well, look at the WHERE clause in Listing 6.9. The clause reads WHERE FirstName='Ben' AND LastName='Forta' OR FirstName='Rick' AND LastName='Richards'. AND is evaluated before OR so this statement looks for Ben Forta and Rick Richards, which is what we wanted.
But what would be returned by a WHERE clause of WHERE FirstName='Rick' OR FirstName='Ben' AND LastName= 'Forta'? Does that statement mean anyone whose first name is either Rick or Ben, and whose last name is Forta, or does it mean anyone whose first name is Rick, and also Ben Forta? The difference is subtle, but if the former is true, then only contacts with a last name of Forta will be retrieved, whereas if the latter is true, then any Rick will be retrieved, regardless of last name.
So which is it? Because AND is evaluated first, the clause means anyone whose first name is Rick, and also Ben Forta. This might be exactly what you want—and then again, it might not.
To prevent the ambiguity created by mixing AND and OR statements, parentheses are used to group related statements. Parentheses have a higher order of evaluation than both AND and OR, so they can be used to explicitly match related clauses. Consider the following WHERE clauses:
WHERE (FirstName='Rick' OR FirstName='Ben') AND (LastName='Forta')
This clause means anyone whose first name is either Rick or Ben, and whose last name is Forta.
WHERE (FirstName='Rick') OR (FirstName='Ben' AND LastName='Forta')
This clause means anyone whose first name is Rick, and also Ben Forta.
As you can see, the exact same set of WHERE clauses can mean very different things depending on where parentheses are used.
Tip
Always using parentheses whenever you have more than one WHERE clause is good practice. They make the SQL statement easier to read and easier to debug.
WHERE Conditions
In the examples so far, you have used only the = (equal to) operator. You filtered rows based on their being equal to a specific value. Many other operators and conditions can be used with the WHERE clause; they’re listed in Table 6.2.
Table 6.2 WHERE Clause Search Conditions
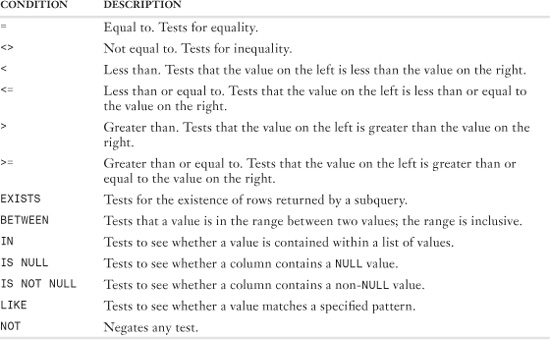
Feel free to experiment with different SELECT statements, using any of the WHERE clauses listed here. The SQL Query tool is safe. By default, it won’t update or modify data (by default), so there’s no harm in using it to play around with statements and clauses.
Testing for Equality: =
You use the = operator to test for value equality. The following example retrieves only contacts whose last name is Smith:
WHERE LastName = 'Smith'
Testing for Inequality: <>
You use the <> operator to test for value inequality. The following example retrieves only contacts whose first name is not Kim:
WHERE FirstName <> 'Kim'
Testing for Less Than: <
By using the < operator, you can test that the value on the left is less than the value on the right. The following example retrieves only contacts whose last name is less than C, meaning that their last name begins with an A or a B:
WHERE LastName < 'C'
Testing for Less Than or Equal To: <=
By using the <= operator, you can test that the value on the left is less than or equal to the value on the right. The following example retrieves actors aged 21 or less:
WHERE Age <= 21
Testing for Greater Than: >
You use the > operator to test that the value on the left is greater than the value on the right. The following example retrieves only movies with a rating of 3 or higher (greater than 2):
WHERE RatingID > 2
Testing for Greater Than or Equal To: >=
You use the >= operator to test that the value on the left is greater than or equal to the value on the right. The following example retrieves only contacts whose first name begins with the letter J or higher:
WHERE FirstName >= 'J'
BETWEEN
Using the BETWEEN condition, you can test whether a value falls into the range between two other values. The following example retrieves only actors aged 20 to 30. Because the test is inclusive, ages 20 and 30 are also retrieved:
WHERE Age BETWEEN 20 AND 30
The BETWEEN condition is actually nothing more than a convenient way of combining the >= and <= conditions. You also could specify the preceding example as follows:
WHERE Age >= 20 AND Age <= 30
Using the BETWEEN condition makes the statement easier to read.
EXISTS
Using the EXISTS condition, you can check whether a subquery returns any rows.
IN
You can use the IN condition to test whether a value is part of a specific set. The set of values must be surrounded by parentheses and separated by commas. The following example retrieves contacts whose last name is Black, Jones, or Smith:
WHERE LastName IN ('Black', 'Jones', 'Smith')
The preceding example is actually the same as the following:
WHERE LastName = 'Black' OR LastName = 'Jones' OR LastName = 'Smith'
Using the IN condition has two advantages. First, it makes the statement easier to read. Second, and more importantly, you can use the IN condition to test whether a value is within the results of another SELECT statement (providing a complete SELECT statement in between ( and ) so as to match whatever that statement returned).
IS NULL and IS NOT NULL
A NULL value is the value of a column that is empty. The IS NULL condition tests for rows that have a NULL value; that is, the rows have no value at all in the specified column. IS NOT NULL tests for rows that have a value in a specified column.
The following example retrieves all contacts whose Email column is empty:
WHERE Email IS NULL
To retrieve only the contacts who have an email address, use the following example:
WHERE Email IS NOT NULL
LIKE
Using the LIKE condition, you can test for string pattern matches using wildcards. Two wildcard types are supported. The % character means that anything from that position on is considered a match. You also can use [] to create a wildcard for a specific character.
The following example retrieves actors whose last name begins with the letter S. To match the pattern, a last name must have an S as the first character.
WHERE LastName LIKE 'S%'
To retrieve actors with an S anywhere in their last names, you can use the following:
WHERE LastName LIKE '%S%'
You also can retrieve just actors whose last name ends with S, as follows:
WHERE LastName LIKE '%S'
The LIKE condition can be negated with the NOT operator. The following example retrieves only actors whose last name doesn’t begin with S:
WHERE LastName NOT LIKE 'S%'
Using the LIKE condition, you also can specify a wildcard on a single character. If you want to find all actors named Smith but aren’t sure whether the one you want spells his or her name Smyth, you can use the following:
WHERE LastName LIKE 'Sm[iy]th'
This example retrieves only names that start with Sm, then have an i or a y, and then a final th. As long as the first two characters are Sm and the last two are th, and as long as the middle character is i or y, the name is considered a match.
Tip
Using the powerful LIKE condition, you can retrieve data in many ways. But everything has its price, and the price here is performance. Generally, LIKE conditions take far longer to process than other search conditions, especially if you use wildcards at the beginning of the pattern. As a rule, use LIKE and wildcards only when absolutely necessary.
For even more powerful searching, LIKE may be combined with other clauses using AND and OR. And you may even include multiple LIKE clauses in a single WHERE clause.