
Chapter 8. The Basics of CFML
Working with Templates
Back in Chapter 4, “Previewing ColdFusion,” we walked through the process of creating several simple applications. ColdFusion applications are made up of one or more files, each with a .cfm extension. These files often are referred to as templates or pages—you’ll see the terms used somewhat interchangeably. Just so you know, they all refer to the same thing. I’ll explain why the term templates is used in a few moments.
Note
As explained in Chapter 2, “Accessing the ColdFusion Administrator,” the URL used with ColdFusion will vary based on whether or not an external Web server is being used. For the sake of simplicity, all URLs used in this and future chapters assume that ColdFusion is being used in conjunction with the integrated Web server (“stand-alone” mode). As such, you’ll see the port address :8500 specified in all URLs (both in the content and the figures). If you are not using the integrated Web server, simply omit the :8500 from any URLs.
Creating Templates
As already explained, ColdFusion templates are plain text files. As such, they can be created using many different programs. We’ll continue to use ColdFusion Builder as we work through these lessons, but there are other options, including Adobe Dreamweaver, which is very popular among Web developers and designers.
Note
There are two other file extensions used with ColdFusion, .cfc and .cfr. We’ll look at those files in future chapters.
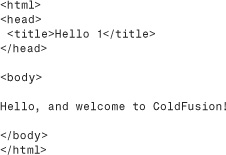
The following code is the contents of a simple ColdFusion file named hello1.cfm. Actually, at this point no ColdFusion code exists in the listing—it is all straight HTML and text, but we’ll change that soon. Launch ColdFusion Builder (if it is not already open), create a 8 folder under ows, create a new file named hello1.cfm, and type the code as shown in Listing 8.1.
Tip
Tag case is not important, so <BODY> or <body> or <Body> can be used—it’s your choice.
Executing Templates
Now, let’s test the code. There are several ways to do this. The simplest is to just click the browser tab under the editor window in ColdFusion Builder.
You may also execute the page directly yourself. Simply open your Web browser and go to this URL:
http://localhost:8500/ows/8/hello1.cfm
Tip
Not using the integrated Web server? See the note at the start of this chapter.
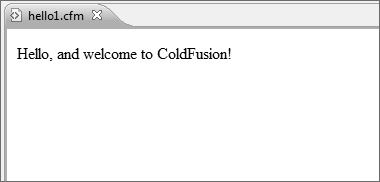
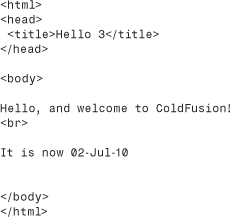
You should see a page like the one in Figure 8.1. I admit that this is somewhat anticlimactic, but wait; it’ll get better soon enough.
Figure 8.1 ColdFusion-generated output usually is viewed in any Web browser.
Templates Explained
I promised to explain why ColdFusion files are often referred to as templates. Chapter 1, “Introducing ColdFusion,” explains that ColdFusion pages are processed differently from Web pages. When requested, Web pages are sent to the client (the browser) as is, whereas ColdFusion files are processed and the generated results are returned to the client instead.
In other words, ColdFusion files are never sent to the client, but what they create is. And depending on what a ColdFusion file contains, it likely will generate multiple different outputs all from that same single .cfm file—thus the term template.
Using Functions
This is where it starts to get interesting. CFML (the ColdFusion Markup Language) is made up of two primary language elements:
• Tags. These perform operations, such as accessing a database, evaluating a condition, and flagging text for processing.
• Functions. These return (and possibly process) data and do things such as getting the current date and time, converting text to uppercase, and rounding a number to its nearest integer.
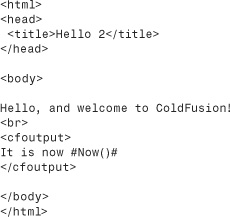
Writing ColdFusion code requires the use of both tags and functions. The best way to understand this is to see it in action. Here is a revised hello page. Type Listing 8.2 in a new page (or use Save As to save a copy of the previous page and then edit the page), and save it as hello2.cfm in the ows/8 directory.
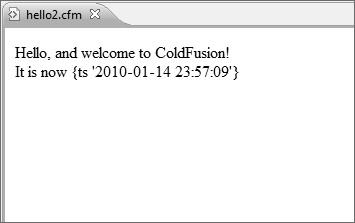
After you have saved the page, try it by browsing it either in a Web browser or right within ColdFusion Builder. (If using a Web browser the URL will be http://localhost:8500/ows/8/hello2.cfm.) The output should look similar to Figure 8.2 (except that your date and time will probably be different).
Figure 8.2 ColdFusion code can contain functions, including one that returns the current date and time.
Before we go any further, let’s take a look at Listing 8.2. You will recall that when ColdFusion processes a .cfm file, it looks for CFML code to be processed and returns any other code to the client as is. So, the first line of code is
<html>
That is not CFML code—it’s plain HTML. Therefore, ColdFusion ignores it and sends it on its way (to the client browser). The next few lines are also HTML code:
No ColdFusion language elements exist there, so ColdFusion ignores the code and sends it to the client as is.
But the next three lines of code are not HTML:
![]()
<cfoutput> is a ColdFusion tag (all ColdFusion tags begin with CF). <cfoutput> is used to mark a block of code to be processed by ColdFusion. All text between the <cfoutput> and </cfoutput> tags is parsed, character by character, and any special instructions within that block are processed.
In the example, the following line was between the <cfoutput> and </cfoutput> tags:
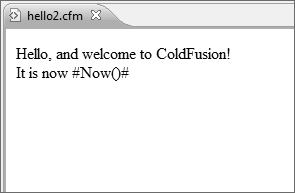
It is now #Now()#
The text It is now is not an instruction, so it is sent to the client as is. But the text #Now()# is a ColdFusion instruction—instructions within strings of text are delimited by number signs (the # character). #Now()# is an instruction telling ColdFusion to execute a function named Now()—a function that returns the current date and time. Thus the output in Figure 8.3 is generated.
Figure 8.3 Number signs (#) are needed around all expressions; otherwise, the expression is sent to the client instead of being processed.
The entire block of text from <cfoutput> until </cfoutput> is referred to as a <cfoutput> block. Not all the text in a <cfoutput> block need be CFML functions. In the previous example, literal text was used, too, and that text was sent to the client untouched. As such, you also could have entered the code like this:
It is now <cfoutput>#Now()#</cfoutput>
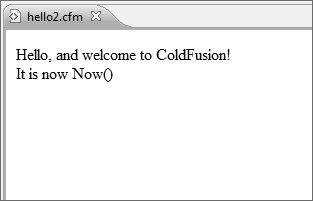
Only the #Now()# expression needs ColdFusion processing, so only it really needs to be within the <cfoutput> block. But what if you had not placed the expression within a <cfoutput> block? Try it; remove the <cfoutput> tags, save the page, and execute it. You’ll see output similar to that in Figure 8.3—obviously not what you want. Because any content not within a <cfoutput> block is sent to the client as is, using Now() outside a <cfoutput> block causes the text Now() to be sent to the client instead of the data returned by Now(). Why? Because if it is outside a <cfoutput> block (and not within any other CFML tag), ColdFusion will never process it.
Omitting the number signs has a similar effect. Put the <cfoutput> tags back where they belong, but change #Now()# to Now() (removing the number signs from before and after it). Then save the page, and execute it. The output will look similar to Figure 8.4. Why? Because all <cfoutput> does is flag a block of text as needing processing by ColdFusion. However, ColdFusion does not process all text between the tags—instead, it looks for expressions delimited by number signs, and any text not within number signs is assumed to be literal text that is to be sent to the client as is.
Figure 8.4 If expressions are sent to the browser, it usually means you have omitted the <cfoutput> tags.
Note
<cfoutput> has another important use when working with database-driven content. More information about that can be found in Chapter 10, “Creating Data-Driven Pages.”
Now() is a function, one of many functions supported in CFML. Now() is used to retrieve information from the system (the date and time), but the format of that date is not entirely readable. Another function, DateFormat(), can help here. DateFormat() is one of ColdFusion’s output formatting functions, and its job is to format dates so they are readable in all types of formats. Here is a revision of the code you just used (see Listing 8.3); save it as hello3.cfm and browse the file to see output similar to what is shown in Figure 8.5.

Figure 8.5 ColdFusion features a selection of output formatting functions that can be used to better control generated output.
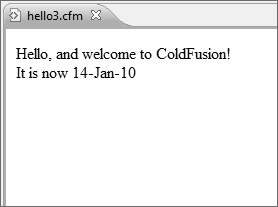
DateFormat() is an example of a function that accepts (and requires) that data must be passed to it—after all, it needs to know which date you want to format for display. DateFormat() can accept dates as hard-coded strings (as in #DateFormat("8/17/2010")#), as well as dates returned by other expressions, such as the Now() function. #DateFormat(Now())# tells ColdFusion to format the date returned by the Now() function.
Note
Passing a function as a parameter to another function is referred to as “nesting.” In this chapter’s example, the Now() function is said to be nested in the DateFormat() function.
DateFormat() takes a second optional attribute, too: a format mask used to describe the output format. Try replacing the #DateFormat(Now())# in your code with any of the following, and try each to see what they do:
• #DateFormat(Now(), "MMMM-DD-YYYY")#
• #DateFormat(Now(), "MM/DD/YY")#
• #DateFormat(Now(), "DDD, MMMM DD, YYYY")#
Parameters passed to a function are always separated by commas. Commas are not used if a single parameter is passed, but when two or more parameters exist, every parameter must be separated by a comma.
You’ve now seen a function that takes no parameters, a function that takes a required parameter, and a function that takes both required and optional parameters. All ColdFusion functions, and you’ll be using many of them, work the same way—some take parameters, and some don’t. But all functions, regardless of parameters, return a value.
Note
It is important to remember that # is not part of the function. The functions you used here were DateFormat() and Now(). The number signs were used to delimit (mark) the expressions, but they are not part of the expression itself.
I know I’ve already said this, but it’s worth repeating: CFML code is processed on the server, not on the client. The CFML code you write is never sent to the Web browser. What is sent to the browser? Most browsers feature a View Source option that displays code as received. If you view the source of for page hello3.cfm you’ll see something like this:
As you can see, there is no CFML code here at all. The <cfoutput> tags, the functions, the number signs—all have been stripped out by the ColdFusion Server, and what was sent to the client is the output that they generated.
Tip
Viewing the generated source is an invaluable debugging trick. If you ever find that output is not being generated as expected, viewing the source can help you understand exactly what was generated and why.
Using Variables
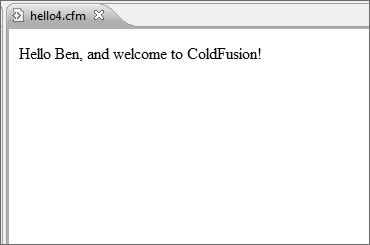
Now that you’ve had the chance to use some basic functions, it’s time to introduce variables. Variables are an important part of just about every programming language, and CFML is no exception. A variable is a container that stores information in memory on the server. Variables are named, and the contents of the container are accessed via that name. Let’s look at a simple example. Type the code in Listing 8.4 into a new file (feel free to use your own name instead of mine), save it as hello4.cfm, and browse it. You should see a display similar to the one shown in Figure 8.6.
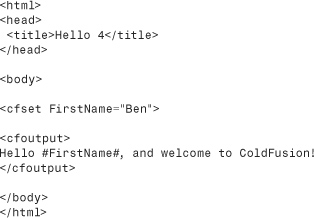
Figure 8.6 Variables are replaced by their contents when content is generated.
This code is similar to the previous code listings. It starts with plain HTML, which is sent to the client as is. Then a new tag is used, <cfset>:
<cfset FirstName="Ben">
<cfset> is used to set variables. Here, a variable named FirstName is created, and a value of Ben is stored in it. After it’s created, that variable will exist until the page has finished processing and can be used, as seen in the next line of code:
Hello #FirstName#, and welcome to ColdFusion!
This line of code was placed in a <cfoutput> block so ColdFusion will know to replace #FirstName# with the contents of FirstName. The generated output is then:
Hello Ben, and welcome to ColdFusion!
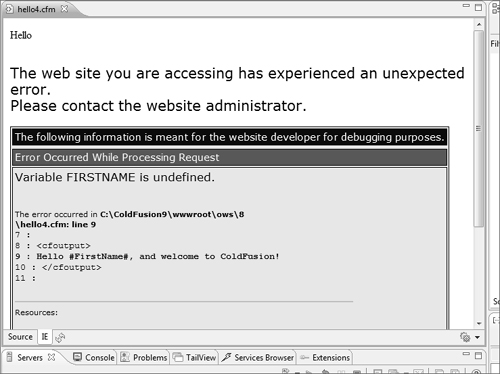
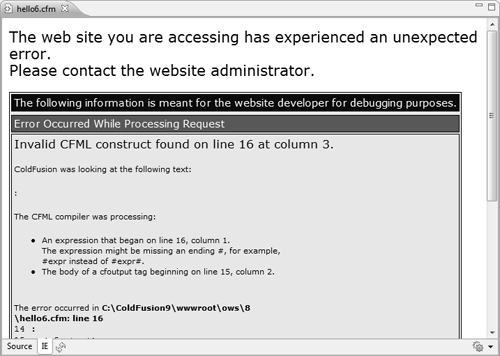
Variables can be used as many times as necessary, as long as they exist. Try moving the <cfset> statement after the <cfoutput> block, or delete it altogether. Executing the page now will generate an error, similar to the one seen in Figure 8.7. This error message is telling you that you referred to (tried to access) a variable that doesn’t exist. The error message includes the name of the variable that caused the problem, as well as the line and column in your code, to help you find and fix the problem easily. More often than not, this kind of error is caused by typos.
Figure 8.7 ColdFusion produces an error if a referenced variable doesn’t exist.
Note
If the error message doesn’t contain line numbers (or displays less detail than seen in Figure 8.7), you’ll need to access the ColdFusion Administrator (as explained in Chapter 2), go to the Debugging Output Settings page, and turn on Enable Robust Exception Information.
Note
Regular variables exist only in the page that creates them. If you define a variable named FirstName in one page, you can’t use it in another page unless you explicitly pass it to that page (see Chapter 10). An exception to this rule does exist. In Chapter 19, “Working with Sessions,” you learn how to create and use variables that persist across requests. (Each page access is known as a request.)
Here is a new version of the code, this time using the variable FirstName six times. Save Listing 8.5 as hello5.cfm, and then try this listing for yourself (feel free to replace my name with your own). The output is shown in Figure 8.8.
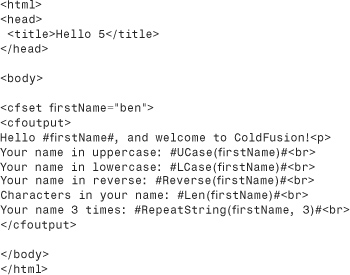
Figure 8.8 There is no limit to the number of functions that can be used in one page, which enables you to render content as you see fit.
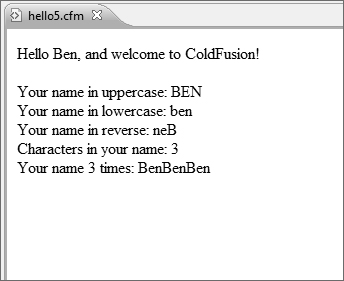
Let’s take a look at the previous code. A <cfset> is used to create a variable named FirstName. That variable is used once by itself (the Hello message), and then five times with functions. UCase() converts a string to uppercase, LCase() converts a string to lowercase, Reverse() reverses the string, Len() returns the length of a string (the number of characters in it), and RepeatString() repeats a string a specified number of times.
But functions such as UCase() don’t truly convert strings; instead, they return converted strings. The difference is subtle but important. Look at the following line of code:
Your name in uppercase: #UCase(firstName)#
UCase() returns FirstName converted to uppercase, but the contents of FirstName itself are intact and are not converted to anything at all. FirstName was not modified; a copy was made and modified instead, and that copy was returned. To save the uppercase FirstName to a variable, you must do something like this:
<CFSET UpperFirstName=UCase(FirstName)>
Here a new variable, UpperFirstName, is created. UpperFirstName is assigned the value that is returned by UCase(FirstName), the uppercase FirstName. And this new variable can be used like any other variable, and as often as necessary. Listing 8.6 is a modified version of Listing 8.5. Try it for yourself—the output will be exactly the same as in Figure 8.8.
This code deserves a closer look. Six <cfset> tags now exist, and six variables are created. The first creates the firstName variable, just like in the previous examples. The next creates a new variable named upperFirstName, which contains the uppercase version of firstName. And then lowerFirstName, reverseFirstName, lenFirstName, and repeatFirstName are each created with additional <cfset> statements.
The <cfoutput> block here contains no functions at all. Rather, it just displays the contents of the variables that were just created. In this particular listing there is actually little value in doing this, aside from the fact that the code is a bit more organized this way. The real benefit in saving function output to variables is realized when a function is used many times in a single page. Then, instead of using the same function over and over, you can use it once, save the output to a variable, and just use that variable instead.
One important point to note here is that variables can be overwritten. Look at the following code snippet:
<cfset firstName="Ben">
<cfset firstName="Ray">
Here, firstName is set to Ben and then set again to Ray. Variables can be overwritten as often as necessary, and whatever the current value is when accessed (displayed, or passed to other functions), that’s the value that will be used.
Knowing that, what do you think the following line of code does?
<cfset firstName=UCase(FirstName)>
This is an example of variable overwriting, but here the variable being overwritten is the variable itself. I mentioned earlier that functions such as UCase() don’t convert text; they return a converted copy. So how could you really convert text? By using code such as the line just shown. <cfset firstName=UCase(firstName)> sets firstName to the uppercase version of firstName, effectively overwriting itself with the converted value.
Variable Naming
This would be a good place to discuss variable naming. When you create a variable you get to name it, and the choice of names is up to you. However, you need to know a few rules about variable naming:
• Variable names can contain alphanumeric characters but can’t begin with a number (so result12 is okay, but 4thresult is not).
• Variable names can’t contain spaces. If you need to separate words, use underscores (for example, monthly_sales_figures instead of monthly sales figures).
• Aside from the underscore, non-alphanumeric characters can’t be used in variable names (so Sales!, SSN#, and firstname are all invalid).
• Variable names are case insensitive (FirstName is the same as FIRSTNAME, which is the same as firstname, which is the same as firstName).
Other than that, you can be as creative as necessary with your names. Pick any variable name you want; just be careful not to overwrite existing variables by mistake.
Tip
Avoid the use of abbreviated variable names, such as fn or c. Although these are valid names, what they stand for is not apparent just by looking at them. Yes, fn is fewer keystrokes than FirstName, but the first time you (or someone else) must stare at the code trying to figure out what a variable is for, you’ll regret saving that little bit of time. As a rule, make variable names descriptive.
Using Prefixes
ColdFusion supports many variable types, and you’ll become very familiar with them as you work through this book. For example, local variables (the type you just created) are a variable type. Submitted form fields are a variable type, as are many others.
ColdFusion variables can be referenced in two ways:
• The variable name itself
• The variable name with the type as a prefix
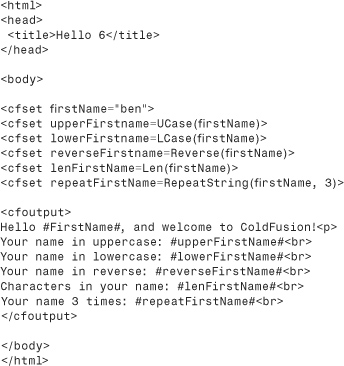
For example, the variable firstName that you used a little earlier is a local variable (local to this page only; type VARIABLES). That variable can be referred to as firstName (as you did previously) and as VARIABLES.firstName. Both are valid, and both will work (you can edit file hello6.cfm to use the VARIABLES prefix to try this).
So should you use prefixes? Well, there are pros and cons. Here are the pros:
• Using prefixes improves performance. ColdFusion will have less work to do finding the variable you are referring to if you explicitly provide the full name (including the prefix).
• If multiple variables exist with the same name but are of different types, the only way to be 100 percent sure that you’ll get the variable you want is to use the prefix.
As for the cons, there is just one:
• If you omit the prefix, multiple variable types will be accessible (perhaps form fields and URL parameters, which are discussed in the following chapters). If you provide the type prefix, you restrict access to the specified type, and although this does prevent ambiguity (as just explained), it does make your code a little less reusable.
The choice is yours, and there is no real right or wrong. You can use prefixes if you see fit, and not use them if not. If you don’t specify the prefix, ColdFusion will find the variable for you. And if multiple variables of the same name do exist (with differing types) then a predefined order of precedence is used. (Don’t worry if these types are not familiar yet; they will become familiar soon enough, and you can refer to this list when necessary.) Here is the order:
• Function local (user-defined functions and CFC methods)
• Thread local (within a <CFTHREAD> statement)
• Query results
• Function ARGUMENTS
• Local variables (VARIABLES)
• CGI variables
• FILE variables
• URL parameters
• FORM fields
• COOKIE values
• CLIENT variables
In other words, if you refer to #firstName# (without specifying a prefix) and that variable exists both as a local variable (VARIABLES.firstName) and as a FORM field (FORM.firstName), VARIABLES.firstName will be used automatically.
Note
An exception to this does exist. Some ColdFusion variable types must always be accessed with an explicit prefix; these are covered in later chapters.
Working with Expressions
I’ve used the term expressions a few times in this chapter. What is an expression? The official ColdFusion documentation explains that expressions are “language constructs that allow you to create sophisticated applications.” A better way to understand it is that expressions are strings of text made up of one or more of the following:
• Literal text (strings), numbers, dates, times, and other values
• Variables
• Operators (+ for addition, & for concatenation, and so on)
• Functions
So, UCase(FirstName) is an expression, as are "Hello, my name is Ben", 12+4, and DateFormat(Now()). And even though many people find it hard to articulate exactly what an expression is, realize that expressions are an important part of the ColdFusion language.
Building Expressions
Expressions are entered where necessary. Expressions can be passed to a <cfset> statement as part of an assignment, used when displaying text, and passed to almost every single CFML tag (except for the few that take no attributes).
Simple expressions can be used, such as those discussed previously (variables, functions, and combinations thereof). But more complex expressions can be used, too, and expressions can include arithmetic, string, and decision operators. You’ll use these in the next few chapters.
When using expressions, number signs are used to delimit ColdFusion functions and variables within a block of text. So, how would you display the # itself? Look at the following code snippet:
![]()
You can try this yourself if you so feel inclined; you’ll see that ColdFusion generates an error when it processes the code (see Figure 8.9).
Figure 8.9 Number signs in text must be escaped; otherwise, ColdFusion produces an error.
What causes this error? When ColdFusion encounters the # at the start of the line, it assumes you are delimiting a variable or a function and tries to find the matching # (which of course does not exist, as this is not a variable reference at all). The solution is to escape the number sign (flag it as being a real number sign), as follows:
![]()
When ColdFusion encounters ##, it knows that # is not delimiting a variable or function. Instead, it correctly displays a single #.
When to Use #, and When Not To
Before we go any further, let’s clarify exactly when number signs are needed and when they’re not.
Simply put, number signs are needed to flag functions and variables within a string of text.
In this first example, the number signs are obviously needed:
Hello #VARIABLES.FirstName#
But what about when a variable is used within a tag, like this?
<cfset UpperFirstName=UCase(FirstName)>
Here number signs are not necessary because ColdFusion assumes that anything passed to a tag is a function or variable unless explicitly defined as a string. So the following is incorrect:
<cfset #UpperFirstName#=#UCase(FirstName)#>
This code will actually work (ColdFusion is very forgiving), but it is still incorrect and should not be used.
This next example declares a variable and assigns a value that is a string, so no number signs are needed here:
<cfset FirstName="Ben">
But if the string contains variables, number signs would be necessary. Look at this next example: FullName is assigned a string, but the string contains two variables (FirstName and LastName) and those variables must be enclosed within number signs (otherwise ColdFusion will assign the text, not the variable values):
<cfset FullName="#FirstName# #LastName#">
Incidentally, the previous line of code is functionally equivalent to the following:
<cfset FullName=FirstName & " " & LastName>
Here number signs are not necessary because the variables are not being referred to within a string.
Again, the rule is: Only use number signs when referring to variables and functions within a block of text. It’s as simple as that.
Using ColdFusion Data Types
The variables you have used thus far are simple variables, are defined, and contain a value. ColdFusion supports three advanced data types that I’ll briefly introduce now: lists, arrays, and structures.
Note
This is just an introduction to lists, arrays, and structures. All three are used repeatedly throughout the rest of this book, so don’t worry if you do not fully understand them by the time you are done reading this chapter. Right now, the intent is to ensure that you know these exist and what they are. You’ll have lots of opportunities to use them soon enough.
Lists
Lists are used to group together related information. Lists are actually strings (plain text)—what makes them lists is that a delimiter is used to separate items within the string. For example, the following is a comma-delimited list of five U.S. states:
California,Florida,Michigan,Massachusetts,New York
The next example is also a list. Even though it might not look like a list, a sentence is a list delimited by spaces:
This is a ColdFusion list
Lists are created just like any other variables. For example, this next line of code uses the <cfset> tag to create a variable named fruit that contains a list of six fruits:
<cfset fruit="apple,banana,cherry,grape,mango,orange">
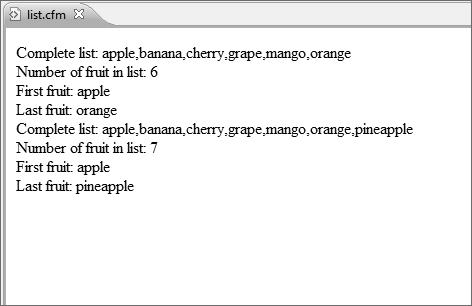
The code in Listing 8.7 demonstrates the use of lists. Type the code and save it as list.cfm in the 8 directory; then execute it. You should see an output similar to the one shown in Figure 8.10.
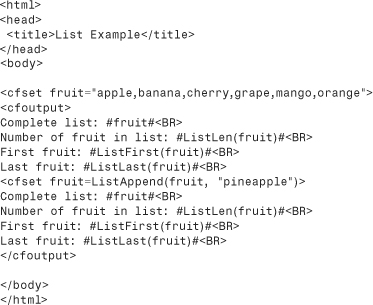
Figure 8.10 Lists are useful for grouping related data into simple sets.
Let’s walk through the code in Listing 8.7. A <cfset> is used to create a list. As a list is simply a string, a simple variable assignment can be used.
Next comes the <cfoutput> block, starting with displaying #fruit# (the complete list). The next line of code uses the ListLen() function to return the number of items in the list (there are six of them). Individual list members can be retrieved using ListFirst() (used here to get the first list element), ListLast() (used here to get the last list element), and ListGetAt() (used to retrieve any list element, but not used in this example).
Then another <cfset> tag is used, as follows:
<cfset fruit=ListAppend(fruit, "pineapple")>
This code uses the ListAppend() function to add an element to the list. You will recall that functions return copies of modified variables, not modified variables themselves. So the <cfset> tag assigns the value returned by ListAppend() to fruit, effectively overwriting the list with the new revised list.
Then the number of items, as well as the first and last items, is displayed again. This time 7 items are in the list, and the last item has changed to pineapple.
As you can see, lists are very easy to use and provide a simple mechanism for grouping related data.
Note
I mentioned earlier that a sentence is a list delimited by spaces. The default list delimiter is indeed a comma. Actually, though, any character can be used as a list delimiter, and every list function takes an optional delimiter attribute if necessary.
Arrays
Arrays, like lists, store multiple values in a single variable. But unlike lists, arrays can contain far more complex data (including lists and even other arrays).
Unlike lists, arrays support multiple dimensions. A single-dimensional array is actually quite similar to a list: It’s a linear collection. A two-dimensional array is more like a grid (imagine a spreadsheet), and data is stored in rows and columns. ColdFusion also supports three-dimensional arrays, which can be envisioned as cubes of data.
If this all sounds somewhat complex, well, it is. Arrays are not as easy to use as lists, but they are far more powerful (and far quicker). Here is a simple block of code that creates an array and displays part of it; the output is shown in Figure 8.11. To try it out, type the code in Listing 8.8 and save it as array1.cfm.
Figure 8.11 Arrays treat data as if they were in a one-, two-, or three-dimensional grid.
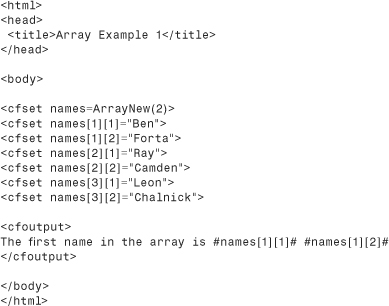
Arrays are created using the ArrayNew() function. ArrayNew() requires that the desired dimension be passed as a parameter, so the following code creates a two-dimensional array named names:
<cfset names=ArrayNew(2)>
Array elements are set using <cfset>, just like any other variables. But unlike other variables, when array elements are set the element number must be specified using an index (a relative position starting at 1). So, in a one-dimensional array, names[1] would refer to the first element and names[6] would refer to the sixth. In two-dimensional arrays, both dimensions must be specified, as seen in these next four lines (taken from the previous code listing):
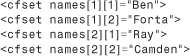
names[1][1] refers to the first element in the first dimension—think of it as the first column of the first row in a grid. names[1][2] refers to the second column in that first row, and so on.
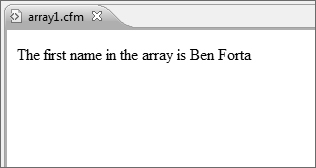
When accessed, even for display, the indexes must be used. Therefore, the following line of code
The first name in the array #names[1][1]# #names[1][2]#
generates this output:
The first name in the array Ben Forta
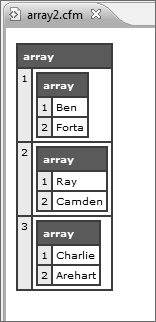
For a better view into an array, you can use a tag named <cfdump>. Listing 8.9 contains the code for array2.cfm (the same as array1.cfm, but with different output code). The output is shown in Figure 8.12.
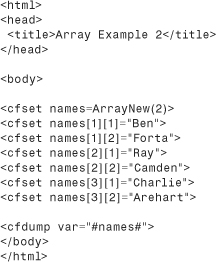
Figure 8.12 <cfdump> is a great way to inspect array contents.
We’ll take a look at <cfdump> again in a moment. But for now, as you can see, although they’re not as easy to use as lists, arrays are a very flexible and powerful language feature.
As you have seen, arrays are first created using ArrayNew(), and then elements are added as needed. Thus far, elements were added to specific array locations ([2][1], for example). Array elements can also be appended using ArrayAppend(), as seen here:
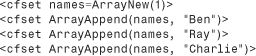
This example creates a single-dimensional array and then appends three elements to it.
When working with single-dimensional arrays, ColdFusion provides a shortcut syntax that can create and populate an array in a single step. The following snippet is functionally identical to the previous example:
<cfset names=["Ben","Ray","Charlie"]>
As you can see, single-dimensional arrays can be created and populated without the use of any array functions at all.
Tip
ColdFusion can process arrays far more quickly than it can lists. For very short sets of data, you’ll probably not see much of a difference between arrays and lists, but as the amount of data in sets grows, the performance benefit of arrays of lists will become more apparent.
Structures
Structures are the most powerful and flexible data type within ColdFusion, so powerful in fact that many internal variables are actually structures.
Simply put, structures provide a way to store data within data. Unlike arrays, structures have no special dimensions and are not like grids. Rather, they can be thought of as top-level folders that can store data, or other folders, which in turn can store data, or other folders, and so on. Structures can contain lists, arrays, and even other structures.
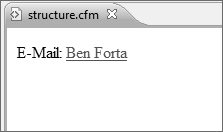
To give you a sneak peek at what structures look like, here is some code. Give it a try yourself; save the file as structure.cfm (see Listing 8.10), and you should see output as shown in Figure 8.13.
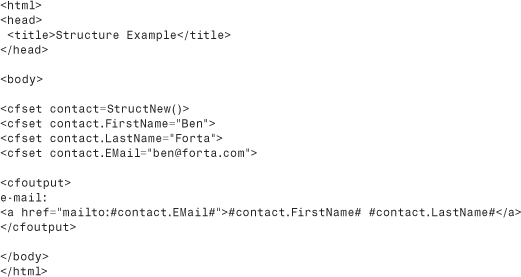
Figure 8.13 Structures are one of the most important data types in ColdFusion and are used internally extensively.
Structures are created using StructNew(), which—unlike ArrayNew()—takes no parameters. After a structure is created, variables can be set inside it. The following three lines of code all set variables with the contact structure:
![]()
To access structure members, simply refer to them by name. #contact.FirstName# accesses the FirstName member of the contact structure. Therefore, the code
<a href="mailto:#contact.EMail#">#contact.FirstName# #contact.LastName#</a>
generates this output:
<a href="mailto:[email protected]">Ben Forta</a>
And that’s just scratching the surface. Structures are incredibly powerful, and you’ll use them extensively as you work through this book.
Like arrays, structures can be implicitly created and populated without the need to use StructNew(). The following snippet replaces the four <cfset> statements in the previous example:
![]()
For simplicity’s sake, I have described only the absolute basic form of structure use. ColdFusion features an entire set of structure manipulation functions that can be used to better take advantage of structures—you use some of them in the next chapter, “Programming with CFML.”
“Dumping” Expressions
I showed you a tag named <cfdump> in Listing 8.9. This tag is never used in live applications, but it’s an invaluable testing and debugging tool. <cfdump> lets you display any expression in a cleanly formatted table. You saw an example of dumping an array previously; now let’s try another example. Type the following code into a new document (see Listing 8.11), save it as cfdump1.cfm, and then execute it in your browser. The output is shown in Figure 8.14.
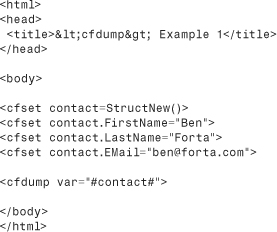
Figure 8.14 <cfdump> is an invaluable diagnostics and debugging tool capable of displaying all sorts of data in a clean and easy-to-read format.
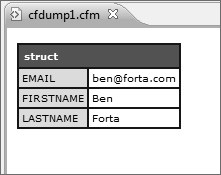
In this listing we’ve removed the <cfoutput> block. Instead, a <cfdump> tag is being used to dump (display) the contents of the contact structure. As you can see in Figure 8.14, <cfdump> creates a nicely formatted table containing the data contained within the structure. Our structure was pretty simple (three members, and no nested data types) but as the variables and data types you work with grow in complexity you’ll find <cfdump> to be an invaluable utility tag.
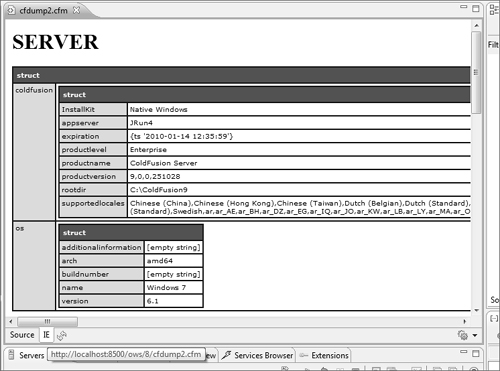
Here is one final <cfdump> example, this time dumping the contents of two special variable scopes. SERVER is a structure (that contains two other structures) containing ColdFusion and operating system information. CGI is a structure that contains all sorts of data provided by the Web browser, Web server, and ColdFusion. Type the following code into a new document (see Listing 8.12), save it as cfdump2.cfm, and then execute it in your browser. The output is shown in Figure 8.15.
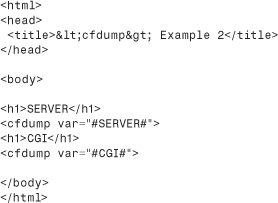
Figure 8.15 <cfdump> can display all ColdFusion data types, including nested data types.
Tip
The <cfdump> tag actually does more than just paint an HTML table. Try clicking any of the boxes with colored backgrounds; you’ll be able to collapse and expand them as needed. When working with very large complex expressions this feature is incredibly useful, and to make it work ColdFusion automatically generates DHTML code (with supporting JavaScript) all automatically. To appreciate just how much work this little tag does, use View Source in your Web browser.
Commenting Your Code
The last introductory topic I want to mention is commenting your code. Many books leave this to the very end, but I believe it is so important that I am introducing the concept right here—before you start real coding.
The code you have worked with thus far has been short, simple, and pretty self-explanatory. But as you start building bigger and more complex applications, your code will become more involved and more complex, and comments become vital. Here is why you should comment your code:
• If you make code as self-descriptive as possible, when you revisit it at a later date you’ll remember what you did, and why.
• This is even truer if others have to work on your code. The more detailed and accurate comments are, the easier (and safer) it will be to make changes or corrections when necessary.
• Commented code is much easier to debug than uncommented code.
• Commented code tends to be better organized.
And that’s just the start of it.
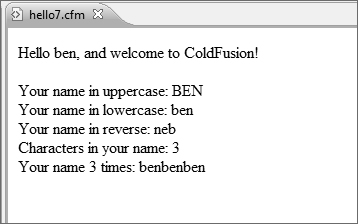
Listing 8.13 is a revised version of hello6.cfm; all that has changed is the inclusion of comments. And as you can see from Figure 8.16, this has no impact on generated output whatsoever.
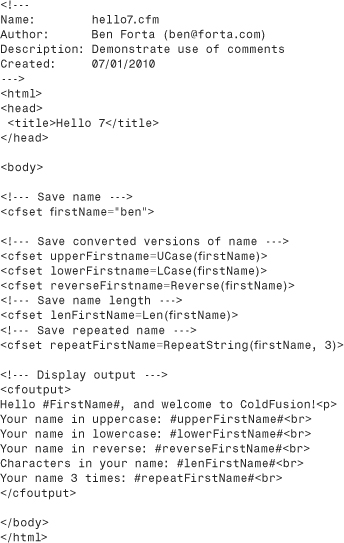
Figure 8.16 ColdFusion comments in your code are never sent to the client browser.
Comments are typed between <!--- and ---> tags. Comments should never be nested and should never be mismatched (such as having a starting tag without an end tag, or vice versa).
Note
ColdFusion uses <!--- and ---> to delimit comments. HTML uses <!-- and --> (two hyphens instead of three). Within ColdFusion code, always use ColdFusion comments and not HTML comments. The latter will be sent to the client (they won’t be displayed, but they will still be sent), whereas the former won’t.
Caution
Be sure not to mix comment styles, using two hyphens on one end of the comment and three on the other. Doing so could cause your code to not be executed as expected.
Tip
Commenting code is a useful debugging technique. When you are testing code and need to eliminate specific lines, you can comment them out temporarily by wrapping them within <!--- and ---> tags.