What You’ll Do
Insert and Update Images from Photoshop
Insert Images from Photoshop and Fireworks
Optimize Images Using Fireworks
Change Image Brightness and Contrast
Is it true that a picture is worth a thousand words? Is it also true that every time a writer begins talking about images they use that same timeworn phrase? Am I ever going to get to the point? To be honest, a picture can be worth much more than a thousand words; in fact, a well-placed image can articulate more than words can ever convey. For example, ever try to verbally describe a sunset? Go ahead, I’ll wait; give it a try.
Communication comes in three forms: Visual, Vocal, and Verbal, and on a Web page the right visual image can be very powerful. On the other hand, placing images on a Web page can produce the opposite effect. I call it the why-did-they-use-that-image syndrome.
Good designers don’t use images just because they can, but because they are needed to convey a specific message. Images should be used to drive your message home; they should blend seamlessly with the Web page, and the text on the pages. Don’t use images because you can, use them because you need them to convey your message.
Dreamweaver makes the insertion of images a snap; in fact, it’s as simple as a drag and a drop. In turn, Dreamweaver creates the compliant HTML tags within the document to make the image display correctly on a variety of browsers. Once the images have been inserted, Dreamweaver’s graphical user interface allows you to modify the images in terms of size and position. You can even set up external editing applications, such as Adobe Photoshop and Fireworks, to revise the images on the fly.
In addition to adding simple images to a Web page, you can use graphics for navigational aids, rollover buttons, and even image maps.
The Internet did not always support the use of graphics. As a matter of fact, its original use was for sharing of textual data among scientists and the U.S. Military. That was yesterday... Today, the Internet supports static graphics, animations, video, and audio, along with all that textual data.
Preparing images for the Internet involves knowing what file formats are best to use for the Internet. Web friendly formats are designed to help the image appear good, load as quickly as possible, be compatible with all the major browsers on the market, and work seamlessly on any operating system (Macintosh, Windows, etc).
The formats that meet those requirements are then submitted to the World Wide Web Consortium, the international organization that controls and organizes the Internet. If they put their blessing on the format, it becomes a Web standard, and then all the browser manufacturers scramble to make their browsers compatible with that format. Eventually, the new browsers find their way into the marketplace, and designers begin using the formats in their Web pages.
The three major file formats that are considered the standard for static images are: GIF, JPEG, and PNG.
Depending on the type of image, and how you’re using it, each one of these formats has their advantages and disadvantages.
Short for Graphics Interchange Format, the GIF format (pronounced, jiff) is a unique Web compression technique that supports 8-bit images with a maximum of 256 colors. GIF is for images with distinct colors, such as line drawings, black and white images and small text groups that are only a few pixels high. With an animation editor, such as Adobe Fireworks, GIF images can be put together for animated images. GIF also supports transparency, where a color or colors can be set to transparent in order to let the color on the underlying Web page to show through. The compression algorithm used in the GIF format is called RLE (Run Length Encoding). This compression algorithm works best with solid colors, like you would encounter in clipart, or text; and since most clipart does not include many colors, the 256 maximum color restriction works just fine.
The GIF format is also considered lossless. In other words, images saved in the GIF format will be compressed without the removal of any color information. Therefore, when they’re displayed on the visitor’s browser, the image will be exactly what you saved, in terms of quality.
Short for Joint Photographic Experts Group, the JPEG (pronounced j-peg) is a Web format designed primarily for the compression and display of photographs. JPEGs allow for 24-bit images using millions of colors. To make JPEGs usable, the large amount of color information must be compressed, which is accomplished by removing what the compression algorithm considers unneeded information. JPEG compression is “lossy,” meaning that the compression scheme sacrifices some image quality, in exchange for a reduction in the file’s size. JPEG files can range from small amounts of lossless compression to large amounts of lossy compression. This is a common standard on the Web, but the data loss generated in its compression makes it undesirable for printing purposes. JPEG images do not support any level of transparency, and will fill transparent areas of the image with a user-defined matte color.
Once an image has been compressed using the JPEG format and saved, the color information that was removed can never be recovered. Therefore, it’s best when editing an image to save a copy as the JPEG, so as to retain the original image information.
Short for Portable Network Graphic, (pronounced ping) the PNG format was designed to be a patent-free successor to the GIF format. Though not designed specifically for the Web, PNG offers particular benefits in this environment such as improved image compression (10 to 30 percent smaller than the GIF format), two dimensional interlacing, storage of text with the image making it possible for search engines to gather information and offer subject searching for images in a standard way. In addition, the PNG format is used for lossless compression and displaying images on the web.
The PNG format comes in two sizes, the PNG-8 (used in place of the GIF format), and the PNG-24 (used in place of the JPEG format).
The advantages of PNG are that it supports images with millions of colors and produces background transparency without jagged edges. The disadvantages are that PNG images will not show up on older browsers (pre 4.0), and when using the full PNG-24 format with transparency, they can be comparatively larger in file size than JPEG images.
One other interesting feature of the PNG format is its ability to adjust the gamma of an image across operating systems. Typically, an image will display differently on a Mac or Windows monitor. The PNG format adjusts the image so that it appears the same... regardless of operating system.
Adobe Fireworks and Adobe Flash use the PNG as their native format, so that means all the power of the format, including transparency, and opacity settings are fully supported.
It’s important to set up a folder within your site folder that holds all of the images for a specific Web project. Creating this folder can be accomplished when you set up the site, or it can be made later. There are several advantages to setting up an image folder: it helps Dreamweaver in the organization of your site, and helps you locate images when you need to work on them. Since we’re about to start adding images to our site, it’s a good idea to stop and define this folder. Once the folder is created, you should copy all of your Web images into this folder. In addition, when you attempt to add an image to a Web page that is outside the site folder, Dreamweaver prompts you to copy the file to your site, and when you do, it adds the new images into the defined folder. All things considered, creating an image folder is a smart, efficient thing to do.
![]() Open your site folder, and create a new folder.
Open your site folder, and create a new folder.
In this example, we’ll use the obvious and call the new folder, Images.
![]() Click the Site menu, and then click Manage Sites.
Click the Site menu, and then click Manage Sites.
![]() Select your site from the available options.
Select your site from the available options.
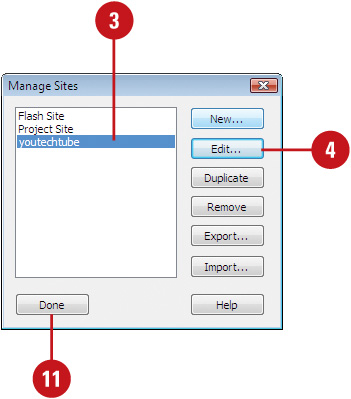
![]() Click Edit.
Click Edit.
![]() Click the Advanced tab.
Click the Advanced tab.
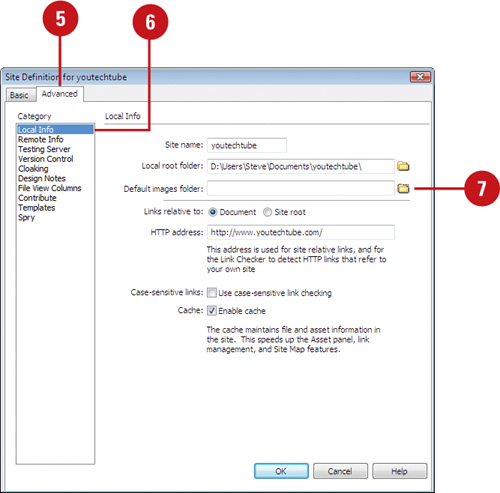
![]() Click the Local Info category.
Click the Local Info category.
![]() Select the folder icon located to the right of the Default Images Folder Input box.
Select the folder icon located to the right of the Default Images Folder Input box.
![]() Navigate to the Local root folder, and then select the Images folder you want to use.
Navigate to the Local root folder, and then select the Images folder you want to use.
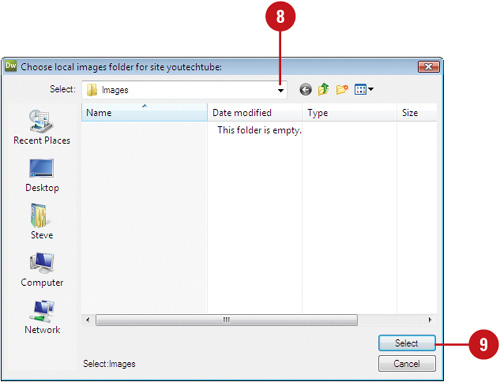
![]() Click Select (Win) or Choose (Mac) to record the folder’s location, and exit the Search dialog box.
Click Select (Win) or Choose (Mac) to record the folder’s location, and exit the Search dialog box.
![]() Click OK to close the Site Definition dialog box.
Click OK to close the Site Definition dialog box.
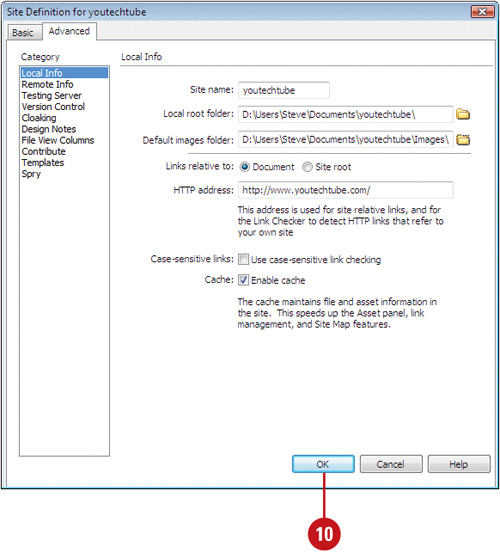
![]() Click Done to save your changes.
Click Done to save your changes.

DW 7.2
The three basic elements of any static Web page are text, images, and links. Adding a static image to a Web page can be as simple as a drag and a drop. By the way, the term “static” simply refers to any non-moving Web image. A static image is not video; it does not dance, move, or sing... it just sits there. You can also add dynamic images, which are images that change. For example, an advertising banner cycles through different images. Images can be added directly to a Web page or they can be added within a section of text: called an inline image. Dreamweaver gives you several ways to add images to your Web pages. The method you choose to add images depends on how you like to work with Dreamweaver. Any time you add an image to a Web page, Dreamweaver (by default) asks you to type in a description, and alternate text. This information is used by screen reader applications (i.e. JAWS) for visually impaired users; therefore it’s important that this information is added to the image.
![]() Open the Web page you want to insert an image.
Open the Web page you want to insert an image.
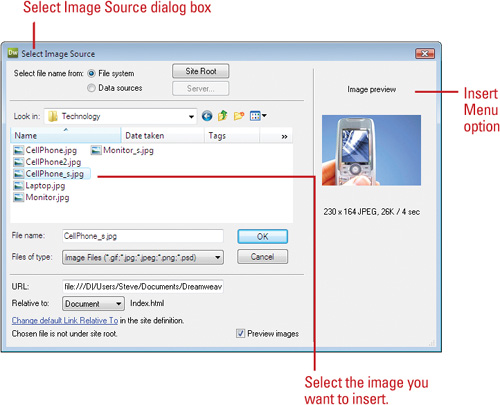
![]() Click to place the insertion point where you want to place the image.
Click to place the insertion point where you want to place the image.
![]() Using one of the following methods to insert an image:
Using one of the following methods to insert an image:
• Assets Panel. Open the Assets panel, select the image you want to add to the page, and then drag the thumbnail, or filename of the image into the Web page.
• Folder. Open a folder on your desktop that contains Web friendly images, and then click and drag from the folder directly into the Web page.
• Insert Panel. Click the Common tab on the Insert panel, click the Image button arrow, click Image, select the image from the available options, and then click OK.
• Insert Menu. Click the Image menu, click Image, select the image from the available options, and then click OK.
![]() If the image you selected is not contained within the site folder, click Yes to the alert asking for permission to make a copy of the image, and place it within the site folder, and then click Save in the Copy File As dialog box.
If the image you selected is not contained within the site folder, click Yes to the alert asking for permission to make a copy of the image, and place it within the site folder, and then click Save in the Copy File As dialog box.
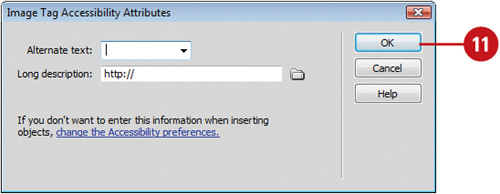
The Image Tag Accessibility Attributes dialog box opens.
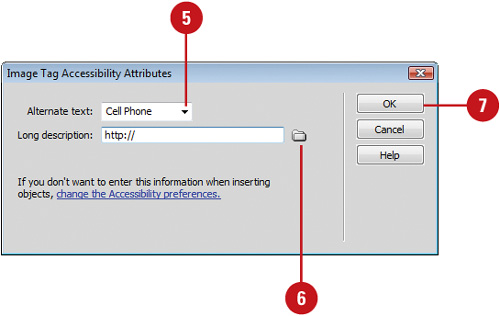
![]() Click in the Alternate Text Input field and type a very short description for the image.
Click in the Alternate Text Input field and type a very short description for the image.
For example, if the image is of a cell phone, you might enter the words, Image of a cell phone, or just, cell phone.
Note
If you prefer to leave this field blank, click the arrow to the right of the input box, and select the empty option.
![]() Click the file folder icon, located to the right of the Long Description input box, and then select the file that contains a longer description of the image.
Click the file folder icon, located to the right of the Long Description input box, and then select the file that contains a longer description of the image.
Note
The Long Description option is a plain text document, which contains a longer description of the image. For example, if the image is of a sunset, you could describe the place and time the image was captured. Remember, the alternate text and long description are primarily used by the visually impaired. This file should be created in a text processor, saved as plain text, and placed inside the site folder.
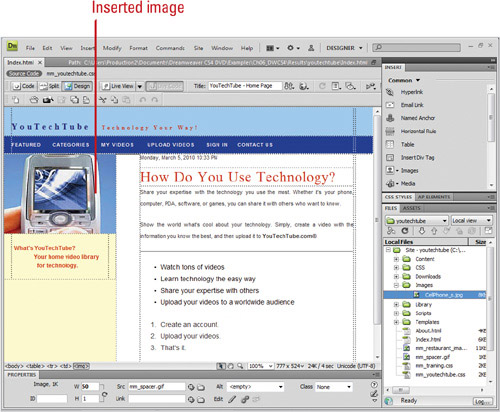
![]() Click OK to add the image to the Web page.
Click OK to add the image to the Web page.

DW 7.2
After you create or modify images in Adobe Photoshop in the PSD format, you can quickly copy and paste all or part of a multi-layered or multi-sliced image or insert the entire PSD file directly into Dreamweaver. Dreamweaver handles the integration and optimizes them as Web-ready images in the selected format (GIF, JPEG, or PNG formats). Before you insert a PSD (or any other image) into a Web page, you should store the file along with the site files, so the link (relative path) to the file is always available and the file gets published when the time comes. When you insert the entire PSD file, Dreamweaver creates a Smart Object (New!) that maintains a live connection with Photoshop. This live connection allows you to up date changes from the original image with the click of a button in Dreamweaver. When you copy and paste, a live connection is not maintained. Any changes to the original need to be manually updated again. However, Dreamweaver does remember your optimization setting when you re-paste it or use the Edit button in the Properties panel.
![]() Open a Web page you want to insert an image.
Open a Web page you want to insert an image.
![]() Click within the document where you want the image inserted.
Click within the document where you want the image inserted.
![]() Click the Insert menu, and then click Image.
Click the Insert menu, and then click Image.
• You can also drag the PSD file from the Files panel (if available) to the Web page.
![]() Navigate to and select the PSD image you want, and then click OK (Win) or Open (Mac).
Navigate to and select the PSD image you want, and then click OK (Win) or Open (Mac).
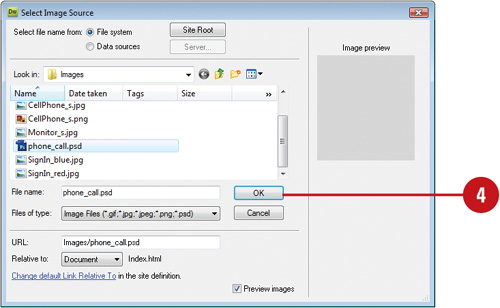
![]() Click the Options tab, and then specify the format, quality, and smoothing options you want.
Click the Options tab, and then specify the format, quality, and smoothing options you want.
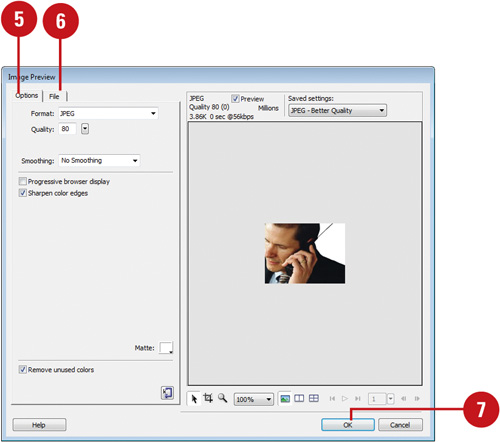
![]() Click the File tab, and then specify the scale options you want.
Click the File tab, and then specify the scale options you want.
![]() Click OK.
Click OK.
![]() If prompted, locate the Images folder on your local root site, and save the image, and then specify Input Accessibility options.
If prompted, locate the Images folder on your local root site, and save the image, and then specify Input Accessibility options.
![]() Open the image you want to copy in Photoshop (PSD format).
Open the image you want to copy in Photoshop (PSD format).
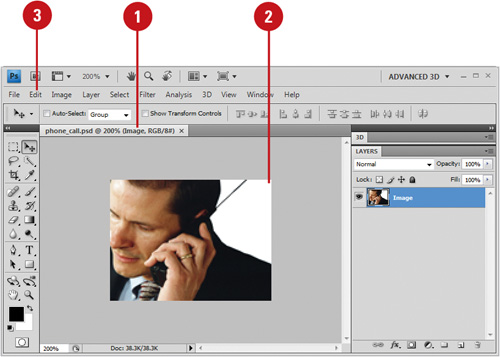
![]() Select the image, layer, or slice.
Select the image, layer, or slice.
![]() Click the Edit menu, and then click Copy.
Click the Edit menu, and then click Copy.
![]() Exit Photoshop.
Exit Photoshop.
![]() Open a Web page in Dreamweaver that you want to insert an image.
Open a Web page in Dreamweaver that you want to insert an image.
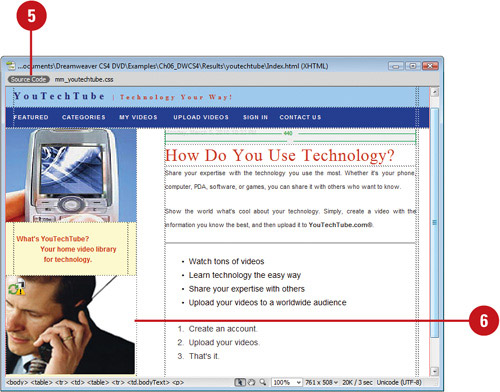
![]() Click within the document where you want the image inserted.
Click within the document where you want the image inserted.
![]() Click the Edit menu, and then click Paste.
Click the Edit menu, and then click Paste.
The Image Preview dialog box opens.
![]() Click the Options tab, and then specify the format, quality, and smoothing options you want.
Click the Options tab, and then specify the format, quality, and smoothing options you want.
![]() Click the File tab, and then specify the scale options you want.
Click the File tab, and then specify the scale options you want.
![]() Click OK.
Click OK.
![]() If prompted, locate the Images folder on your local root site, save the image, and then specify Input Accessibility options.
If prompted, locate the Images folder on your local root site, save the image, and then specify Input Accessibility options.
![]() To edit the pasted image, select it, and then click the Edit button in the Properties panel.
To edit the pasted image, select it, and then click the Edit button in the Properties panel.
Did You Know?
You can change Image Preview optimization settings. If you want to change optimization settings after you insert an image, you can use the Edit Image Settings button in the Properties panel to open the Image Preview dialog and make the changes you want.
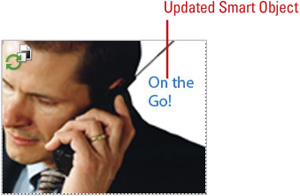
After you insert a Photoshop (PSD) file into a Web page, Dreamweaver creates a Smart Object (New!) that maintains a live connection with the original file in Photoshop. This live connection allows you to up date changes from the original image with the click of a button in Dreamweaver. Any changes you make in Dreamweaver to the Smart Object do not affect the original Photoshop file. When you create a Smart Object from Photoshop, Dreamweaver displays an icon in the upper-left corner of the image. When the object in Dreamweaver and the original file in Photoshop are the same, both of the arrows in the icon are green. When the original file in Photoshop is different than the Smart Object in Dreamweaver, one of the arrows in the icon changes to red, which indicates you need to update it.
![]() Open a Web page in Dreamweaver that contains text.
Open a Web page in Dreamweaver that contains text.
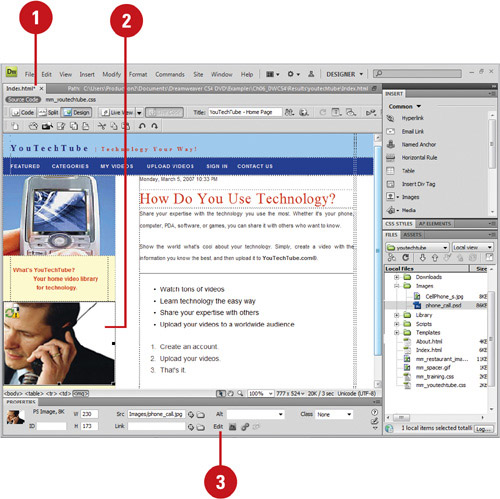
![]() Select the Smart Object image derived from a Photoshop PSD file.
Select the Smart Object image derived from a Photoshop PSD file.
![]() Click Edit Image in the Properties panel.
Click Edit Image in the Properties panel.
Dreamweaver opens the source file in Photoshop.
![]() Make the changes you want, save the file, and then exit Photoshop.
Make the changes you want, save the file, and then exit Photoshop.
Note
If you’re getting a PSD file from another person and don’t have Photoshop installed on your computer, you can still make the update from Dreamweaver.
![]() Select the Smart Object.
Select the Smart Object.
A red icon appears in the upper-left corner of the Smart Object.
![]() Click the Update from Original button in the Document window.
Click the Update from Original button in the Document window.
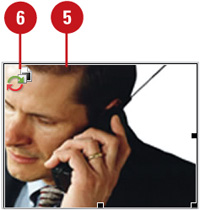

The red icon turns to green, indicating the Photoshop file and the Smart Object are the same.
![]() In Photoshop, open the linked images (PSD) that you want to update in Dreamweaver, make changes to the files, save them, and then exit Photoshop.
In Photoshop, open the linked images (PSD) that you want to update in Dreamweaver, make changes to the files, save them, and then exit Photoshop.

![]() Open a Web page in Dreamweaver that you want to insert an image.
Open a Web page in Dreamweaver that you want to insert an image.
![]() Open the Files panel, and then click the Assets tab to view the site assets.
Open the Files panel, and then click the Assets tab to view the site assets.
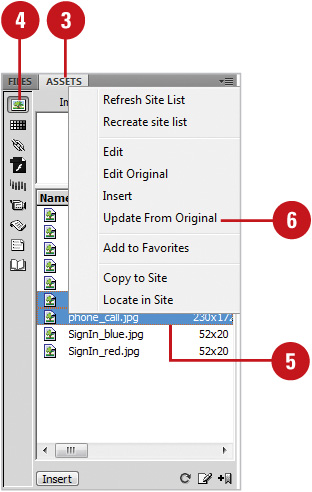
![]() Click the Images button to display Images view.
Click the Images button to display Images view.
![]() Select the image assets in the Assets panel that you want to update. You can use Control-click to select multiple filenames.
Select the image assets in the Assets panel that you want to update. You can use Control-click to select multiple filenames.
The Smart Objects display an icon in the upper left corner.
![]() Right-click (Win) or option-click (Mac) one of the selected filenames, and then click Update from Original.
Right-click (Win) or option-click (Mac) one of the selected filenames, and then click Update from Original.
Did You Know?
You can reset the size of a Smart Object. Drag a resize handle, and then click Update from Original button in the Properties panel.
You can reset the size of a Smart Object to the original PSD. If change the size of the original PSD file, Dreamweaver doesn’t recognize the size change with the update icon. To resize the Smart Object to match the original PSD file, right-click (Win) or option-click (Mac) the Smart Object, and then click Reset Size To Original.

DW 7.2
After you create or modify images in Adobe Fireworks in the PNG format, you can quickly copy and paste or insert them directly into Dreamweaver. Dreamweaver handles the integration and optimizes them as Web-ready images in the selected format (GIF, JPEG, or PNG formats). You can also paste images into a Web page. After you insert images into a Web page, you can edit the source image in Fireworks and update the image in Dreamweaver.
![]() Open the image you want to copy in Fireworks (PNG format).
Open the image you want to copy in Fireworks (PNG format).
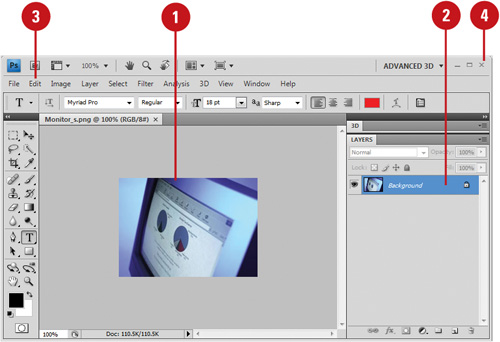
![]() Select the image, layer, or slice.
Select the image, layer, or slice.
![]() Click the Edit menu, and then click Copy.
Click the Edit menu, and then click Copy.
![]() Exit Fireworks.
Exit Fireworks.
![]() Open a Web page in Dreamweaver that you want to insert an image.
Open a Web page in Dreamweaver that you want to insert an image.
![]() Click within the document where you want the image inserted.
Click within the document where you want the image inserted.
![]() Click the Edit menu, and then click Paste.
Click the Edit menu, and then click Paste.
The Image Preview dialog box opens.
![]() Click the Options tab, and then specify the format, quality, and smoothing options you want.
Click the Options tab, and then specify the format, quality, and smoothing options you want.
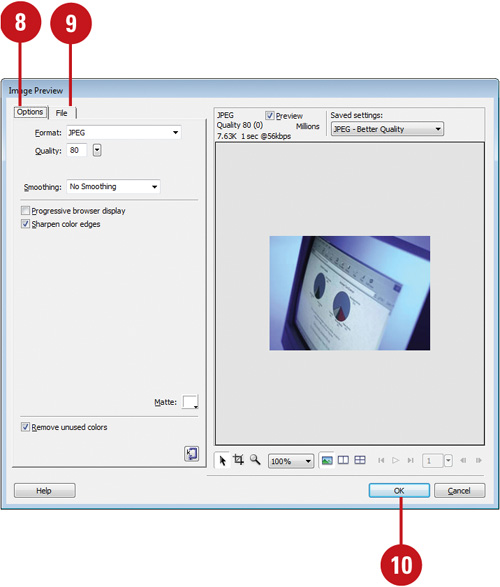
![]() Click the File tab, and then specify the scale options you want.
Click the File tab, and then specify the scale options you want.
![]() Click OK.
Click OK.
![]() If prompted, locate the Images folder on your local root site, and save the image, and then specify Input Accessibility options.
If prompted, locate the Images folder on your local root site, and save the image, and then specify Input Accessibility options.
The image is inserted into the document with the specified format and settings.
![]() Open a Web page you want to insert an image.
Open a Web page you want to insert an image.
![]() Click within the document where you want the image inserted.
Click within the document where you want the image inserted.
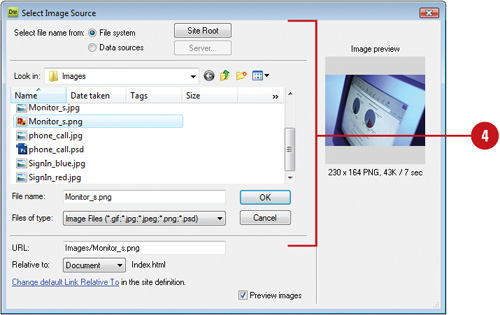
![]() Click the Insert menu, and then click Image.
Click the Insert menu, and then click Image.
![]() Navigate to and select the image you want (.PNG), and then click OK (Win) or Open (Mac).
Navigate to and select the image you want (.PNG), and then click OK (Win) or Open (Mac).
![]() Click the Options tab, and then specify the format, quality, and smoothing options you want.
Click the Options tab, and then specify the format, quality, and smoothing options you want.
![]() Click the File tab, and then specify the scale options you want.
Click the File tab, and then specify the scale options you want.
![]() Click OK.
Click OK.
![]() If prompted, locate the Images folder on your local root site, and save the image, and then specify Input Accessibility options.
If prompted, locate the Images folder on your local root site, and save the image, and then specify Input Accessibility options.
![]() Open a Web page in Dreamweaver that contains text.
Open a Web page in Dreamweaver that contains text.
![]() Select the image derived from a Fireworks PNG file.
Select the image derived from a Fireworks PNG file.
![]() Click Edit Image in the Properties panel.
Click Edit Image in the Properties panel.

Dreamweaver opens the source file in Fireworks.
![]() Make the changes you want, and then save the file.
Make the changes you want, and then save the file.
![]() Select all or part of the image, copy it to the Clipboard, and then exit Fireworks.
Select all or part of the image, copy it to the Clipboard, and then exit Fireworks.
The image is optimized and updated.
If you have Adobe Fireworks installed on your computer, you can use the program to optimize an image in a Web page from within Dreamweaver. When you select an image, you can use the Optimize In Fireworks button in the Properties panel or the Fireworks command on the Image submenu on the Modify menu.
![]() Open a Web page with the image you want to optimize.
Open a Web page with the image you want to optimize.
![]() Select the image you want.
Select the image you want.
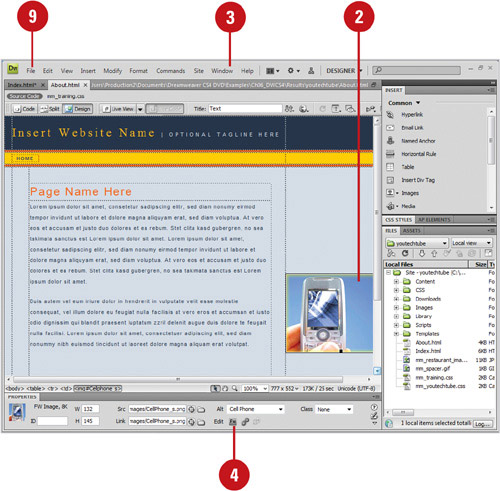
![]() Click the Window menu, and then click Properties to display the Properties panel.
Click the Window menu, and then click Properties to display the Properties panel.
![]() Click the Optimize In Fireworks button in the Properties panel, or click the Modify menu, point to Image, and then click Fireworks.
Click the Optimize In Fireworks button in the Properties panel, or click the Modify menu, point to Image, and then click Fireworks.
![]() Confirm whether to optimize as a PNG file or use the open image file.
Confirm whether to optimize as a PNG file or use the open image file.
![]() Edit the image file.
Edit the image file.

![]() Click Done.
Click Done.
![]() Click Update.
Click Update.
![]() Click the File menu, and then click Save.
Click the File menu, and then click Save.
Loading graphics onto a Web page has a good and a bad side. The good side is that images spice up an otherwise dull and drab Web site. The bad side is that images take up file space and increase download times. It’s a catch-22 situation; your visitors expect lots of graphics and cool stuff and, at the same time, expect the page to load fast. The current rule on the Internet is called the 8-second rule (it used to be the 10-second rule). In other words if your page doesn’t load within 8 seconds, many of your visitors will go elsewhere. One way to make a page load quicker is to specify low source images for your graphics. Low source images are copies of the original image, but severely compressed. For example, you have an image on your Web site of the Colorado Rocky Mountains and it’s 150 k. You really want to use the image; however, you know on the average browser it takes 20 seconds to download the image. So, you open a copy of the photograph in an image-editing application like Adobe Photoshop or Fireworks, and you compress the copy to the max, and you save it. In Dreamweaver, you use the image for the low-source. When the page opens in the visitor’s browser, the low source image quickly loads first, and then after the page opens, the higher-quality image loads over the other image.
![]() Open the Web page that contains the image you want to apply the low source.
Open the Web page that contains the image you want to apply the low source.
![]() Select the image.
Select the image.
![]() Click the Window menu, and then click Properties to display the Properties panel.
Click the Window menu, and then click Properties to display the Properties panel.
![]() Click in the Original box, and use one of the following options:
Click in the Original box, and use one of the following options:
• Enter the name and path of the low source image.
• Click the Browse For File button, and locate the file in the Select Image Source dialog box.
• Click the Point To File button, and drag over to the Assets panel. Release the mouse when you’re hovering over the low source image file name.


DW 4.4
Once an image is placed into a Web page, Dreamweaver gives you the ability to modify the document in two ways: temporary and permanent. For example, you can adjust the size of the image temporarily by adjusting the width and height statements in the Properties panel or by directly accessing the <img> tab. You can even select the image, and click and drag the image at a selection handle to change its relative size. Unfortunately, while the size of the file on the page might change, an image saved on the hard drive does not. This causes problems with the download of the image to the visitor’s site, as well as displaying the image within the visitor’s browser. The best way to modify an image is to plan out what you need ahead of time, and then place the image into the Web page. That’s a nice plan; however, many times, designs change during the course of the creation process, and what worked for an image yesterday might not work today. With that in mind, Dream-weaver gives you the ability to modify the image whenever necessary. After you resize an image, you can reset the size or resample it to add and subtract pixels to match the appearance of the resized image.
![]() Open a Web page, and then select the image you want to modify.
Open a Web page, and then select the image you want to modify.
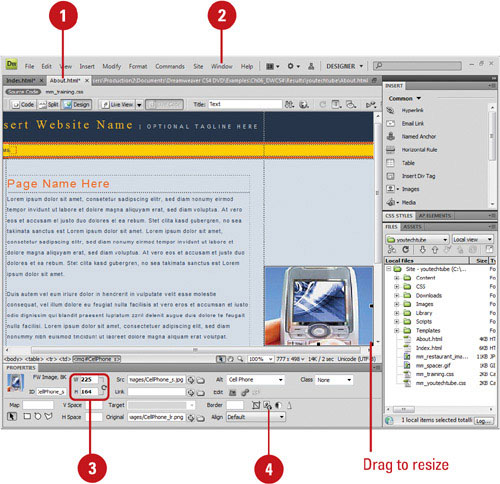
![]() Click the Window menu, and then click Properties to display the Properties panel.
Click the Window menu, and then click Properties to display the Properties panel.
![]() Use any of the following resize methods:
Use any of the following resize methods:
• Width or Height. Drag a selection handle.
• Proportions. Shift-drag a corner selection handle.
• Specific Size. Click in the W and H boxes to change the size of the image width and height (in pixels).
![]() To resample a resized image, click the Resample button in the Properties panel.
To resample a resized image, click the Resample button in the Properties panel.
![]() To return a resize image to its original size, click the Reset Size button in the Properties panel or delete the values in the W and H boxes in the Properties panel.
To return a resize image to its original size, click the Reset Size button in the Properties panel or delete the values in the W and H boxes in the Properties panel.
![]() Open a Web page, and then select the image you want to modify.
Open a Web page, and then select the image you want to modify.
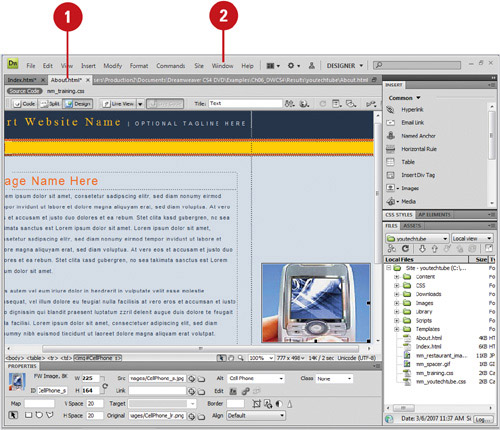
![]() Click the Window menu, and then click Properties to display the Properties panel.
Click the Window menu, and then click Properties to display the Properties panel.
![]() Click in the Border box to add a border to the active image, as measured in pixels.
Click in the Border box to add a border to the active image, as measured in pixels.

![]() Click in the V Space, and H Space boxes to offset your images by adding vertical or horizontal white space (in pixels).
Click in the V Space, and H Space boxes to offset your images by adding vertical or horizontal white space (in pixels).
![]() Click in the Image Name box to give the image a specific name. This is useful when calling the image using JavaScript.
Click in the Image Name box to give the image a specific name. This is useful when calling the image using JavaScript.
![]() Click in the Alt box to give the image the alternate text used by reader applications for the visually impaired.
Click in the Alt box to give the image the alternate text used by reader applications for the visually impaired.
Note
In some browsers the Alt text is displayed in the empty box defined by the browser as the image loads.
Did You Know?
You can edit image accessibility options. Edit the appropriate image attributes in Code view, edit the Alt box in the Properties panel, or right-click (Win) or control-click (Mac), the image, and then click Edit Tag.
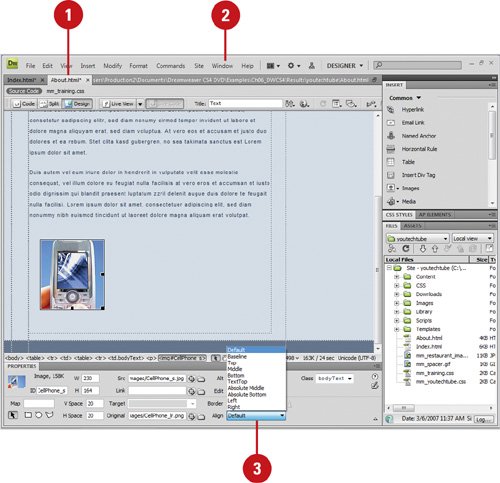
When you place an image into a Dreamweaver document, the default placement of the image is to the left and middle of the container area, which is a blank Web page, a table cell, or layer. Not only is alignment performed on images isolated within a container; they’re also aligned according to adjacent images, or text.
![]() Open a Web page, and then select the image you want to modify.
Open a Web page, and then select the image you want to modify.
![]() Click the Window menu, and then click Properties to display the Properties panel.
Click the Window menu, and then click Properties to display the Properties panel.
![]() Click the Align popup, and then select one of the following align options:
Click the Align popup, and then select one of the following align options:
• Browser Default. No alignment attribute is included in the <img> tag. Most browsers use the baseline as the alignment default.
• Baseline. The bottom of the image is aligned with the baseline of the surrounding text.
• Top. The top of the image is aligned with the top of the tallest object in the current line.
• Middle. The middle of the image is aligned with the baseline of the current line.
• Bottom. The bottom of the image is aligned with the baseline of the surrounding text.
• Text Top. The top of the image is aligned with the tallest letter or object in the current line.
• Absolute Middle. The middle of the image is aligned with the middle of the tallest text or object in the current line.
• Absolute Bottom. The bottom of the image is aligned with the descenders (as in y, g, p, and so forth) that fall below the current baseline.
• Left. The image is aligned to the left edge of the browser or table cell, and all text in the current line flows around the right side of the image.
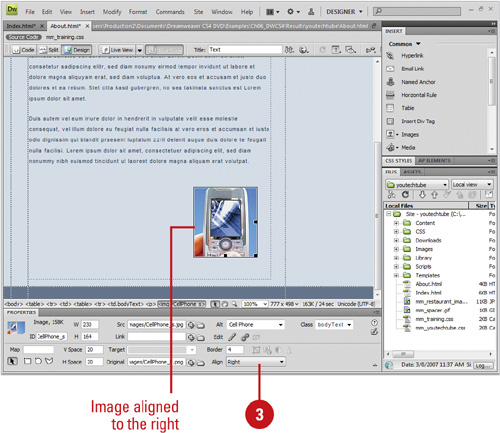
• Right. The image is aligned to the right edge of the browser or table cell, and all text in the current line flows around the left side of the image.
When you place an image into a Dreamweaver document, there’s a good chance that the image was first processed in another application. For example, you might use Adobe Fireworks or Photoshop to prep photographs. If you planned out the Web project, you’ll be able to drop that image into the Web page, and it will fit like the proverbial glove. Unfortunately, you might not be the one creating the images; or it’s possible that you need to make a change. While it’s always desirable to edit an image in the originating application, Dreamweaver gives you the ability to make minor changes to the image. For example, you can use Dreamweaver’s new optimize feature (Hint: If you’ve ever used Photoshop’s and Illustrator’s Save For Web feature, you’re halfway there). In addition, you can resize the image to fit a specific width and height. When you edit an image in Dreamweaver, you’re actually making permanent changes to the original, and Dreamweaver lets you know as you work.
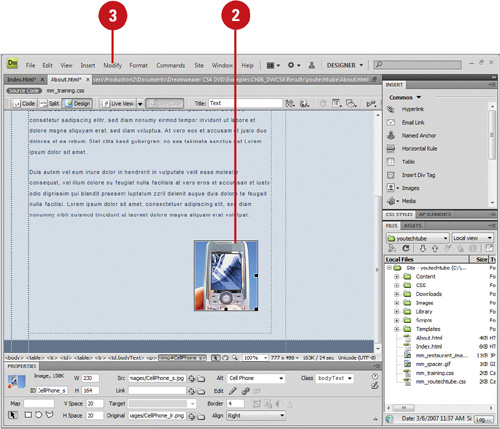
![]() Click the Modify menu, point to Image, and then click Optimize.
Click the Modify menu, point to Image, and then click Optimize.
![]() Click the Options tab to utilize the following options:
Click the Options tab to utilize the following options:
• Format. Click the Format popup, and then select a format from the available options.
• Palette. Click the Palette popup, and then select a color palette from the available options.
• Loss. Set to zero by default (not applicable PNG-8 images).
• Dither. Select the Dither check box, and then set the dither percentage you want from zero to 100 percent. The dither option helps to visually approximate colors that are not in the original image.
• Color Value. Enter a value that represents the maximum number of colors in the image (2-256), and then adjust the colors (optional) in the color box.
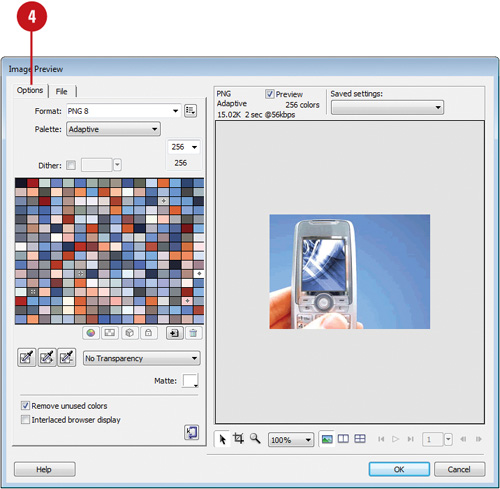
• Transparency. Click the Transparency popup, and then click No Transparency, Index Transparency (based on available colors), or Alpha Transparency (based on an alpha mask).
• Eyedropper. Click the Select Transparent Color button, and then click in the Index Color box to choose the image colors to be made transparent. You can also use the other eyedropper buttons to add or remove a color from the transparency.
• Remove Unused Colors. Select the Remove Unused Colors check box to remove any unused colors from the color box.
• Interlaced Browser Display. Select the Interlaced Browser Display check box to display (load) images in the client browser at low resolution and then progressively increases to full resolution.
• Optimize To Size. Click the Optimize To Size button to specify the desired size of the image. In turn, Dreamweaver attempts to optimize the image to the selected size.
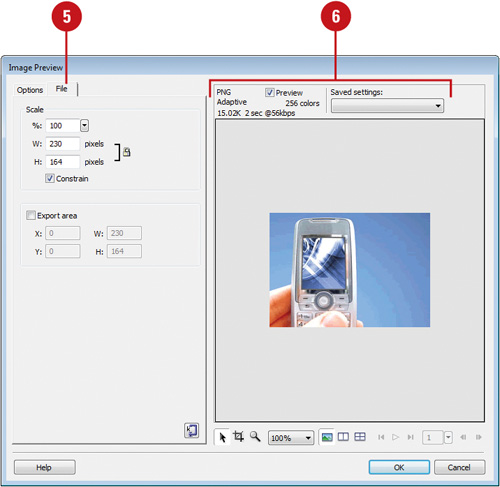
![]() Click the File tab to utilize the following options:
Click the File tab to utilize the following options:
• %. Enter a value from 2 to 200 percent, or drag the slider to change the size of the image, based on a percentage value.
• W and H. Enter a value (in pixels) to change the width and height of the image.
• Constrain. Select the Constrain check box to keep the width and height in proportion.
• Export Area. Select the Export Area check box to crop the image using x and y, or w (width) and h (height) values. Alternately, you can click on the image in the Preview window, and use the corner and side anchor points to the manually adjust the image.
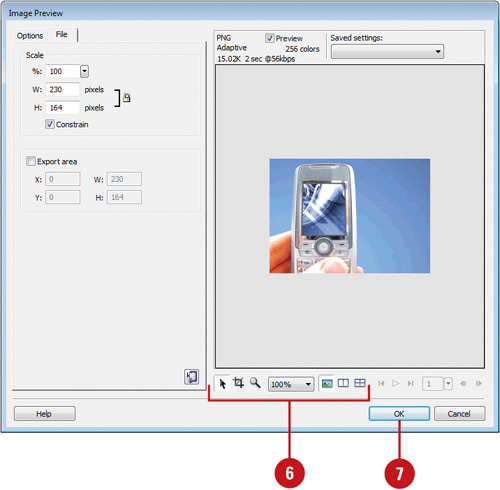
![]() Select from the following Preview options:
Select from the following Preview options:
• Preview. Select the Preview check box to toggle the preview of the image.
• Saved Settings. Click the Saved Settings popup, and then select from the preset optimization options.
• Select. Click the Pointer button to select and move a cropped image in the Preview window.
• Crop. Click the Export Area button to crop the active image. Use the Hand cursor to specify the area you want.
• Zoom. Click the Zoom in/out button, and then click the image to zoom the preview of the active image in (plus sign in magnifying glass) or press Alt (Win) or Option (Mac) and click the image to zoom the preview of the active image out (minus sign in magnifying glass), or click the Zoom popup, and then select a preset zoom value.
• Preview Display. Click a button to change the view to display 1, 2 or 4 images.
• Image display. Click a button to control the view of multiple images used in animations.
Note
When you click the Options tab and select a different format, you see new options based on the selected format. In this example, the options displayed reflected the modification of a GIF image.
![]() Click OK.
Click OK.
And if that were not all, you can change the brightness and contrast of the image, and increase its sharpness. Once you have inserted an image into a Web page, you can adapt them to meet your needs. Perhaps you don’t quite like the colors it uses. You can increase or decrease the brightness of the image, as well as the color contrast. The Brightness/Contrast adjustment changes an image by an overall lightening or darkening of the image pixels. While good for special effects, its linear way of changing an image’s brightness and contrast do not lend themselves to photo restoration.
![]() Open the Web page with the image you want to modify.
Open the Web page with the image you want to modify.
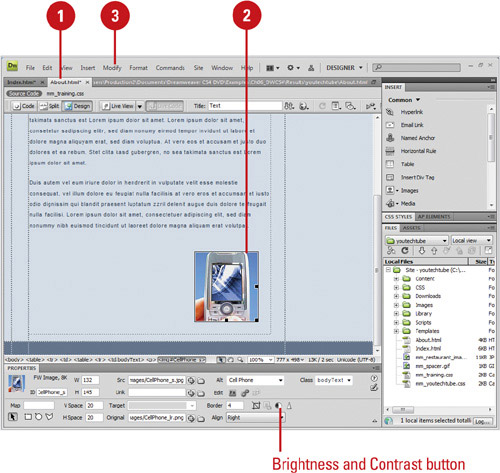
![]() Select the image you want to modify.
Select the image you want to modify.
![]() Click the Modify menu, point to Image, and then click Brightness/Contrast.
Click the Modify menu, point to Image, and then click Brightness/Contrast.
![]() Select from the following options:
Select from the following options:
• Brightness. Click and drag the slider to change the overall brightness of the selected image (-100 - 100).
• Contrast. Click and drag the slider to change the overall contrast of the selected image (-100 - 100).
• Preview. Select to toggle the preview of the image in the display window.
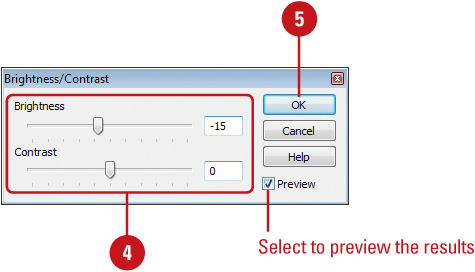
![]() Click OK.
Click OK.
If you have an image that looks a little fuzzy in spots, you can use the Sharpen command to create more image definition. Sharpening increases the contrast of pixels around the edges of objects in an image to increase the image’s definition or sharpness. If you don’t like the sharpening effect applied to an image, you can use the Undo command on the Edit menu before you save the image to revert the image back to the original.
![]() Open the Web page with the image you want to modify.
Open the Web page with the image you want to modify.
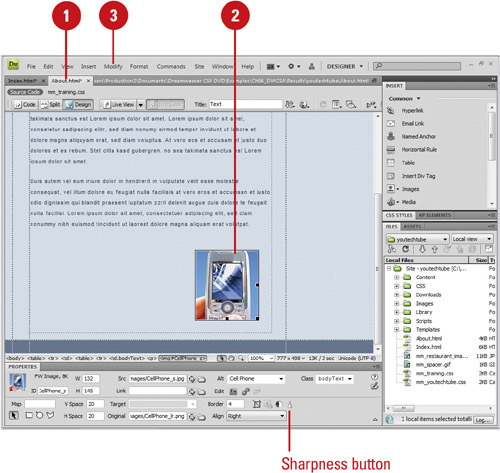
![]() Select the image you want to modify.
Select the image you want to modify.
![]() Click the Modify menu, point to Image, and then click Sharpness.
Click the Modify menu, point to Image, and then click Sharpness.
Note
An alert may appear warning you that the changes you are about to make are permanent. Click OK to continue.
![]() Select from the following options:
Select from the following options:
• Sharpness. Click and drag the slider to increase the sharpness of the active image (0-10).
• Preview. Select to toggle the preview of the image in the display window.
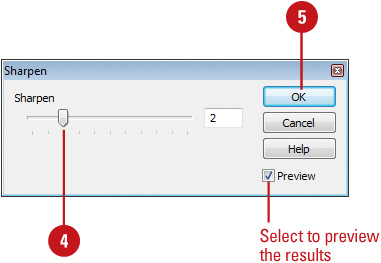
![]() Click OK.
Click OK.
Cropping is the process of framing a portion of a photo and eliminating any unnecessary visual elements. If, for example, you have a photo that is not centered properly, you can crop out the side to center it. You can use the Crop button in the Properties panel to drag a resize handle on a graphic to crop out part of the image. The graphic remains unchanged and you can uncrop it at any time.
![]() Open the Web page with the image you want to modify.
Open the Web page with the image you want to modify.
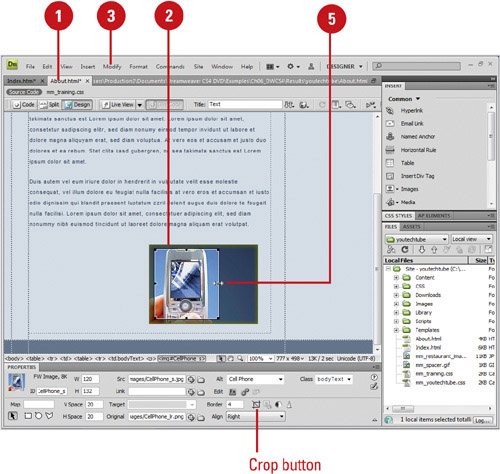
![]() Select the image you want to modify.
Select the image you want to modify.
![]() Click the Modify menu, point to Image, and then click Crop.
Click the Modify menu, point to Image, and then click Crop.
Note
An alert may appear warning you that the changes you are about to make are permanent. Click OK to continue.
![]() Crop the image by clicking and dragging any of the 4 corners, or 4 side control points.
Crop the image by clicking and dragging any of the 4 corners, or 4 side control points.
![]() Click in the middle of the image and drag to move the crop window.
Click in the middle of the image and drag to move the crop window.
![]() Double-click the image or press Enter (Win) or Return (Mac) to set the crop, or press the Esc (Escape) key to cancel.
Double-click the image or press Enter (Win) or Return (Mac) to set the crop, or press the Esc (Escape) key to cancel.
Note
Although the cropping function is permanent, you can always click the Edit menu, and then click Undo to return the image back to its original state.
Dreamweaver may give you some new and improved ways to edit an image; however, there’s no substitute for the real thing. The two most powerful image-editing applications for raster-based (resolution dependent) images are Adobe Photoshop and Fireworks. You might recall an application that came bundled with Photoshop called ImageReady... well, that application is no longer part of the Adobe family, being replaced by Fireworks. While Adobe would prefer that you use one of these two applications to edit your images, they know full well that there are other fish in the sea, so they not only give you the ability to edit images in Photoshop or Fireworks, they give you the ability to choose any application you want.
![]() Open the Web page with the image you want to edit.
Open the Web page with the image you want to edit.
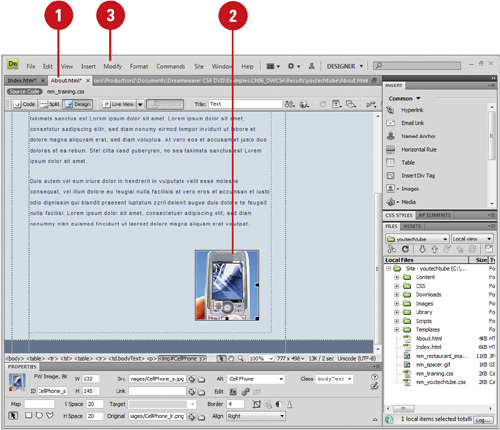
![]() Select the image you want to edit.
Select the image you want to edit.
![]() Click the Modify menu, point to Image, and then select one of the following options:
Click the Modify menu, point to Image, and then select one of the following options:
• Photoshop. Opens the selected image in Adobe Photoshop.
• Fireworks. Opens the selected image in Adobe Fireworks.
• Browse. Opens a Explorer (Win) or Finder (Mac) window and allows you to select the application to use.
![]() Make the changes to the image, based on the selected application.
Make the changes to the image, based on the selected application.
![]() Click the File menu, and then click Save.
Click the File menu, and then click Save.
![]() Click the Close button in the editing program and return to Dreamweaver.
Click the Close button in the editing program and return to Dreamweaver.
The changes are permanently applied to the image in Dreamweaver, which cannot be undone.
You can use the File Types/Editors section of the Preferences dialog box to choose the external image editor you want to use for specific file types. Setting specific external image editors for specific file types makes it quick and easy to edit images. All you need to do is double-click the image and the external image editor automatically opens. Any changes you make and save in an external image editor are displayed when you return to Dreamweaver. You can set different file types to open in different external editors, including Dreamweaver for script files. In addition, you can set Fireworks as your primary external editor for those extensions not specified.
![]() Click the Dreamweaver (Mac) or Edit (Win) menu, and then click Preferences.
Click the Dreamweaver (Mac) or Edit (Win) menu, and then click Preferences.
![]() Click the File Types / Editors category.
Click the File Types / Editors category.

![]() Select the file extension you want to set an external editor, or add new extensions.
Select the file extension you want to set an external editor, or add new extensions.
• Add Extension. Click the Add (+) button above the Extensions list, type an extension, and then press Enter (Win) or Return (Mac).
![]() Select from the following options:
Select from the following options:
• Remove Editor. Select an editor, and then click the Delete (-) button above the Editors list.
• Add Editor. Click the Add (+) button above the Editors list, select the editor you want, and then click Open.
![]() To make the editor the primary editor for the selected files, click Make Primary.
To make the editor the primary editor for the selected files, click Make Primary.
![]() Click OK.
Click OK.
![]() Click the Dreamweaver (Mac) or Edit (Win) menu, and then click Preferences.
Click the Dreamweaver (Mac) or Edit (Win) menu, and then click Preferences.
![]() Click the File Types / Editors category.
Click the File Types / Editors category.
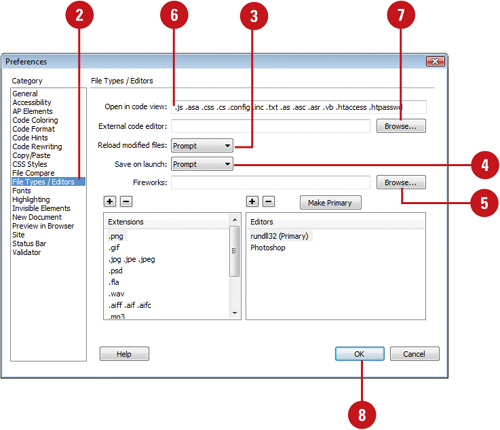
![]() Click the Reload Modified Files popup, and then select the option you want: Always, Never, or Prompt.
Click the Reload Modified Files popup, and then select the option you want: Always, Never, or Prompt.
![]() Click the Save On Launch popup, and then select the option you want: Always, Never, or Prompt.
Click the Save On Launch popup, and then select the option you want: Always, Never, or Prompt.
![]() To set the primary external editor for file types not specified, click Browse next to the Fireworks box, select the Fireworks program, and then click Open.
To set the primary external editor for file types not specified, click Browse next to the Fireworks box, select the Fireworks program, and then click Open.
![]() To open script related files in Code view in Dreamweaver, enter the file types (separated by a space) in the Open In Code View box.
To open script related files in Code view in Dreamweaver, enter the file types (separated by a space) in the Open In Code View box.
![]() To open script related files in an external editor, click Browse next to the External Code Editor box, select the program you want, and then click Open.
To open script related files in an external editor, click Browse next to the External Code Editor box, select the program you want, and then click Open.
![]() Click OK.
Click OK.
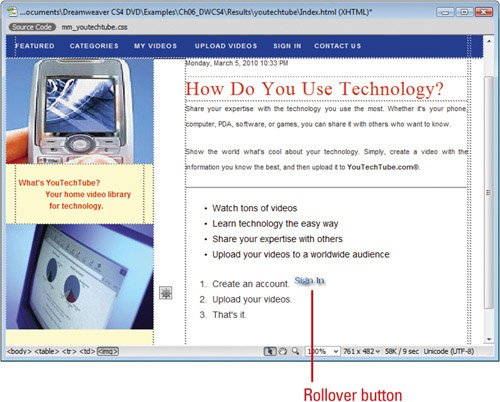
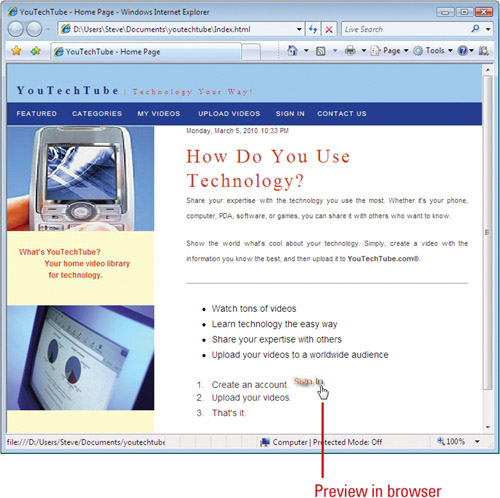
Dreamweaver makes the insertion and creation of rollover images a snap. A rollover is an image that—when viewed in a browser—changes when the pointer moves across or hovers over it. You need two separate images to create the rollover: a primary (the image that displays when the page first loads) and a secondary (the image that appears when the pointer moves over the primary). Both images in a rollover should be the same size; if the images are not the same size, Dreamweaver resizes the secondary image to match the width and height properties of the primary image. In reality, rollover images are set to respond to a onMouseOver event; although you can change what event triggers the action (for example, a mouse click). Rollover images are used extensively in the creation of user-friendly navigation buttons. For example, you have a button that returns the user to the site’s home page; when they roll over the image, it changes from a gray button with the word, HOME, in white, to a gray button with the word, HOME, in yellow.
![]() Open the Web page you want to insert a rollover image.
Open the Web page you want to insert a rollover image.
![]() Click to place the insertion point where you want to create a rollover image.
Click to place the insertion point where you want to create a rollover image.
![]() Click the Insert menu, point to Image Objects, and then click Rollover Image.
Click the Insert menu, point to Image Objects, and then click Rollover Image.
Timesaver
Click the Image button arrow on the Common tab on the Insert bar, and then click Rollover Image.
![]() Select from the following options:
Select from the following options:
• Image Name. The name of the rollover image. This is the image’s JavaScript call name.
• Original Image. The image you want to display when the page loads. Enter the path in the text box, or click Browse to select the image.
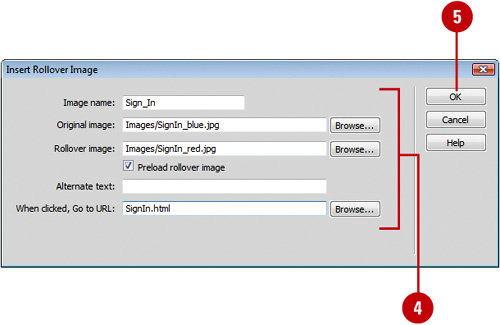
• Rollover Image. The image you want to display when the pointer rolls over the original image. Enter the path or click Browse to select the image.
• Preload Rollover Image. Select to preload the images in the browser’s cache so no delay occurs when the user rolls the pointer over the image (recommended).
• Alternate Text. Text to describe the image for viewers using a text-only browser, or for the visually impaired (optional).
• When Clicked Go to URL. The file that you want to open when a user clicks the rollover image. Enter the path or click Browse and select the file.
![]() Click OK to add the button to the active document.
Click OK to add the button to the active document.
Note
If you don’t set a link for the image, Dreamweaver inserts a null link (#) in the HTML source code to which the rollover behavior is attached. If you remove the null link, the rollover image will not work.
![]() To see the effect in a browser, click the File menu, point to Preview In Browser, and then select the browser you to use.
To see the effect in a browser, click the File menu, point to Preview In Browser, and then select the browser you to use.
Did You Know?
You can create buttons on the Web. Check out www.cooltext.com to create buttons with your own text. The buttons are free and you can download them in the .JPG format.
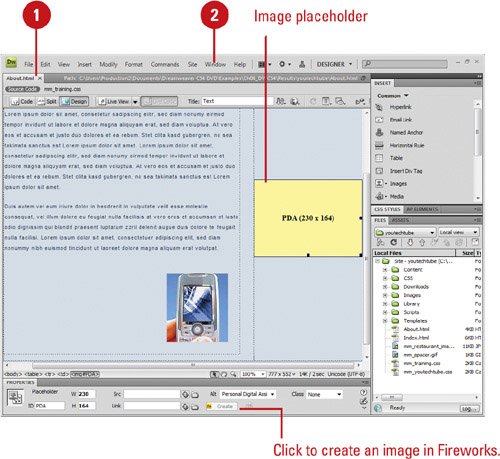
If you know you want to insert an image in a specific location, but the image is not created or ready yet, you can insert an image placeholder in its place. You can set the placeholder’s size and color, and even add a text label to it. When you insert an image placeholder, the placeholder box appears, displaying the color, size, and label you selected. After you insert an image placeholder, you can use the Properties panel to change specific image related properties, such as name, width, height, alternative text description, alignment, and color. When you’re ready to replace the image placeholder with an actual image, you can double-click the placeholder or use the Src box in the Properties panel to select the image.
![]() Open the Web page you want to insert an image placeholder.
Open the Web page you want to insert an image placeholder.
![]() Click to place the insertion point where you want to place the image.
Click to place the insertion point where you want to place the image.
![]() Click the Insert menu, point to Image Objects, and then click Image Placeholder.
Click the Insert menu, point to Image Objects, and then click Image Placeholder.
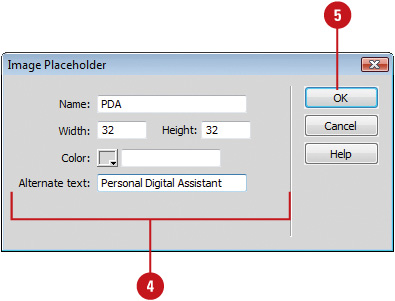
The Image Placeholder dialog box opens.
![]() Specify the image placeholder options you want:
Specify the image placeholder options you want:
• Name. Enter the text you want to appear as a label (optional). Leave blank if you don’t want a label.
• Width and Height. Enter the width and height (in pixels) to set the image size.
• Color. Click the Color box to select a color, or enter the hexadecimal value for the color.
• Alternate Text. Enter text to describe the image for viewers using a text-only browser or for the visually impaired who use speech synthesizers (optional).
![]() Click OK.
Click OK.
![]() Open a Web page, and then select the image you want to modify.
Open a Web page, and then select the image you want to modify.
![]() Click the Window menu, and then click Properties to display the Properties panel.
Click the Window menu, and then click Properties to display the Properties panel.
![]() Specify the image placeholder related options you want:
Specify the image placeholder related options you want:
• Name. Enter the text you want to appear as a label (optional). Leave blank if you don’t want a label.
• W and H. Enter the width and height (in pixels) to set the image size.
• Src. Specify the source file for the image. Drag the Point To File button to a file in the Files panel or click the Browse For Files button to select a file.
• Link. Specify a hyperlink for the image placeholder. Drag the Point To File button to a file in the Files panel or click the Browse For Files button to select a file.
• Color. Click the Color box to select a color, or enter the hexadecimal value for the color.
• Alt. Enter text to describe the image for viewers using a text-only browser or for the visually impaired who use speech synthesizers (optional).
• Create. Click the Create button to start Fireworks to create a replacement image. The button is disabled if Fireworks is not installed on your computer.

