
What You’ll Do
Understand System Requirements
Create Web Pages from Templates
Create a Web Page from a Sample
Open an Existing Web Page or File
Switch Between Pages and Views
Preview a Web Paged
Adobe Dreamweaver CS4 is the industry leading Web development tool for building Web sites and applications. It provides a combination of visual layout tools, application development features, and code editing support, enabling developers and designers at every skill level to create visually appealing, standards-based sites and applications quickly and easily. From leading support for Cascading Style Sheet (CSS) design to hand-coding features, Dreamweaver provides the tools professionals need to get the job done. In addition, developers can use Dreamweaver with the server technology of their choice to build powerful Internet applications that connect users to databases, live data feeds, and legacy systems.
Dreamweaver is an application that’s rooted in the real world. In the real world, new or updated browsers come into the marketplace every year, and this creates problems in compatibility. Dreamweaver solves this problem by giving you powerful error-checking tools, and even gives you the ability to use Live Data View, and see exactly how your pages will perform on virtually any browser.
In the real world, server technologies change quickly. Dreamweaver’s extensible architecture makes server compatibility a snap by giving you the tools to customize for third-party server models. In the real world, computer operating systems change. Dreamweaver’s CS4 not only supports use on Windows and Macintosh systems; in addition, there is now support for the new Intel-based Macintosh computers.
Web designers come at all levels of experience. Dreamweaver’s user-friendly interface helps you out. If you’re relatively new to the application, you can jump right in and begin designing simple Web pages. If you are an experienced designer, you will be able to access the power and control that this application offers, and take your Web designs where no one has gone before.
Before you can install Dreamweaver, you will need to make sure that your computer meets the minimum system requirements. Dreamweaver CS4 is supported on both Windows and Macintosh computers, including the new Intel-based Macintosh systems.
While many designers bemoan the fact that their older computer systems will not support the newer applications, in the long run it’s all for the best. The original versions of Dreamweaver (many years ago) were simply non-visual HTML editing applications. Dreamweaver CS4 is not only doing things that were not even dreamed of in years past; it’s also faster. As a Web designer, time is an important part of getting the job done, and getting it done quickly.
If I can accomplish more work in less time, it gives me more time to be creative, and able to meet my deadlines. And that’s a good thing. So think of system requirements as the power behind the applications, that’s going to help you do more, better work, and all in less time.
You need to have a computer with the following minimum configuration:
• Intel Pentium 4, Intel Centrino, Intel Xeon, or Intel Core Duo (or compatible) processor
• Microsoft Windows XP with Service Pack 3 or higher; Windows Vista with Service Pack 1.
• 512 MB of RAM, 1 GB or above recommended
• 1GB of available hard-disk space (additional free space required during installation)
• 1,024 × 768 monitor resolution with 16-bit video card
• DVD-ROM drive
• Internet or phone connection required for activation.
• Broadband Internet connection required for some services
You need to have a computer with the following minimum configuration:
• 1 GHz PowerPC G5 or multicore Intel processor; Intel-based Macintosh
• Mac OS X 10.5.x, or later
• 512 megabytes (MB) of RAM, 1 GB or above recommended
• 1GB of available hard-disk space (additional free space required during installation)
• 1,024 × 768 monitor resolution with 16-bit video card
• DVD-ROM drive
• Internet or phone connection required for activation
• Broadband Internet connection required for some services
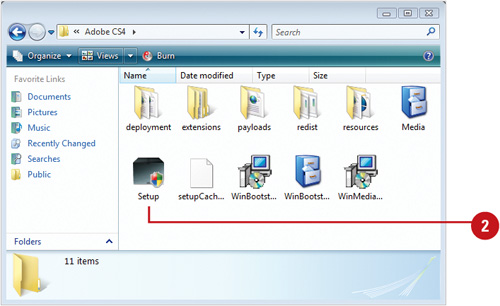
The process of installing the Dreamweaver application is fairly straightforward; you insert the Dreamweaver disc into your disc drive, double-click the installer application and simply follow the on-screen instructions. The first thing that will happen is that the installer will check to see if you have the minimum system requirements. If you meet the minimums, the installer will guide you through the steps to complete the installation. The whole process takes about ten minutes, and at the end of the process you can launch Dreamweaver for the first time. Remember to have your serial number handy, because you will have to type it in before you can open the application. It’s a good idea to have that serial number in a safe place, just in case you would need to reinstall Dreamweaver.
![]() Insert the Dreamweaver CS4 disc into your disc drive.
Insert the Dreamweaver CS4 disc into your disc drive.
![]() Double-click the Dreamweaver icon, and then double-click the installer application (in Windows the installer application launches automatically).
Double-click the Dreamweaver icon, and then double-click the installer application (in Windows the installer application launches automatically).
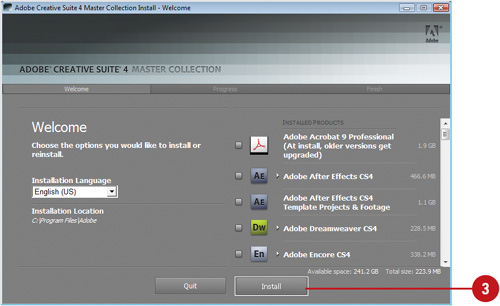
The installer screen will open, displaying the Dreamweaver CS4 installer window.
![]() Follow the on-screen instructions to install the product; the installer asks you to read and accept a licensing agreement, enter a serial number, indicate the language you want, and specify where you want to store the software.
Follow the on-screen instructions to install the product; the installer asks you to read and accept a licensing agreement, enter a serial number, indicate the language you want, and specify where you want to store the software.
Did You Know?
Most Adobe applications can be downloaded. It’s all very simple, you go to the http://www.adobe.com, click the Products menu item, and then select the application you want to purchase. You will need a credit card (of course), and a lot of bandwidth.
The launching of Dreamweaver can be accomplished in one of several ways. You could access the application by opening the Dreamweaver folder and double-clicking on the application icon (Macintosh or Windows). You could create an alias of the application, by right clicking on the Dreamweaver program icon and selecting Make Alias (Macintosh) or Create Shortcut (Windows).
![]() Click the Start button on the taskbar.
Click the Start button on the taskbar.
![]() Point to All Programs, and then click Adobe.
Point to All Programs, and then click Adobe.
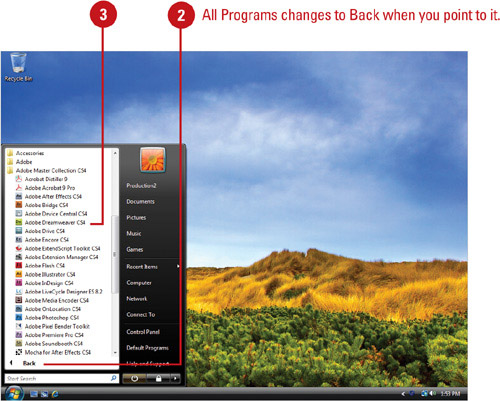
![]() Point to an Adobe Collection CS4 menu, if needed.
Point to an Adobe Collection CS4 menu, if needed.
![]() Click Adobe Dreamweaver CS4.
Click Adobe Dreamweaver CS4.
![]() If you’re starting Dreamweaver CS4 for the first time, perform the following:
If you’re starting Dreamweaver CS4 for the first time, perform the following:
• Enter your serial number, activate the application, and register with Adobe.
• Select the check boxes with page types you want to set Dreamweaver as the default editor, and then click OK.
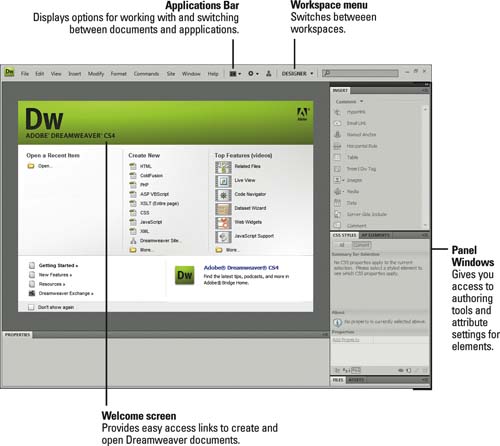
Dreamweaver opens displaying the program window and the Startup Page.

![]() Open the Applications folder (located on the main hard drive).
Open the Applications folder (located on the main hard drive).
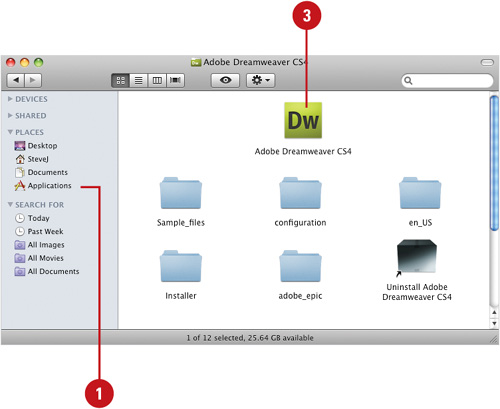
![]() Open the Adobe Dreamweaver CS4 folder.
Open the Adobe Dreamweaver CS4 folder.
![]() Double-click the Dreamweaver CS4 application icon.
Double-click the Dreamweaver CS4 application icon.
![]() If this is the first time opening Dreamweaver CS4 you will be prompted to specify the following initial settings:
If this is the first time opening Dreamweaver CS4 you will be prompted to specify the following initial settings:
• Enter your serial number, and activate the application.
• Select the check boxes with page types you want to set Dreamweaver as the default editor, and then click OK.
Dreamweaver opens displaying the program window and the Startup Page.

Did You Know?
You can create a shortcut on the Macintosh. Drag and drop the Dreamweaver application icon to the bottom of the screen, and then add it to the shortcuts panel.
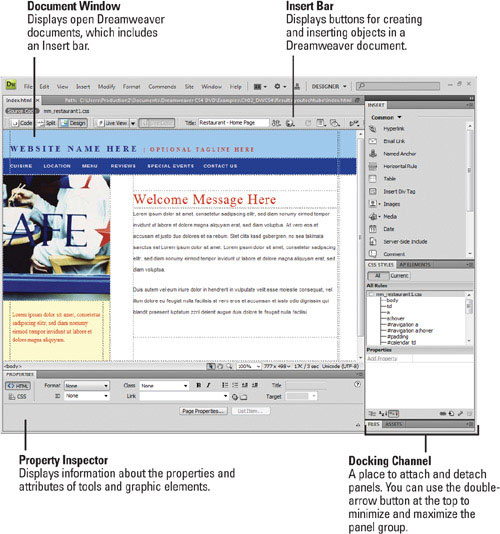
The Dreamweaver Graphical User Interface or GUI (pronounced “GOOEY”) is the Web designer’s workplace. Inside its document window and 19 main work panels you will find all the tools you need to design everything from a simple Web page, to a complex site.

DW 2.1
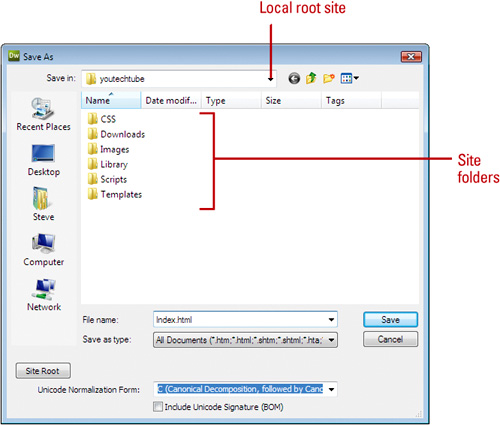
Before you create a Web site, you need to create a local root folder where you’ll store all the elements that make up the site. Web sites are more than just a bunch of Web pages. All the images, navigational buttons, document, etc., are separate files that must be uploaded into those pages. That’s including any video, audio Java applets and scripts. Defining a Web site instructs Dreamweaver that the local root folder is the folder location that contains all the elements of your site. In turn, Dreamweaver will keep track of the files within the folder, automatically update them when necessary, and give you easy access to them, while you’re working.
![]() Define a local root folder where you’ll store all the elements that you will use to build your Web site.
Define a local root folder where you’ll store all the elements that you will use to build your Web site.
![]() Start Dreamweaver.
Start Dreamweaver.
![]() Click the Site menu, and then click New Site.
Click the Site menu, and then click New Site.
Dreamweaver gives you two choices on the creation of a Web site: Basic or Advanced.
![]() Click the Basic tab (we’ll deal with Advanced setting in Chapter 20).
Click the Basic tab (we’ll deal with Advanced setting in Chapter 20).
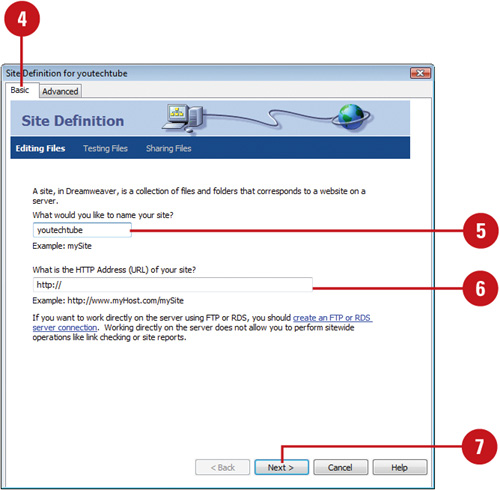
![]() Name your site (Site names are not file names, so feel free to use any naming convention you wish).
Name your site (Site names are not file names, so feel free to use any naming convention you wish).
![]() Enter in the URL (Uniform Resource Locator) for your site (the hosting server).
Enter in the URL (Uniform Resource Locator) for your site (the hosting server).
![]() Click Next to continue.
Click Next to continue.
![]() Click the No option in response to the next screen’s question: Do you want to work with a server technology such as ColdFusion, ASP, NET, JSP, or PHP.
Click the No option in response to the next screen’s question: Do you want to work with a server technology such as ColdFusion, ASP, NET, JSP, or PHP.
![]() Click Next to continue.
Click Next to continue.
![]() Click the Edit Local Copies On My Machine, Then Upload To Server When Ready option.
Click the Edit Local Copies On My Machine, Then Upload To Server When Ready option.
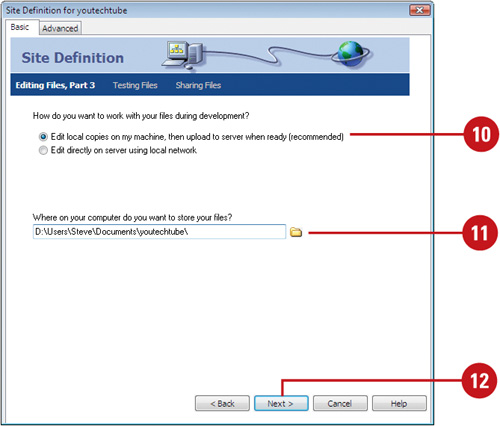
![]() Enter the location of your local root folder, or click the folder icon, located to the right of the input box, and then select the folder from the Find window.
Enter the location of your local root folder, or click the folder icon, located to the right of the input box, and then select the folder from the Find window.
![]() Click Next to continue.
Click Next to continue.
![]() Click the popup menu, and choose None from the available options.
Click the popup menu, and choose None from the available options.
You’ll set up your connection to your remote server later.
![]() Click Next to continue.
Click Next to continue.
You’ll see a listing of all the options you’ve chosen for this site.
![]() Click Back to make changes, or click Done to complete the process.
Click Back to make changes, or click Done to complete the process.

Dreamweaver creates a site definition based on your options and your choice of the local root folder (In our example, youtechtube).
When you define a site in Dreamweaver, the Assets and Files panels will now display a list of all your folders and files.
See Also
See “Setting Advanced Site Definitions” on page 474 for information on using the Advanced tab in the Site Definition dialog box.
DW 2.2
Adobe Dreamweaver allows you to manage multiple sites. When you open Dreamweaver it will load the Web site last used. If, however, you need to work on another Web site it’s a simple matter to redirect Dreamweaver to the needed site using the Manage Sites dialog box, which you can also use to create, edit, duplicate, remove, export, and import sites.
![]() Click the Site menu, and then click Manage Sites.
Click the Site menu, and then click Manage Sites.
![]() Select the site from the listed options.
Select the site from the listed options.
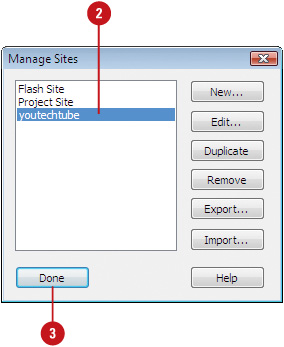
![]() Click Done.
Click Done.
Dreamweaver closes the first site and loads all the assets for the selected site.
The whole point of using Dreamweaver is the creation of Web pages. In turn, these pages will load static and dynamic content, and be bundled together with a good navigational system; finally winding up as a complete Web site. The process of creating a site can become quite involved; however, it all begins with the creation of the first page. A new page is a blank slate for you to draw. A new Web page can be literally anything from a text page to a high-end page dealing with animation, video, audio, CSS, or any combination of the above. Please don’t take this step too lightly. In other words don’t start with a plan, just put the first page together and see where it goes from there. It’s the plan that will make it all come together.
![]() Click the File menu, and then click New.
Click the File menu, and then click New.
The New Document dialog box opens.
Timesaver
To create a Web page without the dialog box, click the file type you want at the Welcome Screen.
![]() Click the Blank Page category.
Click the Blank Page category.
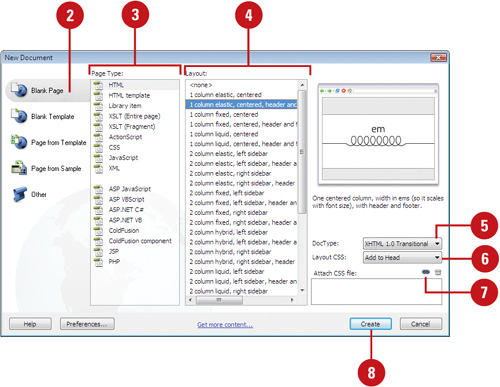
![]() Select the Page Type you want (in this example, HTML).
Select the Page Type you want (in this example, HTML).
![]() Select the Layout you want (in this example, 1 column, elastic, centered).
Select the Layout you want (in this example, 1 column, elastic, centered).
![]() Click the DocType popup and select the option you want.
Click the DocType popup and select the option you want.
In this example, leave steps 5 thru 7 at their default values.
![]() Click the Layout CSS popup, if available, and select the option you want.
Click the Layout CSS popup, if available, and select the option you want.
![]() Click the Link button to attach a CSS file to the current document.
Click the Link button to attach a CSS file to the current document.
![]() Click Create.
Click Create.
Dreamweaver creates the new page and opens it.
A Dreamweaver template is a common structure created and used for all or some pages of a Web site. Each section of a Web site can have its own template with variations in structure or color from the others. Templates are fantastic timesaving tools because they allow you to create pages that share the same design but different content, and if you modify a template document, you immediately update the design of all pages that were created from that template. Dreamweaver templates are special master files that contain editable and locked regions. Pages based on a template enable Dreamweaver users to edit parts of a Web page within the editable regions without the risk of accidentally changing the locked regions. This is a major advantage, because if you are creating a site that will be maintained by other users you can specify which parts of pages editors can and cannot change.
![]() Click the File menu, and then click New.
Click the File menu, and then click New.
![]() Click the Blank Template category.
Click the Blank Template category.
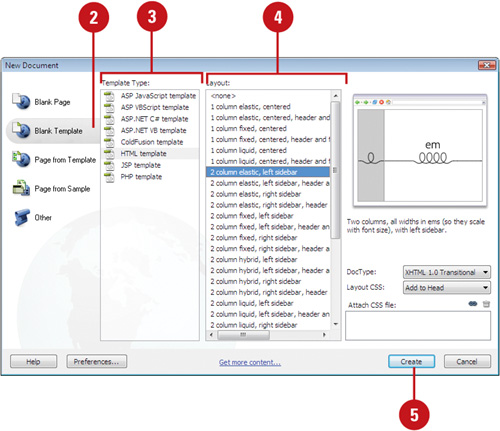
![]() Select the Template Type you want (in this example, HTML Template).
Select the Template Type you want (in this example, HTML Template).
![]() Select the Layout you want (in this example, 2 column, elastic, left sidebar).
Select the Layout you want (in this example, 2 column, elastic, left sidebar).
In this example leave the Doc Type and Layout CSS at their default values of XHTML 1.0 Transitional, and Add to Head, respectively.
![]() Click Create.
Click Create.
Dreamweaver opens the template.
![]() Click the File menu, click Save, click OK if necessary to dismiss the no editable region alert, specify a name, and then click Save.
Click the File menu, click Save, click OK if necessary to dismiss the no editable region alert, specify a name, and then click Save.
![]() Use your cursor to select an area of the image that you want to have the ability to edit. An editable area can be defined as an AP element, or table, or table cell, etc.
Use your cursor to select an area of the image that you want to have the ability to edit. An editable area can be defined as an AP element, or table, or table cell, etc.
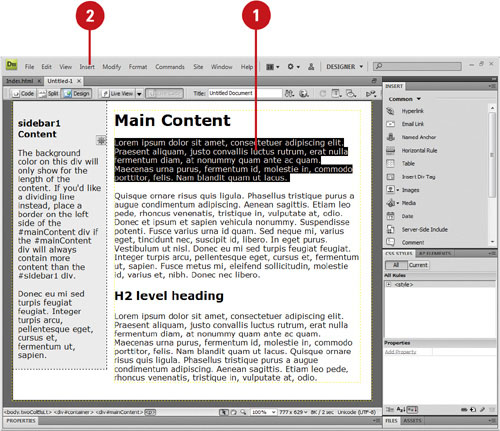
![]() Click the Insert menu, point to Template Objects, and then select from the following Region options:
Click the Insert menu, point to Template Objects, and then select from the following Region options:
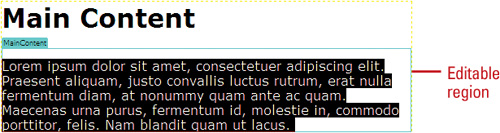
• Editable Region. Use this option to allow contributors to the Web page the ability to change or modify that selected area.
• Optional Region. Use this option to define a section of the page that will or will not be shown, depending on what the content contributor decides.
• Repeating Region. Use this option to allow contributors to the Web page the ability to duplicate the region. For example, creating a table that holds customer comments, and the contributor needs the ability to generate new pages, and add more rows to the table, as needed.
![]() Enter an appropriate name for the Region.
Enter an appropriate name for the Region.
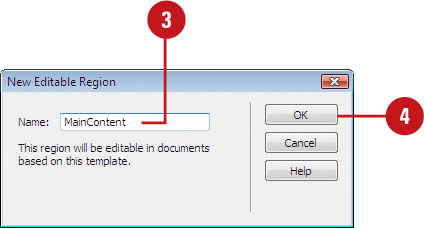
![]() Click OK.
Click OK.
The selected area now takes on the appropriate characteristics.
Instead of creating a Web page from scratch, you can create a new Web page based on the existing template, which can save you a lot of time and effort. In the New Document dialog box, you can select your own custom template designs available in the Page From Template category or click Get More Content to open the Dreamweaver Exchange on the Web to download more template page designs.
![]() Click the File menu, and then click New.
Click the File menu, and then click New.
The New Document dialog box opens.
![]() Click the Page From Template category.
Click the Page From Template category.
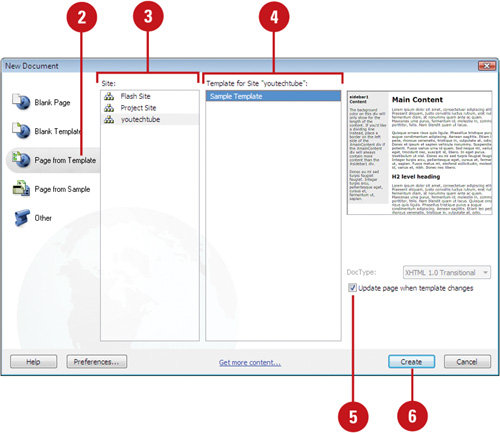
![]() Select the site that contains the template you want: Flash Site and Project Site appear by default.
Select the site that contains the template you want: Flash Site and Project Site appear by default.
![]() Select the template you want to use.
Select the template you want to use.
![]() Select or clear the Update Page When Template Changes check box.
Select or clear the Update Page When Template Changes check box.
![]() Click Create.
Click Create.
![]() Click the File menu, click Save, specify a name, and then click Save.
Click the File menu, click Save, specify a name, and then click Save.
Did You Know?
You can create a document from a template in the Assets panel. Open the Assets panel using the Windows menu, click the Templates icon to view the list of templates, right-click (Win) or Control-click (Mac) the template you want, click New From Template, and then save the document.
If you’re not sure where you start, you can use one of Dreamweaver’s sample designs as a starting point for a new page and then make any changes you want to customize it to suit your specific needs. In the New Document dialog box, you can preview sample file designs and then create a new document based on the one you want to use. You can select from sample pages with CSS (Cascading Style Sheets), frames, themes (starter pages for Entertainment, Lodging, etc.), and basic types (starter pages for Commerce, Data, Images, etc.). When you create a new document, Dreamweaver makes a untitled copy of the sample file, which you can save with a new name.
![]() Click the File menu, and then click New.
Click the File menu, and then click New.
The New Document dialog box opens.
![]() Click the Page From Sample category.
Click the Page From Sample category.
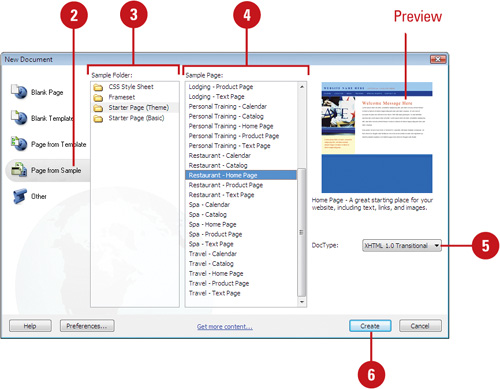
![]() Select the type of sample file you want to use: CSS Style Sheet, Frameset, Starter Page (Theme), or Starter Page (Basic).
Select the type of sample file you want to use: CSS Style Sheet, Frameset, Starter Page (Theme), or Starter Page (Basic).
![]() Select the sample file you want.
Select the sample file you want.
![]() If available, click the DocType popup, and then select from the available options.
If available, click the DocType popup, and then select from the available options.
![]() Click Create.
Click Create.
Dreamweaver creates the new page and opens it.
![]() Click the File menu, click Save, specify a name, and then click Save.
Click the File menu, click Save, specify a name, and then click Save.
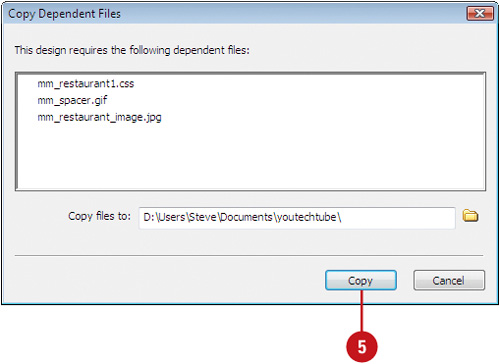
![]() If the Copy Dependent Files dialog box appears, set the options you want, and then click Copy.
If the Copy Dependent Files dialog box appears, set the options you want, and then click Copy.
Web pages should be saved as soon as they’re opened. Naming conventions should be according to a predefined list of names that you created during the planning stage of the project. It’s important to save pages early, that way if there’s any problem such as: the application locking up, you will be able to start again from the last-saved version. Another important reason is error checking and validating. Web pages must be in a saved state before performing any validation.
![]() Click the File menu, and then select from the following options:
Click the File menu, and then select from the following options:
• Save . If the file is new, you will be prompted to enter a proper file name and location for the new page. If the file has been previously saved, Dream-weaver saves the file, using the original file name and location (without prompting).
• Save As . Use this option to make a copy of a file; you will be prompted to give the file a new name and location.
• Save All . Use this option if you have more than one file open, and you want to save all of them at the same time. If any of the files are new, you will be prompted to enter a file name and location.
• Save To Remote Server . Use this option if you’ve set up your remote server, and you want to save the file directly to the server.
• Save As Template . Use this option to save the open document as a template. A template is a reusable document that contains editable regions.
![]() Navigate to the drive and folder location where you want to save the file.
Navigate to the drive and folder location where you want to save the file.
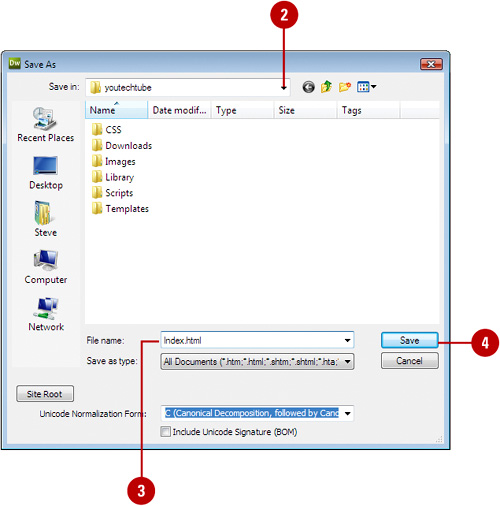
![]() Type a name for the file, or use the suggested name.
Type a name for the file, or use the suggested name.
When naming files, avoid using spaces and special characters, or punctuation.
For this example, leave the other options at their default levels.
![]() Click Save to finalize the process.
Click Save to finalize the process.
![]() Click Copy.
Click Copy.
Did You Know?
You can revert to the last saved version of a document. Click the File menu, click Revert, and then click Yes to revert to the previous version, or click No to keep your changes. If you save a document and then exit Dreamweaver, you cannot revert to the previous version when you restart Dreamweaver.
Macintosh and Windows computers systems are not case sensitive . Therefore when you create a file name for a Web page (or the files loaded on the page), you won’t have a problem validating that page on your computer; however, when you move the site to the server, many servers are case-sensitive, and the same pages may not load correctly. For example, if a Web page is named Index.html and you call it using index.html. It validates on your computer, but it might not work on the server... pay attention to case.
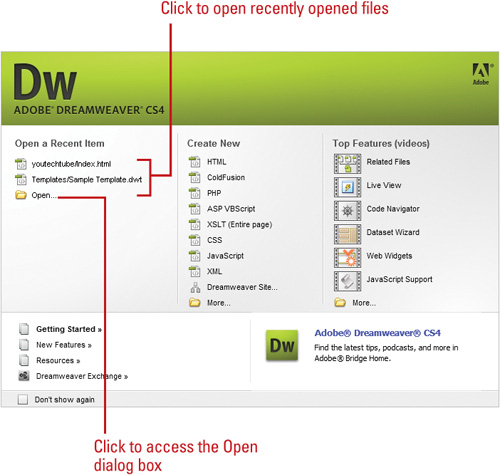
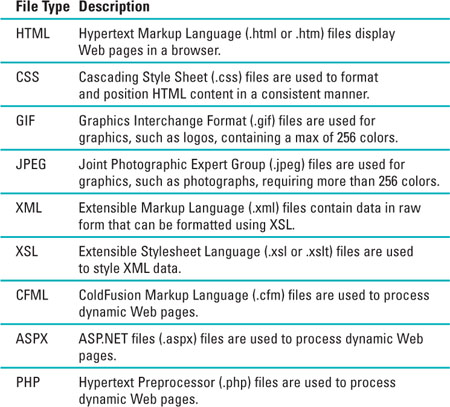
Opening a Web page is a simple procedure. You can use the Open section on the Welcome screen, Open commands on the File menu, or Adobe Bridge CS4 (a stand-alone file management program that comes with Dreamweaver CS4) to open Web related files in several formats. You can open a Web page from your local hard drive, a network drive, or a Web server using an Uniform Resource Locator (URL). By default, Dreamweaver opens the last Web site you worked on every time you open the program. If you open a new page while another site is still open, the new page opens in a new Dreamweaver window. Web pages using the HTML—Hypertext Markup Language—are the primary file types you open in Dreamweaver, however, you can open other types too. As an editor, you can use Dreamweaver to open many types of Web related files, including style sheets, scripts, text, xml, and libraries. For Web pages you recently opened, you can quickly reopen them again by pointing to Open Recent on the File menu, and then selecting the Web page you want to open.
![]() Click the File menu, and then click Open.
Click the File menu, and then click Open.
![]() Navigate to the drive and folder location where you want to open the Web page.
Navigate to the drive and folder location where you want to open the Web page.
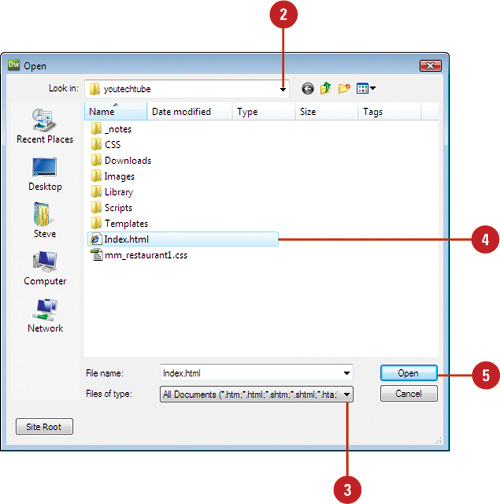
![]() Click the Files Of Type list arrow (Win) or popup (Mac), and then select the type of file you want to open.
Click the Files Of Type list arrow (Win) or popup (Mac), and then select the type of file you want to open.
![]() Select the page you want to open in the working folder, or type the URL of the page you want.
Select the page you want to open in the working folder, or type the URL of the page you want.
![]() Click Open.
Click Open.
• File Menu. Click the File menu, point to Open Recent, and then click the file you want to open.
•Welcome Screen. At the Welcome Screen, click the file you want to open under Open a Recent Item.
Did You Know?
You can open a recent file quickly from the Start menu (Win). Click the Start button, point to Recent Items (Vista) or My Recent Documents (XP), and then click the file name you want to open.
You can browse and open files in Adobe Bridge. Click the File menu, click Browse in Bridge, select a workspace display to view your files the way you want, navigate to the drive or folder where the file is located. To open the file, double-click the file icon. To return back to Dreamweaver, click the File menu, and then click Return to Adobe Dreamweaver.
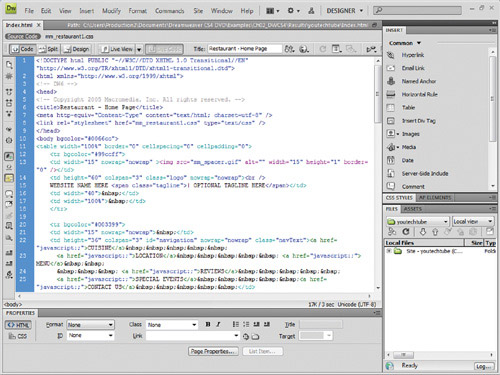
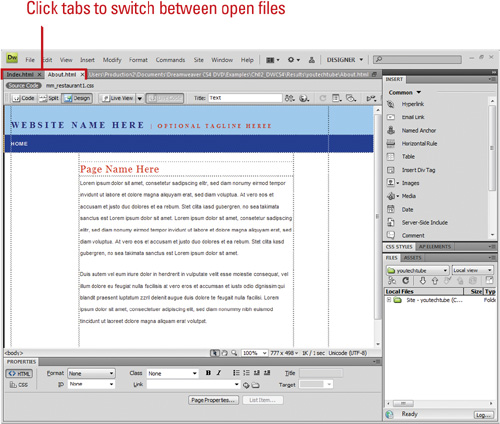
Dreamweaver displays the contents of a Web page in different ways to help you work efficiently with your content. When you click a Web page or document tab, Dreamweaver displays three view buttons on the Document toolbar below the tab name.
Code view displays the HTML and any embedded code for a page.
Split Code view (New!) displays the screen in half horizontally. Both halves display page code. Only available on View or Layout menu.
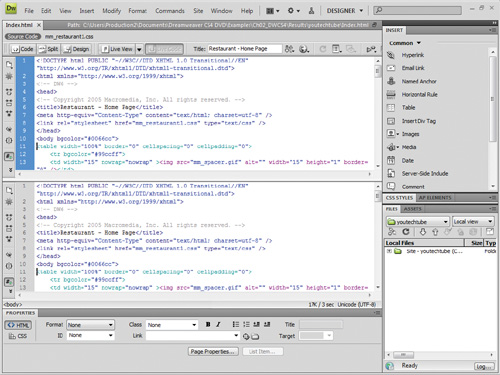
Code and Design view displays the screen in half horizontally. The top half displays the current page in Code view and the bottom half displays the current page in Design view.
Design view displays Web pages in WYSIWYG (What You See Is What You Get) view for editing.
Code view
Design view
Split Code view
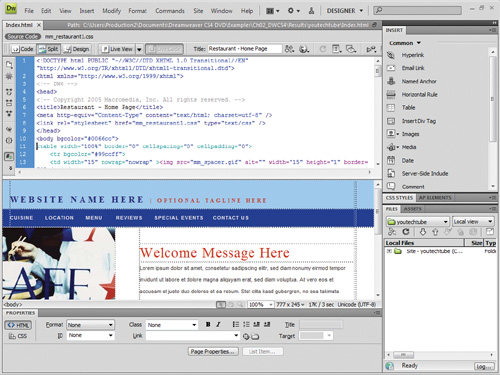
Code and Design view
The tabs across the top of the Document window indicate the currently open Web pages. You can click the tab to display the page or site you want. Below the tab in the Document window, the view buttons—Code, Split, and Design—appear for the current page. Design view displays the page or site as it appears on screen, while Code view displays the HTML code that makes up the page or site. Split (Code and Design) view shows you Code view at the top and Design view at the bottom, while Split Code view (New!) shows code at the top and bottom.
• Web Pages. Click the tab with the name you want to display.
Did You Know?
You can view multiple documents in a single Document window (Mac). Control-click the tab, and then click Move To New Window. To combine separate documents into tabbed windows, click the Window menu, and then click Combine As Tabs.
• Switch Views. Click the Code, Split, or Design button below the tab on the Document toolbar in the Document window, or click the View or Layout (New!) menu, and then click the view you want: Code, Split Code (New!), Design, and Code and Design.
• The Split Code command (no button available) displays code in a split screen.

DW 4.5
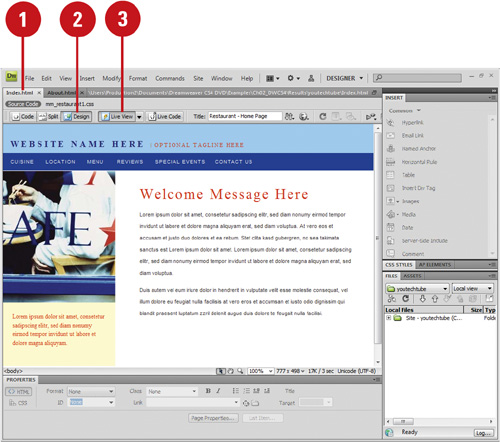
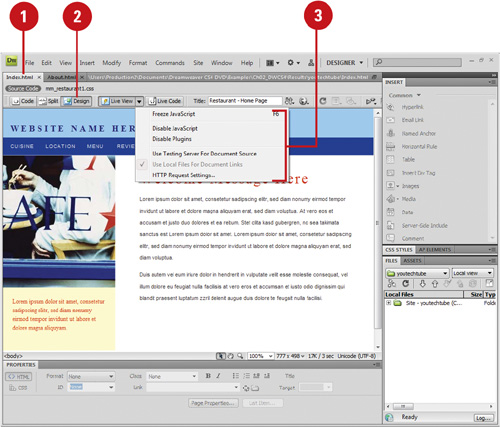
As you work on the development of your site, you will probably want to occasionally stop and see what the individual pages look like. Instead of previewing pages in a browser, you can view pages as they will appear in a browser without having to leave Dreamweaver. Live view (New!) is a non-editable, more realistic view of what you see in Design view. You switch to Live view from Design view. When you switch to Live view, Design view becomes frozen. However, you can still use Code view to make changes and then refresh it back in Live view. While in Live view, you can also view live code (New!), which is a non-editable view of the executed code on the page. When you switch to Live view, you can also freeze JavaScript and the page in its current state. This allows you to make and refresh changes to step through different states of a user interaction, pop-up menus, or other interactive elements, which you can’t do in Design view.
![]() Open the Web page you want to view.
Open the Web page you want to view.
![]() Switch to Design view or Code and Design view.
Switch to Design view or Code and Design view.
![]() Click the Live View button.
Click the Live View button.
![]() If you want, make changes in Code view, in the CSS Styles panel, in an external CSS style sheet, or in another related file.
If you want, make changes in Code view, in the CSS Styles panel, in an external CSS style sheet, or in another related file.
• You can open related files by using the Related Files toolbar.
![]() Click the Refresh button in the Document toolbar or press F5 to view any changes.
Click the Refresh button in the Document toolbar or press F5 to view any changes.

![]() To go to Live Code view, click the Live Code button.
To go to Live Code view, click the Live Code button.
Live code view appears displaying the code that the browser uses to execute the page. The non-editable code is highlighted in yellow.
![]() To return back to Live view, click the Live Code button again.
To return back to Live view, click the Live Code button again.
![]() To return back to Design view, click the Live View button again.
To return back to Design view, click the Live View button again.
![]() Open the Web page you want to view.
Open the Web page you want to view.
![]() Switch to Design view or Code and Design view.
Switch to Design view or Code and Design view.
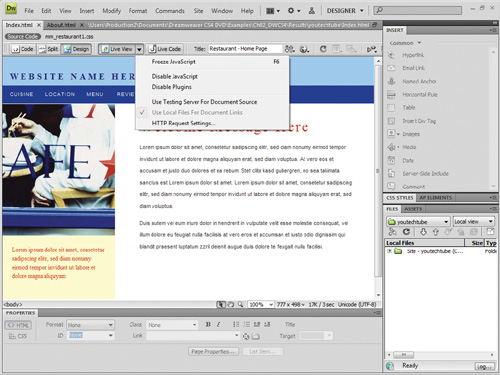
![]() Click the Live View button arrow, or click the View menu, point to Live View Options, and then select any of the following:
Click the Live View button arrow, or click the View menu, point to Live View Options, and then select any of the following:
• Freeze JavaScript. Freezes elements that use JavaScript.
• Disable JavaScript. Displays the page as if the browser doesn’t have JavaScript enabled.
• Disable Plug-ins. Displays the page as if the browser doesn’t have plug-in enabled.
• Use Testing Server for Document Source. Used for dynamic pages, such as ColdFusion pages. Select to use the file version on the site’s testing server as the source for Live view.
• Use Local Files for Document Links. Used for non-dynamic sites. Select to use the local version of the file as the source for Live view. Deselect to use the testing server version.
• HTTP Request Settings. Allows you to set advanced settings for displaying live data.
As you work on the development of your site, you will probably want to occasionally stop and see what the individual pages look like when previewed within a specific browser. One of the most used features for testing your site is the Preview In Browser feature. This is one of the most used when working in Dreamweaver. It lets you see what your site will look like in a particular Internet browser. When testing a particular Web page, it’s a good idea to check it out in more than one browser, and in more than one version of the browser. For example, on the Macintosh the native browser is called Safari, and on Windows, it’s Explorer. The Safari browser will not work on a Windows machine, and Microsoft recently stopped supporting the Macintosh platform. Since your Web page will be loaded, interpreted, and run by the visitor’s browser, it may look great in Safari, and not even work in Explorer. Therefore, make sure that you check your pages out in all the major versions of the browsers that you believe your visitors will use.
![]() Open the Web page you want to view.
Open the Web page you want to view.
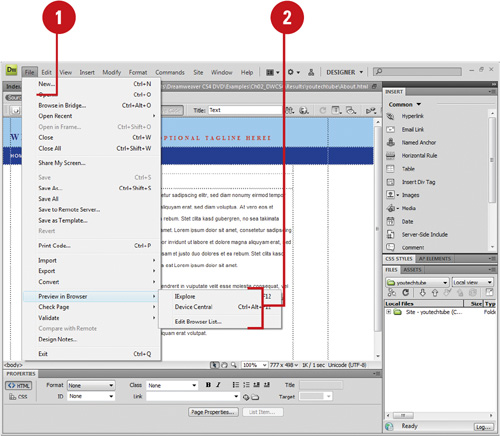
![]() Click the File menu, point to Preview In Browser, and then select a browser from the available options.
Click the File menu, point to Preview In Browser, and then select a browser from the available options.
![]() If the Web page needs to be saved, you will be prompted to save the page before continuing.
If the Web page needs to be saved, you will be prompted to save the page before continuing.
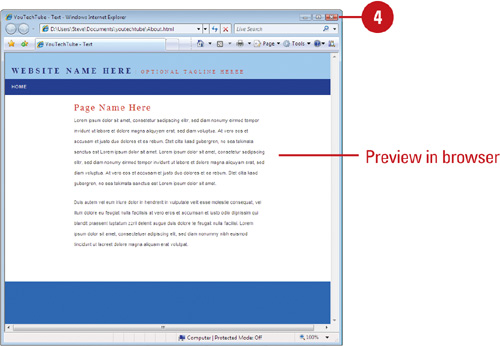
The Web page opens and displays in the selected browser. Check the page out by clicking all the links, and making sure everything displays as planned.
![]() When you’re done, close the browser to return to Dreamweaver.
When you’re done, close the browser to return to Dreamweaver.
Did You Know?
What it means when you get an error previewing a Web page. The preview in browser function may return a “page cannot be found” error if any of the characters in the path of the local folder have a different letter case than the path of the testing server folder.
![]() Click the File menu, point to Preview In Browser, and then click Edit Browser List.
Click the File menu, point to Preview In Browser, and then click Edit Browser List.
![]() Click the Plus (+) button to add another browser to the list.
Click the Plus (+) button to add another browser to the list.
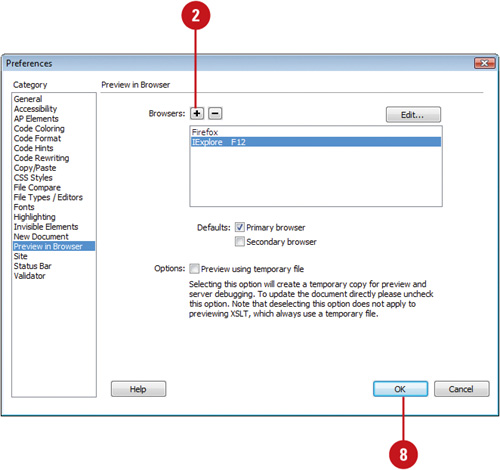
![]() Give the new browser a name.
Give the new browser a name.
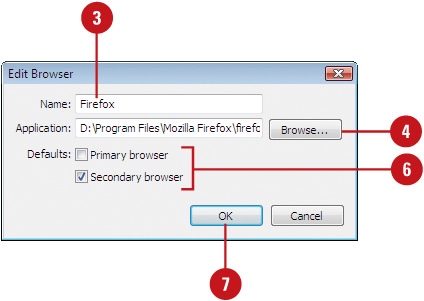
![]() Click Browse, and then locate the browser you want to add to your list.
Click Browse, and then locate the browser you want to add to your list.
![]() Select the browser, and then click Open.
Select the browser, and then click Open.
![]() Select the Primary Browser or Secondary Browser check box to decide whether this new browser is the primary or secondary browser.
Select the Primary Browser or Secondary Browser check box to decide whether this new browser is the primary or secondary browser.
![]() Click OK to return to the Preferences dialog box.
Click OK to return to the Preferences dialog box.
![]() Click OK to close the dialog box and save your changes.
Click OK to close the dialog box and save your changes.
![]() Click the File menu, and then point to Preview In Browser.
Click the File menu, and then point to Preview In Browser.
Your new browser option is added to the list.
Did You Know?
You can use keyboard shortcuts to preview pages. The Primary Browser launches when you press the F12 key. The Secondary Browser launches when you press Ctrl+F12 (Win) or
![]() +F12 (Mac).
+F12 (Mac).
At some time, everyone has a question or two about the program they are using. Dreamweaver Help uses a Community Help site (New!) on the web at adobe.com (which is updated regularly) to help you find the information you need. When you start Dreamweaver Help, your browser opens, displaying a web site with help categories and topics. You can search the site by using keywords or phrases or browsing through a list of categories and topics to locate specific information. When you perform a search using keywords or phrases, a list of possible answers is shown to you from adobe.com, with the most likely answer to your question at the top of the list.
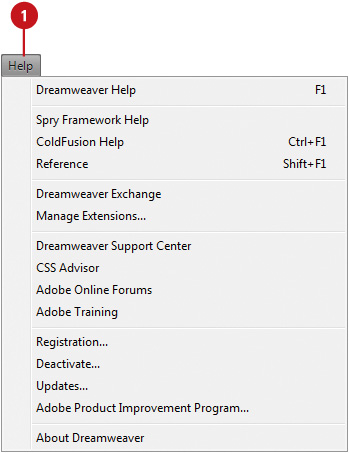
![]() Click the Help menu, and then click Dreamweaver Help.
Click the Help menu, and then click Dreamweaver Help.
• To search for a topic from Dreamweaver, type one or more keywords in the Search box on the menu bar (Win) or title bar (Mac), and then press Enter (Win) or Return (Mac).
Your browser opens, displaying Dreamweaver Help from the web. An Internet connected is required.
![]() Click Using Dreamweaver CS4 to get help information for Dreamweaver.
Click Using Dreamweaver CS4 to get help information for Dreamweaver.
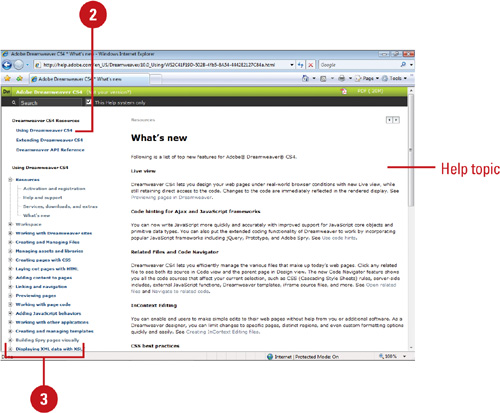
![]() Click Help categories (plus sign icons) until you display the topic you want.
Click Help categories (plus sign icons) until you display the topic you want.
![]() Click the topic you want.
Click the topic you want.
![]() Read the topic, and if necessary, click any hyperlinks to get information on related topics or definitions.
Read the topic, and if necessary, click any hyperlinks to get information on related topics or definitions.
![]() If you can’t find what you need, click in the Search box and type in keywords to search.
If you can’t find what you need, click in the Search box and type in keywords to search.
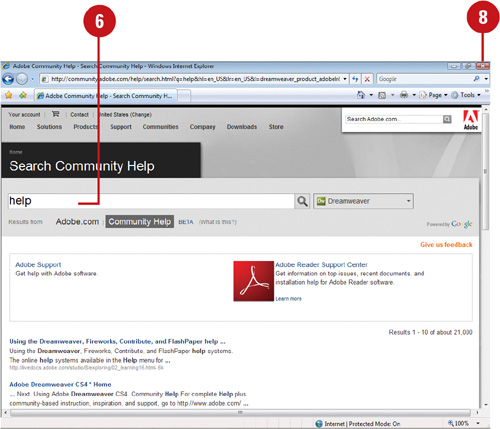
![]() To print the current help topic, use your browser print command.
To print the current help topic, use your browser print command.
![]() When you’re done, close your browser.
When you’re done, close your browser.
![]() Click the Help menu, and choose from the following options:
Click the Help menu, and choose from the following options:
• Dreamweaver Help. Standard help systems for all areas of Dreamweaver.
• Spry Framework Help. Online help for Spry, an open source Ajax framework developed by Adobe which is used in the construction of Rich Internet Applications.
• ColdFusion Help. Online help for CFML (ColdFusion Markup Language). CFML is a tag-based Web scripting language supporting dynamic Web page creation and Database access in a Web server environment.
• Reference. Gives you access to fourteen books and manuals with information of how to use Dreamweaver in a creative and logical way; this one is my favorite.
• Dreamweaver Support Center. Gives you access to the Adobe online support center, and allows you to search through an extensive LiveDocs data base.
• CSS Advisor. Gives you access to information about using Cascading Style Sheets (CSS).
• Adobe Online Forums. Gives you access to the Adobe online forums, where you can get information from contributors.
• Adobe Training. Gives you access to the Adobe online training materials and resources.
Applications are released to the public on a specific date, and as sure as the sun rises in the east; they will eventually come up with a new version. As a matter of fact, this is the ninth version of Dreamweaver. The problem is that we can’t always wait for an update to fix a specific problem. For example, you just picked up Dreamweaver CS4 and loaded it onto your computer... three months later you get an update to your operating system, and load it. Ops... Dreamweaver is having problems, now that the new operating system is loaded. Do you wait another year for the next version update? The good news is that Adobe already knows about the potential problem, and in their immense wisdom created an update to fix the problem. It’s not a bad idea to make a notation on your calendar and visit the update area on a monthly basis. You might be surprised what you find... and all updates are free. But how do you get that update? You’re only a couple of clicks away.
![]() Click the Help menu, and then click Updates.
Click the Help menu, and then click Updates.
![]() If the Adobe Updater dialog box appears, indicating updates are available, click the Show Details link to select the updates you want.
If the Adobe Updater dialog box appears, indicating updates are available, click the Show Details link to select the updates you want.
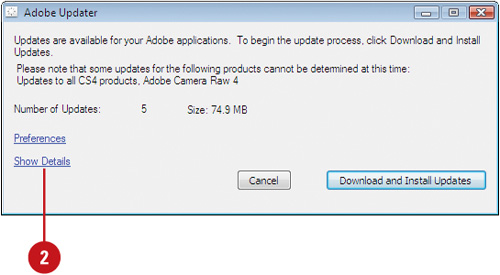
Adobe displays a listing of all available updates for every one of their applications.
![]() Select the updates you want.
Select the updates you want.
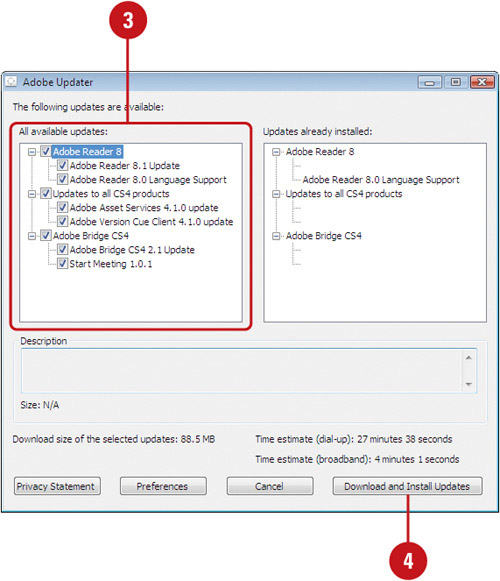
![]() Select the appropriate update, click the Download and Install Updates button, and follow the onscreen instructions.
Select the appropriate update, click the Download and Install Updates button, and follow the onscreen instructions.
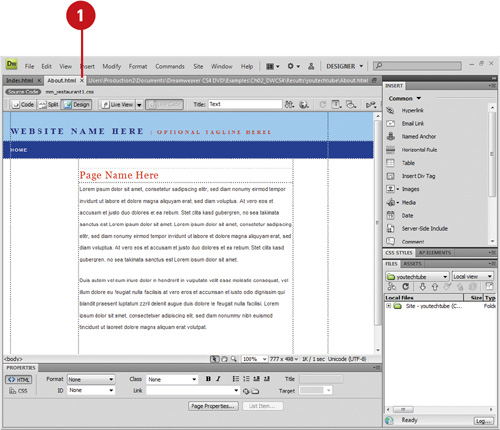
After you finish working on a Web page, you can close it and open another one, or close it and exit Dreamweaver. Closing a Web page makes more computer memory available for other processes. Closing a Web page is different from exiting Dreamweaver: after you close a Web page, Dreamweaver is still running until you exit it. You can use the Exit command on the File menu (Win) or Quit Dreamweaver command on the Dreamweaver menu (Mac) to close a document and exit Flash, or you can use the Close button on the Document tab (New!). If you try to close a document without saving your final changes, a dialog box opens, asking if you want to do so.
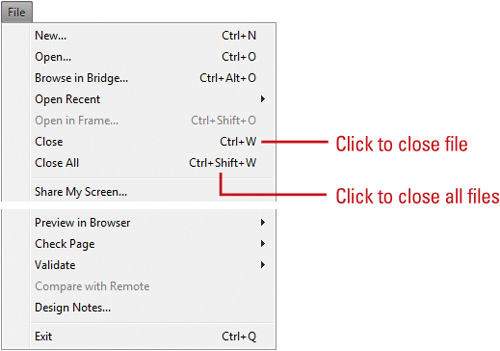
![]() Click the Close button on the Document tab, or click the File menu, and then click Close.
Click the Close button on the Document tab, or click the File menu, and then click Close.
![]() Click Yes to save any Web page changes; click No to close the Web page or file without saving any changes; or click Cancel to return to the Web page or file without closing it.
Click Yes to save any Web page changes; click No to close the Web page or file without saving any changes; or click Cancel to return to the Web page or file without closing it.
Did You Know?
You can close all Web pages at one time. Click the File menu, and then click Close All Pages or press Ctrl+Shift+W (Win) or
![]() +Shift+W (Mac).
+Shift+W (Mac).
You can cascade or tile Document window. To cascade document windows, click the Windows menu, and then click Cascade. To tile documents, click the Windows menu, and then click Tile Horizontally or Tile Vertically (Windows), or Tile (Mac).
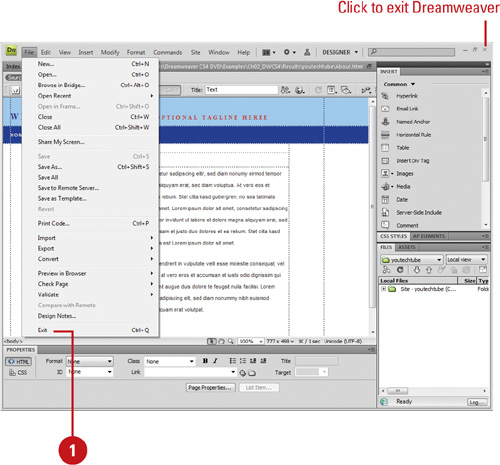
As much as we enjoy working in Dreamweaver, the time will finally come when you want to shut down for the day. The process of closing out a Dreamweaver Web site, is not difficult; as a matter of fact, it’s no more complicated than closing down any application. Dreamweaver is smart, if you attempt to exit or quit before saving that last file you were working on, Dreamweaver prompts you to save or ignore any changes.
![]() Use any of the following methods:
Use any of the following methods:
• Click the Close button on the Dreamweaver program window title bar.
• In Macintosh, click the Dreamweaver menu, and then click Quit Dreamweaver.
• In Windows, click the File menu, and then click Exit.
![]() Click Yes to save any Web changes, or click No to ignore any changes.
Click Yes to save any Web changes, or click No to ignore any changes.
Dreamweaver performs an orderly shutdown of the program.