
What You’ll Do
Static Web pages are composed of three basic elements: text, images, and links. Dynamic Web pages incorporate additional elements such as: video, animation, and/or audio. Of all of these elements, links are the primary building blocks of any Web page. If there were no links there would be no way for a visitor to control their journey through the maze of pages and sites that make up the World Wide Web. However, links are not just for moving a visitor from page to page, or site to site; in addition, links are used for transmitting emails, transferring data via FTP (file transfer protocol), and providing the ability to download data.
This chapter is devoted to creating links, modifying links, and attaching links to various outputs and URLs. Links are all about how you begin the process of making a Web page come alive.
Links come in all sizes and shapes; for example, a link can be as simple as an underlined section of text; for example, click here to go there, or it can be incorporated into a simple graphic, or even into a sophisticated JavaScript rollover. If your links are created using Flash, they can even include animation and sound.
The creation of a link is fairly straightforward... making that link intuitive to your visitor is the key to Web success. You don’t want your visitors looking at a link and wondering if it is a link, or wondering what will happen if they click it.
Links come in all sizes and shapes; however, what they link to is more important than what they look like. Link types refer to the function of the link; for example, the most popular (and common) link is the standard http or HyperText Transfer Protocol. With this link you can access Web pages, images, animations, just about anything that a wandering Web visitor would like to see and experience. However, there is more to the World Wide Web then a simple jump from page to page. The following list illustrates the more common types of Web links and their usage.
telnet:// The telnet link allows a user to log onto a remote computer (called the host), and take over control. For example, computer troubleshooters, could take over control of your computer from a remote location, and fix the problem using the telnet link.
mailto: The mailto link allows a user to click and send email from a Web page. Basically, the mailto link opens a specified email application and automatically adds in the proper recipient’s address.
news:// The news link connects the user to a specific newsgroup. Newsgroups are basically electronic bulletin boards; on various subjects... a newsgroup can be found for virtually any subject under the sun, and then some.
http:// The http, or HyperText Transfer Protocol, is the most common link type and allows the user to connect to any page on the Internet.
ftp:// The ftp, or File Transfer Protocol is used primarily for uploading or downloading large amounts of data. This is performed typically using an FTP server, and requires the user to have the correct username and password.
When you create a link from one document to another, you need to specify the file path, or link path, to the linked document to make sure it works properly. There are three different ways to specify a link path: absolute, document-relative, and site root-relative.
An absolute path provides a complete URL (Uniform Resource Locator) to the linked document, including the protocol. For example, http://www.perspection.com/books/od_books.htm.
An absolute path is best used for linking to a document on another server. Think of an absolute path as a fixed location that doesn’t change.
A document-relative path provides a partial path (the part not the same in URLs) to the linked document within the Web site. If you want to link to a document in the same folder, you only need to provide the file name of the linked document. You omit the part of the absolute path for both documents that are the same. For example, if you want to create a link from http://www.perspection.com/books/od_books.htm to http://www.perspection.com/books/dwcs4.htm, you can use the document-relative path dwcs4.htm.
If you want to create a link from the file od_books.htm to http://www.perspection.com/books/download/download_dwcs4.htm, you can use the document-relative path download/download_dwcs4.htm. Each slash (/..) indicates that you move down one folder level.
If you want to create a link from the file od_books.htm to http://www.perspection.com/index.htm, you can use the document-relative path ../index.htm. Each slash (../) indicates that you move up one folder level.
A document-relative path is best used for linking to a document in the same folder or one relatively close and you don’t plan on moving the documents.
A site root-relative path provides a path from the site’s root folder to a document. A site root-relative folder starts with a forward slash (/), which indicates the root folder. For example, if you want to link to od_books.htm, you can use the site root-relative path /books/od_books.htm.
A site root-relative path is best used for linking to a document on a large Web site that uses several servers or one server that hosts several sites, where the local root folder is equivalent to another remote root folder.
When you create a new link, you can specify the default relative path setting you want to use, either document or site root. If you already have links, setting this option doesn’t convert existing links, it only applies to new links. By default, Dreamweaver sets links to use document-relative paths, which sets the path of a link relative to the current document. A site root-relative path sets links to use the complete HTTP address. If you select the Site Root option, you need to also specify the complete URL in the HTTP Address box to the site root folder on the remote site. For example, if the local root location is C:Web Site and the site root location is http://www.website.com/Pub_Docs/, then the local root folder Web site is set to be equivalent to the remote root folder Pub_Docs. Content linked with a site root-relative path doesn’t display when you preview pages in a browser unless you specify a testing server, or use the Preview Using Temporary File option in Preferences.
![]() Click the Site menu, and then click Manage Sites.
Click the Site menu, and then click Manage Sites.
![]() Click the site you want to change, and then click Edit.
Click the site you want to change, and then click Edit.

![]() Click the Advanced tab.
Click the Advanced tab.

![]() Click the Local Info category.
Click the Local Info category.
![]() Click the Document or Site Root option.
Click the Document or Site Root option.
![]() For site root-relative paths, enter the Web site URL in the HTTP Address box with the equivalent root address on a remote server.
For site root-relative paths, enter the Web site URL in the HTTP Address box with the equivalent root address on a remote server.
Dreamweaver uses this address to make sure links work on a remote server.
![]() Click OK.
Click OK.
![]() Click Done.
Click Done.
![]() Click the Dreamweaver (Mac) or Edit (Win) menu, and then click Preferences.
Click the Dreamweaver (Mac) or Edit (Win) menu, and then click Preferences.
![]() Click the Preview In Browser category.
Click the Preview In Browser category.
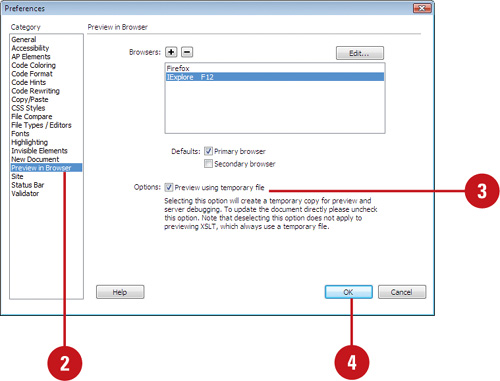
![]() Select the Preview Using Temporary File check box.
Select the Preview Using Temporary File check box.
![]() Click OK.
Click OK.
Adding an http link to a Web page is a relatively simple and painless operation. You will need to decide what to use for the link (text, graphic, animation), what you are linking to (Web page, site, etc), and the correct path to the destination (URL or Uniform Resource Locator). Once you’ve answered those questions, it’s a simple matter of opening Dreamweaver and getting to work. In this example, you’re creating a simple text link that will connect the active Web page to the index page on another site.
![]() Open the Web page that you want to add the link.
Open the Web page that you want to add the link.
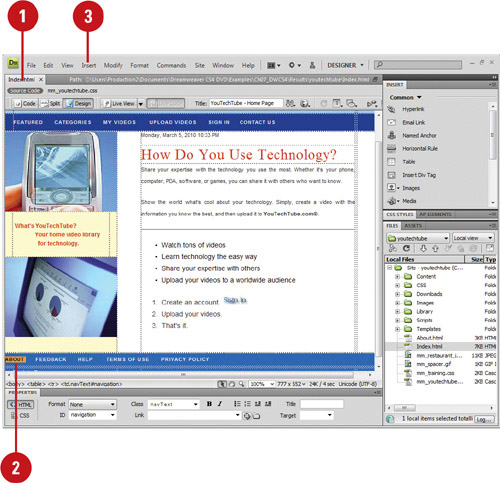
![]() Enter or select the text that you want converted into a link, or click to place the insertion point where you want the link established.
Enter or select the text that you want converted into a link, or click to place the insertion point where you want the link established.
![]() Click the Insert menu, and then click Hyperlink.
Click the Insert menu, and then click Hyperlink.
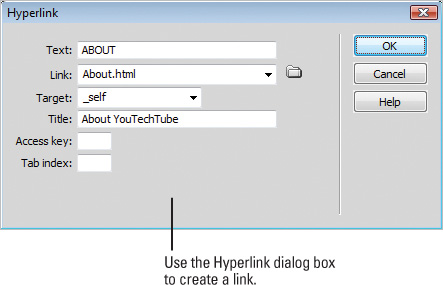
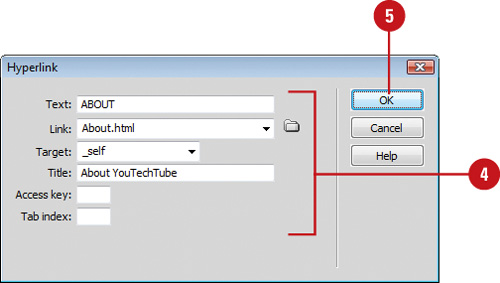
![]() Use the following options to convert the text into a link:
Use the following options to convert the text into a link:
• Text. If you previously selected the text, it appears in this window. If you clicked in the document to add an insertion point, you need to add the text for the link.
• Link. Add the path and link document in the Link Input window, or click the Browse button to locate and add the link.
• Target. Click the Target popup, and then select from the following options:
• _blank. Opens the linked page in a new window.
Note
Be careful of this option because some spam blockers prevent the opening of additional windows.
• _parent. Loads the linked document in the immediate frameset of the active document.

• _self. Loads the linked document in the same browser window (default).
• _top. Loads the linked document in the topmost window of a frameset.
• Title. Insert the title for the link.
• Access Key. Enter a keyboard stroke (one letter), to select the link in the browser (optional shortcut).
• Tab Index. Enter a numerical value to indicate the tab order of this link, as it relates to all other links on the page (optional).
![]() Click OK to add the link to the page.
Click OK to add the link to the page.
In Code view the link would look like this:
<a href=“http://sitename.com” tabindex=“3” title=“Title Text” accesskey=“f” target“_self”>This is the link text<a/>
See Also
See “Modifying a Link” on page 180 for information on changing link settings in the Properties panel.
Where would we be without email... or at least that’s a question that was posed to me by one of my students while I was teaching a class on communications. I will have to admit, e-mail is a big part of our communications structure. You see it everywhere you go: a patron in a restaurant emailing their spouse on the quality of the roast beef, kids emailing their friends, who happen to be sitting right next to them in class. Email is all around us, and Dreamweaver makes the creation of an email link a veritable piece of baklava, cake. Remember, clicking an email link requires that the person doing the clicking has a valid email application, and a connection to the Internet.
![]() Open the Web page that you want to add an email link.
Open the Web page that you want to add an email link.
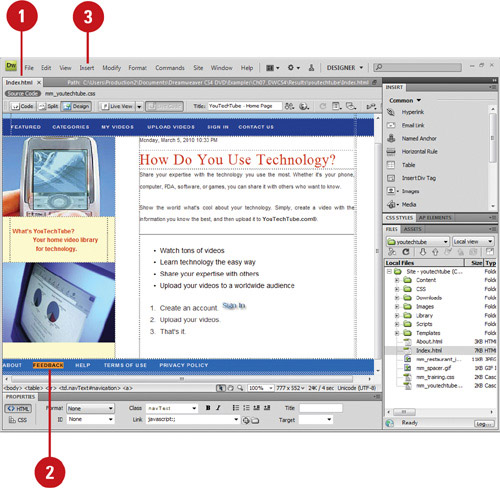
![]() Enter or select the text that you want converted into an email link, or click to place the insertion point where you want the link established. In this example, the appropriate text is selected.
Enter or select the text that you want converted into an email link, or click to place the insertion point where you want the link established. In this example, the appropriate text is selected.
![]() Click the Insert menu, and then click Email Link.
Click the Insert menu, and then click Email Link.
![]() Create the link using the following options:
Create the link using the following options:
• Text. If you previously selected the text, it will appear in this window. If you clicked in the document to add an insertion point, you will be required to add the text for the link.
• E-Mail. Enter a valid email address.
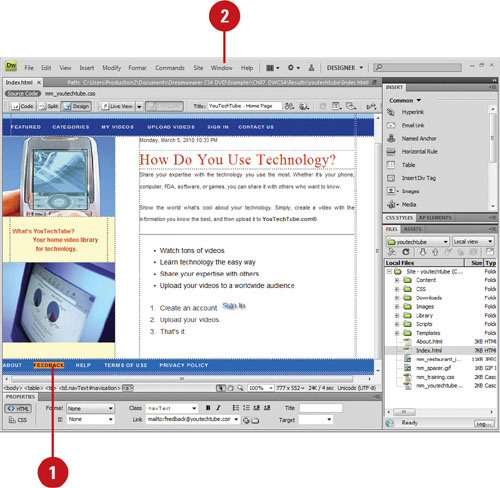
![]() Click OK to add the email link to the page.
Click OK to add the email link to the page.

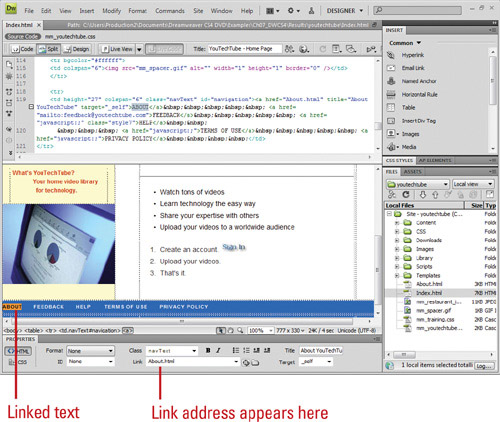
![]() Select the email link in Design view.
Select the email link in Design view.
![]() Click the Window menu, and then click Properties to display the Properties panel.
Click the Window menu, and then click Properties to display the Properties panel.
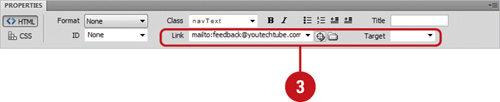
![]() Modify the link using the following options:
Modify the link using the following options:
So far, the Web links created simply jump you from one page to another. When the selected document loads, it places you at the very top of the page. In most circumstances that’s exactly what you want to happen; however, there are times when you want the page to load, and then start the visitor in the middle, or somewhere other than the very top. That’s where named anchors come into play. Named anchors are internal navigation tools that let you select at what part of the page you want the visitor to start. This is extremely helpful in long scrolling documents where you can have the page stop at a particular chapter or paragraph. Named anchors are an HTML anchor tag pair (<a></a>) that includes a name attribute. The named anchor serves as a target for links. To create a named anchor, you first place a named anchor on your Web page, and then create a link that directs the browser to the specific tag. Named anchors are represented by a small book icon that appears in the position of the anchor. You can have as many named anchors as you need in your document and, of course, the corresponding links that direct the browser to the correct anchor.
![]() Open the Web page that you want to add named anchors.
Open the Web page that you want to add named anchors.

![]() Click to place the insertion point where you want the named anchor established. This is where the named anchor is coded in HTML.
Click to place the insertion point where you want the named anchor established. This is where the named anchor is coded in HTML.
![]() Select the Insert menu, and then click Named Anchor.
Select the Insert menu, and then click Named Anchor.
![]() Enter the name for this specific anchor (i.e. chapter1, TOC, etc).
Enter the name for this specific anchor (i.e. chapter1, TOC, etc).
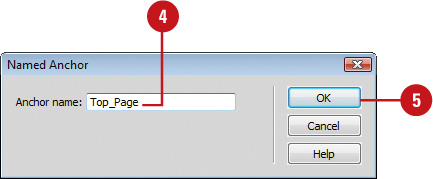
![]() Click OK to add the named anchor to the document.
Click OK to add the named anchor to the document.
![]() Repeat this process to add as many named anchors as needed.
Repeat this process to add as many named anchors as needed.
![]() Select the text (or graphic) that you want to use as the link to a previously created named anchor.
Select the text (or graphic) that you want to use as the link to a previously created named anchor.
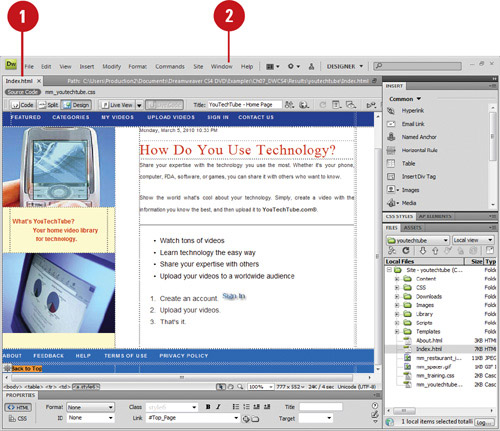
![]() Click the Window menu, and then click Properties to display the Properties panel.
Click the Window menu, and then click Properties to display the Properties panel.
![]() Click in the Link box.
Click in the Link box.
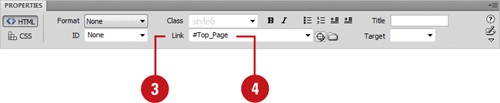
![]() Add the pound sign (#), followed by the name of the anchor (no spacing between the pound sign and the name of the anchor).
Add the pound sign (#), followed by the name of the anchor (no spacing between the pound sign and the name of the anchor).
![]() To test the links, click the File menu, point to Preview In Browser, and then select the browser you want to use.
To test the links, click the File menu, point to Preview In Browser, and then select the browser you want to use.
Timesaver
If you’re using a lot of anchors, it’s not a bad idea to make a list of the anchors, and the order in which they appear within the document. That way you don’t have to hunt for the name or, worse yet, guess.
Did You Know?
You can use the Point To File button to create a link to a named anchor. You can use the Point To File button that appears to the right of the Link box to select an anchor (if it appears in Design view). Simply click the Point To File button, and then drag it over the book icon for the name anchor and release.
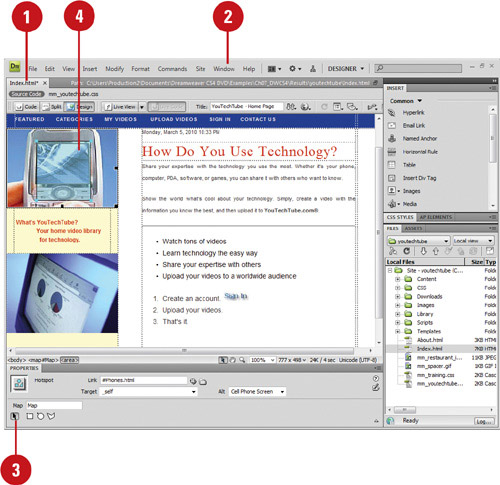
A navigation bar provides an easy-to-use way to get around a Web site. When you click a button on a navigation bar, it links you to another site page. When you incorporate the same navigation bar on every page in your Web site, visitor’s can always access buttons to go to the pages they want on your site. Before you can insert a navigation bar into a Web page, you need to create a set of images for the display status of each navigation element.
![]() Open the Web page you want to insert a navigation bar.
Open the Web page you want to insert a navigation bar.
![]() Click to place the insertion point where you want to create a navigation bar.
Click to place the insertion point where you want to create a navigation bar.
![]() Click the Insert menu, point to Image Objects, and then click Navigation Bar.
Click the Insert menu, point to Image Objects, and then click Navigation Bar.
Timesaver
Click the Image button arrow on the Common tab on the Insert bar, and then click Navigation Bar.
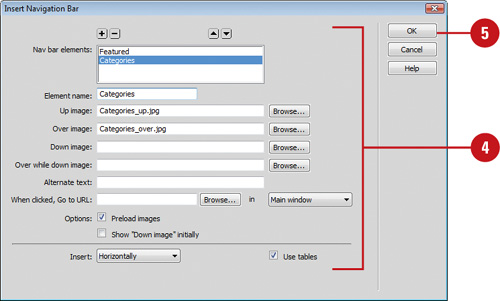
![]() Select from the following options:
Select from the following options:
• Nav Bar Elements. Click the Plus sign (+) to insert an element or select an element, and then click the Minus sign (-) to remove an element.
• Element Name. Enter a name for the navigation bar element, which appear in the Nav Bar Elements list. Use the arrow buttons to arrange elements in the navigation bar.
• Up, Over, Down, and Over While Down Image. Click Browse to select an image for each state. Only the Up image is required. The others are optional.
• Alternate Text. Enter text to describe the element image for viewers using a text-only browser, or for the visually impaired (optional).
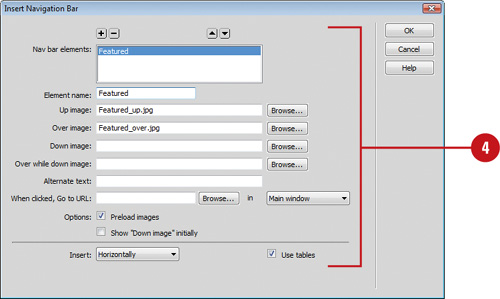
• When Clicked Go To URL. The file that you want to open when a user clicks the rollover image. Enter the path or click Browse, and then select the file.
• Preload Images. Select this option to download images as the page is downloaded.
• Show Down Image Initially. Select this option for elements that you want to display initially in the Down state instead of the Up state, the default.
• Insert Elements. Click the Insert popup, and then click Horizontally or Vertically.
• Use Tables. Select this option to insert elements as a table.
![]() Click OK to add the navigation bar to the active document.
Click OK to add the navigation bar to the active document.
![]() To see the effect in a browser, click the File menu, point to Preview In Browser, and then select the browser you want to use.
To see the effect in a browser, click the File menu, point to Preview In Browser, and then select the browser you want to use.
Did You Know?
You can modify a navigation bar. Select the navigation bar you want to modify, click the Modify menu, and then click Navigation Bar. In the element list, select the element you want to edit, make any changes you want, and then click OK.
See Also
See “Modifying a Navigation Bar” on page 370 for information on using the Set Nav Bar behavior.
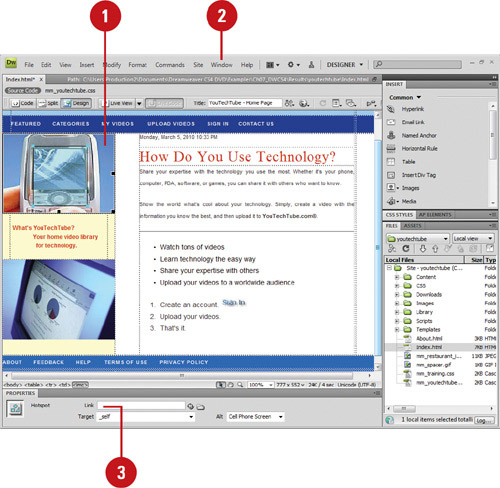
Image maps are an image that has been sub-divided into regions (hotspots); when a user hovers and clicks within a hotspot, a predefined action occurs. For example, you could create a map of the United States with each State as a hot spot; clicking on a specific State would open another Web page and give you the current weather conditions. Dreamweaver allows you to create a client-side map, or a server-side map. Basically, client-side maps store the link information in the HTML document. Therefore, when a visitor clicks a hotspot in the image, the command is sent directly to the server. Server-side maps store the information on the server; while this allows the designer to modify a server-side map; in reality they’re much slower, because every time the visitor clicks on a hot spot, the browser must go back to the originating server to map the response. Client-side maps are faster, because the server does not need to interpret where the visitor clicked. Since, in most cases, client-side maps are faster, easier for the visitor, and are supported by almost every browser your visitors are likely to have; it makes sense to include them into your Web pages.
![]() Open the Web page with the image you want to use to create an image map.
Open the Web page with the image you want to use to create an image map.

![]() Place the image into the document that you want to use to create your image map.
Place the image into the document that you want to use to create your image map.
![]() Click the Window menu, and then click Properties to display the Properties panel.
Click the Window menu, and then click Properties to display the Properties panel.
![]() Create an image map using the following tools:
Create an image map using the following tools:
• Hotspot Tools. Select the Rectangular, Oval, or Polygon hotspot tool, and draw an area on the selected image (this area represents the clickable link area for the visitor).
• Pointer Tool. Select the Pointer tool to select, move, or modify the hotspot.
![]() Click OK to continue.
Click OK to continue.

Hotspot properties appear in the Properties panel.
![]() Enter the link for the active hotspot into the link box. Alternately, you can click the Browse For File button to select the link, or you can click the Point To File button, and drag to the link in the Files or Assets panel.
Enter the link for the active hotspot into the link box. Alternately, you can click the Browse For File button to select the link, or you can click the Point To File button, and drag to the link in the Files or Assets panel.

![]() Click the Target popup, and then select from the following options:
Click the Target popup, and then select from the following options:
• _blank. Opens the linked page in a new window.
• _parent. Loads the linked document in the immediate frameset of the active document.
• _self. Loads the linked document in the same browser window (default).
• _top. Loads the linked document in the topmost window of a frameset.
![]() Enter the alternate text. Used by reader applications for the visually impaired, and for text-only browsers.
Enter the alternate text. Used by reader applications for the visually impaired, and for text-only browsers.
![]() Continue using the hotspot tools until you have completed the client-side image map.
Continue using the hotspot tools until you have completed the client-side image map.
After you create some hotspots in an image map, you can modify them to create the links you want. Using the Pointer tool in the Properties panel, you can select one or more hotspots, move a hotspot area to a new location, resize a hotspot shape, or arrange the stacking order for overlapping hotspots in an absolutely-positioned element (AP element). If you want to duplicate a hotspot for use in the same image map or another one, you can copy and paste it. When you copy an image with one or more hotspots, the hotspots are copied along with the image.
![]() Open the Web page with the image map you want to change.
Open the Web page with the image map you want to change.
![]() Click the Window menu, and then click Properties to display the Properties panel.
Click the Window menu, and then click Properties to display the Properties panel.
![]() Click the Pointer tool.
Click the Pointer tool.
![]() Edit an image map using the following tools:
Edit an image map using the following tools:
• Select Multiple Hotspots. Press and hold the Shift key, and then click each hotspot you want to select.
• Move Hotspots. Drag the hotspot to a new location.
Timesaver
Use the arrow keys to move a hotspot by 1 pixel. Use the Shift + arrow keys to move a hotspot by 10 pixels.
• Resize Hotspots. Drag a hotspot selector handle.
• Arrange Hotspots. Select a hotspot, click the Modify menu, point to Arrange, and then click Bring To Front or Bring To Back.
• Copy Hotspots. Select the hotspot you want to copy, click the Edit menu, click Copy, click the Edit menu, and then click Paste.
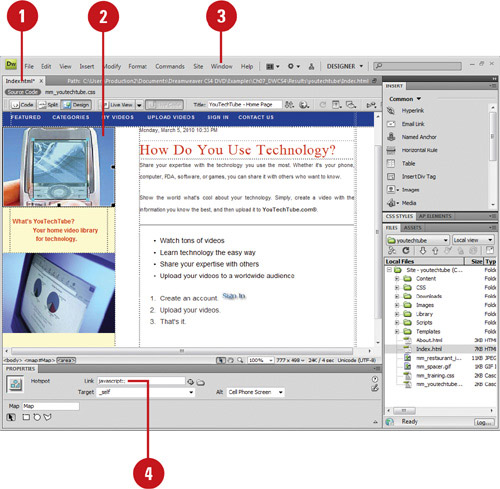
A null link is an undesignated link, while a script link executes JavaScript code or a call to a JavaScript function. A null link is a useful way to activate a link without specifying a target. You can also use a null link to attach behaviors to objects or text on a page. A script link is useful for performing an action, such as performing calculations, without leaving the current Web page.
![]() Open the Web page that you want to create a link.
Open the Web page that you want to create a link.
![]() Select the text, an image, or an object you want to use to create a null or script link.
Select the text, an image, or an object you want to use to create a null or script link.
![]() Click the Window menu, and then click Properties to display the Properties panel.
Click the Window menu, and then click Properties to display the Properties panel.
![]() Use the following options to create a link:
Use the following options to create a link:
• Null. Type javascript:; (the word javascript followed by a colon, followed by a semicolon) in the Link box.
• Script. Type javascript: (the word javascript followed by a colon) followed by JavaScript code or a function call. Do not type a space between the colon and the code or call.
As with any design application, things can change; including links. Say for example, you create a link to a specific site, and the original site owner changes its address. It’s even possible that you created the link and mistyped the link... surely that could never happen. The good news is that just like any other computer application, mistakes are relatively easy to correct, and modifying a link is no exception.
![]() Select the link you want to change in the Design window.
Select the link you want to change in the Design window.

![]() Click the Window menu, and then click Properties to display the Properties panel.
Click the Window menu, and then click Properties to display the Properties panel.
![]() Modify the link using the following options:
Modify the link using the following options:
• Link. Modify the name or path of the link by changing the link information, located within the Link input box. Alternately, you can click the Browse For File button, and then locate the file, or you can click the Point To File button, and then drag over to the Files or Assets panel.
Timesaver
Right-click the link, click Change Link, select the file you want to link to, and then click OK.
• Target. Click the Target popup, and then select from the following options:
• _blank. Opens the linked page in a new window.
• _parent. Loads the linked document in the immediate frameset of the active document.
• _self. Loads the linked document in the same browser window (default).
• _top. Loads the linked document in the topmost window of a frameset.
Removing a link is a lot easier than creating one. As a matter of fact, it only takes a second or two of your precious time. There are several different ways to remove a link. You can delete the contents of the Link box in the Properties panel, use the Remove Link command, or delete the image or text and the link. Removing an entire link is simple, just select the graphic, or text that represents the link, and then press the Backspace (Win) or Delete (Mac) key.
![]() Select the text or graphic that contains the link.
Select the text or graphic that contains the link.
![]() Click the Window menu, and then click Properties to display the Properties panel.
Click the Window menu, and then click Properties to display the Properties panel.
![]() Click in the Link box, and then erase all the text.
Click in the Link box, and then erase all the text.
The link is now removed.
• To prevent a link error, enter the # (null) symbol in the Link box
You can use the General section of the Preferences dialog box to specify how you want to update links in your Web pages. You can have Dreamweaver always update links, never update links, or prompt you when links change. Dreamweaver only updates links in your local root site. The remote site doesn’t change until you update the files on the site. If the updating processing is taking too long, you can create a cache file to store information about all the links to speed up the process. The cache file is managed and maintained by Dreamweaver in the background while you work.
![]() Click the Dreamweaver (Mac) or Edit (Win) menu, and then click Preferences.
Click the Dreamweaver (Mac) or Edit (Win) menu, and then click Preferences.
![]() Click the General category.
Click the General category.

![]() Click the Update Links When Moving Files popup, and then select one of the following:
Click the Update Links When Moving Files popup, and then select one of the following:
• Always. Automatically updates all links when you move or rename a linked document.
• Never. Doesn’t update any links when you move or rename a linked document.
• Prompt. Displays a dialog box listing all the linked documents you have changed. Click Update or Don’t Update to update or leave the file unchanged.
![]() Click OK.
Click OK.
![]() Click the Site menu, and then click Manage Sites.
Click the Site menu, and then click Manage Sites.
![]() Click the site you want to change, and then click Edit.
Click the site you want to change, and then click Edit.

![]() Click the Advanced tab.
Click the Advanced tab.
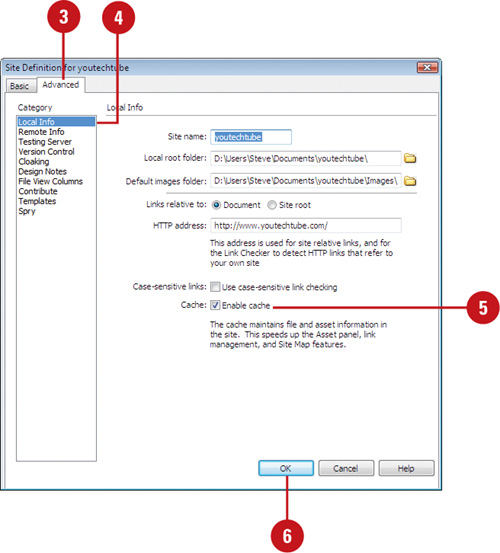
![]() Click the Local Info category.
Click the Local Info category.
![]() Select the Enable Cache check box.
Select the Enable Cache check box.
![]() Click OK.
Click OK.
The first time you change or delete links to files, Dreamweaver prompts you to load the cache.
![]() Click Yes to load the cache and update all links to the file you changed, or click No to note the change for the future and not make any changes to the links.
Click Yes to load the cache and update all links to the file you changed, or click No to note the change for the future and not make any changes to the links.
![]() Click Done.
Click Done.
If you need to change a link across the entire site, you can use the Change Link Sitewide command to manually make the change you want. This command is useful when you want to delete a file other documents are linked to and redirect the link to another document. After you change a link sitewide, the selected file become an orphan (no documents link to it), which you can safely delete without breaking links.
![]() Open the Files panel, and then select the file you want to change in the Local view.
Open the Files panel, and then select the file you want to change in the Local view.
![]() Click the Site menu, and then click Change Link Sitewide.
Click the Site menu, and then click Change Link Sitewide.
![]() Select the options you want:
Select the options you want:
• Change All Links To. Click the Browse For File button to select the target file you want to unlink. If you are changing an e-mail, FTP, null, or script link, type the full text of the link you are changing.
• Into Links. Click the Browse For File button to select the new file to link to. If you are changing an e-mail, FTP, null, or script link, type the full text of the replacement link.
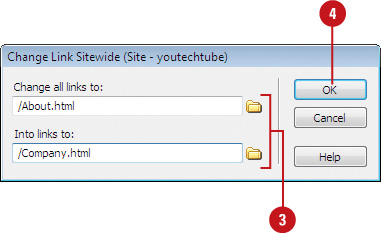
![]() Click OK.
Click OK.
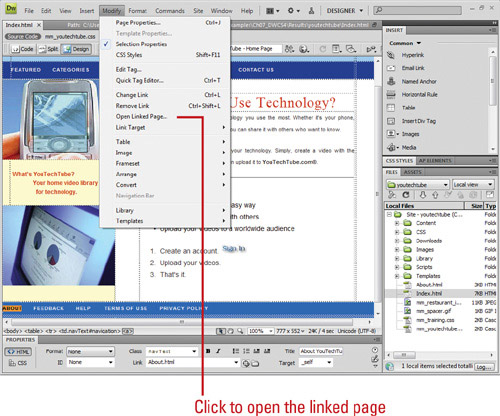
After you create or change a link, it’s important to test the link to make sure it works the way you want. You can test a link by previewing the Web page with a link in a browser, or by opening the linked page. When you want to test a link of any kind, the best way is to preview the page in a browser and click the link you want to test. If you want to test a link to another page and open the linked page, the best way is to open the linked page from within Dreamweaver.
![]() Click the File menu, point to Preview In Browser, and then select a browser to test the link.
Click the File menu, point to Preview In Browser, and then select a browser to test the link.
The link appears as blue underlined text.
![]() Move your mouse over the link (the cursor changes to a hand icon with extended index finger).
Move your mouse over the link (the cursor changes to a hand icon with extended index finger).

![]() Click the link to open it.
Click the link to open it.
• Select the link, click the Modify menu, and then click Open Linked Page.
• Press Ctrl (Win) or Command (Mac), and double-click the link.
See Also
See “Finding Broken Links” on page 452 for information on finding broken links or “Fixing Broken Links” on page 454 for information on changing links sitewide.