Flex applications are event-driven, which means that with the exception of the first phases of application startup, every action is the result of some trigger that causes the action to take place.
Many events are produced by internal functions within the Flex framework that don't necessarily have anything to do with a user's interactions with the application. These are sometimes known as system events. Other events, known as user events, are designed to inform you of actions taken by the user. These actions, known as user gestures, consist of key presses or mouse actions such as moving the mouse or pressing one of its buttons.
Regardless of how an event is generated, you can capture and handle the event in a number of ways. During event handling, you have access to information about the event from a variable known as an event object.
And when you need to share information between an application's components, you can create and dispatch your own custom events to move information and data around the application as needed.
This chapter describes the Flex event architecture: how to find out what events occur and when, what data you can get from them, and how to build your own event architecture.
Note
To use the sample code for this chapter, import the chapter07.zip Flex project archive file from the Web site files into your Flex Builder workspace.
The ActionScript objects you use to build Flex applications communicate with each other and share data by dispatching events. For example, consider a Button control that's declared with MXML:
<mx:Button label="Click Me"/>
As an instance of the mx.controls.Button class, this object supports many properties and methods that we know as the members of the Button class. The Button is capable of generating many events. Each of these events also is considered a member of the class.
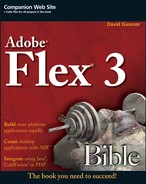
To find out which events are supported by a particular class, look at the API documentation for that class. To get to the API documentation quickly in Flex Builder, place the cursor anywhere in the MXML or ActionScript component or class declaration and press F1 on Windows or Cmd + ? on Mac OS X. Then click the links for the appropriate class documentation that appear in the Help view.
The class's member types are listed at the top of the API documentation. Any class that is capable of generating events displays an Events link, as shown in Figure 7.1.
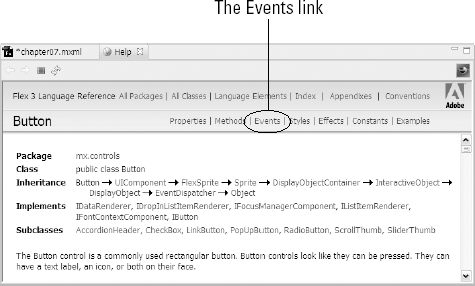
When you click the Events link, the Help view navigates to the Events section of the documentation. As shown in Figure 7.2, you may initially see only a short list of events that are supported by the class. These are the events that are defined locally in the current class. For example, the Button class has three events that are defined locally: buttonDown, change, and dataChange. You also see a Show Inherited Events link that, when clicked, expands the list to include events that are inherited from the current class's inheritance hierarchy.
When you click Show Inherited Events, you see all events that are available to the current class. For example, the Button class's most commonly used event is named click. This event is defined in another class named InteractiveObject, one of the Button class's superclasses. This information is available in the documentation, as shown in Figure 7.3.

You can handle events in two different ways in Flex applications:
With XML attribute-based event handlers in MXML object declarations
With the
addEventListener()method
The first event handling strategy is designed for ActionScript objects that are declared in MXML; the other works for any object, whether declared in MXML or ActionScript.
An MXML event handler uses an XML attribute where the attribute's name matches the name of the event being handled. For example, the Button class's click event uses an XML attribute that's also named click. The value of the XML attribute is an ActionScript statement that causes some action to take place.
Executing a single ActionScript statement in an event handler
If you need to execute a single ActionScript statement for any particular event, you can place the ActionScript code directly in the MXML-based event handler. In the following code, when the user clicks the Button component, the click event is handled and the ActionScript statement in the click XML attribute is executed:
<mx:Button label="Click Me"
    click="messageLabel.text='You clicked the button'"/>
<mx:Label id="messageLabel"/>
Tip
Notice in the above code that the literal string You clicked the button is wrapped in single quotes. This is because the click XML attribute's value (the ActionScript statement) is wrapped in double quotes. In ActionScript, single and double quotes are interchangeable as long as you match them up correctly.
Note
In browser-based JavaScript, the Dynamic HTML (DHTML) equivalent of this event architecture uses event names starting with the word "on" and finishing with the actual event. For example, in JavaScript, you'd use this code to handle an onClick event:
<input type="button" onClick="doSomething()"/>
The result is the same as in MXML: The event handler consists of a markup-based attribute that calls scripting code to be executed upon the event being dispatched. Only the event naming pattern is different.
A simple event handling application
Follow these steps to create a simple application that uses an MXML-based event handler:
Create a new application with the
layoutproperty set tovertical.Add a Label component to the application with an id property set to myLabel.
Add a
Buttoncomponent to the application with alabelproperty set toClick Meand aclickevent handler with ActionScript code that changes theLabelcontrol'stextproperty to a value of YouClicked!.The completed application's code is shown in Listing 7.1.
Run the application, and click the button to see the
Labelcontrol'stextproperty change.
Example 7.1. An application with a simple MXML-based event handler
<?xml version="1.0" encoding="utf-8"?>
<mx:Application xmlns:mx="http://www.adobe.com/2006/mxml"
      layout="vertical">
    <mx:Label id="myLabel"/>
    <mx:Button label="Click Me" click="myLabel.
</mx:Application>
Note
The code in Listing 7.1 is available in the Web site files in the chapter07 project's src folder as SimpleEvent.mxml.
Handling events with ActionScript functions
When you need to execute more than a single ActionScript statement in response to an event, you should create a custom function. The function allows you to add as much code as you need. The event handler function can be very simple:
private function clickHandler():void
{
    ... add ActionScript code here ...
}
Now all the code you want to call is wrapped inside clickHandler(), so to execute the code, call the function from the object's event handler:
<mx:Button label="Click Me" click="clickHandler()"/>
Tip
You can name your event handler functions anything you like. The convention of naming the function with word "handler" at the end isn't a technical requirement, but it helps you identify the function's purpose.
If you have more than a single object whose events you need to handle, name the event handler functions to identify the event that's being handled and the object that's dispatching the event. For example, if you have two buttons with functions to save or cancel an operation, you might name the event handler functions saveClickHandler() and cancelClickHandler(). To call the functions you'd then use this code:
<mx:Button label="Save" click="saveClickHandler()"/>
<mx:Button label="Cancel" click="cancelClickHandler()"/>
Using an event handler function
Follow these steps to create an application that uses an event handler function:
Create a new application with the
layoutproperty set tovertical.Add a
Labelcomponent to the application with an id property set tomyLabel.Add an
<mx:Script>tag set at the top of the application.Within the
<mx:Script>block, add a private function namedclickHandler()that changes theLabelcontrol'stextproperty to a value ofYou Clicked!.Add a
Buttoncomponent to the application with alabelproperty set toClick Me.In the
Buttoncomponent'sclickevent handler, call theclickHandler()function.The completed application's code is shown in Listing 7.2.
Run the application, and click the button to see the
Labelcontrol'stextproperty change.
Example 7.2. Using an event handler function
<?xml version="1.0" encoding="utf-8"?>
<mx:Application xmlns:mx="http://www.adobe.com/2006/mxml"
      layout="vertical">
    <mx:Script>
    <![CDATA[
    private function clickHandler():void
    {
    myLabel.text="You clicked the button";
    }
    ]]>
    </mx:Script>
    <mx:Label id="myLabel"/>
    <mx:Button label="Click Me" click="clickHandler()"/>
</mx:Application>
Note
The code in Listing 7.2 is available in the Web site files in the chapter07 project's src folder as EventWithFunction.mxml.
Tip
Event handler functions typically return void, meaning that their purpose is to take some action but not return any value. When using an MXML-based event handler, this architecture is optional. As described below, when setting up an event handler with the addEventListener() function, the return data type of void is required.
Every event that's dispatched in the Flex framework creates a variable known as an event object. The purpose of an event object is to share information about the nature of the event, including the event's name, the object that dispatched the event, the context of the event, and detailed information that might be useful in understanding what happened.
The event object's variable name
To handle an event and get information from the event object, you typically create an event handler function that's designed to receive the event object as an argument. When the event occurs, you then call the event handler function and pass the event object as its argument. For the duration of an MXML-based event handler, the name of the event object is always the same: event (always spelled in lowercase). So, assuming you've created a clickHandler() function that's designed to receive an event argument, the syntax of the MXML object declaration becomes this:
<mx:Button label="Click Me" click="clickHandler(event)"/>
The event object is always an instance of an ActionScript class named flash.events.Event or a subclass of this Event class. When you create an event handler function to receive an event object, you can always data type the argument as the Event class:
private function clickHandler(event:Event):void
{
    myLabel.text="You clicked the button";
}
Tip
All event objects can be handled as the Event class as they're passed into an event handler function, even if their true type is a subclass of the Event class. This convenient shortcut is made possible by ActionScript's support for polymorphism, where objects can be cast as and handled as their superclass types. As long as you don't need to refer to event object properties that are only implemented in the subclass, such as MouseEvent, typing the event object as Event doesn't have any negative effect on the application's performance or functionality.
Using event object properties
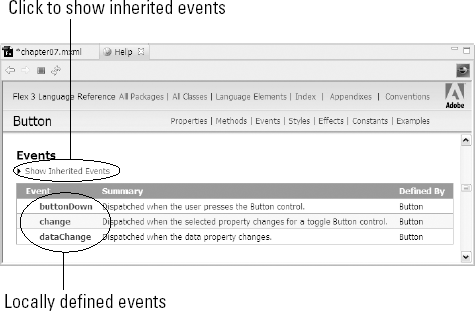
As shown in the UML diagram in Figure 7.4, the Event class supports properties and methods that let you get information about the event and in some cases control its behavior. (The diagram shows only certain key properties and methods of the Event class. See the class's API documentation for a complete list.)
These are the key properties of the Event class:
type:String:The name of the event that was dispatched as aString. For example, when the click event is handled, the value of the event object'stypeproperty is "click."target:Object:A reference to the object that dispatched the event. Because thetargetproperty points to the object, any of that object's properties are then available with extended dot syntax. For example, aButtoncomponent's id property would be available asevent.target.id, and itslabelasevent.target.label.
Note
Other key properties of the Event class are described below in the section on event bubbling.
When you pass an event object to an event handler function as an argument, you have access to all the event object's properties for the duration of the function. To capture information about the event, use the properties that are of interest:
private function clickHandler(event:Event):void
{
    myLabel.text="You clicked the button labeled " +
    event.target.label;
}
Tip
When writing code that refers to event.target, you might notice that properties like label that aren't available on all ActionScript classes aren't suggested by Flex Builder code completion tools. This is because the expression event.target is known to the Flex compiler and to Flex Builder as an instance of the ActionScript Object class, and only properties that are implemented in that class will be suggested for auto-completion.
If you know that event.target refers to a Button in the context of a particular event handler function, you can safely refer to the Button class's properties (such as label). The code will compile and execute correctly, even if Flex Builder's code completion isn't able to help you write it.
Using event object properties in an application
Follow these steps to create an application that uses event object properties:
Create a new application with the
layoutproperty set tovertical.Add a
Labelcomponent to the application with an id property set tomyLabel.Add an
<mx:Script>tag set at the top of the application.Within the
<mx:Script>block, add a private function namedclickHandler()that receives an argument named event, data typed as theEventclass.Add this code to
clickHandler()to display the eventtypeand the id of the eventtarget:myLabel.text="The " + event.type + " event was dispatched by " + event.target.id;
Add a
Buttoncomponent to the application with alabelproperty set toClick Me.In the
Buttoncomponent'sclickevent handler, call theclickHandler()function and pass theeventobject as a function argument.The completed application's code is shown in Listing 7.3.
Run the application, and click the button to see the
Labelcontrol'stextproperty change.
Example 7.3. Using event object properties
<?xml version="1.0" encoding="utf-8"?>
<mx:Application xmlns:mx="http://www.adobe.com/2006/mxml"
layout="vertical">
<mx:Script>
<![CDATA[
private function clickHandler(event:Event):void
{
myLabel.text="The " + event.type +
" event was dispatched by " + event.target.id;
}
]]>
</mx:Script>
<mx:Label id="myLabel"/>
<mx:Button label="Click Me" click="clickHandler(event)"/>
</mx:Application>Note
The code in Listing 7.3 is available in the Web site files in the chapter07 project's src folder as EventObjectProperties.mxml.
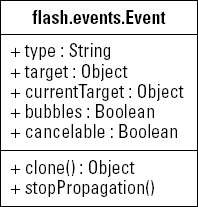
Event objects are created as specific class types depending on the nature of the event that's dispatched. For example, events having to do with mouse actions are typically instances of a class name flash.events.MouseEvent. As shown in the UML diagram in Figure 7.5, MouseEvent, ResultEvent, TextEvent, and dozens of other classes in the Flash and Flex class libraries are directly extended from the standard Event class.
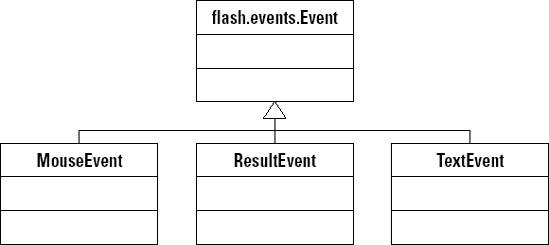
When an event class such as MouseEvent extends Event, it inherits that superclass's basic properties such as type and target. The subclass typically defines additional properties that are useful for that particular event. The MouseEvent class adds properties to track button state, mouse cursor position, and other useful information. Some of these properties include:
altKey:Boolean:Set totrueif the Alt key is held down when the event is dispatched; otherwisefalse.ctrlKey:Boolean:Set totrueif the Ctrl key is held down when the event is dispatched; otherwisefalse.shiftKey:Boolean:Set totrueif the Shift key is held down when the event is dispatched; otherwisefalse.commandKey:Boolean:Set totrueif the command key on the Mac is held down when the event is dispatched; otherwisefalse. Always set tofalseon Windows.localX:int:The number of pixels from the left border where the user clicked an object dispatching the event.localY:int:The number of pixels from the top border where the user clicked an object dispatching the event.stageX:int:The number of pixels from the left border where the user clicked the stage (Flash Player region).stageY:int: The number of pixels from the top border where the user clicked the stage (Flash Player region).
buttonDown:Boolean:Set totrueif the primary mouse button is pressed when the event is dispatched; otherwisefalse.
Which event class will I get?
To find out what specific class will be dispatched for a particular event, you can use one of these strategies:
Debug the application, and inspect the event object in the Variables view.
Read the API documentation for the object whose event you're handling.
Place the mouse cursor over the
eventobject where it's passed into the event handler function in Flex Builder 3 and get a tool tip describing the class name.
Debugging the event object
Follow these steps to debug the application and inspect the event object:
Place a breakpoint in the event handler function on a line of ActionScript code or, if the function is empty, on the line with the function's closing brace:
private function clickHandler(event:MouseEvent):void
{
} //place breakpoint here
Debug the application.
Trigger the event that calls the event handler function (for example, by clicking a button).
When the breakpoint suspends the application, inspect the function's
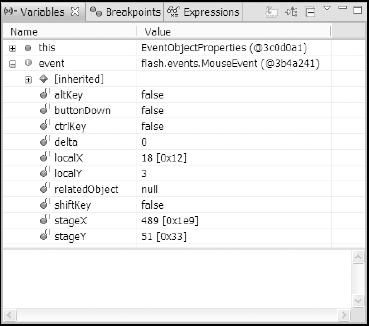
eventargument in the Flex Debugging perspective's Variables view.
As shown in Figure 7.6, the Variables view displays the event object's type and all its current property values.
Reading the documentation
Documentation for every event in the Flex Framework includes the type of the event object that will be dispatched when the event occurs. For example, the documentation for the Button class's click event shows that the event object is an instance of flash.events.MouseEvent. To find this information:
Place the cursor in the object declaration in Source view.
Press F1 to display a list of Help subjects.
Click the link for the class or component you're using.
In the API documentation, click the
Eventslink.Locate the event you're interested in, and click its link.
As shown in Figure 7.7, you should see the specific type of the class that will be dispatched for that event.

Handling specific event objects
To capture information that's available only in one of the extended event classes, set an event handler function's event argument to that class. For example, this event handler function expects an instance of MouseEvent:
private function clickHandler(event:MouseEvent):void
{
    myLabel.text="You clicked; was the alt key pressed? " +
    event.altKey;
}
The altKey property is available only because the event argument is declared as the subclass that supports that property. If the event argument instead is declared as the Event superclass, the altKey property isn't recognized by the compiler and a compiler error results.
The complete application shown in Listing 7.4 is an application that captures a MouseEvent and displays the status of the keys on the keyboard at the moment the event is dispatched.
Example 7.4. An application that handles a MouseEvent object
<?xml version="1.0" encoding="utf-8"?>
<mx:Application xmlns:mx="http://www.adobe.com/2006/mxml"
      layout="vertical">

    <mx:Script>
    <![CDATA[
    private function clickHandler(event:MouseEvent):void
    {
    myLabel.text="The " + event.type +
    " event was dispatched by " + event.target.id;
    altLabel.text="Alt key pressed: " + event.altKey;
    ctrlLabel.text="Ctrl key pressed: " + event.ctrlKey;
    shiftLabel.text="Shift key pressed: " + event.shiftKey;
    }
    ]]>
    </mx:Script>

    <mx:Label id="myLabel"/>
    <mx:Label id="altLabel"/>
    <mx:Label id="ctrlLabel"/>
    <mx:Label id="shiftLabel"/>

    <mx:Button label="Click Me" click="clickHandler(event)"/>

</mx:Application>Note
The code in Listing 7.4 is available in the Web site files in the chapter07 project's src folder as MouseEventObjectProperties.mxml.
You also can set up event handlers with a method named addEventListener(). This method is defined in an ActionScript class named EventDispatcher, which appears in the inheritance hierarchy of every ActionScript class that's able to dispatch events. Stated more briefly, you can call addEventListener() from any object that knows how to dispatch an event.
The following MXML code declares a Button component with a click event handler:
<mx:Button id="myButton" label="Click Me"
    click="clickHandler(event)"/>
The following code calls addEventListener() instead of the MXML-based event handler:
myButton.addEventListener("click", clickHandler);The first argument you pass to addEventListener() is the name of the event you're listening for. The second argument is the name of the function you want to call when the event is dispatched.
Caution
Notice that you pass the name of the function as the second argument, not the complete code required to call the function. You're designating which function to call, rather than calling the function immediately.
The object from which you call addEventListener() always calls the listener function with the same signature, passing a single argument data typed as the appropriate event class for that event. Event listener functions designed to be used with addEventListener() always have the same signature:
[access modifier] function [functionName](
    event:[event class data type]):void
{}
So a function designed to receive an instance of MouseEvent always looks like this:
private function clickHandler(event:MouseEvent):void
{
    ... execute event handling code ...
}
You typically call addEventListener() during application startup, where it can replace an MXML-based event handler definition. For example, you might set up your event listeners in a function named initApp() that's called upon the Application component's creationComplete event. The application in Listing 7.5 uses this strategy. Notice the following:
The
initApp()function returnsvoid.The
initApp()function is called during application startup upon the Application'screationCompleteevent.The MXML-based declaration of the
Buttoncomponent doesn't have aclickevent handler; this would be redundant and in fact would result in the event handler function being called twice.
Example 7.5. An application that uses addEventListener()
<?xml version="1.0" encoding="utf-8"?>
<mx:Application xmlns:mx="http://www.adobe.com/2006/mxml"
      layout="vertical"
    creationComplete="initApp()">
    <mx:Script>
    <![CDATA[
    private function initApp():void
    {
    myButton.addEventListener("click", clickHandler);
    }
    private function clickHandler(event:MouseEvent):void
{
myLabel.text="The " + event.type +
" event was dispatched by " + event.target.id;
}
]]>
</mx:Script>
<mx:Button id="myButton" label="Click Me"/>
</mx:Application>Note
The code in Listing 7.5 is available in the Web site files in the chapter07 project's src folder as UsingAddEventListener.mxml.
Each event class in the Flex framework implements constants that have values equal to the names of events for which the event class is used. For example, the MouseEvent class has many constants that reflect the names of events for which this event class is dispatched (shown with their equivalent values):
CLICK= "click"MOUSE_DOWN= "mouseDown"MOUSE_UP= "mouseUp"MOUSE_MOVE= "mouseMove"RIGHT_CLICK= "rightClick"MOUSE_WHEEL= "mouseWheel"
There are more, but you get the picture. You use these constants in calls to addEventListener() instead of phrasing the event name as a literal string. For example, instead of this code:
myButton.addEventListener("click", clickHandler);you can use this:
myButton.addEventListener(MouseEvent.CLICK, clickHandler);
When you use event name constants, you reduce the risk of typing errors in your code. When you use literal strings to indicate which event you want to listen for, it's easy to misspell the name. For example, this code would result in an event listener that will never be triggered, because no event name is clik:
myButton.addEventListener("clik", clickHandler);Because the event name is phrased as a literal string, the compiler has no way of knowing that it's misspelled. Of course, you can make the same mistake with an event name constant:
myButton.addEventListener(MouseEvent.CLIK, clickHandler);
But in this case, the compiler would complain, as shown in Figure 7.8, telling you that there is no such property or constant as CLIK in the MouseEvent class, and you'd be able to find and fix the error at a much earlier stage of development.

Another advantage of using event name constants comes from Flex Builder's code completion tool. As shown in Figure 7.9, when you type the name of the MouseEvent class and add a period, you see a list of available constants that are members of the class. You can then select the appropriate event name and ensure that it's typed correctly from the beginning.

You can remove an event listener that was set up with addEventListener() with the removeEventListener() method. This method also is defined in the EventDispatcher class and can be called from any object that dispatches events.
The basic syntax for removeEventListener() is the same as addEventListener():
myButton.removeEventListener(MouseEvent.CLICK, clickHandler);
The addEventListener() and removeEventListener() methods allow you to add and remove event listeners as needed whenever an application's requirements change logically at runtime.
Event bubbling refers to the process of dispatching events through multiple levels of inheritance. Consider this application code, which defines a Button control inside a VBox container:
<?xml version="1.0" encoding="utf-8"?>
<mx:Application xmlns:mx="http://www.adobe.com/2006/mxml"
    layout="vertical">
    <mx:VBox id="myContainer">
    <mx:Button label="Click me" id="myButton"/>
    </mx:VBox>
</mx:Application>
When the Button component is clicked, it dispatches a click event. All event objects have a Boolean property named bubbles. When this property's value is set to true, as it is by default with the MouseEvent class, the event first is dispatched by the object that was clicked, then by its container, and so on up the display tree until it's dispatched by the application itself.
Each time the event bubbles up another containership level, the event object is cloned and the new version contains all the original properties and the stored values of the original. But one property is changed: Each new copy of the event object has a currentTarget property that refers to the object that's currently dispatching the event. In the meantime, each event object's target property continues to reference the object that originally dispatched the event.
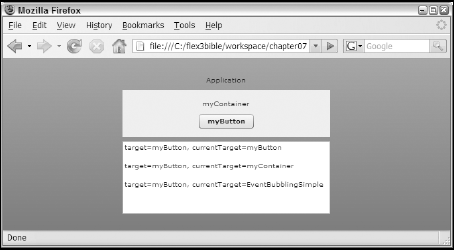
The application in Listing 7.6 uses a two-level containership hierarchy: a Button inside a VBox inside an Application. All objects handle the click event and dispatch the event object to a clickHandler() function, where the target and currentTarget are logged.
Example 7.6. An application that tracks simple event bubbling
<?xml version="1.0" encoding="utf-8"?>
<mx:Application xmlns:mx="http://www.adobe.com/2006/mxml"
      layout="vertical"
    verticalAlign="middle" click="clickHandler(event)">

    <mx:Script>
    <![CDATA[
    private function clickHandler(event:Event):void
    {
    eventLog.text += "target=" + event.target.id +
    ", currentTarget=" + event.currentTarget.id + "

";
    }
    ]]>
    </mx:Script>

    <mx:Label text="Application"/>
    <mx:VBox id="myContainer" height="50%" width="50%"
    horizontalAlign="center" verticalAlign="middle"
    backgroundColor="#eeeeee"
    click="clickHandler(event)">
    <mx:Label text="myContainer"/>
    <mx:Button label="myButton" id="myButton"
    click="clickHandler(event)"/>
    </mx:VBox>
    <mx:TextArea id="eventLog" height="110" width="50%"/>
</mx:Application>
Note
The code in Listing 7.6 is available in the Web site files in the chapter07 project's src folder as EventBubblingSimple.mxml.
As shown in Figure 7.10, each time the event is handled, the target property always points to the Button component, while the currentTarget changes with each new call to the event handler function.
Tip
Event bubbling works only if the parent container declares the event you want to handle. For example, if you try to handle a change event from a ComboBox in a parent VBox in MXML, an error occurs because the compiler says there is no change event to listen for. To overcome this limitation, create your own custom component based on the container you want to use, and explicitly declare the selected event as a member of the new version of the container.
You use custom events to communicate information and data between application components. As described previously, Flex applications are built with a modular architecture, with functionality divided between multiple components. When a component needs to share information with the rest of the application, it does so by dispatching an event.
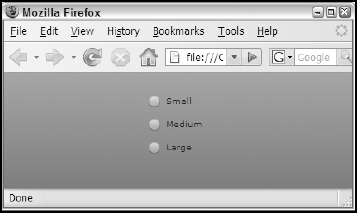
The following MXML component displays three choices of Small, Medium, and Large in a group of RadioButton components:
<?xml version="1.0" encoding="utf-8"?>
<mx:VBox xmlns:mx="http://www.adobe.com/2006/mxml">
    <mx:RadioButtonGroup id="sizeGroup"/>
    <mx:RadioButton value="Small" label="Small"
    groupName="sizeGroup"/>
    <mx:RadioButton value="Medium" label="Medium"
    groupName="sizeGroup"/>
    <mx:RadioButton value="Large" label="Large"
    groupName="sizeGroup"/>
</mx:VBox>
Note
The above code is available from the Web site files' chapter07 project as components/SizeSelectorStart.mxml.
When the user clicks a radio button to make a selection, the component can share the following information with the rest of the application:
The user selected something.
The user selected a particular bit of data.
In order to share the information, you'll need to follow these steps within the component:
Define a custom event that the MXML component is capable of dispatching.
Create an event object at runtime.
Populate the event object with data.
Dispatch the event object.
In the application that instantiates the custom component, you'll follow these steps:
Create an event handler using either an MXML-based event attribute or the
addEventListener()method.Create a custom event handler function that extracts the data from the dispatched event object.
You declare custom events in a component with the <mx:Metadata> tag and a metadata tag named [Event]. Start by adding the <mx:Metadata> tag set as a child of the component root:
<mx:VBox xmlns:mx="http://www.adobe.com/2006/mxml">
    <mx:Metadata>
    </mx:Metadata>
    ... remainder of component code ...
</mx:VBox>
Within the <mx:Metadata> tag set, add one [Event] metadata tag for each custom event you want to declare. The syntax of the [Event] metadata tag is:
[Event(name="[custom event name]", type="[event object type]")]
The [Event] metadata tag has these two attributes:
name:A string that identifies your custom event, and can be of any value. Just as the Flex framework uses event names likeclick, change, andmouseMove, you can select any meaningful string as long as it doesn't contain any spaces or special characters. This value is required.type:The name of an event class that will be instantiated and dispatched to an event listener. The default is the standardflash.events.Eventclass.
If you only need to dispatch an event that informs the event listener that the event occurred, and don't need to share specific data, you can use a shorthand form of the [Event] tag that omits the type attribute:
[Event(name="sizeSelected")]
If you need to share specific data with the event listener and use a special event class that is designed to contain that data, include the type property and refer to the fully qualified event class name:
[Event(name="sizeSelected", type="flash.events.TextEvent")]
Tip
The TextEvent class is already part of the Flash class library and has a text property you can use to package and share a simple String value when you dispatch a custom event. If you only need to share a String, it doesn't make sense to create a custom event class-you'd just be reinventing a wheel.
Adding an event declaration to a custom component and testing it
Follow these steps to add an event declaration to a custom MXML component:
Open
components/SizeSelector.mxmlfrom thechapter07project from the Web site.Place the cursor after the starting
<mx:VBox>tag.Add an
<mx:Metadata> tag set.Within the
<mx:Metadata>tag set, declare a custom event namedsizeSelectedthat dispatches an event object typed asflash.events.TextEvent. The code to declare the event looks like this:<mx:Metadata> [Event(name="sizeSelected", type="flash.events.Event")] </mx:Metadata>Save the file.
Create a new MXML application named
CustomEventApp.mxmlin thechapter07project.Declare an instance of the
SizeSelectorStartcomponent with MXML:<components:SizeSelectorStart/>
Place the cursor after the
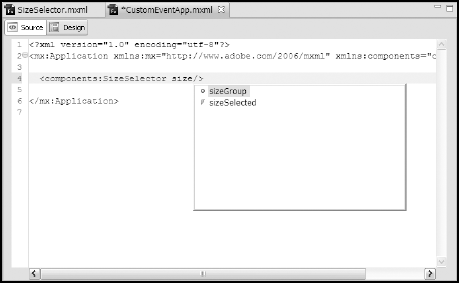
SizeSelectortag name and before the ending /> characters.Press the spacebar to see a list of available class members.
Type size to filter the list.
As shown in Figure 7.11, you should see that the list displays the new
sizeSelectedevent as a member of the component.Remove the partial event attribute size (you learn how to use this attribute in the next section) so you have only the tag declaration with no event listener.
Save and run the application.
As shown in Figure 7.12, the application displays the component but isn't yet handling the custom event.
To dispatch a custom event, follow these steps:
Create an instance of the event class you declared as the event type.
When you instantiate the event object, set its
typeproperty as the name of the custom event. All event classes in the Flex framework have a constructor method that allows you to set the event name as you instantiate the object:var myEvent:Event = new Event("[my event name]");Populate the event object with data, if applicable.
Call the component's
dispatchEvent()method, and pass the event object as the only argument:dispatchEvent(myEvent);
The complete code to dispatch a TextEvent class for an event named sizeChanged looks like this:
var e:TextEvent = new TextEvent("sizeChanged");
e.text = "some value I want to share";
dispatchEvent(e);Follow these steps to dispatch an event from the custom component:
Re-open
components/SizeSelector.mxmlfrom thechapter07project.Add an
<mx:Script>tag set after the <mx:Metadata> tag set.Within the script section, create a private function name
clickHandler()that receives aneventargument typed asEventand returns void.Add this code to the event handler function:
var e:TextEvent = new TextEvent("sizeSelected"); e.text = sizeGroup.selection.value as String; dispatchEvent(e);Add an event handler named
itemClickto theRadioButtonGroupcomponent, and call the new function, passing the event object:<mx:RadioButtonGroup id="sizeGroup" itemClick="clickHandler(event)"/>Save the file.
The completed component code is shown in Listing 7.7.
Example 7.7. A completed component that dispatches a custom event with data
<?xml version="1.0" encoding="utf-8"?>
<mx:VBox xmlns:mx="http://www.adobe.com/2006/mxml">
<mx:Metadata>
    [Event(name="sizeSelected", type="flash.events.Event")]
</mx:Metadata>
<mx:Script>
<![CDATA[
private function clickHandler(event:Event):void
{
var e:TextEvent = new TextEvent("sizeSelected");
e.text = sizeGroup.selection.value as String;
dispatchEvent(e);
}]]>
</mx:Script>
<mx:RadioButtonGroup id="sizeGroup"
    itemClick="clickHandler(event)"/>
<mx:RadioButton value="Small" label="Small" groupName="sizeGroup"/>
<mx:RadioButton value="Medium" label="Medium" groupName="sizeGroup"/>
<mx:RadioButton value="Large" label="Large" groupName="sizeGroup"/>
</mx:VBox>Note
The code in Listing 7.7 is available in the chapter07 project from the Web site as components/SizeSelectorComplete.mxml.
Tip
The RadioButtonGroup component's selection.value property must be explicitly cast as a String, because the API declares it as an Object and the String type is expected by the TextEvent class's text property.
Event handling with custom events looks just like handling events that are predefined by classes in the Flex framework. You can handle a custom event in these two ways:
With an MXML-based event attribute that executes explicit ActionScript code
With the
addEventListener()method
Handling a custom event with MXML
To handle an event with an MXML declaration, add an XML attribute named for the event to the MXML declaration of the object that will dispatch the event. When the event is dispatched, call a custom event handler function and pass the event object as an argument:
<components:SizeSelectorComplete
    sizeSelected="sizeSelectedHandler(event)"/>
Create a custom event handler function that expects the appropriate event class as its event argument:
private function sizeSelectedHandler(event:TextEvent):void
{
    ... process event data here ...
}
When the event occurs, the event handler function is executed and the data can then be appropriately handled.
Follow these steps to handle a custom event with an MXML event handler:
Open
CustomEventApp.mxmlfrom thechapter07project.Add a
Labelcomponent at the end of the application with an id ofsizeMessage.Add an
<mx:Script>tag set to the application.Create a private function named
sizeSelectedHandler()that receives an event argument typed asTextEventand returnsvoid.Within the event handler function, set the
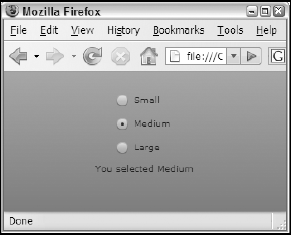
textproperty of thesizeMessageobject to the text property of the event object. The function should now look like this:private function sizeSelectedHandler(event:TextEvent):void { sizeMessage.text = "You selected " + event.text; }Save and run the application, and click a radio button.
As shown in Figure 7.13, you should see that the selected radio button's value is displayed in the application.
Note
The completed application is available in the Web site files as CustomEventAppComplete.mxml in the chapter07 project.
Custom event classes can be used when you need to share complex data with the application or other components. For example, a data entry form component might need to share more than a single string value when the user clicks the form's button to indicate that data entry is complete.
An ActionScript class that's designed to be used as an event object has these requirements:
The custom event class must be extended from
flash.events.Event.The custom event class's constructor method should call the
Eventclass's constructor method and pass the name of the event using a virtual method namedsuper().Data elements that are wrapped inside the event class are declared as public properties.
If the event class is designed to bubble upward through the container hierarchy, two additional requirements must be met:
The custom event class's
bubblesproperty must be set totrue.The custom event class must declare a
clone()method that overrides the version declared in the superclassEvent.
Custom event classes are designed as ActionScript classes that extend the Event class. You can place the custom event class in any folder within a project source root; typically they're created in a folder simply named events.
Using the New ActionScript Class wizard
Follow these steps to create a custom event class that holds data for a Login form:
In the
chapter07project's source root, right-click theeventssubfolder and select New→ActionScript class.In the New ActionScript Class wizard, shown in Figure 7.14, enter LoginEvent as the Name of the new class.
Click Browse next to the Superclass text box.
In the Open Type dialog box, shown in Figure 7.15, type Event to browse to the
flash.events.Eventclass.Click OK to select the Event class.
Select the Generate constructor from superclass option.
Click Finish to create the
LoginEventclass.


The generated class code should now look like this:
package events
{
    import flash.events.Event;
    public class LoginEvent extends Event
    {
    public function LoginEvent(type:String,
    bubbles:Boolean=false, cancelable:Boolean=false)
    {
    super(type, bubbles, cancelable);
    }
    }
}
Tip
Notice that the call to the super() method passes the type (the name of the event) and the bubbles and cancelable properties. The last two properties are marked as optional, by setting default values of false. This means that when you create an instance of the LoginEvent class, you only need to pass the name of the event if you don't need the bubbles or cancelable properties set to true:
var myEvent:LoginEvent = new LoginEvent("myEventName");Each data value you want to wrap into the custom event class should be declared as a public property. For example, a data value for the user's password in a login data entry form would be declared as:
public var password:String;
Follow these steps to add user and password data elements to the custom event class:
In the generated
LoginEvent.asfile, place the cursor inside the class declaration.Declare two public properties named
usernameandpassword, both data typed asString:public var username:String; public var password:String;
Declaring event name constants
If you know the name of certain custom events for which the custom event class is designed, you can declare static event name constants that serve the same purpose of such constants as MouseEvent.CLICK; they help you accurately code the rest of the application.
For example, if the LoginEvent class will be used for a custom event named login, you would declare the event name constant with:
public static const LOGIN:String="login";
When you listen for the event using addEventListener(), you can use the constant with this code:
myComponent.addEventListener(LoginEvent.LOGIN, loginHandler);
The ActionScript class in Listing 7.8 declares custom properties and event name constants.
Example 7.8. The custom event class with properties and event name constants
package events
{
import flash.events.Event;
public class LoginEvent extends Event
{
public var username:String;
public var password:String;
public static const LOGIN:String="login";
public function LoginEvent(type:String,
bubbles:Boolean=false, cancelable:Boolean=false)
{
super(type, bubbles, cancelable);
}
}
}Note
The code in Listing 7.8 is available in the Web site files as events/LoginEvent.as in the chapter07 project.
The Event class has a method named clone() that's used during the bubbling process to create new copies of the event object for each level of bubbling. As described previously, the event object's currentTarget property changes its value each time the event is dispatched to point to the container or control that's currently dispatching the event. By creating a new copy on each dispatch, the currentTarget for previous versions of the event object doesn't change.
Caution
When you override a method in ActionScript, you must include the override keyword in the method declaration:
override public function superMethod():void
{}
If you don't include the override keyword and the method name matches one that's already declared in the current class's inheritance hierarchy, the compiler generates an error.
Keep in mind these rules for overriding the clone() method:
The method must be marked with
overrideandpublic.The method's return data type should be
Event.Within the method:
Instantiate the current custom event class.
Populate the new copy with data from the current copy.
Return the new copy.
The clone() method for the LoginEvent class would look like this:
override public function clone():Event
{
    var newEvent:LoginEvent = new LoginEvent(type);
    newEvent.username = username;
    newEvent.password = password;
    return newEvent;
}
Notice that the current object's type property (the name of the current event) is passed to the new copy of the event object in the constructor method call.
Tip
If you don't make an event bubble, it doesn't need a clone() method. By default, custom event classes have their bubbles property set to false. To turn bubbling on whenever you use the custom event class, pass a value of true to the superclass's constructor method's second argument, as in:
super(type, true, cancelable);
When you dispatch a custom event class, follow these steps, which are the same as for pre-built event classes in the Flex framework:
Define a custom event that sets the type as the new custom ActionScript class.
Create an event object typed as the custom event class at runtime.
Populate the event object with data.
Dispatch the event object.
To declare a custom event named login that dispatches an instance of the LoginEvent class described above, the code within the custom Form component would look like this:
<mx:Metadata>
    [Event(name="login", type="events.LoginEvent")]
</mx:Metadata>
At runtime, you would create an instance of the event class, passing the event name into the constructor method:
var e:LoginEvent = new LoginEvent("login");The next step is to populate the event object with data. Assuming you have TextInput controls with their id properties of userNameInput and passwordInput, the code would be:
e.username = userNameInput.text;
e.password = passwordInput.text;
Finally, dispatch the event just as you would with one of the pre-built event classes:
dispatchEvent(e);
Listing 7.9 shows a Form component that declares and dispatches the custom event using the custom event class.
Example 7.9. A Form component that dispatches a custom event object
<?xml version="1.0" encoding="utf-8"?>
<mx:Form xmlns:mx="http://www.adobe.com/2006/mxml">
    <mx:Metadata>
    [Event(name="login", type="events.LoginEvent")]
    </mx:Metadata>
    <mx:Script>
    <![CDATA[
    import events.LoginEvent;
    private function doLogin():void
    {
    var e:LoginEvent = new LoginEvent("login");
    e.username = userNameInput.text;
    e.password = passwordInput.text;
    dispatchEvent(e);
    }
    ]]>
    </mx:Script>
    <mx:FormItem label="User Name:">
    <mx:TextInput id="userNameInput"/>
    </mx:FormItem>
    <mx:FormItem label="Password:">
    <mx:TextInput id="passwordInput"/>
    </mx:FormItem>
    <mx:FormItem>
    <mx:Button label="Log In" click="doLogin()"/>
    </mx:FormItem>
</mx:Form>
Note
The code in Listing 7.9 is available in the Web site files as components/LoginForm.mxml in the chapter07 project.
You handle an event that uses a custom event class in two ways-the same as with the Flex framework's pre-built event classes:
With an MXML-based event handler
With
addEventListener()
In either case, you create a custom event handler function that expects an event argument typed as your custom event class:
private function loginHandler(event:LoginEvent):void
{}
Tip
Unlike the event classes in the flash.events package, your custom event classes must be imported prior to use:
import events.LoginEvent;
Flex Builder can create import statements for you as you type. For example, as you type the string LoginEvent in the event handler function signature, Flex Builder presents a list of classes that match what you've typed. When you select your class, the import statement for that class is added at the top of the ActionScript code.
Tip
If you don't see the list of available classes, press Ctrl+spacebar to trigger Flex Builder's code completion tool.
Within the event handler function, extract data as needed. The complete event handler function might look like this:
private function loginHandler(event:LoginEvent):void
{
    messageLabel.text = "You logged as " + event.username +
    " with a password of " + event.password;
}
Then, to call the event handler function, use an MXML-based event handler, as in:
<components:LoginForm login="loginHandler(event)"/>
Or, if you prefer to use addEventListener(), call this code as the application starts up:
myForm.addEventListener(LoginEvent.LOGIN, loginHandler);
Either way, the loginHandler() function is called and the data is delivered to the application.
In this chapter, I described the Flex event architecture and how you can create your own events to share data between application components. You learned the following:
Flex applications are event-driven.
Every component that dispatches events includes
EventDispatcherin its inheritance hierarchy.You handle events with either MXML-based event handlers or the
addEventListener()method.Event handler functions receive a single
eventargument and return void.You can declare and dispatch custom events from your custom components.
You can create custom event classes to store and send data from custom components to the rest of the application.
To make a custom event class
bubble, set itsbubbleproperty totrueand override theEvent class's clone()method.You handle custom events and event classes with the same architecture as pre-built classes in the Flex framework.