When you present text in a Flex application, many choices and tools can determine how text is presented and processed. Text values can be "hard-coded" in an application, retrieved from a data source (such as database on a server), and stored in memory as constants or variables.
When text is presented to the user in visual control, you select many font settings, including the font typeface and its size, weight, and style. In this chapter, I describe the various tools available for text processing and presentation in Flex. I describe these strategies and techniques:
Selecting device fonts for text display that are already installed on the client computer.
Embedding fonts to tightly control text display regardless of the state of the client computer.
Formatting of text values with the
formatterfamily of classes
Note
Any discussion of text presentation in Flex must include the use of Cascading Style Sheets (CSS) to select font typefaces and styles, and the use of visual controls that are specifically designed for text presentation, such the Label and Text controls. Previous chapters included detailed descriptions of both subjects. In this chapter, I describe uses of styles that are specifically oriented around text presentation, and I expand on the use of the Label and Text controls in presenting text to the user.
Note
To use the sample code for this chapter, import the chapter11.zip Flex project archive from the Web site files into your Flex Builder workspace.
As described in Chapter 10, CSS is one of the most important tools you have for modifying the appearance of text on the screen. In this section, I describe specific styles and their values that you can use to change how Label, Text, TextInput, or TextArea controls present data.
Some font styles can be used with both device and embedded fonts, while others are used only with embedded fonts.
These styles apply to all fonts:
fontFamilyto determine the typefacefontSizeto determine the font sizefontStyleto select an italicized fontletterSpacingto determine the horizontal space between characters These styles have an effect only on embedded fonts:kerningto enable adjustments to the horizontal gap between charactersfontAntiAliasTypeto enable the use of these advanced anti-aliasing stylesfontGridTypeto determine whether to measure fonts based on pixels or subpixelsfontThicknessto determine the thickness of font glyph edgesfontSharpnessto determine the sharpness of font glyphs
You select which typeface you want to use with the fontFamily (or font-family) style. This Label control presents its text with the Arial typeface with an inline style declaration:
<mx:Label fontFamily="Arial" text="Hello World"/>
When you declare the fontFamily style in an embedded or external style sheet, you can use either the camel case version of the style name, fontFamily, or the hyphenated version, font-family. This type selector sets an application's default font for the Label and Text controls to Times New Roman:
<mx:Style>
    Label, Text {
      font-family:"Times New Roman";
    }
</mx:Style>
Tip
When you designate a typeface that has spaces in its name, always wrap the font name in quotation marks. If you don't use quotes, the CSS parser squeezes the spaces out of the font name, resulting in a font name that might not be recognized by Flash Player.
For example, a font declared with a name of Bookman Old Style Bold without surrounding quotes is transformed internally to BookmanOldStyleBold and no longer matches up correctly with its actual font on the client system.
Caution
If you misname a typeface in a fontFamly declaration, Flash Player renders the unrecognized font as the client system's default serif typeface, which is typically Times Roman.
Two types of fonts can be used in Flex applications:
Device fonts are typefaces that are already installed on the client system.
Embedded fonts are typefaces that are embedded in a compiled Flex application and delivered to the client system as part of the application .swf file.
The pros and cons of using device versus embedded fonts are listed in Table 11.1.
Table 11.1. Pros and Cons of Device and Embedded Fonts
Pros | Cons | |
|---|---|---|
Device fonts | Allow you to minimize the size of the compiled Flex application and speed thedownload of the application during startup (for Web applications) or installation (for desktop applications). | Limited to those fonts that are installed universally, so your graphic design capabilities are limited. Do not support advanced anti-aliasing and font rotation. |
Embedded fonts | Allow you to use any font to which you have access during development. Support advanced ani-aliasing and font rotation. | Result in a larger compiled application .swf file. If not managed carefully, embedded fonts can result in a "bloated" application file and significantly slow download and installation. |
When you declare a device font, you should declare a list of fonts you'd like to use in order of preference. The last item in the list should be a generic device font name that selects a font based on what's available on the client system.
This CSS declaration sets the fontFamily style as a list with a first preference of Helvetica and a last preference of the generic font family _sans:
<mx:Style>
    Label, Text {
      font-family:Helvetica, Arial, "_sans";
    }
</mx:Style>
The first choice, Helvetica, is typically available on Mac OS X, but not on Windows. If that font isn't found by Flash Player on the client system, it then looks for the second choice, Arial, which is installed by default on both Windows and Mac OS X. The final choice, _sans, refers to the general family of sans serif fonts. If Flash Player doesn't find either of the first two choices, it uses the client system's default font of that family.
Three generic device font names are recognized by Flash Player:
_
sansrefers to smoother typefaces that are generally selected for their easy readability on computer screens. This family includes such fonts as Arial, Helvetica, and Verdana._
serifrefers to typefaces that have non-structural visual details added to the ends of font lines. This font family includes such fonts as Times Roman (and its variants such as Times New Roman) and Baskerville._
typewriterrefers to fixed pitch typefaces that look like they were created on typewriters. This font family includes such fonts as Courier (and its variants such as Courier New) and Prestige Elite.
Caution
If you designate only a single typeface in a fontFamily declaration and that font doesn't exist on the client system, Flash Player replaces the font as needed. In this case, the application might not appear to the user as it was originally designed.
When you embed a font in a Flex application, you guarantee that the font will be available to the client system.
Embedded fonts offer great advantages to graphic designers:
You can strongly "brand" an application's appearance with fonts that are unique to a particular company's design standards.
Embedded fonts can be rotated, whereas device fonts always are rendered in their default horizontal layout.
Embedded fonts support advanced anti-aliasing, which allows you to control the sharpness of the font to a fine degree.
Embedded fonts support transparency, whereas device fonts are always opaque.
Embedded fonts have these limitations:
Only TrueType or OpenFace fonts can be embedded directly within Flex applications with simple style declarations or ActionScript metadata tags.
Embedded fonts aren't always legible at sizes less than 10 pixels.
Tip
You can embed other font styles such as PostScript Type 1 or bitmap fonts, but these fonts must first be embedded in a Flash document to vectorize them, and only then can they be embedded in a Flex application.
Caution
Fonts that you've downloaded or purchased from a font vendor aren't always licensed for use in a Flash document or Flex application. Check your license for any restrictions on a font's use.
Declaring embedded fonts with CSS
You can embed a font with the @font-face style selector in an embedded or external style sheet. This selector supports all font styles listed previously, plus these additional style names:
src:localto select a device font to embed by its system font namesrc:urlto select a device font by its file locationfontFamilyto designate a font name that can be used for the rest of Flex application
Each embedded font declaration must include the fontFamily to create an alias by which the embedded font will be referenced in the rest of the application and either src:local or src:url to designate the font to embed.
Embedding by font file location
You can embed a font that you haven't installed in your operating system by referring to the font by its file location. Font files can be referred to from anywhere in your file system, but for convenience you should copy the font file somewhere in your project and then refer to it with a relative file location.
This @font-face declaration embeds a font by its filename and assigns a fontFamily of Goudy:
@font-face {
  src:url("../fonts/GOUDOS.TTF");
  font-family:"Goudy";
}
After the font has been embedded, you can use the fontFamily style to use the font in a particular text control with an inline style declaration or in a set of controls with a style selector. This Label control uses the embedded font:
<mx:Label fontFamily="Goudy" text="An embedded font"/>
This type selector assigns the embedded font to Label and Text controls:
<mx:Style>
  Label, Text {
    font-family: Goudy;
  }
</mx:Style>
Embedding font variations with font files
Fonts that support variations in presentation such as bold and italics are delivered as individual font files. When embedding a font by its filename, you must declare each variation with a separate @font-face selector. If you set all of a font's selectors with the same fontFamily, you can then refer to the individual fonts from an inline style declaration or a style selector by simply including the appropriate font style.
These @font-face declarations embed all three of a font's available variations and assign the same fontFamily to each. The font-weight and font-style settings in each @font-face selector determine when each font file will be used.
The application in Listing 11.1 uses the Goudy font with all its variations and a set of Label controls that use the font in multiple sizes and variations of appearance.
Example 11.1. Listing 11.1
<?xml version="1.0" encoding="utf-8"?>
<mx:Application xmlns:mx="http://www.adobe.com/2006/mxml"
  backgroundColor="white" verticalGap="0">
  <mx:Style>
    @font-face {
      src:url("../fonts/GOUDOS.ttf");
      font-family:"Garamond";
    }
    @font-face {
      src:url("../fonts/GOUDOSB.ttf");
      font-family:"Goudy Old Style";
      font-weight:bold;
    }
    @font-face {
      src:url("../fonts/GOUDOSI.ttf");
      font-family:"Goudy Old Style";
      font-style:italic;
    }
  </mx:Style>
  <mx:Label text="Goudy Old Style 18"
    fontFamily="Goudy Old Style" fontSize="18"/>
  <mx:Label text="Goudy Old Style 30"
    fontFamily="Goudy Old Style" fontSize="30"/>
<mx:Label text="Goudy Old Style 72"
fontFamily="Goudy Old Style" fontSize="72"/>
<mx:Label text="Goudy Old Style italic"
fontFamily="Goudy Old Style" fontSize="72" fontStyle="italic"/>
<mx:Label text="Goudy Old Style bold"
fontFamily="Goudy Old Style" fontSize="72" fontWeight="bold"/>
</mx:Application></mx:Application>Note
The code in Listing 11.1 is available in the Web site files as EmbedFontByFileName.mxml in the chapter11 project.
Note
In these examples, I'm using a font named Goudy Old Style, which is included by default on both Windows and Mac OS X. You can download more specialized fonts from various Web sites, including www.1001freefonts.com.
To embed a font that's been installed in the operating system, use the src:local style and refer to the font by its system name. The font's system name is usually the same as the font filename (without the file extension), but to be sure of the system name, you can open the font file and view the system name information. Figure 11.1 shows a font file displayed in Windows XP and the font's system name.

Tip
On Mac OS X, fonts are stored in the system hard disk's /System/Library/Fonts folder. As with Windows, you can preview a font by locating and double-clicking the font file. The font is displayed in the Font Book application, which is included with the operating system.
This declaration embeds a font using the font's system name after the font has been installed in the operating system:
@font-face {
  src:local("Goudy Old Style");
  font-family:"Goudy";
}
Caution
If you type the name of a system font incorrectly, the compiler generates an error.
As with a declaration by font filename, the font-family style determines the name by which the font is known in the rest of the application. This Label control uses the embedded font:
<mx:Label text="Goudy Font" fontFamily="Goudy"/>
Embedding font variations with system font names
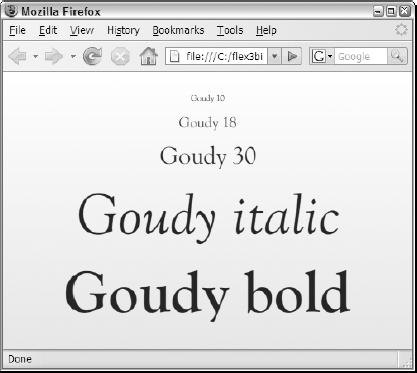
When you embed by system font name, you still have to declare each font variation individually, but you can use the same system font name and font-family for each declaration, and you distinguish each by the use of the font-weight or font-style declarations. The application in Listing 11.2 declares the Goudy font with the system font name and then uses the font in a set of text controls.
Example 11.2. Embedding fonts by system font name
<?xml version="1.0" encoding="utf-8"?>
<mx:Application xmlns:mx="http://www.adobe.com/2006/mxml"
  backgroundColor="white">
  <mx:Style>
    @font-face {
      src:local("Goudy Old Style");
      font-family:"Goudy";
    }
    @font-face {
      src:local("Goudy Old Style");
      font-family:"Goudy";
      font-weight:bold;
    }
    @font-face {
      src:local("Goudy Old Style");
      font-family:"Goudy";
font-style:italic;
}
</mx:Style>
<mx:Text text="Goudy 10" fontFamily="Goudy" fontSize="10"/>
<mx:Text text="Goudy 18" fontFamily="Goudy" fontSize="18"/>
<mx:Text text="Goudy 30" fontFamily="Goudy" fontSize="30"/>
<mx:Text text="Goudy italic" fontFamily="Goudy" fontSize="72"
fontStyle="italic"/>
<mx:Text text="Goudy bold" fontFamily="Goudy" fontSize="72"
fontWeight="bold"/>
</mx:Application>Note
The code in Listing 11.2 is available in the Web site files as EmbedFontBySystemName.mxml in the chapter11 project.
Figure 11.2 shows the application using the embedded font. The application's appearance is the same regardless of whether the fonts are embedded with file or system names.
Embedding fonts with Flex Builder's Design view
Flex Builder 3's enhanced Design view can generate a certain amount of CSS code to declare an embedded font. These generated declarations are always created in an external style sheet and represent only the base font style (and not any variations such as font weight or style).
Note
The CSS Editor's Design view is a new feature of Flex Builder 3. In addition to supporting preview of embedded fonts, it allows you to preview most styles when applied to the Flex framework's visual controls.
Follow these steps to create an external style sheet with an embedded font declaration:
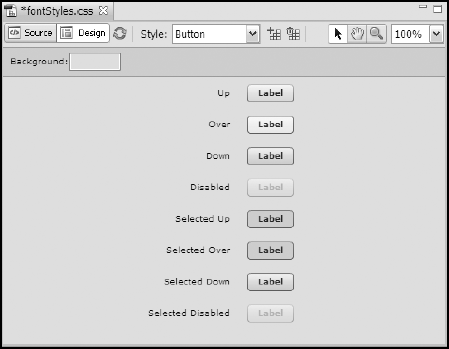
Select File → New CSS File from the Flex Builder project to create a new external style sheet file.
In the New CSS File dialog box, name the new file
fontStyles.cssand click Finish.In Source view of the CSS editor, manually add a
Labelselector to the file without any style declarations. Be sure to declare a code block after theLabelselector with the {} characters. TheLabelselector should look like this:Label { }Click Design to switch to Design view.
As shown in Figure 11.3, Design view previews the
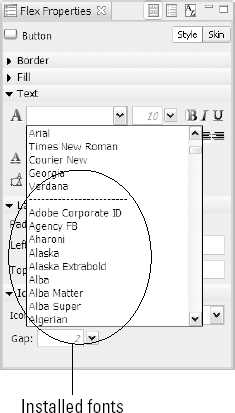
Labelcontrol without any custom styles applied.Look at the Flex Properties view's Text section, and locate the pull-down list of fonts, as shown in Figure 11.4.
Notice that the pull-down list displays the standard five device fonts, and in a section at the bottom of the list, it shows all fonts currently installed on the system listed by their system font name.
Select a font you'd like to embed. If you're working with the Windows operating system, try a font that may not appear on Mac OS X, such as Comic Sans MS.
After selecting the font, Design view refreshes itself and the preview buttons display the select typeface. If the refresh operation doesn't occur, click Design view's Refresh button.
Switch to Source view to view the generated style declarations.
The generated code looks like this:
/* CSS file */

Label {
  fontFamily: "Comic Sans MS";
}
@font-face
{
  fontFamily: "Comic Sans MS";
  fontWeight: normal;
  fontStyle: normal;
  src: local("Comic Sans MS");
}
When you generate font style declarations in this manner, you get only a declaration for the base font, not for such variations as bold and italics.
To add the bold variation for the embedded font, select the entire
@font-faceselector with its nested styles and copy it to the clipboard.Paste the
@font-faceselector at the bottom of the style sheet file.Change the new selector's
font-weightstyle to bold.Save the changes to the style sheet file.
Listing 11.4 shows the contents of the completed style sheet.
Example 11.4. The external style sheet after manual changes to generated code
Label {
  fontFamily: "Comic Sans MS";
}
@font-face
{
  fontFamily: "Comic Sans MS";
  fontWeight: normal;
  fontStyle: normal;
  src: local("Comic Sans MS");
}
@font-face
{
  fontFamily: "Comic Sans MS";
  fontWeight: bold;
  fontStyle: normal;
  src: local("Comic Sans MS");
}
Note
The code in Listing 11.4 is available in the Web site files as fontStylesFinishd.css in the chapter11 project.
Caution
The completed CSS file on the Web site was generated on a Windows-based development system. If you open it on a Mac or other system that doesn't include the Comic Sans MS font, Flex Builder's Design view may not preview the styles correctly.
Follow these steps to use the generated styles in a Flex application:
Create a new MXML application named
ImportingFonts.mxml.In Source view, add two
Labelcontrols as follows:<mx:Label text="Embedded font normal"/> <mx:Label text="Embedded font bold" fontWeight="bold"/>
Add an
<mx:Style/>tag with a source property set to the new external style sheet file:<mx:Style source="fontStyles.css"/>
Save and run the application shown in Listing 11.5.
Example 11.5. An application using embedded fonts in an external style sheet
<?xml version="1.0" encoding="utf-8"?>
<mx:Application xmlns:mx="http://www.adobe.com/2006/mxml"
   layout="vertical"
  backgroundColor="#eeeeee">
  <mx:Style source="fontStyles.css"/>
  <mx:Label text="Embedded font normal"/>
  <mx:Label text="Embedded font bold" fontWeight="bold"/>
</mx:Application>
Note
The code in Listing 11.5 is available in the Web site files as ImportingStylesFinished.mxml in the chapter11 project.
Caution
As mentioned previously, the completed sample applications on the Web site were created on a Windows-based development system. If you open them in Flex Builder on Mac OS X or another system that doesn't include the application's expected fonts, compiler errors will be generated.
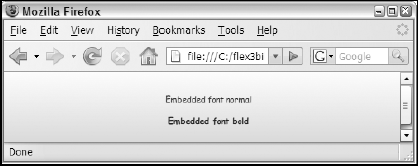
As shown in Figure 11.5, you should see that the two Label controls use the normal and bold variations of the selected typeface.
Embedding ranges of characters in CSS
When you embed a typeface, you significantly increase the size of the compiled Flex application. For example, in the previous example where two font files were embedded in the application, the compiled debug version of the application increased in size from 152,533 bytes to 308,776 bytes, or roughly twice the original size. This is because font definition files contain font outlines for every possible character, frequently including outlines for non-Latin characters that you might never use in your application.
You can restrict which characters of a typeface are embedded in your application by declaring the unicodeRange style. This style takes an array of range designators, each starting and ending with a Unicode character in hexadecimal code.
Tip
Unicode is a standard for encoding characters on computer systems that uses unique numbers, known as code points, for each character. Flex uses the most common encoding style, where each character description starts with the string U+ and ends with a 4-character hexadecimal representation of the code point. For example, the Unicode expression U+0021 represents the exclamation point, U+005A represents an uppercase Z character, and so on.
Note
A PDF document containing a chart of the Basic Latin alphabet in Unicode is available at http://unicode.org/charts/PDF/U0000.pdf. Charts of other character sets are available in PDF format at www.unicode.org/charts. Complete information about the Unicode standard is available at www.unicode.org.
The following declaration embeds a broad range of basic Latin Unicode characters that would normally be used in an English language Flex application. The Unicode range of U+0021, representing the exclamation point (!),through U+007E, representing the the tilde (~) includes all uppercase and lowercase alpha characters, numeric characters, and most common punctuation:
@font-face
{
  fontFamily: "Comic Sans MS";
  src: local("Comic Sans MS");
  unicodeRange:U+0021-U+007E;
}
After adding this unicodeRange setting to both embedded fonts in the preceding example, the compiled application in the release build is 174,954 bytes-a bit larger than the application without any embedded fonts (152,533 bytes), but significantly smaller than the version with both fonts embedded with all their character outlines (308,776 bytes). The result is an application that downloads and installs more quickly, but still has all the text display functionality you need.
For European languages such as French, where an extended Latin alphabet is required, you can add additional ranges of characters that include versions of the Latin alphabet characters with accents and other required annotations. This style declaration embeds both the set of characters known in Unicode as Basic Latin and another set of characters known as Latin Extended A:
@font-face
{
  fontFamily: "Comic Sans MS";
src: local("Comic Sans MS");
unicodeRange:
U+0021-U+007E, //Basic Latin
U+0100-U+017F; //Latin Extended A
}Tip
The Flex Builder installation contains a file named flash-unicode-table.xml in the sdks/3.0.0/framesworks folder. This file contains definitions of common Unicode character ranges. The file is not processed with the command-line compiler or Flex Builder, but it can serve as a handy reference to common Unicode ranges.
Declaring embedded fonts with ActionScript
You also can embed fonts with the ActionScript [Embed] metadata tag by either font location or system name. The [Embed] tag must be placed inside an <mx:Script> tag set and include either a source attribute for fonts embedded by filename or a systemFont attribute for fonts embedded by system name.
An [Embed] declaration also requires these attributes:
fontNameto select an alias by which the font will be known to the rest of the applicationmimeTypealways set to application/x-font
The [Embed] tag is always followed by a variable declaration typed as Class. This variable is never accessed directly in ActionScript code, so its name can be anything you like. This [Embed] tag embeds a font by filename and assigns a fontName of myEmbeddedFont:
[Embed(source='../fonts/MyCustomFont.ttf',
  fontName='myEmbeddedFont',
  mimeType='application/x-font')]
private var font1:Class;
Tip
The name of variable declared after the [Embed] metatdata tag is arbitrary and is only used internally to store the font. It isn't referred to in other ActionScript code, so you can name the variable anything you like.
Tip
The [Embed] metadata tag also supports a unicodeRange attribute that can be used to limit which font characters are embedded.
A font that's been installed in the operating system can be embedded using the system font name instead of the filename:
[Embed(systemName='MyCustomFont',
  fontName='myEmbeddedFont',
  mimeType='application/x-font')]
private var font1:Class;
In either case, you then use the font in a text control by assigning the fontFamily style to the new font name:
<mx:Label fontFamily="myEmbeddedFont" text="An embedded font"/>
Declaring embedded fonts in ActionScript gives you the same benefits as CSS declarations and has the same requirements:
Each individual font file must be declared separately.
Each font variation, such as bold or italics, must be declared separately even if the variation isn't stored in a separate file.
Note
Flex Builder's Design view CSS editor creates a small advantage in using CSS declarations over ActionScript, but you still have to customize the code that the CSS editor generates. So the choice of embedding fonts using CSS or ActionScript is purely a coding preference and is not driven by any strong benefits or drawbacks that might be inherent in either approach.
One advantage of embedded fonts over device fonts is the ability to change their visual appearance using these tools:
Font rotation to change the orientation of a text control
Advanced anti-aliasing to render text in clear, high-quality resolution
You can rotate a text control that uses an embedded font with the control's rotation property. The value of the rotation property defaults to 0 (indicating standard control layout). A positive value from 1 to 180 indicates that the control is rotated clockwise, while a negative value from −1 to −180 causes the control to rotate counter-clockwise. Values outside these ranges are added to or subtracted from 360 to get a valid value.
The code in Listing 11.6 embeds a system font and then uses the font in a control that's rotated 90 degrees counter-clockwise to turn the control on its side.
Example 11.6. A rotated control with an embedded font
<?xml version="1.0" encoding="utf-8"?>
<mx:Application xmlns:mx="http://www.adobe.com/2006/mxml"
      layout="absolute"
     backgroundColor="white">
<mx:Style>
@font-face {
src:local("Comic Sans MS");
font-family:"Comic";
unicodeRange:U+0041-U+007E;
}
</mx:Style>
<mx:Label id="rotatedControl" text="Rotated Text" fontFamily="Comic"
rotation="-90" top="{rotatedControl.width + 10}" left="10"
fontSize="36"/>
</mx:Application>Note
The code in Listing 11.6 is available in the Web site files as RotatingFonts.mxml in the chapter11 project.
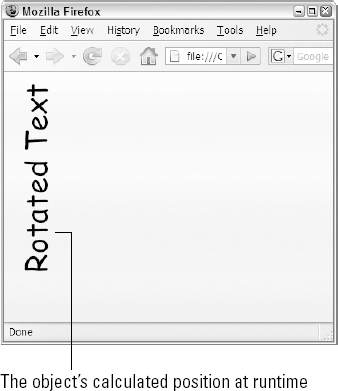
Figure 11.6 shows the resulting application, with the control placed in the application's upper-left corner.
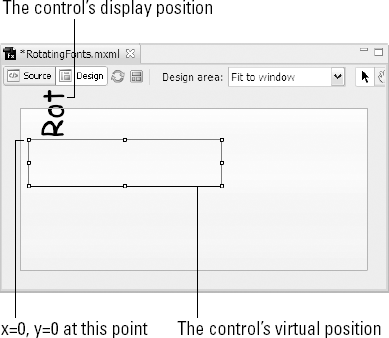
When you rotate a visual control, its calculated upper-left corner is still based on the control's virtual position when it isn't rotated. A Flash developer would refer to this as the object's "registration point"-the point in the object from which its x and y properties are calculated. The position of the x/y coordinate doesn't change for Flex visual controls, even when the object's font is rotated at runtime.
To properly place such a control, you need to take into account the x and y properties and their true meaning. The top property's calculation used in Listing 11.6 binds to the control's width and uses this value to offset itself vertically. If you place the rotated control in an application with absolute layout, as shown in Listing 11.6, in Design view it appears to run off the screen, as shown in Figure 11.7. At runtime, the top property is calculated correctly and the object is positioned 10 pixels from the top of the application.
The rotation property can be set at runtime through bindings or through ActionScript statements. The code in Listing 11.7 binds a Label control's rotation property to a Slider control's value. As the user manipulates the Slider, the Label rotates.
Example 11.7. A Label control with an embedded font, rotating based on a Slider control's value
<?xml version="1.0" encoding="utf-8"?>
<mx:Application xmlns:mx="http://www.adobe.com/2006/mxml"
   layout="absolute"
  backgroundColor="white">
  <mx:Style>
    @font-face {
src:local("Comic Sans MS");
font-family:"Comic";
unicodeRange:U+0041-U+007E;
}
</mx:Style>
<mx:VSlider id="mySlider"
top="10" left="10" height="150"
minimum="-180" maximum="180" value="0"
tickInterval="45" snapInterval="45"/>
<mx:Label id="rotatedControl" text="Rotated Text" fontFamily="Comic"
rotation="{mySlider.value}" top="{this.height / 2}"
left="{this.width / 2}" fontSize="18" liveDragging="true"/>
</mx:Application>Note
The code in Listing 11.7 is available in the Web site files as RotatingFontsWithSlider.mxml in the chapter11 project.
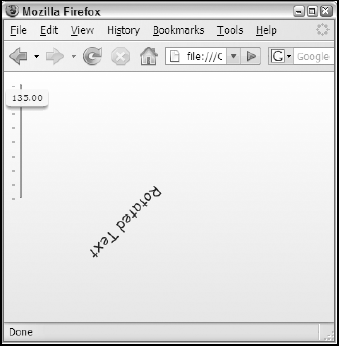
Figure 11.8 shows the resulting application, with the control rotated based on the Slider control's current value.
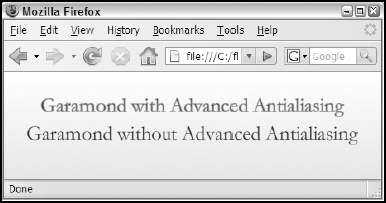
Advanced anti-aliasing refers to the ability of Flash Player to make embedded fonts more readable by smoothing the font's edges during the rendering process. When you embed a font, its fontAntiAliasType style is set to advanced by default. If you don't want to use this feature on a particular font, set the style's value to normal in the embedding declaration:
@font-face {
  src:source("Garamond");
  font-family:"GaramondWithoutAntialiasing";
  font-anti-alias-type:normal;
}
When advanced anti-aliasing is enabled, you can set these styles to effect the font's presentation:
fontGridFitTypedetermines how a text control fits to the pixel grid on the monitor. Values ofnone, pixel, andsubpixelare available. Thepixelsetting works only for left-aligned text. Thesubpixelsetting works only on LCD monitors and works for right- and center-aligned text.fontSharpnessdetermines the sharpness of the font glyph. Values from −400 to 400 are available.fontThicknessdetermines the width the font glyph. Values from −200 to 200 are available.
The code in Listing 11.8 creates an application with two embedded versions of the Garamond font. The first embedded font supports advanced anti-aliasing, while the second has the style set to normal. The two Label controls use the different embedded fonts. The control with advanced anti-aliasing enabled uses the fontSharpness and fontThickness styles.
Example 11.8. An application with advanced anti-aliasing styles
<?xml version="1.0" encoding="utf-8"?>
<mx:Application xmlns:mx="http://www.adobe.com/2006/mxml"
  backgroundColor="white" verticalGap="0">
  <mx:Style>
    @font-face {
      src:source("Garamond");
      font-family:"GaramondWithAntialiasing";
      font-anti-alias-type:advanced;
    }
    @font-face {
      src:source("Garamond");
      font-family:"GaramondWithoutAntialiasing";
      font-anti-alias-type:normal;
}
</mx:Style>
<mx:Label text="Garamond with Advanced Antialiasing"
fontFamily="GaramondWithAntialiasing" fontSize="24"
fontSharpness="-400" fontThickness="0"/>
<mx:Label text="Garamond without Advanced Antialiasing"
fontFamily="GaramondWithoutAntialiasing" fontSize="24"/>
</mx:Application>Note
The code in Listing 11.8 is available in the Web site files as EmbedFontWithAntialiasing.mxml in the chapter11 project.
Figure 11.9 shows the resulting application. The first Label control has smoother, fuzzier edges created by the advanced antialiasing, while the second shows the control's default appearance with a sharper appearance.
The Flex framework includes a set of formatter classes that can be used to return particular types of data values as formatted strings. There are six classes in this group. The formatter class is the superclass from which all other classes are extended, and the other five classes are designed to format particular types of values.
The Formatter classes include the following:
Each of the formatter classes has a set of properties that determine the format of the returned string, and a format() method that's used to process a value into a formatted string.
You can create a formatter with either MXML or ActionScript. When declaring the class in ActionScript, you use the class name in an MXML declaration:
<mx:DateFormatter id="myDateFormatter"/>
Caution
The formatter classes are non-visual components, meaning that they don't implement the IUIComponent interface. As with all non-visual components, their MXML declarations must be placed as direct child elements of the Application or component root element. If you declare a formatter inside a visual container, a compiler error is generated and the application does not successfully compile.
To instantiate a formatter class in ActionScript, declare and instantiate a variable typed as the appropriate formatter class. Flex Builder should create an import statement for the class; if not, create it manually:
import mx.formatters.DateFormatter;
var myDateFormatter:DateFormatter = new DateFormatter();
Each formatter class has its own set of properties that determine how it formats strings. The DateFormatter, for example, has a single formatString property that can be used to create a custom date format. The formatString property takes as its value a string consisting of masking tokens, combined with literal strings. Table 11.1 describes the tokens that can be used in a DateFormatter object's formatString property.
Table 11.1. DateFormatter formatString Tokens
Pattern token | Description |
|---|---|
YY | Year as a two-digit number. |
YYYY | Year as a four-digit number. |
M | Month as a one- or two-digit number without padded zeroes. |
MM | Month as a two-digit number with padded zero where necessary. |
MMM | Month as a short name. Values include "Jan", "Feb", and so on. |
MMMM | Month as a long name. Values include "January", "February", and so on. |
D | Day in month as a one- or two-digit number without padded zeroes. |
DD | Day in month as a two-digit number with padded zero where necessary. |
E | Day in week as a one- or two-digit number without padded zeroes. Sunday is interpreted as 0, Monday as 1, and so on. |
EE | Day in week as a two-digit number with padded zero where necessary. |
EEE | Day in week as a short name. Values include "Sun", "Mon", and so on. |
EEEE | Day in week as a long name. Values include "Sunday", "Monday", and so on. |
A | Returns "AM" for morning, "PM" for afternoon/evening. |
J | Hour in day in 24-hour format. |
H | Hour in day in 12-hour format. |
N | Minutes in hour as a one- or two-digit number without padded zero. |
NN | Minutes in hour as a two-digit number with padded zero where necessary. |
S | Seconds in current minute. |
SS | Seconds in current minute with padded zero |
All text used in a dateFormat property other than the supported tokens is considered to be literal text. For example, a formatString of "EEEE, MMMM D, YYYY" on the first day of 2008 returns "Tuesday, January 1, 2008". The comma and space characters in the formatting string are returned along with the token replacements.
In contrast, the CurrencyFormatter and NumberFormatter classes have properties that affect thousand separators and decimal characters, the number of characters after a decimal, selection and placement of a currency symbol, and numeric rounding. The ZipCodeFormatter and PhoneFormatter classes have properties that affect the formatting of those values.
You can use a formatter class in a binding expression to change how a value is displayed in a text control. Follow these steps:
Create the
formattercontrol, and set its formatting properties.Add a text control that displays a value.
Set the text control's text property with a binding expression that wraps the value in the
formattercontrol'sformat()method.
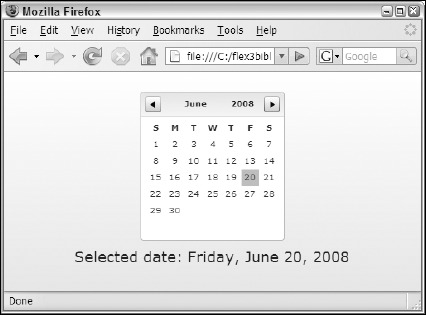
The application in Listing 11.9 uses a DateFormatter to format the selectedDate property of a DateChooser control.
Example 11.9. An application using a DateFormatter
<?xml version="1.0" encoding="utf-8"?>
<mx:Application xmlns:mx="http://www.adobe.com/2006/mxml"
  backgroundColor="white">
  <mx:DateFormatter id="myDateFormatter" formatString="EEEE, MMMM D,
    YYYY"/>
  <mx:DateChooser id="myDateChooser"/>
  <mx:Label fontSize="18"
    text="Selected date: {myDateFormatter.format(
      myDateChooser.selectedDate)}" />
</mx:Application>
Note
The code in Listing 11.9 is available in the Web site files as DateFormatterDemo.mxml in the chapter11 project.
Figure 11.10 shows the resulting application with the Label control displaying the date value's formatted string.
You may want to use a single formatting rule throughout an application. When you create a formatter class for each view component in an application, it can become cumbersome to update all the formatter object's formatting values when they have to be changed.
You can solve this by wrapping a formatter object in a static method that can be called from anywhere in an application. The nature of a static method is that it behaves the same in all circumstances, and it can be called from its class without having to first instantiate the class.
The code in Listing 11.10 shows a class with a static formatDate() method. The method accepts a value argument typed as an ActionScript Object so that the method can accept either a true date or a string that can be parsed as a date. It then instantiates the DateFormatter class local to the function, sets its formatString property to control the output, and returns a formatted value.
Example 11.10. A utility class with a static method to universally format date values
package utilities
{
  import mx.formatters.DateFormatter;
  public class FormatUtilities
  {
    public static function dateFormat(value:Object):String
    {
      var df:DateFormatter = new DateFormatter();
      df.formatString = "EEEE, MMMM D, YYYY";
      return df.format(value)
    }
    }
}
Note
The code in Listing 11.10 is available in the Web site files as FormatUtilities.as in the src/utilities folder of chapter11 project.
To use this static method in an application or component, follow these steps:
Declare an
importstatement for the ActionScript class containing the static method.Wrap the value you want to format in a call to the static method.
The code in Listing 11.11 uses the static method to format the date value.
Example 11.11. An application using a static formatting method
<?xml version="1.0" encoding="utf-8"?>
<mx:Application xmlns:mx="http://www.adobe.com/2006/mxml"
  backgroundColor="white">
  <mx:Script>
    <![CDATA[
      import utilities.FormatUtilities;
    ]]>
  </mx:Script>
  <mx:DateChooser id="myDateChooser"/>
  <mx:Label text="Selected date: {FormatUtilities.dateFormat(
      myDateChooser.selectedDate)}"
    fontSize="18"/>
</mx:Application>
Note
The code in Listing 11.11 is available in the Web site files as FormatWithStaticMethod.mxml in the chapter11 project.
When you use a static method to wrap formatting functionality, it becomes possible to change formatting rules for the entire application from a single source code file. The result is an application that's easier to maintain.
In this chapter, I described how to use device and embedded fonts to determine which typeface is used when displaying text. I also described the use of formatter classes to display values with specific formats. You learned the following:
You can use device or embedded fonts to display text in various Flex controls.
Device fonts make the compiled application as small as possible, resulting in faster download and installation.
Embedded fonts expand graphic design possibilities and provide control of formatting choices such as control rotation and advanced anti-aliasing.
You can select only certain ranges of characters in an embedded font to minimize the font's impact on the compiled application's size.
Formatterclasses allow you to present various types of values with formatted strings.You can declare a
formatterobject with MXML or ActionScript.You can use a
formatterin a binding expression or by wrapping it in an ActionScript static method.