
3. Animating Symbols with Classic Tweens
Lesson overview
In this lesson, you’ll learn how to do the following:
Animate the position, scale, and rotation of objects using classic tweening.
Adjust the pacing and timing of your animation.
Animate transparency and filters.
Create a nested animation.
Animate an object on a path.
Swap a symbol instance on the Stage.
Change the easing of an object’s motion.
Position an object in 3D space.

This lesson will take about 2 hours to complete.
To get the lesson files used in this chapter, download them from the web page for this book at www.adobepress.com/AnimateCIB2023. For more information, see “Accessing the lesson files and Web Edition” in the Getting Started section at the beginning of this book.

Use Adobe Animate to change almost any aspect of an object—position, color, transparency, size, rotation, and more—over time. Classic tweening is a basic technique for creating animation with symbol instances.
Getting started
![]() Note
Note
If you have not already downloaded the project files for this lesson to your computer from your Account page, make sure to do so now. See Getting Started at the beginning of the book.
Start by viewing the finished movie file to see the animated title page that you’ll create in this lesson.
Double-click the 03End.mp4 file in the 03/03End folder to play the final animation, which was exported as a high-definition video file.
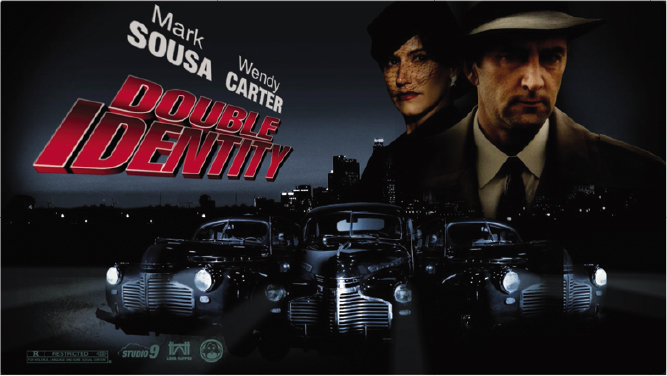
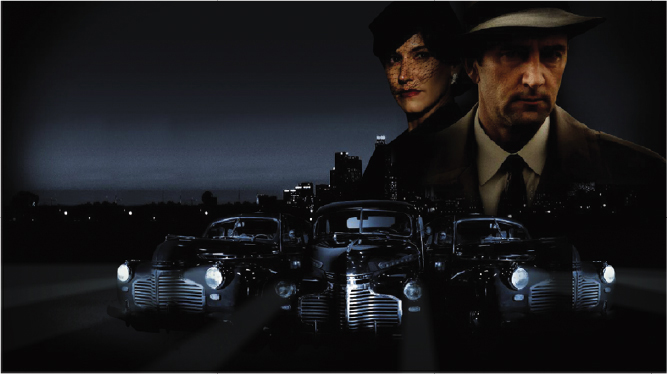
The project is an animated opener that can be placed on a website for an imaginary, soon-to-be-released motion picture. In this lesson, you’ll use motion tweens to animate several components on the page: the cityscape, the main actors, several old-fashioned cars, and the main title.
Close the 03End.mp4 file.
Double-click the 03Start.fla file in the 03/03Start folder to open the initial project file in Animate. This file is an ActionScript 3.0 document that is partially completed and already contains many of the graphic elements imported into the library for you to use. You’ll use all the animation functionality available in an ActionScript 3.0 document and then export an MP4 video file.
From the view options above the Stage, choose Fit In Window, or choose View > Magnification > Fit In Window, so that you can see the entire Stage on your computer screen.
Choose File > Save As. Name the file 03_workingcopy.fla, and save it in the 03Start folder. Saving a working copy ensures that the original start file will be available if you want to start over.
About animation
Animation is the change of an object’s appearance over time. Animation can be as simple as moving a ball across the Stage, which is a change in the object’s position. It can also be much more complex. As you’ll see in this lesson, you can animate many different properties of an object. In addition to an object’s position, you can change its color or transparency, change its size or rotation, and even animate the filters that you saw in the previous lesson. You also have control over an object’s path of motion as well as its easing, which is the way an object accelerates or decelerates its property changes.
Classic tweens create animation for changes in position, rotation, size, color, transparency, or a filter. Classic tweens require you to use a symbol instance. If the object you’ve selected is not a symbol instance, Animate will automatically ask to convert the selection to a symbol.
![]() Note
Note
The term “tween” comes from the world of classic animation. Senior animators would be responsible for drawing the beginning and ending poses for their characters. The beginning and ending poses were the keyframes of the animation. Junior animators would then come in and draw the “in-between” frames, or do the “in-betweening.” Hence, “tweening” refers to the smooth transitions between keyframes.
In Animate, the basic workflow for animation with classic tweens goes like this: Begin with a symbol instance on the Stage. Establish a beginning keyframe and an ending keyframe on the Timeline and change the symbol instance’s properties in one of those keyframes. Select one of the frames between the beginning and ending keyframes, and choose Create Classic Tween. Animate takes care of the rest by smoothly interpolating the changes between the two points in time.
There are just a few simple rules to follow. There can be only one tween per layer, and no element other than your symbol instance can be on that layer.
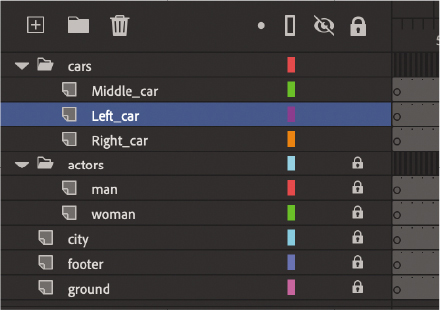
Understanding the project file
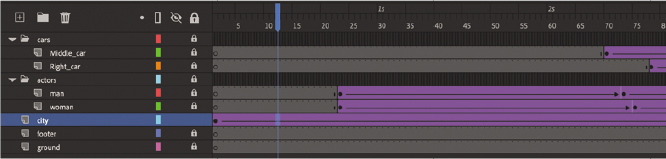
The 03Start.fla file contains a few of the animated elements already or partially completed. Each of the six layers—man, woman, Middle_car, Right_car, footer, and ground—contains an animation. The man and woman layers are in a folder called actors, and the Middle_car and Right_car layers are in a folder called cars.

You’ll be adding more layers to create an animated cityscape, refining the animation of one of the actors, and adding a third car and a title. All the necessary graphic elements have been imported into the library. The Stage is set at a standard HD size, 1280 pixels by 720 pixels, and the Stage color is black. You might need to choose a different view option to see the entire Stage.
Animating position
You’ll start this project by animating the cityscape. It will begin slightly lower than the top edge of the Stage and then rise slowly until its top is aligned with the top of the Stage.
Lock all the existing layers so that you don’t accidentally modify them. Create a new layer above the footer layer and rename it city.
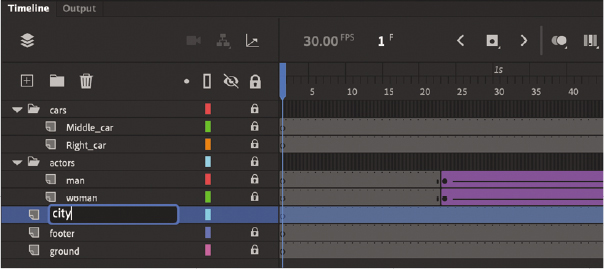
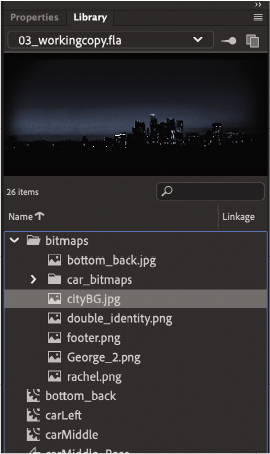
Drag the bitmap image called cityBG.jpg from the bitmaps folder in the Library panel to the Stage in frame 1 of the city layer.
In the Properties panel, set the value of X to 0 and the value of Y to 90.
This positions the cityscape image just slightly below the top edge of the Stage.

Select the cityscape image and choose Modify > Convert To Symbol (F8), or right-click and choose Convert To Symbol.
In the Convert To Symbol dialog box that opens, enter city for the Name and keep the Type as Movie Clip. Click OK.

Animate creates a movie clip symbol with the city bitmap inside it. The symbol instance is left on the Stage.
Move the blue playhead to the end of the tween span, at frame 191.
Insert a new keyframe (F6) at frame 191. Recall from Lesson 1 that there is an Auto Keyframe mode, and while doing the tasks in this book, you should disable it.
You now have two keyframes in the city layer: a beginning keyframe at frame 1 and an ending keyframe at frame 191.
Select the instance of the cityscape on the Stage, and while holding down the Shift key, move the instance up the Stage.

Holding down the Shift key constrains the movement to the vertical or horizontal direction. For more precision, set the value of Y to 0.0 in the Properties panel.
The two keyframes now contain the same symbol instance at different positions on the Stage.
Select any frame between the two keyframes and choose Create Classic Tween above the Timeline.

A classic tween is applied between the two keyframes, indicated by a black arrow over a purple background.
Animate smoothly interpolates the change in position from frame 1 to frame 191. Your tween satisfies all the criteria for success: the tween uses a symbol instance, the tween is on its own layer, and the tween is placed between two keyframes.
 Tip
TipTemporarily hide all the other layers to isolate the cityscape and to better see the results of the motion tween.
Drag the playhead back and forth at the top of the timeline to see the smooth motion. You can also choose Control > Play, or press Return (macOS) or Enter (Windows), to make Animate play the animation.
TipRemove a motion tween by selecting the tween and clicking Remove Tween in the Frame tab of the Properties panel. You can also right-click the tween on the timeline or the Stage and choose Remove Classic Tween.
Previewing the animation
Integrated into the Timeline panel is a set of playback controls. These controls allow you to play, rewind, loop, or go step by step backward or forward through your timeline to review your animation in a controlled manner. You can also use the playback commands on the Control menu.
Click any of the playback buttons on the controller above the timeline to play, stop, or step forward or backward one frame. Hold the Step Forward or Step Backward button to move the playhead to the last or first frame.

Select the Loop button (to the left of the controller), and then click the Play button.
TipYou can also use the Time Scrub tool (hidden under the Hand tool) to move back and forth on the timeline to preview your animation. Select the Time Scrub tool (or hold down Spacebar+T) and drag left and right on the Stage.
The playhead loops, allowing you to see the animation over and over for careful analysis.
Move the start or end marker in the timeline header to define the range of frames that you want to see looped.
The playhead loops within the marked frames. Click the Loop button again to turn it off.
Changing the pacing and timing
You can change the duration of the entire tween span or change the timing of the animation by dragging keyframes on the timeline.
Changing the animation duration
If you want the animation to proceed at a slower pace (and thus take up a much longer period of time), you need to lengthen the entire tween between the beginning and ending keyframes. If you want to shorten the animation, you need to decrease the number of frames in between the keyframes.
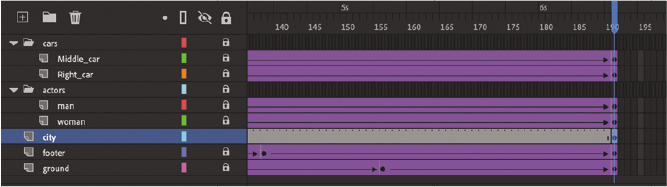
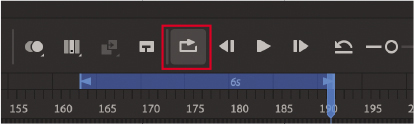
Drag the last keyframe from frame 191 to frame 60.
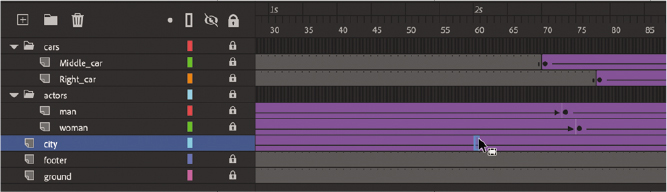
Your tween shortens to 60 frames, reducing the time it takes the cityscape to move, so the motion is faster.

Drag the beginning keyframe forward from frame 1 to frame 10.
Your motion tween begins at a later time, so it now plays only from frame 10 to frame 60. From frame 60 to frame 191, the instance does not change.
Understanding frame rate
The speed of your animation is tied to the frame rate of your document (shown in the Properties section of the Properties panel with the Document tab selected). But you should not modify the frame rate to change the speed or duration of your animation.
The frame rate determines how many frames on the timeline make up 1 second of time. The default is either 30 or 24 frames per second (fps). The seconds are marked on the timeline. Frame rate is a measure of how smooth an animation appears—the higher the frame rate, the more frames there are to show the action. Animations at slower frame rates appear choppy because there are fewer frames to show the action. Slow-motion videography depends on very high frame rates to capture action that happens very quickly, such as a speeding bullet or a falling water droplet.

If you want to modify the overall duration or speed of your animation, don’t change the frame rate. Instead, add frames to, or delete frames from, your timeline.
If you want to change the frame rate but keep the overall duration constant, select the Scale Spans option in the Properties panel before you modify the frame rate.
Animating transparency
In the previous lesson, you learned how to change the color effect of any symbol instance to change the transparency, tint, or brightness. You can change the color effect of an instance in one keyframe and change the value of the color effect in another keyframe, and Animate will automatically display a smooth change, just as it does with changes in position.
You’ll change the cityscape in the beginning keyframe to be totally transparent but keep the cityscape in the ending keyframe opaque. Animate will create a smooth fade-in effect.
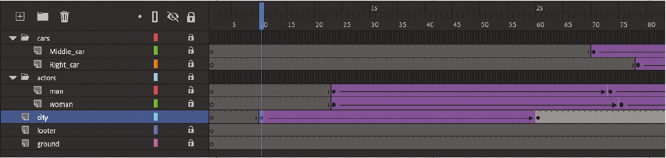
Move the playhead to the first keyframe of the classic tween (frame 10).
Select the cityscape instance on the Stage.
In the Color Effects section of the Properties panel, choose Alpha from the Style menu.
Set the Alpha value to 0%.

The cityscape instance on the Stage becomes totally transparent, but you can still see the blue bounding box around it.
Preview the effect by choosing Control > Play (or pressing Return/Enter).
Animate interpolates the changes in both position and transparency between the two keyframes. No re-tweening needed!
Animating filters
Filters, which give instances special effects such as blurs and drop shadows, can also be animated. You’ll next refine the motion tween of the actors by applying a blur filter to one of them to make it appear as if the camera changes focus. Animating filters is no different than animating changes in position or changes in color effect. You simply set the values for a filter at one keyframe and set different values for the filter at another keyframe, and Animate creates a smooth transition.
![]() Note
Note
Filters can be applied, but not animated, in an HTML5 Canvas document.
Make sure that the actors layer folder on the timeline is visible.
Unlock the woman layer.
Select the beginning keyframe in the woman layer, at frame 23.
Select the Object tab in the Properties panel.
The instance of the woman is selected, with its properties shown.
In the Properties panel, click the Add Filter (+) button in the Filters section, and choose Blur from the menu to add a blur to the instance.

In the Filters section of the Properties panel, select the link icon, if it isn’t already selected, to apply equal values to the x and y directions. Set the Blur X value to 50 pixels.
The Blur Y value also changes to 50 pixels.

Move the playhead along the entire timeline to preview the animation.
The woman instance starts out blurry at frame 23, but comes into sharp focus at frame 75. At the same time, she moves from right to left, appearing from behind the man with the hat.
TipYou can add more than one filter to an animation. Drag the filters to rearrange the order in which they appear in the Properties panel, or collapse each filter to save space in the panel.
 Tip
TipClick the Enable Or Disable Filter button in the Filters section of the Properties panel to toggle the visibility of the filter effect on your animation to make your work easier. The Enable Or Disable Filter option doesn’t affect the final exported animation, however.
Animating transformations
Now you’ll learn how to animate changes in scale or rotation. These kinds of changes are made with the Free Transform tool or with the Transform panel. You’ll add a third car to the project. The car will start small and then become larger as it appears to move forward toward the viewer.
Lock all the layers on the timeline.
Insert a new layer inside the cars folder, and rename it Left_car.

Select frame 75 and insert a new keyframe (press F6 or the Insert Keyframe button).

Drag the movie clip symbol called carLeft from the Library panel to the Stage at frame 75.
Select the Free Transform tool.
The transformation handles appear around the instance on the Stage.

While holding down the Shift key, drag a corner handle inward to make the car smaller.
In the Properties panel, make sure that the width of the graphic is about 400 pixels.
Alternatively, you can use the Transform panel (Window > Transform) and change the scale of the car to about 29.4%.

Move the car to its starting position at about X=710 and Y=488.

In the Properties panel, in the Color Effects section, choose Alpha from the Style menu.
Set the Alpha value to 0%.
The car becomes totally transparent.

Move the playhead to frame 100 and insert a new keyframe (F6).

Make sure the transparent instance of the car on the Stage is selected, and in the Object tab of the Properties panel, change the Alpha value to100%.
In the ending keyframe, the instance of the car becomes opaque.

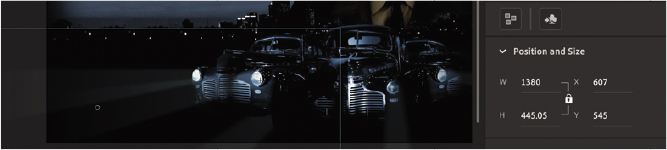
While holding down the Shift key, drag a corner handle outward to make the car larger. For more precision, use the Properties panel and set the dimensions of the car to width=1380 pixels and height=445.05 pixels.
Position the car at X=607 and Y=545.
Select any frame between the two keyframes and choose Create Classic Tween.
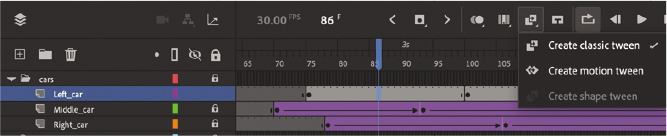
A classic tween is created between frames 75 and 100 where the car fades in and slowly gets bigger as it moves toward the viewer.

Move the Left_car layer in between the Middle_car and Right_car layers so that the car in the center overlaps the cars on the sides.
TipHolding down the Option/Alt key while dragging one corner handle of the bounding box causes the box to resize relative to the opposite corner rather than relative to the object’s transformation point (usually the center).

Save your progress so far in this document, 03_workingcopy.fla.
Editing multiple frames
If you need to make the same change across multiple keyframes, you can use the Edit Multiple Frames option above the timeline. This option allows you to make edits that affect many keyframes in the same layer or even across many different layers.
For example, imagine that you liked the animation of the cars in this project, but you wanted to move the animation to a different location on the Stage. Instead of moving every instance at each keyframe of the animation, the Edit Multiple Frames option lets you do one move for all of them at once.
Moving the animation of the cars
You will move the animation of the cars so that they are centered on the Stage.
Lock all the layers except the layers in the cars folder.
Select and hold the Edit Multiple Frames option above the timeline and choose All Frames.

Brackets appear on the timeline indicating the span of frames that will be editable. The All Frames option automatically puts the brackets at the beginning and end to encompass all the frames of the timeline.
Choose Selected Range if you want to select only a span of frames. With the Selected Range option, you can move the beginning or ending bracket.
Choose Edit > Select All (Command+A/Ctrl+A).
All the frames in the layers of the cars folder become selected.

While holding down the Shift key, drag the selected group of cars to the left of the Stage. Move the group so that they are generally centered on the Stage.

You are actually moving multiple instances in multiple keyframes across all three layers at the same time.
Deselect Edit Multiple Frames.
Scrub the timeline from frames 70 to 191.
The three cars remain animated with changes in size, color effect, and position, but they have been moved to the center of the Stage.
Save your work. In the next section, you’ll work with a different file.
Creating a path for motion
In some cases, you’ll want to make your symbol instance travel along a particular path. For example, a car travels along a racetrack, or a leaf makes a zigzag descent from a tree to the ground.
To move an object along a specific path, classic tweens require that you draw the path in a separate layer called a motion guide.
A motion guide tells an object in a classic tween how to move from its position in the first keyframe to its position in the last keyframe. Without a motion guide, a classic tween will animate an object’s position in a straight line from the first to the last keyframe. You draw the path in the motion guide. The path can curve, zigzag, or make all sorts of detours as long as it doesn’t cross itself. The path itself should be a stroke (and not a fill).
To better demonstrate how you can create the path of the motion, open the sample file 03MotionGuide_Start.fla in the 03/03Start folder. The file contains a single classic tween with a leaf moving from the top of the Stage to the bottom.
Open 03MotionGuide_Start.fla from the 03/03Start folder.
The leaf tweens from the top to the bottom, rotating and becoming slanted as it does so. You’ll create a more interesting path for the leaf to take as it falls.

Right-click near the layer name containing the classic tween of the falling leaf and choose Add Classic Motion Guide.

A new layer, called a classic motion guide, is added above the layer containing your classic tween. The classic tween layer becomes indented under the classic motion guide, indicating that it will follow any path drawn in the classic motion guide layer.

Select the Pencil tool and choose the Smooth option in the Tool tab of the Properties panel or from the bottom of the Tools panel. You may need to add the Pencil tool to the Tools panel if it’s not added already.

Select the motion guide layer and then start drawing on the Stage. Draw a path for the leaf to move on that starts from the top of the Stage and curves gracefully downward in an s-shape. Make sure the path does not cross itself. End the path near the leaf position at the last keyframe.

Switch to the Selection tool and make sure that Snap To Objects is selected (the magnet icon is depressed) in the Properties panel.

The Snap To Objects option makes sure that objects align with each other, and it will help position the leaf’s registration point on the path.
Move the playhead to the first keyframe (frame 1). Drag the leaf so that it snaps to the starting point of the path.

Move the leaf in the last keyframe so that it snaps to the end of the path.

Press Return/Enter to test the effect of the motion guide on the classic tween.
The leaf makes a graceful curved descent down the Stage, following the path that is drawn in the classic motion guide.
TipYou can edit the path in the classic motion guide with any of the editing tools, such as the Selection tool, Subselection tool, or Pen tool. Any change you make to the path will immediately change the object’s motion as long as the object remains snapped to the path in both the beginning and ending keyframes.

When you export or publish the final animation, the path in the motion guide layer will not be visible. Choose Control > Test Movie to see the animation without the motion guide path.
Orienting objects to the path
Sometimes the orientation of an object traveling along a path is important. In the previous task, the orientation of the leaf doesn’t matter since it tumbles as it falls. However, if you are animating a rocket ship moving along a path, its nose should always point in the direction in which it is heading. Orient To Path in the Properties panel gives you this option.
Select the leaf instance in the first keyframe of the classic tween layer.

In the Object tab of the Properties panel, select the Swap Symbol option.

The Swap Symbol dialog box appears.
Choose the rocket symbol and click OK.
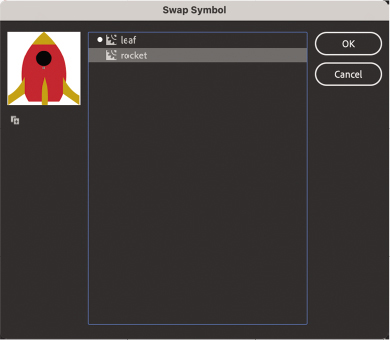
The leaf instance is replaced by a rocket.

Select the leaf instance in the last keyframe of the classic tween layer and use the Swap Symbol option to swap the leaf for the rocket.
Your leaf in both the first and last keyframes of the classic tween has now been replaced a rocket.
Select the rocket on the Stage in the last keyframe of the classic tween layer and choose the Transform panel option.
Choose the Remove Transform option at the bottom of the Transform panel.

The transformations that were applied to the original leaf are reset so that the rocket is in its original size and orientation.

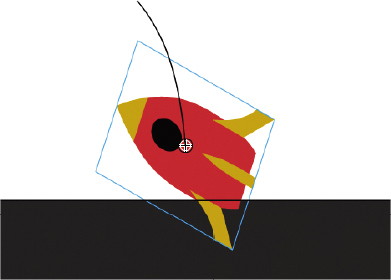
Use the Free Transform tool to rotate the rocket so that its nose is pointing in the same direction as the path.

Use the Selection tool to move the rocket to make sure that its registration point snaps to the end of the Motion Guide path.
Select the rocket in the first keyframe, and with the Free Transform and Selection tools, make similar adjustments so that the rocket is on the path and rotated in the direction of the path.

Select any frame in the classic tween. In the Frame tab of the Properties panel, under the Tweening section, enable the Orient To Path option.
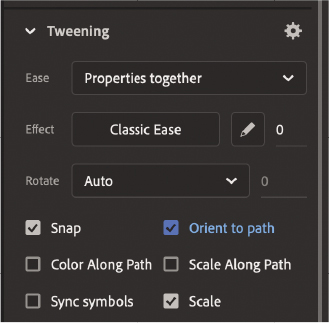
Animate maintains the rocket orientation so that its nose always points in the direction of the path.

Easing
Easing refers to the way in which a motion tween proceeds. You can think of easing for changes in position as acceleration or deceleration. An object that moves from one side of the Stage to the other side can start off slowly, build up speed, and then stop suddenly. Or the object can start off quickly and then gradually slow to a halt. Your keyframes indicate the beginning and ending points of the motion, but the easing determines how your object gets from one keyframe to the next.
To apply easing to a motion tween, use the Effect menu under the Tweening section of the Properties panel. You can choose a Classic ease, which provides easing values that range from -100 to 100. A negative value creates a more gradual change from the starting position (known as an ease-in). A positive value creates a gradual slowdown (known as an ease-out). Or you can choose more complex ease effects that alter both the ease-in and ease-out.
Adding eases to motion
You will add an ease to the rocket ship motion in this task, but eases can be applied to any property change, including scale, transparency, and color.
Select any of the tweened frames between the first and last keyframes of the rocket ship animation in the leaf layer.

In the Properties panel, under the Tweening section, choose Classic Ease for Effect and –100 for Intensity.

The ease curve on the graph shows on the vertical axis how the property (in this case, the position) changes for every interval of time, which is on the horizontal axis.
For an ease-in, there is very little change at the beginning of the tween, which is why the curve is very shallow at first.
Press Return/Enter to preview your animation.
The rocket moves by starting very gradually (ease-in).
In the Properties panel, under the Tweening section, change the Classic Ease Intensity to 100.

The ease curve on the graph appears different, with the end of the curve becoming flatter, indicating that the motion slows at the end.
Press Return/Enter to preview your animation.
The rocket now starts normally but gradually slows at the end (ease-out).
Adding more complex eases
The Effects menu in the Tweening section of the Properties panel contains many other ease options you can explore.
Choose Ease In or Ease Out to apply that type of ease, and then choose the intensity of ease in the secondary menu.
Choose Ease In Out to apply an ease that affects both the start and the end of the motion.
Choose Custom and then New to create a new ease that you can design yourself using Bezier curves to control the ease curve.
 Note
NoteWhen you copy and paste the frames of a tween, the ease that is applied to it is also copied and pasted.
 Tip
TipTo remove an ease, choose No Ease from the Effects menu in the Tweening section of the Properties panel.
Creating nested animations
Often, an object that is animated on the Stage will have its own internal animation. For example, the wings of a butterfly may flap as the butterfly moves across the Stage. Or the rocket you worked with previously could have animated flames coming out of its fuselage as it flies. These kinds of animations are called nested animations because they are contained inside their movie clip symbols. Movie clip symbols have their own timeline capable of displaying animation that is independent of the main timeline.
In this section, you’ll return to your animation in 03_workingcopy.fla.
You’ll insert a frame-by-frame animation inside the carLeft movie clip symbol to make it move up and down in a jittery fashion. When the movie clip loops, the car will rumble slightly to simulate the idle of the motor.
About frame-by-frame animation
Frame-by-frame animation is a technique that creates the illusion of movement by making incremental changes between every keyframe. Frame-by-frame animation in Animate is similar to traditional hand-drawn cel animation or flipbooks, where each drawing is on a separate sheet of paper or page. It’s also just as tedious, but the results can be very creative.
Sometimes animators will trace live-action footage to create realistic frame-byframe animation known as rotoscoping. You can see an example of this in the sample file 03Frame-by-Frame.fla in the 03/03Start folder.

Frame-by-frame animations increase your file size rapidly because Animate has to store the contents for each keyframe, so use frame-by-frame animation sparingly.
Creating animations inside movie clip symbols
The frame-by-frame animations inside the carMiddle and carRight movie clip symbols have already been done. You’ll finish the animation for the carLeft symbol.
In the Library panel, double-click the carRight movie clip symbol to examine its completed frame-by-frame animation.

Inside the carRight movie clip, three keyframes establish three different positions for the car and its headlights. The keyframes are spaced unevenly to provide the unpredictable up and down motion.
In the Library panel, double-click the carLeft movie clip symbol.
This brings you to symbol-editing mode for the carLeft symbol.

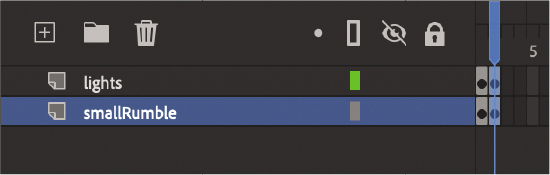
Select frame 2 in both the lights layer and the smallRumble layer.
Choose Insert Keyframe (F6).
Animate inserts a keyframe in frame 2 of the lights layer and the smallRumble layer. The contents of the previous keyframes are copied into the new keyframes.
 Tip
TipYou can navigate quickly between multiple keyframes by choosing Control > Step Forward To Next Keyframe (Alt/Option+.) or Control > Step Backward To Previous Keyframe (Alt/Option+,). You can also click the forward-pointing or backward-pointing arrow to the left of the playback controls at the top of the Timeline panel to move to the next or previous keyframe, respectively.
In frame 2, select all three graphics (the car and its two headlights) on the Stage (Edit > Select All, or Command+A/Ctrl+A) and move them down the Stage by one pixel. Use the Properties panel to decrease the Y-position value by one pixel, or press the Down Arrow key to nudge the graphics by one pixel.
TipIf the image of the car isn’t visible, select Fit In Window from the Zoom menu in the upper-right corner of the Stage.
 Tip
TipYou can quickly build nested animations with a workflow shortcut, Convert Layers To Symbols. If you have an animation on the main timeline, simply select the layers, right-click, and choose Convert Layers To Symbol. Animate will put the selected layers into a symbol of your choosing and leave an instance of the symbol on the Stage.
The car and its headlights move down slightly.
Repeat the process of inserting keyframes and changing the graphics. For a random motion like an idling car, using at least three keyframes is ideal.
Select frame 4 in both the lights layer and the smallRumble layer.
Choose Insert Keyframe (F6).
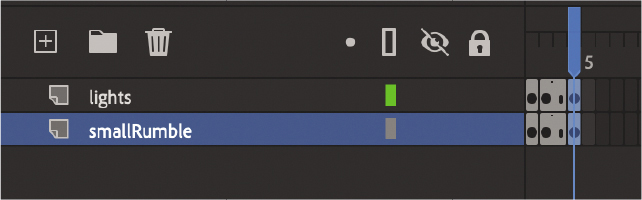
Keyframes are inserted into frame 4 of the lights and smallRumble layers. The contents of the previous keyframes are copied into the new keyframes.
Select all three graphics on the Stage (Edit > Select All, or Command+A/Ctrl+A) and move them up the Stage by two pixels. You can use the Properties panel or press the Up Arrow key twice to nudge the graphics by two pixels.
The car and its headlights move up slightly. You now have three keyframes for both layers inside the movie clip.
Test the idling motion by enabling the Loop option at the top of the Timeline panel and clicking Play (Return/Enter). Choose Control > Test to preview the entire animation.
NoteIn this section, you created the car’s idling motion by manually moving the car’s position frame by frame. In Lesson 6, “Animating Symbols with Motion Tweens,” you’ll learn to use motion tweens and the Refine Motion Tween panel, which can automatically modify your tween to simulate natural movements such as bounces or random jitters (as in the idling of a car).
 Note
NoteAnimations inside movie clip symbols will loop automatically. To prevent the looping, you need to add code to tell the movie clip timeline to stop on its last frame. You’ll learn to control those timelines with ActionScript or JavaScript in later lessons.
Adding a 3D title
Finally, you’ll add a title and position it in 3D space. The 3D Rotation tool and 3D Translation tool allow you to move symbol instances in 3D space to give your projects more depth. Both tools are provided in the additional Drag And Drop Tools panel and must be added to your Tools panel.

Moving objects in 3D presents the added complication of a third axis (z). When you choose the 3D Rotation or 3D Translation tool, you need to be aware of the Global Transform option at the bottom of the Tools panel (see the sidebar “Global vs. local transformations”). Global Transform toggles between a Global option (when you select the button) and a Local option (when you deselect the button). Moving an object in Global mode makes the transformation relative to the global coordinate system, whereas moving an object in Local mode makes the transformation relative to itself.
In the next task, the 3D title will make a dramatic appearance to conclude the animation. The title will not be animated, however. Three-dimensional objects cannot be animated with classic tweens. In order to animate symbol instances with the 3D Rotation tool or 3D Translation tool, you must use a motion tween, which we’ll cover in Lesson 6.
Global vs. local transformations
When you select the 3D Rotation or 3D Translation tool, be aware of the Global Transform toggle button found at the bottom of the Tools panel when one of the 3D tools is selected. When the button is toggled on (and highlighted), Global mode is engaged and the rotation and positioning of 3D objects are relative to the global, or Stage, coordinate system. The 3D display over the object that you’re moving shows the three axes in constant position, no matter how the object is rotated or moved. Notice in the following image how the 3D display is perpendicular to the Stage.
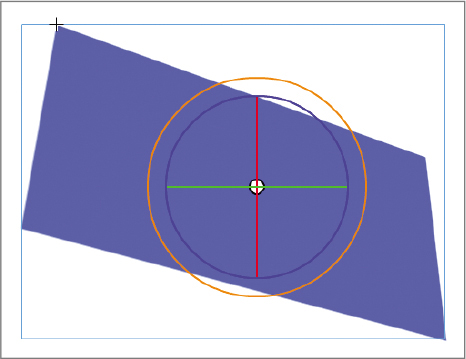
However, when the Global Transform option is turned off (the button is not highlighted), Local mode is in force and rotation and positioning are relative to the object. The 3D display shows the three axes oriented relative to the object, not to the Stage. For example, in the following image, notice that the 3D Rotation tool shows the rotation relative to the object, not to the Stage.

Click the left-facing arrow in the Edit bar to return to the main timeline. Insert a new layer at the top of the layer stack and rename it title.

Lock all the other layers.
Insert a new keyframe at frame 140 (F6).

Drag the movie clip symbol called movietitle from the Library panel onto the Stage in the empty space in the top-left corner.

The movietitle instance appears in your new layer in the keyframe at frame 140.
Position the title in the empty sky at X=180 and Y=90.
Select the 3D Rotation tool. The 3D Rotation tool is hidden in the additional tear-off tools at the bottom of the Toolbar (you’ll have to add it to your Toolbar to use it).
The 3D rotation control appears on the selected movie clip.

Deselect the Global Transform button at the bottom of the Tools panel to put the 3D Rotation tool into Local mode.
Drag the left arm of the green Y control to rotate the title around the y-axis to angle it so that it seems to recede into the distance. Its angle is at about -60 degrees. If you have trouble with the 3D controls on the Stage, just change the 3D Rotation values in the Transform panel (Window > Transform).
NoteAnimating the 3D rotation or translation of a symbol is not currently supported in HTML5 Canvas documents.

The title appears to recede in the distance because of its tilted angle in 3D space. Its dramatic appearance at the end of the project concludes the composition of the animated movie poster.
Exporting your final movie
You can quickly preview your animation by “scrubbing” the playhead back and forth on the timeline, by choosing Control > Play, or by using the Time Scrub tool from the Tools panel. You can also use the integrated controller at the top of the Timeline panel. But to create your final project as a movie and see the nested animations inside movie clip symbols, you must export it.
Use the Quick Share And Publish option to create an MP4 movie file. Your animation is converted in Adobe Media Encoder, a freestanding application that is part of Adobe Creative Cloud.
Choose Quick Share And Publish > Publish > Video (.mp4). Click Publish.

Animate exports a video in Adobe Media Encoder, which automatically launches. Your project is added to the Queue panel for processing.

The encoding process will begin automatically. If it doesn’t, click the Start Queue button (the green triangle) or press Return/Enter to begin the encoding process.

Media Encoder converts your project file into an H.264-formatted video with the standard .mp4 extension and notifies you when the process is finished.
Congratulations—you’re done! The final file can be uploaded to your favorite video-sharing sites or put up on a promotional website for the fictional cinematic release.
NoteYou can also publish an MP4 movie by choosing File > Export > Export Video/Media. If you choose this route, you will have an opportunity to tinker with the options in Adobe Media Encoder and change audio/video encodings, cropping, trimming, and other properties of your video.

Review answers
1 A classic tween requires a symbol instance on the Stage and its own layer. No other tween, graphic, or asset can exist on the tween layer.
2 A classic tween creates smooth transitions of an object’s location, scale, rotation, transparency, brightness, tint, or filter values.
3 The Edit Multiple Frames option provides a way for you to edit many different keyframes across a span of frames and across multiple layers at once. For example, use the Edit Multiple Frames option to apply the same operation on both the first and last keyframes of a tween.
4 To animate an object’s motion on a path, add a Motion Guide layer to the classic tween. Create a stroke on the Motion Guide and make sure that the instances in the first and last keyframes are snapped to the path.
5 Easing alters the rate of change in a tween. Without easing, a tween proceeds linearly, where the same amount of change happens over time. An ease-in makes an object begin its animation slowly, and an ease-out makes an object end its animation slowly.