
8. Animating Shapes and Using Masks
Lesson overview
In this lesson, you’ll learn how to do the following:
Animate shapes with shape tweens.
Use shape hints to refine shape tweens.
Animate gradient fills.
View onion skin outlines.
Apply easing to shape tweens.
Create and use masks.
Understand mask limitations.
Animate the mask and masked layers.

This lesson will take about 1 hour to complete.
To get the lesson files used in this chapter, download them from the web page for this book at www.adobepress.com/AnimateCIB2023. For more information, see “Accessing the lesson files and Web Edition” in the Getting Started section at the beginning of this book.

Shape tweening is another technique you can use to deform the contours of a graphic. You can make changes to either the stroke or the fill of any vector shape for organic, fluid animation. Masks provide a way to selectively show only parts of a layer. Together, they can add more sophisticated effects to your animations.
Getting started
![]() Note
Note
If you have not already downloaded the project files for this lesson to your computer from your Account page, make sure to do so now. See Getting Started at the beginning of the book.
You’ll start the lesson by viewing the animated logo that you’ll create as you learn about shape tweens and masks in Adobe Animate.
Switch to a web browser, choose File > Open File, and navigate to 08/08End/08End.gif to play the finished animated GIF. An animated GIF is a single file that often combines multiple images as a looped animation, popular for internet memes.

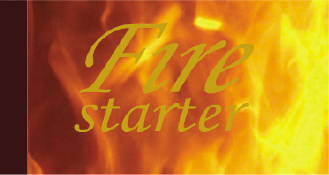
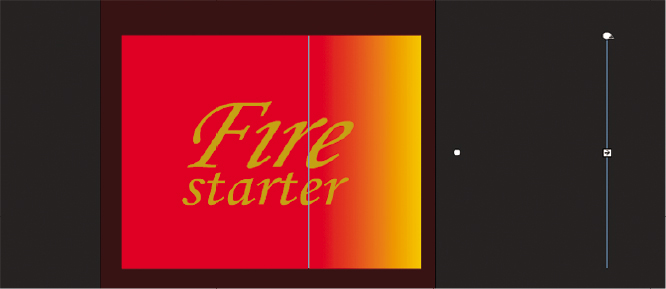
The project is an animated logo for a fictional company intended as a profile image for various social media platforms. The animation shows a flame flickering at the top of the company name. Both the shape of the flame and the radial gradient fill inside the flame change constantly. A linear gradient sweeps across the letters of the company name from left to right. In this lesson, you’ll animate both the flame and the colors that move across the letters.
Close your browser. Double-click the 08Start.fla file in the 08/08Start folder to open the initial project file in Animate.
Choose File > Save As. Name the file 08_workingcopy.fla and save it in the 08Start folder.
Saving a working copy ensures that the original start file will be available if you want to start over.
Animating shapes
In Lesson 5, you learned to deform the envelope of a graphic with the Asset Warp tool for more organic motions, such as the undulations of musical notes.
Another approach to animating the contours of a graphic is to use shape tweening.
Shape tweening is a technique for interpolating the stroke and fill changes of a vector shape between different keyframes. Shape tweens make it possible to smoothly morph one shape into another. Any kind of animation that requires the stroke or fill of a shape to change—for example, animation of smoke, water, or hair—is a potential candidate for shape tweening.
Shape tweens vs. the Asset Warp tool’s envelope deformer
Both shape tweening and classic tweening with the Asset Warp tool’s envelope deformer (see Lesson 5) involve making changes to an object’s contours. However, there are key differences between the two techniques:
Shape tweening can be applied only to vector shapes.
The envelope deformer can be applied to either vector shapes or bitmap images. However, when the envelope deformer is applied to a vector shape, Animate automatically converts the shape to a bitmap (called a warped bitmap) unless you disable the conversion in Preferences.
Shape tweening can modify nearly any aspect of a shape’s stroke or fill. A gradient fill, the stroke width, and the stroke color can all be tweened.
In a shape tween, you directly modify the shape’s outline with the Selection or Subselection tool; in the envelope deformer, you modify the boundaries of the mesh, which, in turn, distorts the graphic.
In general, use shape tweening on simple shapes, such as a droplet of water, the curl of a lock of hair, or a puff of smoke. Use the Asset Warp tool’s envelope deformer for more complicated illustrations composed of multiple shapes that you want to deform together. For example, you might want to use a shape tween for the changes in just a single eyebrow, but use the envelope deformer for changes to the entire head, which includes the hair and facial features.
Understanding the project file
The 08Start.fla file is an ActionScript 3.0 document that contains most of the graphics already completed and organized in different layers. However, the file is static, and you’ll be adding the animation.
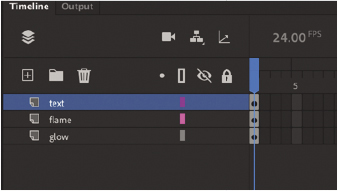
The text layer is at the very top and contains the company name, “Fire starter.” The flame layer contains the flame, and the bottom layer, called glow, contains a radial gradient to provide a soft glow.
There are no assets in the library.
Creating a shape tween
To create the flickering flame effect, you’ll animate the pulsating changes in a flame’s typical teardrop shape. You’ll rely on shape tweening to handle the smooth morphing from one shape to the next, as well as the gradual shifts in color. A shape tween requires at least two keyframes on the same layer. The beginning keyframe contains a shape drawn with the drawing tools in Animate or imported from Adobe Illustrator. The ending keyframe also contains a shape. A shape tween interpolates the smooth changes between the beginning keyframe and the ending keyframe.
Establishing keyframes containing different shapes
In the following steps, you’ll animate the flame that will sit on top of the company name.
Select frame 40 in all three layers and choose Insert > Timeline > Frame (F5).
Forty frames are added to all three layers to define the overall length of the animation.

Lock the text layer and the glow layer. This prevents you from accidentally selecting or moving the graphics in those layers.
Select frame 40 in the flame layer and choose Insert Keyframe above the timeline (or right-click and choose Insert Keyframe, or choose Insert > Timeline > Keyframe [F6]). The contents of the previous keyframe at frame 1 are copied into the new keyframe.

You now have two keyframes on the timeline in the flame layer, at frame 1 and at frame 40. Next, you’ll change the shape of the flame in the end keyframe.
Select the Selection tool.
Click away from the shape to deselect it. Move your cursor close to the outlines of the shape, and drag the contours of the flame to make the flame skinnier.

The beginning keyframe and the ending keyframe now contain different shapes—a fat flame in the beginning keyframe and a skinny flame in the ending keyframe, at frame 40.
Applying the shape tween
Next, you’ll apply a shape tween between the keyframes to create the smooth transitions.
Click any frame between the beginning keyframe and the ending keyframe in the flame layer.
Press and hold the Create Tween button above the timeline and choose Create Shape Tween. Or right-click and then choose Create Shape Tween, or choose Create Shape Tween from the Insert menu.

Animate applies a shape tween between the two keyframes, which is indicated by a black forward-pointing arrow and an orange fill in the tween span.

Watch your animation by choosing Control > Play (Return [macOS] or Enter [Windows]), or by clicking the Play button at the top of the Timeline panel.
 Note
NoteDon’t worry if your flame doesn’t morph exactly the way you want it to. Small changes between keyframes work best. Your flame may rotate while going from the first shape to the second. You’ll have a chance later in this lesson to refine the shape tweening with shape hints.

You have created a smooth animation between the keyframes in the flame layer, morphing the shape of the first flame into the shape of the second flame.
Blend types
In the Properties panel, you can modify your shape tween by choosing either the Distributive or the Angular option for Blend. These two options determine how Animate makes the interpolations to change the shapes from one keyframe to the next.
The Distributive option is the default and works well for most cases. It creates animations in which the intermediate shapes are smoother.

Use the Angular blend if your shapes have many points and straight lines. Animate attempts to preserve apparent corners and lines in the intermediate shapes.
Changing the pace
The keyframes of a shape tween can be easily moved along the timeline to change the timing or pacing of the animation.
Moving a keyframe
The flame slowly transforms from one shape to another over a period of 40 frames. If you want the flame to make the shape change more rapidly, you need to move the keyframes closer together.
Select the last keyframe of the shape tween in the flame layer.

Make sure the box icon appears near your cursor as you drag the last keyframe to frame 6.
The shape tween shortens.

Press Return/Enter to play your animation.
The flame flickers quickly and then remains static until frame 40.
Adding more shape tweens
You can add shape tweens by creating more keyframes. Each shape tween simply requires two keyframes to define its beginning state and its ending state.
Inserting additional keyframes
You want the flame to continually change shape, just as a real flame would. You’ll change the shape of the flame in keyframes later in the timeline and apply shape tweens between all the keyframes.
Make sure the Auto Keyframe option is enabled above your timeline and select frame 17 in the flame layer.

Click away from the shape to deselect it. Drag the contours of the flame to create another variation in its shape. You can make the base thicker or change the curvature of the tip to make it lean left or right.

Animate automatically creates a keyframe at frame 17, where you’ve made a change in the shape of the flame.

Select frame 22 in the flame layer and modify the contours of the flame.
Animate automatically creates a new keyframe at frame 22, indicating another change.

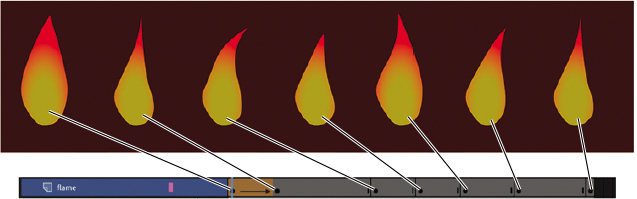
Continue making slight variations of the flame at frames 27, 33, and 40.
Your timeline now has seven keyframes in the flame layer, with a shape tween between the first and second keyframes.

Each of the seven keyframes in the flame layer contains a slightly different shape for the flame.
Extending the shape tweens
Your next step is to extend the shape tweens so that the flame morphs from one shape to the next.
Select any frame between the second and third keyframes, and choose Create Shape Tween. Or choose Insert > Create Shape Tween.

A black forward-pointing arrow on an orange background appears between the two keyframes, showing that you’ve applied a shape tween.

Continue to insert shape tweens between all the keyframes.
You should have six shape tweens in the flame layer.

Press Return/Enter to watch the animation play.
 Tip
TipTry this shortcut: select a range of frames that cover multiple keyframes, right-click, and choose Create Shape Tween to apply a shape tween across all keyframes.

Your flame flickers back and forth for the duration of the animation. Depending on how extensive your modifications to the flame have been, your flame may undergo some weird contortions between keyframes—for example, flipping or rotating unpredictably. Don’t worry! You’ll have a chance later in the lesson to refine your animation with shape hints.
Broken tweens
Every shape tween needs a beginning and an ending keyframe with a shape inside each. If the last keyframe of a shape tween is missing, Animate shows the broken tween as a dotted black line (rather than a solid arrow).

In this example, insert a keyframe at frame 40 to fix the tween.
Creating a looping animation
Your flame should flicker back and forth continuously for as long as the logo is on-screen. You can create a seamless loop by making the first and last keyframes identical and putting the animation inside a graphic or a movie clip symbol. A movie clip timeline loops continuously, independently of the main timeline, while a graphic symbol plays as long as there are enough frames on the main timeline.
Duplicating keyframes
Make the first keyframe identical to the last keyframe by duplicating its contents.
Right-click the first keyframe on the flame layer and select Copy Frames. Or choose Edit > Timeline > Copy Frames.
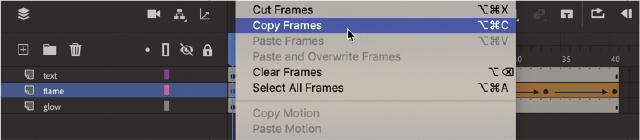
The contents of the first keyframe are placed on your clipboard.
Right-click the last keyframe on the flame layer and select Paste Frames. Or choose Edit > Timeline > Paste Frames.
TipYou can quickly duplicate keyframes by first selecting a keyframe and then Option/Alt-dragging the keyframe to a new position.
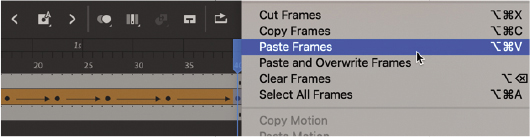
The first and last keyframes now contain identical flame shapes.
Previewing the loop
Use the Loop button at the top of the Timeline panel to preview your animation.
Click the Loop button or choose Control > Loop Playback (Option+Shift+L/Alt+Shift+L) to enable continuous playback when you play the movie.

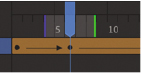
Markers appear on the timeline header indicating the range of frames that loop during playback. Next, you’ll adjust the markers to extend the loop to include the entire movie.
Drag the markers to include all the frames on your timeline (frames 1 through 40). Hold down the Command/Ctrl key while you’re dragging either marker to move both of them in equal amounts.

Press Return/Enter to test the animation.
NoteThe Loop Playback option loops the animation only in the Animate authoring environment and not in the published animation.
The flame animation plays and loops continuously. Click the Pause button or press Return/Enter again to stop the animation.
Deselect the Loop button at the top of the Timeline panel to hide the markers and end the loop playback.
Inserting the animation into a graphic symbol
When your animation plays in a graphic clip symbol, the animation loops automatically as long as there are sufficient frames on the main timeline.
Select the flame layer and right-click to choose Convert Layers To Symbol.
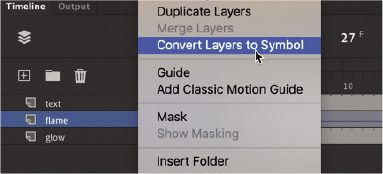
The Convert Layers To Symbol dialog box appears.
Enter flame as the name of the symbol, and choose Graphic from the Type menu. Click OK.

A new graphic symbol is created and saved in your library. On the flame layer, Animate leaves an instance of your newly created symbol.

Press Return/Enter.
NoteThe reason why we’re using a graphic symbol rather than a movie clip symbol to create the looping animated flame is that movie clip timelines do not get included in exported animated GIFs, and the last exercise in this lesson will involve publishing this file as an animated GIF.
Animate plays the animation on the timeline. Since your graphic symbol contains 40 frames and the main timeline contains 40 frames, the entire animation of the flame flickering fits into the main timeline.
Using shape hints
Animate creates the smooth transitions between keyframes of your shape tween, but sometimes the results are unpredictable. Your shapes may go through strange contortions, flips, and rotations to get from one keyframe to another. You may like the effect, but more often than not you’ll want to maintain control of the transformations. Using shape hints can help refine the shape changes.
Shape hints force Animate to map points on the start shape to corresponding points on the end shape. By placing multiple shape hints, you can more precisely control how a shape tween appears.
Adding shape hints
Now you’ll add shape hints to the shape of the flame to modify the way it morphs from one shape to the next.
Double-click the flame graphic symbol in the library to enter symbol editing mode. Move the playhead to frame 1 of the shape tween in the flame layer.

Choose Modify > Shape > Add Shape Hint (Command+Shift+H/Ctrl+Shift+H).
A red-circled letter “a” appears on the Stage. The circled letter represents the first shape hint.

Select the Selection tool and make sure Snap To Objects in the Doc tab of the Properties panel is selected.
Snap To Objects ensures that objects snap to each other when being moved or modified.
Drag the circled letter to the tip of the flame.
TipShape hints should be placed on the edges of shapes.

Choose Modify > Shape > Add Shape Hint again to create a second shape hint.
A red-circled “b” appears on the Stage.

Drag the “b” shape hint to the bottom of the flame shape.

You have two shape hints mapped to different points on the shape in the first keyframe.
Select the next keyframe of the flame layer (frame 6).
A corresponding red-circled “b” appears on the Stage, hiding an “a” shape hint that is directly under it.

Drag the circled letters to corresponding points on the shape in the second keyframe. The “a” hint goes on the top of the flame, and the “b” hint goes on the bottom of the flame.
The shape hints turn green, indicating that you’ve correctly placed them so that they correspond to equivalent locations in the first keyframe.

Select the first keyframe.
Note that the initial shape hints have turned yellow, indicating that they are correctly placed. When placed properly, the shape hints in the beginning keyframe turn yellow and those in the ending keyframe turn green.

Scrub the playhead through the first shape tween on the timeline to see the effect of the shape hints on the shape tween.
The shape hints force the tip of the flame in the first keyframe to map to the tip of the flame in the second keyframe and force the bottoms to map to each other. This restricts the transformations.
TipYou can add a maximum of 26 shape hints to any shape tween. Be sure to add them consistently in a clockwise or counterclockwise direction for best results.

To demonstrate the value of shape hints, you can deliberately create a mess of your shape tweens. In the ending keyframe, put the “b” hint at the top of the flame and the “a” hint at the bottom.
Animate forces the tip of the flame to tween to the bottom of the flame and vice versa. The result is a strange flipping motion as Animate tries to make the transformation. Put the “a” back at the top and the “b” back at the bottom after you’re done experimenting.
Removing shape hints
If you’ve added too many shape hints, you can easily delete the unnecessary ones. Removing a shape hint in one keyframe will remove its corresponding shape hint in the other keyframe.
If you want to remove a shape hint, drag an individual shape hint entirely off the Stage and pasteboard.
If you want to remove all shape hints, choose Modify > Shape > Remove All Hints.
Previewing animations with onion skinning
It’s sometimes useful to see how your shapes are changing from one keyframe to another on the Stage all at once. Seeing how the shapes gradually change lets you make smarter adjustments to your animation. You can do so using the onion skinning option, available at the top of the Timeline panel.
Onion skinning shows the contents of the frames before and after the currently selected frame.
The term “onion skin” comes from the world of traditional hand-drawn animation, in which animators draw on thin, semitransparent tracing paper known as onionskin. A light box shines a light behind the drawings to allow them to be seen through several sheets. When creating an action sequence, animators flip back and forth quickly between drawings held between their fingers. This allows them to see how the drawings smoothly connect to each other.
For this reason, onion skinning is an effective technique if you do frame-by-frame animations.
Turning on onion skinning
The Onion Skin button is above the timeline, allowing you to toggle it on and off. Pressing and holding the Onion Skin button displays additional options.
Click the Onion Skin button at the top of the Timeline panel.

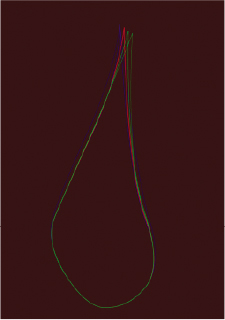
Animate shows several shapes for the flame, representing the shapes in previous and future frames. Seeing multiple frames on the Stage all at once allows you to compare the changes between frames. The currently selected frame is in red. The previous frames are shown in blue, and the future frames are shown in green. The outlines of the flame fade the farther away they are from the current frame.

On the timeline, Animate displays markers to bracket your currently selected frame. The blue marker (to the left of the playhead) indicates how many previous frames are shown on the Stage, and the green marker (to the right of the playhead) indicates how many future frames are shown.
Move the playhead to a different frame.
TipYou can even scrub the playhead back and forth along the timeline to see the ghostly images of the onion skins moving along with the animation. You cannot see onion skins during normal playback, however.
Animate keeps the markers around the playhead no matter where you move it, always showing the same number of frames behind and ahead.
Adjusting the markers
You can move either marker to show more or fewer onion skin frames.
Drag the blue marker to adjust the number of past onion skin frames shown.
Drag the green marker to adjust the number of future frames displayed.
Hold down the Command/Ctrl key while dragging either marker to move the past and future markers in equal amounts.
Hold down the Shift key while dragging either marker to move the onion skin range to a different spot on the timeline (as long as it still encompasses the playhead).
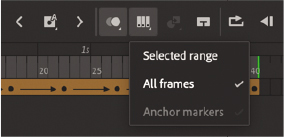
Press and hold the Onion Skin button at the top of the Timeline panel and choose Anchor Markers. With the Anchor Markers option enabled, you can move your playhead on the timeline and the bracketed onion-skinned frames will remain locked in place.

Press and hold the Onion Skin button at the top of the Timeline panel and choose All Frames. With the All Frames option enabled, the brackets will automatically move to cover the first frame and the last frame on the timeline.
Advanced onion skin options
If you want to change the blue and green color coding of previous and future frames, or if you want to change the opacity of the onion skins, you can do so, and more, in the Advanced Settings.
Press and hold the Onion Skin button at the top of the Timeline panel and choose Advanced Settings.
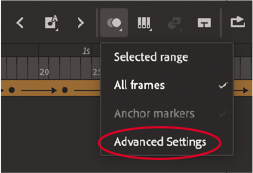
The Onion Skin Settings dialog box appears.
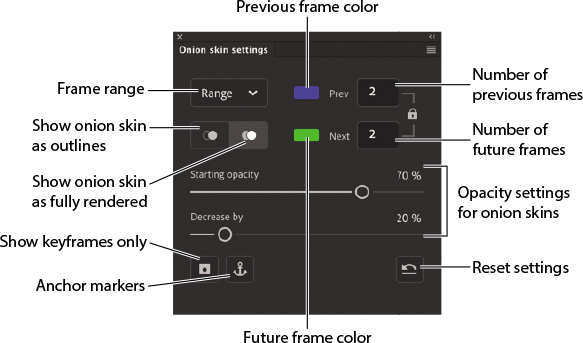
You can fine-tune how the onion skin frames appear by adjusting the following settings:
Choose the previous and future frame ranges numerically.
Click the color swatches to change the color of the previous and future frames.
Choose between seeing the onion skin frames only as outlines, as shown here, or fully rendered.
TipAnimate remembers the most recent preferences set in the Onion Skin Settings panel. Clicking the Onion Skin button above the timeline will toggle onion skins with those settings on and off.
Move the opacity sliders to change the starting opacities and how quickly the onion skin frames fade.
Choose to see only keyframes.
Anchor the frame markers.
Animating color
Shape tweens interpolate all aspects of a shape, which means that both the stroke and fill of a shape can be tweened. So far, you’ve modified the stroke, or outlines, of the flame. In the next section, you’ll modify the fill so that the color gradient can change—perhaps the flame will glow brighter and more intensely at some points in the animation.
Adjusting the gradient fills
Use the Gradient Transform tool to change the way the color gradient is applied to a shape, and use the Color panel to change the actual colors used in a gradient.
If you’re not already in symbol editing mode for your flame symbol, double-click the flame graphic symbol in the library to edit it.
Select the second keyframe on the flame layer (frame 6).
Select the Gradient Transform tool, which is grouped with the Free Transform tool in the Tools panel.
The control points for the Gradient Transform tool appear on the gradient fill of the flame. The various control points allow you to stretch, rotate, and move the focal point of the gradient within the fill. (The Stage color is shown in white so that you can better see the Gradient Transform tool control points.)
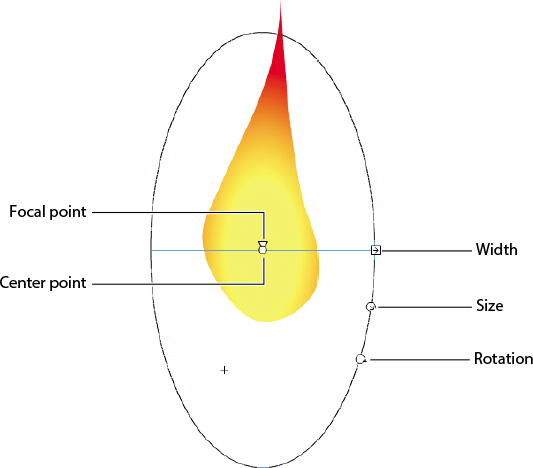
Use the control points to tighten the color gradient into the base of the flame. Reduce the gradient’s size, make it wider, position it lower on the flame, and move the focal point (represented by a tiny triangle) of the gradient to one side.

Your flame’s orange core appears lower and more intense because the colors are distributed in a smaller area.
Move the playhead along the timeline between the first and second keyframes.
The shape tween automatically animates the colors inside the flame as well as its contours.
Select the third keyframe on the flame layer (frame 17). In this frame, you’ll adjust the actual color of the gradient.
Select the Selection tool and click the fill of the flame on the Stage.
Open the Color panel (Window > Color).
The Color panel appears, showing you the gradient colors of the selected fill.

Click the inner color marker, which is currently yellow.
Change the color to a hot pink (#FF33CC).

The center color of the gradient turns pink.
Move the playhead along the timeline between the second and third keyframes.
NoteShape tweens can smoothly animate solid colors or color gradients, but they can’t animate between different types of gradients. For example, you can’t shape tween a linear gradient into a radial gradient.

The shape tween automatically animates the center color in the gradient from yellow to pink. Experiment with the other keyframes by modifying the gradient fill and see what kinds of interesting effects you can apply to your flickering flame.
Creating and using masks
Masking is a way of selectively hiding and displaying content on a layer. It enables you to control the content that your audience sees. For example, you can make a circular mask and allow your audience to see only through the circular area so that you get a keyhole or spotlight effect. In Animate, you put a mask on one layer and the masked content in a layer below it.
For the animated logo you’re creating in this lesson, you’ll make the text a little more visually interesting by using the text itself as a mask.
Defining the mask layer
From the “Fire starter” text, you’ll create a mask that will reveal an image of a fire beneath it.
Return to the main timeline. If necessary, deselect the onion skin and ensure that the playhead is at the beginning of the timeline. Unlock the text layer. Double-click the icon in front of the text layer name, or select the text layer and choose Modify > Timeline > Layer Properties.
The Layer Properties dialog box appears.
 Note
NoteMasks do not recognize strokes, so use only fills in the mask layer. Text created with the Text tool also works as a mask.
Select Mask and click OK.

The text layer becomes a mask layer, indicated by the mask icon in front of the layer name. Anything in this layer will act as a mask for a masked layer below it.
TipAnimate does not recognize different Alpha levels in a mask created on a timeline, so a semitransparent fill in the mask layer has the same effect as an opaque fill, and edges will always be hard. However, in an ActionScript 3.0 document, you can use ActionScript code to dynamically create masks that will allow transparencies.

For this lesson, we’re using the text already in place as the mask, but the mask can be any filled shape. The color of the fill doesn’t matter. What’s important to Animate are the size, location, and contours of the shape. The shape will be the “peephole” through which you’ll see the content on the layer below. You can use any of the drawing or text tools to create the fill for your mask.
Creating the masked layer
The masked layer is always indented under the mask layer.
Click the New Layer button, or choose Insert > Timeline > Layer.
A new layer appears.
Name the layer fiery_effect.
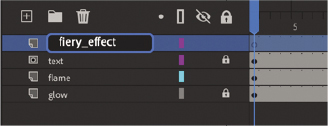
Drag the fiery_effect layer under the mask layer (named text) and a little to the right so that it becomes indented.

The fiery_effect layer becomes a masked layer, paired with the mask layer above it. Any content in the masked layer will be masked by the layer above it.
Choose File > Import > Import To Stage, and select fire.jpg from the 08Start folder. Then click Open.
TipYou can also double-click a normal layer under a mask layer, or choose Modify > Timeline > Layer Properties, and select Masked to modify the layer into a masked layer.
The bitmap image of fire appears on the Stage, and the words appear over the image.
Seeing the effects of the mask
![]() Note
Note
You can have multiple masked layers under a single mask layer.
To see the effects of the mask layer on its masked layer, you must lock both layers.
Click the Lock option for both the text layer and the fiery_effect layer.
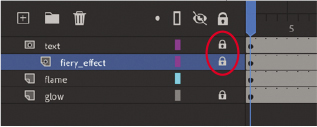
Both the mask and masked layers become locked. The shapes of the letters in the mask layer reveal parts of the image in the masked layer.

Choose Control > Test.
As the flame flickers above the text, the letters reveal the fiery texture in the layer below it.
Animating the mask and masked layers
The letters of your animated logo have more drama now that you’ve created a mask with an image of fire behind it. However, the client for this fictional project now demands that it have even more punch. Although she likes the look of the fiery letters, she wants an animated effect.
Fortunately, you can include tweens in either the mask or the masked layer. You can create an animation in the mask layer if you want the mask itself to move or expand to show different parts of the masked layer. Or you can create an animation in the masked layer if you want the content to move under a mask, like scenery whizzing by a train window.
Adding a tween to the masked layer
To make the logo more compelling for your client, you’ll add a shape tween to the masked layer. The shape tween will move a glow from left to right for a portion of the movie under the letters.
Unlock both the text layer and the fiery_effect layer.
The effects of the mask and masked layers are no longer visible, but their contents are now editable.
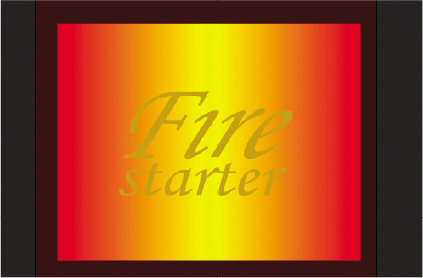
Delete the bitmap image of the fire in the fiery_effect layer.
Select the Rectangle tool and open the Color panel (Window > Color).
In the Color panel, make sure Fill Color is selected and choose Linear Gradient from the Color Type menu.
Create a gradient that starts with red on the far left (#FF0000), goes to yellow in the middle (#FFFC00), and becomes red again on the far right (#FF0000). Make sure your Alpha is set to 100% so that the colors are not transparent.

Create a rectangle in the fiery_effect layer that encompasses the letters in the text layer.
Choose the Gradient Transform tool, and click the fill of your rectangle to select it.
The control handles for the Gradient Transform tool appear on the fill of the rectangle. We’ll use this tool to position the gradient off the Stage so that it can make a dramatic entrance.
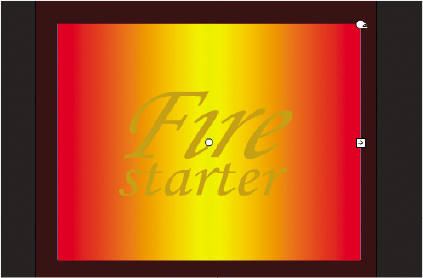
Drag the center point of the gradient so that the yellow color appears on the far-left side of the Stage.

The yellow glow will enter from the left and move to the right.
Select frame 20 in the fiery_effect layer and choose the Insert Keyframe button above the timeline (or F6).

The contents of the previous keyframe are copied into the new keyframe. This will mark the start of the tween. Even though Auto Keyframe is enabled, you have to manually insert this keyframe because there is no change from frame 1.
Select the last frame (frame 40) in the fiery_effect layer.
Drag the center point of the gradient far enough to the right so that the yellow color is just barely visible on the right side of the Stage.
Since your Auto Keyframe option is enabled, a new keyframe is automatically created at frame 40 with the new gradient fill. You now have three keyframes in the fiery_effect layer.

Select any frame on the timeline between the second and third keyframes in the fiery_effect layer, and choose Create Shape Tween above the timeline. Or, from the main menu bar, choose Insert > Create Shape Tween.
The color gradient is shape-tweened so that the yellow glow moves within the fill of the rectangle from left to right.

Watch your animation by choosing Control > Test or by pressing Return/Enter.

While the flame burns above the letters, a soft yellow glow flashes across the letters.
Easing a shape tween
![]() Note
Note
The Motion Editor, which is the advanced panel integrated into the timeline that provides different ease types, is not available for shape tweens.
Eases help your animation bear a sense of weight by enabling you to add an acceleration or deceleration component to its motion.
You can use the Properties panel to add an ease to a shape tween. Ease values range from -100, which indicates an ease-in, to 100, which indicates an ease-out. An ease-in makes the motion start off slowly. An ease-out slows down the motion as it approaches its ending keyframe.
Adding an ease-in
You’ll make the glow that flashes across the letters of the logo begin slowly and then pick up speed. The ease-in will help viewers take notice of the animation before it proceeds.
Click anywhere inside the shape tween in the fiery_effect layer.
In the Properties panel, click the Effect button and choose Ease In > Cubic. Double-click to apply the effect.

Animate applies an ease-in effect to the shape tween. You can explore the other kinds of ease effects, which vary in kind and intensity.
Make sure your mask and masked layers are locked, and choose Control > Test to test your movie.
TipAs with classic tweens, you can apply more advanced eases or even custom eases. Click the Edit Easing button to customize your ease curve.
The soft yellow glow flashes across the letters, starting off slowly and then adding a little more sophistication to the entire animation.
Exporting the finished animated GIF
Your project is done, and you’ll export the animated GIF to be used as your client’s Facebook profile image. There is a quick way to create an animated GIF and a more complicated way, depending on whether you want to fine-tune your animated GIF settings.
For the quick method, choose Quick Share And Publish > Publish > Animated GIF (.gif).
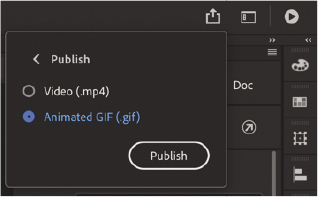
Click Publish.
Animate exports an animated GIF and saves it to the same location as your Animate file.
If you want more control over the export settings, choose File > Export > Export Animated GIF.
Animate opens the Export Image dialog box. It shows a preview of the image and various options for optimizations. In the Preset area, make sure the Transparency option is unselected.

In the Preset area, choose GIF from the Optimized File Format menu. Choose 0 from the Lossy menu and 256 from the Colors menu. This will maximize the quality of your image. You can select Selective and Diffusion for the other two menus. These options determine how the 256 colors are chosen and mixed to create the final image.

In the Image Size area, keep all the values at their default settings. The Width and Height should match the original Stage size.
In the last area, Animation, you can choose the type of looping behavior for your animated GIF. Select Forever, which will make your animated GIF loop endlessly. You can preview the animation by clicking the Play button. You can also examine each of the 40 frames individually by moving forward or backward one frame at a time.

Click Save, and in the dialog box that appears, provide a filename and navigate to the 08End folder to save your animated GIF.
Review questions
1 What is a shape tween, and how do you apply it?
2 What are shape hints, and how do you use them?
3 What does the color coding of the onion skin markers indicate?
4 How is shape tweening different from tweening with the Asset Warp tool’s envelope deformer?
5 What is a mask, and how do you create one?
6 How do you see the effects of a mask?
Review answers
1 A shape tween creates smooth transitions between keyframes containing different shapes. To apply a shape tween, create different shapes in an initial keyframe and in a final keyframe. Then select any frame between the keyframes in the timeline and choose Create Shape Tween from the Create Tween button above the timeline.
2 Shape hints are labeled markers that indicate how one point on the initial shape of a shape tween will map to a corresponding point on the final shape. Shape hints help refine the way the shapes will morph. To use shape hints, first select the initial keyframe of a shape tween. Choose Modify > Shape > Add Shape Hint. Move the first shape hint to the edge of the shape. Move the playhead to the final keyframe, and move the corresponding shape hint to a matching edge of the shape.
3 By default, Animate shows the onion skins in previous frames in blue and the onion skins in future frames in green. The onion skin in the currently selected frame is in red. The colors can be customized in the Advanced Settings options in the Onion Skin menu.
4 A shape tween uses shapes, whereas the Asset Warp tool’s envelope deformer can be applied to either shapes or bitmaps. A shape tween smoothly interpolates the change of stroke or fill of a shape between two keyframes. The envelope deformer can only deform the mesh around the graphic, and not the stroke or fill.
5 Masking is a way of selectively hiding and displaying content on a layer. In Animate, you put a mask on the top mask layer and the content in the layer below it, which is called the masked layer. Both the mask and masked layers can be animated.
6 To see the effects of the mask layer on the masked layer, you must lock both layers, or test your movie by choosing Control > Test.