
4. Layer Parenting and Character Animation
Lesson overview
In this lesson, you’ll learn how to do the following:
Animate characters with classic tweening.
Create and edit object hierarchies with layer parenting.
Swap symbol instances.
Understand graphic symbol playback options.
Add sound and understand sound sync options.
Automatically synchronize dialogue with graphic symbols.
Use the Frame Picker for graphic symbols.

This lesson will take about 90 minutes to complete.
To get the lesson files used in this chapter, download them from the web page for this book at www.adobepress.com/AnimateCIB2023. For more information, see “Accessing the lesson files and Web Edition” in the Getting Started section at the beginning of this book.

Layer parenting creates hierarchies for your animation to make character animation easy. Add sound and automatic lip-syncing with graphic symbols to bring your characters to life.
Getting started
![]() Note
Note
If you have not already downloaded the project files for this lesson to your computer from your Account page, make sure to do so now. See Getting Started at the beginning of the book.
Start by viewing the finished project to see the short animation that you’ll create in this lesson.
Double-click the 04End.mp4 file in the 04/04End folder to play the finished video.
 Note
NoteMonkey character design by Chris Georgenes (www.keyframer.com) used with permission.

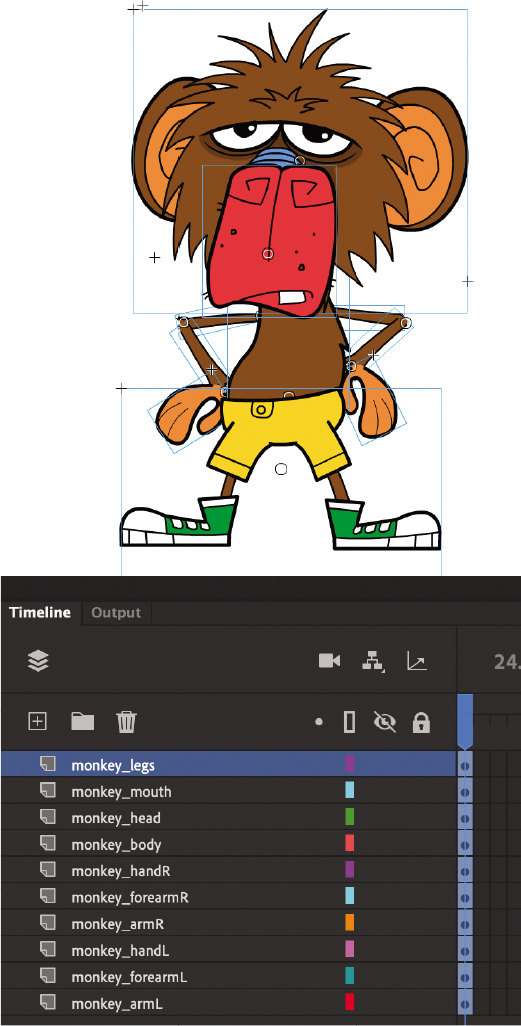
The project is an animation of a monkey who waves to you and then recites some of Hamlet’s famous “To be or not to be” soliloquy while holding a skull.
Close the 04End.mp4 file.
As you complete this project, you’ll learn how to create object hierarchies with layer parenting, and synchronize dialogue for character animation.
Layer parenting
Animating characters depends a lot on object hierarchies, which describe how one object is connected to another object. For example, your hand is connected to your forearm, which is connected to your upper arm, which in turn is connected to your torso. When you move your upper arm, your forearm and hand must follow. When you move your torso, all the pieces connected to your torso also move.
Defining how objects are linked creates a hierarchy, which we often describe in terms of relationships: the torso is the parent to the upper arm and the upper arm is the child of the torso.
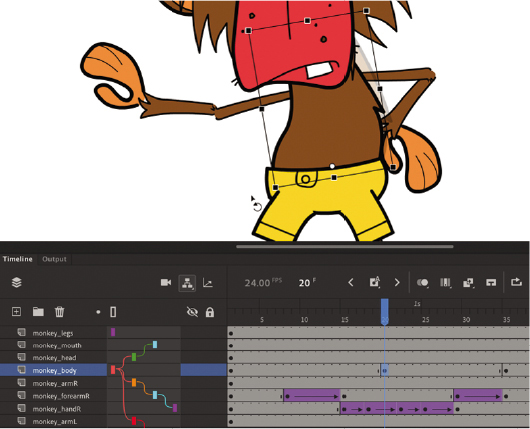
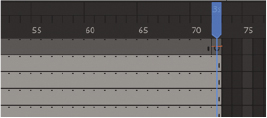
In Adobe Animate, you create hierarchies for your layers using the Parenting View option in the timeline. In Parenting View, you connect the child layer to the parent layer. A colored line in between the layers shows the relationship. When the objects in the parent layer move, rotate, or grow smaller or larger, so do the objects in the child layer.
The figure shows the Parenting View option in the timeline for this finished project. The colored lines connecting the layers indicate the various relationships between the objects in those layers.

Connecting the monkey parts in Parenting View
To begin animating the monkey character, you need to establish the relationships between the various parts of his body.
Open the 04Start.fla file and then save it as 04_workingcopy.fla.
The file contains all the completed graphics and symbols saved in the library. Symbol instances have been placed and arranged on the Stage. Each instance is separated on its own layer so that you can apply a tween to any individual part.
On the main timeline, click the Show Parenting View button. If you click and hold, you will be able to deselect options for the kinds of tweening changes affected.

The button remains depressed, indicating that Parenting View is enabled. The space after the layer names expands.
Drag from the colored rectangle in the monkey_mouth layer to the colored rectangle in the monkey_head layer.
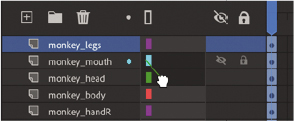
A curvy line connects the monkey_mouth layer to the monkey_head layer. The monkey_mouth is now the child to the monkey_head.

Drag from the colored rectangle in the monkey_head layer to the monkey_body layer.

A curvy line connects the monkey_head layer to the monkey_body layer. You now have three layers that are connected: the body is connected to the head, which is connected to the mouth. It’s important that your layer names are accurate so that you can easily understand the object relationships on the Stage.

Connect the parts of the right arm by dragging from monkey_handR to monkey_forearmR, then from monkey_forearmR to monkey_armR, and then finally from monkey_armR to monkey_body.
You’re always connecting child to parent (not the other way around).

The monkey’s right arm is now connected to his body. Notice that a single layer—in this case, monkey_body—can have more than one child. However, a child layer cannot have more than one parent.
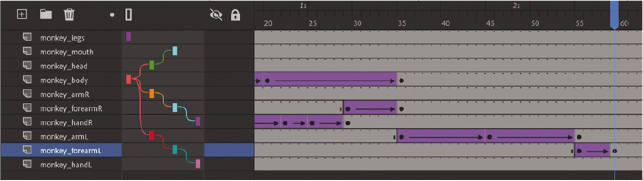
Connect the parts of the left arm by dragging from monkey_handL to monkey_forearmL, then from monkey_forearmL to monkey_armL, and then finally from monkey_armL to monkey_body.
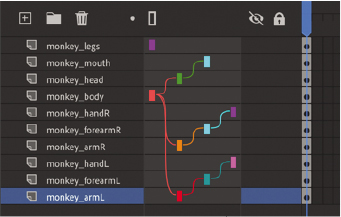
Your Parenting View diagram should look similar to this figure. All layers are connected to the monkey_body layer except for the monkey_legs layer.
Editing layer parenting
If you make a mistake, you can easily change a layer’s parent or remove a parent.
![]() Note
Note
The connections between layers in Parenting View are keyframe based, which means they can be broken and changed in new keyframes.
To remove a layer’s parent, click the dark gray area to the right of the layer’s name in Parenting View and choose Remove Parent.

To change a layer’s parent, click the layer in the Parenting View section of the timeline and choose Change Parent, and then select a different layer.
NoteWhen you change a layer’s parent, that layer’s children will follow.

To change a layer’s parent, you can also simply drag from a layer’s colored rectangle to a new layer.
Editing layer stacking
Keep in mind that connecting layers in Parenting View is independent from how your layers overlap each other. The order in which your layers appear in the timeline determines how the objects in your layers overlap each other on the Stage.
You can reorder layers to change how objects overlap and still maintain the parent–child connections.
Drag the monkey_forearmL layer below monkey_armL, and then drag the monkey_handL layer below monkey_forearmL.

The stacking order of the monkey’s left arm changes so that the hair at the monkey’s wrist more naturally overlaps the monkey’s arm. The parent–child relationships do not change, however.

Rearrange the monkey’s right arm parts so that his hand is below his forearm, and his forearm is below his arm.

Tweening instances in connected layers
Now we’re ready to animate our monkey. We’ll start by making him wave to us. When we animate the arm (the parent layer), we’ll see that the hand (the child layer) automatically moves with it.
Creating beginning and ending keyframes
Classic tweens require a beginning and an end keyframe. Whether your Auto Keyframe mode is enabled or disabled, you will manually create your keyframes (F6) in these tasks.
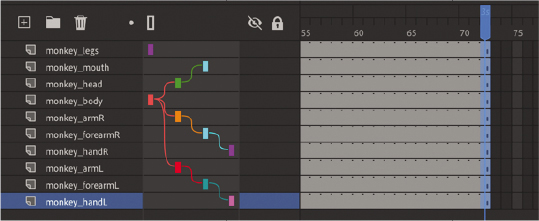
Select frame 72 in all your layers, and add frames (F5) so that you have about 3 seconds in your timeline to work with this animation.
Select frame 8 in the monkey_forearmR layer.
Choose the Insert Keyframe option from above the timeline (F6).
A new keyframe appears in frame 8. This will establish the start of the motion to raise the monkey’s arm.

Select frame 15 in the monkey_forearmR layer and insert another keyframe.

You now have an ending keyframe.
Select the monkey’s right forearm on the Stage.
Select the Free Transform tool and drag a corner point to rotate the monkey’s forearm upward as if to wave.

As you rotate the forearm, the hand that’s connected to it automatically follows. You now have a beginning keyframe where the forearm is at the monkey’s hips and an ending keyframe where the forearm is raised.
Applying a classic tween
A classic tween interpolates the changes in a symbol instance between two keyframes.
Select any frame in between the beginning keyframe (frame 8) and the frame just before the last keyframe.
Choose Create Classic Tween from the Create Tween menu above the timeline.

Animate creates a classic tween between your two keyframes, resulting in the monkey raising his arm and the arm’s child (the hand). Even though only the forearm layer contains keyframes and a tween, the child layer also moves.

Finishing the arm wave
You’ll insert additional tweens to complete the animation.
In the monkey_handR layer, insert keyframes (F6) at frames 15, 18, 22, 25, and 29.

These keyframes will represent the different up and down positions of the hand for the waving motion.
At frame 18, select the hand on the Stage and choose the Free Transform tool to swivel the monkey’s hand downward.

At frame 25, do the same to lower the monkey’s hand.
The resulting keyframes show the hand in alternating up and down positions.
Select the span of frames between the first keyframe up to a frame before the last keyframe.
Choose Create Classic Tween above the timeline.
Tweens are applied across all the keyframes. The monkey raises his arm and waves. Notice that moving a child layer does not affect the parent layer.
NoteWhile changing an instance’s position, rotation, or scale in a parent layer affects all the objects in a child layer, the same is not true for color effects or filters. Changes in color effects or filters are not inherited by the objects in the child layers. So, if you changed the transparency of the monkey’s forearm, his hand would still remain opaque.

Insert keyframes (F6) at frames 29 and 35 in the monkey_forearmR layer.

At frame 35, select the forearm and select the Free Transform tool. Rotate the forearm downward to bring the attached hand back to the monkey’s hip.
 Tip
TipIf you do not want scale, skew, or flip changes in a parent layer to affect its child layers, you can deselect the Propagate Scale Skew And Flip option in the Layer Parenting button. When this option is deselected (unchecked), those transformational changes will be disabled in the child layers and in the tweens.
 Note
NoteLayer parenting affects only symbol instances.
Select the first keyframe (or any frame between the two keyframes) and choose Create Classic Tween.

After the monkey waves, his arm lowers to the original position.
Tweening the parent layer
When you tween parent layers, all their child layers are affected as well. Next, you’ll bend the monkey’s body slightly, and all the connected parts—even those that are animated—will follow.
In the monkey_body layer, insert keyframes at frames 20 and 35.

At frame 20, select the monkey’s body on the Stage and then select the Free Transform tool if it isn’t already selected.
Rotate the body counterclockwise just slightly to give some overall sway.
Select the span of frames between frame 1 and frame 34.
Choose Create Classic Tween above the timeline.

As the monkey slowly sways back and forth between frames 1 and 34, all the connected parts, including his waving right arm, move along with the rotation, maintaining the integrity of the whole character.
Swapping instances
For the animation to be complete, the monkey needs to reach behind his back and pull out a skull to ponder life and death before his soliloquy. You’ll animate his left arm for the motion and then swap his hand instance with another that includes a skull.
In the monkey_armL layer, insert keyframes at frames 35, 45, and 55.

At frame 45 (the middle keyframe), select the monkey’s left upper arm on the Stage if it isn’t already selected.
Use the Free Transform tool and rotate the upper arm clockwise so that his hand disappears behind his back.

Select the span of frames between frames 35 and 54 and click Create Classic Tween above the timeline.
In the monkey_forearmL layer, insert keyframes at frames 55 and 59.

At frame 59, select the monkey’s left forearm on the Stage if it isn’t already selected.
Use the Free Transform tool to rotate the forearm counterclockwise so that his arm is fully extended horizontally.

Select the span of frames between frames 55 and 58 and choose Create Classic Tween above the timeline.
Insert a keyframe in the monkey_handL layer at frame 45, where his hand is behind his back.

Now you’ll need to swap the hand instances so that when the monkey pulls his hand from behind his back, a skull appears. At frame 45, select the hand on the Stage. You’ll have to hide or lock all the layers above the monkey_handL layer to select it if it isn’t already selected.
In the Object tab of the Properties panel, click the Swap Symbol icon.

The Swap Symbol dialog box appears, showing you all the symbols in your library. The current symbol has a dot in front of it.
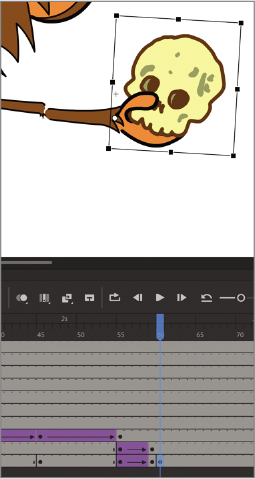
Select the “monkey_hand skull down” symbol and click OK.
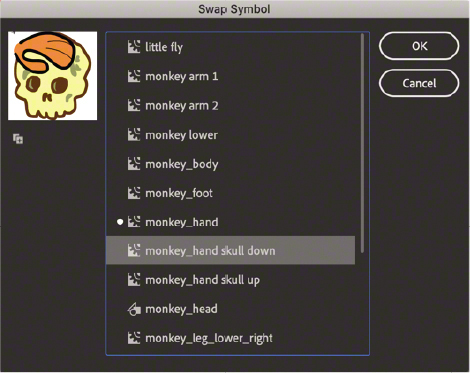
The instance of the plain hand is swapped with one that shows a hand holding a skull.
Unlock or unhide all the layers.
Insert keyframes at 55 and 59 in the monkey_handL layer and rotate the monkey’s hand in the last keyframe so that it is level with his arm.

Apply a classic tween between the keyframes at 55 and 59.
As the monkey pulls the skull from behind his back, his hand rotates so that his arm, forearm, and hand are all level.
Insert a keyframe at frame 60 in the monkey_handL layer.
Select the hand instance on the Stage and swap it with the “monkey_hand skull up” symbol.
TipAny classic tween can have an ease applied to it. In the Properties panel, choose Classic Ease for a simple ease-in or ease-out, or choose the options under Classic Ease to create complex and even customized ease curves.
The swapped instances work with the tweens to create a smooth, integrated animation.
Advanced easing for classic tweens
For advanced control over easing for classic tweens, choose a different ease in the Effect menu. Animate provides several easing profiles with varying intensities of ease-ins and ease-outs. You can even apply Bounce and Elastic eases that simulate physics-based motion.
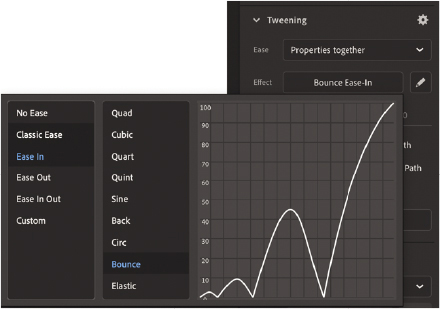
To customize the eases, click the Edit Easing button in the Properties panel. The Custom Ease dialog box will appear, showing you the ease profile for the animation.

The graph shows you how a property value changes from the first keyframe to the last keyframe. In this example, the curved line means that, in the beginning, the change is fast, but near the end, the changes in value slow down. You can edit the ease profile in any frame by simply clicking the graph to add an anchor point. Move the handles to change the curve of the graph to change the ease.

Graphic symbols for lip-syncing dialogue
In Lesson 3, you used movie clip symbols to create a nested animation of a car jiggling up and down. Movie clip symbols allow for animations that proceed independently of the main timeline.
You can also have nested animations and graphics inside graphic symbols, although they work a little differently.
An animation inside a graphic symbol doesn’t play independently the same way it does in a movie clip symbol. It will play only if there are sufficient frames on the main timeline where the instance is placed. In other words, the two timelines are synchronized. And while you can control the internal playhead of a movie clip timeline with code, you can control the playhead of a graphic symbol only from the Properties panel (see the sidebar “Looping options for graphic symbols”). Because of the ease with which you can choose what frames appear inside graphic symbols, they are ideal for lip-syncing or other projects that require character variations.
Looping options for graphic symbols
The Looping section of the Properties panel provides many powerful options for playback control of graphic symbols.

By default, a graphic symbol will play from its first frame to its last and then repeat as often as there are frames on the main timeline. You can change this behavior, however, if you want only a single frame of the graphic symbol’s timeline to show (as demonstrated with the Frame Picker in the next task). You can also play the graphic symbol’s timeline only once, pick the first frame and last frame to play, play it in reverse, or even loop it in reverse. Select the graphic symbol instance on the Stage and choose the option for the desired looping behavior.
Using the Frame Picker and lip-syncing
When animated characters talk, their mouths should be synchronized with their words. Each sound, or phoneme, is produced by a different mouth shape. For example, an explosive “p” or “b” sound is made by closing the lips, and an “o” sound is made by a rounded open mouth. Animators draw a collection of these mouth positions, called visemes, to synchronize to the soundtrack.
You can store each mouth position as a keyframe in a graphic symbol. The Frame Picker panel (accessed from the Properties panel) lets you choose the frame on graphic symbols’ timelines that matches each sound.
Animate also includes a powerful feature that analyzes any imported voice recording to detect individual phonemes and then automatically applies the correct viseme from a graphic symbol to create lip-syncing animation.
In this exercise, you’ll use the Frame Picker panel and the Lip Syncing feature to animate the mouth of the monkey to match imported dialogue.
Create a new layer at the top of all the other layers and rename it audio.

Insert a new keyframe (F6) at frame 72, 3 seconds into the animation and just after the animation of the monkey holding the skull finishes.
Drag the sound file called To_Be_or_Not.wav from the Library panel onto the Stage. The audio file is a recording of Hamlet’s famous soliloquy pondering life and death.

The sound file gets added to the audio layer in the keyframe at frame 72. A tiny waveform representing the audio file is displayed in the keyframe.
With frame 72 selected, in the Sound area of the Properties panel in the Frame tab, choose Stream from the Sync menu.

The Stream option ties the audio to the timeline so that you can synchronize animation to it.
Extend the timeline for all your layers to frame 938—enough frames so that the entire audio file can play to the end. When you’ve added the frames, you’ll see the end of the sound file represented in the audio layer.

In the Library panel, double-click the graphic symbol mouth_positions to examine it.

Animate takes you to symbol-editing mode for the mouth_positions symbol. Notice that in the bottom layer, there are 12 individual keyframes, each containing a different graphic corresponding to a mouth position for a specific sound.

In the top layer, individual keyframes are labeled (indicated by red flags). In the Properties panel, each label has a different name corresponding to the phoneme.

The first keyframe is labeled Neutral because the mouth position is closed in a resting state. The second keyframe is labeled Ah because the mouth position is open in a way that produces that particular sound.
When you create your own lip-synced animation, you’ll want to set up a graphic symbol similar to this one, where you draw 12 different mouth positions in 12 different keyframes.
Exit symbol-editing mode.
Select the mouth_positions symbol instance on the Stage in the monkey_mouth layer.

In the Properties panel, click the Lip Syncing button.

The Lip Syncing dialog box opens. The first step is to set up the visemes. A grid of 12 visemes is displayed, each associated with a specific phoneme. At first, all the visemes are set to the same graphic. You’ll change that next.

Click the first viseme, marked as Neutral.
A menu opens allowing you to choose one of your frames from the mouth_positions graphic symbol. The labeled keyframes from your graphic symbol correspond to the required visemes, making the matching process simple. Select the 1 neutral keyframe.

Click the second viseme, marked as Ah, and in the menu that opens, select the second keyframe from your graphic symbol labeled 2 Ah.
Animate matches the second keyframe from your graphic symbol to the Ah viseme.
Continue setting all 12 visemes by matching them with the corresponding keyframes from your graphic symbol.

Now move on to step 2 in the Lip Syncing dialog box. Choose the layer named audio from the menu, if it is not already chosen. This is the sound file that Animate will use to match the visemes.

Click Done.
Now sit back and watch the magic happen!

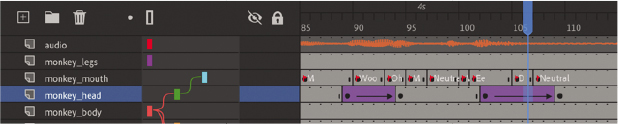
Animate will process the selected audio file and then automatically create labeled keyframes in the monkey_mouth layer with the correct keyframe from your graphic symbol to synchronize the dialogue.

Press Return (macOS) or Enter (Windows) to play the animation.

As the sound file plays, the graphic symbol switches from one of its keyframes to another, matching the sound to the correct mouth position.
If you want to make any adjustments to a particular mouth position at any keyframe, select the instance on the Stage and choose Frame Picker in the Properties panel.

In the Frame Picker panel that appears, you can manually choose a different keyframe from your graphic symbol.
Adding head motion
Whenever characters talk, there is usually other motion besides their mouths opening and closing. There may be times when the head may tilt or shake, the nose may wrinkle, or an eyebrow may rise. These are all important movements that contribute to an animation’s overall naturalness. The monkey_head movie clip symbol already includes a few keyframes to make occasional blinks and eye movements, but you’ll add slight head tilts as well.
Insert keyframes in the monkey_head layer at frames 89, 94, 102, and 109.

In the keyframe at frame 94, select the monkey head instance and choose the Free Transform tool.
Rotate the head slightly clockwise about 9 degrees to give some head tilt just as the monkey begins to speak. Make the same rotation in frame 102.

Since the monkey_head layer is a parent to the monkey_mouth layer, the rotation also affects the monkey’s mouth.
Select any frame between frames 89 and 94, and choose Create Classic Tween above the timeline.
The slight head tilt is animated.
Select any frame between frames 102 and 109, and choose Create Classic Tween above the timeline.
The monkey’s head animates back to its normal position.
Experiment with adding little head bobs and tilts along the timeline for emphasis to the dialogue and to give some visual variety to the animation. Have fun with giving your character some attitude and making him come to life!
As you did in Lesson 3, export your finished project as an MP4 video using the Adobe Media Encoder (File > Export > Export Video/Media), or use the Quick Share And Publish button to publish to video.
Review questions
1 How do you create a parent–child relationship between objects for tweening?
2 What are three ways in which you can edit a parent–child relationship between layers?
3 How do you prevent scale transformations in the parent layer from affecting the child layer?
4 How is a graphic symbol different from a movie clip symbol?
5 What are the 12 visemes, and what is required for lip-syncing animation to dialogue?
Review answers
1 To create a parent–child relationship between objects for tweening, the objects must be symbol instances in different layers. Activate the Parenting view from the Timeline, and then drag from the colored rectangle in the child layer to the colored rectangle in the parent layer.
2 You can edit a parent–child relationship between layers by dragging the child layer to a new parent; clicking the child layer and choosing Remove Parent; or clicking the child layer, choosing Change Parent, and selecting a new layer for its parent.
3 To prevent scale transformations in the parent layer from affecting the child layer, disable the Propagate Scale, Skew, And Flip option in the Parenting View button on the Timeline.
4 A graphic symbol plays an animation on its timeline only if there are sufficient frames on the main timeline where the instance is placed. A movie clip symbol, on the other hand, contains an independent timeline, so it will play its animation regardless of how long the main timeline lasts, as long as an instance remains on the Stage.
5 The 12 visemes are graphical representations of 12 positions of a character’s mouth that correspond to individual sounds, called phonemes. To lip-sync dialogue in an animation, you create 12 visemes in separate keyframes of a graphic symbol. Click the Lip Syncing button in the Properties panel to automatically have Animate analyze an audio file on the timeline and create synchronized keyframes containing the correct frame of your graphic symbol along the main timeline.